Canon i-SENSYS MF8380Cdw Manual de utilizare
- Tip
- Manual de utilizare

Starter Guide
English
Základní příručka
Upute za početak korištenja
Руководство по началу работы
Başlangıç Kılavuzu
Startvejledning
Guía de inicio
Español
Guide de démarrage
Telepítési kézikönyv
Ghid de punere rapidă în funcţiune
Початок роботи
Darba sākšanas rokasgrāmata
Startveiledning
Beknopte handleiding
Guida all’avvio
Italiano
Przewodnik wprowadzający
Začetna navodila
Pradinė instrukcija
Aloitusopas
Manual Inicial
Handbuch für Starter
Úvodná príručka
Кратко ръководство
Alustusjuhend
Starthandbok
Οδηγός πρώτων βημάτων

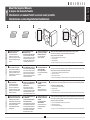
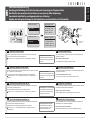
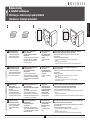
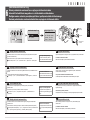
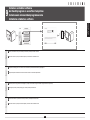
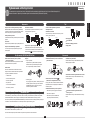
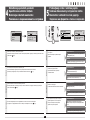
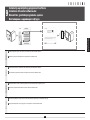
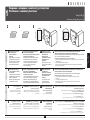
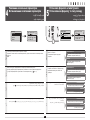
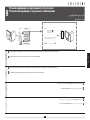
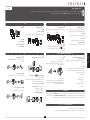
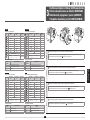
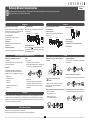
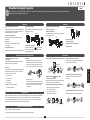
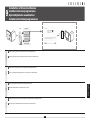
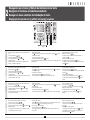
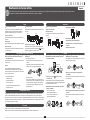
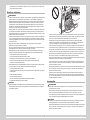
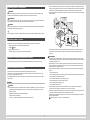
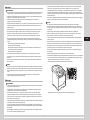
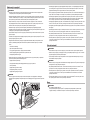
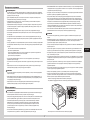
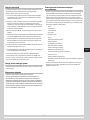
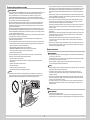
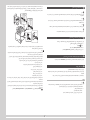
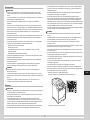
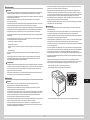
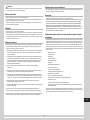
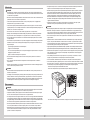
Check!
Check!
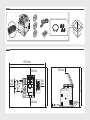
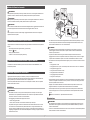
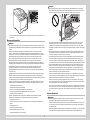
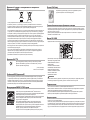
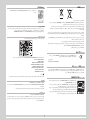
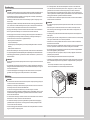
1327 mm
674 mm
100 mm
100 mm
100
mm
100
mm
851 mm
100 mm
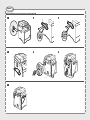
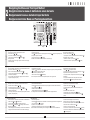
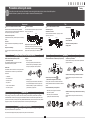
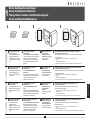
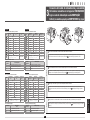
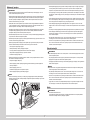
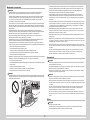
MF8380Cdw/MF8360Cdn Only

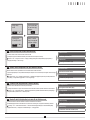
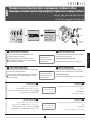
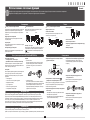
1 2
4
3
5 6
7
8
9
(2)
(1)
(2)
(1)
x 3
x 8

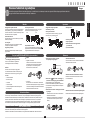
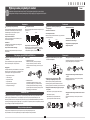
14 15
16 17 18
13
1210 11

19 20
21 22 23
24
(1)
(2)
(2)
(1)
(2)
(1)
(2)
(1)
LGL

Option
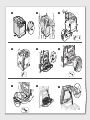
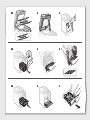
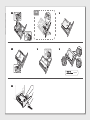
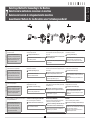
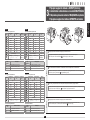
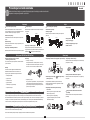
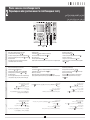
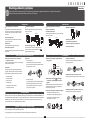
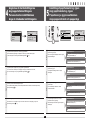
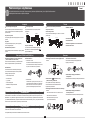
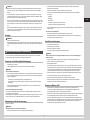
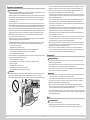
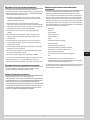
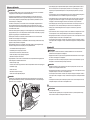
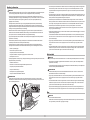
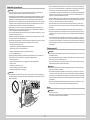
Installing the Handset (MF8380Cdw/MF8360Cdn Only)
4 5 6
2 31
7

English
Italiano
Español

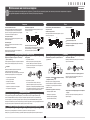
1
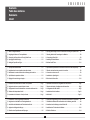
English
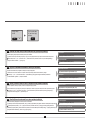
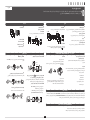
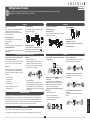
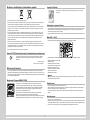
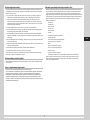
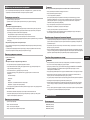
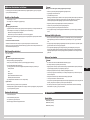
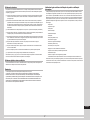
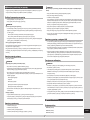
1 About the Supplied Manuals P2
2 Navigating the Menu and Text Input Method P3
3 Connecting the Power Cord and Turning ON the Power P4
4 Specifying the Initial Settings P5
5 Setting the Paper Size and Type P5
6
Specifying Initial Settings for the Fax Functions and Connecting the Telephone Cable
P6
7 Selecting a Method for Connecting to the Machine P8
8 Connecting to Wired LAN P9
9 Installing the Driver/Software P10
10
Perform Useful Tasks P11
Français
1 A propos des manuels fournis P2
2 Navigation dans le menu et méthode de saisie de texte P3
3 Branchement du cordon d'alimentation et allumage de la machine P4
4 Spécication des paramètres initiaux P5
5 Réglage du format et du type de papier P5
6
Spécication des paramètres de fax initiaux et connexion du câble téléphonique
P6
7 Sélection de la méthode de connexion à la machine P8
8 Connexion au réseau sans l P9
9 Installation du pilote/logiciel P10
10
Exécution de tâches utiles P12
Italiano
1 Informazioni sui manuali forniti a corredo con il prodotto Pag2
2 Navigazione del menu e metodo di input del testo Pag3
3 Collegamento del cavo di alimentazione e accensione della macchina Pag4
4 Selezione delle impostazioni iniziali Pag5
5 Impostazione di un formato e di un tipo di carta Pag5
6
Impostazioni iniziali del fax e collegamento del cavo telefonico Pag6
7 Selezione del metodo di collegamento della macchina Pag8
8 Collegamento alla LAN cablata Pag9
9 Installazione di driver/software Pag10
10
Attività utili Pag13
Deutsch
1 Informationen zu den mitgelieferten Handbüchern S2
2 Navigieren durch das Menü und Texteingabemethode S3
3 Anschließen des Netzkabels und Einschalten des Geräts S4
4 Angeben der Anfangseinstellungen S5
5 Einstellen eines Papierformats und Papiertyps S5
6
Angeben der Anfangseinstellungen für die Faxfunktionen und Anschließen des Telefonkabels
S6
7 Auswählen der Methode für das Herstellen einer Verbindung zum Gerät S8
8 Herstellen einer Verbindung zu einem Wired LAN S9
9 Installieren des Treibers bzw der Software S10
10
Hilfreiche Funktionen S14
Contents
Table des matières
Sommario
Inhalt
1 2 3 4 5 6 7 8 9
10

English Français
Italiano Deutsch
2
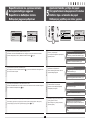
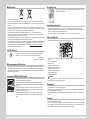
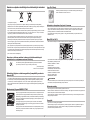
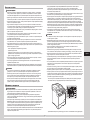
English
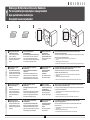
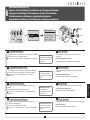
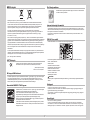
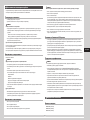
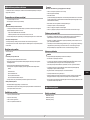
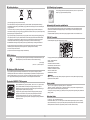
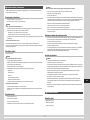
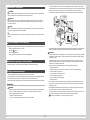
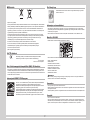
A
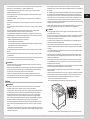
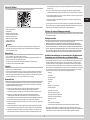
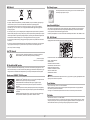
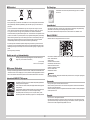
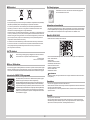
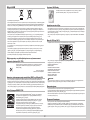
Starter Guide (This manual):
Read this manual rst
This manual describes the
installation of the machine, the
settings, and a caution. Be sure to
read this manual before using the
machine.
B
Wireless LAN Setting Guide
(MF8380Cdw Only):
Read this manual with the Starter Guide
This manual describes the wireless
LAN setup procedures and the causes
and solutions for troubles you might
face during setup. Be sure to read this
manual before using the machine.
C
MF Driver Installation Guide
(User Software CD-ROM):
Read this manual next
This manual describes
software installation.
D
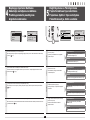
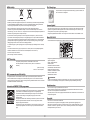
e-Manual (User Manual CD-ROM): Read the desired chapter to suit your needs
The e-Manual is categorized by subject to nd desired information easily.
Displaying the e-Manual from the CD-ROM
1. Insert the User Manual CD-ROM in your computer.
2. Select your language.
3. Click [Display Manual].
* Depending on the operating system you are using, a security protection message is displayed. Allow the contents to be displayed.
Français
A
Guide de démarrage (ce manuel) :
Veuillez d'abord lire ce guide
Ce manuel décrit l'installation de
la machine, les paramètres et les
précautions à prendre. Veillez à
lire attentivement ce manuel avant
d'utiliser la machine.
B
Guide des paramètres du réseau
sans l (MF8380Cdw uniquement) :
Lisez ce manuel avec le Guide de démarrage
Ce manuel décrit les procédures de conguration
du réseau sans l, les causes et les solutions des
problèmes que vous rencontrez éventuellement
pendant la conguration. Veillez à lire attentivement
ce manuel avant d'utiliser la machine.
C
Guide d'installation des
pilotes MF (CD-ROM "User
Software CD-ROM") :
Lisez ce guide ensuite
Ce manuel décrit l'installation
du logiciel.
D
Manuel électronique (CD-ROM "User Manual CD-ROM") : Lisez le chapitre qui répond à vos besoins
Le manuel électronique est divisé en catégories par sujet, ce qui permet de trouver facilement les informations voulues.
Afchage du manuel électronique directement depuis le CD-ROM
1. Insérez le CD-ROM "User Manual CD-ROM" dans l'ordinateur.
2. Sélectionnez votre langue.
3. Cliquez sur [Afcher manuel].
* Selon votre système d'exploitation, un message de protection de la sécurité peut s'afcher. Autorisez l'afchage du contenu.
Italiano
A
Guida all'avvio (questo manuale):
Leggere questa guida
In questo manuale vengono
descritti l'installazione della
macchina, le impostazioni e le
avvertenze da osservare. Leggere
attentamente il manuale prima di
utilizzare la macchina.
B
Guida alle impostazioni della
LAN wireless (solo MF8380Cdw):
Leggere questo manuale con la
Guida all'avvio
Questo manuale descrive le procedure di
congurazione della rete LAN wireless e le
cause e soluzioni dei problemi che si potrebbero
vericare durante la congurazione. Leggere
questo manuale prima di utilizzare la macchina.
C
Guida di Installazione del
Driver MF (User Software
CD-ROM):
Leggere quindi questo
manuale
Questo manuale descrive
l'installazione del software.
D
e-Manual (User Manual CD-ROM): Leggere il capitolo desiderato in base alle proprie esigenze
L'e-Manual è suddiviso in una serie di categorie per argomento che consentono di trovare le informazioni desiderate più facilmente.
Visualizzazione dell'e-Manual dal CD-ROM
1. Inserire l'User Manual CD-ROM nel computer.
2. Selezionare la lingua.
3. Fare clic su [Visual. manuale].
* A seconda del sistema operativo in uso, è possibile che venga visualizzato un messaggio di protezione. Consentire la visualizzazione dei contenuti.
Deutsch
A
Handbuch für Starter (dieses Handbuch):
Bitte lesen Sie dieses Handbuch zuerst
In diesem Handbuch werden die
Geräteinstallation, die Einstellungen
und Vorsichtshinweise beschrieben.
Lesen Sie dieses Handbuch
vor Inbetriebnahme des Geräts
unbedingt durch.
B
Handbuch der WLAN-Einstellungen
(nur MF8380Cdw):
Lesen Sie dieses Handbuch zusammen
mit dem Handbuch für Starter
In diesem Handbuch werden die Arbeitsschritte
für die WLAN-Einrichtung sowie die Ursachen
und Lösungen für Probleme beschrieben, die
Sie möglicherweise bei der Einrichtung haben.
Vor der Verwendung des Geräts sollten Sie
dieses Handbuch auf jeden Fall lesen.
C
Installationshandbuch zum
MF-Treiber (User Software
CD-ROM):
Lesen Sie als Nächstes
dieses Handbuch
In diesem Handbuch wird
die Softwareinstallation
beschrieben.
D
e-Anleitung (User Manual CD-ROM): Lesen Sie das gewünschte Kapitel entsprechend Ihren Anforderungen
Die e-Anleitung ist thematisch gegliedert, sodass Sie die gewünschten Informationen problemlos nden.
Anzeigen der e-Anleitung von der CD-ROM
1. Legen Sie die Bedienerhandbuch-CD-ROM in Ihren Computer ein.
2. Wählen Sie Ihre Sprache aus.
3. Klicken Sie auf [Handbuch anzeigen].
* Abhängig von dem von Ihnen verwendeten Betriebssystem wird eine Sicherheitswarnung angezeigt. Lassen Sie die Anzeige des Inhalts zu.
DCBA
1
About the Supplied Manuals
A propos des manuels fournis
Informazioni sui manuali forniti a corredo con il prodotto
Informationen zu den mitgelieferten Handbüchern
1 2 3 4 5 6 7 8 9
10

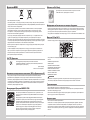
3
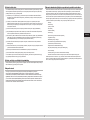
English
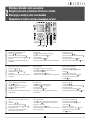
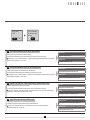
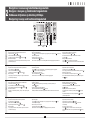
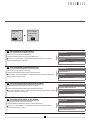
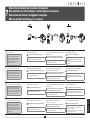
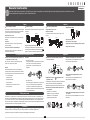
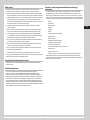
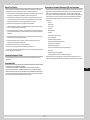
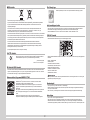
Navigating the Menu
▪ Item selection or moving the cursor among the menu items
Select an item with [
] or [ ].
Proceed to the next hierarchy with [OK] or [
].
Return to the previous hierarchy with [
] (Back) or [ ].
▪ Setting conrmation
Press [OK]. However, when <Apply> appears on the screen, select <Apply>,
and then press [OK].
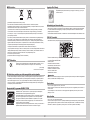
Text Input Method
▪ Changing the entry mode
Press [
] to select <Entry Mode>, and press [OK]. You can also press [ ] (Tone) to change the entry mode.
▪ Entering text, symbols, and numbers
Enter using the numeric keys or [
] (Symbols).
For details on the switchable mode or the available text, see the next page.
▪ Moving the cursor (entering a space)
Move the cursor by pressing [
] or [ ].
To enter a space, move the cursor to the end of the text, and then press [ ].
▪ Deleting text, symbols, or numbers
To delete text, numbers, or symbols, press [
] (Clear).
To delete all text, numbers, or symbols, press and hold [ ] (Clear).
Français
Navigation dans le menu
▪ Sélection d'éléments ou déplacement du curseur dans les éléments de menu
Sélectionner un élément avec [
] ou [ ].
Passer au niveau hiérarchique suivant avec [OK] ou [
].
Revenir au niveau hiérarchique précédent avec [
] (Préc.) ou [ ].
▪ Conrmation du paramétrage
Appuyer sur [OK]. Lorsque le message <Appliquer> s'afche, sélectionner
<Appliquer>, puis appuyer sur [OK].
Méthode de saisie du texte
▪ Changement de mode de saisie
Appuyer sur [
] pour sélectionner <Mode de saisie>, puis appuyer sur [OK]. Vous pouvez également utiliser
[
] (Tonalité) pour changer de mode de saisie.
▪ Saisie de texte, de symboles et de chiffres
Utiliser le clavier numérique ou [
] (SYMBOLES).
Pour en savoir plus sur les modes ou le texte disponible, reportez-vous à la page suivante.
▪ Déplacement du curseur (ajout d'un espace)
Utiliser [
] ou [ ] pour déplacer le curseur.
Pour entrer un espace, placer le curseur à la n du texte et appuyer sur [ ].
▪ Suppression de texte, de symboles ou de nombres
Pour supprimer du texte, des symboles ou des nombres, appuyer sur [
]
(Effacement).
Pour supprimer l'ensemble de texte, des symboles ou des nombres,
appuyer sur la touche [ ] (Effacement) et la maintenir enfoncée.
Italiano
Navigazione dei menu
▪ Selezione di una voce o spostamento del cursore sulle voci dei menu
Selezionare una voce utilizzando [
] e [ ].
Procedere al livello gerarchico successivo con [OK] o [
].
Tornare al livello gerarchico precedente con [
] (Indietro) o [ ].
▪ Conferma delle impostazioni
Premere [OK]. Tuttavia, quando sullo schermo appare <Applica>, selezionare
<Applica>, quindi premere [OK].
Metodo d'immissione del testo
▪ Cambio della modalità d'immissione
Premere [
] per selezionare <Modo immissione> e premere [OK]. Per cambiare il modo d'immissione è
anche possibile premere [
] (Tono).
▪ Immissione di testo, simboli e numeri
Immettere utilizzando i tasti numerici oppure [
] (Simboli).
Per i dettagli relativi al modo selezionabile o al testo disponibile, vedere la pagina successiva.
▪ Spostamento del cursore (immissione di uno spazio)
Spostare il cursore premendo [
] o [ ].
Per inserire uno spazio, spostare il cursore alla ne del testo, quindi
premere [ ].
▪ Cancellazione di testo, simboli o numeri
Cancellare testo, numeri o simboli premendo [
] (Azzera).
Cancellare tutto il testo, tutti i numeri o i simboli tenendo premuto [ ]
(Azzera).
Deutsch
Navigieren durch das Menü
▪ Elementauswahl oder Versetzen des Cursors zwischen den Menüelementen
Wählen Sie mit [
] oder [ ] ein Element aus.
Fahren Sie mit [OK] oder [
] mit der nächsten Hierarchie fort.
Kehren Sie mit [
] (Zurück) oder [ ] zur vorherigen Hierarchie zurück.
▪ Bestätigung der Einstellung
Drücken Sie [OK]. Doch wenn die Meldung <Anwenden> auf dem Bildschirm
angezeigt wird, wählen Sie <Anwenden> aus, und drücken Sie dann [OK].
Texteingabemethode
▪ Ändern des Eingabemodus
Drücken Sie [
], um <Eingabemodus> auszuwählen, und drücken Sie [OK]. Sie können den Eingabemodus
auch durch Drücken von [
] (Ton) ändern.
▪ Eingeben von Text, Symbolen und Zahlen
Nehmen Sie die Eingabe über die numerischen Tasten oder über [
] (Symbole) vor.
Nähere Informationen zur Modusänderung oder zum verfügbaren Text nden Sie auf der nächsten Seite.
▪ Versetzen des Cursors (Eingeben eines Leerzeichens)
Bewegen Sie den Cursor durch Drücken von [
] oder [ ].
Wenn Sie ein Leerzeichen eingeben möchten, bewegen Sie den Cursor an
das Ende des Textes, und drücken Sie dann [ ].
▪ Löschen von Text, Symbolen oder Zahlen
Zum Löschen von Text, Zahlen oder Symbolen drücken Sie [
] (Löschen).
Zum Löschen von sämtlichem Text, allen Zahlen oder Symbolen halten Sie
[ ] (Löschen) gedrückt.
2
Navigating the Menu and Text Input Method
Navigation dans le menu et méthode de saisie de texte
Navigazione del menu e metodo di input del testo
Navigieren durch das Menü und Texteingabemethode
1 2 3 4 5 6 7 8 9
10
# C
Numeric
keys
OK

English Français
Italiano Deutsch
4
English
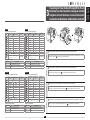
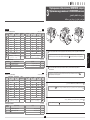
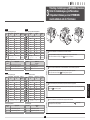
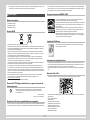
Entering text, symbols, and numbers
Key Entry mode: <A> Entry mode: <a>
Entry mode:
<12>
@ . - _ / 1
ABC abc 2
DEF def 3
GHI ghi 4
JKL jkl 5
MNO mno 6
PQRS pqrs 7
TUV tuv 8
WXYZ wxyz 9
(Not available) 0
(space) @ . / - _ ! ? & $ % # ( ) [ ]
{ } < > * + = " , ; : ' ^ ` | \
~
(Not available)
Changing the entry mode
Entry mode Available text
<A> Alphabet (capital letters) and symbols
<a> Alphabet (small letters) and symbols
<12> Numbers
Italiano
Immissione di testo, simboli e numeri
Tasto
Modo
d'immissione: <A>
Modo
d'immissione: <a>
Modo
d'immissione: <12>
@ . - _ / 1
AÀBC aàbc 2
DEÈF deèf 3
GHIÌ ghiì 4
JKL jkl 5
MNOÒ mnoò 6
PQRS pqrs 7
TUÙV tuùv 8
WXYZ wxyz 9
(Non disponibile) 0
(spazio) @ . / - _ ! ? & $ % # ( ) [ ]
{ } < > * + = " , ; : ' ^ ` | \
~
(Non disponibile)
Cambio della modalità d'immissione
Modo d'immissione
Testo disponibile
<A> Alfabeto (lettere maiuscole) e simboli
<a> Alfabeto (lettere minuscole) e simboli
<12> Numeri
Deutsch
Eingeben von Text, Symbolen und Zahlen
Taste
Eingabemodus:
<A>
Eingabemodus:
<a>
Eingabemodus:
<12>
@ . - _ / 1
AÄBC aäbc 2
DEF def 3
GHI ghi 4
JKL jkl 5
MNOÖ mnoö 6
PQRSß pqrs 7
TUÜV tuüv 8
WXYZ wxyz 9
(nicht verfügbar) 0
(Leerzeichen) @ . / - _ ! ? & $ % # ( ) [ ]
{ } < > * + = " , ; : ' ^ ` | \
~
(nicht verfügbar)
Ändern des Eingabemodus
Eingabemodus
Verfügbarer Text
<A> Alphabet (Großbuchstaben) und Symbole
<a> Alphabet (Kleinbuchstaben) und Symbole
<12> Zahlen
Français
Saisie de texte, de symboles et de chiffres
Touche
Mode de saisie:
<A>
Mode de saisie:
<a>
Mode de saisie:
<12>
@ . - _ / 1
AÀÂBCÇ aàâbcç 2
DEËÉÈÊF deëéèêf 3
GHIÏÎ ghiïî 4
JKL jkl 5
MNOÔ mnoô 6
PQRS pqrs 7
TUÜÙÛV tuüùûv 8
WXYZ wxyz 9
(Non disponible) 0
(Espace) @ . / - _ ! ? & $ % # ( ) [ ]
{ } < > * + = " , ; : ' ^ ` | \
~
(Non disponible)
Modication du mode de saisie
Mode de saisie
Texte disponible
<A> Lettres (majuscules) et symboles
<a> Lettres (minuscules) et symboles
<12> Chiffres
1 2 3 4 5 6 7 8 9
10
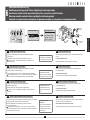
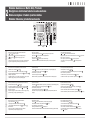
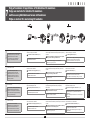
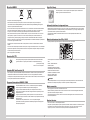
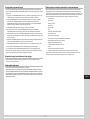
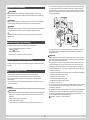
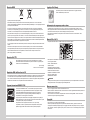
English
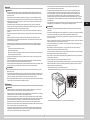
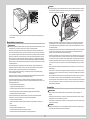
Do not connect the USB cable. Connect the USB cable when installing the software.
The machine enters the Sleep mode to conserve energy when no operations are performed for a certain period of time. To cancel
the Sleep mode, press the [
] (Energy Saver) key on the operation panel.
Français
Ne branchez pas le câble USB. Vous le connecterez lors de l'installation du logiciel.
La machine passe en mode Veille pour économiser de l'énergie en l'absence d'activité pendant un certain laps de temps. Pour
annuler le mode Veille, appuyez sur la touche [
] (Economie d'énergie) du panneau de commande.
Italiano
Non collegare il cavo USB. Collegare il cavo USB quando si installa il software.
La macchina entra in Modo riposo per risparmiare energia quando non viene eseguita alcuna operazione per un determinato
periodo di tempo. Per annullare il Modo riposo, premere il tasto [
] (Risparmio energetico) sul pannello di controllo.
Deutsch
Schließen Sie nicht das USB-Kabel an. Schließen Sie das USB-Kabel bei der Installation der Software an.
Wenn eine bestimmte Zeit lang kein Vorgang ausgeführt wird, wird das Gerät zur Einsparung von Energie in den Schlafmodus
geschaltet. Zum Abbrechen des Schlafmodus drücken Sie die Taste [
] (Stromsparmodus) auf dem Bedienfeld.
3
Connecting the Power Cord and Turning ON the Power
Branchement du cordon d'alimentation et allumage de la machine
Collegamento del cavo di alimentazione e accensione della macchina
Anschließen des Netzkabels und Einschalten des Geräts
(2)
(1)

5
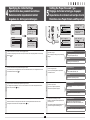
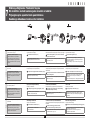
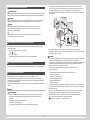
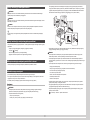
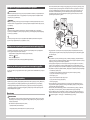
English
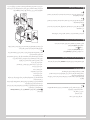
Follow the instructions on the screen, set the language and time.
For details on navigating the menu and how to input the numbers, see 2 "Navigating the Menu and Text Input
Method" (
P.3).
Français
Suivez les instructions à l'écran pour dénir la langue et l'heure.
Pour en savoir plus sur la navigation dans le menu et la saisie des nombres, voir 2 "Navigation dans le menu
et méthode de saisie de texte" (
P.3).
Italiano
Seguire le istruzioni visualizzate per impostare la lingua e l'orario.
Per i dettagli sulla navigazione del menu e su come immettere i numeri, vedere 2 "Navigazione del menu e
metodo di input del testo" (
Pag.3).
Deutsch
Folgen Sie den Anweisungen auf dem Bildschirm, und stellen Sie die Sprache und die Uhrzeit ein.
Nähere Informationen zum Navigieren durch das Menü und zur Eingabe der Zahlen nden Sie unter 2
"Navigieren durch das Menü und Texteingabemethode" (
S.3).
Language
English
French
Spanish
German
Language
English
French
Spanish
German
Copie: tche Copie
100% A4
Densité: 0
Type d'original: Te
...
Recto verso: Non
1
+
-
1
4
Specifying the Initial Settings
Spécication des paramètres initiaux
Selezione delle impostazioni iniziali
Angeben der Anfangseinstellungen
Copy: Press Start
100% A4
Density: 0
Original Type: Text
...
2-Sided: Off
1
+
-
1
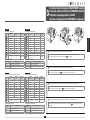
English
Follow the instructions on the screen, set the
paper size and type.
After completing the setting, specify the following
settings.
MF8380Cdw/MF8360Cdn
6 "Specifying Initial Settings for the Fax Functions and
Connecting the Telephone Cable" (P6)
MF8340Cdn
9 "Installing the Driver/Software" (P10)
Français
Suivez les instructions à l'écran pour dénir le
format et le type de papier.
Une fois le paramétrage effectué, spéciez les
paramètres suivants.
MF8380Cdw/MF8360Cdn
6 "Spécication des paramètres de fax initiaux et
connexion du câble téléphonique" (P6)
MF8340Cdn
9 "Installation du pilote/logiciel" (P10)
Italiano
Seguire le istruzioni visualizzate per impostare il
formato e il tipo di carta.
Dopo aver completato l'impostazione,
selezionare le impostazioni seguenti.
MF8380Cdw/MF8360Cdn
6 "Impostazioni iniziali del fax e collegamento del cavo
telefonico" (Pag6)
MF8340Cdn
9 "Installazione di driver/software" (Pag10)
Deutsch
Folgen Sie den Anweisungen auf dem
Bildschirm, und stellen Sie das Papierformat und
den Papiertyp ein.
Wenn Sie die Einstellung abgeschlossen haben,
geben Sie die folgenden Einstellungen an.
MF8380Cdw/MF8360Cdn
6 "Angeben der Anfangseinstellungen für die
Faxfunktionen und Anschließen des Telefonkabels" (S6)
MF8340Cdn
9 "Installieren des Treibers bzw der Software" (S10)
5
Setting the Paper Size and Type
Réglage du format et du type de papier
Impostazione di un formato e di un tipo di carta
Einstellen eines Papierformats und Papiertyps
Copy: Press Start
100% A4
Density: 0
Original Type: Text
...
2-Sided: Off
1
+
-
1
1 2 3 4 5 6 7 8 9
10
Select Paper
MP Tray
A4:Plain 2
Paper Settings
1
Choisir le papier
Bac multifonct.
A4:Ordinaire 2
Réglages du papier
1
Copie: tche Copie
100% A4
Densité: 0
Type d'original: Te
...
Recto verso: Non
1
+
-
1

English Français
Italiano Deutsch
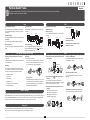
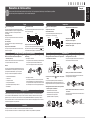
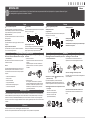
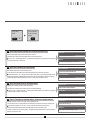
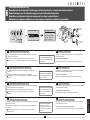
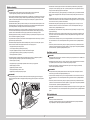
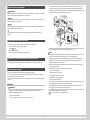
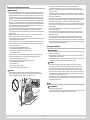
6
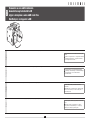
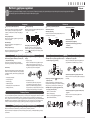
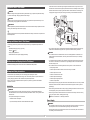
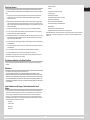
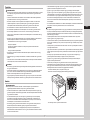
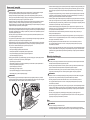
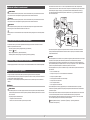
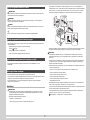
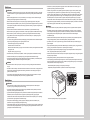
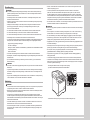
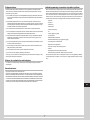
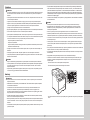
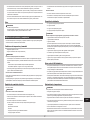
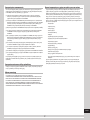
English
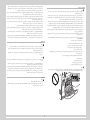
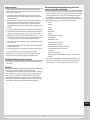
6-1 Specify the initial fax settings
Follow the "Fax Setup Guide" to specify a fax number, a unit name, and a receive mode.
For more details on the receive mode, see the e-Manual.
e-Manual -> "Fax" -> "Using the Fax Functions" -> "Receiving Faxes" -> "RX Mode."
What happens with the unit name
Once the information has been registered,
it is printed at the top of each page that you
are sending.
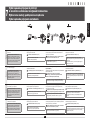
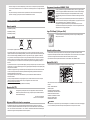
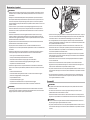
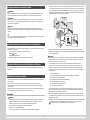
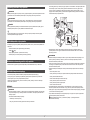
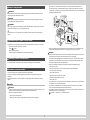
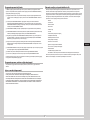
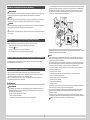
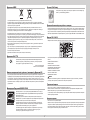
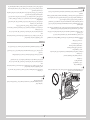
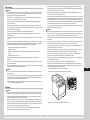
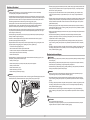
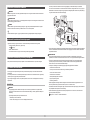
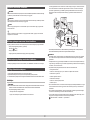
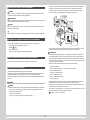
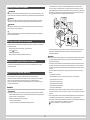
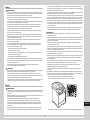
6-2 Connect the telephone line
When <Connect phone line> appears on the display, connect the telephone line by
referring to the illustration.
When installing the optional handset
For more details, see the supplied manual with the handset.
Français
6-1 Spéciez les paramètres de fax initiaux
Suivez les instructions du manuel "Guide de conguration du fax" pour spécier un numéro de
fax, un nom d'unité et un mode de réception.
Pour en savoir plus sur le mode de réception, reportez-vous au manuel électronique.
Manuel électronique -> "Fax" -> "Utilisation des fonctions fax" -> "Réception de fax" ->
"Mode RX".
Traitement du nom d'unité
Une fois les informations enregistrées, elles
sont imprimées en haut de chaque page que
vous envoyez.
6-2 Raccordez la ligne téléphonique
Lorsque l'afcheur indique <Connecter ligne tél.>, branchez le câble téléphonique en
vous reportant à l'illustration.
Lors de l'installation du combiné en option
Pour en savoir plus, reportez-vous au manuel fourni avec le combiné.
Italiano
6-1 Specicare le impostazioni iniziali del fax
Attenersi alle istruzioni della "Guida congurazione fax" per specicare il numero del fax, il
nome dell'unità e la modalità di ricezione.
Per ulteriori dettagli sulla modalità di ricezione, consultare l'e-Manual.
e-Manual -> "Fax" -> "Utilizzo delle funzioni fax" -> "Ricezione di fax" -> "Modo RX".
Operazioni eseguite con il nome dell'unità
Una volta registrate le informazioni, queste
vengono stampate nella parte superiore di
ogni pagina che si sta inviando.
6-2 Collegare un cavo telefonico
Alla visualizzazione del messaggio <Collegare linea telefonica> sul display, collegare il
cavo del telefono facendo riferimento all'illustrazione.
Quando si installa il ricevitore opzionale
Per ulteriori dettagli consultare il manuale fornito a corredo con il ricevitore.
Deutsch
6-1 eben Sie die Anfangsfaxeinstellungen an
Folgen Sie den Anweisungen im "Fax Setup Handbuch", um eine Faxnummer, den Namen
einer Einheit und einen Empfangsmodus anzugeben.
Weitere Informationen zum Empfangsmodus nden Sie in der e-Anleitung.
e-Anleitung -> "Fax" -> "Verwenden der Faxfunktion" -> "Empfangen von Faxen" ->
"Empfangsmodus".
Verwendung des Namens der Einheit
Nachdem die Informationen gespeichert
wurden, werden sie auf jeder von Ihnen
gesendeten Seite oben gedruckt.
6-2 Schließen Sie die Telefonleitung an
Wenn <Telefonleitung anschl.> auf dem Display angezeigt wird, schließen Sie die
Telefonleitung an, wie in der Abbildung dargestellt.
Wenn Sie den optionalen Hörer installieren
Nähere Informationen nden Sie in dem mit dem Hörer gelieferten Handbuch.
Configurer le fax ?
Maintenant
Plus tard
Connect phone line.
Follow illustrations
on the next screen:
Connect line to A.
*Next : Press OK
Connecter ligne tél.
Suivre instructions
à l'écran suivant :
Connecter ligne à A.
*Suivant: App sur OK
6
(MF8380Cdw/MF8360Cdn Only)
Specifying Initial Settings for the Fax Functions and Connecting the Telephone Cable
Spécication des paramètres de fax initiaux et connexion du câble téléphonique
Impostazioni iniziali del fax e collegamento del cavo telefonico
Angeben der Anfangseinstellungen für die Faxfunktionen und Anschließen des Telefonkabels
1 2 3 4 5 6 7 8 9
10
Perform Fax Setup?
Set up Now
Set up Later
Telephone line
connector
Telephone
(C)
(B)
(A)
Handset
(optional)

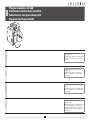
7
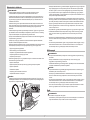
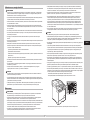
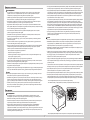
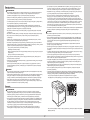
English
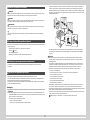
6-3 Exit the Fax Setup Guide, and then restart the machine
Turn OFF the machine, wait for at least 10 seconds, and then it back ON.
The telephone line types are not detected automatically. See the e-Manual and set a telephone line manually.
e-Manual -> "Fax" -> "Using the Fax Functions" -> "Changing Fax Settings (Settings that Can Be Specied Using the [Menu] Button)" ->
"Conguring Send Settings" -> "Select Line Type."
For Network Connection
8 "Connecting to Wired LAN" (P9)
For USB Connection
9 "Installing the Driver/Software" (P10)
Français
6-3 Quittez le Guide de conguration du fax, puis redémarrez la machine
Mettez la machine hors tension, puis attendez au moins 10 secondes avant de la remettre sous tension.
Les types de ligne téléphonique ne sont pas détectés automatiquement. Reportez-vous au manuel électronique et congurez manuellement la ligne
téléphonique.
Manuel électronique -> "Fax" -> "Utilisation des fonctions de fax" -> "Modication des réglages de fax (Eléments pouvant être spéciés avec le
bouton [Menu])" -> "Conguration des réglages d'envoi" -> "Choix du type de ligne".
Pour la connexion réseau
8 "Connexion au réseau sans l" (P9)
Avec une connexion USB
9 "Installation du pilote/logiciel" (P10)
Italiano
6-3 Chiudere la Guida congurazione fax e riavviare la macchina
Spegnere la macchina, attendere almeno 10 secondi e quindi riaccenderla.
Le tipologie di linea telefonica non vengono riconosciute automaticamente. Consultare l'e-Manual e impostare manualmente una linea telefonica.
e-Manual -> "Fax" -> "Utilizzo delle funzioni fax" -> "Modica delle impostazioni fax (impostazioni selezionabili utilizzando il pulsante [Menu])" ->
"Congurazione delle impostazioni di invio" -> "Selezione tipo linea".
Per il collegamento di rete
8 "Collegamento alla LAN cablata" (Pag9)
Per il collegamento USB
9 "Installazione di driver/software" (Pag10)
Deutsch
6-3 Beenden Sie das Fax Setup Handbuch, und starten Sie das Gerät dann erneut
Schalten Sie das Gerät aus, warten Sie mindestens 10 Sekunden, und schalten Sie es dann wieder ein.
Die Telefonleitungstypen werden nicht automatisch erkannt. Lesen Sie in der e-Anleitung nach, und legen Sie die Telefonleitung manuell fest.
e-Anleitung -> "Fax" -> "Verwenden der Faxfunktionen" -> "Ändern der Faxeinstellungen (Einstellungen, die über die Schaltäche [Menü]
angegeben werden können)" -> "Kongurieren von Sendeeinstellungen" -> "Leitungstyp wählen".
Für Netzwerkverbindung
8 "Herstellen einer Verbindung zu einem Wired LAN" (S9)
Für USB-Verbindung
9 "Installieren des Treibers bzw der Software" (S10)
End Fax Setup
Guide?
NoYes
Terminer guide
d'installation fax ?
NonOui
Turn the main power
OFF and ON to apply
settings.
OK
1 2 3 4 5 6 7 8 9
10
Mettre la machine
hors/ss tension pour
appliquer réglages.
OK

English Français
Italiano Deutsch
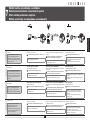
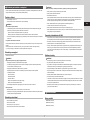
8
7
Selecting a Method for Connecting to the Machine
Sélection de la méthode de connexion à la machine
Selezione del metodo di collegamento della macchina
Auswählen der Methode für das Herstellen einer Verbindung zum Gerät
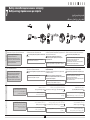
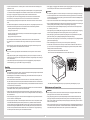
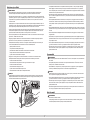
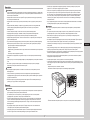
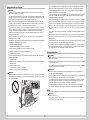
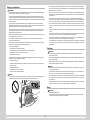
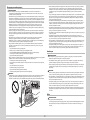
English
Select from the following three methods, depending on your
environment and devices.
If you are not sure whether the router or
access point you are using supports wireless
LAN or wired LAN, see the instruction manual
provided with the network device you are
using, or contact the manufacturer.
Connecting via a USB Cable
Connect them using a USB cable.
9 "Installing the Driver/Software" (P10)
* The machine does not come with a USB cable.
Have cables ready as needed.
Wireless LAN (MF8380Cdw Only)
Connect using wireless communication (radio frequency) without
using a cable.
Connecting to Wireless LAN: Refer to the separate manual
"Wireless LAN Setting Guide"
* A wireless LAN or access point that supports IEEE802.11 (b/g
or n) is required.
Wired LAN
Connect them using a LAN cable.
8 "Connecting to Wired LAN" (P9)
* Check to make sure that there is a free port for connecting the
machine or the computer you use to the router or hub.
* Use a Category 5 or higher twisted pair cable for the LAN.
Français
Sélectionnez l'une trois des méthodes suivantes, en fonction de
votre environnement et de vos périphériques.
Si vous ne savez pas si le routeur ou point
d'accès que vous utilisez prend en charge le
réseau sans l ou le réseau laire, consultez
le manuel d'instructions fourni avec votre
périphérique réseau ou contactez le fabricant.
Connexion par câble USB
Branchez-les avec un câble USB.
9 "Installation du pilote/logiciel" (P10)
* La machine est livrée sans câble USB.
Procurez-vous les câbles nécessaires.
Réseau sans l (MF8380Cdw uniquement)
Connectez-vous par communication sans l (fréquence radio) sans
utiliser de câble.
Connexion au réseau sans l : Reportez-vous au manuel
spécique "Guide des paramètres du réseau sans l"
* Vous devez utiliser un réseau sans l ou un point d'accès
prenant en charge IEEE802.11 (b/g ou n).
Réseau laire
Connectez-vous avec un câble réseau (LAN).
8 "Connexion au réseau sans l" (P9)
* Assurez-vous qu'il existe un port libre où connecter la
machine ou l'ordinateur que vous utilisez sur le routeur ou le
concentrateur.
* Utilisez un câble réseau (LAN) à paires torsadées CAT5 ou
supérieur.
Italiano
Selezionare uno dei tre metodi seguenti in base all'ambiente
operativo e ai dispositivi presenti.
Se non si conosce il supporto per una rete
LAN wireless o cablata del router o dell'Access
Point utilizzato, consultare il manuale delle
istruzioni fornito a corredo con il dispositivo di
rete utilizzato o rivolgersi al produttore.
Collegamento tramite cavo USB
Collegare utilizzando un cavo USB.
9 "Installazione di driver/software" (Pag10)
* Insieme alla macchina non viene fornito un cavo USB.
I cavi devono essere già disponibili e pronti.
LAN wireless (solo MF8380Cdw)
Collegare utilizzando la comunicazione wireless (frequenza radio)
senza utilizzare un cavo.
Collegamento a una LAN wireless: fare riferimento al
manuale separato "Guida alla congurazione LAN wireless"
* È richiesta una LAN wireless o un Access Point che supporti lo
standard IEEE802.11 (b/g oppure n).
LAN cablata
Collegare utilizzando un cavo di rete LAN.
8 "Collegamento alla LAN cablata" (Pag9)
* Veri care che vi sia una porta disponibile per collegare la
macchina o il computer utilizzato al router o all'hub.
* Utilizzare un cavo a coppie ritorte di categoria 5 o superiore
per la rete LAN.
Deutsch
Wählen Sie abhängig von Ihrer Umgebung und Ihren Geräten eine
der folgenden drei Methoden aus.
Wenn Sie sich nicht sicher sind, ob der von
Ihnen verwendete Router oder Access Point
Wireless LAN oder Wired LAN unterstützt,
lesen Sie in der Bedienungsanleitung des von
Ihnen verwendeten Netzwerkgeräts nach, oder
wenden Sie sich an den Hersteller.
Herstellen einer Verbindung über ein USB-Kabel
Stellen Sie die Verbindung über ein USB-Kabel her.
9 "Installieren des Treibers bzw der Software" (S10)
* Im Lieferumfang des Geräts bendet sich kein USB-Kabel.
Halten Sie die Kabel bei Bedarf bereit.
Wireless LAN (nur MF8380Cdw)
Stellen Sie die Verbindung über eine drahtlose Kommunikation
(Funkfrequenz) ohne Verwendung eines Kabels her.
Herstellen einer Verbindung zu einem Wireless LAN: Siehe
separates Handbuch "Handbuch der WLAN-Einstellungen"
* Es ist ein Wireless LAN oder Access Point erforderlich, der
IEEE802.11 (b/g oder n) unterstützt.
Wired LAN
Stellen Sie die Verbindung über ein LAN-Kabel her.
8 "Herstellen einer Verbindung zu einem Wired LAN" (S9)
* Vergewissern Sie sich, dass ein freier Anschluss für den
Anschluss des von Ihnen verwendeten Geräts oder Computers
an den Router oder Hub vorhanden ist.
* Verwenden Sie ein Kabel der Kategorie 5 oder höher mit
verdrilltem Adernpaar für das LAN.
1 2 3 4 5 6 7 8 9
10

9
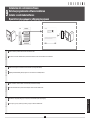
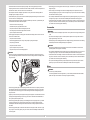
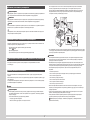
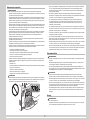
English
Connect the LAN cable. The machine sets the IP address automatically. Wait approximately two minutes.
If you want to set the IP address manually, see the following items.
e-Manual -> "Network Settings" -> "Basic Network Settings" ->
"Setting the IP Address" -> "Setting the IPv4 Address" or "Setting the
IPv6 Address"
Français
Connectez le câble réseau (LAN). La machine dénit automatiquement l'adresse IP. Attendez environ deux minutes.
Si vous souhaitez dénir manuellement l'adresse IP, voir les rubriques
suivantes.
Manuel électronique -> "Réglages réseau" -> "Réglages réseau de
base" -> "Réglage de l'adresse IP" -> "Dénition de l'adresse IPv4" ou
"Dénition de l'adresse IPv6".
Italiano
Collegare il cavo LAN. La macchina imposta l'indirizzo IP automaticamente. Attendere circa due minuti.
Per impostare manualmente l'indirizzo IP vedere le voci seguenti.
e-Manual -> "Impostazioni di rete" -> "Impostazioni di rete di base"
-> "Impostazione dell'indirizzo IP" -> "Impostazione dell'indirizzo IPv4" o
"Impostazione dell'indirizzo IPv6".
Deutsch
Schließen Sie das LAN-Kabel an. Das Gerät legt die IP-Adresse automatisch fest. Warten Sie ca. 2 Minuten.
Wenn Sie die IP-Adresse manuell festlegen möchten, lesen Sie die
folgenden Punkte.
e-Anleitung -> "Netzwerkeinstellungen" -> "Grundlegende
Netzwerkeinstellungen" -> "Festlegen der IP-Adresse" -> "Festlegen der
IPv4-Adresse" oder "Festlegen der IPv6-Adresse".
8
Connecting to Wired LAN
Connexion au réseau sans l
Collegamento alla LAN cablata
Herstellen einer Verbindung zu einem Wired LAN
1 2 3 4 5 6 7 8 9
10

English Français
Italiano Deutsch
10
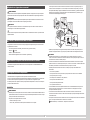
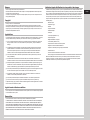
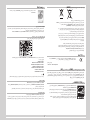
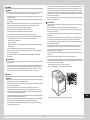
English
A
Install the driver and software using the User Software CD-ROM.
B
For details on the installation procedures, see the MF Driver Installation Guide.
Français
A
Installez le pilote et le logiciel avec le CD-ROM "User Software CD-ROM".
B
Pour en savoir plus sur les procédures d'installation, voir le Guide d'installation des pilotes MF.
Italiano
A
Installare il driver e il software dall'User Software CD-ROM.
B
Per i dettagli relativi alle procedure d'installazione, consultare la Guida di Installazione del Driver MF.
Deutsch
A
Installieren Sie den Treiber und die Software über die User Software CD-ROM.
B
Nähere Informationen zur Vorgehensweise bei der Installation nden Sie im Installationshandbuch zum MF-Treiber.
9
Installing the Driver/Software
Installation du pilote/logiciel
Installazione di driver/software
Installieren des Treibers bzw. der Software
A
B
A
B
1 2 3 4 5 6 7 8 9
10

11
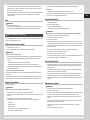
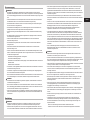
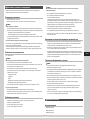
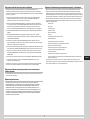
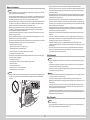
Copy Print
Remote UI
Network Settings
Fax (MF8380Cdw/MF8360Cdn Only) Scan
●
Sending a Document Directly from a Computer
(PC Fax)
In addition to the normal sending and receiving faxes, you
can use the PC fax.
●
Sending
You can register fax destinations in the address book.
You can specify the destinations using various methods,
enabling you to send documents quickly and easily.
▪ Destination search
▪ Favorites list
▪ Coded dialing
▪ Destination Group
▪ Specifying from the sending history
▪ Sequential broadcast
●
Saving the Documents Using the Operation Panel
of the Machine
1
2
3
Documents
Data
●
Scanning with the [ ] (Scan to PC1)/(Scan to
PC2) key
You can simplify the procedure for selecting the
destination and making the scan settings by registering
them in the keys on the operation panel.
●
Saving the Documents Using Operations from a
Computer
▪ Scanning with the MF Toolbox
▪ Scanning from an Application
▪ Scanning with the WIA Driver
(Windows XP/Vista/7 Only)
1
2 3
Documents
Data
●
Enlarged/Reduced Printing
●
2-Sided Printing
●
Reduced Layout
You can reduce multiple documents to print them onto
one sheet.
2 on 1 4 on 1
●
Booklet Printing
●
Poster Printing
●
Watermark Printing
●
Displaying a Preview before Printing
●
Selecting a "Prole"
This machine comes equipped with a network interface that you can construct a network environment easily. If you
use the MF8380Cdw, you can connect to the network using the wireless LAN. Also you can print a document, use the
PC fax (MF8380Cdw/MF8360Cdn only), and use the network scan from all computers which are connected with the
machine. The machine supports to increase work efciency as a shared machine in the ofce.
You can understand the condition of the machine from the computers on the network.
You can access the machine and manage jobs or specify various settings via network.
●
Enlarged/Reduced Copies
You can enlarge or reduce standard size documents to
copy on standard size paper or specify the copy ratio in
percentage.
●
2-Sided Copying
You can copy 1-sided documents on both sides of paper.
●
Collating
You can sort copies into sets arranged in page order.
●
Copying ID Card
You can make a copy of a 2-sided card onto one side of
paper.
●
Reduced Layout
You can reduce multiple documents to copy them onto
one sheet.
2 on 1 4 on 1
●
Paper Save Copy
You can choose the desired copy settings from the
options displayed when you select [
] (Paper Save
Copy) on the operation panel.
●
Receiving
▪ Receiving in the memory
You can store the received documents in the memory.
You can print the stored documents at any time or if
you do not need them, you can delete them.
▪ Remote Receiving
If an external telephone is connected, you can switch
to the fax receiving mode immediately by dialing the
ID number for fax receiving using the dial buttons of
the telephone during a phone call.
10
Perform Useful Tasks
English
You can use various functions in this machine. Following functions are the overview of the main functions that you can use routinely.
For details on each function, see the e-Manual.
●
Saving in a USB Memory
You can save scanned documents in a USB memory
connected to the machine.
Documents
Data
●
E-mailing Scanned Documents
You can send scanned documents to your e-mail
application.
Documents
Data E-mail
+
●
Sending Scanned Documents to a File Server
You can send scanned documents to a le server.
Documents
Data File server
1 2 3 4 5 6 7 8 9
10

1 2 3 4 5 6 7 8 9
10
English Français
Italiano Deutsch
12
10
Exécution de tâches utiles
Français
Vous pouvez utiliser les diverses fonctions de la machine. Voici les principales fonctions que vous utiliserez au quotidien.
Pour en savoir plus sur chaque fonction, voir le manuel électronique.
Copie Impression
Interf dist
Réglages réseau
Fax (MF8380Cdw/MF8360Cdn uniquement) Numérisation
●
Envoi d'un document directement depuis un
ordinateur (Fax PC)
Outre les modes normaux d'envoi et de réception de fax,
vous pouvez utiliser la fonction Fax PC.
●
Envoi
Vous pouvez enregistrer des destinataires de fax dans le
carnet d'adresses. Vous disposez de plusieurs méthodes
pour spécier les destinataires, ce qui vous permet
d'envoyer vos documents rapidement et facilement.
▪ Recherche de destinataires
▪ Liste Favoris
▪ Composition codée
▪ Groupe de destinataires
▪ Spécication depuis l'historique d'envoi
▪ Multidiffusion
●
Enregistrement de documents avec le panneau de
commandes de la machine
1
2
3
Documents
Données
●
Lecture avec la touche [ ] (LECT > PC1)/(LECT
> PC2)
Vous pouvez simplier la procédure de sélection du
destinataire et dénir les paramètres de lecture en les
enregistrant dans les touches du panneau de commande.
●
Enregistrement de documents via des opérations
réalisées depuis un ordinateur
▪ Numérisation avec MF Toolbox
▪ Numérisation depuis une application
▪ Numérisation avec le pilote WIA
(Windows XP/Vista/7 uniquement)
1
2 3
Documents
Données
●
Impression réduite/agrandie
●
Impression recto verso
●
Présentation réduite
Vous pouvez réduire plusieurs document pour les
imprimer tous sur une seule page.
2 sur 1 4 sur 1
●
Impression au format brochure
●
Impression d'afche
●
Impression avec ligrane
●
Afchage d'un aperçu avant l'impression
●
Sélection d'un "prol"
Cette machine est équipée d'une interface réseau qui vous permet de créer facilement un environnement réseau.
Si vous utilisez le modèle MF8380Cdw, vous pouvez vous connecter au réseau par réseau sans l. Vous pouvez
également imprimer un document, utiliser la fonction Fax PC (MF8380Cdw/MF8360Cdn uniquement) et utiliser la
fonction de lecture réseau sur tous les ordinateurs reliés à la machine. Utilisée en mode partagé au sein d'un bureau,
cette machine augmente votre productivité.
Vous pouvez connaître la condition de la machine à partir des ordinateurs du réseau.
Vous pouvez accéder à la machine sur le réseau an de gérer les tâches ou de spécier divers paramètres.
●
Copie réduite/agrandie
Vous pouvez agrandir ou réduire les documents de
taille standard an de les copier sur du papier de format
standard, ou spécier un taux de reproduction en
pourcentage.
●
Copie recto verso
Vous pouvez copier des documents recto sur les deux
faces du papier.
●
Tri séquentiel
Vous pouvez trier les copies par ensemble de pages,
dans l'ordre.
●
Copie d'une carte d'identité
Vous pouvez copier les deux faces d'une carte sur une
même face du papier.
●
Présentation réduite
Vous pouvez réduire plusieurs document pour les copier
tous sur une seule page.
2 sur 1 4 sur 1
●
Copie en mode d'économie de papier
Vous pouvez choisir les paramètres de copie suivants à partir
des options à l'écran lorsque vous sélectionnez [
] (Copie
en mode d'économie de papier) sur le panneau de commande.
●
Receiving
▪ Réception en mémoire
Vous pouvez stocker les documents reçus dans la mémoire.
Vous pouvez imprimer les documents stockés à tout
moment ou les supprimer si vous n'en avez pas besoin.
▪ Réception à distance
Si un téléphone externe est connecté, vous pouvez
passer immédiatement en mode de réception de fax
en composant l'ID de réception de fax sur les touches
de votre téléphone au cours d'un appel téléphonique.
●
Enregistrement sur clé USB
Vous pouvez enregistrer les documents numérisés sur
une clé USB connectée à la machine.
Documents
Données
●
Envoi par e-mail des documents numérisés
Vous pouvez envoyer les documents numérisés vers
votre application de messagerie.
Documents
Données E-mail
+
●
Envoi des documents numérisés vers un serveur
de chiers
Vous pouvez envoyer les documents numérisés vers un
serveur de chiers.
Documents
Données Serveur de fichiers

1 2 3 4 5 6 7 8 9
10
13
10
Attività utili
Italiano
La macchina dispone di una serie di funzioni utili. Le funzioni descritte sono una panoramica delle funzioni principali che si possono utilizzare tutti i giorni.
Per i dettagli relativi a ogni funzione, consultare l'e-Manual.
Copia Stampa
IU Remota
Impostazioni di rete
Fax (solo MF8380Cdw/MF8360Cdn) Scansione
●
Invio di un documento direttamente da un computer
(invio fax da PC)
Oltre all'invio e alla ricezione normali dei fax è possibile
utilizzare il fax da PC.
●
Invio
È possibile registrare destinazioni di fax nella rubrica. Le
destinazioni possono essere selezionate in vari modi, il
che consente di inviare i documenti in modo più rapido e
semplice.
▪ Ricerca di una destinazione
▪ Elenco preferiti
▪ Selezione codicata
▪ Gruppo di destinazione
▪ Selezione dalla cronologia degli invii
▪ Trasmissione sequenziale
●
Salvataggio dei documenti utilizzando il pannello di
controllo della macchina
1
2
3
Documenti
Dati
●
Scansione con il tasto [ ] (Scansione > PC1)/
(Scansione > PC2)
È possibile semplicare la procedura di selezione
della destinazione ed esecuzione delle impostazioni di
scansione registrandole nei tasti sul pannello di controllo.
●
Salvataggio dei documenti con operazioni svolte da
un computer
▪ Scansione con MF Toolbox
▪ Scansione da un'applicazione
▪ Scansione con il driver WIA
(solo Windows XP/Vista/7)
1
2 3
Documenti
Dati
●
Stampa ingrandita/rimpicciolita
●
Stampa fronte/retro
●
Layout ridotto
È possibile rimpicciolire più documenti in modo da poterli
stampare su un unico foglio.
2 in 1 4 in 1
●
Stampa opuscolo
●
Stampa di poster
●
Stampa di ligrane
●
Visualizzazione di un'anteprima prima della stampa
●
Selezione di un "prolo"
La macchina è dotata di un'interfaccia di rete che consente di inserirla in un ambiente di rete con molta facilità. Se si
utilizza la MF8380Cdw, è possibile collegarla a una rete LAN wireless. È inoltre possibile stampare un documento,
utilizzare il fax da PC (solo MF8380Cdw/MF8360Cdn) e la scansione tramite rete da tutti i computer collegati alla
macchina. La macchina ha una maggiore efcienza di lavoro in quanto progettata per essere una macchina da ufcio
condivisa.
Dai computer presenti in rete è possibile leggere lo stato della macchina.
Attraverso la rete è possibile accedere alla macchina per gestire i lavori e specicare varie impostazioni.
●
Copie ingrandite/rimpicciolite
È possibile ingrandire o rimpicciolire i documenti di
formati standard per copiare su carta di formato standard
oppure selezionare le proporzioni in percentuale.
●
Copia fronte/retro
È possibile copiare documenti di un lato su entrambi i lati
dei fogli di carta.
●
Fascicolazione
È possibile ordinare le copie in gruppi sistemati in ordine
di pagina.
●
Copia di documenti identità
È possibile fare una copia di un documento fronte/retro
su un unico lato del foglio di carta.
●
Layout ridotto
È possibile rimpicciolire più documenti in modo da poterli
copiare su un unico foglio.
2 in 1 4 in 1
●
Copia risparmio cartav
È possibile scegliere le impostazioni di copia desiderate
dalle opzioni visualizzate quando si seleziona [
]
(Copia risparmio carta) sul pannello di controllo.
●
Ricezione
▪ Ricezione in memoria
È possibile memorizzare i documenti ricevuti nella
memoria.
È possibile stampare i documenti memorizzati in
qualsiasi momento e, se non servono, è possibile
cancellarli.
▪ Ricezione remota
Se è collegato un telefono esterno, è possibile
passare immediatamente alla modalità di ricezione
fax durante una telefonata componendo il numero
identicativo per la ricezione fax con i pulsanti di
composizione del telefono.
●
Salvataggio in una memoria USB
È possibile salvare i documenti scansionati in un
dispositivo di memoria USB collegato alla macchina.
Documenti
Dati
●
Invio dei messaggi scansionati per e-mail
È possibile inviare i documenti scansionati all'applicazione
di e-mail installata.
Documenti
Dati E-mail
+
●
Invio di documenti scansionati a un le server
È possibile inviare i documenti scansionati a un le
server.
Documenti
Dati File server
Pagina se încarcă...
Pagina se încarcă...
Pagina se încarcă...
Pagina se încarcă...
Pagina se încarcă...
Pagina se încarcă...
Pagina se încarcă...
Pagina se încarcă...
Pagina se încarcă...
Pagina se încarcă...
Pagina se încarcă...
Pagina se încarcă...
Pagina se încarcă...
Pagina se încarcă...
Pagina se încarcă...
Pagina se încarcă...
Pagina se încarcă...
Pagina se încarcă...
Pagina se încarcă...
Pagina se încarcă...
Pagina se încarcă...
Pagina se încarcă...
Pagina se încarcă...
Pagina se încarcă...
Pagina se încarcă...
Pagina se încarcă...
Pagina se încarcă...
Pagina se încarcă...
Pagina se încarcă...
Pagina se încarcă...
Pagina se încarcă...
Pagina se încarcă...
Pagina se încarcă...
Pagina se încarcă...
Pagina se încarcă...
Pagina se încarcă...
Pagina se încarcă...
Pagina se încarcă...
Pagina se încarcă...
Pagina se încarcă...
Pagina se încarcă...
Pagina se încarcă...
Pagina se încarcă...
Pagina se încarcă...
Pagina se încarcă...
Pagina se încarcă...
Pagina se încarcă...
Pagina se încarcă...
Pagina se încarcă...
Pagina se încarcă...
Pagina se încarcă...
Pagina se încarcă...
Pagina se încarcă...
Pagina se încarcă...
Pagina se încarcă...
Pagina se încarcă...
Pagina se încarcă...
Pagina se încarcă...
Pagina se încarcă...
Pagina se încarcă...
Pagina se încarcă...
Pagina se încarcă...
Pagina se încarcă...
Pagina se încarcă...
Pagina se încarcă...
Pagina se încarcă...
Pagina se încarcă...
Pagina se încarcă...
Pagina se încarcă...
Pagina se încarcă...
Pagina se încarcă...
Pagina se încarcă...
Pagina se încarcă...
Pagina se încarcă...
Pagina se încarcă...
Pagina se încarcă...
Pagina se încarcă...
Pagina se încarcă...
Pagina se încarcă...
Pagina se încarcă...
Pagina se încarcă...
Pagina se încarcă...
Pagina se încarcă...
Pagina se încarcă...
Pagina se încarcă...
Pagina se încarcă...
Pagina se încarcă...
Pagina se încarcă...
Pagina se încarcă...
Pagina se încarcă...
Pagina se încarcă...
Pagina se încarcă...
Pagina se încarcă...
Pagina se încarcă...
Pagina se încarcă...
Pagina se încarcă...
Pagina se încarcă...
Pagina se încarcă...
Pagina se încarcă...
Pagina se încarcă...
Pagina se încarcă...
Pagina se încarcă...
Pagina se încarcă...
Pagina se încarcă...
Pagina se încarcă...
Pagina se încarcă...
Pagina se încarcă...
Pagina se încarcă...
Pagina se încarcă...
Pagina se încarcă...
Pagina se încarcă...
Pagina se încarcă...
Pagina se încarcă...
Pagina se încarcă...
Pagina se încarcă...
Pagina se încarcă...
Pagina se încarcă...
Pagina se încarcă...
Pagina se încarcă...
Pagina se încarcă...
Pagina se încarcă...
Pagina se încarcă...
Pagina se încarcă...
Pagina se încarcă...
Pagina se încarcă...
Pagina se încarcă...
Pagina se încarcă...
Pagina se încarcă...
Pagina se încarcă...
Pagina se încarcă...
Pagina se încarcă...
Pagina se încarcă...
Pagina se încarcă...
Pagina se încarcă...
Pagina se încarcă...
Pagina se încarcă...
Pagina se încarcă...
Pagina se încarcă...
Pagina se încarcă...
Pagina se încarcă...
Pagina se încarcă...
Pagina se încarcă...
Pagina se încarcă...
Pagina se încarcă...
Pagina se încarcă...
Pagina se încarcă...
Pagina se încarcă...
Pagina se încarcă...
Pagina se încarcă...
Pagina se încarcă...
Pagina se încarcă...
Pagina se încarcă...
Pagina se încarcă...
Pagina se încarcă...
Pagina se încarcă...
Pagina se încarcă...
Pagina se încarcă...
Pagina se încarcă...
Pagina se încarcă...
Pagina se încarcă...
Pagina se încarcă...
Pagina se încarcă...
Pagina se încarcă...
Pagina se încarcă...
Pagina se încarcă...
Pagina se încarcă...
Pagina se încarcă...
Pagina se încarcă...
Pagina se încarcă...
Pagina se încarcă...
Pagina se încarcă...
Pagina se încarcă...
Pagina se încarcă...
Pagina se încarcă...
Pagina se încarcă...
Pagina se încarcă...
Pagina se încarcă...
Pagina se încarcă...
Pagina se încarcă...
Pagina se încarcă...
Pagina se încarcă...
Pagina se încarcă...
Pagina se încarcă...
Pagina se încarcă...
Pagina se încarcă...
Pagina se încarcă...
Pagina se încarcă...
Pagina se încarcă...
Pagina se încarcă...
Pagina se încarcă...
Pagina se încarcă...
Pagina se încarcă...
Pagina se încarcă...
Pagina se încarcă...
Pagina se încarcă...
Pagina se încarcă...
Pagina se încarcă...
Pagina se încarcă...
Pagina se încarcă...
Pagina se încarcă...
Pagina se încarcă...
Pagina se încarcă...
Pagina se încarcă...
Pagina se încarcă...
Pagina se încarcă...
Pagina se încarcă...
Pagina se încarcă...
Pagina se încarcă...
Pagina se încarcă...
Pagina se încarcă...
Pagina se încarcă...
Pagina se încarcă...
Pagina se încarcă...
Pagina se încarcă...
Pagina se încarcă...
Pagina se încarcă...
Pagina se încarcă...
Pagina se încarcă...
Pagina se încarcă...
Pagina se încarcă...
Pagina se încarcă...
Pagina se încarcă...
Pagina se încarcă...
Pagina se încarcă...
Pagina se încarcă...
Pagina se încarcă...
Pagina se încarcă...
Pagina se încarcă...
Pagina se încarcă...
Pagina se încarcă...
Pagina se încarcă...
Pagina se încarcă...
Pagina se încarcă...
Pagina se încarcă...
Pagina se încarcă...
Pagina se încarcă...
Pagina se încarcă...
Pagina se încarcă...
Pagina se încarcă...
Pagina se încarcă...
Pagina se încarcă...
Pagina se încarcă...
Pagina se încarcă...
Pagina se încarcă...
Pagina se încarcă...
Pagina se încarcă...
Pagina se încarcă...
Pagina se încarcă...
Pagina se încarcă...
Pagina se încarcă...
Pagina se încarcă...
Pagina se încarcă...
Pagina se încarcă...
Pagina se încarcă...
Pagina se încarcă...
Pagina se încarcă...
-
 1
1
-
 2
2
-
 3
3
-
 4
4
-
 5
5
-
 6
6
-
 7
7
-
 8
8
-
 9
9
-
 10
10
-
 11
11
-
 12
12
-
 13
13
-
 14
14
-
 15
15
-
 16
16
-
 17
17
-
 18
18
-
 19
19
-
 20
20
-
 21
21
-
 22
22
-
 23
23
-
 24
24
-
 25
25
-
 26
26
-
 27
27
-
 28
28
-
 29
29
-
 30
30
-
 31
31
-
 32
32
-
 33
33
-
 34
34
-
 35
35
-
 36
36
-
 37
37
-
 38
38
-
 39
39
-
 40
40
-
 41
41
-
 42
42
-
 43
43
-
 44
44
-
 45
45
-
 46
46
-
 47
47
-
 48
48
-
 49
49
-
 50
50
-
 51
51
-
 52
52
-
 53
53
-
 54
54
-
 55
55
-
 56
56
-
 57
57
-
 58
58
-
 59
59
-
 60
60
-
 61
61
-
 62
62
-
 63
63
-
 64
64
-
 65
65
-
 66
66
-
 67
67
-
 68
68
-
 69
69
-
 70
70
-
 71
71
-
 72
72
-
 73
73
-
 74
74
-
 75
75
-
 76
76
-
 77
77
-
 78
78
-
 79
79
-
 80
80
-
 81
81
-
 82
82
-
 83
83
-
 84
84
-
 85
85
-
 86
86
-
 87
87
-
 88
88
-
 89
89
-
 90
90
-
 91
91
-
 92
92
-
 93
93
-
 94
94
-
 95
95
-
 96
96
-
 97
97
-
 98
98
-
 99
99
-
 100
100
-
 101
101
-
 102
102
-
 103
103
-
 104
104
-
 105
105
-
 106
106
-
 107
107
-
 108
108
-
 109
109
-
 110
110
-
 111
111
-
 112
112
-
 113
113
-
 114
114
-
 115
115
-
 116
116
-
 117
117
-
 118
118
-
 119
119
-
 120
120
-
 121
121
-
 122
122
-
 123
123
-
 124
124
-
 125
125
-
 126
126
-
 127
127
-
 128
128
-
 129
129
-
 130
130
-
 131
131
-
 132
132
-
 133
133
-
 134
134
-
 135
135
-
 136
136
-
 137
137
-
 138
138
-
 139
139
-
 140
140
-
 141
141
-
 142
142
-
 143
143
-
 144
144
-
 145
145
-
 146
146
-
 147
147
-
 148
148
-
 149
149
-
 150
150
-
 151
151
-
 152
152
-
 153
153
-
 154
154
-
 155
155
-
 156
156
-
 157
157
-
 158
158
-
 159
159
-
 160
160
-
 161
161
-
 162
162
-
 163
163
-
 164
164
-
 165
165
-
 166
166
-
 167
167
-
 168
168
-
 169
169
-
 170
170
-
 171
171
-
 172
172
-
 173
173
-
 174
174
-
 175
175
-
 176
176
-
 177
177
-
 178
178
-
 179
179
-
 180
180
-
 181
181
-
 182
182
-
 183
183
-
 184
184
-
 185
185
-
 186
186
-
 187
187
-
 188
188
-
 189
189
-
 190
190
-
 191
191
-
 192
192
-
 193
193
-
 194
194
-
 195
195
-
 196
196
-
 197
197
-
 198
198
-
 199
199
-
 200
200
-
 201
201
-
 202
202
-
 203
203
-
 204
204
-
 205
205
-
 206
206
-
 207
207
-
 208
208
-
 209
209
-
 210
210
-
 211
211
-
 212
212
-
 213
213
-
 214
214
-
 215
215
-
 216
216
-
 217
217
-
 218
218
-
 219
219
-
 220
220
-
 221
221
-
 222
222
-
 223
223
-
 224
224
-
 225
225
-
 226
226
-
 227
227
-
 228
228
-
 229
229
-
 230
230
-
 231
231
-
 232
232
-
 233
233
-
 234
234
-
 235
235
-
 236
236
-
 237
237
-
 238
238
-
 239
239
-
 240
240
-
 241
241
-
 242
242
-
 243
243
-
 244
244
-
 245
245
-
 246
246
-
 247
247
-
 248
248
-
 249
249
-
 250
250
-
 251
251
-
 252
252
-
 253
253
-
 254
254
-
 255
255
-
 256
256
-
 257
257
-
 258
258
-
 259
259
-
 260
260
-
 261
261
-
 262
262
-
 263
263
-
 264
264
-
 265
265
-
 266
266
-
 267
267
-
 268
268
-
 269
269
-
 270
270
-
 271
271
-
 272
272
-
 273
273
-
 274
274
-
 275
275
-
 276
276


Canon i-SENSYS MF8380Cdw Manual de utilizare
- Tip
- Manual de utilizare
în alte limbi
Lucrări înrudite
-
Canon i-SENSYS MF8080Cw Manual de utilizare
-
Canon i-SENSYS MF5940dn Manual de utilizare
-
-
Canon i-SENSYS MF8380Cdw Manual de utilizare
-
Canon L170 Manualul proprietarului
-
-
Canon MF232 Manualul proprietarului
-
Canon MF267dw II Manualul utilizatorului