
Package Contents
Lieferumfang / Contenu de l'emballage / Contenido del paquete / Conteúdo do Pacote / Contenuto Confezione
Комплект поставки / Przewodnik użytkownika / Paket İçeriği / 包裝內容物 / 包装内容物 / パッケージの内 容
패키지�내용물
Geng Familiar with Your Unit
Lernen Sie ihr Geräts kennen / Découvrez votre unité / Conozca su disposivo / Conhecendo a sua unidade / Scopri la tua unità / Первое знакомство с устройством / Prezentacja zestawu / Cihazınızı daha iyi tanıyın
認識您的裝置 (※系統操作溫度0℃~35℃) / 熟悉您的设备 / 自分のBRIXにつ いて 詳 しくなろう / 장치 숙지하기
BRIX & BRIXs Ultra Compact PC Kit
BRIX & BRIXs Ultrakompaktes PC Kit / Kits PC ultra compact BRIX & BRIX s
PC Kit Ultra compacto BRIX y BRIXs / BRIX & BRIXs Kit PC Ultra Compacto
Kit PC Ultra Compao BRIX / Ультракомпактный ПК BRIX: Комплект для самостоятельной сборки
GB-BX系列超微型電腦 / GB-BX系列超微型台式计算机
BRIX & BRIX s ウ ル ト ラ ・コ ン パ ク ト PCキット / BRIX & BRIX s 울트라�컴펙트 PC 키트
Quick Start Guide
Schnellstartanleitung / Guide de démarrage rapide / Guía de inicio rápido / Guia de Início Rápido
Guida Rapida / Руководство по быстрой сборке / Skrócona instrukcja obsługi
Hızlı Başlangıç Kılavuzu / 快速入門使用者手冊 / 快速入门用户手册
ク イ ッ ク ・ス タ ー ト ・ ガ イ ド / 빠른�시작�설명서
A1. Wireless Module: How to Safely Remove the Module
Wireless-Modul: Das sichere enernen des Moduls / Module sans fil : Comment rerer le module en toute sécurité / Módulo Inalámbrico: Cómo eliminar de forma segura el módulo
Módulo Wireless: Como remover o módulo com segurança / Modulo Wireless: Come rimuovere con sicurezza il modulo / Модуль беспроводной связи: Как безопасно удалить модуль
Moduł bezprzewodowy: Jak bezpieczne usunąć moduł / Kablosuz Modülü : Modülü Nasıl Güvenli Kaldırabilirim / 移除隨機搭配的無線模組 / 移除随机搭配的无线模块
ワイヤレスモジュール:安 全 にモ ジュールを 取り外す 方 法 / 무선 모듈: 모듈을 안전하게 제거하는 방법
Safety and Regulatory Informaon
Sicherheitshinweise und Normen / Informaon sur la Sécurité et Réglementaon / Seguridad y Normava / Informações Regulatórias e de Segurança / Informazioni di Sicurezza e Regolamen
Меры безопасности и нормативная информация / Bezpieczeństwo i zgodność z przepisami / Güvenlik ve Yasal Bilgiler
安全規範 / 安全规范 / 安全性と規制に関する情 報 / 안전 및 규제 정보
Risk of explosion if the baery is replaced with an incorrect type. Baeries should be recycled
where possible. Disposal of used Baeries must be in accordance with local environmental
regulaons.
Failure to use the included Model GB-BX Power Adapter may violate regulatory compliance and may
expose the user to safety hazards.
Es besteht Explosionsgefahr, wenn die Baerie durch einen falschen Typ ersetzt wird. Baerien
müssen recycelt werden, sofern möglich. Gebrauchte Baerien müssen gemäß den örtlichen
Umweltschutzvorschrien entsorgt werden.
Die Nichtbenutzung des mitgelieferten Netzteils Modell GB-BX könnte eine Einhaltung gesetzlicher
Vorschrien nicht mehr gewährleisten und für den Benutzer zu einem Sicherheitsrisiko werden.
Risque d’explosion si la baerie n’est pas dcompable. Les piles doivent être recyclées quand cela
est possible. Le rejet des baeries usagées doit être effectué en foncon des réglementaons
locales.
Si vous n'ulisez pas le modèle d'alimentaon GB-BX fournit, vous pouvez transgresser la
conformité réglementaire et peut exposer l'ulisateur à des risques de sécurité.
Riesgo de explosión si se reemplaza la batería por una incorrecta. Las baterías deben ser reciclados
donde sea posible. Eliminación de baterías usadas debe ser de acuerdo con las regulaciones
ambientales locales.
Si no se uliza el adaptador de corriente incluido modelo GB-BX pueda violar el cumplimiento
normavo y puede exponer al usuario a riesgos de seguridad.
IRisco de explosão caso a bateria seja substuída por po errado. Baterias devem ser recicladas. O
descarte de baterias usadas devem ser feitas em locais de acordo com o regulamento ambiental.
O não cumprimento na ulização da fonte de energia modelo GB-BX incluso, pode violar o
regulamento e pode expor o usuário à riscos de segurança.
Il mancato ulizzo della dotazione del modello GB-BX Power Adapter può violare la conformità
normava e può esporre l'utente a rischi per la sicurezza.
Użycie innego zasilacza niż dostosowany do modelu GB-BX może spowodować uszkodzenie sprzętu,
a także być niebezpieczne dla zdrowia.
Güvenlik Uyarısı: GB-BX Güç Adaptörünün kullanılmaması kullanıcıya ve cihaza zarar verebilir.
Применение стороннего блока питания отличного от устройства из комплекта поставки
модели GB-BX может повлечь за собой нарушение нормативных требований и правил
техники безопасности.
Rischio di esplosione della baeria se sostuita con una non correa. Le baerie devono essere
riciclate dove possibile. Lo smalmento delle baerie usate deve essere svolto in accordo con la
regolamentazione locale.
배터리를�잘못된�타입으로�교체하면�폭발�위험이�있습니다. 가능한한�배터리를�재활용하십시오. 수명이
다한�배터리는�현지의�환경�규정에�따라�폐기해야�합니다.
間違ったバッテリーの交換は、破裂など事故の原因になります。可能であればバッテリーはなる
べくリサイクルしてください。使用済みバッテリーは地域の環境 規制に従い処理してください。
제공된GB-BX전원�어댑터를�사용하지�않은�것은�관련�규정을�어긴�것이며�이로인해�안전상의�위험에
노출될�수�있습니다.
GB-BXに付属の 電源 アダ プターと電 源ケーブルは 専用 品となります。他の 機 器で 使 用し ないで下
さい、安全上の問題や各種規制違反になる場合がございます。
若未使用隨附的GB-BX型號電源變壓器,可能會違反規範合規性,並讓使用者暴露在危險中。
Характеристики батареи отличные от оригинальных могут привести к разрушению корпуса
элемента (микровзрыву). Использованные батареи должны быть утилизированы в
соответствии с рекомендациями местных регулирующих органов.
不使用随货附赠的GB-BX型号电源适配器,可能不符合规格,并给用户的人身安全带来危险。
BRIX符合中国能效标识规范─微型计算器效能等级:1级 ,属 于 B类 产 品 类 型 。典 型 能 耗 值
:139kWh。
BRIX s 符合中国能效标识规范─微型计算器效能等级:1级 ,属 于 B类 产 品 类 型 。典 型 能 耗 值
:164kWh。
根据中华人民共和国国家标准GB 28380-2012(微型计算器能效限定值及能效等级)规 范 要 求 ,此
机型仅适用于产品类型:B类,系统总内存配置容量必须大于2GB(含2GB)。
Istnieje ryzyko wybuchu, w razie zastosowania nieodpowiedniego typu baterii. Zużyte baterie mogą
być odpadami niebezpiecznymi. Zużyte baterie powinny być zatem segregowane i utylizowane w
miejscach do tego przeznaczonych.
Yanlış şekilde pil takıldığında patlama tehlikesi bulunmaktadır. Piller mümkün olduğunda geri
dönüştürülmelidir. Kullanılmış piller yerel çevresel düzenlemelere uygun olarak ak işleme
tesislerine gidecek şekilde almalıdır.
若以不正確類型的電池進行更換,可能會有爆炸的危險。應儘可能回收電池。應依照當地環保
法規棄置使用過的電池。
若以不正确类型的电池进行更换,可能会有爆炸的危险。应尽可能回收电池。应依照当地环保
法规弃置使用过的电池。
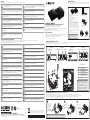
2
1
【BRIX Front】
2 x USB 3.0
Audio-Out & Mic-In
(3.5mm only)
2 x USB 3.0
Audio-Out & Mic-In
(3.5mm only)
Note: The GIGABYTE BRIX i7 comes
with an NFC antenna installed inside
the chassis which supports NFC.
At the end of its serviceable life, this product should not be treated as household or
general waste. It should be handed over to the applicable collecon point for the recycling
of electrical and electronic equipment, or returned to the supplier for disposal.
©2015 GIGABYTE Technology Co., Ltd. All rights reserved. The marks menoned herein are trademarks or registered trademarks of GIGABYTE
Technology Co., Ltd. or its affiliates. All other product names menoned herein are trademarks or registered trademarks or their respecve owners.
The terms HDMI and HDMI High-Definion Mulmedia Interface, and the HDMI Logo are trademarks or registered trademarks of HDMI Licensing LLC
in the United States and other countries.
25ME0-B7B600-Q0R
产地:中国 Made in China
Please visit hp://www.gigabyte.com/support-downloads/customer-service to find your BRIX
warranty informaon from the drop down list, or by clicking on the map. You will then be directed
to the corresponding page for your region.
Veuillez visiter la page hp://www.gigabyte.fr/support-downloads/customer-service afin de
trouver toutes les informaons concernant la garane du BRIX. Il suffit de seleconner le menu
déroulant ou de cliquer sur la carte. Vous serez alors redirigé vers la page correspondante à votre
région.
Por favor visite hp://www.gigabyte.com/support-downloads/customer-service para encontrar
informações sobre a garana do BRIX na lista ou clicando no mapa. Será redirecionado para a página
correspondente da sua região.
Чтобы найти информацию о гарантийных обязательствах на вашу модель BRIX, пожалуйста,
посетите страницу hp://www.gigabyte.com/support-downloads/customer-service.aspx и
укажите страну в выпадающем списке. Вы будете перенаправлены на соответствующую
страницу вашего регионального сайта.
Aşağıdaki listede veya harita üzerinden klayarak, açılan menüden, BRIX garan bilgilerini bulmak
için hp://www.gigabyte.com/support-downloads/customer-hizmet ziyaret ediniz. Daha sonra
bulunduğunuz bölge için ilgili sayfaya yönlendirileceksiniz.
请访问技嘉官网hp://www.gigabyte.com/support-downloads/customer以取得您所在区域的
BRIX产品保修信息。
hp://www.gigabyte.com/support-downloads/customer-service.aspx 를�방문하시면�구입하신 BRIX
보장내용을�확인할�수�있습니다. 드롭다운리스트�또는�맵을�클릭하면�거주국가에�해당하는�페이지로
연결됩니다.
Bie besuchen Sie für unseren Service die Seite hp://www.gigabyte.com/support-
downloads/customer-Service, um Ihre Garane BRIX Informaonen aus der Dropdown-Liste zu
entnehmen, oder klicken Sie direkt auf der Karte um diese zu entnehmen. Sie werden dann auf die
entsprechende Seite für Ihre Region weitergeleitet
Por favor, visite hp://www.gigabyte.com/support-downloads/customer-service para encontrar la
información de garana BRIX de la lista desplegable, o haciendo clic en el mapa. A connuación, será
dirigido a la página correspondiente de su pais.
Per maggiori informazioni sulla garanzia BRIX visita la seguente pagina e scorri il menu a tendina,
oppure clicca sulla mappa. Sarai reinidirizzato alla pagina di supporto per la tua regione:
hp://www.gigabyte.com/support-downloads/customer-service
Odwiedź hp://www.gigabyte.com/support-downloads/customer-service by znaleźć informacje
dotyczące gwarancji dla BRIX, znajdujące się w rozwijalnej liście lub mapie. Zostaniesz przeniesiony
do strony odpowiedniej dla twojego regionu.
請參訪技嘉官網hp://www.gigabyte.com/support-downloads/customer以取得您所在區域的
BRIX產品保固訊息。
BRIXの保証情報については、hp://www.gigabyte.jp/support-downloads/customer-service.aspx
にアクセスし、プルダウンリストから製品カテゴリーの「デスクトップPC」を 選 択 して く だ さ い 。
Support
Unterstützung / Soporte / Suporte / Supporto / Техническая поддержка / Wsparcie / Destek / 支援 / 支持 / サ ポート / 지원
【BRIX Rear】 【BRIX s Front】 【BRIX s Rear】
RJ-45
HDMIDC-In
Kensington lock slot Mini DP 2 x USB 3.0
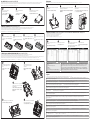
A1
A2
B
D
C
E
Note: The BRIX & BRIX s require DDR3L
SO-DIMM system memory. This is the low
voltage DDR3 memory that offers great
performance at a lower 1.35v.
注 意:技 嘉 BRIX & BRIX s僅支援低電壓DDR3
SO-DIMM記 憶 體。低 耗 電 的1.35V記憶體提
供了同 記憶體模組一樣出
【PIN Definion】
A1 WiFi connector
A2 mSATA connector
B DDR3L SO-DIMM slot
C SATA 6Gb/s connector
(Only supported in BRIX s)
D NFC connector
(Only supported in BRIX i7)
E 80H port
2
Remove the screw
in the middle.
鬆開固定於無線
模組中央頂端的
螺 絲。
3
Carefully pull the
wireless module
from the slot.
小心的把無線模組從
Mini PCIe插 槽 拔 除。
1 x GB-BX Bare-bone
- NOT Include any of the following: mSATA, 2.5” HDD,
SO-DIMM memory
- Folgende Arkel sind NICHT enthalten: mSATA,
2.5”HDD, SO-DIMM-Speicher
- Composants non inclus: mSATA, Disque Dur 2.5",
Mémoire SO-DIMM
- No incluye: mSATA, 2.5” HDD, memoria SO-DIMM
- Não inclui: mSATA, 2.5” HDD, memória SO-DIMM
- Non include: mSATA, 2.5” HDD, memorie SO-DIMM
- Следующие позиции не включены в комплект поставки:
mSATA, 2,5-дюйм накопитель, SO-DIMM модули ОЗУ
- Zestaw nie zawiera: mSATA, 2.5" oraz, pamieci SO-DIMM
- Şunlar dahil değildir: mSATA, 2.5“ HDD, SO-DIMM haza
- 不 包 含 下 列 任 何 項 目:mSATA、2.5”硬 碟、SO-DIMM記憶體
- 不包含下列任何项目:mSATA、2.5"硬盘、SO-DIMM内存
- 後記のものはこれに含まれていません:mSATA, 2.5”
HDD, SO-DIMMメモリー
- 미포함항목: mSATA, 2.5” HDD, SO-DIMM memory
RJ-45HDMIDC-In
Kensington lock slot Mini DP 2 x USB 3.0
1
Disconnect the
two antennas by
manually liing off
the clips that hold
them in place.
向上移除連接於無
線模組左側頂端天
線。
Note: Wireless module inclusion may vary based on local distribuon.
注意:根据各地经销商之产品规格配置,有些市场将不提供预载的无线模块。
1 x VESA Mount Bracket
& 6 x Screws
1 x 65W Adapter & Power Cord
※ 輸 入:DC 19V, 3.42A
1 x Quick Start Guide
1 x Driver CD

USB Power On Funcon: Allows Device Power-on Via USB. Useful When Mounted Behind a Display or TV
USB Power On Funkon / Foncon Démarrage par USB / Función USB Power On
Função USB Power On / Funzione USB Power On / Функция USB Power On
Opcja USB Power On / USB Güç Açık Fonksiyonu / USB埠啟動功能
USB接口启动功能 / USB機器からの電源ON機能 / USB 포트를 이용한 전원 켜기
System Requirements
- Win 7
- Win 8.x (Install ulity required)
系統需求
- Windows 7
- Windows 8或以上的版本(需安裝額外的應用程式)
Press “Del” during device start up to
enter BIOS.
開機後按啟Del鍵進入BIOS設 定 畫 面。
1
Select “Chipset” from the menu.
在BIOS主選單選取”Chipset”。
2
Manually configure “Erp Low Power State
Mode” sengs to “Disabled”.
進入Chipset的Erp Low Power State Mode
選項,手動控制將其”Disabled”。
3
Press F4 to Save and Exit.
按啟F4存儲設定並離開BIOS選單重新
開機。
4
VESA Bracket
VESA-Halterung / Support VESA / soporte VESA / Suporte VESA / Staffa VESA / Крепление VESA / Uchwyt VESA / VESA Desteği / VESA支架 / VESA支架 / VESA対 応 ブ ラケ ット / VESA 브래킷
Aach the VESA mounng plate to the rear of a compable
display using the screws provided.
安裝隨附的VESA支撐架於支援VESA支撐架的電腦螢幕或
電 視 機 後 背。
2
The BRIX or BRIX s can now be mounted by sliding the
device into place.
將已安裝VESA支撐架螺絲的BRIX插入VESA支撐架的滑軌
孔,向下壓至定位點後即可固定。
31
Aach the screws provided on the underside of the
BRIX or BRIX s.
安裝隨附的VESA支撐架螺絲於BRIX底 部。
Support
Unterstützung / Support / Soporte / Suporte / Supporto / Техническая поддержка / Wsparcie / Destek / 支援 / 支持 / サポート / 지원
● 테스트한 메모리,무선어댑터 지원 관련 목록은 hp://www.gigabyte.com 을 참조 하십시오 ● 최신 드라이버 및BIOS의 업데이트는 홈페이지 hp://www.gigabyte.com 에서 다운로드하십시오. ● 제품 지원에
대한 상세한 내용은 홈페이지 hp://www.gigabyte.com 를 참조하십시오.
● 動 作 確 認 済み のメモリ、mSATA、2.5"SATA HDD、ワイヤレスアダプター、OSのリストについては、次のサイトで確認できます: hp://www.gigabyte.com ● 最新のドライバーおよびBIOSのアップデートをダウン
ロードの場合、次を参照してください。 ● 製品のサポート情報については、次を参照ください。
● For a list of tested memory, mSATA, 2.5” HDD, wireless adapters and OS supported, go to: hp://www.gigabyte.com ● To download the latest drivers and BIOS updates, go to: hp://www.gigabyte.com ●
For product support, go to: hp://www.gigabyte.com
● Pour obtenir une liste de mémoire, mSATA, disques 2.5” HDD, adaptateurs sans fil et systèmes d'exploitaon compable, veuillez vous rendre sur : hp://www.gigabyte.fr ● Télécharger la dernier version de
mis à jour du bios et des pilotes, veuillez vous rendre sur: hp://www.gigabyte.fr ● Pour l'assistance produit, veuillez vous rendre sur : hp://www.gigabyte.fr
● Para obtener una lista de memorias probadas, mSATA, HDD 2.5", adaptadores inalámbricos y sistemas operavos compables, visite: hp://es.gigabyte.com ● Para descargar los úlmos controladores y
actualizaciones de BIOS, vaya a: hp://es.gigabyte.com ● Para el soporte del producto, visite: hp://es.gigabyte.com
● Para a lista de memórias testadas, mSATA, HDD 2.5", adaptadores wireless e Sistemas Operacionais suportados, acesse: hp://br.gigabyte.com ● Para baixar os drivers mais recentes e atualizações de BIOS, acesse:
hp://br.gigabyte.com ● Para suporte ao produto, acesse: hp://br.gigabyte.com
● Per una lista di compabilità di HDD 2,5", mSATA, memorie, adaori Wireless e OS supporta visita: hp://www.gigabyte.com ● Per scaricare gli ulmi Driver e BIOS visita: hp://www.gigabyte.com ●
Per supporto visita: hp://www.gigabyte.com
● Eine Liste mit geprüem Arbeitsspeicher, mSATA, 2.5” HDD, drahtlosen Adaptern und unterstützten Betriebssystemen finden Sie bie unter: hp://www.gigabyte.com ● Für den Download aktuellster Treiber und
BIOS-Updates gehen Sie bie zu: hp://www.gigabyte.com ● Unterstützung zu Produkten finden Sie bie unter: hp://www.gigabyte.com
● Подробная информация о протестированных модулях ОЗУ, mSATA, 2.5” HDD и модулях беспроводной связи под управлением совместимой ОС размещена по адресу: hp://www.gigabyte.com ● Для
загрузки актуальных драйверов и обновлений версии BIOS воспользуйтесь ссылкой: hp://www.gigabyte.com ● Информация о технической поддержке продукта размещена по адресу:
hp://www.gigabyte.com
● Test edilen haza listesi için, mSATA, 2.5” HDD, kablosuz adaptörler ve desteklenen OS için, ilgili adrese gidiniz: hp://www.gigabyte.com ● En son sürücüleri ve BIOS güncellemelerini indirmek için, ilgili adrese
gidiniz: hp://www.gigabyte.com ● Ürün desteği için, ilgili adrese gidiniz: hp://www.gigabyte.com
● Listę kompatybilnych komponentów (pamięć, mSATA, 2.5” HDD, karty rozszerzeń) oraz systemów operacyjnych można znaleźć pod adresem: hp://gigabyte.com ● Najnowsze wersje sterowników oraz BIOSu
można pobrać ze strony:hp://www.gigabyte.com ● Aby uzyskać wsparcie dotyczące produktów proszę wejść na stronę internetową: hp://www.gigabyte.com
● 如需已測試記憶體、mSATA、2.5" SATA HDD、無線介面卡和支援的作業系統清單,請前往hp://www.gigabyte.com ● 若要下載最新驅動程式和BIOS更 新 ,請 前 往 :hp://www.gigabyte.com ● 如需產
品 支 援 資 訊 ,請 前 往 :hp://www.gigabyte.com
● 如需已测试内存、mSATA、2.5" SATA HDD、无线适配卡和支持的操作系统列表,请前往:hp://www.gigabyte.com ● 若要下载最新驱动程序和BIOS更 新 ,请 前 往 :hp://www.gigabyte.com ●
如需产品支持信息,请前往:hp://www.gigabyte.com
1
Unscrew and remove the boom
panel, disconnecng the SATA
cable.
移除BRIX s底蓋並取下主機板上
的SATA線。
4
Screw the HDD cage in place in the boom panel.
將安裝好硬碟的硬碟插槽固定回BRIX s底 蓋。
3
Install the HDD in the cage using the
screws provided and connect the SATA
cable to the HDD.
將硬碟插入硬碟插槽並使用包裝隨附的4
顆 螺 絲 固 定 硬 碟,將 SATA線另一端連接於
硬碟連接埠。
2
Flip the boom panel and unscrew
the four screws holding the HDD
cage in place.
翻轉底蓋並鬆開固定硬碟插槽的
4顆 螺 絲。
5
Connect the SATA cable to the motherboard
and reinstall the boom panel.
安裝主機板端的SATA線,裝 回BRIX s底 蓋。
A2. mSATA SSD: How to Install the mSATA SSD
mSATA SSD: Wie Sie die mSATA SSD installieren / SSD mSATA: Comment l'installer / mSATA SSD: Cómo instalar SSD mSATA / SSD mSATA: Como instalar o SSD mSATA / mSATA SSD: Come installare un' unità mSATA SSD
Накопитель mSATA SSD: Порядок установки накопителя mSATA SSD / mSATA SSD: Jak zainstalować mSATA SSD / mSATA SSD: mSATA SSD nasıl kurulum yapılır / 如何安裝mSATA SSD / 如何安装mSATA SSD
mSATA SSD:mSATA SSDの取り付け方法 / mSATA SSD : mSATA방식 SSD을 설치하는 방법
C. BRIX s Support Addional SATA 6Gbps HDD: How to Install 2.5” HDD
BRIX s Unterstützt Zusätzliche SATA 6Gbps HDD: So installieren Sie die 2,5 "Festplae / Le BRIX s supporte un disque dur SATA 6Gbps addionel: Comment l'installer
Soporte adicional HDD 6Gbps SATA para BRIXs: Cómo instalar HDD 2.5” / BRIX s Suporte adicional para HDD SATA 6Gbps: Como instalar HDD 2.5"
BRIX Supporta un' ulteriore porta SATA 6Gbps per HardDisk: Come installare un HDD da 2,5" / BRIX допускает установку дополнительного жесткого SATA-диска (6 Гбит/с): Порядок установки 2,5-дюйм жесткого диска
BRIX wspiera dodatkowy dysk SATA 6Gbps HDD: Jak zainstalować 2.5” HDD / BRIX, extra 6Gbps HDD destekler: 2.5'' HDD nasıl kurulum yapılır / BRIX s支援額外的SATA 6Gbps硬 碟:如 何 安 裝 2.5“ HDD
BRIX s支援额外的SATA 6Gbps硬 盘 :如 何 安 装 2.5“ HDD / BRIXs SATA 6Gbp ハ ード ディス ク (HDD)増 設:2.5インチ HDDの取り付け方法 / BRIX s는 추가 SATA 6Gbps을 지원합니다. HDD : 2.5" HDD를 설치하는 방법
B. Memory Installaon: DDR3 Low Voltage (1.35v)
Arbeitsspeicher Installaon DDR3 Low Voltage (1,35 V) / Installaon de la mémoire DDR3 en basse tension (1.35v) / Instalación de la Memoria DDR3 de bajo voltaje (1.35v)
Instalação da memória DDR3 de Baixa Voltagem (1.35V) / Installazione Memoria DDR3 Low Voltage (1,35V) / Установка модулей ОЗУ DDR3 Low Voltage (1,35 В)
Instalacja pamięci DDR3 nisko napięciowych (1.35V) / Bellek Yerleşrilmesi DDR3 Düşük Voltaj (1.35v)
安裝記憶體 / 安装内存 / モリの増 設方法 DDR3L(1.35v) / 메모리 설치 DDR3 Low Voltage (1.35v)
Carefully insert SO-DIMM memory modules.
小心並由下至上安裝SO-DIMM記憶體於記
憶 體 插 槽。
1
Carefully insert SO-DIMM memory modules.
安裝下層記憶體後,重覆前述動作安裝上層
記憶體。
3
Push down unl the modules click into
place.
當 記 憶 體 固 定 於 插 槽 後,再輕輕下壓
至 定 點。
2
Push down unl the modules click into
place.
當 記 憶 體 固 定 於 插 槽 後,再輕輕下壓
至 定 點。
4
1
The upper slot is designed
for mSATA installaon.
上方的Mini PCIe插槽只提供
mSATA SSD安裝使用。
2
Carefully insert the mSATA SSD
into the slot.
小心的安裝mSATA SSD於上方
的Mini PCIe插 槽。
3
The mSATA SSD is secured in place with
a small screw in the le corner.
使用包裝隨附的螺絲固定mSATA SSD。
Note: ‘USB Power On’ funconality in Windows 8 and above requires an addional Windows patch. This is provided
on GIGABYTE’s official website labeled ‘USB Power-On Patch’. Your GIGABYTE BRIX can be powered on via a connected
USB device such as a keyboard or mouse, offering greater convenience when mounted behind a display or monitor.
注 意:在 Windows 8或以上的版本環境下需要額外的應用程式來啟動"USB Power On"功 能。你 可以 透 過 技 嘉 官 網
的產品支援與更新下載"USB Power-On Patch"來執行。USB Power On提供了方便的開機功能,使用者可以透過連接
到BRIX上的USB裝置啟動BRIX;讓 安 裝 於 顯 示 器 後 方 的 BRIX更 方便 使 用。
-
 1
1
-
 2
2


Gigabyte GB-BXI5H-5200 Manualul proprietarului
- Tip
- Manualul proprietarului
- Acest manual este potrivit și pentru
în alte limbi
- Türkçe: Gigabyte GB-BXI5H-5200 El kitabı
- français: Gigabyte GB-BXI5H-5200 Le manuel du propriétaire
- русский: Gigabyte GB-BXI5H-5200 Инструкция по применению
- English: Gigabyte GB-BXI5H-5200 Owner's manual
- Deutsch: Gigabyte GB-BXI5H-5200 Bedienungsanleitung
- 日本語: Gigabyte GB-BXI5H-5200 取扱説明書
- italiano: Gigabyte GB-BXI5H-5200 Manuale del proprietario
- español: Gigabyte GB-BXI5H-5200 El manual del propietario
- português: Gigabyte GB-BXI5H-5200 Manual do proprietário
Lucrări înrudite
Alte documente
-
Adata SU800 Ghid de instalare
-
Adata ATOM 30 KIT Manualul proprietarului
-
Lenovo ThinkPad X1 Ghidul Utilizatorului
-
Lenovo THINKPAD T520 Ghidul Utilizatorului
-
Lenovo THINKPAD L520 Ghidul Utilizatorului
-
Lenovo ThinkPad X220 Ghidul Utilizatorului
-
Lenovo ThinkPad T420i Ghidul Utilizatorului
-
Dell Latitude 6430u Manualul proprietarului
-
Genesis IRID 515 LIGHTS Ghid de instalare