
SGR-FD-C400B
Food Dehydrator
Food Dehydrator
Dörrautomat
Sušička potravin
Sušička potravín
Ételszárító
Déshydrateur alimentaire
Disidratatore di alimenti
Deshidratator de alimente
EN Translation of the operating instructions from the original language.
DE Übersetzung der Bedienungsanleitung aus der Originalsprache.
CZ Návodkpoužitívoriginálnímjazyce.
SK Prekladnávodunapoužitiezoriginálnehojazyka.
HU Ahasználatiutasításfordításaeredetinyelvről.
FR Traduction du mode d‘emploi à partir de la langue d‘origine.
IT Traduzione delle istruzioni per l‘uso dalla lingua originale.
RO Traducereainstrucțiunilordeutilizaredinlimbaoriginală.

ENGLISH 4
Safety information 4
Use 7
Tips and recommendations
for drying food 8
Cleaning and maintenance 12
Related products 12
DEUTSCH 14
Sicherheitshinweise 14
Verwendung 17
Ratschläge und tipps beim
trocknen von lebensmitteln 18
Reinigung und wartung 23
Zusammenhängende produkte 23
ČESKY 24
Bezpečnostní informace 24
Použití 26
Rady a doporučení při sušení potravin 27
Čištění a údržba 31
Související produkty 32
SLOVENSKY 33
Bezpečnostné informácie 33
Použitie 35
Rady a odporúčania
pri sušení potravín 36
Čistenie a údržba 40
Súvisiace produkty 41
MAGYAR 42
Biztonsági információk 42
Használat 45
Ajánlások és tippek az alapanyagok
szárításához 46
Tisztítás és karbantartás 50
Kapcsolódó termékek 51
FRANÇAIS 52
Informations relatives à la sécurité 52
Utilisation 55
Astuces et conseils pour
déshydrater les aliments 56
Nettoyage et entretien 61
Produits associés 61
ITALIANO 62
Informazioni di sicurezza 62
Uso 65
Consigli e raccomandazioni
per l'essiccazione degli alimenti 66
Pulizia e manutenzione 71
Prodotti correlati 71
ROMÂNĂ 72
Informații privind siguranța 72
Utilizare 75
Sfaturi și recomandări
pentru uscarea alimentelor 76
Curățare și întreținere 80
Produse asemănătoare 81

1
2
5
4
3
6 7
8
9 10

EN
EN - 4 EN - 5
Thank you for purchasing a SIGURO appliance. We are grateful for
your trust and are pleased to introduce the device to you on the
following pages and introduce you to all its functions and uses.
We believe in a fair and responsible company and therefore we only work
with suppliers who meet our strict criteria for protecting the interests of em-
ployees, preventing their abuse and provide fair working conditions.
If you need help with extensive maintenance or repair of the product, which
requires intervention in its internal parts, our authorized service is available at
the email address siguro@alza.cz, or the operators at the seller's info line. We
have unied these contact points for your convenience in solving any prob-
lems with the products and the above contacts can be used in the event of
any complaints or post-warranty service.
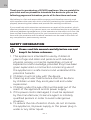
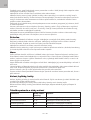
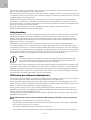
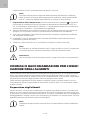
SAFETY INFORMATION
Please read this manual carefully before use and
keep it for future reference.
1. This appliance is intended for use by children 8
years of age and older and persons with reduced
physical, sensory or mental capabilities, or lack of
experience and knowledge, provided they have been
given supervision or instruction concerning use of
the appliance in a safe manner and understand the
potential hazards.
2. Children must not play with the device.
3. Cleaning and user maintenance shall not be done
by children unless they are 8 years old and under
supervision.
4. Children under the age of 8 must be kept out of the
reach of the appliance and its power supply.
5. If the power cord is damaged, it must be replaced
by the manufacturer, its service agent or similarly
qualied persons in order to avoid a dangerous
situation.
6. To reduce the risk of electric shock, do not immerse
the appliance, its power supply, or the power plug in
water or any other liquid.
ENGLISH

EN
EN - 4 EN - 5
ENGLISH
7. This appliance is intended for domestic and indoor
use. Do not use it outdoors.
8. This appliance is not intended for operation via an
external timer or remote control.
9. Clean surfaces that come into contact with food
according to the instructions in this manual.
10. Before connecting the plug to the electrical outlet, make sure that the
voltage indicated on the type plate of the appliance corresponds to the
voltage in your power outlet.
11. Plug the power cord into a properly grounded electrical outlet. We
recommend connecting the appliance to a separate electrical circuit. Do
not use extension cables.
12. Place the appliance on a at, dry, rm and heat-resistant surface. Do not
place the appliance near re or other heat sources. Place the appliance
away from heat - sensitive surfaces or objects.
13. Do not let the power cord hang over the edge of the counter or table. Do
not let the power cord touch the electric or gas plate or any hot surface.
14. Use the appliance only with the supplied accessories. The use of
accessories that are not intended for this appliance or are not specied
by the manufacturer as suitable may cause a dangerous situation.
15. Always make sure that the appliance is properly assembled before
connecting it to the power supply.
16. Do not touch the appliance or the power supply with wet or damp hands.
17. Clean the appliance after each use. Always allow the appliance to cool
completely before cleaning it.
18. Always switch off the appliance and unplug the power cord from the
mains when you are not using the appliance, if you leave it unattended,
before cleaning, moving, folding or unfolding it.
19. Do not cover the appliance while it is in operation.
20. Do not leave the appliance unattended while it is in operation.
21. Do not use the appliance continuously in operation for more than 48
hours. Allow the appliance to cool down properly after each use.
22. Improper use of the appliance can lead to injury or damage to the
appliance.
23. This appliance is only intended for drying fruit and vegetables. Do not
use it for purposes other than those for which it is intended. Follow the
instructions in this manual.
24. Always disconnect the power cord by grasping the plug, not by pulling
on the power cord.
25. Do not use the appliance if it shows any signs of damage, if the power
cord or the plug is damaged. Contact an authorized service center if
the appliance needs to be repaired, adjusted or serviced that cannot be
performed by the user.

EN
EN - 6 EN - 7

EN
EN - 6 EN - 7
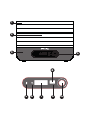
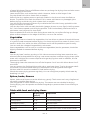
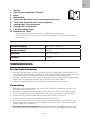
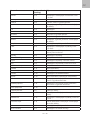
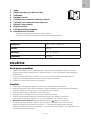
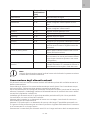
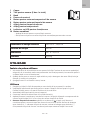
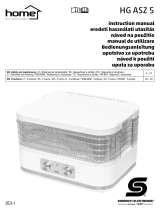
1 Lid
2 Drying trays (5 pcs total)
3 Base
4 Control panel
5 Button for setting the drying temperature
6 Button for setting the drying time
7 Drying time display
8 Temperature display
9 Operation LED indicator
10 Combined button
• Press the button to start / stop drying
• Turn the knob to set the drying time / drying temperature
Power 220–240 V~, 50/60 Hz
Power consumption 400 W
Dimensions 29 × 19 × 21.9 cm
Weight 2.156 kg
USE
Before rst use
1. Remove the appliance and its accessories from the packaging. Before disposing
of the packaging, be sure to remove all components. Check the appliance and
accessories for damage.
2. Wash the drying trays in warm water with a little kitchen detergent. Rinse with
clean water and wipe dry.
3. Wipe the base with a clean, dry sponge.
Use
1. Prepare and slice the food you want to process in the dryer.
2. Spread the food on drying trays. Leave enough space around each piece for hot air
to ow freely.
3. Assemble the trays on the base and put on the lid.
4. Plug the power cord into a power outlet.
5. Press the combination button and the dryer will switch on. The display shows a
default drying temperature of 50 °C and a default drying time of 10:00.
6. Setting the drying time: press briey the button and then turn the
combination knob to set the drying time between 00:10 and 48:50. Turning to
the right towards the "+" symbol increases the drying time; by turning to the left
towards the "-" symbol, you shorten the drying time. The dryer starts automatically
after 5 seconds.
3

EN
EN - 8 EN - 9
Note:
The drying time depends on the thickness of the sliced food, the amount
of water, the ambient temperature and the humidity in the room - see the
food table and drying times.
7. Temperature setting: press briey the button and turn the combination knob to
set the desired temperature between 35 °C and 70 °C. Turning to the right towards
the "+" symbol increases the temperature; turning to the left towards the "-" symbol
lowers the temperature.
8. While the dryer is in operation, the operation LED indicator will light up and go out.
A lit LED indicates operation of the heating element.
9. Once the drying process is complete, press the combination button to turn off the
dryer.
10. Unplug the power cord and allow the dryer to cool before using it again or before
cleaning.
11. Transfer the dried food to an airtight container and keep it dry.
Note:
We recommend that you always use all the trays, even if they are empty.
This will ensure proper operation and efcient performance of the dryer.
Warning:
Never switch on the dryer without the lid inserted properly.
TIPS AND RECOMMENDATIONS FOR DRYING
FOOD
Drying is one of the methods of food preservation, in which they are heated and
subsequently water evaporates. By gently drying, the food retains a high proportion
of vitamins, minerals and trace elements. Proper storage guarantees the use of dried
food throughout the year.
Always use high quality ingredients. Choose ripe fruits and vegetables, not overripe,
with no signs of rot, mold or damage. The meat should be lean and fresh.
Preparation of food
Some vegetables or fruits you buy in the store may have a protective wax layer or be
chemically treated. It is therefore necessary to remove such a layer from fruit or veg-
etables before processing. To do this, you can use a biodegradable cleaner or vinegar
water and then rinse the food with clean water. It is also possible to scrape the food
before drying.
Note:
Always prepare only the amount that corresponds to the capacity of the
dryer.
Fruit
Wash, dry the fruit thoroughly and remove the pits and cores. Cut into slices or pieces

EN
EN - 8 EN - 9
of equal thickness. Pieces of different sizes can prolong the drying time and also cause
uneven drying of the food.
Leave small fruits, such as berries, whole. However, halve or slice larger fruits.
Dry the sliced fruit with a clean cloth or napkin.
Some fruits (e.g. apples, pears or apricots) oxidize in the air and cause the esh to
brown. To prevent this, soak the sliced fruit in water with lemon or pineapple juice
before drying, and then dry with a clean cloth or napkin.
You will achieve interesting avors if you drizzle the fruit with honey, sprinkle it with
sugar, cinnamon or coconut.
You can dip fruits with naturally hard skin (grapes, plums, or even gs) in boiling water
for 1-2 minutes to speed up the drying process. Then immediately immerse them in
cold water, cool, dry and cut into slices.
Place unpeeled fruit with the skin facing down and the cut surface facing up. Always
place uneven shapes on the edge of the skin, not on a at surface.
Vegetables
Thoroughly clean and wash the vegetables. Cut into slices or pieces of equal thickness.
It is good to peel tomatoes before drying. Cut them and pour hot water on them. Let it
work on them for a while, the skin will loosen and it will be possible to peel it easily.
You can soak the chopped vegetables in salt water.
Some vegetables, such as root or cruciferous vegetables, berries, potatoes, should be
slightly cooked or steamed before drying.
Meat
You can dry beef, venison, poultry or sh. We recommend using lean meat that con-
tains as little fat as possible for drying. Lean meat requires a shorter drying time, while
meat with a higher fat content requires a longer drying time and in addition, the fat
shortens its shelf life.
Thoroughly clean the meat and cut off the fat parts. Cut it into thin slices about 2 to 5
mm thick.
You can season the nished slices with salt or marinate them. To give the meat a deli-
cious taste, we recommend leaving it marinated in the refrigerator overnight.
Chicken and sh must be cooked or fried before drying.
Check the meat drying process regularly. You can recognize properly dried meat by
breaking it in half.
Spices, herbs, owers
Spices, herbs and owers must be dried very gently. Their structure is very fragile and
can easily crumble after drying.
Use only petals or whole owers for drying. The stems are not suitable for drying.
During drying, turn the petals and owers regularly to prevent them from sticking to
the tray.
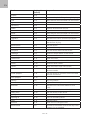
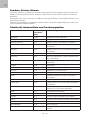
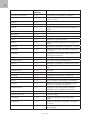
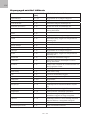
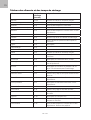
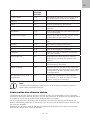
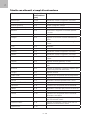
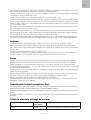
Table with food and drying times
Food Drying time
(hours)
Preparation
Apricot 13–23 Halve it and remove the pit.
Orange peel 8–16 Cut into long strips.
Pineapple (fresh) 4–8 Peel and slice.
Pineapple (canned) 4–8 Drain the juice and cut into slices.
Banana 4–8 Peel and cut into 3-4 mm thick circles.

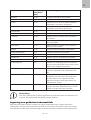
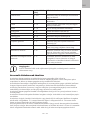
EN
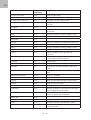
EN - 10 EN - 11
Food Drying time
(hours)
Preparation
Grapes 4–8
Cherries 4–8 Remove the pit halfway through drying.
Pear 4–8 Peel, remove the core and cut into slices.
Fig 4–8 Slice.
Cranberry 4–8
Peach 4–8 Halve it and remove the pit.
Date 4–8 Halve it and remove the pit.
Apple 4–8 Peel, remove the core and cut into slices.
Artichoke 4–8 Cut into 3-4 mm thick slices.
Eggplant 4–8 Peel and cut into 6-12 mm thick slices.
Broccoli 4–6 Cut into rosettes and steam for 3-5 min-
utes before drying.
Mushrooms 4–6 Cut into slices.
Green beans 4–6 Cook until transparent.
Pumpkin 4–6 Cut into slices about 6 mm thick.
Cabbage 4–6 Slice into strips about 3 mm thick.
Brussels sprouts 4–20 Halve
Cauliower 4–12 Cook until soft.
Potatoes 4–12 Slice and cook for about 8-10 minutes.
Onion 4–10 Slice into thin circles.
Carrot 4–10 Cook until soft. Slice into circles.
Cucumber 4–14 Peel and cut into 12 mm thick circles.
Remove seeds.
Sweet pepper 4–12 Cut into strips or circles 6 mm thick and
remove the seeds.
Chilli pepper 4–10
Parsley 2–6 Dry only leaves
Tomatoes 4–20 Peel and cut into pieces or slices.
Rhubarb 4–14 Peel and cut into slices about 3 mm
thick.
Beetroot 4–12 Cook until soft. Peel and thinly slice.
Celery root 4–10 Cut into slices 6 mm thick.
Spring onion 4–6 Cut into smaller pieces.
Asparagus 4–10 Cut into smaller pieces.
Garlic 4–12 Peel and slice.
Spinach 4–12 Cook until it changes color.
Mushrooms 2–6 Choose mushrooms where the cap curls
inward. Cut as needed.

EN
EN - 10 EN - 11
Food Drying time
(hours)
Preparation
Chicken meat, sh 2–8 Chicken and sh must be cooked or
fried before drying.
Beef or venison 2–8 Clean the meat well and cut off the
excess fat. The meat can be salted or
marinated and left to rest overnight in
the refrigerator.
Pet treats 2–6 Use fresh ingredients suitable for pets.
The size and age of the dog must be
taken into consideration.
Note:
The above drying times are for guidance only and may vary according to
current conditions.
Dried food storage
The dried food must be allowed to cool before packaging or storage.
Check food about a week after storing it. If water condenses in the container, the food
must be dried again.
We recommend using airtight containers, paper food bags, jars or packaging that is
resistant to moisture absorption for storage. Plastic or aluminum containers are not
suitable.
Pack the dried food in small quantities and place them as close to each other as possi-
ble, but do not squeeze them together.
Put herbs and spices in a glass jar with a cap. Paper bags are not suitable for storage.
Place dried owers in a wide-necked glass jar. You can drizzle them with 3-4 drops of
fragrant oil to revive the scent. Shake the contents gently and store in a cool place.
Store dried food containers in a dry, dark place at room temperature or below. Low
temperature can extend the storage time 2 to 3 times. The shelf life of dried foods can
be several years with proper storage.
Once opened, consume dried food as soon as possible.
Check the condition of the dried food regularly.
Rehydration
Rehydration is a process in which dried food is restored to its original state in terms of
size, shape and appearance. When handled properly, they retain most of their aroma
and taste, as well as minerals and a signicant amount of vitamins. Dried foods can be
restored by soaking, cooking, or a combination of both.
However, not all dried foods are suitable for rehydration.
Wash the vegetables for cooking in clean water and then put them in cold, unsalted
water and cover. Let them soak for 2-8 hours. Then cook them in the water you used to
soak them. Add more water if necessary. Bring to a boil, then reduce the heat and cook
slowly until done. You can also add salt at the end of cooking.
Note:
Drying does not rid the food of bacteria, yeasts and molds. Therefore, if
you soak dried fruits or vegetables for more than an hour, place the con-
tainer in the refrigerator.
One cup of dried fruit has a volume of about 1 1/2 cup after rehydration. Pour enough

EN
EN - 12 EN - 13
water into the container with the dried fruit so that the fruit is immersed. Let them
soak for 1-8 hours. Do not soak the fruit for too long, it may lose its aroma. If you con-
tinue to cook the fruit, cover the container and cook slowly in the water in which you
soaked the fruit.
Use of dried foods
Dried fruit is suitable for preparing snacks at home, on the road. You can add pieces of
fruit to pastries or confections.
Rehydrated fruit can be served as compotes or used to prepare fruit glazes.
You can use dried vegetables in soups, stews, prepare them as a vegetable tray or as a
dry snack.
You can add restored fruits and vegetables to various recipes for preparing breads, jelly
salads, omelettes, coffee cakes, stufngs, milk, ice cream and cooked cereals.
Crushed dried vegetables are an excellent ingredient for meat broths, soups and sauc-
es.
We recommend for optimal preservation of nutritional values:
• to keep the correct pre-cooking time;
• to package dried foods properly and store them in containers in a cool, dry and
dark place;
• to carry out regular inspections of stored food;
• to consume dried food after opening the container as soon as possible;
• when cooking rehydrated foods, use the water in which they were soaked.
CLEANING AND MAINTENANCE
Before cleaning or any maintenance, always switch off the appliance, disconnect the
plug from the power outlet and allow it to cool down completely.
Warning:
Never immerse the appliance, the power cable and plug in water or any
other liquid.
Do not use plastic or metal scrapers, harsh cleaners, chemicals, gasoline, solvents or
other similar substances to clean parts of the appliance. The surface nish could be
seriously damaged.
Wash the drying trays in warm water with a little kitchen detergent. Rinse with clean
water and wipe dry.
Wipe the base with a clean, dry sponge.
Storage
Before storing, make sure that the appliance and its accessories are cool and clean.
Store the appliance and its accessories in a dry and well-ventilated place out of the
reach of children or pets.
Do not place any objects on the appliance.
Level of protection against electric shock: II
Protection against electric shock is provided by double or reinforced insu-
lation.
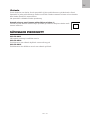
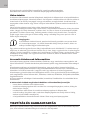
RELATED PRODUCTS

EN
EN - 12 EN - 13
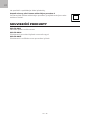
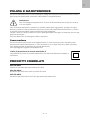
SGR-FD-X001
Spare trays for fruit dryer
SGR-FD-X004
Accessories for drying herbs and fruit puree
SGR-FD-X007
Accessories for fruit dryers for drying sticks

DE
DE - 14 DE - 15
Wir bedanken uns für den Kauf des Gerätes der Marke SIGURO.
Wir sind dankbar für Ihr Vertrauen und freuen uns, Ihnen das
Gerät auf den folgenden Seiten vorzustellen und Sie mit all seinen
Funktionen und Verwendungszwecken vertraut zu machen.
Wir glauben an ein faires und verantwortungsvolles Unternehmen und
arbeiten daher nur mit Lieferanten zusammen, die unsere strengen Kriterien
zum Schutz der Interessen der Mitarbeiter, zur Verhinderung von Missbrauch
und fairen Arbeitsbedingungen erfüllen.
Wenn Sie Hilfe bei der umfassenden Wartung oder Reparatur des Produkts
benötigen, die einen Eingriff in die Innenteile erfordert, stehen Ihnen unser
autorisierter Kundendienst unter der E-Mail-Adresse [email protected] oder die
Hotline des Verkäufers zur Verfügung. Bei der Lösung von Problemen mit
dem Produkt haben wir diese Kontaktstellen vereinheitlicht. Die oben gen-
annten Kontakte können auch bei Beschwerden oder Nachgarantieservice
genutzt werden.
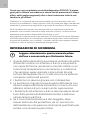
SICHERHEITSHINWEISE
Lesen Sie vor der Anwendung dieses Benutzer-
handbuch durch und bewahren Sie es für den
künftigen Gebrauch auf.
1. Dieses Gerät kann von Kindern ab 8 Jahren und von
Personen mit verminderten physischen, sensorischen
und mentalen Fähigkeiten oder mangelnden
Erfahrungen und Kenntnissen benutzt werden, sofern
sie beaufsichtigt werden oder über die Anwendung
des Verbrauchers auf eine sichere Weise belehrt
wurden und eventuelle Gefahren verstehen.
2. Kinder dürfen nicht mit dem Gerät spielen.
3. Reinigungs- und Wartungsarbeiten, die gewöhnlich
durch den Anwender vorgenommen werden, dürfen
nur Kinder durchführen, die alter als 8 Jahre sind und
beaufsichtigt werden.
4. Kinder unter 8 Jahre sind außer Reichweite des Geräts
und des Netzkabels zu halten.
5. Wenn die Stromversorgungsleitung beschädigt ist,
muss sie durch den Hersteller, seinen Servicetechniker
DEUTSCH

DE
DE - 14 DE - 15
DEUTSCH
oder eine ähnlich qualizierte Person ersetzt werden,
um eine gefährliche Situation zu vermeiden.
6. Um ein Stromschlagrisiko zu vermeiden, dürfen Sie
das Gerät, das Netzkabel oder den Netzstecker nicht in
Wasser oder andere Flüssigkeiten tauchen.
7. Dieses Gerät ist ausschließlich für den Gebrauch im
Haushalt und innerhalb von Gebäuden vorgesehen.
Verwenden Sie es nicht im Freien.
8. Das Gerät ist nicht für den Betrieb über eine externe
Zeitschaltuhr oder eine Fernbedienung vorgesehen.
9. Reinigen Sie die Oberächen, die mit der Speise
in Berührung kommen, gemäß den in diesem
Benutzehandbuch angeführten Anweisungen.
10. Vergewissern Sie sich vor dem Einstecken des Netzsteckers in die
Steckdose, dass die auf dem Typenschild des Geräts angegebene
Spannung mit der Spannung Ihrer Steckdose übereinstimmt.
11. Stecken Sie den Netzstecker in eine ordnungsgemäß geerdete
Steckdose. Wir empfehlen, das Gerät an einen separaten Stromkreis
anzuschließen. Verwenden Sie keine Verlängerungskabel.
12. Stellen Sie das Gerät auf eine ebene, trockene und hitzebeständige
Oberäche. Stellen Sie das Gerät nicht in der Nähe von Feuer oder
anderen Wärmequellen auf. Stellen Sie das Gerät weit entfernt von
hitzeempndlichen Oberächen oder Gegenständen auf.
13. Lassen Sie das Netzkabel nicht über die Kante einer Arbeitsplatte
oder eines Tisches hängen. Vermeiden Sie, dass das Netzkabel nicht
mit einem Elektro- oder Gaskochfeld oder einer heißen Oberäche in
Berührung kommt.
14. Verwenden Sie das Gerät nur mit dem mitgelieferten Zubehör. Die
Verwendung von Zubehör, das nicht für dieses Gerät bestimmt ist oder
vom Hersteller nicht als geeignet angegeben wurde, kann zu einer
gefährlichen Situation führen.
15. Bevor Sie das Gerät an das Stromnetz anschließen, vergewissern Sie sich
immer, dass es richtig zusammengebaut ist.
16. Berühren Sie das Gerät oder das Netzteil nicht mit nassen oder feuchten
Händen.
17. Reinigen Sie das Gerät nach jedem Gebrauch. Lassen Sie das Gerät
immer vollständig abkühlen, bevor Sie es reinigen.
18. Schalten Sie das Gerät aus und ziehen Sie den Netzstecker aus
der Steckdose, wenn Sie das Gerät nicht benutzen, wenn es
unbeaufsichtigt bleibt, bevor Sie es reinigen, umstellen, zusammen- oder
auseinanderlegen.
19. Decken Sie das Gerät nicht ab, während es in Betrieb ist.
20. Lassen Sie das Gerät nicht unbeaufsichtigt, während es in Betrieb ist.
21. Verwenden Sie das Gerät nicht länger als 48 Stunden im Dauerbetrieb.

DE
DE - 16 DE - 17
Lassen Sie das Gerät nach jedem Gebrauch gut abkühlen.
22. Eine unsachgemäße Verwendung des Geräts kann zu Verletzungen oder
Beschädigungen des Geräts führen.
23. Dieses Gerät ist nur zum Trocknen von Obst und Gemüse vorgesehen.
Verwenden Sie es nicht für andere Zwecke als die, für die es bestimmt ist.
Befolgen Sie die Anweisungen in dieser Gebrauchsanweisung.
24. Ziehen Sie das Netzkabel immer am Stecker aus der Steckdose, nicht am
Netzkabel.
25. Verwenden Sie das Gerät nicht, wenn es Anzeichen von Beschädigungen
aufweist oder wenn das Netzkabel oder der Stecker beschädigt ist.
Wenden Sie sich an eine autorisierte Kundendienststelle, wenn das Gerät
auf repariert, eingestellt oder gewartet werden muss, was der Benutzer
nicht selbst durchführen kann.

DE
DE - 16 DE - 17
1 Deckel
2 Dörrfächer (insgesamt 5 Stück)
3 Basis
4 Bedienfeld
5 Taste zum Einstellen der Trocknungstemperatur
6 Taste zum Einstellen der Trocknungszeit
7 Anzeige der Trocknungszeit
8 Anzeige der Temperatur
9 LED-Betriebsanzeige
10 Kombinierte Taste
• Drücken Sie die Taste zum Starten / Stoppen der Trocknung
• Drehen Sie den Drehknopf, um die Trocknungszeit / Trocknungstemperatur
einzustellen
Stromversorgung 220–240 V~, 50/60 Hz
Stromverbrauch 400 W
Ausmaße 29 × 19 × 21,9 cm
Gewicht 2,156 kg
VERWENDUNG
Vor der Erstverwendung
1. Nehmen Sie das Gerät und sein Zubehör aus der Verpackung. Vergewissern Sie
sich, dass alle Komponenten entfernt wurden, bevor Sie die Verpackung entsorgen.
Vergewissern Sie sich, dass weder Gerät noch Zubehör beschädigt sind.
2. Waschen Sie die Dörrfächer in warmem Wasser und ein wenig Geschirrspülmittel.
Spülen Sie sie mit klarem Wasser ab und wischen Sie sie trocken.
3. Wischen Sie die Basis mit einem sauberen, trockenen Schwamm ab.
Verwendung
1. Bereiten Sie die Lebensmittel vor, die Sie im Dörrgerät verarbeiten wollen, und
schneiden Sie sie in Stücke.
2. Verteilen Sie die Lebensmittel auf den Dörrfächern. Lassen Sie um jedes Stück
herum genügend Freiraum, damit die heiße Luft ungehindert strömen kann.
3. Stapeln Sie die Fächer auf die Basis und setzen Sie den Deckel auf.
4. Stecken Sie den Stecker des Netzkabels in die Steckdose.
5. Drücken Sie die kombinierte Taste, um den Dörrautomaten einzuschalten. Das
Display zeigt die Standard-Trocknungstemperatur von 50 °C und die Standard-
Trocknungszeit von 10:00 an.
6. Einstellung der Trocknungszeit: drücken Sie kurz die Taste und drehen Sie
dann die kombinierte Taste, um die Trockenzeit von 00:10 bis 48:50 einzustellen.
3

DE
DE - 18 DE - 19
Drehen Sie nach rechts auf das Symbol „+“, um die Trocknungszeit zu erhöhen;
drehen Sie nach links auf das Symbol „-“, um die Trocknungszeit zu verringern.
Nach 5 Sekunden startet der Dörrautomat automatisch.
Bemerkung:
Die Trocknungszeit hängt von der Dicke der Lebensmittelscheiben, der
Wassermenge, der Umgebungstemperatur und der Luftfeuchtigkeit im
Raum ab – siehe die Tabelle der Lebensmittel und Trocknungszeiten.
7. Temperatureinstellung: drücken Sie kurz die Taste und drehen Sie dann die
kombinierte Taste, um die gewünschte Temperatur in einem Bereich von 35 °C
bis 70 °C einzustellen. Drehen Sie nach rechts in Richtung des Symbols „+“, um die
Temperatur zu erhöhen; drehen Sie nach links in Richtung des Symbols „-“, um die
Temperatur zu senken.
8. Während der Dörrautomat in Betrieb ist, schaltet sich die LED-Anzeige ein und aus.
Die leuchtende LED-Anzeige zeigt den Betrieb des Heizkörpers an.
9. Wenn der Trocknungsvorgang abgeschlossen ist, drücken Sie die kombinierte
Taste, um den Dörrautomaten auszuschalten.
10. Ziehen Sie den Netzstecker und lassen Sie den Dörrautomat abkühlen, bevor Sie
ihn wieder benutzen oder reinigen.
11. Geben Sie die getrockneten Lebensmittel in einen luftdichten Behälter und
bewahren Sie die auf einem trockenen Ort auf.
Bemerkung:
Wir empfehlen Ihnen, immer alle Dörrfächer zu verwenden, auch wenn
sie leer sind. Dadurch wird der ordnungsgemäße Betrieb und die efzien-
te Leistung des Dörrautomaten sichergestellt.
Warnung:
Schalten Sie den Dörrautomat niemals ohne aufgesetzten Deckel ein.
RATSCHLÄGE UND TIPPS BEIM TROCKNEN
VON LEBENSMITTELN
Das Trocknen ist eine der Methoden zur Konservierung von Lebensmitteln, bei dem
die Lebensmittel erhitzt werden und das Wasser anschließend verdampft. Durch
die schonende Trocknung bleibt ein hoher Anteil an Vitaminen, Mineralstoffen und
Spurenelementen im Lebensmittel erhalten. Die richtige Lagerung sorgt dafür, dass
getrocknete Lebensmittel das ganze Jahr über konsumiert werden können.
Verwenden Sie stets hochwertige Lebensmittel. Wählen Sie reifes, nicht überreifes
Obst und Gemüse, das keine Anzeichen von Fäulnis, Schimmel oder Beschädigungen
aufweist. Das Fleisch sollte mager und frisch sein.
Zubereitung von Zutaten
Einige Gemüse- und Obstsorten, die Sie im Laden kaufen, können eine schützende
Wachsbeschichtung haben oder chemisch behandelt sein. Es ist daher notwendig,
diese Schicht vor der Verarbeitung von der Frucht oder dem Gemüse zu entfernen.
Sie können einen biologisch abbaubaren Reiniger oder Essigwasser verwenden und
die Lebensmittel anschließend mit klarem Wasser abspülen. Es ist auch möglich, die
Lebensmittel vor dem Trocknen abzuschaben.

DE
DE - 18 DE - 19
Bemerkung:
Bereiten Sie immer nur die Menge zu, die der Kapazität des Dörrautoma-
ten entspricht.
Obst
Waschen Sie das Obst gründlich, trocknen Sie es und entkernen Sie es. Schneiden
Sie es in gleich dicke Scheiben oder Stücke. Unterschiedlich große Stücke können
die Trocknungszeit verlängern und auch zu einer ungleichmäßigen Trocknung der
Lebensmittel führen.
Kleine Früchte, wie z.B. Beeren, sollten ganz gelassen werden. Größere Früchte sollten
jedoch halbiert oder in Scheiben oder Würfel geschnitten werden.
Trocknen Sie die geschnittenen Früchte mit einem sauberen Tuch oder einer Serviette
ab.
Einige Früchte (z. B. Äpfel, Birnen oder Aprikosen) oxidieren an der Luft, wodurch sich
das Fruchteisch braun färben kann. Um dies zu vermeiden, geben Sie die geschnitte-
nen Früchte vor dem Trocknen in Wasser mit Zitronen- oder Ananassaft und trocknen
Sie sie dann mit einem sauberen Tuch oder einer Serviette ab.
Für einen interessanten Geschmack können Sie die Früchte mit Honig betropfen und
mit Zucker, Zimt oder Kokosnuss bestreuen.
Obst mit harter Schale (Weintrauben, Paumen oder Feigen) kann 1-2 Minuten in
kochendem Wasser eingeweicht werden, wodurch das Trocknen beschleunigt wird.
Dann sollte es sofort in kaltes Wasser getaucht, abgekühlt, getrocknet und in Schei-
ben geschnitten werden.
Legen Sie ungeschältes Obst mit der Schale nach unten und der Schnittäche nach
oben. Legen Sie unebene Formen immer auf die Kante mit der Schale, nicht auf die
ebene Fläche.
Gemüse
Gemüse sollte gründlich gereinigt und gewaschen werden. Schneiden Sie es in gleich
dicke Scheiben oder Stücke.
Tomaten sollten vor dem Trocknen geschält werden. Schneiden Sie sie auf und über-
gießen Sie sie mit heißem Wasser. Lassen Sie das Wasser eine Weile wirken. Danach
löst sich die Schale und die Tomaten können gut geschält werden.
Geschnittenes Gemüse kann in salziges Wasser eingeweicht werden.
Einige Gemüsesorten, z.B. Wurzel- oder Kreuzblütlergemüse, Beeren, Kartoffeln, soll-
ten vor dem Trocknen leicht gekocht oder gedämpft werden.
Fleisch
Sie können Rindeisch, Wildeisch, Geügel oder Fisch trocknen. Wir empfehlen, zum
Trocknen mageres Fleisch zu verwenden, das möglichst wenig Fett enthält. Mageres
Fleisch benötigt eine kürzere Trocknungszeit, während Fleisch mit einem höheren
Fettgehalt eine längere Trocknungszeit benötigt. Darüber hinaus verkürzt das Fett die
Haltbarkeit.
Reinigen Sie das Fleisch gründlich und schneiden Sie die fettigen Teile ab. Schneiden
Sie das Fleisch in 2 bis 5 mm dicke Scheiben.
Sie können die fertigen Scheiben mit Salz oder Marinade würzen. Um dem Fleisch ei-
nen köstlichen Geschmack zu verleihen, empfehlen wir, es über Nacht im Kühlschrank
zu marinieren.
Hähnchen und Fisch müssen vor dem Trocknen gekocht oder gebraten werden.
Kontrollieren Sie regelmäßig den Trocknungsprozess des Fleisches. Ob das Fleisch
richtig getrocknet ist, erkennen Sie daran, dass Sie es in zwei Hälften bricht.

DE
DE - 20 DE - 21
Gewürze, Kräuter, Blumen
Gewürze, Kräuter und Blumen müssen besonders schonend getrocknet werden. Sie
haben eine sehr zerbrechliche Struktur und könnten nach dem Trocknen leicht zer-
bröckeln.
Verwenden Sie zum Trocknen nur Blätter oder ganze Blüten. Die Stängel sollten nicht
getrocknet werden.
Drehen Sie die Blätter und Blüten während des Trocknens regelmäßig um, damit sie
nicht am Blech kleben bleiben.
Tabelle mit Lebensmitteln und Trocknungszeiten
Lebensmittel Trocknungs-
zeit (Stun-
den)
Vorbereitung
Aprikose 13–23 Halbieren und entkernen
Orangenschale 8–16 In lange Streifen schneiden.
Ananas (frisch) 4–8 Schälen und in Scheiben schneiden.
Ananas (konserviert) 4–8 Den Saft abgießen und in Scheiben
schneiden.
Banane 4–8 Schälen und in 3–4 mm dicke Scheiben
schneiden.
Trauben 4–8
Kirschen 4–8 Nach der Hälfte der Trocknungszeit den
Stein entfernen.
Birne 4–8 Schälen, entkernen und in Scheiben
schneiden.
Feigen 4–8 Schneiden.
Preiselbeere 4–8
Prsich 4–8 Halbieren und entkernen
Datteln 4–8 Halbieren und entkernen
Apfel 4–8 Schälen, entkernen und in Scheiben
schneiden.
Artischocke 4–8 In 3–4 mm dicke Scheiben schneiden.
Aubergine 4–8 Schälen und in 6–12 mm dicke Scheiben
schneiden.
Brokkoli 4–6 In Röschen schneiden und vor dem
Trocknen 3–5 Minuten dämpfen.
Pilze 4–6 In Scheiben schneiden.
Grüne Bohnen 4–6 Kochen, bis sie klar sind.
Kürbis 4–6 In 6 mm dicke Scheiben schneiden.
Kraut 4–6 In etwa 3 mm dicke Scheiben schneiden.
Rosenkohl 4–20 Halbieren.
Blumenkohl 4–12 Weich kochen.
Kartoffeln 4–12 Schneiden und etwa 8–10 Minuten
kochen.
Pagina se încarcă...
Pagina se încarcă...
Pagina se încarcă...
Pagina se încarcă...
Pagina se încarcă...
Pagina se încarcă...
Pagina se încarcă...
Pagina se încarcă...
Pagina se încarcă...
Pagina se încarcă...
Pagina se încarcă...
Pagina se încarcă...
Pagina se încarcă...
Pagina se încarcă...
Pagina se încarcă...
Pagina se încarcă...
Pagina se încarcă...
Pagina se încarcă...
Pagina se încarcă...
Pagina se încarcă...
Pagina se încarcă...
Pagina se încarcă...
Pagina se încarcă...
Pagina se încarcă...
Pagina se încarcă...
Pagina se încarcă...
Pagina se încarcă...
Pagina se încarcă...
Pagina se încarcă...
Pagina se încarcă...
Pagina se încarcă...
Pagina se încarcă...
Pagina se încarcă...
Pagina se încarcă...
Pagina se încarcă...
Pagina se încarcă...
Pagina se încarcă...
Pagina se încarcă...
Pagina se încarcă...
Pagina se încarcă...
Pagina se încarcă...
Pagina se încarcă...
Pagina se încarcă...
Pagina se încarcă...
Pagina se încarcă...
Pagina se încarcă...
Pagina se încarcă...
Pagina se încarcă...
Pagina se încarcă...
Pagina se încarcă...
Pagina se încarcă...
Pagina se încarcă...
Pagina se încarcă...
Pagina se încarcă...
Pagina se încarcă...
Pagina se încarcă...
Pagina se încarcă...
Pagina se încarcă...
Pagina se încarcă...
Pagina se încarcă...
Pagina se încarcă...
Pagina se încarcă...
Pagina se încarcă...
Pagina se încarcă...
-
 1
1
-
 2
2
-
 3
3
-
 4
4
-
 5
5
-
 6
6
-
 7
7
-
 8
8
-
 9
9
-
 10
10
-
 11
11
-
 12
12
-
 13
13
-
 14
14
-
 15
15
-
 16
16
-
 17
17
-
 18
18
-
 19
19
-
 20
20
-
 21
21
-
 22
22
-
 23
23
-
 24
24
-
 25
25
-
 26
26
-
 27
27
-
 28
28
-
 29
29
-
 30
30
-
 31
31
-
 32
32
-
 33
33
-
 34
34
-
 35
35
-
 36
36
-
 37
37
-
 38
38
-
 39
39
-
 40
40
-
 41
41
-
 42
42
-
 43
43
-
 44
44
-
 45
45
-
 46
46
-
 47
47
-
 48
48
-
 49
49
-
 50
50
-
 51
51
-
 52
52
-
 53
53
-
 54
54
-
 55
55
-
 56
56
-
 57
57
-
 58
58
-
 59
59
-
 60
60
-
 61
61
-
 62
62
-
 63
63
-
 64
64
-
 65
65
-
 66
66
-
 67
67
-
 68
68
-
 69
69
-
 70
70
-
 71
71
-
 72
72
-
 73
73
-
 74
74
-
 75
75
-
 76
76
-
 77
77
-
 78
78
-
 79
79
-
 80
80
-
 81
81
-
 82
82
-
 83
83
-
 84
84


în alte limbi
- français: SIGURO SGR-FD-C400B Manuel utilisateur
- slovenčina: SIGURO SGR-FD-C400B Používateľská príručka
- Deutsch: SIGURO SGR-FD-C400B Benutzerhandbuch
- italiano: SIGURO SGR-FD-C400B Manuale utente
Lucrări înrudite

Alte documente
-
home HM-FD-C280W Manual de utilizare
-
 Somogyi Elektronic HG ASZ 5 Manualul proprietarului
-
Maestro MR 765 Manualul proprietarului
-
BROWIN 801008 Manualul proprietarului
-
Oursson DH3501D/RD Manual de utilizare
-
Teesa TSA3031 Manualul proprietarului
-
Scarlett sc-fd421t19 Instrucțiuni de utilizare
-
Scarlett SC-FD 421004 Manual de utilizare
-
Clatronic DR 2751 Manualul proprietarului
-
Scarlett sc-421 Instrucțiuni de utilizare
