Kinderkraft FreeWay Manual de utilizare
- Categorie
- Jucării
- Tip
- Manual de utilizare

MODEL: FREEWAY V. 1.2
CZ TROJKOLKA
DE FAHRRADS
EN TRICYCLE
ES BICICLETA
FR TRICYCLE
HU GYEREK BICIKLI
IT TRICICLO
NL FIETSJE
PL ROWEREK
PT BICICLETA
RO BICICLETĂ
RU ДЕТСКИЙ ВЕЛОСИПЕД
SK TROJKOLKA
CZ NÁVOD K OBSLUZE
DE BEDIENUNGSANLEITUNG
EN USER MANUAL
ES MANUAL DE USUARIO
FR GUIDE D’UTILISATION
HU HASZNÁLATI UTASÍTÁS
IT ISTRUZIONI PER UTENTE
NL GEBRUIKSAANWIJZING
PL INSTRUKCJA OBSŁUGI
PT MANUAL DE INSTRUÇÕES
RO MANUAL DE UTILIZARE
RU РУКОВОДСТВО ПО ЭКСПЛУАТАЦИИ
SK NÁVOD NA POUŽITIE


CZ.......................................................................................................... 12
DE ......................................................................................................... 14
EN ......................................................................................................... 16
ES .......................................................................................................... 19
FR ......................................................................................................... 21
HU ........................................................................................................ 24
IT .......................................................................................................... 26
NL ......................................................................................................... 29
PL .......................................................................................................... 31
PT ......................................................................................................... 33
RO ......................................................................................................... 35
RU ......................................................................................................... 37
SK ......................................................................................................... 40

4
A
B
C
D
E
F
G
H

5
I
J
K
L
M
N
O
P

6
Q
R
T
U
V
W
X

7
Y
Z
A’
B’
C’
D’

8
1
2
3
3A

9
4
5
5A
6
7

10
8
9
10
11
12

11
13
14
15
16

12
Vážený zákazníku!
Děkujeme za zakoupení výrobku značky Kinderkraft.
Tvoříme výrobky pro vaše dítě dbáme vždy na bezpečnost a kvalitu a zajišťujeme tak pohodlí toho nejlepšího výběru.
DŮLEŽITÉ! POKYNY SI POZORNĚ PŘEČTĚTE A
USCHOVEJTE PRO POZDĚJŠÍ POUŽITÍ.
UPOZORNĚNÍ TÝKAJÍCÍ SE BEZPEČNOSTI A BEZPEČNOSTNÍCH
OPATŘENÍ
UPOZORNĚNÍ!:
• Dodržování návodu zajišťuje bezpečné používání hračky. Přečtěte si pozorně návod před zahájením používání
odražedla a uchovejte jej pro pozdější použití. Určeno pro děti ve věku od 9 měsíců.
• Používejte osobní ochranné prostředky, tj. přílbu, rukavice, chrániče loktů a kolen. Výrobek je určen pro venkovní
použití. Nepoužívejte v silničním provozu. Odražedlo nepoužívejte v blízkosti motorových vozidel, ulice, bazénu, kopců,
cest, schodů, svahů.
• Hráčku používejte na rovných površích bez překážek.
• Aby nedošlo k vážnému zranění, vyžaduje se stálý dohled dospělé osoby.
• Aby se předešlo pádům a srážkám způsobujícím zranění uživatele nebo třetích stran, by rodiče/pečovatelé měly
upozornit děti na dodržování bezpečnostních opatření. Před zahájením používání vysvětlete dětem, jak bezpečně
používat výrobek.
• Pří používání výrobku vždy noste obuv
• Montáž musí vždy provádět dospělý. Před každým použitím zkontrolujte, zda výrobek není poškozený a zda nemá
známky opotřebení, zkontrolujte zda jsou všechny spojovací a upevňovací prvky dobře přizpůsobeny. Ujistěte se, zda
zachovávají šrouby a matice své samouzavírací vlastnosti. Zkontrolujte, zda je sada kompletní a bez poškození. Pokud
zjistíte, že částí chybí nebo jsou poškozené, nepoužívejte výrobek, ale kontaktujte prodejce.
• Při používání hraček na ježdění buďte opatrní, požadované jsou řidičské achopnosti, aby nedošlo k pádu nebo srážce,
které mohou způsobit zranění uživatele nebo třetí strany.
• Nejbezpečnější oblasti pro jízdu na odražedle, jsou oblasti s omezenou nebo vypnutou automobilovou dopravou jako:
soukromé oblasti, hřiště, školní hřiště, rekreační oblastí.
• Tento výrobek je určen pro jednoho uživatele s maximální hmotností 25 kg.
• Balení uschovejte nebo zlikvidujte v souladu s místnými předpisy.
• Pro bezpečnost dětí nenechávejte volně přístupné části balení (plastové sáčky, kartony, atp.). Nebezpečí udušení!
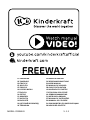
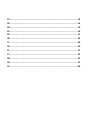
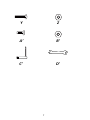
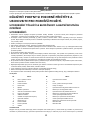
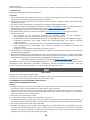
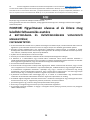
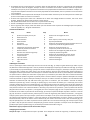
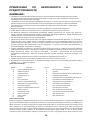
I Prvky kola
Díl
Název
Díl
Název
A
Rám s opěrkou nohou
P
Upevňovací šroub koše
B
Zadní kola x2
Q
Koš
C
Przedni widelec
R
Horní, spodní část úchytu rodiče
D
Přední kolo
T
Úchyt na nápoje
E
Blatník
U
Upevňovací šrouby přední vidlice 25 mm x2
F
Řidítka s potahem
V
Matice pro šrouby přední vidlice
G
Zvonek s montážním šroubem
W
Upevňovací šrouby sedátka 40 mm x2
H
Kryt šroubu řidítek
X
Matice pro upevňovací šrouby sedátka x4
A
Základna sedátka
Y
Šroub upevňující řidítka 25 mm
J
Sedátko s bezpečnostními pásy
Z
Matice pro upevňovací šroub řidítek
K
Opěradlo sedátka
A’
Šroub upevňující sedátko 10 mm
L
Boční kryty x2
B’
Matice pro upevňovací šroub opěradla
M
Potah sedátka
C’
Montážní klíč
N
Potah opěradla
D’
Montážní klíč
O
Stříška
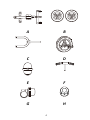
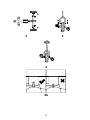
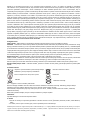
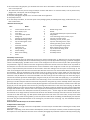
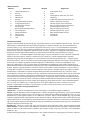
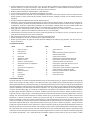
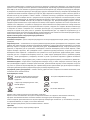
II Instalace kola
Připojte rám (A) k zadním kolům (B), dokud neuslyšíte zvuk zámku (obr. 1). Přední vidlici (C) nasaďte na plastové trny
umístěné na předním kole (D), upevněte upevňovacími šrouby (U) a maticemi (V) na obou stranách (obr. 2). Nasaďte

13
blatník (E) na obdržený prvek (obr. 3). Po provedení kroku popsaného na obr. 3 se ujistěte, že blatník je maximálně
našroubován na trn předního kola tak, aby nevznikla mezera. Obrázek 3A zobrazuje správnou instalaci blatníku, věnujte
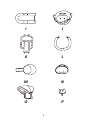
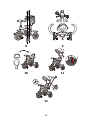
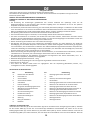
pozornost výčnělkům označených v kruhu umístěným na dříku! Umístěte přední kolo v rámu a kontrolujte, aby se
nevytvořily volné prvky (obr. 4). Zářez na blatníku by měl být umístěn na přední straně kola. Nasaďte kryt šroubu na řidítka.
Dalším krokem je instalace řídítek. Umístěte upevňovací šroub spolu s maticí, jak je zobrazeno na obrázku 5. Pozor!
Ujistěte se, že otvory umístěné v trnu řídítek a na předním kole jsou správně nainstalovány (obr. 5A). Mezi jednotlivými
prvky by neměla vzniknout mezera, poněvadž to má vliv na řízení. Pomocí šroubu (P) umístěte koš (Q) na rám (obr. 6).
Základnu sedátka (I) a opěradlo (K)sešroubujte (A') a zajistěte maticí (B') (obr. 7). Je možné nasadit základnu sedačky (I) na
jeden ze dvou otvorů na opěradle (K), blíže k zadnímu opěradlu a dále od bočních krytů (L) nebo dále od e opěradla a blíž
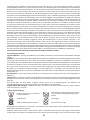
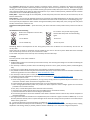
od zadního bočních krytů (L). Obdržený prvek a sedátko (J) upevněte na rám pomocí šroubů - vložte šrouby sedátka (V)
otvorem v základně a rámu a poté zajistěte maticemi (X) (obr. 8). K opěradlu připevněte boční kryty (L) tak, že je umístíte
do trubek na zadní straně sedátka (obr. 9). Na sedátko a opěradlo nasaďte látkový potah (M + N) (obr. 10). Po natažení
potahu sedátka nejprve přetáhněte bezpečnostní pásy otvory po stranách, poté nasaďte horní část krytu a natáhněte jeho
spodní část. Zkontrolujte, aby pásy nebyly zkroucené. Bezpečnostní pásy jsou připevněny ve výrobně - v pozdější fázi
vývoje dítěte, kdy pásy již nejsou potřeba, je musíte odšroubovat ze sedátka. Zasuňte stříšku (O) do otvorů v zadní části
opěradla a zajistěte páčkami (obr. 11). Zasuňte rodičovského držáku (R) do otvoru v zadní části rámu, dokud neuslyšíte
zvuk zámku (obr. 12). Nasaďte držák nápojů (T) na rodičovský držák. Při montáži zvonku (G) je nutné nejprve vyšroubovat
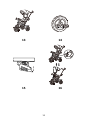
šroub a položit základnu zvonku na řidítkách a poté zašroubovat šroub (obr. 12). Připravené kolo je zobrazeno na obr. 13.
Drobné elementy je nutné udržovat mimo dosah dětí.
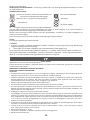
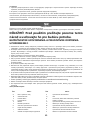
III Regulace kola:
Poloha stříšky - délka stříšky je regulovatelná. Rozepnutím bezpečnostní spony lze stříšku prodloužit
Podnožka - v závislosti na úrovni rozvoje dítěte lze podnožku rozložit nebo složit, aby mohlo dítě samo pohánět kolo. Vždy,
když je podnožka rozložena, je nutné spouštět blokádu pedálů v předním kole (červená páčka) (obr. 14). POZOR! Kdykoli
je nainstalována rodičovská rukojeť a opěrka nohou je rozvinutá, odpojte zámek kola tak, aby se pedály volně otáčely bez
rozpohybování kola (vypnutý pohon). Bez odpojení blokády můžete dojít k rozdrcení nebo zranění nohou! Po demontáži
rodičovské rukojeti sklopte opěrku nohou a připojte zámek kola tak, aby pedály rozpohybovaly kolo (pohon spuštěný).
Pro rozbalení/sklopení musíte zatáhnout páku a poté nastavit podpěry nohou do pohodlné polohy (obr. 15).
Bezpečnostní pásy - přizpůsobte délku, aby pevně držely dítě a neblokovaly jeho pohyby.
Poloha sedátka - sedátko lze nastavit dopředu a dozadu a otáčet proti směru jízdy. Chcete-li tuto akci provést, odemkněte
sedátko červeným tlačítkem umístěným v dolní části a otáčejte jej, dokud neuslyšíte zvuk zámku (obr. 16).
Kolo lze upravit pro starší děti odstraněním střechy, bočních krytů a rodičovského držadla a sklopením opěrky nohou.
Regulace délky úchytu rodiče – stiskněte tlačítko, posuňte a zasuňte do nižší polohy, pokud byla předchozí poloha příliš
vysoká.
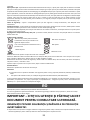
IV Údržba a čištění
Neperte. Výrobek můžete opatrně omýt vlhkým
hadříkem a jemným mycím prostředkem.
Nesušte v bubnové sušičce
Perte na teplotě max. 30°C, šetrné praní
Nežehlete
Nebělte
Nečistěte chemicky
Batoh: Vyjměte z rámu a očistěte podle štítku.
Střecha: Nemyjte. Nebělte. Nesušte v bubnové sušičce. Nežehlete. Nečistěte chemicky. Očistěte jej čistým vlhkým
hadříkem a jemným mýdlem. Nechte uschnout na vzduchu. Neponořujte do vody.
Potah sedadel, bezpečnostní popruhy: Ruční praní při max. 40 °C, nebělte, nesušte v bubnové sušičce, nežehlete,
nečistěte chemicky.
Rám: Rám vyčistěte měkkým, čistým a vlhkým hadříkem a jemným mýdlem
Uskladnění
Výrobek skladujte na místě nedostupném dětem.
V. Záruka
1. Záruka se vztahuje na produkty prodávané v těchto zemích: Francie, Španělsko, Německo, Polsko, Velká Británie,
Itálie.
2. V zemích, které nejsou uvedeny výše, záruční podmínky stanoví Prodávající.
Veškerá práva k tomuto vypracování patří v celku 4Kraft Sp. z o.o. Jejich jakékoli neoprávněné použití, které je v rozporu
s jejich určením, zejména: používání, kopírování, množení, sdílení - zejména nebo v části bez souhlasu 4Kraft Sp. z o.o.
může mít za následek následky právní povahy.

14
Sehr geehrte Kunde!
Vielen Dank, dass Sie sich für ein Kinderkraft-Produkt entschieden haben.
Wir schaffen mit dem Gedanken an Ihr Kind - wir achten immer auf Sicherheit und Qualität und sorgen so für den
Komfort der besten Wahl.
WICHTIG: FÜR DEN SPÄTEREN GEBRAUCH AUFBEWAHREN.
HINWEISE ZU SICHERHEITS- UND VORSICHTSMASSNAHMEN
Achtung:
• Die Beachtung der Anweisungen gewährleistet den sicheren Gebrauch des Spielzeugs. Lesen Sie die
Bedienungsanleitung vor der Benutzung des Fahrrades sorgfältig durch und bewahren Sie sie für den späteren
Empfohlen für Kinder im Alter ab 9 Monaten
• Verwenden Sie persönliche Schutzausrüstung, d.h. Fahrradhelm, Handschuhe, Ellbogen- und Knieschoner. Das Produkt
ist für den Gebrauch an der frischen Luft bestimmt. Nicht im Straßenverkehr benutzen. Das Laufrad sollte nicht in der
Nähe von Kraftfahrzeugen, Straße, Schwimmbad, Hügeln, Wegen, Treppen und Hängen verwendet werden.
• Das Spielzeug sollte auf ebenen und hindernisfreien Flächen verwendet werden.
• Um ernsthafte Verletzungen zu vermeiden, ist eine ständige Aufsicht durch Erwachsene erforderlich.
• Um Stürze und Kollisionen zu vermeiden, die den Benutzer oder Dritte verletzen, sollten Eltern ihre Kinder auf die
Beachtung der Vorsichtsmaßnahmen aufmerksam machen. Vor dem Verwendungsbeginn des Produktes soll man den
Kindern erklären, worauf die sichere Nutzung des Produktes beruht.
• Bei der Verwendung des Produktes muss man immer Schuhe tragen.
• Die Montage soll immer durch einen Erwachsenen durchgeführt werden. Vor jedem Gebrauch den Artikel auf
Beschädigung und Verschleiß überprüfen und kontrollieren, ob alle Verbindungsteile und Verschlüsse gut angepasst
sind. Sicherstellen, dass die Schrauben und Muttern ihre selbstschließenden Eigenschaften behalten. Überprüfen Sie,
ob der Satz vollständig und unbeschädigt ist. Wenn Sie feststellen, dass Teile fehlen oder beschädigt sind, verwenden
Sie das Produkt nicht, sondern wenden Sie sich an den Verkäufer.
• Bei der Verwendung des Fahrspielzeuges soll man Vorsicht bewahren, es sind Fahrkenntnisse erforderlich, um Stürze
oder Kollisionen zu vermeiden, die zu Verletzungen des Benutzers oder von Dritten führen können.
• Die sichersten Bereiche für das Radfahren sind Bereiche mit begrenztem oder keinem Autoverkehr, wie z. B. :
Privatbereiche, Spielplätze, Schulhöfe, Erholungsgebiete.
• Maximales Körpergewicht des Nutzers - 25 kg
• Bewahren Sie die Verpackung auf oder entsorgen Sie sie gemäß den örtlichen Vorschriften.
• Halten Sie ihn von Feuer fem
• Zum Schutz von Kindern dürfen keine frei zugänglichen Teile der Verpackung (Plastiktüten, Kartons, etc.)
zurückgelassen werden. Erstickungsgefahr!
I Bestandteile des Kinderfahrrades
Teil
Bezeichnung
Teil
Bezeichnung
A
Rahmen mit der Fußstütze
P
Befestigungsschraube des Korbes
B
Hinterräder x2
Q
Korb
C
Vordere Gabel
R
Oberteil, Unterteil des Elterngriffes
D
Vorderrad mit Pedalen
T
Becherhalter
E
Schutzblech
U
Befestigungsschrauben der vorderen Gabel 25mm x2
F
Lenkrad mit Bezug
V
Mutter für die Schrauben der vorderen Gabel
G
Klingel mit der Befestigungsschraube
W
Befestigungsschrauben des Sitzes 40 mm x2
H
Abdeckung der Lenkradschraube
X
Mutter für die Befestigungsschrauben des Sitzes x4
I
Unterbau des Sitzes
Y
Befestigungsschraube des Lenkrades 25 mm
J
Sitz mit Sicherheitsgurten
Z
Mutter für die Befestigungsschraube des Lenkrades
K
Rücklehne des Sitzes
A’
Befestigungsschraube der Rücklehne 10 mm
L
Seitensicherheitsbügel x2
B’
Mutter für die Befestigungsschraube der Rücklehne
M
Sitzbezug
C’
Montageschlüssel
N
Bezug der Rücklehne
D’
Montageschlüssel
O
Baldachin
II Montage des Kinderfahrrades
Verbinden Sie den Rahmen (A) mit den Hinterrädern (B), bis Sie das Geräusch der Verriegelung hören (Abb.1). Schieben
Sie die vordere Gabel (C) auf die sich am Vorderrad (D) befindlichen Kunststoffstifte und sichern Sie sie mit den
Befestigungsschrauben (U) und den Muttern (V) auf beiden Seiten (Abb.2). Auf das erhaltene Element setzen Sie das
Schutzblech (E) (Abb.3) und achten Sie darauf, dass sich die Kerbe am Schutzblech vorne am Fahrrad befindet. Nach der

15
Durchführung des in Abbildung 3 beschriebenen Schritts stellen Sie sicher, dass das Schutzblech maximal weit auf die
Vorderradgabel geschoben ist, so dass kein Spiel entsteht. Das 3A-Bild zeigt die korrekte Montage des Schutzbleches.
Beachten Sie die mit dem Ring markierten, sich auf dem Bolzen befindenden Noppen! Setzen Sie das Vorderrad in den
Rahmen ein und achten Sie darauf, dass keine losen Elemente entstehen (Abb. 4). Die Kerbe am Schutzblech muss sich
vorne am Fahrrad befinden. Schieben Sie die Schraubenabdeckung auf den Lenker. Der nächste Schritt ist die Montage
des Lenkers. Setzen Sie die Befestigungsschraube mit der Kappe ein, wie es in Abbildung 5 gezeigt wurde. Achtung! Stellen
Sie sicher, dass die Löcher in der Lenkerstange und in der Vorderradgabel richtig ausgerichtet sind (Abb. 5A). Zwischen
den einzelnen Elementen sollte kein Spiel bestehen, da dies die Lenkbarkeit beeinträchtigt. Mit Hilfe der Schraube (P)
befestigen Sie den Korb (Q) am Rahmen (Abb.6). Verbinden Sie den Unterbau des Sitzes(I) und der Rückenlehne (K)
miteinander mit Hilfe der Schraube (A‘) und sichern Sie sie mit der Mutter (B') (Abb.7). Es ist möglich, die Basis des Sitzes
(I) auf eines der beiden Löcher in der Rückenlehne (K) zu setzen, näher zu der hinteren Rückenlehne und weiter von den
Seitenabdeckungen (L) oder weiter zu der hinteren Rückenlehne und näher von den Seitenabdeckungen (L). Befestigen
Sie das erhaltene Element und den Sitz (J) am Rahmen mit Hilfe der Schrauben: stecken Sie die Befestigungsschrauben
des Sitzes (X) durch die Öffnung im Unterbau und im Rahmen und dann und sichern Sie sie mit der Muttern (Y) (Abb. 8).
Befestigen Sie die Seitensicherheitsbügel (L) an der Rückenlehne, indem Sie sie in die Rohre an der Rückseite des Sitzes
anpassen (Abb.9). Legen Sie den Stoffbezug (M + N) auf den Sitz und die Rückenlehne (Abb. 10). Beim einsetzen des
Sitzbezuges schieben Sie zuerst die Sicherheitsgurte durch die Öffnungen an den Seiten und dann setzen Sie den oberen
Teil des Bezuges auf und spannen Sie den unteren Teil an. Achten Sie darauf, dass die Gurte nicht verdreht sind. Die
Sicherheitsgurte werden werkseitig angebracht. Wenn die Sicherheitsgurte zu einem späteren Zeitpunkt in der
Entwicklung des Kindes nicht mehr benötigt werden, sollten sie vom Sitz abgeschraubt werden. Schieben Sie den
Baldachin (O) in die Öffnungen in der Rückenlehne und sichern Sie sie mit den Hebeln (Abb. 11). Teile des Elterngriffes (R)
schieben Sie sie in die Öffnung an der Rückseite des Rahmens bis Sie das Verriegelungsgeräusch hören (Abb.12). Schieben
Sie den Becherhalter (T) auf den Elterngriff. Bei der Montage der Klingel (G) zuerst die Schraube lösen und dann die Klingel
auf das Lenkrad setzen und die Schraube anziehen (Abb. 12). Das fertige Fahrrad ist in Abbildung 13 dargestellt.
Kleine Elemente sollten außerhalb der Reichweite von Kindern aufbewahrt werden.
III Einstellung des Fahrrades:
Lage des Baldachins - die Länge des Baldachins ist verstellbar. Durch Öffnen der Schnalle kann der Baldachin verlängert
werden.
Fußstütze - je nach Entwicklungsstand des Kindes kann die Fußstütze ausgeklappt oder zusammengeklappt werden, damit
das Kind das Fahrrad selbst fahren kann. Wenn die Fußstütze ausgeklappt ist, lösen Sie die Pedalsperre am Vorderrad
(roter Hebel) (Abb. 14). ACHTUNG! Wenn der Elterngriff montiert ist und die Fußstütze ausgeklappt ist, ist die Radsperre
auf solche Art und Weise zu lösen, dass die Pedale sich frei drehen können, ohne das Rad in Bewegung zu setzen (Antrieb
aus). Ohne Lösen der Sperre kann es zu Quetschungen oder Verletzungen der Füße kommen! Nach Demontage des
Elterngriffs ist die Fußstütze zusammenzuklappen und die Radsperre so zu verbinden, dass die Pedale das Rad in
Bewegung setzen (Antrieb ein). Zum Auf- und Einklappen den Hebel ziehen und die Fußstützen in eine bequeme Position
bringen (Abb. 15).
Sicherheitsgurte - passen Sie die Länge der Gurte an, um das Kind sicher zu halten, jedoch ohne seine Bewegungen zu
behindern.
Lage des Sitzes – der Sitz kann vorwärts und rückwärts verstellt verstellt und gegen die Fahrtrichtung umgedreht werden.
Entriegeln Sie dazu den Sitz mit dem roten Knopf darunter und drehen Sie ihn, bis Sie das Verriegelungsgeräusch hören
(Abb. 16).
Das Fahrrad kann für ältere Kinder angepasst werden, indem man die Sicherheitsgurte, das Baldachin, die
Seitensicherheitsbügel und den Elterngriff abnimmt und die Fußstütze zusammenklappt.
Längeeinstellung des Elterngriffs - drücken Sie die Taste, schieben Sie nach unten und rasten Sie in der unteren Position,
wenn die vorherige zu hoch war.
IV. Wartung und Reinigung
Bei einer Temperatur von maximal 30 °
C schonend waschen .
Nicht waschen. Das Produkt darf mit feuchtem
Tuch und mildem Reinigungsmittel gereinigt
werden.
Nicht bleichen
Nicht bügeln.
Nicht im Wäschetrockner trocknen
Nicht chemisch reinigen
Bezüge: Bei einer Temperatur von maximal 30 ° C schonend waschen. Nicht bleichen. Nicht im Wäschetrockner trocknen.
Nicht bügeln. Nicht chemisch reinigen.
Baldachin, Gürtel: Nicht waschen. Nicht bleichen. Nicht im Wäschetrockner trocknen. Nicht bügeln. Nicht chemisch
reinigen. Mit einem sauberen und angefeuchteten Tuch und einer milden Seife reinigen. An der Luft trocknen lassen. Nicht

16
ins Wasser tauchen.
Rahmen: Reinigen Sie den Kunststoffrahmen mit einem weichen, sauberen und angefeuchteten Tuch und milder Seife.
V. Aufbewahrung
Außerhalb der Reichweite von Kindern aufbewahren.
VI.Garantie
1. Alle Produkte werden durch Kinderkraft mit einer 24 - Monats-Garantie abgedeckt. Die Dauer der Garantiedeckung
beginnt mit dem Tag der Herausgabe des Produkts an den Käufer.
2. Die Garantie gilt für Produkte, die in diesen Ländern verkauft wurden : Frankreich, Spanien, Deutschland, Polen,
Großbritannien, Italien.
3. In Ländern, die oben nicht genannt sind, bestimmt der Verkäufer die Garantiebedingungen.
4. Es ist möglich, die Garantie auf 120 Monate (10 Jahre) zu verlängern. Vollständiger Wortlaut der Bedingungen und das
Registrierungsformular zur Garantieverlängerung ist auf dem WWW.KINDERKRAFT.COM verfügbar.
5. Die Garantie gilt nur in dem Land, in dem der Kauf getätigt wurde.
6. Beschwerden sollten über das Formular auf der Website WWW.RMA.KINDERKRAFT.COM eingereicht werden.
7. Die Garantie gilt nicht:
a. für Ansprüche aus den technischen Parametern des Produktes, solange sie vom Hersteller in
Bedienungsanleitungen oder anderen Dokumenten normativer Natur entsprechen;
b. Produktfehler, die durch unsachgemäße Wartung oder unsachgemäße Verwendung von Chemikalien entstehen;
c. Farbwechsel (Verfärbung), wenn Artikel -entgegen den Bedienungsanleitung- dem direkten Sonnenlicht
ausgesetzt werden;
d. Reißen, Abreiben, Bruch im Stoff/Kunststoff, die auf Verschulden des Kunden zurückzuführen sind;
e. eine Verringerung der Produktqualität durch normalen Verschleiß und natürlichen Verschleiß von
Verbrauchsartikeln;
f. Produkte, die nicht gemäß den Spezifikationen verwendet wurden;
8. Die Garantiezeit für das Zubehör zu dem Gerät läuft über 6 Monate ab dem Datum des Verkaufs, mit Ausnahme von
mechanischen Beschädigungen.
9. Diese Garantiebedingungen sind komplementär in Bezug auf die Befugnisse des Kunden, die dem Kunden gegen
4KRAFT sp. z oo.zustehen. Die Garantie schließt nicht aus, schränkt nicht ein oder setzt nicht aus, die Rechte des Kunden
gemäß den Bestimmungen für die Gewährleistung für Mängel an den verkauften Waren.
10. Vollständiger Wortlaut der Garantie ist auf der Website WWW.KINDERKRAFT.COM verfügbar.
Alle Rechte an dieser Studie liegen vollständig bei 4Kraft Sp. z o. o. Jede nicht autorisierte Verwendung, die ihrem
beabsichtigten Zweck widerspricht, insbesondere: Verwendung, Kopieren, Reproduktion, Weitergabe - ganz oder
teilweise ohne Zustimmung von 4Kraft Sp. z o. o. kann rechtliche Konsequenzen haben.
Dear customer
Thank you for purchasing a Kinderkraft product.
We design our bicycles with your child in mind - we always care about safety and quality, which guarantees that with the
purchase of our products you get the comfort of the best possible choice.
IT IS IMPORTANT TO KEEP THIS MANUAL FOR FUTURE USE.
SAFETY INSTRUCTIONS AND PRECAUTIONS
Warning:
● Compliance with the user manual ensures safe use of the toy. Read the user manual carefully before using the bike
and keep it for future use. Recommended for children from the age of 9 months.
● Use personal protective equipment such as helmets, gloves, elbow pads and knee pads. This product is intended for
outdoor use. Do not use in road traffic. The kids cruiser bike should not be used near motor vehicles, streets, swimming
pools, hills, roads, stairs or on uneven ground.
● Use the toy on flat, obstacle-free surfaces.
● To avoid serious injuries, continuous adult supervision is necessary.
● To avoid falls and collisions causing injury to the user or others, parents/guardians should draw children's attention to
the safety precautions to be taken. Before using the product, it is important to explain to children how to use it safely.
● The person using the product must always wear shoes.
● Assembly must always be carried out by an adult. Before each use, check that the item is not damaged or worn and
that all assembly and fastening parts are in good condition. Ensure that the bolts and nuts retain their auto-locking
properties. Check that the assembly is complete and in good condition. If you notice that some parts are missing or
damaged, do not use the product, but contact your retailer.

17
● Be careful when riding bicycles, you should know how to ride to avoid falls or collisions that could cause injury to the
user or a third person.
● The safest areas for the persons using the bicycle are those with little or no vehicular traffic, such as private areas,
playgrounds, schoolyards, and school playgrounds.
● Maximum user weight − 25 kg
● Keep the packaging or dispose of it in accordance with local regulations.
● Keep away from fire
● For the safety of children, do not leave parts of the packaging freely accessible (plastic bags, cardboard boxes, etc.).
Risk of suffocation!
I Elements of the Tricycle
Part
Name
Part
Name
A
Frame with the foot-rest
P
Basket fixing screw
B
Rear wheels, 2 pcs.
Q
Basket
C
Front fork
R
Top part and bottom part of parent handle
D
Front wheel with pedals
T
Mug holder
E
Mudguard
U
Front fork fixing screws, 25 mm, 2 pcs.
F
Steering bar with sheathing
V
Caps for front fork screws
G
Bike bell with fixing screw
W
Seat fixing screws, 40 mm, 2 pcs.
H
Cap for steering bar screw
X
Caps for seat fixing screws, 4 pcs.
I
Seat base
Y
Steering bar fixing screw, 25 mm
J
Seat with seat belts
Z
Cap for steering bar fixing screw
K
Seat back-rest
A’
Back-rest fixing screw, 10 mm
L
Side guards, 2 pcs.
B’
Cap for back-rest fixing screw
M
Seat sheathing
C’
Assembly wrench
N
Back-rest sheathing
D’
Assembly wrench
O
Hood
II Assembly of the Tricycle
Connect the frame (A) with rear wheels (B), until you hear them interlocking (Fig. 1). Slide the front fork (C) onto plastic
pins on the front wheel (D) and secure them with fixing screws (U) and caps (V) on both sides (Fig. 2). Slide the mudguard
onto the assembly (E) (Fig. 3). Make sure the notch on the mudguard is at the front of the tricycle. After performing the
step described in Figure 3, make sure that the mudguard is pushed onto the fork of the front wheel as far as possible so
that the parts are not loose. Picture 3A shows the correct installation of the mudguard. To make sure your installation is
correct, compare with the picture! Place the front wheel in the frame making sure that no parts are loose (Fig. 4). The
notch on the mudguard must be in the front of the bike. Slide the screw cover onto the handlebar. Next proceed to mount
the handlebar. Place the attachment screw and the screw cap as shown in Figure 5. Note: Make sure that the holes in
the stem of the handlebar and the front wheel are correctly aligned (fig 5A). All components have to be firmly fixed,
otherwise it may be difficult to control the handlebar. Use the screw (P) to fix the basket (Q) onto the frame (Fig. 6).
Connect the seat base (I) with the sheathing (K), using the screw (A’) and secure with the cap (B’) (Fig. 7). It is possible to
place the seat base (I) on one of the two holes in the backrest (K), closer to the backrest and further away from the side
guards (L) or further away the backrest and further away from the side guards (L). Fix the assembly and the seat (J) onto
the frame with tap screws — thread seat screws (W) through holes in the seat base and frame, and then secure with caps
(X) (Fig. 8). Fix the side guards to the back-rest (L), flushing them with tubes at the rear of the seat (Fig. 9). Slide the
material sheathing onto the seat and back-rest (M+N) (Fig. 10). When putting the sheathing, first thread the safety belts
through holes in both sides, and then slide in the top part of the sheathing and stretch it onto bottom part. Make sure
the belts are not twisted. The safety belts are fixed in production plant — at later stages of child’s development, when
the seat belts are no longer needed, screw the belts off of the seat. Slide the hood (O) onto holes at the rear of the back-
rest and secure with levers (Fig. 11). Slide parent handle (R) onto the hole at the rear of the frame, until you hear them
interlocking (Fig. 12). Slide the mug holder (T) onto the parent handle. When assembling the bike bell (G), first take out
the screw and place the bike bell base on the steering bar, and then fix the screw (Fig. 12). The assembled tricycle is
shown in Fig. 13.
Small elements should be kept out of reach of children.
III Adjustment of the tricycle:
Hood position — the length of the hood is adjustable. The hood may be extended after unlatching the buckle, which
secures the hood.
Foot-rest — depending on the level of child’s development, the foot-rest may be retracted, so that the child may propel
the tricycle on its own. Whenever the foot-rest is extended, disengage the pedal lock at the front wheel (red lever) (Fig.

18
14). WARNING! Whenever the parent's handle is mounted and the footrest is unfolded, the wheel lock should be
disengaged so that the pedals rotate freely without causing the wheel to move (transmission off). Without disengaging
the lock, feet may be crushed or injured! After removing the parent handle, fold up the footrest and engage the wheel
lock so that the pedals set the wheel in motion (transmission on). In order to extend/retract, pull back the lever and then
set the foot-rest in a comfortable position (Fig. 15).
Safety belts — adjust the length of the safety belts, so that they firmly secure the child and, at the same time, do not
block its movements.
Seat position — the seat may be adjusted forwards and rearwards and rotated backwards to the direction of the travel.
To this end, release the seat with the red button at the bottom and then rotate it until you hear it interlocking (Fig. 16).
The tricycle may be adapted for older children through disassembly of the safety belts, hood, side guards and parent
handle, and retraction of the foot-rest.
Adjustment of the parent handle — press the button, push down and latch in lower position if the previous one was too
high.
IV. Maintenance and Cleaning
Wash in the temperature of max. 30°C,
gentle process.
Do not wash. The product may be gently
cleaned with damp cloth and mild washing
agent.
Do not bleach.
Do not iron.
Do not tumble-dry.
Do not dry clean.
Sheathings: Wash in the temperature of max. 30°C, gentle process. Do not bleach. Do not tumble-dry. Do not iron. Do
not dry clean.
Hood, belts: Do not wash. Do not bleach. Do not tumble-dry. Do not iron. Do not dry clean. Wash with clean and damp
cloth and mild soap. Leave to air dry. Do not immerse in water.
Frame: Wash the plastic frame with soft, clean and damp cloth and mild soap.
V. Storage
Store the product out of reach of children.
V. Warranty
1. All Kinderkraft products are covered by a 24-month warranty. The warranty period begins on the date of releasing the
product to the Buyer.
2. The warranty is valid for products sold in the following countries: France, Spain, Germany, Poland, United Kingdom,
Italy.
3. In countries not listed above warranty terms and conditions are determined by the Seller.
4. It is possible to extend the warranty period to 120 months (10 years). Full text of the terms and conditions and warranty
extension registration form are available at WWW.KINDERKRAFT.COM
5. The warranty is valid only in the country where the purchase was made.
6. Complaints should be submitted by completing the form available at WWW.RMA.KINDERKRAFT.COM
7. The warranty shall not cover:
a. claims arising from product specifications, as long as they comply with those specified by the manufacturer in the
instruction manual or other documents of a legislative nature;
b. product damage caused by improper maintenance or use of inadequate chemicals;
c. colour change (discolouration) when the product has been exposed to direct sunlight against the instructions
provided in the instruction manual;
d. tear, wear, crack of fabric/plastic that is the fault of the Customer;
e. reduction in the quality of the product and consumables due to normal wear and tear;
f. products which have not been used according to specifications;
8. The warranty period for accessories attached to the device is 6 months from the date of sale, with the exception of
mechanical damage.
9. These guarantee terms and conditions are complementary to the Customer’s rights in relation to 4KRAFT sp. Z o.o. The
warranty shall not exclude, limit or suspend the rights of the Customer arising from the provisions on the warranty for
defects in the goods sold.
10. Full text of Warranty Terms and Conditions is available at WWW.KINDERKRAFT.COM
All rights to this data are entirely reserved to 4Kraft Sp. z o.o. Any unauthorized use or misuse, including usufruct, copying,
duplication and sharing, wholly or partially, without consent of 4Kraft Sp. z o.o. may result in legal consequences.

19
Estimado cliente
Gracias por comprar un producto de Kinderkraft.
Diseñamos nuestras bicicletas pensando en su hijo - en todo momento nos preocupamos por la seguridad y la calidad, lo
que garantiza el mejor confort y la mejor elección posibles.
IMPORTANTE CONSERVAR ESTE MANUAL PARA USO FUTURO.
INSTRUCCIONES DE SEGURIDAD Y PRECAUCIÓN
Advertencias:
● El cumplimiento de las instrucciones de uso garantiza un uso seguro del juguete. Lea atentamente las instrucciones
antes de utilizar la bicicleta y guárdela para un uso futuro. Se recomienda para niños a partir de 9 meses.
● Use equipo de protección personal como cascos, guantes, coderas y rodilleras. Este producto está destinado para uso
en exteriores. No lo utilice en el tráfico rodado. La bicicleta de carretera del niño no debe utilizarse cerca de vehículos
de motor, calles, piscinas, colinas, carreteras, escaleras o cuestas.
● Use el juguete sobre superficies planas y libres de obstáculos.
● Para evitar lesiones graves, es necesaria la supervisión continua por parte de un adulto.
● Para evitar caídas y colisiones que causen lesiones al usuario u otras personas, los padres/tutores deben llamar la
atención de los niños sobre las precauciones que deben tomar. Antes de usar el producto, es importante explicar a los
niños cómo usar la bici de manera segura.
● Siempre póngase zapatos cuando use el producto.
● El montaje de la bici debe ser realizado siempre por un adulto. Antes de cada uso, compruebe que el artículo no esté
dañado ni desgastado y que todas las piezas de montaje y fijación estén en buenas condiciones. Asegúrese de que los
pernos y las tuercas mantengan sus propiedades de autocierre. Compruebe que el montaje esté completo y en buen
estado. Si se percata que faltan piezas o que algunas están dañadas, no utilice el producto, pero póngase en contacto
con su detallista.
● Tenga cuidado al montar en bicicleta, sepa cómo montarla para evitar caídas o colisiones que puedan causar lesiones
al usuario o a un tercero.
● Las áreas más seguras para los ciclistas son aquellas con poco o ningún tráfico vehicular, tales como áreas privadas,
patios de recreo, áreas de recreo escolares.
● Peso máximo de usuario - 25 kg
● Mantenga el embalaje o deséchelo de acuerdo con las regulaciones locales.
● Mantener lejos de fuego
● Para la seguridad de los niños, no deje partes del embalaje bolsas de plástico, cajas de cartón, etc.) a su alcance. Peligro
de ahogo por atragantamiento!
I Componentes de la bicicleta
Pieza
Nombre
Pieza
Nombre
A
Bastidor con reposapiés
P
Tornillo de fijación de la cesta
B
Ruedas traseras x2
Q
Cesta
C
Horquilla delantera
R
Parte superior, parte inferior de la empuñadura de
los padres
D
Rueda delantera con pedales
T
Portavasos
E
Guardabarros
U
Tornillos de fijación de la horquilla delantera 25mm x2
F
Volante con revestimiento
V
Tuercas para tornillos de fijación de horquilla
delantera
G
Timbre con tornillo de fijación
W
Tornillos de fijación del asiento 40 mm x2
H
Cubierta de tornillo del volante
X
Tuercas para tornillos de fijación de asiento x4
I
Base del asiento
Y
Tuerca de fijación del volante 25 mm
J
Asiento con cinturones de seguridad
Z
Tuerca para el tornillo de fijación del volante
K
Respaldo del asiento
A’
Tornillo de fijación del respaldo 10 mm
L
Protectores laterales x2
B’
Tuerca para el tornillo de fijación del respaldo
M
Revestimiento del asiento
C’
Llave de montaje
N
Revestimiento del respaldo
D’
Llave de montaje
O
Techo

20
II Montaje de la bicicleta
Conecte el bastidor (A) a las ruedas traseras (B) hasta que oiga un sonido de bloqueo (Fig. 1). Deslice la horquilla delantera
(C) sobre los pasadores de plástico de la rueda delantera (D) y fíjela con los tornillos de fijación (U) y las tuercas (V) de
ambos lados (fig. 2). Deslice el guardabarros (E) sobre el elemento (fig. 3). Asegúrese de que la muesca del guardabarros
esté en la parte delantera de la bicicleta. Después de realizar el paso descrito en la figura 3, asegúrese de que el
guardabarros esté lo más cerca posible de la horquilla de la rueda delantera para que las piezas no se aflojen. La figura
3A muestra la instalación correcta del guardabarros. Para asegurarse de que su instalación es correcta, ¡compárela con
la imagen! Coloque la rueda delantera en el cuadro asegurándose de que no haya piezas sueltas (Fig. 4). La muesca del
guardabarros debe estar en la parte delantera de la bicicleta. Coloque la tapa del tornillo sobre el manillar. A continuación,
monte el manillar. Coloque el tornillo de fijación y la tapa de rosca como se muestra en la Figura 5. Nota: Asegúrese de
que los orificios de la potencia del manillar y de la rueda delantera estén correctamente alineados (fig. 5A). Todos los
componentes deben estar firmemente fijados, de lo contrario puede ser difícil controlar el manillar. Utilice el tornillo (P)
para montar la cesta (Q) en el marco (fig. 6). Conecte la base del asiento (I) y el respaldo (K) con un tornillo (A’) y fíjelo
con una tuerca (B') (fig. 7). Es posible colocar la base del asiento (I) en uno de los dos agujeros del respaldo (K), más cerca
del respaldo y más lejos de las protecciones laterales (L) o más lejos del respaldo y más cerca de las protecciones laterales
(L). Fije el elemento y el asiento (J) al bastidor con tornillos - introduzca los tornillos del asiento (W) a través del orificio
de la base y del bastidor y fíjelos con las tuercas (X) (fig. 8). Fije los protectores laterales (L) al respaldo encajándolos en
los tubos del respaldo del asiento (fig. 9). Deslice el revestimiento (M+N) sobre el asiento y el respaldo (fig. 10). Al fijar el
revestimiento de asiento, primero pase los cinturones de seguridad a través de las aberturas laterales, luego deslice la
parte superior del revestimiento y estire la parte inferior. Asegúrese de que las correas no estén torcidas. Los cinturones
de seguridad se colocan durante la producción - cuando el niño alcanza una edad suficiente y ya no los necesita, se deben
desatornillar del asiento. Deslice el toldo (O) en los orificios de la parte posterior del respaldo y fíjelo con las palancas (fig.
11). Deslícela la cuna de padres ® en el agujero en la parte posterior del marco hasta que escuche un sonido de bloqueo
(Figuras 12). Monte el portavasos (T) sobre la empuñadura. Para montar el timbre (G), primero destornille el tornillo y
coloque la base del timbre en el volante, luego apriete el tornillo (fig. 12). La bicicleta montada se muestra en la Figura
13.
Mantenga las piezas pequeñas fuera del alcance de los niños.
III Ajuste de la bicicleta:
Posición del techo - la longitud del techo es ajustable. El techo puede extenderse abriendo la hebilla de seguridad.
Reposapiés - dependiendo del nivel de desarrollo del niño, el reposapiés se puede desplegar o plegar para que el niño
pueda conducir la bicicleta por sí mismo. Siempre que el reposapiés esté desplegado, desactive el bloqueo del pedal de
la rueda delantera (palanca roja) (fig. 14). PRECAUCIÓN: Siempre que se monte la empuñadura de padres y se despliegue
el reposapiés, desenganche el bloqueo de ruedas para que los pedales giren libremente sin mover la rueda (la propulsión
desactivada). Sin desconectar el bloqueo de ruedas, se corre el riesgo de aplastar o lesionar los pies. Después de
desmontar la empuñadura de padres, doble el reposapiés y conecte el bloqueo de ruedas para que los pedales activen la
rueda (propulsión activada). Para desplegar/doblar, tire de la palanca hacia atrás y coloque los reposapiés en una posición
cómoda (fig. 15).
Cinturones de seguridad - ajuste la longitud de los cinturones para que sujeten al niño de manera segura pero sin
bloquear sus movimientos.
Posición del sillín - el sillín se puede ajustar hacia delante, hacia atrás y girar en el plano horizontal. Para ello, desbloquee
el asiento con el botón rojo situado debajo y gírelo hasta que oiga un sonido de bloqueo (fig. 16).
La bicicleta se puede adaptar a los niños mayores desmontando los cinturones de seguridad, el techo, las cubiertas
laterales y la empuñadura de los padres y plegando el reposapiés.
Ajuste de la longitud de la empuñadura de los padres - pulse el botón, deslícelo hacia abajo y colóquelo en la posición
más baja si la posición anterior era demasiado alta.
IV. Mantenimiento y limpieza
Lavar a temperatura máx. de 30°C,
proceso suave.
No lavar. El producto se puede lavar con un
paño húmedo y un detergente suave.
No usar blanqueador
No planchar
No secar en secadora
No lavar en seco
Capota, cinturón: No lavar. No usar blanqueador. No secar en secadora. No planchar. No lavar en seco. Limpiar con un
paño limpio y húmedo con un jabón suave. Dejar secar al aire. No sumergir en agua.
Bolsita: Lavar a mano a una temperatura que no exceda 40°C. No usar blanqueador, no secar en secadora. No planchar.
No lavar en seco. Dejar que se seque.
Cuadro: El cuadro de plástico limpiar con un paño suave, limpio y húmedo con un jabón suave.
Pagina se încarcă...
Pagina se încarcă...
Pagina se încarcă...
Pagina se încarcă...
Pagina se încarcă...
Pagina se încarcă...
Pagina se încarcă...
Pagina se încarcă...
Pagina se încarcă...
Pagina se încarcă...
Pagina se încarcă...
Pagina se încarcă...
Pagina se încarcă...
Pagina se încarcă...
Pagina se încarcă...
Pagina se încarcă...
Pagina se încarcă...
Pagina se încarcă...
Pagina se încarcă...
Pagina se încarcă...
Pagina se încarcă...
Pagina se încarcă...
Pagina se încarcă...
Pagina se încarcă...
-
 1
1
-
 2
2
-
 3
3
-
 4
4
-
 5
5
-
 6
6
-
 7
7
-
 8
8
-
 9
9
-
 10
10
-
 11
11
-
 12
12
-
 13
13
-
 14
14
-
 15
15
-
 16
16
-
 17
17
-
 18
18
-
 19
19
-
 20
20
-
 21
21
-
 22
22
-
 23
23
-
 24
24
-
 25
25
-
 26
26
-
 27
27
-
 28
28
-
 29
29
-
 30
30
-
 31
31
-
 32
32
-
 33
33
-
 34
34
-
 35
35
-
 36
36
-
 37
37
-
 38
38
-
 39
39
-
 40
40
-
 41
41
-
 42
42
-
 43
43
-
 44
44


Kinderkraft FreeWay Manual de utilizare
- Categorie
- Jucării
- Tip
- Manual de utilizare
în alte limbi
- français: Kinderkraft FreeWay Manuel utilisateur
- slovenčina: Kinderkraft FreeWay Používateľská príručka
- polski: Kinderkraft FreeWay Instrukcja obsługi
- italiano: Kinderkraft FreeWay Manuale utente
- español: Kinderkraft FreeWay Manual de usuario
- português: Kinderkraft FreeWay Manual do usuário
Lucrări înrudite
-
Kinderkraft ASTON Manual de utilizare
-
-
-
-
-
-
-
-
-
Alte documente
-
Thule Yepp Nexxt Mini Instrucțiuni de utilizare
-
Thule Rear Bicycle Seat Instrucțiuni de utilizare
-
Lionelo Haari Three wheeler bike Manual de utilizare
-
Lionelo Kori Manual de utilizare
-
 KikkaBoo NIKKI Manual de utilizare
-
Lionelo ALEX Manual de utilizare
-
Graco 6CM99BRCU Manual de utilizare
-
CYBEX gold Zeno Manual de utilizare
-
byox Tricycle Tornado Instrucțiuni de utilizare
-
