
MODEL: RACOON REV. 1.2
RACOON
CZ REGÁL
DE DES REGAL
EN BOOKCASE
ES ATRIL
FR LE RAYON
HU KÖNYVSZEKRÉNY
IT LEGGIO
NL BOEKENSTANDAARD
PL REGAŁ
PT ESTANTE
RO ETAJERĂ PENTRU CĂRȚI
RU КНИЖНЫЙ СТЕНД
SK REGÁL
CZ NÁVOD K OBSLUZE
DE BEDIENUNGSANLEITUNG
EN USER MANUAL
ES MANUAL DEL USUARIO
FR GUIDE D’UTILISATION
HU HASZNÁLATI ÚTMUTATÓ
IT ISTRUZIONI PER UTENTE
NL HANDLEIDING
PL INSTRUKCJA OBSŁUGI
PT MANUAL DE INSTRUÇÕES
RO MANUAL DE UTILIZARE
RU РУКОВОДСТВО ПО
SK NÁVOD NA POUŽITIE

2

3
CS ................................................................................................................. 10
DE ................................................................................................................. 13
EN ................................................................................................................. 16
ES ................................................................................................................. 19
FR ................................................................................................................. 23
HU ................................................................................................................ 26
IT .................................................................................................................. 29
NL ................................................................................................................. 33
PL ................................................................................................................. 36
PT ................................................................................................................. 40
RO ................................................................................................................ 43
RU ................................................................................................................ 46
SK ................................................................................................................. 49

4

5

6

7

8

9

10
Vážený zákazníku!
Děkujeme Vám za nákup produktu Kinderkraft.
Tvoříme s ohledem na Vaše dítě - vždy se staráme o bezpečnost a kvalitu, čímž zajistíme
pohodlí nejlepšího výběru.
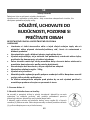
DŮLEŽITÉ, USCHOVEJTE DO
BUDOUCNA, ČTĚTE POZORNĚ
BEZPEČNOSTNÍ POKYNY A BEZPEČNOSTNÍ OPATŘENÍ
VAROVÁNÍ
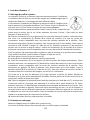
• Mějte na paměti rizika spojena s otevřeným ohněm a dalšími silnými zdroji
tepla, jako jsou radiátory / elektrické nebo plynové ohřívače atd. umístěné v
blízkosti produktu.
• Nestavte regál v blízkosti zdrojů tepla a oken.
• Nepoužívejte produkt, pokud je některá z jeho součástí poškozena, roztržena
nebo chybí, používejte pouze komponenty schválené výrobcem.
• Všechny montážní díly a příslušenství musí být při montáži řádně dotaženy a
pravidelně kontrolovány a v případě potřeby dotaženy.
• Nenechávejte děti samotné, aby nešplhaly na nábytek.
• Maximální zatížení regálu - 28 kg.
• Produkt není hračkou.
• Montáž produktu by měla být provedena v souladu s níže uvedenými pokyny.
Nesprávná montáž zvyšuje riziko nehod a poškození.
• Pro ochranu před převrácením by měl být produkt používán s připojeným
nástěnným upevňovacím zařízením.
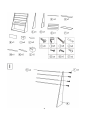
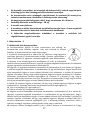
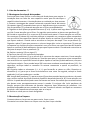
1. Seznam prvků - 5
2. Sestavení boxu na hračky:
K montáži potřebujete šroubováky: křížový a plochý. Montáž by měla být
provedena na měkkém povrchu, který nepoškodí povrch prvků. Montáž by
měla být provedena dvěma osobami.
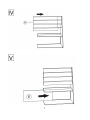
I. Montáž regálu začněte umístěním boční stěny regálu (A) a čtyř nosníků (C)
kolmo k sobě. Přišroubujte nosníky ke stěně pomocí šroubů (1), věnujte při
tom pozornost odpovídajícím otvorům.
II. Umístěte dvě desky kolmo (E a H). Širší deska by měla mít drážku směrem k podlaze. Věnujte
pozornost otvorům. Poté obě desky spojte šrouby (5)
III. Ke konstrukci z kroku II připevněte spojky (2) a kolíky (4) . Věnujte pozornost otvorům. Spojky
CS

11
(2) by měly být zasunuty tak, aby zásuvky ve spojkách byly kompatibilní s otvory na bočních
plochách desky. Kolíky (4) připevněte k desce jemně, ale tak, aby byly stabilní. Upevněte celou
konstrukci k sadě z kroku I pomocí šroubů (3). Položte desku (F) tak, abyste viděli drážku podél
ní. Spojky (2) zasuňte tak, aby zásuvky ve spojkách byly kompatibilní s otvory na bočních
plochách desky.
Kolíky (4) připevněte k desce jemně, ale tak, aby byly stabilní. Upevněte celou konstrukci k sadě
z kroku I pomocí šroubů (3).
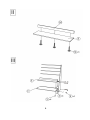
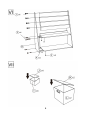
IV. Nasuňte materiál (D) na nosníky (C).
V. Nasuňte desku (G) do příslušných drážek.
VI. Ke konstrukci z předchozích kroků připevněte spojky (2) a kolíky (4) . Věnujte pozornost
otvorům. Spojky (2) by měly být zasunuty tak, aby zásuvky ve spojkách byly kompatibilní s otvory
na bočních plochách desky. Kolíky (4) připevněte k desce jemně, ale tak, aby byly stabilní.
Připojte boční stěnu (B) k výsledné konstrukci pomocí šroubů (1,3). Z bezpečnostních důvodů
znovu zkontrolujte všechna spojení v regálu a v případě potřeby dotáhněte šrouby.
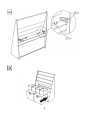
VII. Umístěte všechny prvky (I, J, K, L), které budou tvořit krabice, na podlaze. Položte prvky (I a
L) tak, aby tvar připomínal krabici. Poté vložte dovnitř čtvercové dna (J a K), aby se forma
vyztužila.
VIII. Pomocí šroubů (7) připevněte držadla (6) k oběma bočním stěnám zevnitř tak, aby oválný
otvor držadla přiléhal k povrchu boční stěny (A, B). Věnujte pozornost otvorům. Při pádu nábytku
může dojít ke zranění nebo smrti. Aby se zabránilo převrhnutí nábytku, musí být trvale
připevněn ke zdi. V sadě nejsou žádné upevňovací šrouby, protože různé typy stěn vyžadují
různé typy šroubů. Použijte šrouby vhodné pro stěny u Vás doma. Upevněte nábytek a ujistěte
se, že konstrukce je stabilní a nepředstavuje nebezpečí pro děti.
IX. Zasuňte krabice na určené místo.
3. Údržba a čištění
Regál čistěte měkkým, čistým a suchým hadříkem.
Materiál a krabice čistěte čistým, vlhkým hadříkem.
4. Záruka
1. Na všechny Výrobky Kinderkraft se vztahuje záruka 24 měsíců. Období záruční ochrany
začíná dnem vydání zboží kupujícímu.
2. Záruka se vztahuje pouze na území členských států Evropské Unie s výjimkou zámořských
území (v souladu s aktuálním skutkovým stavem, včetně zejména: Azorské ostrovy,
Madeira, Kanárské Ostrovy, Francouzské zámořské departamenty, Ålandy, Athos, Ceuta,
Melilla, Helgoland, Büsingen am Hochrhein, Campione d'Italia a Livigno), a také na území
Spojeného Království velké Británie a Severního Irska, s výjimkou britských zámořských
teritorií (mj. Bermudy, Kajmanské Ostrovy, Falklandy).
3. V zemích, které nejsou uvedeny výše, záruka výrobce neplatí. Podmínky dodatečné záruky
může prodejce specifikovat. V některých zemích je možné na omezenou dobu rozšířit
záruku až na 120 měsíců (10 let). Kompletní obsah podmínek a registrační formulář pro
prodloužení záruky jsou k dispozici na webových stránkách WWW.KINDERKRAFT.COM
4. Záruka platí pouze na území uvedené v odst. 2.

12
5. Reklamace musí být podány vyplněním formuláře dostupného na webu
WWW.RMA.KINDERKRAFT.COM
6. Záruka se nevztahuje na:
A. Kosmetické škody, včetně mj.: škrábance, promáčknutí a praskliny plastu, ledaže k
havárii došlo z důvodu výrobní závady nebo chyby materiálu;
B. Poškození způsobené nesprávným používáním nebo špatnou údržbou, včetně:
mechanického poškození výrobků způsobeného nesprávným používáním nebo
špatnou údržbou;
• Seznamte se s návodem k obsluze a údržbě výrobku obsaženého v návodu k obsluze;
C. Poškození způsobené nesprávným montážem, instalací nebo demontáží výrobků a /
nebo příslušenství;
• Seznamte se s návodem k obsluze a montáži výrobku obsaženého v návodu k obsluze;
D. Poškození způsobených korozí, plísní nebo rzí v důsledku nesprávné údržby, péče a
skladování;
E. Poškození způsobené standardním opotřebením nebo jiným způsobem v důsledku
normálního plynutí času;
• To zahrnuje: roztržení nebo proražení potrubí; poškození pneumatiky; poškození
běhounu pneumatiky; blednutí tkáně vzniklé v důsledku mechanického používání
(např. na závěsech a krytu pohyblivých částí);
F. Poškození nebo eroze způsobené vystavením slunci, potu, pracím prostředkům,
skladovacím podmínkám nebo častému mytí atd.;
G. Škody způsobené nehodou, zneužíváním, nesprávným používáním, požárem,
kontaktem s kapalinou, zemětřesením nebo jinými vnějšími příčinami;
H. Produkty, které byly modifikovány za účelem změny funkčnosti bez písemného
povolení 4Kraft;
I. Produkty, ze kterých bylo odstraněno nebo nějakým způsobem znetvořeno sériové
číslo nebo číslo šarže;
J. Poškození způsobené použitím komponent nebo produktů třetích stran, mj.: držáky
nápojů, deštníky, odrazové prvky, zvonky;
K. Škody způsobené dopravou nebo údržbou letadla.
7. Záruční doba pro příslušenství dodávané v balení je 6 měsíců od data prodeje, s výjimkou
výše uvedených škod.
8. Tyto záruční podmínky mají doplňkový charakter ve vztahu k zákonným právům zákazníka,
které mu náleží vůči 4KRAFT sp. z o.o.. Záruka nevylučuje, neomezuje ani nepozastavuje
práva zákazníka vyplývající z ustanovení o zárukách za vady prodané věci.
9. Úplný obsah záručních podmínek je k dispozici na webových stránkách
WWW.KINDERKRAFT.COMhttp://WWW.KINDERKRAFT.COM
Všechna práva na toto zpracování náleží výhradně společnosti 4Kraft Sp. z o.o. Jakékoli
neoprávněné použití v rozporu s jejich zamýšleným účelem, zejména: použití, kopírování,

13
reprodukce, sdílení - zcela nebo zčásti bez souhlasu 4Kraft Sp. z o.o. může mít za následek právní
důsledky.
Sehr geehrte Kunden,
Vielen Dank für den Kauf des Produktes von Kinderkraft.
Wir entwickeln unsere Produkte speziell für Ihre Kinder - wir sorgen für die Sicherheit und
Qualität, indem wir Ihnen die beste Auswahl anbieten.
WICHTIG, FÜR ZUKÜNFTIGE
VERWENDUNG AUFBEWAHREN,
AUFMERKSAM LESEN
SICHERHEITSHINWEISE UND VORSICHTSMAßNAHMEN
ACHTUNG
• Offene Flammen und andere starke Wärmequelle, wie Heizkörper/Elektro- oder
Gasheizung usw. in der Nähe des Produktes vermeiden.
• Das Regal nicht in der Nähe von Wärmequellen, Fenstern aufstellen.
• Das Produkt nicht verwenden, wenn ein seiner Teile beschädigt oder zerrissen
ist oder fehlt. Nur Originalersatzteile des Herstellers verwenden.
• Alle Montageteile und Rahmen gut während der Montage anziehen und
regelmäßig auf festen Sitz prüfen ggf. festziehen.
• Kinder nicht allein lassen, damit sie nicht ins Produkt steigen.
• Maximale Belastung des Regals - 28 kg.
• Das Produkt ist kein Spielzeug.
• Das Produkt gemäß der folgenden Anleitung montieren. Eine falsche Installation
erhöht das Risiko von Unfällen und Beschädigungen.
• Um das Produkt vor Stürzen zu schützen, verwenden Sie die beigefügte
Vorrichtung zur Wandmontage.
1. Liste der Teile - 5
2. Montage des Regals:
Werkzeuge für Montage: Kreuz- und Schlitzschraubenzieher. Das Produkt auf einen weichen
Boden montieren, um die Oberfläche der Elemente nicht beschädigen. Das Produkt sollte von
zwei Personen montiert werden.
DE

14
I. Am Anfang der Montage die Seitenwand des Regals (A) und vier Balken
(C) senkrecht zueinander legen. Die Balken mit den Schrauben (1) an die
Wand schrauben und dabei auf die entsprechenden Öffnungen achten.
II. Zwei Bretter senkrecht legen (E und H). Die Nut des breiteren Bretts
sollte auf den Boden gerichtet werden. Achten Sie auf die Öffnungen. Dann
beide Bretter mit den Schrauben befestigen (5).
III. An der Struktur vom Schritt 2 die Verbinder (2) und Bolzen (4) befestigen. Achten Sie auf die
Öffnungen. Die Verbinder (2) sollten so eingesetzt werden, dass die Buchsen in den Verbindern
mit den Öffnungen an den Seitenflächen der Platte kompatibel sind. Die Bolzen (4) vorsichtig
und stabil befestigen. Die ganze Struktur an dem Satz vom Schritt 1 mit den Schrauben (3)
befestigen. Das Brett (F) so legen, dass die Nut entlang des Brettes sichtbar ist. Die Verbinder
(2) so einsetzen, dass die Buchsen in den Verbindern mit den Öffnungen an den Seitenflächen
der Platte kompatibel sind.
Die Bolzen (4) vorsichtig und stabil befestigen. Die ganze Struktur an dem Satz vom Schritt 1 mit
den Schrauben (3) befestigen.
IV. Das Material (D) auf die Balken (C) schieben.
V. Die Platte (G) in die entsprechenden Nuten schieben.
VI. An der Struktur von vorherigen Schritten die Verbinder (2) und Bolzen (4) befestigen. Achten
Sie auf die Öffnungen. Die Verbinder (2) sollten so eingesetzt werden, dass die Buchsen in den
Verbindern mit den Öffnungen an den Seitenflächen der Platte kompatibel sind. Die Bolzen (4)
vorsichtig und stabil befestigen. Die Seitenwand (B) an der entstandenen Struktur mit den
Schrauben befestigen (1, 3). Aus Sicherheitsgründen alle Verbindungen im Regal noch einmal
überprüfen, gegebenenfalls die Schrauben festziehen.
VII. Alle Teile (I, J, K, L) der Box auf den Boden legen. Die Teile (I und L) so auf den Boden legen,
dass sie die Form einer Box haben. Dann die eckigen Böden (J und K) einsetzen, um die Box zu
versteifen.
VIII. Die Griffe (6) mit Schrauben (7) von innen an beiden Seitenwänden befestigen, so dass die
ovale Öffnung des Griffs an die Oberfläche der Seitenwand (A, B) haftet. Achten Sie auf die
Öffnungen. Sturz vom Regal kann zu Verletzungen oder zum Tod führen. Um das Regal vor
Stürzen zu schützen, sollte es fest an der Wand befestigt werden. Der Lieferumfang enthält
keine Befestigungsschrauben, da unterschiedliche Typen von Wänden unterschiedliche Typen
von Schrauben erfordern. Verwenden Sie Schrauben, die für die Wände Ihres Hauses geeignet
sind. Befestigen Sie das Regal und stellen Sie sicher, dass die Struktur stabil ist und sicher für
Kinder ist.
IX. Die Boxen in die dafür vorgesehenen Stellen schieben.
3. Wartung und Reinigung
Das Regal mit einem weichen, sauberen und trockenen Tuch reinigen.
Der Stoff und die Boxen mit einem sauberen, feuchten Tuch reinigen.
4. Garantie
1. Alle Kinderkraft Produkte haben 24-monatige Garantie. Die Garantiefrist beginnt an dem
Tag, an dem das Produkt an den Käufer geliefert wird.

15
2. Die Garantie gilt nur im Gebiet der EU-Mitgliedstaaten, mit Ausnahme von
Überseegebieten (gemäß dem aktuellen Sachstand, insbesondere: Azoren, Madeira,
Kanarische Inseln, französische Überseegebieten, Ålandinseln, Athos, Ceuta, Melilla,
Helgoland, Büsingen am Hochrhein, Campione d'Italia und Livigno), sowie im Gebiet des
Vereinigten Königreichs Großbritannien und Nordirland, mit Ausnahme von
Überseegebieten (u.a. Bermuda, Cayman Islands, Falkland Islands).
3. Die Garantie gilt nicht in Ländern, die oben nicht genannt wurden. Die Bedingungen der
zusätzlichen Garantie können vom Verkäufer festgelegt werden.
4. In einigen Ländern ist es möglich, die Garantie für einen begrenzten Zeitraum auf 120
Monate (10 Jahre) zu verlängern. Der vollständige Text der Allgemeinen
Geschäftsbedingungen und das Formular für Garantieverlängerung sind unter
WWW.KINDERKRAFT.COM verfügbar.
5. Die Garantie gilt nur im Absatz 2 genannten Gebiet.
6. Die Beschwerden sollten unter Anwendung des Formulars unter
WWW.RMA.KINDERKRAFT.COM eingereicht werden.
7. Die Garantie umfasst nicht:
A. kleine Schäden, einschließlich, aber nicht beschränkt auf: Kratzer, Dellen und Risse
des Kunststoffs, es sei denn, der Fehler ist auf einen Material- oder Herstellungsfehler
zurückzuführen;
B. Schäden durch unsachgemäße Verwendung oder schlechte Wartung, einschließlich,
aber nicht beschränkt auf: mechanische Schäden an den Produkten, die durch
unsachgemäße Verwendung oder schlechte Wartung verursacht wurden;
• Lesen Sie die Informationen über Bedienung und Wartung in der
Bedienungsanleitung;
C. Schäden durch unsachgemäße Montage, Installation oder Demontage von Produkten
und / oder Zubehör;
• Lesen Sie die Informationen über Bedienung und Montage in der
Bedienungsanleitung;
D. Schäden durch Korrosion, Schimmel oder Rost durch unsachgemäße Wartung, Pflege
und Lagerung;
E. Schäden, die durch normale Abnutzung oder durch normalen Zeitablauf verursacht
wurden;
• Dazu gehören: Risse oder Brüche der Schläuche; Reifenschäden; Reifenprofilschäden,
Ausbleichen der Stoffe infolge mechanischer Verwendung (z.B. an Gelenken oder
Bedeckung der beweglichen Teile);
F. Schäden oder Erosion durch Sonne, Schweiß, Reinigungsmittel, Lagerbedingungen
oder häufiges Waschen usw.;
G. Schäden durch Unfall, Missbrauch, unsachgemäße Verwendung, Feuer, Flüssigkeit,
Erdbeben und andere äußere Ursachen;
H. Produkte, deren Funktionen ohne schriftliche Zustimmung von 4Kraft geändert
wurden;

16
I. Produkten, von denen die Seriennummer oder Chargennummer entfernt oder in
irgendeiner Weise zerstört wurde;
J. Schäden durch die Verwendung von Komponenten und Produkten der anderen
Produzenten, einschließlich, aber nicht beschränkt auf: Getränkehalter, Schirme,
Reflektoren, Glocken;
K. Schäden durch Transport oder Flugzeugpersonal.
8. Die Garantiedauer für das dem Produkt beigefügte Zubehör beträgt 6 Monate ab
Verkaufsdatum, ausgenommen von den oben erwähnten Schäden.
9. Diese Garantiebedingungen ergänzen die gesetzlichen Ansprüche des Kunden gegenüber
4KRAFT sp. z o.o. Die Garantie schließt die Rechte des Kunden, die sich aus den Vorschriften
über die Gewährleistung für Mängel am verkauften Produkt ergeben, nicht aus, beschränkt
sie nicht und stellt sie nicht ein.
10. Der vollständige Inhalt der Garantiebedingungen ist auf der Website
WWW.KINDERKRAFT.COMhttp: //WWW.KINDERKRAFT.COM verfügbar
Alle Rechte an dieser Studie liegen vollständig bei 4Kraft Sp. z o. o. Jede nicht autorisierte
Verwendung, die ihrem beabsichtigten Zweck widerspricht, insbesondere: Verwendung,
Kopieren, Reproduktion, Weitergabe - ganz oder teilweise ohne Zustimmung von 4Kraft Sp. z o.
o. kann rechtliche Konsequenzen haben
EN
Dear Customer!
Thank you for your purchasing Kinderkraft product.
We create our products special for your child - we always take care of safety and quality to
offer you the best choice.
IMPORTANT, KEEP FOR FUTURE
USE, READ CAREFULLY
SAFETY INSTRUCTIONS AND PRECAUTIONS
WARNINGS
• Remember about the risks related to open flames and other strong heat sources,
such as radiators/electric or gas heaters etc. near the product.
• Do not place the bookcase near heat sources, windows.
• Do not use the product if any of its parts is damaged, thorn or missing, use only
original manufacturer parts.

17
• All assembly parts and frame shall be well tightened during the assembly and
regularly checked and tightened if necessary.
• Do not leave children alone so that they do not climb on furniture.
• Maximal load of the bookcase - 28 kg.
• The product is not a toy.
• Assembly the product in accordance with the following instructions. Incorrect
assembly increases the risk of accidents and damage.
• To protect the product against falling over it should be used with the attached
wall mounting device.
1. List of parts - 5
2. Assembly of the bookcase:
Tools: Philips and flat-blade screwdriver. Do the assembly on a soft floor that
will not damage the surface of the parts. The product shall be assembled by
two persons.
I. Start the assembly of the bookcase by placing the side wall of the bookcase
(A) and four beams (C) perpendicular to each other. Tighten the beams to
the wall with screws (1), considering the corresponding openings.
II. Lay two boards perpendicularly (E and H). The groove of the wider board shall be directed to
the floor. Pay attention to the openings. Then connect both boards with screws (5).
III. Attach the connectors (2) and the studs (4) to the structure from 2. step. Pay attention to the
openings. The connectors (2) shall be inserted in such a manner that the bushings in the
connectors are compatible with the openings on the side surfaces of the board. Gently but
stable fasten the studs (4) in the board. Attach the whole structure to the set from 1. step with
the screws (3). Lay the board (F) in such a way that you can see the groove. Insert the connectors
(2) in such a manner that the bushings in the connectors are compatible with the openings on
the side surfaces of the board.
Gently but stable fasten the studs (4) in the board. Attach the whole structure to the set from
1. step with the screws (3).
IV. Slide the material (D) onto the beams (C).
V. Slide the board (G) into the appropriate grooves.
VI. Attach the connectors (2) and the studs (4) to the structure from the steps above. Pay
attention to the openings. The connectors (2) shall be inserted in such a manner that the
bushings in the connectors are compatible with the openings on the side surfaces of the board.
Gently but stable fasten the studs (4) in the board. Fasten the side wall (B) to the structure with
screws (1,3). For safety, check all connections in the bookcase again and tighten the screws if
necessary.
VII. Lay all parts (I, J, K, L) of the boxes on the floor. Lay the parts (I and L) so that they look like
a box. Then put in the square bottoms (J and K) to stiffen the box.
VIII. With two screws (7) fasten the handles (6) to both side walls from the inside in such a way
that the oval opening of the handle adheres to the surface of the side wall (A, B). Pay attention

18
to the openings. If the furniture falls over it can cause injury or damage. To prevent the furniture
from falling over, it shall be permanently attached to the wall. The set does not include fixing
screws, because different types of walls require different types of screws. Use screws suitable
for the walls in your home. Fasten the furniture and make sure that the structure is stable and
does not pose a threat to children.
IX. Slide the boxes into their designated openings.
3. Maintenance and cleaning
Clean the bookcase with a soft, clean and dry cloth.
Clean the material and boxes with a soft, clean and damp cloth.
4. Warranty
1. All Kinderkraft products are covered by a 24-month warranty. The warranty period starts
from the date the product is handed over to the Buyer.
2. The warranty is only valid in the member states of the European Union, excluding overseas
territories (as currently defined, including in particular: Azores, Madeira, Canary Islands,
French Overseas Departments, Åland Islands, Athos, Ceuta, Melilla, Helgoland, Büsingen
am Hochrhein, Campione d'Italia and Livigno) and the territory of the United Kingdom of
Great Britain and Northern Ireland excluding the British Overseas Territories (e.g. Bermuda,
Cayman Islands, Falkland Islands).
3. The manufacturer's warranty does not apply to countries not listed above. The conditions
of the additional warranty may be determined by the Seller.
4. In some countries, it is possible to extend the warranty to a limited period of 120 months
(10 years).The complete terms and conditions and the warranty extension registration
form are available at WWW.KINDERKRAFT.COM
5. The warranty is valid only in the territory indicated in paragraph 2.
6. Claims must be made by completing the form available at WWW.RMA.KINDERKRAFT.COM
7. The warranty does not cover:
A. Cosmetic damage, including but not limited to: scratches, dents and cracks in plastic,
unless the failure is due to a material or manufacturing defect;
B. Damage resulting from misuse or poor maintenance - including but not limited to:
mechanical damage to products caused by misuse or poor maintenance;
• Refer to the instructions for use and installation of the product contained in the user
manual;
C. Damage caused by improper assembly, installation or disassembly of products and/or
accessories;
• Refer to the instructions for use and installation of the product contained in the user
manual;
D. Damage caused by corrosion, mould or rust, resulting from improper maintenance,
care and storage;

19
E. Damage caused by normal wear and tear or otherwise resulting from the normal
passage of time;
• This includes: tears or punctures in inner tubes; tyre damage; tyre tread damage;
fading of fabrics resulting from mechanical use (e.g. on joints and covering of moving
parts);
F. Damage or erosion caused by sun, perspiration, detergents, storage conditions or
frequent washing, etc;
G. Damage caused by accident, abuse, misuse, fire, contact with liquid, earthquake or
other external causes;
H. Products that have been modified to change functionality without 4Kraft's written
consent;
I. Products from which the serial number or lot number has been removed or tampered
with in any way;
J. Damage caused by the use of third party components or products - including but not
limited to: cup holders, umbrellas, reflectors, bells;
K. Damage caused by transport or by ground handling service providers.
8. The warranty period for accessories included with the product is 6 months from the date
of sale, excluding the faults described above.
9. These warranty conditions are complementary to the Customer's statutory rights with
respect to 4KRAFT sp. z o.o. The warranty does not exclude, limit or suspend the Customer's
rights under warranty for defects in goods sold.
10. The full text of the Terms and Conditions of the Warranty is available on the website
WWW.KINDERKRAFT.COM
All rights to this data are entirely reserved to 4Kraft Sp. z o.o. Any unauthorized use or misuse,
including usufruct, copying, duplication and sharing, wholly or partially, without consent of
4Kraft Sp. z o.o. may result in legal consequences.
ES
Estimado cliente!
Gracias por comprar un producto de Kinderkraft.
Diseñamos nuestros productos pensando en sus hijos, siempre nos preocupamos
por la seguridad y la calidad, asegurando la comodidad de haber elegido lo mejor.
IMPORTANTE, GUÁRDELAS PARA
EL FUTURO, LÉALAS CON

20
ATENCIÓN.
INSTRUCCIONES Y PRECAUCIONES DE SEGURIDAD
ADVERTENCIA
● Sea consciente de los peligros que representan los fuegos abiertos y otras
fuentes de calor fuertes como los radiadores/calentadores eléctricos o de gas,
etc. en las proximidades del producto.
● No coloque el estante cerca de una fuente de calor o una ventana.
● No utilice el producto si alguna pieza está dañada, rota o faltante, utilice sólo las
piezas aprobadas por el fabricante.
● Todos los herrajes y accesorios de montaje deben ser apretados firmemente
durante la instalación y deben ser revisados regularmente y apretados de nuevo
si es necesario.
● No deje a sus hijos solos para evitar que se suban a los muebles.
● Carga máxima de los estantes - 28 kg.
● El producto no es un juguete.
● El producto debe instalarse de acuerdo con las instrucciones que se indican a
continuación. La instalación incorrecta aumenta el riesgo de accidentes y daños.
● Para evitar que se vuelque, el producto debe utilizarse con el soporte de pared
suministrado.
1. Lista de elementos - 5
2. Montaje de la caja de juguetes :
Se requiere un destornillador de cabeza Phillips y un destornillador plano
para la instalación. La instalación debe hacerse en una superficie suave que
no dañe la superficie de los elementos. Para la instalación se necesitan dos
personas.
I. Comience la instalación del estante colocando el lado del estante (A) y
cuatro travesaños (C) perpendiculares entre sí. Atornille los travesaños a la
pared con los tornillos (1), asegurándose de que los agujeros son adecuados.
II. Coloque dos tablones perpendiculares entre sí (E y H). El tablón más ancho debe ser colocado
con la muesca hacia el suelo. Preste atención a los agujeros. Entonces conecte los dos tablones
con tornillos (5).
III. Ate los conectores (2) y los tacos (4) a la estructura hecha en el paso II. Preste atención a los
agujeros. Los conectores (2) deben ser insertados de tal manera que los enganches de los
conectores sean compatibles con los agujeros de las superficies laterales del tablón.
Suavemente fije los tacos (4) en el tablón, pero asegúrese de que estén estables. Fije la
estructura a la estructura hecha en el paso I con los tornillos (3). Coloque el tablón (F) de manera
que se pueda ver la muesca a lo largo del tablón. Inserte los conectores (2) de manera que los
Pagina se încarcă...
Pagina se încarcă...
Pagina se încarcă...
Pagina se încarcă...
Pagina se încarcă...
Pagina se încarcă...
Pagina se încarcă...
Pagina se încarcă...
Pagina se încarcă...
Pagina se încarcă...
Pagina se încarcă...
Pagina se încarcă...
Pagina se încarcă...
Pagina se încarcă...
Pagina se încarcă...
Pagina se încarcă...
Pagina se încarcă...
Pagina se încarcă...
Pagina se încarcă...
Pagina se încarcă...
Pagina se încarcă...
Pagina se încarcă...
Pagina se încarcă...
Pagina se încarcă...
Pagina se încarcă...
Pagina se încarcă...
Pagina se încarcă...
Pagina se încarcă...
Pagina se încarcă...
Pagina se încarcă...
Pagina se încarcă...
Pagina se încarcă...
Pagina se încarcă...
Pagina se încarcă...
Pagina se încarcă...
Pagina se încarcă...
-
 1
1
-
 2
2
-
 3
3
-
 4
4
-
 5
5
-
 6
6
-
 7
7
-
 8
8
-
 9
9
-
 10
10
-
 11
11
-
 12
12
-
 13
13
-
 14
14
-
 15
15
-
 16
16
-
 17
17
-
 18
18
-
 19
19
-
 20
20
-
 21
21
-
 22
22
-
 23
23
-
 24
24
-
 25
25
-
 26
26
-
 27
27
-
 28
28
-
 29
29
-
 30
30
-
 31
31
-
 32
32
-
 33
33
-
 34
34
-
 35
35
-
 36
36
-
 37
37
-
 38
38
-
 39
39
-
 40
40
-
 41
41
-
 42
42
-
 43
43
-
 44
44
-
 45
45
-
 46
46
-
 47
47
-
 48
48
-
 49
49
-
 50
50
-
 51
51
-
 52
52
-
 53
53
-
 54
54
-
 55
55
-
 56
56


în alte limbi
- français: Kinderkraft RACOON Manuel utilisateur
- slovenčina: Kinderkraft RACOON Používateľská príručka
- polski: Kinderkraft RACOON Instrukcja obsługi
- Deutsch: Kinderkraft RACOON Benutzerhandbuch
- italiano: Kinderkraft RACOON Manuale utente
- español: Kinderkraft RACOON Manual de usuario
- português: Kinderkraft RACOON Manual do usuário
Lucrări înrudite
-
Kinderkraft Sienna Manual de utilizare
-
-
-
-
-
-
-
-
-