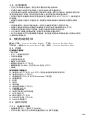
Atos Provox Electrolarynx Instrucțiuni de utilizare
- Tip
- Instrucțiuni de utilizare

Electrolarynx
IFU
MD
1
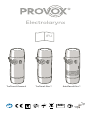
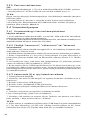
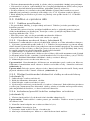
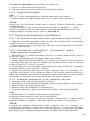
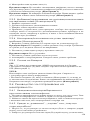
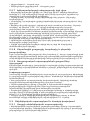
TruTone® Emote®
TruTone® Plus™
SolaTone® Plus™
RT
-20
25
-4
77

2
A
B
D
E
G
C
K
L
V
U
H
M
F
D
A
V
L
E
G
C
K
F
J
I
1.
SolaTone®
Plus™ TruTone®
Emote®
TruTone®
Plus™

3
1
34
2
STOP
2.
1
23
3.

4
1
23
4.
5.

5
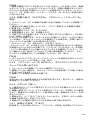
Limited warranty
For international warranty contact your local distributer.
Patent and trademarks
Provox®, TruTone®, SolaTone® and Emote® are registered trademarks owned by
Atos Medical AB.
For information about protective rights (e.g. patents), please refer to our web page
www.atosmedical.com/patents

6
Contents
EN - ENGLISH ..............................................................7
DE - DEUTSCH ........................................................... 15
NL - NEDERLANDS .................................................... 24
FR - FRANÇAIS ..........................................................33
IT - ITALIANO ............................................................. 42
ES - ESPAÑOL ............................................................51
PT - PORTUGUÊS ....................................................... 60
SV - SVENSKA ...........................................................69
DA - DANSK .............................................................. 77
NO - NORSK ..............................................................85
FI - SUOMI .................................................................93
LV - LATVISKI ...........................................................101
CS - ČESKY ..............................................................109
HU - MAGYAR ........................................................117
SK - SLOVENČINA ...................................................126
PL - POLSKI ..............................................................134
RO - ROMÂNĂ .......................................................143
HR - HRVATSKI.........................................................151
EL - ΕΛΛΗΝΙΚΑ ........................................................ 159
BG - БЪЛГАРСКИ ...................................................168
TR - TÜRKÇE.............................................................177
HY - ՀԱՅԵՐԵՆ ....................................................... 185
RU - РУССКИЙ ....................................................... 195
MS - BAHASA MELAYU ...........................................204
JA - 日本語 ..............................................................213
KO - 한국어한국어 .............................................................222
ZHTW - 繁體中文 ......................................................230
ZHCN - 简体中文 .....................................................238
HE - ............................................................253
AR - ........................................................... 260

7
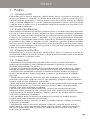
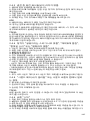
1. Descriptive information
1.1 Intended use
and intended for use in the absence of the ability to use the larynx to produce
sound. When held against the skin in the area of the voicebox, or by insertion of
a tube in the oral cavity (with an oral adapter), the device generates mechanical
vibrations which resonate in the oral and nasal cavities and can be modulated by
the tongue and lips in a normal manner, thereby allowing the production of speech.
1.2 Contraindications
The device should only be used in accordance with the Instructions for Use.
Users without the physical, cognitive, or mental ability required to operate the
device themselves, should not use the device independently and should only use
The device should not be directly applied over frail neck tissue with weak blood
vessels. This can cause tissue damage or bleeding. Patients with this condition
clinician about how to use the device and where to safely apply it.
1.3 Description of the device
undamaged skin and intended for use in the absence of the larynx or the inability
to use the larynx to produce sound.
1.4 Warnings
• Failure to follow the safety instructions could result in personal injury, or
damage the device. Read all safety information below before using the device.
• Incorrect use of the device or not following instructions in this IFU can cause
personal injury and/or damage the device.
• Do not use the device between persons, this can cause cross contamination.
The device is intended for single patient use only.
• Do not turn on, or use, or charge the device if it has been exposed or dropped
in water or other liquids, as it can cause personal injury and/or damage the
device.
• Before charging inspect the charger for damage. A damaged or non-
injury or damage the device.
•
personal injury, or damage to the device.
• Do not attempt to charge non-rechargeable batteries, as this could result in
personal injury or damage the device.
• Do not replace rechargeable batteries with non-rechargeable batteries, as this
could result in personal injury or damage the device.
• Do not physically damage the batteries, as this could result in personal injury
or damage the device.
• Do not store batteries in a pocket, purse, box or drawer etc. where they may
short-circuit each other, or be short-circuited by conductive materials such as
coins or keys, as this could result in personal injury or damage the device.
• Do not use a leaking battery as it could result in personal injury or damage
the device.
ENGLISH

8
• Do not expose the lithium battery to temperatures outside the temperature
the device.
• Use caution when replacing the batteries. Incorrect installation of the
this could result in personal injury or damage the device or other property.
• The device contains a magnet that generates magnetic and electromagnetic
as certain procedures or treatments. Maintain a minimum distance of 6"/15 cm
between the device and any medically implanted devices. Consult with your
physician before any medical procedure or treatment. If interference between
the device and any medically implanted device is suspected, discontinue use
and consult with your physician.
• Do not insert any part of the device or accessories into the stoma, as this
could result in personal injury.
• Do not modify the device, as it could result in personal injury or damage the
device.
• The device contains small parts that may become dislodged and present a
choking hazard. Keep away from small children.
1.5 Precautions
• Be careful not to damage the battery wiring when opening/closing the battery
cap.
• Failure to follow maintenance instructions could result in personal injury
and/or damage the device.
•
or altered device, as this could result in personal injury and/or damage the
device.
• The device and batteries may become warm (up to 45 °C/113 °F) during
charging. Allow the device to cool down before use.
• The device may become warm during use. Take necessary precautions when
placing on neck for use.
• With extensive use, vibrations can cause discomfort for some sensitive users.
•
interference from other devices.
• Be careful not to chew/bite on the oral tube as it could cause dental damages.
• Be careful not to drop the device, as it could cause damage to the device.
•
individuals who experiences shoulder dysfunction.
2. Instructions for use
Denitions: TTE = Provox TruTone Emote, TTP = Provox TruTone Plus,
TTE/P = both Provox TruTone products, STP = Provox SolaTone Plus
2.1 Content
Box content
• Electrolarynx
• IFU - Instructions for use
• Oral adapter
• Oral tube variety pack
• Micro USB-cable
• Extra sharp sound head (TTE/P)
• 2 AA NiMH rechargeable batteries (STP)
• Lanyard

9
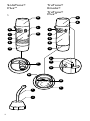
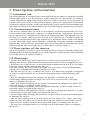
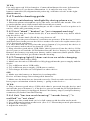
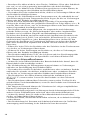
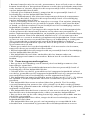
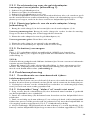
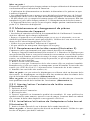
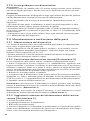
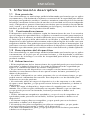
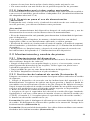
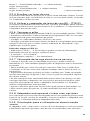
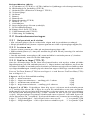
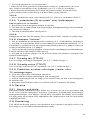
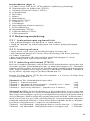
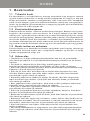
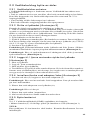
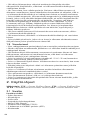
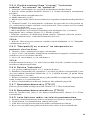
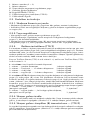
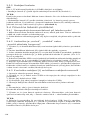
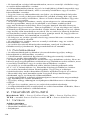
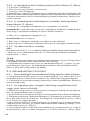
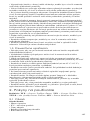
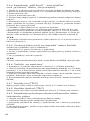
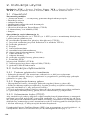
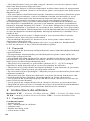
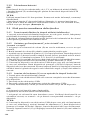
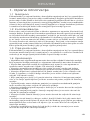
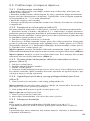
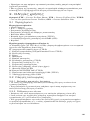
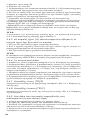
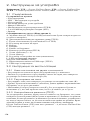
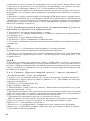
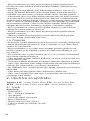
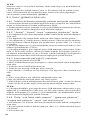
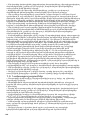
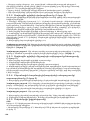
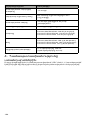
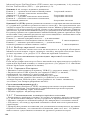
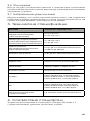
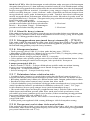
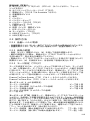
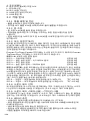
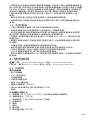
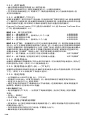
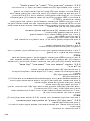
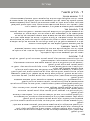
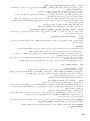
Part specication (Illustration 1)
A. Sound head (x2 TTE/P) (x1 STP) (including sound button and foam ring)
B. Sound head spacer (TTE/P)
C. Power button (Emotion™ button in TTE/P)
D. Volume knob
E. Body
F. Battery
G. Battery cap
H. Battery connector (TTE/P)
I. Oral tube (2 + 2)
J. Oral adapter
K. Tone (pitch) adjustment knob
L. LED indicator light
M. MODE button (TTE/P)
U. USB dust cover (TTE/P)
V. USB charge jack
2.2 Operating instruction
2.2.1 Volume level and power
•
• Turn the device on and adjust the volume by turning the volume knob
upwards (D).
2.2.2 Adjusting tone
• Adjust the tone by turning the tone adjustment knob (K).
• Keep the power button (C) pressed while making your initial adjustment to
• Using the tone knob (K) without holding the power button (C) still changes
the tone without the ability to hear it.
2.2.3 Setting the mode (TTE/P)
(M) and the power button (C). The mode changes immediately, but if you continue
to hold the power button, the device will beep to indicate the new mode setting.
The number of beeps and the tone of the beeps indicate which mode it is in.
Provox TruTone Emote (TTE) has six modes 1-6 and Provox TruTone Plus (TTP)
has two modes 1-2.
Modes 1-4: Four preset ranges.
Mode 1 – Nearly monotone 1 Beep
Mode 2 – Low tonal variations —1/2-octave range 2 Beeps
Mode 3 – Medium tonal variations 3 Beeps
Mode 4 – High tonal variations—2-octave range 4 Beeps
Modes 5-6 (TTE): Volume mode lets you control the volume with the power
button (C), instead of the tone (K). This is for people who do not use the tone
control, and it allows volume control without moving the knob. A very light touch
full volume. The volume control knob still limits your max volume. Changing
into these modes creates a “Whoop“ sound (with an increasing tone), rather than
a steady tone beep.
Mode 5 – Low Sensitivity—full volume requires more pressure. 2 “Whoops“
Mode 6 – High Sensitivity—full volume requires less pressure. 3 “Whoops“

10
2.2.4 Choosing sound head
If you have hard neck tissue or are in a loud environment. The grey sound head
can be used because of its sharper sound. (See 2.3.2 Replacing the sound head)
2.2.5 Using the sound head spacer (B) - (TTE/P)
If you regularly use a higher tone and prefer the tonal qualities without a sound
head spacer you may remove it. (See 2.3.3 Add/remove sound head spacer)
2.2.6 Charging battery
• Pull the USB dust cover (U) out at the top end. (TTE/P)
• Insert micro-USB into the USB charge jack (V).with an approved plug for
wall charging.
• Check that the LED indicator light (L) is lit.
• Unplug the unit when the charging is complete to conserve power. Use until
volume begins to fade, which is at 80% drained.
LED indicator light (L)
• Low battery (TTE/P) - The light turns on when you press the power button
signaling that it is approaching time to charge.
• Charging - Solid light
• Complete charging - Flashing light
2.2.7 Electrolarynx neck placement
• Place the sound head (A) against your neck and activate the power button (C).
Do not insert any part of the device or accessories into the stoma.
• Speak as sound is carried into your mouth. Do not force air out.
• Ensure an airtight seal between the sound head and your neck.
•
1/8" position change can have a great impact on the sound volume.
• If you are unable to achieve sound transmission through your neck or are
unable to place the device against your neck for medical reasons, try cheek
placement or use the use the oral adapter (See installing/using optional oral
adapter/tube 2.3.4).
• Adjusting the base tone up or down may produce a better voice.
• Mid-range tones are easier to hear for most people.
2.2.8 Optional oral adapter and oral tubes
If neck placement does not suit you because of a tender neck or excess buzzing
you can use the oral adapter. (Installing/using oral adapter/tube 2.3.4)
2.2.9 Guidelines for demonstration use
Warning!
The oral adapter, oral tube and sound head are for single-patient use only, and
must not be reused between patients.
Precaution!
Maintain the device after each patient and demonstration use according to the
maintenance instructions.
• Demonstration use is intended to determine patient suitability for the device.
• The users shall clean and disinfect their hands with isopropyl alcohol (IPA)
or with other suitable disinfectant, or use gloves.
• The sound head (A) (including the sound button and foam ring) shall be
replaced and discarded between each patient (2.3.2 Replacing the sound head).
•
of device.

11
2.3 Maintenance and part changing
2.3.1 Maintenance of device
• Maintenance actions are the responsibility of the user. Maintenance should
be performed after each use.
• Wipe the device with a clean, dry cloth or if necessary, a slightly damp cloth
(not dripping wet). Use water with mild soap or Isopropylalcohol 50-75%.
• Be careful not to get moisture inside the device
• Do not use electrical or spray cleaners
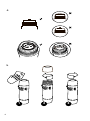
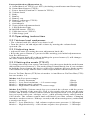
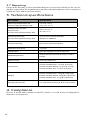
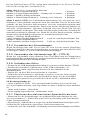
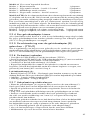
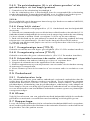
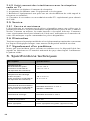
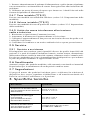
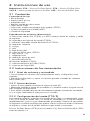
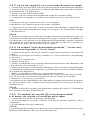
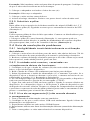
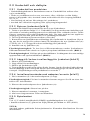
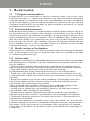
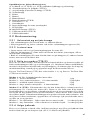
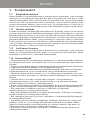
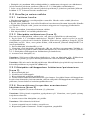
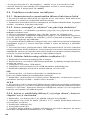
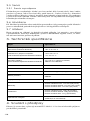
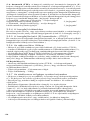
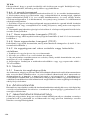
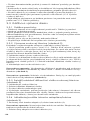
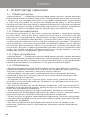
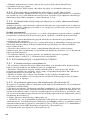
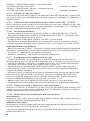
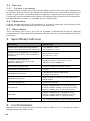
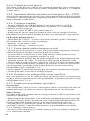
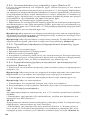
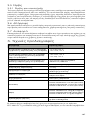
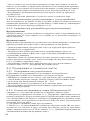
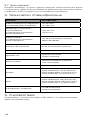
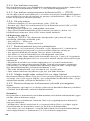
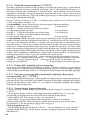
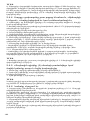
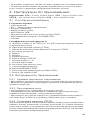
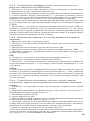
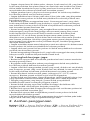
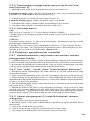
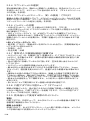
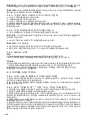
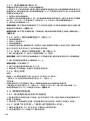
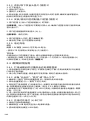
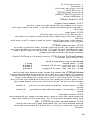
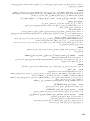
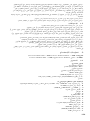
2.3.2 Replacing the sound head (Illustration 5)
Contact your local representative for replacement sound heads.
1. Wipe down the device according to 2.3.1. Maintenance. Be sure to apply light
pressure and wipe the power button with a circular or twisting motion. After wiping
down the body, wipe down the sound head cap, being careful to not apply excess
pressure that would cause the top sound button to be dislodged.
2. Remove the sound head by unscrewing it.
3. Make sure that the sound head spacer (B) is still installed. Replace it if it is
broken or missing before installing the new sound head (A) (TTE/P) (See. 2.3.3
Add/remove sound head spacer).
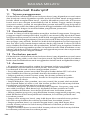
4. Install a new sound head (A).
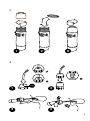
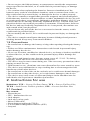
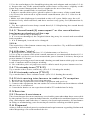
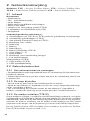
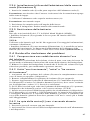
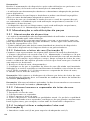
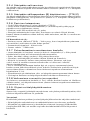
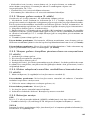
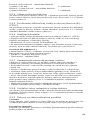
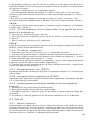
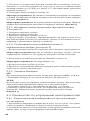
Precaution: Do not remove the silicone diaphragm underneath the sound head.
The silicone diaphragm should be retained in the groove on the coil’s/actuator’s
stem. (Illustration 3)
Precaution: Do not to twist the coil/actuator. The wires should wind smoothly
around the coil/actuator. (Illustration 3)
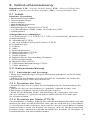
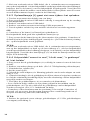
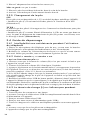
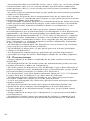
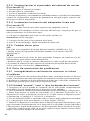
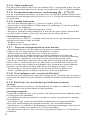
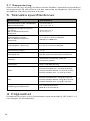
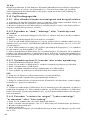
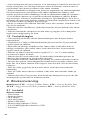
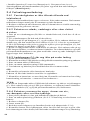
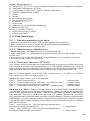
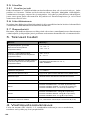
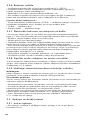
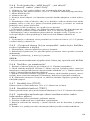
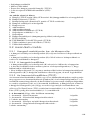
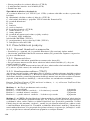
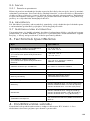
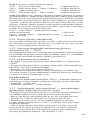
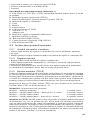
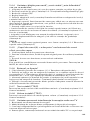
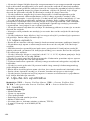
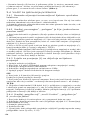
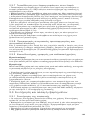
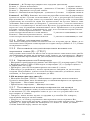
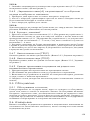
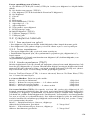
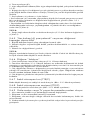
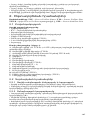
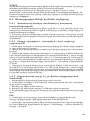
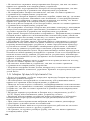
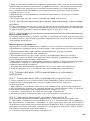
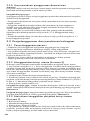
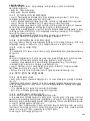
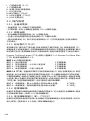
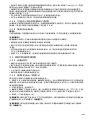
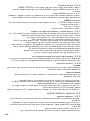
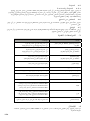
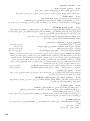
2.3.3 Add/remove sound head spacer (Illustration 2)
1. Unscrew the sound head.
2. Add/remove the spacer.
3. Screw the sound head back on.
4. Test the device, listening to the tonal qualities. If you prefer the tonal qualities
without the spacer, be sure to store the spacer in a safe place, such as the box
your device came in.
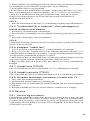
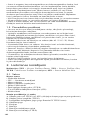
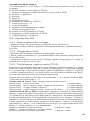
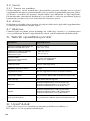
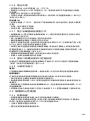
2.3.4 Installing/using oral adapter/tube (Illustration 3)
1. Insert oral tube (I) into top of oral adapter (J).
Precaution: Do not insert oral tube beyond stop. Ensure that the tube does not
protrude into the cap area.
2. Place oral adapter over sound head (A).
Precaution: Do not twist it on.
3. Place oral tube into mouth, at the corner of the mouth.
4. Activate electrolarynx. Speak around oral tube.
2.3.5 Changing battery
STP
Two 1.5 V Nickel Metal Hydride (NiMH) rechargeable AA cells.
• Install battery (F) by following the arrows placed inside of the STP
(Illustration 1)

12
TTE/P:
Use only approved Li-Ion batteries. Contact distributors for more information.
•
battery connector (H) alignment tab points up, with the red wire to the right.
(Illustration 1)
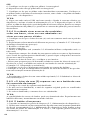
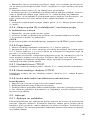
2.4 Trouble shooting guide
2.4.1 Not satisfactory intelligibility during phone use
1. Place the phone microphone up by the nose, not below the mouth. This will
get microphone away from stoma and electrolarynx sound.
2. Reduce the volume of the electrolarynx so the volume level is as quiet as it
can be, while still generating a tone.
2.4.2 Unit “dead“, “broken” or “just stopped working”
1. Make sure that the volume knob (D) is not turned all the way down which
3. Lightly press the power button (C) and increase pressure. If the device activates
and deactivates in the process the device needs to be sent in for replacement. (See
2.5.1 Service & assistance)
4. If the LED turns on every time the power button (C) is pressed, the device is
low on battery and needs to be charged. (TTE/P)
5. Plug a known-good micro USB cable, that is powered, into the device. If the
Remove the battery cap and press battery cable connector (black plastic where
the black and red wires go) further into the housing.
2.4.3 Charging light (L) does not turn on while charging
1. Test power outlet with a lamp.
2. Make sure the micro USB cable is fully plugged into the power supply and the
device.
5. Test charger & cable on a cell phone or other device.
STP
6. Make sure the battery (or batteries) is rechargeable.
Device will not charge non-rechargeable batteries.
7. Make sure the batteries are inserted correctly. Check to make sure the batteries
have proper orientation with the battery + going to the device +.
TTE/P:
8. Plug a known-good micro USB cable that is powered into the device and
then the device battery is unplugged. Remove the battery cap (G) and press battery
connector (H) further into the housing.
2.4.4 Unit “has too much buzzing” “sounds funny“, “is
muffled“ or “not clear“
1. Make sure the sound head (A) is in full contact with the skin on the neck.
3. Reduce the volume (D).
4. Adjust the tone (K).

13
5. Use the oral adapter (See Installing/using the oral adapter and oral tube 2.3.4).
6. Inspect the cap. If the sound button seems loose or has move slightly or the
foam ring seems damaged the device might need a new foam ring.
7. Remove the sound head (A) and look inside.
• Is there a small rubber piece glued in place in the center of the sound head
(A)? If not, the unit needs a replacement sound-button. (See 2.5.1 Service &
assistance)
• Make sure the diaphragm is attached to the coil’s post. Make sure the coil
bounces freely when touched, and does not have any gritty feel (Illustration 4)
TTE/P:
1. Try the optional extra sharp sound head (2.3.2 Replacing the sound head)
(Illustration 5)
2.4.5 “Sound head (A) came apart” or the sound button
has been pushed out of the cap
1. Check if foam ring is damaged.
2. If it was not damaged, the original foam ring may be reused and assembled
back together.
3. If it is damaged, it needs to be changed.
TTE/P:
typically a lower mode.
2.4.6 Button “sticks“
1. Read general cleaning advice (2.3.1 Maintenance of device)
2. Use q-tip or cotton swab with a small amount of recommended alcohol (2.3.1
Maintenance of device) to clean around the power button 5-6 times, then press
power button 5-6 times.
3. Alternate pressing power button and cleaning around button with q-tip or cotton
swab. Continue until no longer sticking.
4. Use a thicker piece of paper to remove debris stuck in power button crevice.
2.4.7 Unsteady tone (TTE/P)
Try a mode with a lower sensitivity. (See 2.2.3 Setting the mode)
2.4.8 Unsteady volume (TTE/P)
Try a mode that is not a volume mode. (See 2.2.3 Setting the mode)
2.4.9 Unit causing interference to radio or TV reception
1. Reorient or relocate the receiving antenna.
2. Increase the separation between the equipment and receiver.
the receiver is connected.
4. Consult the dealer or an experienced radio/TV technician for help.
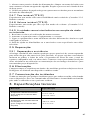
2.5 Service
2.5.1 Service & assistance
The electrolarynx does not contain any serviceable parts other than those removable
by the patient. Service parts include batteries, sound head, sound head spacer, foam
ring, oral adapter and oral tubes. Contact your local representative for assistance
in using or maintaining your electrolarynx and for ordering available parts.
2.6 Disposal
Always follow medical practice and national requirements regarding biohazards
when disposing of a used medical device.

14
2.7 Reporting
Please note that any serious incident that has occurred in relation to the device
shall be reported to the manufacturer and the national authority of the country in
which the user and/or patient resides.
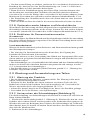
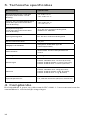
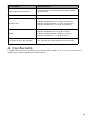
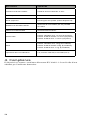
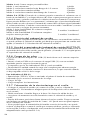
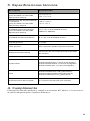
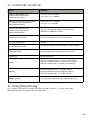
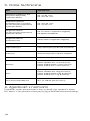
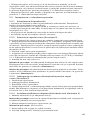
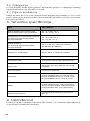
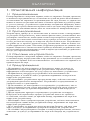
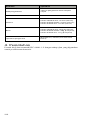
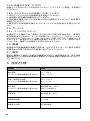
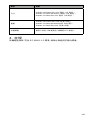
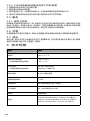
3. Technical specifications
Description Specification
Operating temperature (to
maintain optimal battery life)
+5°C to +25°C
+41°F to +77 °F
Storage and transport
temperature
(to maintain optimal battery life)
-20 °C to +25 °C
-4°F to +77°F
Operating humidity
(to maintain optimal battery life)
15% to 93% relative humidity,
700 hPa to 1060 hPa
Storage humidity 0% to 45% relative humidity
Expected service life 1-5 years
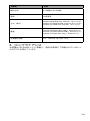
Applied part Type BF Applied Part (entire device)
Mode of operation 30 minutes of activation during a24hour
period
Power source Internally powered
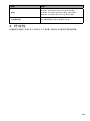
Dimensions
Provox SolaTone Plus 118 mm (4.6inch);
Provox TruTone Emote 113mm (4.5 inch);
Provox TruTone Plus 113 mm (4.5 inch)
Weight
Provox SolaTone Plus 130 g (0.29pounds);
Provox TruTone Emote 130g (0.29 pounds);
Provox TruTone Plus 131 g (0.29 pounds)
Charge specification 5V, 750mA minimum (or 0.75A minimum)
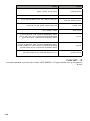
4. Compliance
Device is tested and conforms to the IEC 60601-1-2 with test level adopted for
domestic environment.

15
1. Beschreibung
1.1 Verwendungszweck
Eine elektronische Sprechhilfe ist ein akkubetriebenes Produkt zur externen
Anwendung zur Tonerzeugung nach einer Laryngektomie, nach der diese Funktion
des Kehlkopfs nicht mehr vorhanden ist. Beim Anlegen des Produktes an die Halshaut
im anatomischen Kehlkopfbereich oder durch das Einführen eines Röhrchens in
die Mundhöhle (Nutzung mit oralem Adapter) wird die mechanische Schwingung,
die das Produkt erzeugt, in die Mundhöhle übertragen, wo der Ton von Zunge
und Lippen normal geformt werden kann. So wird das Sprechen ermöglicht.
1.2 Kontraindikationen
Das Produkt darf nur gemäß der Gebrauchsanweisung verwendet werden.
Anwender, die nicht über die erforderlichen körperlichen, kognitiven oder geistigen
Fähigkeiten verfügen, um das Produkt selbst zu bedienen, dürfen das Produkt
nicht eigenständig verwenden und es nur unter ausreichender Aufsicht eines Arztes
schwachem Halsgewebe mit schwachen Blutgefäßen angebracht werden. Dies
kann zu Gewebeschäden oder Blutungen führen. Patienten mit diesem Zustand
sollten das Produkt nur dann verwenden, wenn sie von ihrem Arzt gezielt darüber
unterwiesen wurden, wie es zu verwenden und wo es sicher anzuwenden ist.
1.3 Produktbeschreibung
Eine elektronische Sprechhilfe ist ein akkubetriebenes Produkt zur externen
Anwendung auf unbeschädigter Haut nach einer totalen Laryngektomie oder
wenn der Kehlkopf nicht dazu genutzt werden kann.
1.4 Warnhinweise
• Die Nichtbeachtung der Sicherheitshinweise kann zu Verletzungen oder
zur Beschädigung des Produkts führen. Lesen Sie vor der Verwendung des
Produkts alle nachstehenden Sicherheitshinweise.
• Die unsachgemäße Verwendung des Produkts oder die Nichtbeachtung der
Anweisungen in dieser Gebrauchsanweisung kann zu Verletzungen führen
und/oder das Produkt beschädigen.
• Verwenden Sie das Produkt nicht bei weiteren Personen, da dies zu
Kreuzkontaminationen führen kann. Das Produkt darf nur von einem Patienten
benutzt werden.
• Schalten Sie das Produkt nicht ein, verwenden Sie es nicht und laden Sie es
nicht auf, wenn es in Wasser oder andere Flüssigkeiten getaucht oder fallen
gelassen wurde, da dies zu Verletzungen und/oder Schäden am Produkt führen
kann.
•
beschädigtes oder nicht funktionsfähiges Ladegerät darf nicht mehr verwendet
werden, da es Brände, Verletzungen oder Schäden am Produkt verursachen
kann.
• Verwenden Sie nur zugelassene Ladegeräte, da die Verwendung von nicht
zugelassenen Ladegeräten zu Bränden, Verletzungen oder Schäden am Produkt
führen kann.
•
Verletzungen führen oder das Produkt beschädigen könnte.
•
Batterien, da dies zu Verletzungen führen oder das Produkt beschädigen könnte.
• Beschädigen Sie die Akkus nicht, da dies zu Verletzungen führen oder das
Produkt beschädigen könnte.
DEUTSCH

16
• Bewahren Sie Akkus nicht in einer Tasche, Geldbörse, Kiste oder Schublade
usw. auf, wo sie sich gegenseitig kurzschließen oder durch leitfähige
Materialien wie Münzen oder Schlüssel kurzgeschlossen werden können, da
dies zu Verletzungen oder Schäden am Produkt führen kann.
• Verwenden Sie keine auslaufende Akku, da dies zu Verletzungen führen oder
das Produkt beschädigen könnte.
• Setzen Sie die Lithiumakkus nicht Temperaturen aus, die außerhalb der auf
dem Etikett angegebenen Temperaturbereiche liegen, da dies zu Verletzungen
führen oder das Produkt beschädigen könnte.
• Seien Sie beim Austauschen der Akkus vorsichtig. Ein unsachgemäßes
Einlegen der Akkus kann eine gefährliche Situation zur Folge haben, wie z. B.
extreme Hitze oder Feuer, was zu Verletzungen führen oder das Produkt oder
andere Gegenstände beschädigen könnte.
• Das Produkt enthält einen Magneten, der magnetische und elektromag-
netische Felder erzeugt, die Herzschrittmacher oder andere implantierbare
Zwischen dem Produkt und einem medizinisch implantierten Produkt ist ein
Mindestabstand von 6 Zoll/15 cm erforderlich. Konsultieren Sie vor jedem
Gebrauch des Produktes bei Verdacht auf Störungen zwischen dem Produkt
und einem medizinisch implantierten Produkt ein und wenden Sie sich an
Ihren Arzt.
• Führen Sie keine Teile des Produkts oder des Zubehörs in das Tracheostoma
ein, da dies zu Verletzungen führen kann.
• Nehmen Sie keine Änderungen am Produkt vor, da dies zu Verletzungen
führen oder das Produkt beschädigen könnte.
• Das Produkt enthält kleine Teile, die sich lösen und eine Erstickungsgefahr
darstellen können. Halten Sie die Sprechhilfe von kleinen Kindern fern.
1.5 Vorsichtsmaßnahmen
•
Batteriekabel nicht beschädigt werden.
• Die Nichtbeachtung der Wartungsanweisungen könnte zu Verletzungen
und/oder zur Beschädigung des Produkts führen.
•
auf, da dies zu Verletzungen und/oder Schäden am Produkt führen könnte.
•
45 °C/113 °F) warm werden. Lassen Sie das Produkt vor dem Gebrauch
abkühlen.
•
erforderlichen Vorsichtsmaßnahmen, wenn Sie das Produkt zum Gebrauch am
Hals positionieren.
•
Benutzer Unbehagen hervorrufen.
• Das Produkt kann aufgrund von Störungen durch elektromagnetische Felder
anderer Geräte Fehlfunktionen aufweisen oder nicht mehr funktionieren.
• Achten Sie darauf, dass Sie nicht auf den Mundschlauch kauen/beißen,
da dies zu Zahnschäden führen könnte.
• Achten Sie darauf, das Produkt nicht fallen zu lassen, da es dadurch beschädigt
werden könnte.
• Das Produkt kann bei Personen mit Schulterdysfunktionen ein Gefühl der
Anstrengung und Ermüdung in der Schulter/im Arm hervorrufen.

17
2. Gebrauchsanweisung
Denitionen: TTE = Provox TruTone Emote, TTP = Provox TruTone Plus,
TTE/P = beide Provox TruTone Produkte, STP = Provox SolaTone Plus
2.1 Inhalt
Inhalt der Verpackung
• Elektronische Sprechhilfe
• Gebrauchsanweisung
• Oraler Adapter
• Mundschlauch-Sortiment
• Micro-USB-Kabel
• Schraubkappe für klareren Ton (TTE/P)
•
• Umhängeband
Teilespezikation (Abbildung 1)
A. Schraubkappe (x 2 TTE/P) (x 1 STP) (einschließlich Membran und
B. Abstandsring (TTE/P)
C. An-/Aus-Schalter (Emotion™-Taste in TTE/P)
D. Lautstärkeregler
E. Gehäuse
F. Akku
G. Batteriefachdeckel
H. Batterieanschluss (TTE/P)
I. Mundschlauch (2 + 2)
J. Oraler Adapter
K. Rädchen für die Toneinstellung (Tonhöhe)
L. LED-Anzeigeleuchte
M. MODUS-Taste (TTE/P)
U. USB-Staubschutzabdeckung (TTE/P)
V. USB-Ladebuchse
2.2 Gebrauchsanleitung
2.2.1 Lautstärke und Leistung
• Wenn der Lautstärkeregler (D) ganz nach unten gedreht ist, ist das Produkt
ausgeschaltet.
• Schalten Sie das Produkt ein und stellen Sie die Lautstärke ein, indem Sie
den Lautstärkeregler nach oben drehen (D).
2.2.2 Einstellen des Tons
• Stellen Sie den Ton ein, indem Sie das Rädchen für die Toneinstellung (K)
drehen.
• Halten Sie den An-/Aus-Schalter (C) gedrückt, während Sie Ihre erste
Einstellung vornehmen, um die Unterschiede zu hören.
• Wenn Sie das Rädchen für die Toneinstellung (K) verwenden, ohne den
An-/Aus-Schalter (C) gedrückt zu halten, ändert sich der Ton, ohne dass
Sie es hören können.
2.2.3 Einstellen des Modus (TTE/P)
Um den Modus zu ändern, nehmen Sie zunächst den Batteriefachdeckel ab und
drücken Sie dann sowohl die Modus-Taste (M) als auch den An-/Aus-Schalter
(C). Der Modus ändert sich sofort, aber wenn Sie den An-/Aus-Schalter weiterhin
gedrückt halten, ertönt ein Piepton, der anzeigt, dass die Modus-Einstellung
geändert wurde. Anhand der Anzahl und Höhe der Pieptöne ist erkennbar, in

18
Provox TruTone Emote (TTE) verfügt über sechs Modi (1–6), Provox TruTone
Plus (TTP) verfügt über zwei Modi (1–2).
Modi 1 bis 4: Vier voreingestellte Bereiche.
Modus 1: Fast monotoner Klang 1 Piepton
Modus 2: Geringe Klangvariationen – Umfang von 1/2 Oktave 2 Pieptöne
Modus 3: Mittlere Klangvariationen 3 Pieptöne
Modus 4: Hohe Klangvariationen – Umfang von 2 Oktaven 4 Pieptöne
Modi 5 und 6 (TTE): Im Lautstärkemodus können Sie mit dem An-/Aus-
Schalter (C) die Lautstärke anstatt des Tons (K) einstellen. Dies ist für Anwender
gedacht, die den Tonregler nicht benutzen, was eine Lautstärkeregelung ohne
Nutzung des Rädchens ermöglicht. Durch sehr leichte Berührung können Sie
mit einer „Flüsterstimme“ sprechen, während ein fester Druck den Ton mit
voller Lautstärke wiedergibt. Über den Lautstärkeregler stellen Sie weiterhin die
maximal erreichbare Lautstärke ein. Wenn Sie in diese Modi wechseln, ertönen
anstatt eines gleichmäßigen Pieptons an- und abschwellende Töne.
volle Lautstärke erfordert höheren Druck. 2-mal an- und abschwellender Ton
volle Lautstärke erfordert weniger Druck. 3-mal an- und abschwellender Ton
2.2.4 Auswählen der Schraubkappe
Wenn Ihr Halsgewebe sehr fest ist oder Sie sich in einer lauten Umgebung
zu erzeugen. (Siehe 2.3.2 Auswechseln der Schraubkappe)
2.2.5 Verwenden des Abstandsrings (B) – (TTE/P)
Wenn Sie regelmäßig einen höheren Ton verwenden und die klanglichen
Eigenschaften ohne Abstandsring bevorzugen, können Sie ihn entfernen. (Siehe 2.3.3
Hinzufügen/Entfernen des Abstandsrings)
2.2.6 Aufladen des Akkus
• Ziehen Sie die USB-Staubschutzabdeckung (U) am oberen Ende heraus. (TTE/P)
• Stecken Sie den Micro-USB-Stecker in die USB-Ladebuchse (V).
Wandsteckdose.
• Prüfen Sie, ob die LED-Anzeigeleuchte (L) leuchtet.
• Ziehen Sie den Netzstecker, um Strom zu sparen, wenn der Ladevorgang
abgeschlossen ist. Verwenden Sie das Produkt so lange, bis die Lautstärke
nachzulassen beginnt. Dies geschieht bei einem zu 80 % entladenen Akku.
LED-Anzeigeleuchte (L)
• Akku schwach (TTE/P) – Die Anzeigeleuchte leuchtet auf, wenn Sie den
ist.
• Akku wird geladen – Dauerlicht
• Ladevorgang abgeschlossen – Blinkendes Licht
2.2.7 Platzieren der elektronischen Sprechhilfe am Hals
• Platzieren Sie die Schraubkappe (A) an Ihrem Hals und betätigen Sie den
An-/Aus-Schalter (C). Führen Sie keine Teile des Produkts oder Zubehörteile
in das Tracheostoma ein.
• Sprechen Sie, während der erzeugte Ton in den Mundraum übertragen wird.
Vermeiden Sie während des Sprechens, Luft herauszupressen.
• Achten Sie auf eine luftdichte Verbindung zwischen Schraubkappe und Hals.

19
• Um den besten Klang zu erhalten, probieren Sie verschiedene Positionen aus.
Beachten Sie, dass bereits eine Positionsänderung von 3 mm/ 1/8 Zoll einen
• Wenn Sie keine Schallübertragung uber Ihren Hals erreichen können oder
das Produkt aus medizinischen Gründen nicht am Hals platzieren können,
versuchen Sie es mit der Wange oder verwenden Sie den oralen Adapter (siehe
Montieren/Verwenden des optionalen oralen Adapters/Mundschlauchs 2.3.4).
• Die Einstellung des Grundtons nach oben oder unten kann zu einer besseren
Stimme führen.
• Töne im mittleren Bereich sind für die meisten Menschen leichter zu hören.
2.2.8 Optionaler oraler Adapter und Mundschläuche
übermäßiger Brummgeräusche nicht zusagt, können Sie den oralen Adapter
verwenden. (Montieren/Verwenden des oralen Adapters/Mundschlauchs 2.3.4)
2.2.9 Richtlinien für Demonstrationszwecke
Warnhinweis!
Der orale Adapter, der Mundschlauch und die Schraubkappe sind für die Anwendung
bei einem einzigen Patienten vorgesehen. Eine Wiederverwendung durch weitere
Patienten ist nicht gestattet.
Vorsichtsmaßnahmen!
Warten Sie das Produkt nach jedem Patienten- und Demonstrationseinsatz gemäß
den Wartungsanweisungen.
• Die Nutzung für Demonstrationszwecke dient dazu, die Eignung des
Produkts für den Patienten festzustellen.
• Benutzer müssen vor der Verwendung ihre Hände mit Isopropanol (IPA) oder
Handschuhe tragen.
•
müssen zwischen den einzelnen Patienten ausgetauscht und entsorgt werden
(2.3.2 Austauschen der Schraubkappe).
• Das Produkt muss vor und nach jedem Patienten gemäß 2.3.1 „Wartung des
Produkts“ abgewischt werden.
2.3 Wartung und Auswechslung von Teilen
2.3.1 Wartung des Produkts
• Für die Wartung ist der Benutzer verantwortlich. Die Wartung sollte nach
jedem Gebrauch durchgeführt werden.
• Wischen Sie das Produkt mit einem sauberen, trockenen Tuch oder bei
Bedarf mit einem leicht feuchten Tuch (nicht tropfnass) ab. Verwenden Sie
Wasser mit milder Seife oder Isopropylalkohol 50–75 %.
• Achten Sie darauf, dass keine Feuchtigkeit ins Innere des Produkts gelangt.
• Verwenden Sie keine Elektro- oder Sprühreiniger.
2.3.2 Austauschen der Schraubkappe (Abbildung 5)
Ihren lokalen Händler.
1. Wischen Sie das Produkt gemäß 2.3.1 Wartung ab. Wischen Sie den An-/Aus-
Schalter mit leichtem Druck und kreisenden oder drehenden Bewegungen ab.
Wischen Sie nach der Reinigung des Gehäuses die Schraubkappe ab. Achten Sie
dabei darauf, dass Sie keinen zu starken Druck ausüben, der dazu führen würde,
dass sich die Membran löst.
2. Entfernen Sie die Schraubkappe.

20
3. Überprüfen Sie, ob der Abstandsring (B) noch angebracht ist. Ersetzen Sie ihn,
wenn er gebrochen ist oder fehlt, bevor Sie die neue Schraubkappe (A) (TTE/P)
montieren (siehe 2.3.3 Hinzufügen/Entfernen des Abstandsrings).
4. Montieren Sie eine neue Schraubkappe (A).
Vorsichtsmaßnahmen: Entfernen Sie nicht die Silikonmembran unter der
Schraubkappe. Die Silikonmembran sollte in der Kerbe auf dem Schaft der Spule/
des Aktuators bleiben. (Abbildung 3)
Vorsichtsmaßnahmen: Verdrehen Sie nicht die Spule / den Aktuator. Die Drähte
sollten sich problemlos um die Spule/den Aktuator legen. (Abbildung 3)
2.3.3 Hinzufügen/Entfernen des Abstandsrings
(Abbildung 2)
1. Schrauben Sie die Schraubkappe ab.
2. Fügen Sie den Abstandsring hinzu oder entfernen Sie ihn.
3. Schrauben Sie die Schraubkappe wieder auf.
4. Testen Sie das Produkt, indem Sie sich die Klangqualitäten anhören. Wenn Sie
die Klangqualität bei Nutzung ohne Abstandsring bevorzugen, bewahren Sie den
Abstandsring an einem sicheren Ort auf, z. B. in der Produktverpackung.
2.3.4 Montieren/Verwenden des oralen Adapters/
Mundschlauchs (Abbildung 3)
1. Setzen Sie den Mundschlauch (I) oben in den oralen Adapter (J) ein.
Vorsichtsmaßnahmen: Führen Sie den Mundschlauch nicht über den
Anschlag hinaus. Achten Sie darauf, dass der Schlauch nicht in den Bereich der
Schraubkappe ragt.
2. Bringen Sie den oralen Adapter auf der Schraubkappe (A) an.
Vorsichtsmaßnahmen: Drehen Sie ihn nicht fest.
3. Platzieren Sie den Mundschlauch am Mundwinkel im Mund.
4. Aktivieren Sie die elektronische Sprechhilfe und sprechen Sie.
2.3.5 Auswechseln des Akkus
STP
Zwei 1,5 V Nickel-Metallhydrid-Akkumulatoren (NiMH) der Größe AA.
• Legen Sie den Akku (F) ein, indem Sie den Pfeilen auf der Innenseite der
STP folgen (Abbildung 1)
TTE/P:
Verwenden Sie nur zugelassene Lithiumionen-Akkus. Weitere Informationen
erhalten Sie bei den Vertriebshändlern.
• Setzen Sie den Akku (F) wie abgebildet ein (Abbildung 1). Er passt nur in
einer Richtung. Das Verbindungsstück des Batterieanschlusses (H) zeigt nach
(Abbildung 1)
2.4 Anleitung zur Fehlerbehebung
2.4.1 Nicht zufriedenstellende Verständlichkeit beim
Telefonieren
1. Platzieren Sie das Mikrofon des Telefons nahe an der Nase, nicht unterhalb
des Mundes. Dadurch wird das Mikrofon vom Tracheostoma und dem Geräusch
der elektronischen Sprechhilfe entfernt.
2. Verringern Sie die Lautstärke der elektronischen Sprechhilfe, sodass die
Lautstärke so leise wie möglich ist, aber immer noch ein Ton erzeugt wird.
Pagina se încarcă ...
Pagina se încarcă ...
Pagina se încarcă ...
Pagina se încarcă ...
Pagina se încarcă ...
Pagina se încarcă ...
Pagina se încarcă ...
Pagina se încarcă ...
Pagina se încarcă ...
Pagina se încarcă ...
Pagina se încarcă ...
Pagina se încarcă ...
Pagina se încarcă ...
Pagina se încarcă ...
Pagina se încarcă ...
Pagina se încarcă ...
Pagina se încarcă ...
Pagina se încarcă ...
Pagina se încarcă ...
Pagina se încarcă ...
Pagina se încarcă ...
Pagina se încarcă ...
Pagina se încarcă ...
Pagina se încarcă ...
Pagina se încarcă ...
Pagina se încarcă ...
Pagina se încarcă ...
Pagina se încarcă ...
Pagina se încarcă ...
Pagina se încarcă ...
Pagina se încarcă ...
Pagina se încarcă ...
Pagina se încarcă ...
Pagina se încarcă ...
Pagina se încarcă ...
Pagina se încarcă ...
Pagina se încarcă ...
Pagina se încarcă ...
Pagina se încarcă ...
Pagina se încarcă ...
Pagina se încarcă ...
Pagina se încarcă ...
Pagina se încarcă ...
Pagina se încarcă ...
Pagina se încarcă ...
Pagina se încarcă ...
Pagina se încarcă ...
Pagina se încarcă ...
Pagina se încarcă ...
Pagina se încarcă ...
Pagina se încarcă ...
Pagina se încarcă ...
Pagina se încarcă ...
Pagina se încarcă ...
Pagina se încarcă ...
Pagina se încarcă ...
Pagina se încarcă ...
Pagina se încarcă ...
Pagina se încarcă ...
Pagina se încarcă ...
Pagina se încarcă ...
Pagina se încarcă ...
Pagina se încarcă ...
Pagina se încarcă ...
Pagina se încarcă ...
Pagina se încarcă ...
Pagina se încarcă ...
Pagina se încarcă ...
Pagina se încarcă ...
Pagina se încarcă ...
Pagina se încarcă ...
Pagina se încarcă ...
Pagina se încarcă ...
Pagina se încarcă ...
Pagina se încarcă ...
Pagina se încarcă ...
Pagina se încarcă ...
Pagina se încarcă ...
Pagina se încarcă ...
Pagina se încarcă ...
Pagina se încarcă ...
Pagina se încarcă ...
Pagina se încarcă ...
Pagina se încarcă ...
Pagina se încarcă ...
Pagina se încarcă ...
Pagina se încarcă ...
Pagina se încarcă ...
Pagina se încarcă ...
Pagina se încarcă ...
Pagina se încarcă ...
Pagina se încarcă ...
Pagina se încarcă ...
Pagina se încarcă ...
Pagina se încarcă ...
Pagina se încarcă ...
Pagina se încarcă ...
Pagina se încarcă ...
Pagina se încarcă ...
Pagina se încarcă ...
Pagina se încarcă ...
Pagina se încarcă ...
Pagina se încarcă ...
Pagina se încarcă ...
Pagina se încarcă ...
Pagina se încarcă ...
Pagina se încarcă ...
Pagina se încarcă ...
Pagina se încarcă ...
Pagina se încarcă ...
Pagina se încarcă ...
Pagina se încarcă ...
Pagina se încarcă ...
Pagina se încarcă ...
Pagina se încarcă ...
Pagina se încarcă ...
Pagina se încarcă ...
Pagina se încarcă ...
Pagina se încarcă ...
Pagina se încarcă ...
Pagina se încarcă ...
Pagina se încarcă ...
Pagina se încarcă ...
Pagina se încarcă ...
Pagina se încarcă ...
Pagina se încarcă ...
Pagina se încarcă ...
Pagina se încarcă ...
Pagina se încarcă ...
Pagina se încarcă ...
Pagina se încarcă ...
Pagina se încarcă ...
Pagina se încarcă ...
Pagina se încarcă ...
Pagina se încarcă ...
Pagina se încarcă ...
Pagina se încarcă ...
Pagina se încarcă ...
Pagina se încarcă ...
Pagina se încarcă ...
Pagina se încarcă ...
Pagina se încarcă ...
Pagina se încarcă ...
Pagina se încarcă ...
Pagina se încarcă ...
Pagina se încarcă ...
Pagina se încarcă ...
Pagina se încarcă ...
Pagina se încarcă ...
Pagina se încarcă ...
Pagina se încarcă ...
Pagina se încarcă ...
Pagina se încarcă ...
Pagina se încarcă ...
Pagina se încarcă ...
Pagina se încarcă ...
Pagina se încarcă ...
Pagina se încarcă ...
Pagina se încarcă ...
Pagina se încarcă ...
Pagina se încarcă ...
Pagina se încarcă ...
Pagina se încarcă ...
Pagina se încarcă ...
Pagina se încarcă ...
Pagina se încarcă ...
Pagina se încarcă ...
Pagina se încarcă ...
Pagina se încarcă ...
Pagina se încarcă ...
Pagina se încarcă ...
Pagina se încarcă ...
Pagina se încarcă ...
Pagina se încarcă ...
Pagina se încarcă ...
Pagina se încarcă ...
Pagina se încarcă ...
Pagina se încarcă ...
Pagina se încarcă ...
Pagina se încarcă ...
Pagina se încarcă ...
Pagina se încarcă ...
Pagina se încarcă ...
Pagina se încarcă ...
Pagina se încarcă ...
Pagina se încarcă ...
Pagina se încarcă ...
Pagina se încarcă ...
Pagina se încarcă ...
Pagina se încarcă ...
Pagina se încarcă ...
Pagina se încarcă ...
Pagina se încarcă ...
Pagina se încarcă ...
Pagina se încarcă ...
Pagina se încarcă ...
Pagina se încarcă ...
Pagina se încarcă ...
Pagina se încarcă ...
Pagina se încarcă ...
Pagina se încarcă ...
Pagina se încarcă ...
Pagina se încarcă ...
Pagina se încarcă ...
Pagina se încarcă ...
Pagina se încarcă ...
Pagina se încarcă ...
Pagina se încarcă ...
Pagina se încarcă ...
Pagina se încarcă ...
Pagina se încarcă ...
Pagina se încarcă ...
Pagina se încarcă ...
Pagina se încarcă ...
Pagina se încarcă ...
Pagina se încarcă ...
Pagina se încarcă ...
Pagina se încarcă ...
Pagina se încarcă ...
Pagina se încarcă ...
Pagina se încarcă ...
Pagina se încarcă ...
Pagina se încarcă ...
Pagina se încarcă ...
Pagina se încarcă ...
Pagina se încarcă ...
Pagina se încarcă ...
Pagina se încarcă ...
Pagina se încarcă ...
Pagina se încarcă ...
Pagina se încarcă ...
Pagina se încarcă ...
Pagina se încarcă ...
Pagina se încarcă ...
Pagina se încarcă ...
Pagina se încarcă ...
Pagina se încarcă ...
Pagina se încarcă ...
Pagina se încarcă ...
Pagina se încarcă ...
Pagina se încarcă ...
Pagina se încarcă ...
Pagina se încarcă ...
Pagina se încarcă ...
Pagina se încarcă ...
Pagina se încarcă ...
Pagina se încarcă ...
Pagina se încarcă ...
-
 1
1
-
 2
2
-
 3
3
-
 4
4
-
 5
5
-
 6
6
-
 7
7
-
 8
8
-
 9
9
-
 10
10
-
 11
11
-
 12
12
-
 13
13
-
 14
14
-
 15
15
-
 16
16
-
 17
17
-
 18
18
-
 19
19
-
 20
20
-
 21
21
-
 22
22
-
 23
23
-
 24
24
-
 25
25
-
 26
26
-
 27
27
-
 28
28
-
 29
29
-
 30
30
-
 31
31
-
 32
32
-
 33
33
-
 34
34
-
 35
35
-
 36
36
-
 37
37
-
 38
38
-
 39
39
-
 40
40
-
 41
41
-
 42
42
-
 43
43
-
 44
44
-
 45
45
-
 46
46
-
 47
47
-
 48
48
-
 49
49
-
 50
50
-
 51
51
-
 52
52
-
 53
53
-
 54
54
-
 55
55
-
 56
56
-
 57
57
-
 58
58
-
 59
59
-
 60
60
-
 61
61
-
 62
62
-
 63
63
-
 64
64
-
 65
65
-
 66
66
-
 67
67
-
 68
68
-
 69
69
-
 70
70
-
 71
71
-
 72
72
-
 73
73
-
 74
74
-
 75
75
-
 76
76
-
 77
77
-
 78
78
-
 79
79
-
 80
80
-
 81
81
-
 82
82
-
 83
83
-
 84
84
-
 85
85
-
 86
86
-
 87
87
-
 88
88
-
 89
89
-
 90
90
-
 91
91
-
 92
92
-
 93
93
-
 94
94
-
 95
95
-
 96
96
-
 97
97
-
 98
98
-
 99
99
-
 100
100
-
 101
101
-
 102
102
-
 103
103
-
 104
104
-
 105
105
-
 106
106
-
 107
107
-
 108
108
-
 109
109
-
 110
110
-
 111
111
-
 112
112
-
 113
113
-
 114
114
-
 115
115
-
 116
116
-
 117
117
-
 118
118
-
 119
119
-
 120
120
-
 121
121
-
 122
122
-
 123
123
-
 124
124
-
 125
125
-
 126
126
-
 127
127
-
 128
128
-
 129
129
-
 130
130
-
 131
131
-
 132
132
-
 133
133
-
 134
134
-
 135
135
-
 136
136
-
 137
137
-
 138
138
-
 139
139
-
 140
140
-
 141
141
-
 142
142
-
 143
143
-
 144
144
-
 145
145
-
 146
146
-
 147
147
-
 148
148
-
 149
149
-
 150
150
-
 151
151
-
 152
152
-
 153
153
-
 154
154
-
 155
155
-
 156
156
-
 157
157
-
 158
158
-
 159
159
-
 160
160
-
 161
161
-
 162
162
-
 163
163
-
 164
164
-
 165
165
-
 166
166
-
 167
167
-
 168
168
-
 169
169
-
 170
170
-
 171
171
-
 172
172
-
 173
173
-
 174
174
-
 175
175
-
 176
176
-
 177
177
-
 178
178
-
 179
179
-
 180
180
-
 181
181
-
 182
182
-
 183
183
-
 184
184
-
 185
185
-
 186
186
-
 187
187
-
 188
188
-
 189
189
-
 190
190
-
 191
191
-
 192
192
-
 193
193
-
 194
194
-
 195
195
-
 196
196
-
 197
197
-
 198
198
-
 199
199
-
 200
200
-
 201
201
-
 202
202
-
 203
203
-
 204
204
-
 205
205
-
 206
206
-
 207
207
-
 208
208
-
 209
209
-
 210
210
-
 211
211
-
 212
212
-
 213
213
-
 214
214
-
 215
215
-
 216
216
-
 217
217
-
 218
218
-
 219
219
-
 220
220
-
 221
221
-
 222
222
-
 223
223
-
 224
224
-
 225
225
-
 226
226
-
 227
227
-
 228
228
-
 229
229
-
 230
230
-
 231
231
-
 232
232
-
 233
233
-
 234
234
-
 235
235
-
 236
236
-
 237
237
-
 238
238
-
 239
239
-
 240
240
-
 241
241
-
 242
242
-
 243
243
-
 244
244
-
 245
245
-
 246
246
-
 247
247
-
 248
248
-
 249
249
-
 250
250
-
 251
251
-
 252
252
-
 253
253
-
 254
254
-
 255
255
-
 256
256
-
 257
257
-
 258
258
-
 259
259
-
 260
260
-
 261
261
-
 262
262
-
 263
263
-
 264
264
-
 265
265
-
 266
266
-
 267
267
-
 268
268


Atos Provox Electrolarynx Instrucțiuni de utilizare
- Tip
- Instrucțiuni de utilizare
în alte limbi
- slovenčina: Atos Provox Electrolarynx Návod na používanie
Alte documente
-
 Dermlite DL200HYG Instrucțiuni de utilizare
-
Yamaha RX-500 Manual de utilizare
-
Covidien Shiley 18760S Manual de utilizare
-
Medtronic Tracheal Tube Manual de utilizare
-
-
HP LaserJet Pro MFP M126 series Manualul utilizatorului
-
-
-
-
Asus ROG Chariot Core Gaming Chair Manualul proprietarului
