Samsung HW-S40T Manual de utilizare
- Categorie
- Boxe soundbar
- Tip
- Manual de utilizare
Acest manual este potrivit și pentru

HW-S40T / S41T
FULL MANUAL
Imagine the possibilities
Thank you for purchasing this Samsung product.
To receive more complete service, please register
your product at www.samsung.com/register

ENG - 2
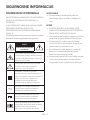
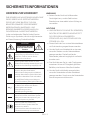
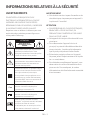
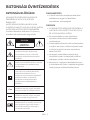
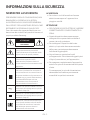
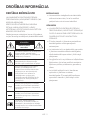
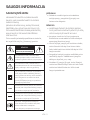
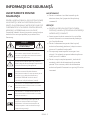
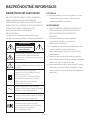
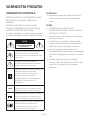
SAFETY INFORMATION
SAFETY WARNINGS
TO REDUCE THE RISK OF ELECTRIC SHOCK, DO
NOT REMOVE THE COVER (OR BACK).
NO USER-SERVICEABLE PARTS ARE INSIDE.
REFER SERVICING TO QUALIFIED SERVICE
PERSONNEL.
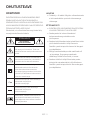
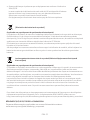
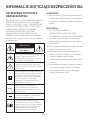
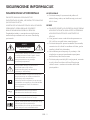
Refer to the table below for an explanation of
symbols which may be on your Samsung product.
CAUTION
RISK OF ELECTRIC SHOCK.
DO NOT OPEN.
This symbol indicates that high voltage
is present inside. It is dangerous to
make any kind of contact with any
internal part of this product.
This symbol indicates that this product
has included important literature
concerning operation and maintenance.
Class II product : This symbol indicates
that it does not require a safety
connection to electrical earth (ground).
If this symbol is not present on a
product with a power cord, the product
MUST have a reliable connection to
protective earth (ground).
AC voltage : This symbol indicates that
the rated voltage marked with the
symbol is AC voltage.
DC voltage : This symbol indicates that
the rated voltage marked with the
symbol is DC voltage.
Caution, Consult instructions for use :
This symbol instructs the user to
consult the user manual for further
safety related information.
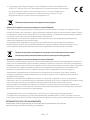
WARNING
• To reduce the risk of re or electric shock, do
not expose this appliance to rain or moisture.
CAUTION
• TO PREVENT ELECTRIC SHOCK, MATCH WIDE
BLADE OF PLUG TO WIDE SLOT, FULLY INSERT.
• This apparatus shall always be connected to a
AC outlet with a protective grounding
connection.
• To disconnect the apparatus from the mains,
the plug must be pulled out from the mains
socket, therefore the mains plug shall be
readily operable.
• Do not expose this apparatus to dripping or
splashing. Do not put objects lled with
liquids, such as vases on the apparatus.
• To turn this apparatus off completely, you
must pull the power plug out of the wall
socket. Consequently, the power plug must
be easily and readily accessible at all times.

ENG - 3
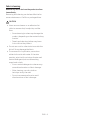
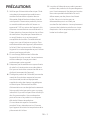
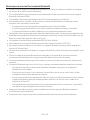
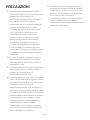
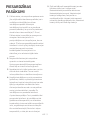
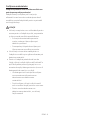
PRECAUTIONS
1. Ensure that the AC power supply in your
house complies with the power
requirements listed on the identication
sticker located on the bottom of your
product. Install your product horizontally, on
a suitable base (furniture), with enough
space around it for ventilation (7~10 cm).
Make sure the ventilation slots are not
covered. Do not place the unit on ampliers
or other equipment which may become hot.
This unit is designed for continuous use. To
fully turn off the unit, disconnect the AC plug
from the wall outlet. Unplug the unit if you
intend to leave it unused for a long period of
time.
2. During thunderstorms, disconnect the AC
plug from the wall outlet. Voltage peaks due
to lightning could damage the unit.
3. Do not expose the unit to direct sunlight or
other heat sources. This could lead to
overheating and cause the unit to
malfunction.
4. Protect the product from moisture (i.e.
vases), and excess heat (e.g. a replace) or
equipment creating strong magnetic or
electric elds. Unplug the power cable from
the AC wall socket if the unit malfunctions.
Your product is not intended for industrial
use. It is for personal use only. Condensation
may occur if your product has been stored in
cold temperatures. If transporting the unit
during the winter, wait approximately
2 hours until the unit has reached room
temperature before using.
5. The battery used with this product contains
chemicals that are harmful to the
environment. Do not dispose of the battery
in the general household trash. Do not
expose the battery to excess heat, direct
sunlight, or re. Do not short circuit,
disassemble, or overheat the battery.
Danger of explosion if the battery is replaced
incorrectly. Replace only with the same or
equivalent type.

ENG - 4
Fabric cleaning
Remove any dirt or stain on the product surface
immediately.
Removing and cleaning can be less effective for
some substances or if left for a prolonged time.
CAUTION
• Use a vacuum cleaner or an adhesive lint
roller to remove dust, handprints, and the
likes.
– Some cleaning brushes may damage the
product, depending on the materials they
contain.
– Towels and cleaning clothes may leave
lint or dirt on the product.
• Do not use a nail or other tools to scratch the
dirt off. It may damage the fabric.
• To remove oil or liquid stains, use a clean
white cloth moist with water. If the stain
persists, wipe it with a mixture of water and
neutral detergent (such as dishwashing
soaps) and a cloth.
– A non-neutral detergent or cleaner may
cause discolouration or fabric damage.
– After cleaning, use a dry cloth or
hairdryer to dry the area.
– Do not use excessive force to avoid
discolouration or fabric damage.

ENG - 5
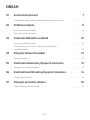
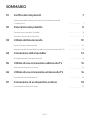
CONTENTS
01 Checking the Components 7
Inserting Batteries before using the Remote Control (AA batteries X 2) ------------------------- 7
02 Product Overview 8
Top Panel of the Soundbar ------------------------- 8
Bottom Panel of the Soundbar ------------------------- 9
03 Using the Remote Control 10
How to Use the Remote Control
-------------------------
10
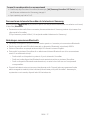
Adjusting the Soundbar volume with a TV remote control ------------------------- 13
04 Connecting the Soundbar 14
Connecting Electrical Power
-------------------------
14
05 Using a wired connection to the TV 15
Connecting using an Optical Cable
-------------------------
15
06 Using a wireless connection to the TV 16
Connecting via Bluetooth
-------------------------
16
07 Connecting an External Device 18
Connecting using an Optical Cable
-------------------------
18

ENG - 6
08 Connecting a Mobile Device 19
Connecting via Bluetooth
-------------------------
19
Using the Tap Sound
-------------------------
23
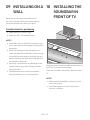
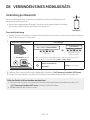
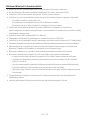
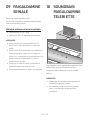
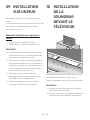
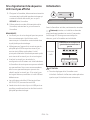
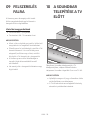
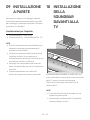
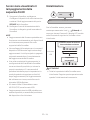
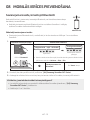
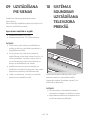
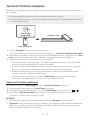
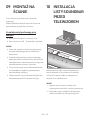
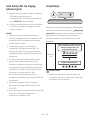
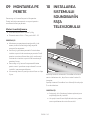
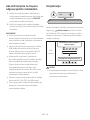
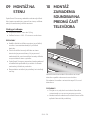
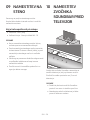
09 Installing on a wall 24
10 Installing the Soundbar in front of TV 24
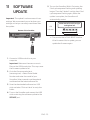
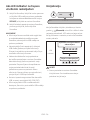
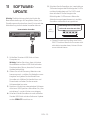
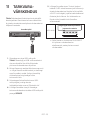
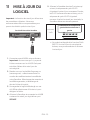
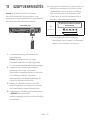
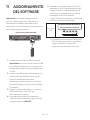
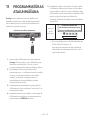
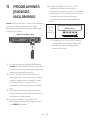
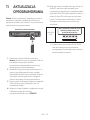
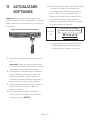
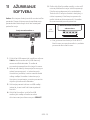
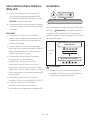
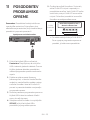
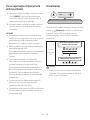
11 Software Update 25
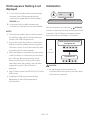
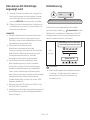
Initialization
-------------------------
26
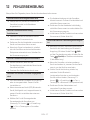
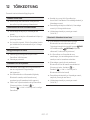
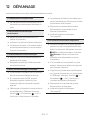
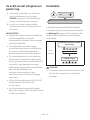
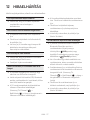
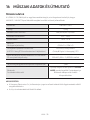
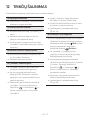
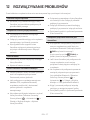
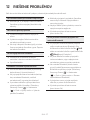
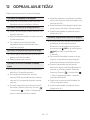
12 Troubleshooting 27
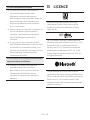
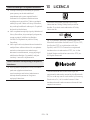
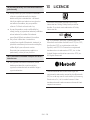
13 Licence 28
14 Open Source Licence Notice 29
15 Important Notes About Service 29
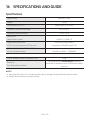
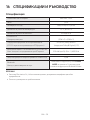
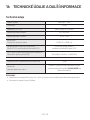
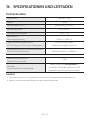
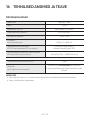
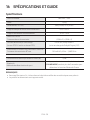
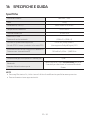
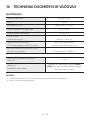
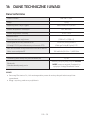
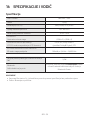
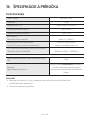
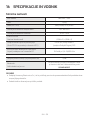
16 SpecicationsandGuide 30
Specications
-------------------------
30

ENG - 7
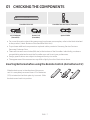
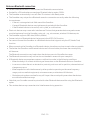
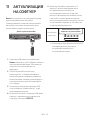
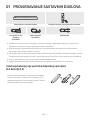
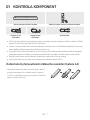
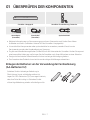
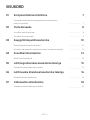
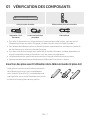
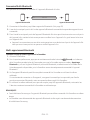
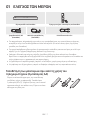
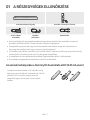
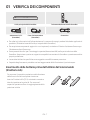
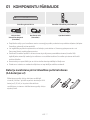
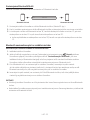
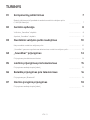
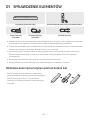
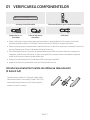
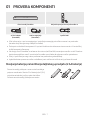
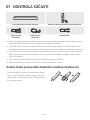
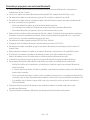
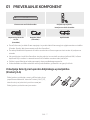
01 CHECKING THE COMPONENTS
VOL WOOFER
SOUNDBAR
SOUND
MODE
PAIR
Soundbar Main Unit Soundbar Remote Control
/ Batteries
AC/DC Adapter
(Soundbar)
Power Cord
(Soundbar)
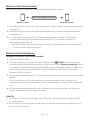
Optical Cable
• For more information about the power supply and power consumption, refer to the label attached
to the product. (Label: Bottom of the Soundbar Main Unit)
• To purchase additional components or optional cables, contact a Samsung Service Centre or
Samsung Customer Care.
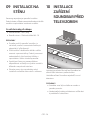
• There are two wall mount holes (M4 size) at the bottom of the Soundbar. Individually purchase a
compatible bracket and mount the Soundbar on a wall to suit your preferences.
• Design, specications are subject to change without prior notice.
• The appearance of the accessories may differ slightly from the illustrations above.
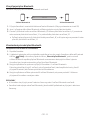
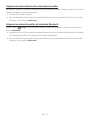
Inserting Batteries before using the Remote Control (AA batteries X 2)
Slide the back cover in the direction of the arrow
until it is completely removed. Insert 2 AA batteries
(1.5V) oriented so that their polarity is correct. Slide
the back cover back into position.

ENG - 8
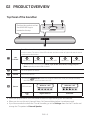
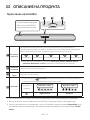
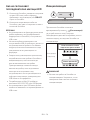
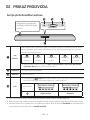
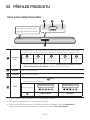
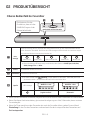
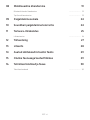
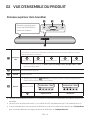
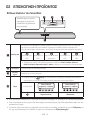
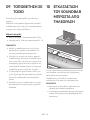
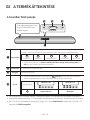
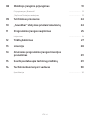
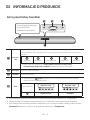
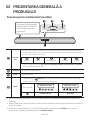
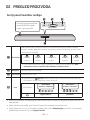
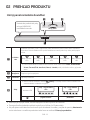
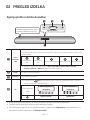
02 PRODUCT OVERVIEW
Top Panel of the Soundbar
Top Panel
Position the product so that
the SAMSUNG logo is
located on the top.
LED
indicator
The LED Indicator ashes, glows, or changes colour depending on the Soundbar's current
mode or status. The colour of the LED indicator and the number of lights indicate the active
mode as described below.
W
White LED
W
White LED
M
Multicolour LED
W
White LED
W
White LED
• The Multicolour LED changes to White, Cyan, Green, Red, Yellow, Orange, Purple and
Blue depending on the mode or status.
Power Turns the power on and off.
Volume Adjusts the volume.
Source
• Press the (Source) button to change the mode. Each time you change the mode,
the LED lights in white and then turns off.
LED Indicator
White On -> Off White On -> Off
“Digital Audio In” “Bluetooth”
• When you plug in the AC cord, the power button will begin working in 4 to 6 seconds.
• When you turn on this unit, there will be a 4 to 5 second delay before it produces sound.
• If you hear sounds from both the TV and Soundbar, go to the Settings menu for the TV audio and
change the TV speaker to External Speaker.

ENG - 9
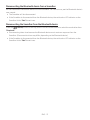
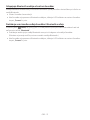
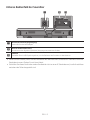
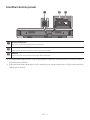
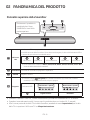
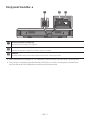
Bottom Panel of the Soundbar
SERVICE
DC 24V
DIGITAL AUDIO IN
(OPTICAL)
DC 24V
SERVICE
DIGITAL AUDIO IN
(OPTICAL)
DC 24V
SERVICE
DIGITAL AUDIO IN
(OPTICAL)
SERVICE
DC 24V
DIGITAL AUDIO IN
(OPTICAL)
DC 24V
SERVICE
DIGITAL AUDIO IN
(OPTICAL)
DC 24V
SERVICE
DIGITAL AUDIO IN
(OPTICAL)
SERVICE
DC 24V
DIGITAL AUDIO IN
(OPTICAL)
DC 24V
SERVICE
DIGITAL AUDIO IN
(OPTICAL)
DC 24V
SERVICE
DIGITAL AUDIO IN
(OPTICAL)
DC 24V (Power Supply In)
Connect the AC/DC power adapter.
DIGITAL AUDIO IN (OPTICAL)
Connect to the digital (optical) output of an external device.
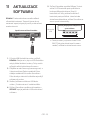
SERVICE
Connect a USB storage device to upgrade the product's software.
• When disconnecting the power cable of the AC/DC power adaptor from a wall outlet, pull the plug.
Do not pull the cable.
• Do not connect this unit or other components to an AC outlet until all connections between
components are complete.

ENG - 10
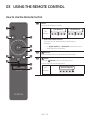
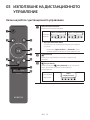
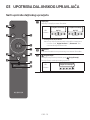
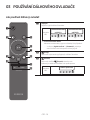
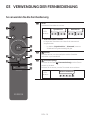
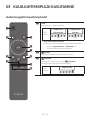
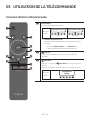
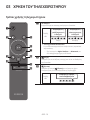
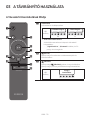
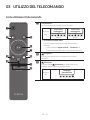
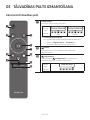
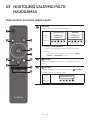
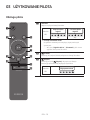
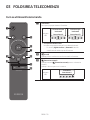
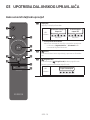
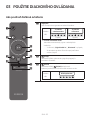
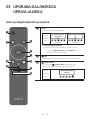
03 USING THE REMOTE CONTROL
How to Use the Remote Control
VOL WOOFER
SOUNDBAR
SOUND
MODE
PAIR
Power
Turns the Soundbar on and off.
LED
Indicator
Cyan Blinks X1
On
Off
Red Blinks X3
• Auto Power Down Function
The unit turns off automatically in the following
situations:
– In “Digital Audio In” / “Bluetooth” mode if there is no
audio signal for 20 minutes.
(Source)
Press to select a source connected to the Soundbar.
(Mute)
Press the (Mute) button to mute the sound.
Press it again to unmute the sound.
LED
Indicator
Blinks X Repeatly

ENG - 11
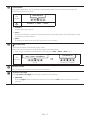
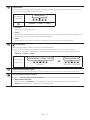
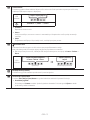
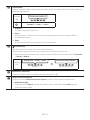
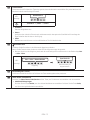
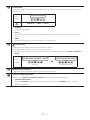
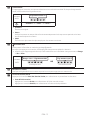
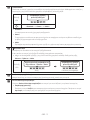
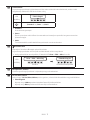
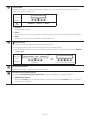
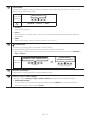
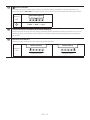
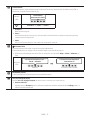
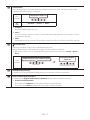
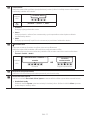
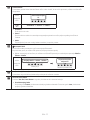
SOUND MODE
By pressing the button, you can select the desired audio mode. Each time the mode changes, the
Multicolour LED blinks in white.
LED
Indicator
White Blinks X1
“Standard” “Smart” “Music”
• Standard
Outputs the original sound.
• Smart
Analyzes the content in real time and automatically provides the optimal sound eld based on the
characteristics of the content.
• Music
Provides more natural and room lling sound for music content.
Bluetooth PAIR
Switch the Soundbar to Bluetooth pairing mode.
When you press the button, the LED display changes as shown below.
• Until pairing is complete, the Multicolour LED changes as Red → Green → Blue in turn.
LED
Indicator
Red → Green → Blue Blinks
Pairing
Connection is complete
Cyan Blinks X3
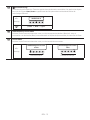
p (Play / Pause)
You can also play or pause music by pressing the button.
Up/Down/Left/Right
Press Up/Down/Left/Right on the button to select or set functions.
• Music Skip
Press the Right button to select the next music le. Press the Left button to select the previous
music le.

ENG - 12
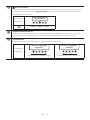
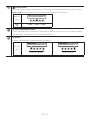
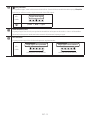
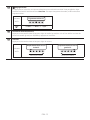
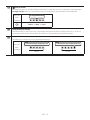
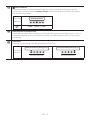
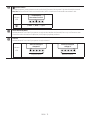
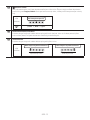
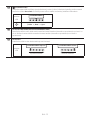
(Sound Control)
By pressing the button, you can select the desired audio mode. The desired item can be adjusted using
the Up/Down buttons. Each time the mode changes, the Multicolour LED blinks in white.
LED
Indicator
White Blinks X1
“Treble” “Bass” “Sync”
WOOFER (BASS) LEVEL
Push the button up or down to adjust the woofer (bass) between -6 to +6. To set the woofer (bass)
volume level to 0 (Default), press the button.
VOLUME
Push the button up or down to adjust the volume.
LED
Indicator
White moves to right X1
Volume Up
White moves to left X1
Volume Down

ENG - 13
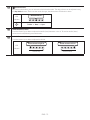
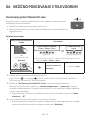
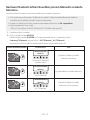
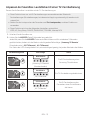
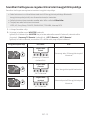
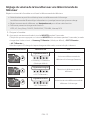
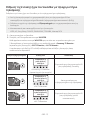
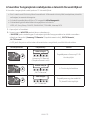
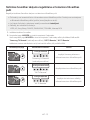
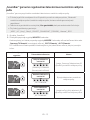
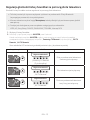
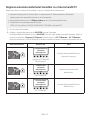
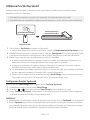
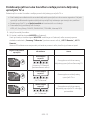
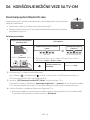
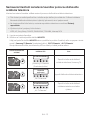
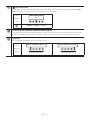
Adjusting the Soundbar volume with a TV remote control
Adjust the Soundbar volume using the TV’s remote control.
• This function can be used with IR remote controls only. Bluetooth remote controls (remote
controls that require pairing) are not supported.
• Set the TV speaker to External Speaker to use this function.
• Manufacturers supporting this function:
VIZIO, LG, Sony, Sharp, PHILIPS, PANASONIC, TOSHIBA, Hisense, RCA
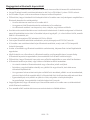
1. Turn Off the Soundbar.
2. Push up and hold the WOOFER button for 5 seconds.
Each time you push the WOOFER button up and hold it for 5 seconds, the mode switches in the
following order: “Samsung-TV Remote” (Default mode), “Off-TV Remote”, “All-TV Remote”.
The LED indicator status changes each time the mode is changed, as shown below.
Remote Control Button LED Indicator Status
SOUND
MODE
VOL
WOOFER
SOUNDBAR
5 Sec
"Samsung-TV Remote"
(Default mode)
Blue Blinks X1
Enable a Samsung TV’s IR remote
control.
SOUND
MODE
VOL
WOOFER
SOUNDBAR
5 Sec
"Off-TV Remote"
Red Blinks X1
Disable the TV remote control.
SOUND
MODE
VOL
WOOFER
SOUNDBAR
5 Sec
"All-TV Remote"
Green Blinks X1
Enable a third-party TV’s IR remote
control.

ENG - 14
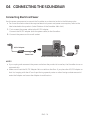
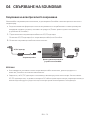
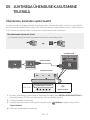
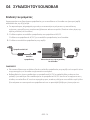
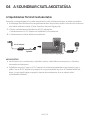
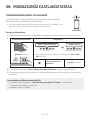
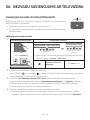
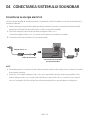
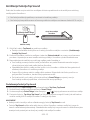
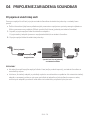
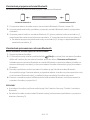
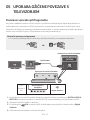
04 CONNECTING THE SOUNDBAR
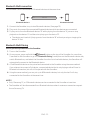
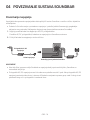
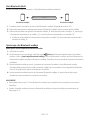
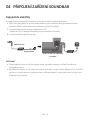
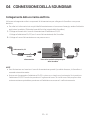
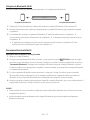
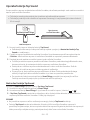
Connecting Electrical Power
Use the power components to connect the Soundbar to an electrical outlet in the following order:
• For more information about the required electrical power and power consumption, refer to the
label attached to the product. (Label: Bottom of the Soundbar Main Unit)
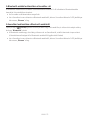
1. First connect the power cable to the AC/DC adapter.
Connect the AC/DC adapter (with the power cable) to the Soundbar.
2. Connect the power cord to a wall socket.
DC 19V
Power Cord
AC/DC Adapter
SERVICE
DC 24V
DIGITAL AUDIO IN
(OPTICAL)
DC 24V
SERVICE
DIGITAL AUDIO IN
(OPTICAL)
DC 24V
SERVICE
DIGITAL AUDIO IN
(OPTICAL)
SERVICE
DC 24V
DIGITAL AUDIO IN
(OPTICAL)
DC 24V
SERVICE
DIGITAL AUDIO IN
(OPTICAL)
DC 24V
SERVICE
DIGITAL AUDIO IN
(OPTICAL)
DC 19V
Bottom of the Soundbar Main Unit
NOTES
• If you unplug and reconnect the power cord when the product is turned on, the Soundbar turns on
automatically.
• Make sure to rest the AC/DC Adapter at on a table or the oor. If you place the AC/DC Adapter so
that it is hanging with the AC cord input facing upwards, water or other foreign substances could
enter the Adapter and cause the Adapter to malfunction.

ENG - 15
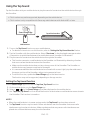
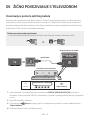
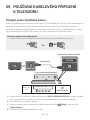
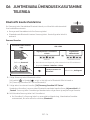
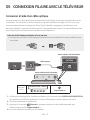
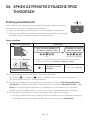
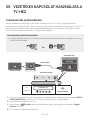
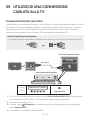
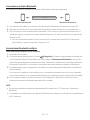
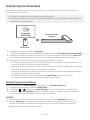
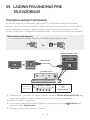
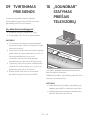
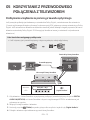
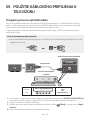
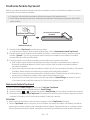
05 USING A WIRED CONNECTION TO THE TV
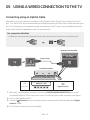
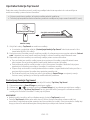
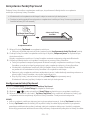
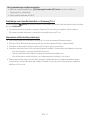
Connecting using an Optical Cable
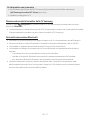
When the audio in a broadcast is encoded in Dolby Digital and the “Digital Output Audio Format” on
your TV is set to PCM, we recommend that you change the setting to Dolby Digital. When the setting on
the TV is changed, you will experience better sound quality. (The TV menu may use different words for
Dolby Digital and PCM depending on the TV manufacturer.)
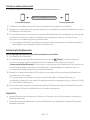
Pre-connection Checklist
• When you use an optical cable and the terminals have covers, be sure to remove the covers.
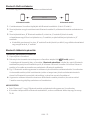
LED
Indicator
White On -> Off
“Digital Audio In”
DC 24V
SERVICE
DIGITAL AUDIO IN
(OPTICAL)
OPTICAL OUT
Bottom of the Soundbar
Optical Cable
Top of the Soundbar
1. With the TV and Soundbar turned off, connect the DIGITAL AUDIO IN (OPTICAL) port on the
Soundbar and the OPTICAL output port on the TV with the optical cable, as shown in the gure.
2. Turn on the Soundbar and TV.
3. Press the (Source) button on the top panel or remote control, and then select the “Digital
Audio In” mode.
4. The TV sound is output from the Soundbar.

ENG - 16
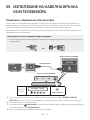
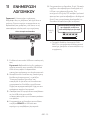
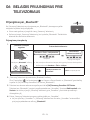
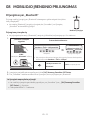
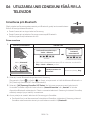
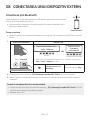
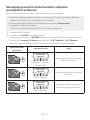
06 USING A WIRELESS CONNECTION TO THE TV
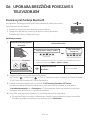
Connecting via Bluetooth
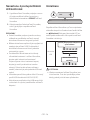
When a Samsung TV is connected using Bluetooth, you can hear stereo sound
without the hassle of cables.
• Only one Samsung TV can be connected at a time.
• Samsung TV that supports Bluetooth can be connected.
Check the specications of your TV.
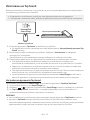
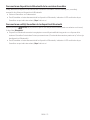
The initial connection
1.
Bluetooth Pairing button LED Indicator
SOUND
MODE
PAIR
OR
Red → Green → Blue Blinks
Pairing
Connection is complete
Cyan Blinks X3
When in “Bluetooth” mode
5 Sec
• Until pairing is complete, the Multicolor LED changes as Red → Green
→ Blue in turn.
“Ready to connect via
Bluetooth.”
“Ding” Short Sound.
2. Select Bluetooth mode on the Samsung TV.
(e.g. Home ( ) Settings ( ) Sound Sound Output Bluetooth Speaker List
[AV] Samsung Soundbar S4T-Series (Bluetooth))
3. Select “[AV] Samsung Soundbar S4T-Series” from the list on TV’s screen.
An available Soundbar is indicated with “Need Pairing” or “Paired” on the TV’s Bluetooth device
list. To connect the Samsung TV to the Soundbar, select the message, and then establish a
connection.
4. You can now hear Samsung TV sound from the Soundbar.
• If there is a connection log between the Soundbar and Samsung TV, the Soundbar is
automatically connected by changing its mode to “Bluetooth”.

ENG - 17
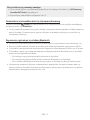
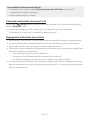
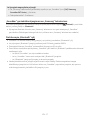
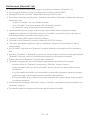
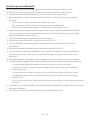
If the device fails to connect
• If you have an existing Soundbar (e.g., [AV] Samsung Soundbar S4T-Series) on the list of
speakers on the Samsung TV, delete it.
• Then repeat steps 1 through 3.
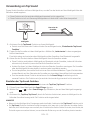
Disconnecting the Soundbar from the Samsung TV
Press the (Source)
button on the top panel or on the remote control to select the mode other than
“Bluetooth”.
• Disconnecting takes time because the Samsung TV must receive a response from the Soundbar.
(The time required may differ, depending on the Samsung TV model.)
Notes on Bluetooth connection
• Locate a new device within 1 m to connect via Bluetooth communication.
• If asked for a PIN code when connecting a Bluetooth device, enter <0000>.
• The Soundbar automatically turns off after 20 minutes in the Ready state.
• The Soundbar may not perform Bluetooth search or connection correctly under the following
circumstances:
– If there is a strong electrical eld around the Soundbar.
– If several Bluetooth devices are simultaneously paired with the Soundbar.
– If the Bluetooth device is turned off, not in place, or malfunctions.
• Electronic devices may cause radio interference. Devices that generate electromagnetic waves
must be kept away from the Soundbar main unit - e.g., microwaves, wireless LAN devices, etc.

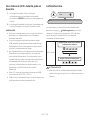
ENG - 18
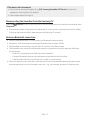
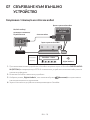
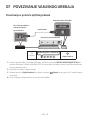
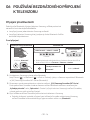
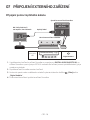
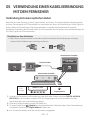
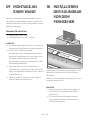
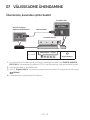
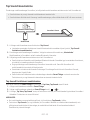
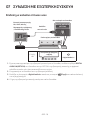
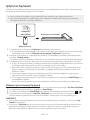
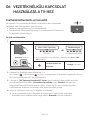
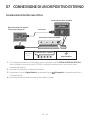
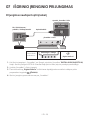
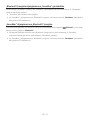
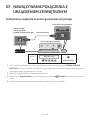
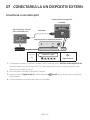
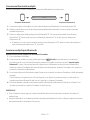
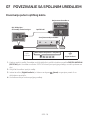
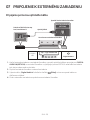
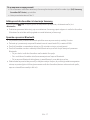
07 CONNECTING AN EXTERNAL DEVICE
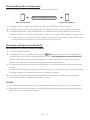
Connecting using an Optical Cable
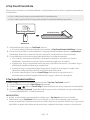
LED
Indicator
White On -> Off
“Digital Audio In”
DC 24V
SERVICE
DIGITAL AUDIO IN
(OPTICAL)
- AUDIO -
R L
OPTICAL OUT
Bottom of the Soundbar
Optical Cable
Top of the Soundbar
BD / DVD player / Set-top
box / Game console
1. With the external device and Soundbar turned off, connect the DIGITAL AUDIO IN (OPTICAL) port
on the Soundbar and the OPTICAL output port on the external device with the optical cable, as
shown in the gure.
2. Turn on the Soundbar and external device.
3. Press the (Source) button on the top panel or remote control, and then select the “Digital
Audio In” mode.
4. The external device sound is output from the Soundbar.

ENG - 19
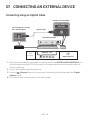
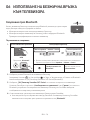
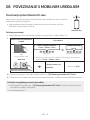
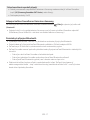
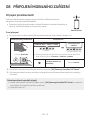
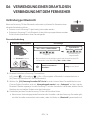
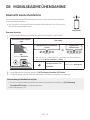
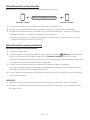
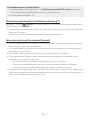
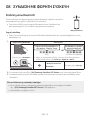
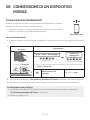
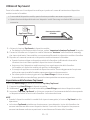
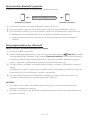
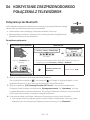
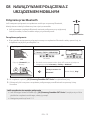
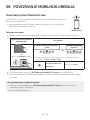
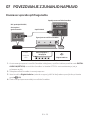
08 CONNECTING A MOBILE DEVICE
Connecting via Bluetooth
When a mobile device is connected using Bluetooth, you can hear stereo sound
without the hassle of cables.
• When you connect a paired Bluetooth device with the Soundbar off, the
Soundbar automatically turns on.
The initial connection
• When connecting to a new Bluetooth device, make sure the device is within 1 m distance.
1.
Bluetooth Pairing button LED Indicator
SOUND
MODE
PAIR
OR
Red → Green → Blue Blinks
Pairing
Connection is complete
Cyan Blinks X3
When in “Bluetooth” mode
5 Sec
• Until pairing is complete, the Multicolor LED changes as Red → Green
→ Blue in turn.
“Ready to connect via
Bluetooth.”
“Ding” Short Sound.
2. On your device, select “[AV] Samsung Soundbar S4T-Series” from the list that appears.
3. Play music les from the device connected via Bluetooth through the Soundbar.
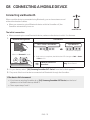
If the device fails to connect
• If you have an existing Soundbar (e.g., [AV] Samsung Soundbar S4T-Series) on the list of
speakers on the Mobile device, delete it.
• Then repeat steps 1 and 2.
mobile device

ENG - 20
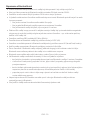
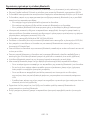
Notes on Bluetooth connection
• Locate a new device within 1 m to connect via Bluetooth communication.
• If asked for a PIN code when connecting a Bluetooth device, enter <0000>.
• The Soundbar automatically turns off after 20 minutes in the Ready state.
• The Soundbar may not perform Bluetooth search or connection correctly under the following
circumstances:
– If there is a strong electrical eld around the Soundbar.
– If several Bluetooth devices are simultaneously paired with the Soundbar.
– If the Bluetooth device is turned off, not in place, or malfunctions.
• Electronic devices may cause radio interference. Devices that generate electromagnetic waves
must be kept away from the Soundbar main unit - e.g., microwaves, wireless LAN devices, etc.
• The Soundbar supports SBC data (44.1kHz, 48kHz).
• Connect only to a Bluetooth device that supports the A2DP (AV) function.
• You cannot connect the Soundbar to a Bluetooth device that supports only the HF (Hands Free)
function.
• When connecting the Soundbar to a Bluetooth device, place them as close to each other as possible.
• The farther the Soundbar and Bluetooth device are from each other, the lower the sound quality
will become.
The Bluetooth connection may break when the devices are out of the effective range.
• The Bluetooth connection may not function as intended in areas with poor reception.
• A Bluetooth device may experience noise or malfunction under in the following conditions:
– When the body is in contact with the signal transceiver on the Bluetooth device or Soundbar
– In corners or when there is an obstacle in proximity, such as a wall or partition, where electrical
changes may occur.
– When exposed to radio interferences by other products operating on the same frequency
ranges, such as medical equipment, microwave ovens, and wireless LAN devices.
– Obstacles such as doors and walls may still impact the sound quality even when the devices
are within the effective range.
• Note that your Soundbar cannot be paired with other Bluetooth devices while using the Bluetooth
option.
• This wireless device may cause electrical interference during operation.
Pagina se încarcă...
Pagina se încarcă...
Pagina se încarcă...
Pagina se încarcă...
Pagina se încarcă...
Pagina se încarcă...
Pagina se încarcă...
Pagina se încarcă...
Pagina se încarcă...
Pagina se încarcă...
Pagina se încarcă...
Pagina se încarcă...
Pagina se încarcă...
Pagina se încarcă...
Pagina se încarcă...
Pagina se încarcă...
Pagina se încarcă...
Pagina se încarcă...
Pagina se încarcă...
Pagina se încarcă...
Pagina se încarcă...
Pagina se încarcă...
Pagina se încarcă...
Pagina se încarcă...
Pagina se încarcă...
Pagina se încarcă...
Pagina se încarcă...
Pagina se încarcă...
Pagina se încarcă...
Pagina se încarcă...
Pagina se încarcă...
Pagina se încarcă...
Pagina se încarcă...
Pagina se încarcă...
Pagina se încarcă...
Pagina se încarcă...
Pagina se încarcă...
Pagina se încarcă...
Pagina se încarcă...
Pagina se încarcă...
Pagina se încarcă...
Pagina se încarcă...
Pagina se încarcă...
Pagina se încarcă...
Pagina se încarcă...
Pagina se încarcă...
Pagina se încarcă...
Pagina se încarcă...
Pagina se încarcă...
Pagina se încarcă...
Pagina se încarcă...
Pagina se încarcă...
Pagina se încarcă...
Pagina se încarcă...
Pagina se încarcă...
Pagina se încarcă...
Pagina se încarcă...
Pagina se încarcă...
Pagina se încarcă...
Pagina se încarcă...
Pagina se încarcă...
Pagina se încarcă...
Pagina se încarcă...
Pagina se încarcă...
Pagina se încarcă...
Pagina se încarcă...
Pagina se încarcă...
Pagina se încarcă...
Pagina se încarcă...
Pagina se încarcă...
Pagina se încarcă...
Pagina se încarcă...
Pagina se încarcă...
Pagina se încarcă...
Pagina se încarcă...
Pagina se încarcă...
Pagina se încarcă...
Pagina se încarcă...
Pagina se încarcă...
Pagina se încarcă...
Pagina se încarcă...
Pagina se încarcă...
Pagina se încarcă...
Pagina se încarcă...
Pagina se încarcă...
Pagina se încarcă...
Pagina se încarcă...
Pagina se încarcă...
Pagina se încarcă...
Pagina se încarcă...
Pagina se încarcă...
Pagina se încarcă...
Pagina se încarcă...
Pagina se încarcă...
Pagina se încarcă...
Pagina se încarcă...
Pagina se încarcă...
Pagina se încarcă...
Pagina se încarcă...
Pagina se încarcă...
Pagina se încarcă...
Pagina se încarcă...
Pagina se încarcă...
Pagina se încarcă...
Pagina se încarcă...
Pagina se încarcă...
Pagina se încarcă...
Pagina se încarcă...
Pagina se încarcă...
Pagina se încarcă...
Pagina se încarcă...
Pagina se încarcă...
Pagina se încarcă...
Pagina se încarcă...
Pagina se încarcă...
Pagina se încarcă...
Pagina se încarcă...
Pagina se încarcă...
Pagina se încarcă...
Pagina se încarcă...
Pagina se încarcă...
Pagina se încarcă...
Pagina se încarcă...
Pagina se încarcă...
Pagina se încarcă...
Pagina se încarcă...
Pagina se încarcă...
Pagina se încarcă...
Pagina se încarcă...
Pagina se încarcă...
Pagina se încarcă...
Pagina se încarcă...
Pagina se încarcă...
Pagina se încarcă...
Pagina se încarcă...
Pagina se încarcă...
Pagina se încarcă...
Pagina se încarcă...
Pagina se încarcă...
Pagina se încarcă...
Pagina se încarcă...
Pagina se încarcă...
Pagina se încarcă...
Pagina se încarcă...
Pagina se încarcă...
Pagina se încarcă...
Pagina se încarcă...
Pagina se încarcă...
Pagina se încarcă...
Pagina se încarcă...
Pagina se încarcă...
Pagina se încarcă...
Pagina se încarcă...
Pagina se încarcă...
Pagina se încarcă...
Pagina se încarcă...
Pagina se încarcă...
Pagina se încarcă...
Pagina se încarcă...
Pagina se încarcă...
Pagina se încarcă...
Pagina se încarcă...
Pagina se încarcă...
Pagina se încarcă...
Pagina se încarcă...
Pagina se încarcă...
Pagina se încarcă...
Pagina se încarcă...
Pagina se încarcă...
Pagina se încarcă...
Pagina se încarcă...
Pagina se încarcă...
Pagina se încarcă...
Pagina se încarcă...
Pagina se încarcă...
Pagina se încarcă...
Pagina se încarcă...
Pagina se încarcă...
Pagina se încarcă...
Pagina se încarcă...
Pagina se încarcă...
Pagina se încarcă...
Pagina se încarcă...
Pagina se încarcă...
Pagina se încarcă...
Pagina se încarcă...
Pagina se încarcă...
Pagina se încarcă...
Pagina se încarcă...
Pagina se încarcă...
Pagina se încarcă...
Pagina se încarcă...
Pagina se încarcă...
Pagina se încarcă...
Pagina se încarcă...
Pagina se încarcă...
Pagina se încarcă...
Pagina se încarcă...
Pagina se încarcă...
Pagina se încarcă...
Pagina se încarcă...
Pagina se încarcă...
Pagina se încarcă...
Pagina se încarcă...
Pagina se încarcă...
Pagina se încarcă...
Pagina se încarcă...
Pagina se încarcă...
Pagina se încarcă...
Pagina se încarcă...
Pagina se încarcă...
Pagina se încarcă...
Pagina se încarcă...
Pagina se încarcă...
Pagina se încarcă...
Pagina se încarcă...
Pagina se încarcă...
Pagina se încarcă...
Pagina se încarcă...
Pagina se încarcă...
Pagina se încarcă...
Pagina se încarcă...
Pagina se încarcă...
Pagina se încarcă...
Pagina se încarcă...
Pagina se încarcă...
Pagina se încarcă...
Pagina se încarcă...
Pagina se încarcă...
Pagina se încarcă...
Pagina se încarcă...
Pagina se încarcă...
Pagina se încarcă...
Pagina se încarcă...
Pagina se încarcă...
Pagina se încarcă...
Pagina se încarcă...
Pagina se încarcă...
Pagina se încarcă...
Pagina se încarcă...
Pagina se încarcă...
Pagina se încarcă...
Pagina se încarcă...
Pagina se încarcă...
Pagina se încarcă...
Pagina se încarcă...
Pagina se încarcă...
Pagina se încarcă...
Pagina se încarcă...
Pagina se încarcă...
Pagina se încarcă...
Pagina se încarcă...
Pagina se încarcă...
Pagina se încarcă...
Pagina se încarcă...
Pagina se încarcă...
Pagina se încarcă...
Pagina se încarcă...
Pagina se încarcă...
Pagina se încarcă...
Pagina se încarcă...
Pagina se încarcă...
Pagina se încarcă...
Pagina se încarcă...
Pagina se încarcă...
Pagina se încarcă...
Pagina se încarcă...
Pagina se încarcă...
Pagina se încarcă...
Pagina se încarcă...
Pagina se încarcă...
Pagina se încarcă...
Pagina se încarcă...
Pagina se încarcă...
Pagina se încarcă...
Pagina se încarcă...
Pagina se încarcă...
Pagina se încarcă...
Pagina se încarcă...
Pagina se încarcă...
Pagina se încarcă...
Pagina se încarcă...
Pagina se încarcă...
Pagina se încarcă...
Pagina se încarcă...
Pagina se încarcă...
Pagina se încarcă...
Pagina se încarcă...
Pagina se încarcă...
Pagina se încarcă...
Pagina se încarcă...
Pagina se încarcă...
Pagina se încarcă...
Pagina se încarcă...
Pagina se încarcă...
Pagina se încarcă...
Pagina se încarcă...
Pagina se încarcă...
Pagina se încarcă...
Pagina se încarcă...
Pagina se încarcă...
Pagina se încarcă...
Pagina se încarcă...
Pagina se încarcă...
Pagina se încarcă...
Pagina se încarcă...
Pagina se încarcă...
Pagina se încarcă...
Pagina se încarcă...
Pagina se încarcă...
Pagina se încarcă...
Pagina se încarcă...
Pagina se încarcă...
Pagina se încarcă...
Pagina se încarcă...
Pagina se încarcă...
Pagina se încarcă...
Pagina se încarcă...
Pagina se încarcă...
Pagina se încarcă...
Pagina se încarcă...
Pagina se încarcă...
Pagina se încarcă...
Pagina se încarcă...
Pagina se încarcă...
Pagina se încarcă...
Pagina se încarcă...
Pagina se încarcă...
Pagina se încarcă...
Pagina se încarcă...
Pagina se încarcă...
Pagina se încarcă...
Pagina se încarcă...
Pagina se încarcă...
Pagina se încarcă...
Pagina se încarcă...
Pagina se încarcă...
Pagina se încarcă...
Pagina se încarcă...
Pagina se încarcă...
Pagina se încarcă...
Pagina se încarcă...
Pagina se încarcă...
Pagina se încarcă...
Pagina se încarcă...
Pagina se încarcă...
Pagina se încarcă...
Pagina se încarcă...
Pagina se încarcă...
Pagina se încarcă...
Pagina se încarcă...
Pagina se încarcă...
Pagina se încarcă...
Pagina se încarcă...
Pagina se încarcă...
Pagina se încarcă...
Pagina se încarcă...
Pagina se încarcă...
Pagina se încarcă...
Pagina se încarcă...
Pagina se încarcă...
Pagina se încarcă...
Pagina se încarcă...
Pagina se încarcă...
Pagina se încarcă...
Pagina se încarcă...
Pagina se încarcă...
Pagina se încarcă...
Pagina se încarcă...
Pagina se încarcă...
Pagina se încarcă...
Pagina se încarcă...
Pagina se încarcă...
Pagina se încarcă...
Pagina se încarcă...
Pagina se încarcă...
Pagina se încarcă...
Pagina se încarcă...
Pagina se încarcă...
Pagina se încarcă...
Pagina se încarcă...
Pagina se încarcă...
Pagina se încarcă...
Pagina se încarcă...
Pagina se încarcă...
Pagina se încarcă...
Pagina se încarcă...
Pagina se încarcă...
Pagina se încarcă...
Pagina se încarcă...
Pagina se încarcă...
Pagina se încarcă...
Pagina se încarcă...
Pagina se încarcă...
Pagina se încarcă...
Pagina se încarcă...
Pagina se încarcă...
Pagina se încarcă...
Pagina se încarcă...
Pagina se încarcă...
Pagina se încarcă...
Pagina se încarcă...
Pagina se încarcă...
Pagina se încarcă...
Pagina se încarcă...
Pagina se încarcă...
Pagina se încarcă...
Pagina se încarcă...
Pagina se încarcă...
Pagina se încarcă...
Pagina se încarcă...
Pagina se încarcă...
Pagina se încarcă...
Pagina se încarcă...
Pagina se încarcă...
Pagina se încarcă...
Pagina se încarcă...
Pagina se încarcă...
Pagina se încarcă...
Pagina se încarcă...
Pagina se încarcă...
Pagina se încarcă...
Pagina se încarcă...
Pagina se încarcă...
Pagina se încarcă...
Pagina se încarcă...
Pagina se încarcă...
Pagina se încarcă...
Pagina se încarcă...
Pagina se încarcă...
Pagina se încarcă...
Pagina se încarcă...
Pagina se încarcă...
Pagina se încarcă...
Pagina se încarcă...
Pagina se încarcă...
Pagina se încarcă...
Pagina se încarcă...
Pagina se încarcă...
Pagina se încarcă...
Pagina se încarcă...
Pagina se încarcă...
Pagina se încarcă...
Pagina se încarcă...
Pagina se încarcă...
Pagina se încarcă...
Pagina se încarcă...
Pagina se încarcă...
Pagina se încarcă...
Pagina se încarcă...
Pagina se încarcă...
Pagina se încarcă...
Pagina se încarcă...
Pagina se încarcă...
Pagina se încarcă...
Pagina se încarcă...
Pagina se încarcă...
Pagina se încarcă...
Pagina se încarcă...
Pagina se încarcă...
Pagina se încarcă...
Pagina se încarcă...
Pagina se încarcă...
Pagina se încarcă...
Pagina se încarcă...
Pagina se încarcă...
Pagina se încarcă...
Pagina se încarcă...
Pagina se încarcă...
Pagina se încarcă...
Pagina se încarcă...
Pagina se încarcă...
Pagina se încarcă...
Pagina se încarcă...
Pagina se încarcă...
Pagina se încarcă...
Pagina se încarcă...
Pagina se încarcă...
Pagina se încarcă...
Pagina se încarcă...
Pagina se încarcă...
Pagina se încarcă...
Pagina se încarcă...
Pagina se încarcă...
Pagina se încarcă...
Pagina se încarcă...
Pagina se încarcă...
Pagina se încarcă...
Pagina se încarcă...
Pagina se încarcă...
Pagina se încarcă...
Pagina se încarcă...
-
 1
1
-
 2
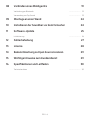
2
-
 3
3
-
 4
4
-
 5
5
-
 6
6
-
 7
7
-
 8
8
-
 9
9
-
 10
10
-
 11
11
-
 12
12
-
 13
13
-
 14
14
-
 15
15
-
 16
16
-
 17
17
-
 18
18
-
 19
19
-
 20
20
-
 21
21
-
 22
22
-
 23
23
-
 24
24
-
 25
25
-
 26
26
-
 27
27
-
 28
28
-
 29
29
-
 30
30
-
 31
31
-
 32
32
-
 33
33
-
 34
34
-
 35
35
-
 36
36
-
 37
37
-
 38
38
-
 39
39
-
 40
40
-
 41
41
-
 42
42
-
 43
43
-
 44
44
-
 45
45
-
 46
46
-
 47
47
-
 48
48
-
 49
49
-
 50
50
-
 51
51
-
 52
52
-
 53
53
-
 54
54
-
 55
55
-
 56
56
-
 57
57
-
 58
58
-
 59
59
-
 60
60
-
 61
61
-
 62
62
-
 63
63
-
 64
64
-
 65
65
-
 66
66
-
 67
67
-
 68
68
-
 69
69
-
 70
70
-
 71
71
-
 72
72
-
 73
73
-
 74
74
-
 75
75
-
 76
76
-
 77
77
-
 78
78
-
 79
79
-
 80
80
-
 81
81
-
 82
82
-
 83
83
-
 84
84
-
 85
85
-
 86
86
-
 87
87
-
 88
88
-
 89
89
-
 90
90
-
 91
91
-
 92
92
-
 93
93
-
 94
94
-
 95
95
-
 96
96
-
 97
97
-
 98
98
-
 99
99
-
 100
100
-
 101
101
-
 102
102
-
 103
103
-
 104
104
-
 105
105
-
 106
106
-
 107
107
-
 108
108
-
 109
109
-
 110
110
-
 111
111
-
 112
112
-
 113
113
-
 114
114
-
 115
115
-
 116
116
-
 117
117
-
 118
118
-
 119
119
-
 120
120
-
 121
121
-
 122
122
-
 123
123
-
 124
124
-
 125
125
-
 126
126
-
 127
127
-
 128
128
-
 129
129
-
 130
130
-
 131
131
-
 132
132
-
 133
133
-
 134
134
-
 135
135
-
 136
136
-
 137
137
-
 138
138
-
 139
139
-
 140
140
-
 141
141
-
 142
142
-
 143
143
-
 144
144
-
 145
145
-
 146
146
-
 147
147
-
 148
148
-
 149
149
-
 150
150
-
 151
151
-
 152
152
-
 153
153
-
 154
154
-
 155
155
-
 156
156
-
 157
157
-
 158
158
-
 159
159
-
 160
160
-
 161
161
-
 162
162
-
 163
163
-
 164
164
-
 165
165
-
 166
166
-
 167
167
-
 168
168
-
 169
169
-
 170
170
-
 171
171
-
 172
172
-
 173
173
-
 174
174
-
 175
175
-
 176
176
-
 177
177
-
 178
178
-
 179
179
-
 180
180
-
 181
181
-
 182
182
-
 183
183
-
 184
184
-
 185
185
-
 186
186
-
 187
187
-
 188
188
-
 189
189
-
 190
190
-
 191
191
-
 192
192
-
 193
193
-
 194
194
-
 195
195
-
 196
196
-
 197
197
-
 198
198
-
 199
199
-
 200
200
-
 201
201
-
 202
202
-
 203
203
-
 204
204
-
 205
205
-
 206
206
-
 207
207
-
 208
208
-
 209
209
-
 210
210
-
 211
211
-
 212
212
-
 213
213
-
 214
214
-
 215
215
-
 216
216
-
 217
217
-
 218
218
-
 219
219
-
 220
220
-
 221
221
-
 222
222
-
 223
223
-
 224
224
-
 225
225
-
 226
226
-
 227
227
-
 228
228
-
 229
229
-
 230
230
-
 231
231
-
 232
232
-
 233
233
-
 234
234
-
 235
235
-
 236
236
-
 237
237
-
 238
238
-
 239
239
-
 240
240
-
 241
241
-
 242
242
-
 243
243
-
 244
244
-
 245
245
-
 246
246
-
 247
247
-
 248
248
-
 249
249
-
 250
250
-
 251
251
-
 252
252
-
 253
253
-
 254
254
-
 255
255
-
 256
256
-
 257
257
-
 258
258
-
 259
259
-
 260
260
-
 261
261
-
 262
262
-
 263
263
-
 264
264
-
 265
265
-
 266
266
-
 267
267
-
 268
268
-
 269
269
-
 270
270
-
 271
271
-
 272
272
-
 273
273
-
 274
274
-
 275
275
-
 276
276
-
 277
277
-
 278
278
-
 279
279
-
 280
280
-
 281
281
-
 282
282
-
 283
283
-
 284
284
-
 285
285
-
 286
286
-
 287
287
-
 288
288
-
 289
289
-
 290
290
-
 291
291
-
 292
292
-
 293
293
-
 294
294
-
 295
295
-
 296
296
-
 297
297
-
 298
298
-
 299
299
-
 300
300
-
 301
301
-
 302
302
-
 303
303
-
 304
304
-
 305
305
-
 306
306
-
 307
307
-
 308
308
-
 309
309
-
 310
310
-
 311
311
-
 312
312
-
 313
313
-
 314
314
-
 315
315
-
 316
316
-
 317
317
-
 318
318
-
 319
319
-
 320
320
-
 321
321
-
 322
322
-
 323
323
-
 324
324
-
 325
325
-
 326
326
-
 327
327
-
 328
328
-
 329
329
-
 330
330
-
 331
331
-
 332
332
-
 333
333
-
 334
334
-
 335
335
-
 336
336
-
 337
337
-
 338
338
-
 339
339
-
 340
340
-
 341
341
-
 342
342
-
 343
343
-
 344
344
-
 345
345
-
 346
346
-
 347
347
-
 348
348
-
 349
349
-
 350
350
-
 351
351
-
 352
352
-
 353
353
-
 354
354
-
 355
355
-
 356
356
-
 357
357
-
 358
358
-
 359
359
-
 360
360
-
 361
361
-
 362
362
-
 363
363
-
 364
364
-
 365
365
-
 366
366
-
 367
367
-
 368
368
-
 369
369
-
 370
370
-
 371
371
-
 372
372
-
 373
373
-
 374
374
-
 375
375
-
 376
376
-
 377
377
-
 378
378
-
 379
379
-
 380
380
-
 381
381
-
 382
382
-
 383
383
-
 384
384
-
 385
385
-
 386
386
-
 387
387
-
 388
388
-
 389
389
-
 390
390
-
 391
391
-
 392
392
-
 393
393
-
 394
394
-
 395
395
-
 396
396
-
 397
397
-
 398
398
-
 399
399
-
 400
400
-
 401
401
-
 402
402
-
 403
403
-
 404
404
-
 405
405
-
 406
406
-
 407
407
-
 408
408
-
 409
409
-
 410
410
-
 411
411
-
 412
412
-
 413
413
-
 414
414
-
 415
415
-
 416
416
-
 417
417
-
 418
418
-
 419
419
-
 420
420
-
 421
421
-
 422
422
-
 423
423
-
 424
424
-
 425
425
-
 426
426
-
 427
427
-
 428
428
-
 429
429
-
 430
430
-
 431
431
-
 432
432
-
 433
433
-
 434
434
-
 435
435
-
 436
436
-
 437
437
-
 438
438
-
 439
439
-
 440
440
-
 441
441
-
 442
442
-
 443
443
-
 444
444
-
 445
445
-
 446
446
-
 447
447
-
 448
448
-
 449
449
-
 450
450
-
 451
451
-
 452
452
-
 453
453
-
 454
454
-
 455
455
-
 456
456
-
 457
457
-
 458
458
-
 459
459
-
 460
460
-
 461
461
-
 462
462
-
 463
463
-
 464
464
-
 465
465
-
 466
466
-
 467
467
-
 468
468
-
 469
469
-
 470
470
-
 471
471
-
 472
472
-
 473
473
-
 474
474
-
 475
475
-
 476
476
-
 477
477
-
 478
478
-
 479
479
-
 480
480
-
 481
481
-
 482
482
-
 483
483
-
 484
484
-
 485
485
-
 486
486
-
 487
487
-
 488
488
-
 489
489
-
 490
490
-
 491
491
-
 492
492
-
 493
493
-
 494
494
-
 495
495
-
 496
496
-
 497
497
-
 498
498
-
 499
499
-
 500
500
-
 501
501
-
 502
502
-
 503
503
-
 504
504
-
 505
505
-
 506
506
-
 507
507
-
 508
508
-
 509
509
-
 510
510
-
 511
511
-
 512
512


Samsung HW-S40T Manual de utilizare
- Categorie
- Boxe soundbar
- Tip
- Manual de utilizare
- Acest manual este potrivit și pentru
în alte limbi
- slovenčina: Samsung HW-S40T Používateľská príručka
- eesti: Samsung HW-S40T Kasutusjuhend
Lucrări înrudite
-
Samsung HW-J7501R Manual de utilizare
-
Samsung HW-J8501R Manual de utilizare
-
Samsung HW-J7501 Manual de utilizare
-
Samsung HW-J8501 Manual de utilizare
-
Samsung HW-K551 Manual de utilizare
-
-
-
Samsung HW-J250 Manual de utilizare
-
Samsung HW-J6001R Manual de utilizare
-
Samsung HW-J450 Manual de utilizare