
User manual
Imagine the possibilities
Thank you for purchasing this Samsung product.
To receive more complete service, please register your product at
www.samsung.com/register
HW-K950

2
GETTING STARTED
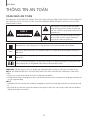
SAFETY INFORMATION
SAFETY WARNINGS
TO REDUCE THE RISK OF ELECTRIC SHOCK, DO NOT REMOVE THE COVER (OR BACK).
NO USER-SERVICEABLE PARTS ARE INSIDE. REFER SERVICING TO QUALIFIED SERVICE PERSONNEL.
CAUTION
RISK OF ELECTRIC SHOCK.
DO NOT OPEN.
This symbol indicates that high voltage is
present inside. It is dangerous to make any kind
of contact with any internal part of this product.
This symbol indicates that important literature
concerning operation and maintenance has
been included with this product.
Class II product : This symbol indicates that it does not require a safety connection to electrical
earth (ground).
AC voltage : This symbol indicates that the rated voltage marked with the symbol is AC voltage.
DC voltage : This symbol indicates that the rated voltage marked with the symbol is DC voltage.
Caution, Consult instructions for use : This symbol instructs the user to consult the user manual for
further safety related information.
WARNING : To reduce the risk of fire or electric shock, do not expose this appliance to rain or moisture.
CAUTION : TO PREVENT ELECTRIC SHOCK, MATCH WIDE BLADE OF PLUG TO WIDE SLOT, FULLY INSERT.
• This apparatus shall always be connected to a AC outlet with a protective grounding connection.
• To disconnect the apparatus from the mains, the plug must be pulled out from the mains socket, therefore the
mains plug shall be readily operable.
CAUTION
• Do not expose this apparatus to dripping or splashing. Do not put objects filled with liquids, such as vases on the
apparatus.
• To turn this apparatus off completely, you must pull the power plug out of the wall socket. Consequently, the power
plug must be easily and readily accessible at all times.
GETTING STARTED

ENG
3
GETTING STARTED
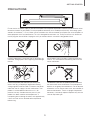
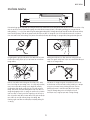
PRECAUTIONS
99.1mm 99.1mm
68.6
mm
99.1mm
Ensure that the AC power supply in your house complies with the power requirements listed on the identification sticker
located on the back of your product. Install your product horizontally, on a suitable base (furniture), with enough space
around it for ventilation (7~10 cm). Make sure the ventilation slots are not covered. Do not place the unit on amplifiers or
other equipment which may become hot. This unit is designed for continuous use. To fully turn off the unit, disconnect
the AC plug from the wall outlet. Unplug the unit if you intend to leave it unused for a long period of time.
During thunderstorms, disconnect the AC plug from the
wall outlet. Voltage peaks due to lightning could damage
the unit.
Protect the product from moisture (i.e. vases), and
excess heat (e.g. a fireplace) or equipment creating
strong magnetic or electric fields. Disconnect the power
cable from the AC supply if the unit malfunctions. Your
product is not intended for industrial use. It is for
personal use only. Condensation may occur if your
product has been stored in cold temperatures. If
transporting the unit during the winter, wait approximately
2 hours until the unit has reached room temperature
before using.
Do not expose the unit to direct sunlight or other heat
sources. This could lead to overheating and cause the
unit to malfunction.
The batteries used with this product contain chemicals
that are harmful to the environment. Do not dispose of
batteries in the general household trash. Do not dispose
of batteries in a fire. Do not short circuit, disassemble, or
overheat the batteries. There is a danger of explosion if
the battery is incorrectly replaced. Replace only with the
same or equivalent type.

4
GETTING STARTED
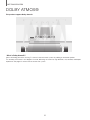
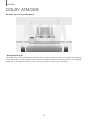
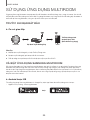
DOLBY ATMOS®
This product supports Dolby Atmos®.
* What is Dolby Atmos®?
Atmos technology enhances existing 5.1 channel surround sound systems by adding an overhead speaker.
This envelops the listener in 360 degrees of sound, delivering an immersive, high-definition, rich, detailed, and deeper
experience. See page 24 to learn how to connect the system.

ENG
5
GETTING STARTED
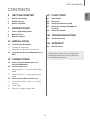
CONTENTS
2 GETTING STARTED
2 Safety Information
4 Dolby Atmos®
6 What’s Included
7 DESCRIPTIONS
7 Front / Right Side Panel
8 Bottom Panel
9 Remote Control
14 INSTALLATION
14 Installing the Soundbar
14 Installing the Wall Mount
17 Detaching the Soundbar from the Wall
18 Installing the Surround Speakers on a
Wall
19 CONNECTIONS
19 Connecting the Subwoofer and
Surround Speakers
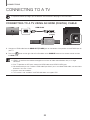
22 Connecting to a TV
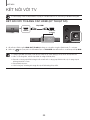
22 Connecting to a TV Using an HDMI (Digital)
Cable
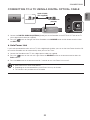
23 Connecting to a TV Using a Digital Optical
Cable
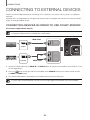
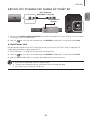
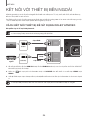
24 Connecting to External Devices
24 Connecting Devices in Order to Use Dolby
Atmos®
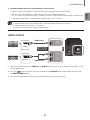
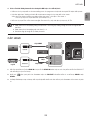
25 HDMI Cable
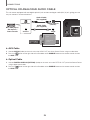
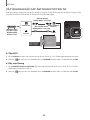
26 Optical or Analogue Audio Cable
27 FUNCTIONS
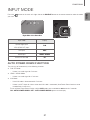
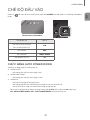
27 Input Mode
28 Bluetooth
30 Using the Multiroom App
32 Using the Network Standby On
Function
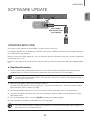
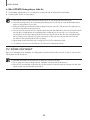
33 Software Update
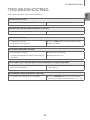
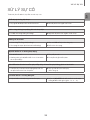
35 TROUBLESHOOTING
35 Troubleshooting
36 APPENDIX
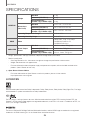
36 Specifications
Figures and illustrations in this User Manual are
provided for reference only and may differ from
actual product appearance.

6
GETTING STARTED
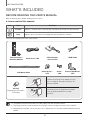
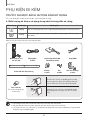
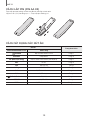
WHAT’S INCLUDED
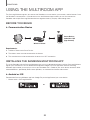
BEFORE READING THE USER’S MANUAL
Note the following terms before reading the user manual.
+ Icons used in this manual
Icon Term Definition
Caution
Indicates a situation where a function does not operate or settings may be cancelled.
Note
Indicates tips or instructions on the page that help you operate a function.
Check for the supplied accessories shown below.
SOUND
SOURCE
EFFECT
LEVEL
VOL WOOFER
SOUNDBAR
Remote Control /
Batteries (AA Size)
Power Cord : 3 EA
AC/DC Adapter
(for main unit)
HDMI Cable
C TYPE : 700mm
CENTER LINE
C C
Wall Mount Guide
Holder-Screw :
2 EA
Screw :
2 EA
Bracket-Wall Mount :
2 EA
AC Plug
(Depending on the country
and model)
Connect the AC plug to the adapter until you
hear a "snapping" sound to ensure they are
securely fastened.
Do not detach the AC plug from the adapter
(it will not be removed once it has been
attached).
● The appearance of the accessories may differ slightly from the illustrations above.
● To distinguish the left surround speaker from the right, check the label on the rear of each speaker.
● Depending on the region, the AC plug may vary in appearance, or it may be supplied integrated with the
adapter.

ENG
7
DESCRIPTIONS
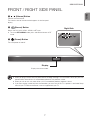
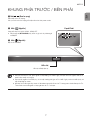
FRONT / RIGHT SIDE PANEL
1 /
(Volume) Button
Controls the volume level.
The numeric value of the volume level appears in the front panel
display.
2 (Source) Button
Selects the D.IN, AUX, HDMI1, HDMI2, or BT input.
● To turn on BT PAIRING mode, press and hold this button in BT
mode.
3 (Power) Button
Turns the power on and off.
2 3
Right Side
1
Display
Displays the current mode.
● When you plug in the AC cord, the power button will begin working in 4 to 6 seconds. When you press the
power button, there will be a 20 second delay before the unit produces sound.
● When you turn on this unit, there will be a 4 to 5 second delay before it produces sound.
● If you want to enjoy sound only from the Soundbar, you must turn off the TV's speakers in the Audio Setup
menu of your TV. Refer to the owner's manual supplied with your TV.
DESCRIPTIONS

8
DESCRIPTIONS
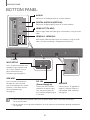
BOTTOM PANEL
Wi-Fi SETUP SPK ADD
AUX IN
DIGITAL AUDIO IN
(OPTICAL)
HDMI OUT
(TV-ARC)
HDMI IN 1
HDMI IN 2
DC 19V
SERVICE
DC 19V
SERVICE
Wi-Fi SETUP SPK ADD
AUX IN
DIGITAL AUDIO IN
(OPTICAL)
HDMI OUT
(TV-ARC)
HDMI IN 1
HDMI IN 2
DIGITAL AUDIO IN
(OPTICAL)
HDMI OUT
(TV-ARC)
HDMI IN 1
HDMI IN 2
AUX IN
HDMI IN 1, HDMI IN 2
Inputs digital video and audio signals simultaneously using an HDMI
cable. Use when connecting a supported external device.
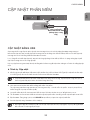
Wi-Fi SETUP
Press this button to connect your
Soundbar to your network using
Wi-Fi setup. (Requires a smart
device and the Samsung
Multiroom app. See page 30.)
SPK ADD
Press this button to connect the
Soundbar to a Samsung HUB
(purchased separately) or a network.
(Requires a smart device and the
Samsung Multiroom app.
See page 30.)
AUX IN
Connect to the Analogue output of an external device.
DIGITAL AUDIO IN (OPTICAL)
Connect to the digital (optical) output of an external device.
HDMI OUT (TV-ARC)
Outputs digital video and audio signals simultaneously using an HDMI
cable.
LABEL
DC 19V
(Power Supply In)
Connect the AC/DC power
adaptor to the power supply
jack, and then connect the
AC/DC power adaptor plug to
a wall outlet.
SERVICE
USB micro jack. To upgrade the
product's software. Requires a
USB adapter. (Sold separately.)
See page 33.
● When disconnecting the power cable of the AC power adaptor from a wall outlet, pull the plug.
Do not pull the cable.
● Do not connect this unit or other components to an AC outlet until all connections between components
are complete.

ENG
9
DESCRIPTIONS
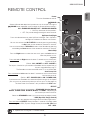
REMOTE CONTROL
SOUND
SOURCE
EFFECT
LEVEL
VOL WOOFER
SOUNDBAR
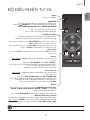
Power
Turns the Soundbar on and off.
SOUND
Surround Sound adds depth and spaciousness to the sound. Pressing the
SOUND button repeatedly cycles through the Surround Sound settings :
ON - SURROUND SOUND, OFF - SURROUND SOUND
• ON: Play sound over all the speakers.
• OFF: Play sound through the original source channel.
Up/Down/Left/Right
Press the indicated areas to select Up/Down/Left/Right.
Press Up/Down/
Left/Right on the button to select or set functions.
You can also activate the Wi-Fi SETUP function by pressing and holding
the Up button on the remote for more than 5 seconds.
You can also activate the SPK ADD function of the Soundbar by pressing
and holding the Down button of the remote for more than 5 seconds.
Music Skip
Press the Right button to select the next music; press the Left button to
select the previous music.
Anynet+
Press and hold
the Right
button for about 5 seconds
to turn the Anynet+
function on or off.
(Default : ON - ANYNET+ or OFF - ANYNET+)
The Anynet+ function lets you control the Soundbar with the remote from an
Anynet+ compatible Samsung TV.
The Soundbar must be connected to the TV via an HDMI cable.
Auto Power Link
Press and hold the
Left
button for about 5 seconds to turn the Auto Power
Link function on or off.
(Default :
OFF - POWER LINK
or
ON - POWER LINK
)
Synchronizes the Soundbar to a connected Optical source via the Optical
jack so it turns on automatically when you turn on your TV. (See page 23)
The Auto Power Link function is only available in the D.IN mode.
EFFECT
You can select from 6 sound modes - STANDARD (Original Sound),
MUSIC, CLEAR VOICE, SPORTS, MOVIE, and NIGHT - depending on
the content you want to listen to.
Select the STANDARD mode if you want to enjoy the original sound.
* DRC (Dynamic Range Control)
Lets you apply dynamic range control to Dolby Digital tracks.
Press and hold the EFFECT button for about 5 seconds in standby mode
to toggle the DRC (Dynamic Range Control) function ON - DRC and
OFF - DRC.
● Operate the TV using the TV's remote control.

10
DESCRIPTIONS
SOUND
SOURCE
EFFECT
LEVEL
VOL WOOFER
SOUNDBAR
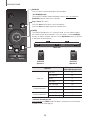
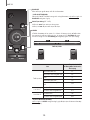
SOURCE
Press to select a source connected to the Soundbar.
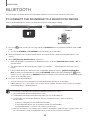
* BT PAIRING mode
To turn on BT PAIRING mode in Bluetooth function, press and hold the
SOURCE button for more than 5 seconds.
Play / Pause (BT / WIFI)
Press the
p
button to pause a music temporarily.
Press the
p
button again to play the selected music.
LEVEL
The ATMOS Soundbar has 5.1.4 channel sound. Use this button to adjust
the volume of each of the speakers. Press this button, use the Left/Right
buttons to select a speaker, and then use the Up/Down buttons to increase
or decrease the level (volume).
FL FR
FTRFTL
C
Main Unit
STL
SL
Surround
Speaker L
STR
SR
Surround
Speaker R
Speaker
Displayed on OLED
when adjusting the level
Main Unit
Front Left FL
Front Top Left FTL
Centre C
Front Right FR
Front Top Right FTR
Surround Speaker L
Surround Left SL
Surround Top Left STL
Surround Speaker R
Surround Right SR
Surround Top Right STR
* Network Standby On/Off
Press and hold
the LEVEL
button for about 5 seconds
to turn the Network
Standby on or off.
(See page 32)

ENG
11
DESCRIPTIONS
SOUND
SOURCE
EFFECT
LEVEL
VOL WOOFER
SOUNDBAR
WOOFER
Push the button up or down to adjust the volume of the subwoofer to -12 or
-6 to +6.
Pressing the button reverts the subwoofer volume to level 0.
EFFECT
LEVEL
VOL
WOOFER
SOUNDBAR
EFFECT
LEVEL
VOL
WOOFER
SOUNDBAR
EFFECT
LEVEL
VOL
WOOFER
SOUNDBAR
EFFECT
LEVEL
VOL
WOOFER
SOUNDBAR
EFFECT
LEVEL
VOL
WOOFER
SOUNDBAR
EFFECT
LEVEL
VOL
WOOFER
SOUNDBAR
EFFECT
LEVEL
VOL
WOOFER
SOUNDBAR
EFFECT
LEVEL
VOL
WOOFER
SOUNDBAR
VOL
Push the button up or down to adjust the volume.
Mute
Press the VOL button to mute the sound. Press it again to unmute the sound.
EFFECT
LEVEL
VOL
WOOFER
SOUNDBAR
EFFECT
LEVEL
VOL
WOOFER
SOUNDBAR
EFFECT
LEVEL
VOL
WOOFER
SOUNDBAR
EFFECT
LEVEL
VOL
WOOFER
SOUNDBAR
EFFECT
LEVEL
VOL
WOOFER
SOUNDBAR
EFFECT
LEVEL
VOL
WOOFER
SOUNDBAR
EFFECT
LEVEL
VOL
WOOFER
SOUNDBAR
EFFECT
LEVEL
VOL
WOOFER
SOUNDBAR
(Sound Control)
Press to select TREBLE, BASS, or AUDIO SYNC. Then, use the
Up/Down buttons to adjust the TREBLE or BASS volume from -3 ~ +3.
Press and hold the
(Sound Control) button for about 5 seconds to
adjust the sound for each frequency band. 150Hz, 300Hz, 600Hz, 1.2KHz,
2.5KHz, 5KHz, and 10KHz are selectable (Left/Right) and each can be
adjusted to a setting between -6 ~ +6 (Up/Down).
If the Soundbar is connected to a digital TV and the video appears out of
sync with the audio, press the
(Sound Control) button to sync the audio
with the video. Use the Up/Down buttons to set the audio delay between
0 ms ~ 300 ms. In BT mode, the Audio Sync function may not available.
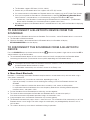
+ Controlling the Volume of Soundbar by using Your TV Remote Control
1. Press and hold the
SOUND
button for more than 5 seconds while the Soundbar is turned on.
2. "ON - TV REMOTE" appears on the Soundbar's display.
3. In the TV's menu, set the TV speaker to external speaker.
● Not available in TV ARC, BT, HDMI1 and HDMI2 modes. (Available only in D.IN (optical) and AUX
modes)
● On the TV remote control, only the volume and mute buttons are available. Other buttons are disabled.
● TV menus differ by manufacturer and model. Refer to the TV's user manual for further information.
● Manufacturers supporting this function:
- VIZIO, LG, Sony, Sharp, PHILIPS, PANASONIC, TOSHIBA, GRUNDIG, Hisense, RCA
-
This function may not be compatible with your TV's remote depending on the remote control's manufacturer.
● To turn off this function, press the
SOUND
button for 5 seconds.
"OFF - TV REMOTE" appears on the Soundbar's display.

12
DESCRIPTIONS
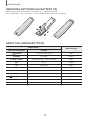
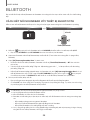
INSERTING BATTERIES (AA BATTERY X2)
Slide the battery cover in the direction of the arrow until it is completely removed.
Insert 2 AA batteries (1.5V) in the correct +/- polarity. Slide the battery cover back into position.
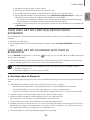
USING THE HIDDEN BUTTONS
Hidden Button
Reference page
Remote Control Button Function
SOUND
TV remote control On/Off P
age 11
SOURCE
BT Paring P
age 28
p
(Play / Pause)
Auto Power Down On/Off (AUX mode) P
age 27
VOL
ID SET P
age 20
Up
WIFI SETUP P
age 9
Down
ADD SPEAKER P
age 9
Left
Auto Power Link On/Off P
age 23
Right
Anynet+ On/Off P
age 9
(Sound Control)
7 Band EQ P
age 11
EFFECT
DRC On/Off P
age 9
LEVEL
Network Standby On/Off P
age 32

ENG
13
DESCRIPTIONS
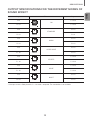
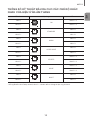
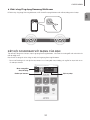
OUTPUT SPECIFICATIONS FOR THE DIFFERENT MODES OF
SOUND EFFECT
Input Effect Output
2 ch
SOUND
SOURCE
EFFECT
LEVEL
VOL WOOFER
ON
5.1.4 ch
5.1 ch 5.1.4 ch
2 ch
SOUND
SOURCE
EFFECT
LEVEL
VOL WOOFER
STANDARD
2.1 ch
5.1 ch 5.1 ch
2 ch
SOUND
SOURCE
EFFECT
LEVEL
VOL WOOFER
MUSIC
2.1 ch
5.1 ch 5.1 ch
2 ch
SOUND
SOURCE
EFFECT
LEVEL
VOL WOOFER
CLEAR VOICE
3.1 ch
5.1 ch 5.1 ch
2 ch
SOUND
SOURCE
EFFECT
LEVEL
VOL WOOFER
SPORTS
5.1.4 ch
5.1 ch 5.1.4 ch
2 ch
SOUND
SOURCE
EFFECT
LEVEL
VOL WOOFER
MOVIE
5.1.4 ch
5.1 ch 5.1.4 ch
2 ch
SOUND
SOURCE
EFFECT
LEVEL
VOL WOOFER
NIGHT
3.1 ch
5.1 ch 5.1 ch
* If the input source is Dolby Atmos®, 5.1.4 channel is outputted. The sound effect is not available.

14
INSTALLATION
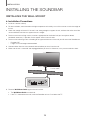
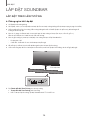
INSTALLING THE SOUNDBAR
INSTALLING THE WALL MOUNT
+ Installation Precautions
● Install on a vertical wall only.
● For the installation, avoid a location with high temperature or humidity, or a wall that cannot sustain the weight of
the set.
● Check the strength of the wall. If the wall is not strong enough to support the unit, reinforce the wall or install the
unit on a different wall that can support the unit's weight.
● Purchase and use the fixing screws or anchors appropriate for the kind of wall you have (plaster board,
iron board, wood, etc.). If possible, fix the support screws into wall studs.
● Purchase wall mounting screws according to the type and thickness of the wall you will mount the Soundbar on.
- Diameter: M5
- Length: 35 mm or longer recommended.
● Connect cables from the unit to external devices before you install it on the wall.
● Make sure the unit is turned off and unplugged before you install it. Otherwise, it may cause an electric shock.
5 cm or more
1. Place the Wall Mount Guide against the wall surface.
• The Wall Mount Guide must be level.
• If the TV is mounted on the wall, install the Soundbar at least 5 cm below the TV.
INSTALLATION

ENG
15
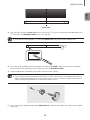
INSTALLATION
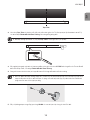
Centre Line
C TYPE : 700mm
CENTER LINE
C C
2. Align the Paper Template’s Centre Line with the centre of your TV (if you are mounting the Soundbar below your
TV), and then fix the Wall Mount Guide to the wall using tape.
● If you are not mounting below a TV, place the Centre Line in the centre of the installation area.
CENTER LINE
C
C TYPE : 700mm
CENTER LINE
C
C B
3. Push a pen tip or sharpened pencil tip through the centre of the C-TYPE images on each end of the Guide to
mark the holes for the supporting screws, and then remove the Wall Mount Guide.
4. Using an appropriately sized drill bit, drill a hole in the wall at each marking.
● If the markings do not correspond to the positions of studs, make sure you insert appropriate anchors or
mollies into the holes before you insert the support screws. If you use anchors or mollies, make sure the
holes you drill are large enough for the anchors or mollies you use.
5. Push a screw (not supplied) through each Holder-Screw, and then screw each screw firmly into a support
screw hole.

16
INSTALLATION
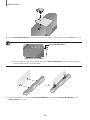
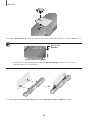
6. Install 2
Bracket-Wall Mounts
in the right orientation on the bottom of the Soundbar, using 2
Screws
(M4 x L12).
Rear of the Soundbar
Right end of the Soundbar
● When assembling, make sure the hanger parts of the Bracket-Wall Mounts are located behind the rear
of the Soundbar. See the illustration above.
7. Install the Soundbar with the attached Bracket-Wall Mounts by hanging the Bracket-Wall Mounts on the
Holder-Screws on the wall.

ENG
17
INSTALLATION
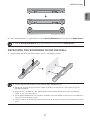
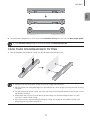
8. Slide the Soundbar down as shown above so that the Bracket-Wall Mounts rest securely on the Holder-Screws.
● Slide the Bracket-Wall Mounts down from the bottom to install it onto the Holder-Screws.
DETACHING THE SOUNDBAR FROM THE WALL
1. To separate the Soundbar from the wall mount, push it in the direction of arrow.
● Do not hang onto the installed unit and avoid striking or dropping the unit.
● Secure the unit firmly to the wall so that it does not fall off. If the unit falls off, it may cause an injury or
damage the product.
● When the unit is installed on a wall, please make sure that children do not pull any of the connecting
cables, as this may cause it to fall.
● For the optimal performance of a wall mount installation, install the speaker system at least 5 cm below the
TV, if the TV is mounted on the wall.
● For your safety, if you do not mount the unit on the wall, install it on a secure, flat surface where it is unlikely
to fall.

18
INSTALLATION
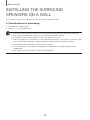
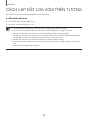
INSTALLING THE SURROUND
SPEAKERS ON A WALL
You can purchase wall mounts separately to install the surround speakers on a wall.
+ Considerations for purchasing
● Endurable load : Above 8.0 Kg
● Hole size : 1/4 - 20 threaded insert
● Since wall mount installation is optional, you must purchase the corresponding accessories separately.
● Please have a qualified installer install the surround speaker Wall Mount Brackets.
● Ask a professional installation company to mount your product on the wall.
● Check the strength of the wall before you install the Wall Mount Brackets. If the strength is insufficient, make
sure to reinforce the wall before installing the Wall Mount Brackets and the speakers on the wall.
● For more information, please refer to the Wall Mount's manual.
● Samsung Electronics is not liable for any damage to the product due to the product being installed
inappropriately.
● Take care not to install the speakers sideways or upside down.

ENG
19
CONNECTIONS
CONNECTING THE SUBWOOFER AND
SURROUND SPEAKERS
● Do not connect the power cord of this product or your TV to a wall outlet until all connections between
components are complete.
● Before moving or installing this product, be sure to turn off the power and disconnect the power cord.
● If the main unit is powered off, the wireless subwoofer and surround speaker will go into stand-by mode
and the STANDBY LED on the rear will be Red after blinking Blue several times.
● If you use a device that uses the same frequency (2.4GHz) as the Soundbar near the Soundbar,
interference may cause some sound interruption.
● The maximum transmission distance of the wireless signal of the main unit is about 10 meters, but may
vary depending on your operating environment. If a steel-concrete or metallic wall is between the main unit
and the wireless subwoofer or surround speaker, the system may not operate at all, because the wireless
signal cannot penetrate metal.
● Wireless receiving antennas are built into the wireless subwoofer and surround speakers. Keep the units
away from water and moisture.
● For optimal listening performance, make sure that the area around the wireless subwoofer and surround
speakers location is clear of any obstructions.
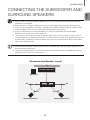
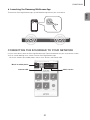
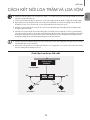
TV
Soundbar Main Unit
Subwoofer
90°
90°
110° 110°
Surround Speaker L Surround Speaker R
Recommended Speaker Layout
CONNECTIONS

20
CONNECTIONS
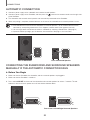
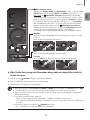
AUTOMATIC CONNECTION
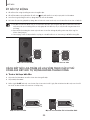
1. Connect a power supply to the subwoofer and surround sound speakers.
2. Connect a power supply to the Soundbar, and then press the
button on the remote control or on the right side
of the Soundbar.
3. The subwoofer and surround sound speakers are automatically connected to the Soundbar.
4. When auto pairing is complete, the blue indicators at the rear of the subwoofer and surround speakers turn on.
● If the red indicator at the rear of the subwoofer or surround speakers is on or the blue indicator flashes
continuously, auto pairing cannot occur. If this happens, connect each of the speakers manually.
● You can enjoy better sound from the wireless subwoofer by selecting a Sound Effect. (See page 9.)
● Important: Before you begin, put the batteries into the remote. See page 12 for instructions.
LINK STANDBY ID SET
POWER
LINK
LINK STANDBY ID SET
LINK
Rear of Subwoofer Rear of Surround Speaker
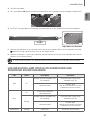
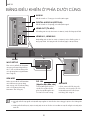
CONNECTING THE SUBWOOFER AND SURROUND SPEAKERS
MANUALLY IF THE AUTOMATIC CONNECTION FAILS
+ Before You Begin
● Make sure that the Soundbar, the subwoofer, and the surround speakers are plugged in.
● Make sure that the Soundbar is turned on.
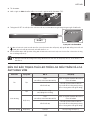
1. Press and hold ID SET on the rear of the subwoofer and surround speakers for at least 5 seconds. The red
indicator at the rear of each speaker turns off and the blue indicator blinks.
LINK STANDBY ID SET
POWER
LINK STANDBY ID SET
POWER
LINK STANDBY ID SET
LINK STANDBY ID SET
POWER
LINK STANDBY ID SET
POWER
LINK STANDBY ID SET
POWER
LINK STANDBY ID SET
LINK STANDBY ID SET
POWER
Rear of Subwoofer
Rear of the Left and Right Surround Speakers
Pagina se încarcă ...
Pagina se încarcă ...
Pagina se încarcă ...
Pagina se încarcă ...
Pagina se încarcă ...
Pagina se încarcă ...
Pagina se încarcă ...
Pagina se încarcă ...
Pagina se încarcă ...
Pagina se încarcă ...
Pagina se încarcă ...
Pagina se încarcă ...
Pagina se încarcă ...
Pagina se încarcă ...
Pagina se încarcă ...
Pagina se încarcă ...
Pagina se încarcă ...
Pagina se încarcă ...
Pagina se încarcă ...
Pagina se încarcă ...
Pagina se încarcă ...
Pagina se încarcă ...
Pagina se încarcă ...
Pagina se încarcă ...
Pagina se încarcă ...
Pagina se încarcă ...
Pagina se încarcă ...
Pagina se încarcă ...
Pagina se încarcă ...
Pagina se încarcă ...
Pagina se încarcă ...
Pagina se încarcă ...
Pagina se încarcă ...
Pagina se încarcă ...
Pagina se încarcă ...
Pagina se încarcă ...
Pagina se încarcă ...
Pagina se încarcă ...
Pagina se încarcă ...
Pagina se încarcă ...
Pagina se încarcă ...
Pagina se încarcă ...
Pagina se încarcă ...
Pagina se încarcă ...
Pagina se încarcă ...
Pagina se încarcă ...
Pagina se încarcă ...
Pagina se încarcă ...
Pagina se încarcă ...
Pagina se încarcă ...
Pagina se încarcă ...
Pagina se încarcă ...
Pagina se încarcă ...
Pagina se încarcă ...
-
 1
1
-
 2
2
-
 3
3
-
 4
4
-
 5
5
-
 6
6
-
 7
7
-
 8
8
-
 9
9
-
 10
10
-
 11
11
-
 12
12
-
 13
13
-
 14
14
-
 15
15
-
 16
16
-
 17
17
-
 18
18
-
 19
19
-
 20
20
-
 21
21
-
 22
22
-
 23
23
-
 24
24
-
 25
25
-
 26
26
-
 27
27
-
 28
28
-
 29
29
-
 30
30
-
 31
31
-
 32
32
-
 33
33
-
 34
34
-
 35
35
-
 36
36
-
 37
37
-
 38
38
-
 39
39
-
 40
40
-
 41
41
-
 42
42
-
 43
43
-
 44
44
-
 45
45
-
 46
46
-
 47
47
-
 48
48
-
 49
49
-
 50
50
-
 51
51
-
 52
52
-
 53
53
-
 54
54
-
 55
55
-
 56
56
-
 57
57
-
 58
58
-
 59
59
-
 60
60
-
 61
61
-
 62
62
-
 63
63
-
 64
64
-
 65
65
-
 66
66
-
 67
67
-
 68
68
-
 69
69
-
 70
70
-
 71
71
-
 72
72
-
 73
73
-
 74
74


în alte limbi
- English: Samsung HW-K950 User manual
Lucrări conexe
-
Samsung HW-K360 Manual de utilizare
-
Samsung HW-T420 Manual de utilizare
-
-
Samsung HW-LST70T Manual de utilizare
-
Samsung WAM6501 Manual de utilizare
-
Samsung HW-J8501R Ghid de inițiere rapidă
-
Samsung HW-J6500R Ghid de inițiere rapidă
-
Samsung HW-S40T Manual de utilizare
-
Samsung SWA-9000S Manual de utilizare
-
Alte documente
-
Blaupunkt LS200SUB Manualul proprietarului
-
LG SH8 Manual de utilizare
-
Hisense HS218 Manual de utilizare
-
JVC TH-E321B Manual de utilizare
-
-
JVC TH-E741B Manual de utilizare
-
-
JVC TH-E431B Manual de utilizare
-
 Fidelio B8/12 Manual de utilizare
-
Sharp HT-SB95 Manualul proprietarului
