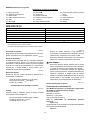
Makita 9046 Manual de utilizare
- Categorie
- Unelte electrice
- Tip
- Manual de utilizare

1
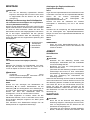
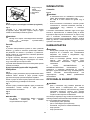
GB
Orbital Sander INSTRUCTION MANUAL
UA
PL
Szlifierka oscylacyjna INSTRUKCJA OBSUGI
RO
lefuitor cu excentric MANUAL DE INSTRUCIUNI
DE
Schwingschleifer BEDIENUNGSANLEITUNG
HU
Excentercsiszoló HASZNÁLATI KÉZIKÖNYV
SK
Elektrická brúska NÁVOD NA OBSLUHU
CZ
Vibraní bruska NÁVOD K OBSLUZE
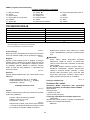
9046

2
1
2
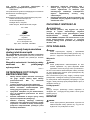
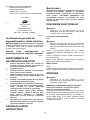
1 003280
1
2 003295 3 003309
1
2
4 004435
123
4
5
5 003317
1
2
3
6 003742
1
2
7 003743
1
2
8 003744 9 003745
10 003331

3
ENGLISH (Original instructions)
Explanation of general view
1-1. Lock button
1-2. Switch trigger
2-1. Front grip
4-1. Velcro type of abrasive paper
4-2. Pad
5-1.
Mark
5-2.
Mark
5-3. Dust bag
5-4. Entry port
5-5. Dust spout
6-1. Groove
6-2. Front fixing cardboard
6-3. Front side of paper dust bag
7-1. Claws
7-2. Upper part
8-1. Notch
8-2. Guide
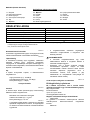
SPECIFICATIONS
Model 9046
Pad size 115 mm x 229 mm
Abrasive paper size 115 mm x 280 mm
Orbits per minute (min
-1
) 6,000
Overall length 283 mm
Net weight 3.1 kg
Safety class /II
• Due to our continuing program of research and development, the specifications herein are subject to change without notice.
• Specifications may differ from country to country.
• Weight according to EPTA-Procedure 01/2003
ENE052-1
Intended use
The tool is intended for the sanding of large surface of
wood, plastic and metal materials as well as painted
surfaces.
ENF002-2
Power supply
The tool should be connected only to a power supply of
the same voltage as indicated on the nameplate, and can
only be operated on single-phase AC supply. They are
double-insulated and can, therefore, also be used from
sockets without earth wire.
ENG905-1
Noise
The typical A-weighted noise level determined according
to EN60745:
Sound pressure level (L
pA
) : 84 dB(A)
Sound power level (L
WA
) : 95 dB(A)
Uncertainty (K) : 3 dB(A)
Wear ear protection
ENG900-1
Vibration
The vibration total value (tri-axial vector sum) determined
according to EN60745:
Work mode : sanding metal plate
Vibration emission (a
h
) : 3.5 m/s
2
Uncertainty (K) : 1.5 m/s
2
ENG901-1
•
The declared vibration emission value has been
measured in accordance with the standard test
method and may be used for comparing one tool
with another.
• The declared vibration emission value may also be
used in a preliminary assessment of exposure.
WARNING:
•
The vibration emission during actual use of the power
tool can differ from the declared emission value
depending on the ways in which the tool is used.
• Be sure to identify safety measures to protect the
operator that are based on an estimation of
exposure in the actual conditions of use (taking
account of all parts of the operating cycle such as
the times when the tool is switched off and when it
is running idle in addition to the trigger time).
ENH101-16
For European countries only
EC Declaration of Conformity
We Makita Corporation as the responsible
manufacturer declare that the following Makita
machine(s):
Designation of Machine:
Orbital Sander
Model No./ Type: 9046
are of series production and
Conforms to the following European Directives:
2006/42/EC
And are manufactured in accordance with the following
standards or standardised documents:
EN60745
The technical documentation is kept by:
Makita International Europe Ltd.
Tech ni ca l Depart men t,
Michigan Drive, Tongwell,
Milton Keynes, Bucks MK15 8JD, England

4
000230
Tomo ya su Kato
Director
Makita Corporation
3-11-8, Sumiyoshi-cho,
Anjo, Aichi, 446-8502, JAPAN
GEA010-1
General Power Tool Safety
Warnings
WARNING Read all safety warnings and all
instructions. Failure to follow the warnings and
instructions may result in electric shock, fire and/or
serious injury.
Save all warnings and instructions for
future reference.
GEB021-4
SANDER SAFETY WARNINGS
1. Always use safety glasses or goggles.
Ordinary eye or sun glasses are NOT safety
glasses.
2. Hold the tool firmly.
3. Do not leave the tool running. Operate the tool
only when hand-held.
4. This tool has not been waterproofed, so do not
use water on the workpiece surface.
5. Ventilate your work area adequately when you
perform sanding operations.
6. Some material contains chemicals which may
be toxic. Take caution to prevent dust
inhalation and skin contact. Follow material
supplier safety data.
7. Use of this tool to sand some products, paints
and wood could expose user to dust
containing hazardous substances. Use
appropriate respiratory protection.
8. Be sure that there are no cracks or breakage
on the pad before use. Cracks or breakage
may cause a personal injury.
SAVE THESE INSTRUCTIONS.
WARNING:
DO NOT let comfort or familiarity with product
(gained from repeated use) replace strict adherence
to safety rules for the subject product. MISUSE or
failure to follow the safety rules stated in this
instruction manual may cause serious personal
injury.
FUNCTIONAL DESCRIPTION
CAUTION:
• Always be sure that the tool is switched off and
unplugged before adjusting or checking function on
the tool.
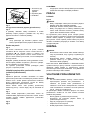
Switch action
Fig.1
CAUTION:
• Before plugging in the tool, always check to see
that the switch trigger actuates properly and returns
to the "OFF" position when released.
To start t he t oo l, s im pl y p ul l t he s wi tc h trigge r. R el ea se
the switch trigger to stop.
For continuous operation, pull the switch trigger and then
push in the lock button.
To st op th e tool fr om th e l ocked position, pull the switch
trigger fully, then release it.
Front grip
Fig.2
The front grip position can be changed in 90° increments.
Pull the front grip and rotate it to the desired position.
ASSEMBLY
CAUTION:
•
Always be sure that the tool is switched off and
unplugged before carrying out any work on the tool.
Installing or removing abrasive paper
For conventional type of abrasive paper with
pre-punched holes (standard equipment):
Turn the clamp lever counterclockwise. Insert the paper
end into the clamper, aligning the holes in the paper with
those in the pad. Then return the clamp lever to the
original position to secure the paper. Repeat the same
process for the other end of the tool, maintaining the
proper paper tension.
Open
1
2
3
003307
Fig.3
For the velcro type of abrasive paper (accessory)
Fig.4
Remove all dirt or foreign matter from the pad. Attach the
paper to the pad, aligning the holes in the paper with
those in the pad.
1. Conventional
type of abrasive
paper
2. Clamp lever
3. Pad

5
CAUTION:
• Always use velcro type of abrasive papers. Never
use pressure-sensitive abrasive papers.
Dust bag
Fig.5
To i ns ta ll t he dust b ag , ali gn t he
mark on the bag's
entry port with the
mark on the dust spout of the tool
and fit the entry port onto the dust spout. Then turn the
dust bag clockwise to secure it in place.
For the best results, empty the dust bag when it becomes
approximately half full, tapping it lightly to remove as
much dust as possible.
To re mo ve th e dust b ag , f ol low the ins ta ll at io n
procedures in reverse.
Installing paper dust bag (optional accessory)
Fig.6
Place the paper dust bag on the paper dust bag holder
with its front side upward. Insert the front fixing cardboard
of the paper dust bag into the groove of the paper dust
bag holder.
Then press the upper part of the front fixing cardboard in
arrow direction to hook it onto the claws.
Fig.7
Insert the notch of the paper dust bag into the guide of
the paper dust bag holder. Then install the paper dust
bag holder set on the tool.
Fig.8
Fig.9
NOTE:
• If you connect a Makita dust collector to this tool,
more efficient and cleaner operations can be
performed.
OPERATION
Sanding operation
Fig.10
CAUTION:
• Never run the tool without the abrasive paper. You
may seriously damage the pad.
• Do not block motor vent with your finger or hand.
• Never force the tool. Excessive pressure may
decrease the sanding efficiency, damage the
abrasive paper or shorten tool life.
Hold the tool firmly with one hand on the switch handle
and the other hand on the front grip when performing the
tool. Turn the tool on and wait until it attains full speed.
Then gently place the tool on the workpiece surface.
Keep the pad flush with the workpiece and apply slight
pressure on the tool.
MAINTENANCE
CAUTION:
• Always be sure that the tool is switched off and
unplugged before attempting to perform inspection
or maintenance.
• Never use gasoline, benzine, thinner, alcohol or the
like. Discoloration, deformation or cracks may
result.
To ma intain produc t SAFE TY an d RE LI AB IL IT Y, repa irs,
carbon brush inspection and replacement, any other
maintenance or adjustment should be performed by
Makita Authorized Service Centers, always using Makita
replacement parts.
OPTIONAL ACCESSORIES
CAUTION:
• These accessories or attachments are
recommended for use with your Makita tool
specified in this manual. The use of any other
accessories or attachments might present a risk of
injury to persons. Only use accessory or
attachment for its stated purpose.
If you need any assistance for more details regarding
these accessories, ask your local Makita Service Center.
• Abrasive paper (with pre-punched holes)
• Velcro type of abrasive paper (with pre-punched
holes)
• Joint 25 (for connecting to vacuum cleaner)
• Paper dust bag
• Paper dust bag holder
NOTE:
• Some items in the list may be included in the tool
package as standard accessories. They may differ
from country to country.

6
( )
1-1.
1-2.
2-1.
4-1.
4-2.
5-1.
5-2.
5-3.
5-4.
5-5.
6-1.
6-2.
6-3.
7-1.
7-2.
8-1.
8-2.
9046
115 x 229
115 x 280
(.
-1
) 6000
283
3,1
/II
• , ,
.
• .
• EPTA-Procedure 01/2003
ENE052-1
,
.
ENF002-2
, ,
,
.
,
.
ENG905-1
,
EN60745:
(L
pA
): 84 (A)
(L
WA
): 95 (A)
(K) : 3 (A)
ENG900-1
( )
EN60745:
:
(a
h
) : 3,5 /
2
(): 1,5 /
2
ENG901-1
•
.
•
.
:
•
.
•
,
(
, ,
).
ENH101-16
, Makita Corporation,
, ,
Makita:
:
/ : 9046

7
:
2006/42/EC
:
EN60745
:
Makita International Europe Ltd.
Tech ni ca l Depart men t,
Michigan Drive, Tongwell,
Milton Keynes, Bucks MK15 8JD,
000230
Tomo ya su Kato
Makita Corporation
3-11-8, Sumiyoshi-cho,
Anjo, Aichi, 446-8502,
GEA010-1
!
.
/ .
.
GEB021-4
1.
.
.
2. .
3. .
,
.
4. ,
.
5. '
.
6.
. ,
.
.
7.
,
.
.
8. ,
.
.
:
( );
.
, ,
.
:
•
, ,
.
.
Fig.1
:
•
' ,
"".
,
. - .
,
.
,
.
Fig.2
90°.
.
:
• ,
, ,
.

8
( ):
.
,
.
,
.
, .
Відкрито
1
2
3
003307
Fig.3
()
Fig.4
.
,
.
:
•
.
, .
Fig.5
.
, .
,
, ,
.
,
,
.
( )
Fig.6
.
.
,
.
Fig.7
.
.
Fig.8
Fig.9
:
•
Makita,
.
Fig.10
:
•
.
.
•
.
• .
,
.
, –
. ,
.
.
,
,
.
:
• , ,
, ,
.
• , ,
, .
,
.
,
, , ,
-
"",
"".
1.
2.
3.

9
:
•
"",
.
.
.
,
"".
• ( )
• (
)
• 25 ( )
•
•
:
•
.
.

10
POLSKI (Oryginalna instrukcja)
Objanienia do widoku ogólnego
1-1. Przycisk blokujcy
1-2. Spust przecznika
2-1. Uchwyt przedni
4-1. Papier cierny typu Velcro
4-2. Podkadka
5-1. Symbol
5-2. Symbol
5-3. Worek na py
5-4. Dysza wlotowa
5-5. Dysza na py
6-1. Bruzda
6-2. Tekturowy element mocujcy
6-3. Przednia cz papierowego worka
na py
7-1. Ky
7-2. Górna cz
8-1. Nacicie
8-2. Prowadnica
SPECYFIAKCJE
Model 9046
Rozmiar podkadki 115 mm x 229 mm
Rozmiar papieru ciernego 115 mm x 280 mm
Liczba oscylacji na minut (min
-1
) 6 000
Dugo cakowita 283 mm
Ciar netto 3,1 kg
Klasa bezpieczestwa /II
• W zwizku ze stale prowadzonym przez nasz firm programem badawczo-rozwojowym, niniejsze specyfikacje mog ulec zmianom
bez wczeniejszego powiadomienia.
• Specyfikacje mog róni si w zalenoci od kraju.
• Waga obliczona zgodnie z procedur EPTA 01/2003
ENE052-1
Przeznaczenie
Opisywane narzdzie jest przeznaczone do szlifowania
duych powierzchni materiaów z drewna, tworzywa
sztucznego i metalu, jak równie do szlifowania
powierzchni malowanych.
ENF002-2
Zasilanie
Narzdzie wolno podcza tylko do róde zasilania o
napiciu zgodnym z napiciem podanym na tabliczce
znamionowej. Mona je zasila wycznie jednofazowym
prdem przemiennym. Jest ono podwójnie izolowane,
dlatego te mona je zasila z gniazda bez uziemienia.
ENG905-1
Poziom haasu i drga
Typowy równowany poziom dwiku A okrelony w
oparciu o EN60745:
Poziom cinienia akustycznego (L
pA
): 84 dB(A)
Poziom mocy akustycznejl (L
WA
): 95 dB(A)
Niepewno (K): 3 dB(A)
Naley stosowa ochraniacze na uszy
ENG900-1
Drgania
Cakowita warto poziomu drga (suma wektorów w 3
osiach) okrelona zgodnie z norm EN60745:
Tryb pracy: szlifowanie metalowych pyt
Wytwarzanie drga (a
h
) : 3,5 m/s
2
Niepewno (K) : 1,5 m/s
2
ENG901-1
•
Deklarowana warto wytwarzanych drga zostaa
zmierzona zgodnie ze standardow metod
testow i mona j wykorzysta do porównywania
narzdzi.
• Deklarowan warto wytwarzanych drga mona
take wykorzysta we wstpnej ocenie naraenia.
OSTRZEENIE:
• Drgania wytwarzane podczas rzeczywistego
uytkowania elektronarzdzia mog si róni od
wartoci deklarowanej, w zalenoci od sposobu
jego uytkowania.
• W oparciu o szacowane naraenie w rzeczywistych
warunkach uytkowania naley okreli rodki
bezpieczestwa w celu ochrony operatora
(uwzgldniajc wszystkie elementy cyklu dziaania,
tj. czas, kiedy narzdzie jest wyczone i kiedy
pracuje na biegu jaowym, a take czas, kiedy jest
wczone).
ENH101-16
Dotyczy tylko krajów europejskich
Deklaracja zgodnoci UE
Niniejszym firma Makita Corporation jako
odpowiedzialny producent owiadcza, i opisywane
urzdzenie marki Makita:
Opis maszyny:
Szlifierka oscylacyjna
Model nr/ Typ: 9046
jest produkowane seryjnie oraz

11
Jest zgodne z wymogami okrelonymi w
nastpujcych dyrektywach europejskich:
2006/42/EC
Jest produkowane zgodnie z nastpujcymi normami lub
dokumentami normalizacyjnymi:
EN60745
Dokumentacja techniczna przechowywana jest przez:
Makita International Europe Ltd.
Tech ni ca l Depart men t,
Michigan Drive, Tongwell,
Milton Keynes, Bucks MK15 8JD, Anglia
000230
Tomo ya su Kato
Dyrektor
Makita Corporation
3-11-8, Sumiyoshi-cho,
Anjo, Aichi, 446-8502, JAPONIA
GEA010-1
Ogólne zasady bezpieczestwa
obsugi elektronarzdzi
OSTRZEENIE Przeczytaj wszystkie ostrzeenia
i instrukcje. Nie przestrzeganie ich moe prowadzi do
porae prdem, poarów i/lub powanych obrae
ciaa.
Wszystkie ostrzeenia i instrukcje naley
zachowa do póniejszego
wykorzystania.
GEB021-4
OSTRZEENIE DOTYCZCE
BEZPIECZESTWA
1. Naley zawsze uywa okularów ochronnych
lub gogli. Zwyke okulary bd okulary
przeciwsoneczne NIE s okularami
ochronnymi.
2. Trzyma narzdzie w sposób niezawodny.
3. Nie pozostawia zaczonego elektronarzdzia.
Mona uruchomi elektronarzdzie tylko
wtedy, gdy jest trzymane w rkach.
4. Opisywane narzdzie nie jest wodoszczelne,
wic do szlifowania powierzchni nie wolno
uywa wody.
5. Podczas szlifowania w miejscu pracy naley
zapewni odpowiedni wentylacj.
6. Niektóre materiay zawieraj substancje
chemiczne, które mog by toksyczne. Unika
wdychania i kontaktu ze skór. Przestrzega
przepisów bezpieczestwa podanych przez
dostawc materiaów.
7. Szlifowanie niektórych materiaów, farb i
drewna przy u
yciu tego narzdzia moe
narazi uytkownika na dziaanie pyu
zawierajcego substancje niebezpieczne.
Uywa odpowiedniej ochrony dróg
oddechowych.
8. Przed przystpieniem do pracy sprawdzi, czy
podkadka nie jest popkana. Pknicia gro
obraeniami ciaa.
ZACHOWA INSTRUKCJE
OSTRZEENIE:
NIE WOLNO pozwoli, aby wygoda lub rutyna
(nabyta w wyniku wielokrotnego uywania
narzdzia) zastpiy cise przestrzeganie zasad
bezpieczestwa obsugi. NIEWACIWE
UYTKOWANIE narzdzia lub niestosowanie si do
zasad bezpieczestwa podanych w niniejszej
instrukcji obsugi moe prowadzi do powanych
obrae ciaa.
OPIS DZIAANIA
UWAGA:
• Przed rozpoczciem regulacji i sprawdzania
dziaania elektronarzdzia, naley upewni si, czy
jest ono wyczone i nie podczone do sieci.
Wczanie
Rys.1
UWAGA:
• Przed podczeniem elektronarzdzia do sieci
zawsze sprawdza czy spust wcznika dziaa
poprawnie i wraca do pozycji "OFF" po zwolnieniu.
W celu uruchomienia elektronarzdzia naley nacisn
na spust przecznika. Zwolni spust przecznika, aby
wyczy elektronarzdzie.
Dla uruchomienia trybu pracy cigej, nacisn spust
przecznika, a nastpnie wcisn przycisk blokujcy.
Do zatrzymania elektronarzdzia pracujcego w trybie
cigym, naley nacisn spust przecznika do oporu, a
nastpnie zwolni go.
Uchwyt przedni
Rys.2
Pozycj uchwytu przedniego mona regulowa w
odstpach 90° . Pocignij uchwyt przedni i obró go do
danej pozycji.
MONTA
UWAGA:
• Przed wykonywaniem jakichkolwiek czynnoci na
elektronarzdziu naley upewni si, czy jest ono
wyczone i nie podczone do sieci.

12
Zakadanie lub zdejmowanie papieru
ciernego
Konwencjonalny typ papieru ciernego z otworami
(wyposaenie standardowe)
Obró dwigni zaciskow w kierunku odwrotnym do
ruchu wskazówek zegara. Wsu papier w zacisk,
wyrównujc otwory papieru i podkadki. Przywró
dwigni zaciskow do pierwotnej pozycji, aby
zablokowa papier. Powtórzy t sam procedur w
przypadku drugiego koca podstawy, utrzymujc
odpowiedni nacig papieru.
Otwórz
1
2
3
003307
Rys.3
Papier cierny typu Velcro (osprzt dodatkowy)
Rys.4
Usu z podkadki zanieczyszczenia i ciaa obce.
Zamocuj papier na podkadce, wyrównujc otwory
papieru i podkadki.
UWAGA:
• Uywaj zawsze papieru ciernego typu velcro. Nie
uywaj nigdy papieru ciernego wraliwego na
nacisk.
Worek na py
Rys.5
Aby zamontowa worek na py, wyrównaj symbol
na
otworze wlotowym worka z symbolem
dyszy
wylotowej narzdzia i wsu dysz do otworu wlotowego.
Nastpnie obró worek w kierunku zgodnym z ruchem
wskazówek zegara, aby go zablokowa we waciwej
pozycji.
Worek najlepiej oprónia, gdy jest wypeniony do
poowy. Naley wówczas postuka go lekko, aby usun
jak najwicej zebranego pyu.
Aby zdemontowa worek na py, naley wykona
procedur instalacji w odwrotnej kolejnoci.
Monta papierowego worka na py (osprzt
dodatkowy)
Rys.6
Papierowy worek na py umieci w uchwycie, tak aby
jego przednia strona bya skierowana w gór. Wsun
tekturowy element mocujcy papierowego worka na py
w rowek uchwytu.
Nastpnie nacisn górn cz tekturowego elementu
mocujcego w kierunku strzaki i wsun go pod
zaczepy.
Rys.7
Wsun nacicie papierowego worka na py w
prowadnic uchwytu worka. Nastpnie zamontowa
uchwyt wraz z workiem na narzdziu.
Rys.8
Rys.9
UWAGA:
• Bardziej wydajn i czyst prac mona osign
podczajc do narzdzia urzdzenie do
odprowadzania pyu firmy Makita.
DZIAANIE
Szlifowanie
Rys.10
UWAGA:
• Nie wolno uruchamia narzdzia bez zaoonego
papieru ciernego. Mona w ten sposób powanie
uszkodzi podkadk.
• Nie blokuj otworu wentylacyjnego silnika palcem
lub rk.
• Nie wolno uywa nadmiernej siy. Zbyt duy
nacisk moe przyczyni si do obnienia
wydajnoci szlifowania, zniszczenia papieru
ciernego i/lub obnienia trwaoci narzdzia.
Przed rozpoczciem pracy z narzdziem naley mocno
chwyci narzdzie jedn rk za uchwyt przecznika, a
drug rk za uchwyt przedni. Wczy narzdzie i
poczeka, a osignie ono maksymaln prdko.
Nastpnie naley delikatnie przyoy narzdzie do
obrabianego elementu. Trzyma pasko podkadk
wzgl
dem obrabianego elementu, lekko dociskajc
narzdzie do elementu.
KONSERWACJA
UWAGA:
• Przed wykonywaniem kontroli i konserwacji naley
si zawsze upewni, czy elektronarzdzie jest
wyczone i nie podczone do sieci.
• Nie wolno uywa benzyny, benzenu,
rozpuszczalnika, alkoholu itp. Substancje takie
mog spowodowa odbarwienia, odksztacenia lub
pknicia.
Dla zachowania BEZPIECZESTWA i
NIEZAWODNOCI wyrobu, naprawy, wymiana szczotek
wglowych oraz inne prace konserwacyjne i regulacyjne
powinny by wykonywane przez Autoryzowane Centra
Serwisowe Makita, wycznie przy uyciu czci
zamiennych Makita.
1. Konwencjonalny
typ papieru
ciernego
2. Dwignia
zaciskowa
3. Podkadka

13
AKCESORIA OPCJONALNE
UWAGA:
• Zaleca si stosowanie wymienionych akcesoriów i
dodatków razem z elektronarzdziem Makita
opisanym w niniejszej instrukcji. Stosowanie
jakichkolwiek innych akcesoriów i dodatków moe
stanowi ryzyko uszkodzenia ciaa. Stosowa
akcesoria i dodatki w celach wycznie zgodnych z
ich przeznaczeniem.
W razie potrzeby, wszelkiej pomocy i szczegóowych
informacji na temat niniejszych akcesoriów udziel
Pastwu lokalne Centra Serwisowe Makita.
• Papier cierny (z otworami)
• Papier cierny typu Velcro (z otworami )
• Zczka 25 (do podczania odkurzacza)
• Papierowy worek na py
• Uchwyt worka papierowego
UWAGA:
• Niektóre pozycje znajdujce si na licie mog by
doczone do pakietu narzdziowego jako
akcesoria standardowe. Mog to by róne pozycje,
w zalenoci od kraju.

14
ROMÂN (Instruciuni originale)
Explicitarea vederii de ansamblu
1-1. Buton de blocare
1-2. Trgaciul întreruptorului
2-1. Mâner frontal
4-1. Hârtie abraziv de tip Velcro
4-2. Taler
5-1. Marcaj
5-2. Marcaj
5-3. Sac de praf
5-4. Racord de admisie
5-5. Duz de evacuare a prafului
6-1. Canelur
6-2. Plac de fixare frontal
6-3. Partea frontal a sacului de praf din
hârtie
7-1. Clichete
7-2. Partea superioar
8-1. Cresttur
8-2. Ghidaj
SPECIFICAII
Model 9046
Dimensiunea tlpii 115 mm x 229 mm
Dimensiunea hârtiei abrazive 115 mm x 280 mm
Rotaii pe minut (min
-1
) 6.000
Lungime total 283 mm
Greutate net 3,1 kg
Clasa de siguran /II
• Datorit programului nostru continuu de cercetare i dezvoltare, caracteristicile pot fi modificate fr o notificare prealabil.
• Specificaiile pot varia în funcie de ar.
• Greutatea este specificat confom procedurii EPTA-01/2003
ENE052-1
Destinaia de utilizare
Maina este destinat lefuirii suprafeelor mari de lemn,
plastic i metal precum i a suprafeelor vopsite.
ENF002-2
Surs de alimentare
Unealta trebuie conectat doar la o surs de alimentare
cu aceeai tensiune precum cea indicat pe plcua
indicatoare a caracteristicilor tehnice i poate fi operat
doar de la o surs de curent alternativ cu o singur faz.
Acestea au o izolaie dubl i, drept urmare, pot fi
utilizate de la prize fr împmântare.
ENG905-1
Emisie de zgomot
Nivelul de zgomot normal ponderat A determinat în
conformitate cu EN60745:
Nivel de presiune acustic (L
pA
): 84 dB(A)
Nivel putere sonor (L
WA
): 95 dB(A)
Eroare (K): 3 dB(A)
Purtai mijloace de protecie a auzului
ENG900-1
Vibraii
Valoarea total a vibraiilor (suma vectorilor tri-axiali)
determinat conform EN60745:
Mod de funcionare: lefuire plac metalic
Emisia de vibraii (a
h
): 3,5 m/s
2
Incertitudine (K): 1,5 m/s
2
ENG901-1
•
Nivelul de vibraii declarat a fost msurat în
conformitate cu metoda de test standard i poate fi
utilizat pentru compararea unei unelte cu alta.
• Nivelul de vibraii declarat poate fi, de asemenea,
utilizat într-o evaluare preliminar a expunerii.
AVERTISMENT:
• Nivelul de vibraii în timpul utilizrii reale a uneltei
electrice poate diferi de valoarea nivelului declarat,
în funcie de modul în care unealta este utilizat.
•
Asigurai-v c identificai msurile de siguran
pentru a proteja operatorul, acestea fiind bazate pe o
estimare a expunerii în condiii reale de utilizare
(luând în considerare toate prile ciclului de operare,
precum timpii în care unealta a fost oprit, sau a
funcionat în gol, pe lâng timpul de declanare).
ENH101-16
Numai pentru rile europene
Declaraie de conformitate CE
Noi, Makita Corporation ca productor responsabil,
declarm c urmtorul(oarele) utilaj(e):
Destinaia utilajului:
lefuitor cu excentric
Modelul nr. / Tipul: 9046
este în producie de serie i
Este în conformitate cu urmtoarele directive
europene:
2006/42/EC
i este fabricat în conformitate cu urmtoarele standarde
sau documente standardizate:
EN60745

15
Documentaia tehnic este pstrat de:
Makita International Europe Ltd.
Tech ni ca l Depart men t,
Michigan Drive, Tongwell,
Milton Keynes, Bucks MK15 8JD, Marea Britanie
000230
Tomo ya su Kato
Director
Makita Corporation
3-11-8, Sumiyoshi-cho,
Anjo, Aichi, 446-8502, JAPONIA
GEA010-1
Avertismente generale de
siguran pentru unelte electrice
AVERTIZARE Citii toate avertizrile de siguran
i toate instruciunile. Nerespectarea acestor avertizri
i instruciuni poate avea ca rezultat electrocutarea,
incendiul i/sau rnirea grav.
Pstrai toate avertismentele i
instruciunile pentru consultri ulterioare.
GEB021-4
AVERTISMENTE DE
SECURITATE LEFUITOR
1. Folosii întotdeauna viziere sau ochelari de
protecie. Ochelarii obinuii sau ochelarii de
soare NU sunt ochelari de protecie.
2. inei bine maina
3. Nu lsai maina în funciune. Folosii maina
numai când o inei cu mâinile
4. Aceast main nu este etan la ap, prin
urmare nu folosii ap pe suprafaa piesei de
prelucrat.
5. Ventilai corespunztor spaiul de lucru atunci
când executai operaii de lefuire.
6. Unele materiale conin substane chimice care
pot fi toxice. Avei grij s nu inhalai praful i
evitai contactul cu pielea. Respectai
instruciunile de siguran
ale furnizorului
7. Folosirea acestei maini pentru lefuirea
anumitor produse, vopsele i tipuri de lemn
poate expune utilizatorul la substane
periculoase. Folosii protecie respiratorie
adecvat.
8. Asigurai-v c nu exist fisuri sau rupturi pe
taler înainte de utilizare. Fisurile sau rupturile
pot provoca vtmri corporale.
PSTRAI ACESTE
INSTRUCIUNI
AVERTISMENT:
NU permitei comoditii i familiarizrii cu produsul
(obinute prin utilizare repetat) s înlocuiasc
respectarea strict a normelor de securitate pentru
acest produs. FOLOSIREA INCORECT sau
nerespectarea normelor de securitate din acest
manual de instruciuni poate provoca vtmri
corporale grave.
DESCRIERE FUNCIONAL
ATENIE:
• Asigurai-v c ai oprit maina i c ai
debranat-o de la reea înainte de a o regla sau de
a verifica starea sa de funcionare.
Acionarea întreruptorului
Fig.1
ATENIE:
• Înainte de a brana maina la reea, verificai dac
trgaciul întreruptorului funcioneaz corect i
dac revine la poziia "OFF" (oprit) atunci când este
eliberat.
Pentru a porni maina, trebuie doar s acionai
întreruptorul. Eliberai întreruptorul pentru a opri
maina.
Pentru o funcionare continu, apsai întreruptorul i
butonul de blocare.
Pentru a opri maina din poziia blocat, acionai la
maxim întreruptorul, apoi eliberai-l.
Mâner frontal
Fig.2
Poziia mânerului frontal poate fi modificat în incremente
de 90°. Tragei mânerul frontal i rotii-l în poziia dorit.
MONTARE
ATENIE:
• Asigurai-v c ai oprit maina i c ai
deconectat-o de la reea înainte de a efectua vreo
intervenie asupra mainii.
Montarea sau demontarea hârtiei abrazive
Pentru hârtie abraziv convenional cu guri
perforate (echipament standard):
Rotii pârghia de strângere în sens anti-orar. Introducei
captul hârtiei în clem, aliniind perforaiile hârtiei cu cele
de pe talp. Apoi readucei pârghia de strângere în
poziia iniial pentru a fixa hârtia. Repetai aceeai
operaie pentru cellalt capt al hârtiei, tensionând
corespunztor hârtia.

16
Deschis
1
2
3
003307
Fig.3
Pentru hârtia abraziv de tip Velcro (accesoriu)
Fig.4
Îndeprtai toate impuritile i materiile strine de pe
talp. Ataai hârtia la talp, aliniind perforaiile hârtiei cu
cele de pe talp.
ATENIE:
• Folosii întotdeauna hârtie abraziv de tip Velcro.
Nu folosii niciodat hârtie abraziv sensibil la
presare.
Sac de praf
Fig.5
Pentru a instala sacul de praf, aliniai marcajul
de pe
racordul de admisie al sacului cu marcajul
de pe
duza de evacuare a prafului de pe main i instalai
racordul de admisie pe duza de evacuare a prafului. Apoi
rotii sacul de praf în sens orar pentru a-l fixa.
Pentru rezultate optime, golii sacul de praf atunci când
se umple pân la circa jumtate din capacitate,
aplicându-i lovituri uoare pentru a elimina cât mai mult
praf posibil.
Pentru a demonta sacul de praf, executai în ordine
invers operaiile de instalare.
Instalarea sacului de praf din hârtie
(accesoriu opional)
Fig.6
Amplasai sacul de praf din hârtie pe suportul acestuia cu
partea frontal orientat în sus. Introducei placa de
fixare frontal a sacului de praf din hârtie în canelura
suportului acestuia.
Apoi apsai partea superioar a plcii de fixare frontale
în direcia sgeii pentru a o cupla pe clichete.
Fig.7
Introducei cresttura sacului de praf din hârtie pe
ghidajul suportului acestuia. Apoi instalai ansamblul
suport al sacului de praf din hârtie pe main.
Fig.8
Fig.9
NOT:
• Conectând un colector de praf Makita la aceast
main putei efectua operaii mai eficiente i mai
curate.
FUNCIONARE
Operaia de lefuire
Fig.10
ATENIE:
• Nu folosii niciodat maina fr hârtie abraziv.
Putei avaria serios talerul.
• Nu blocai fantele de ventilaie ale motorului cu
degetul sau cu mâna.
• Nu forai niciodat maina. O presare excesiv
poate reduce eficiena lefuirii, poate deteriora
hârtia abraziv sau scurta durata de exploatare a
mainii.
inei maina ferm cu o mân pe mânerul de comutare i
cealalt mân pe mânerul frontal în timpul utilizrii.
Pornii maina i ateptai ca aceasta s ating turaia
maxim. Apoi amplasai cu atenie maina pe suprafaa
piesei de prelucrat. Meninei talerul aliniat cu piesa de
prelucrat i aplicai o uoar presiune pe main.
ÎNTREINERE
ATENIE:
• Asigurai-v c ai oprit maina i c ai
debranat-o de la reea înainte de a efectua
operaiuni de verificare sau întreinere.
• Nu utilizai niciodat gazolin, benzin, diluant,
alcool sau alte substane asemntoare. În caz
contrar, pot rezulta decolorri, deformri sau fisuri.
Pentru a menine sigurana i fiabilitatea mainii,
reparaiile, schimbarea i verificarea periilor de carbon,
precum i orice alte operaiuni de întreinere sau reglare
trebuie s fie efectuate numai la Centrele de service
autorizat Makita, folosindu-se piese de schimb Makita.
ACCESORII OPIONALE
ATENIE:
• Folosii accesoriile sau piesele auxiliare
recomandate pentru maina dumneavoastr în
acest manual. Utilizarea oricror alte accesorii sau
piese auxiliare poate cauza vtmri. Folosii
accesoriile pentru operaiunea pentru care au fost
concepute.
Dac avei nevoie de asisten sau de mai multe detalii
referitoare la aceste accesorii, adresai-v centrului local
de service Makita.
• Hârtie abraziv (cu guri perforate)
• Hârtie abraziv de tip Velcro (cu guri perforate)
• Racord 25 (pentru conectare la aspirator)
• Sac de praf din hârtie
• Suport pentru sac de praf din hârtie
NOT:
• Unele articole din list pot fi incluse ca accesorii
standard în ambalajul de scule. Acestea pot diferi
în funcie de ar.
1. Hârtie abraziv
convenional
2. Pârghie de
strângere
3. Taler

17
DEUTSCH (Originalbetriebsanleitung)
Erklärung der Gesamtdarstellung
1-1. Blockierungstaste
1-2. Schalter
2-1. Vorderer Griff
4-1. Klettverschluss-Schleifpapier
4-2. Schleifteller
5-1. Markierung
5-2. Markierung
5-3. Staubbeutel
5-4. Einlassstutzen
5-5. Absaugstutzen
6-1. Rille
6-2. Vordere Kartonplatte
6-3. Vorderseite des Papierstaubbeutels
7-1. Klauen
7-2. Oberkante
8-1. Kerbe
8-2. Führung
TECHNISCHE DATEN
Modell 9046
Schleiftellergröße 115 mm x 229 mm
Schleifpapiergröße 115 mm x 280 mm
Umdrehungen pro Minute (min
-1
) 6.000
Gesamtlänge 283 mm
Netto-Gewicht 3,1 kg
Sicherheitsklasse /II
• Aufgrund der laufenden Forschung und Entwicklung unterliegen die hier aufgeführten technischen Daten Veränderungen ohne
Hinweis
• Die technischen Daten können für verschiedene Länder unterschiedlich sein.
• Gewicht entsprechend der EPTA-Vorgehensweise 01/2003
ENE052-1
Verwendungszweck
Das Werkzeug wurde für das Schleifen großer Flächen
aus Holz, Kunststoff und Metall sowie lackierter Flächen
entwickelt.
ENF002-2
Stromversorgung
Das Werkzeug darf ausschließlich an
Einphasen-Wechselstrom mit der auf dem Typenschild
angegebenen Spannung angeschlossen werden. Das
Werkzeug verfügt über ein doppelt isoliertes Gehäuse
und kann daher auch an einer Stromversorgung ohne
Schutzkontakt betrieben werden.
ENG905-1
Geräuschpegel
Die typischen A-bewerteten Geräuschpegel, bestimmt
gemäß EN60745:
Schalldruckpegel (L
pA
) : 84 dB(A)
Schallleistungspegel (L
WA
) : 95 dB(A)
Abweichung (K) : 3 dB(A)
Tragen Sie Gehörschutz.
ENG900-1
Schwingung
Schwingungsgesamtwerte (Vektorsumme dreier
Achsen) nach EN60745:
Arbeitsmodus: Schleifen einer Metallplatte
Schwingungsausgabe (a
h
) : 3,5 m/s
2
Abweichung (K): 1,5 m/s
2
ENG901-1
•
Die deklarierte Schwingungsbelastung wurde
gemäß der Standardtestmethode gemessen und
kann für den Vergleich von Werkzeugen
untereinander verwendet werden.
• Die deklarierte Schwingungsbelastung kann auch
in einer vorläufigen Bewertung der Gefährdung
verwendet werden.
WARNUNG:
• Die Schwingungsbelastung während der
tatsächlichen Anwendung des Elektrowerkzeugs
kann in Abhängigkeit von der Art und Weise der
Verwendung des Werkzeugs vom deklarierten
Belastungswert abweichen.
• Stellen Sie sicher, dass Schutzmaßnahmen für den
Bediener getroffen werden, die auf den unter den
tatsächlichen Arbeitsbedingungen zu erwartenden
Belastungen beruhen (beziehen Sie alle
Bestandteile des Arbeitsablaufs ein, also zusätzlich
zu den Arbeitszeiten auch Zeiten, in denen das
Werkzeug ausgeschaltet ist oder ohne Last läuft).
ENH101-16
Nur für europäische Länder
EG-Konformitätserklärung
Wir, Makita Corporation als verantwortlicher Hersteller,
erklären, dass die folgenden Geräte der Marke Makita:
Bezeichnung des Geräts:
Schwingschleifer
Modelnr./ -typ: 9046
in Serie gefertigt werden und

18
Den folgenden EG-Richtlininen entspricht:
2006/42/EC
Außerdem werden die Geräte gemäß den folgenden
Standards oder Normen gefertigt:
EN60745
Die technische Dokumentation erfolgt durch:
Makita International Europe Ltd.
Tech ni ca l Depart men t,
Michigan Drive, Tongwell,
Milton Keynes, Bucks MK15 8JD, England
000230
Tomo ya su Kato
Direktor
Makita Corporation
3-11-8, Sumiyoshi-cho,
Anjo, Aichi, 446-8502, JAPAN
GEA010-1
Allgemeine Sicherheitshinweise
für Elektrowerkzeuge
WARNUNG Lesen Sie alle Sicherheitswarnungen
und -anweisungen sorgfältig durch. Werden die
Warnungen und Anweisungen ignoriert, besteht die
Gefahr eines Stromschlags, Brands und/oder schweren
Verletzungen.
Bewahren Sie alle Warnhinweise und
Anweisungen zur späteren Referenz gut
auf.
GEB021-4
SICHERHEITSHINWEISE FÜR
DAS SCHLEIFEN
1. Tragen Sie immer Sicherheitsgläser oder
Schutzbrillen. Bei gewöhnlichen Brillen und
Sonnenbrillen handelt es sich NICHT um
Sicherheitsgläser.
2. Halten Sie das Werkzeug fest in der Hand.
3. Lassen Sie das Werkzeug nicht
unbeaufsichtigt laufen. Arbeiten Sie nur mit
ihm, wenn Sie es in der Hand halten.
4. Dieses Werkzeug ist nicht zum Nass-Schliff
geeignet. Verwenden Sie daher kein Wasser
auf der Werkstückoberfläche.
5. Beim Schleifbetrieb muss auf eine
ausreichende Belüftung des Arbeitsplatzes
geachtet werden.
6. Manche Materialien enthalten Chemikalien, die
giftig sein können. Geben Sie Acht, dass Sie
diese nicht einatmen oder berühren. Lesen Sie
die Material-Sicherheitsblätter des Lieferers.
7. Bei manchen Produkten, Lackierungen und
Holzverarbeitungen kann der Benutzer beim
Schleifen Staub ausgesetzt werden, der
Gefahrstoffe enthält. Tragen Sie stets einen
ausreichenden Atemschutz.
8. Überprüfen Sie den Schleifteller vor der
Verwendung sorgfältig auf Risse oder
sonstige Beschädigungen. Risse oder
Beschädigungen bergen die Gefahr von
Verletzungen.
BEWAHREN SIE DIESE
ANWEISUNGEN AUF.
WARNUNG:
Lassen Sie sich NIE durch Bequemlichkeit oder (aus
fortwährendem Gebrauch gewonnener) Vertrautheit
mit dem Werkzeug dazu verleiten, die
Sicherheitsregeln für das Werkzeug zu missachten.
Bei MISSBRÄUCHLICHER Verwendung des
Werkzeugs oder Missachtung der in diesem
Handbuch enthaltenen Sicherheitshinweise kann es
zu schweren Verletzungen kommen.
FUNKTIONSBESCHREIBUNG
ACHTUNG:
• Überzeugen Sie sich immer vor dem Einstellen des
Werkzeugs oder der Kontrolle seiner Funktion,
dass es abgeschaltet und der Stecker aus der Dose
gezogen ist.
Einschalten
Abb.1
ACHTUNG:
• Kontrollieren Sie immer vor dem Anschluss des
Werkzeugs in die Steckdose, ob der Schalter richtig
funktioniert und nach dem Loslassen in die
ausgeschaltete Position zurückkehrt.
Wenn Sie das Werkzeug ingangsetzen wollen, muss nur
der Schalter gedrückt werden. Wenn Sie das Werkzeug
abschalten wollen, lassen Sie den Schalter los.
Wenn Sie kontinuierlich arbeiten wollen, drücken Sie den
Schalter und dann die Blockierungstaste.
Wenn Sie das Werkzeug aus dem Blockierungsbetrieb
abschalten wollen, drücken Sie fest den Schalter und
lassen ihn dann los.
Vorderer Griff
Abb.2
Die Position des vorderen Griffs kann in Schritten von
90° geändert werden. Ziehen Sie den vorderen Griff und
drehen Sie ihn in die gewünschte Position.

19
MONTAGE
ACHTUNG:
• Ehe Sie am Werkzeug irgendwelche Arbeiten
beginnen, überzeugen Sie sich immer vorher, dass
es abgeschaltet und der Stecker aus der Dose
gezogen ist.
Montage und Demontage des Schleifpapiers
Für herkömmliches Schleifpapier mit vorgestanzten
Löchern (Standardausstattung):
Drehen Sie den Klemmhebel nach links. Legen Sie das
Papier in die Klemme ein, wobei Sie die Löcher im Papier
an denen im Teller ausrichten. Stellen Sie dann den
Klemmhebel zurück in die Ausgangsposition und sichern
Sie so das Papier. Wiederholen Sie den gleichen
Vorgang auf der anderen Seite des Werkzeugs, und
achten Sie dabei auf eine angemessene Spannung des
Schleifpapiers.
Offen
1
2
3
003307
Abb.3
Für Klettverschluss-Schleifpapier (Zubehör)
Abb.4
Entfernen Sie Schmutz und Fremdpartikel vom Teller.
Bringen Sie das Papier am Teller an, wobei Sie die
Löcher im Papier an denen im Teller ausrichten.
ACHTUNG:
• Verwenden Sie immer
Klettverschluss-Schleifpapier. Verwenden Sie nie
druckempfindliches Schleifpapier.
Staubbeutel
Abb.5
Richten Sie zum Anbringen des Staubbeutels die
Markierung
an dessen Einlassstutzen mit der
Markierung
am Absaugstutzen des Werkzeugs an
und führen den Einlassstutzen auf den Absaugstutzen.
Drehen Sie dann den Staubbeutel leicht im
Uhrzeigersinn, um ihn an seinem Platz zu sichern.
Um beste Ergebnisse zu erzielen, sollten Sie den
Staubbeutel entleeren, wenn er etwa halb voll ist, wobei
durch leichtes Abklopfen möglichst viel Staub gelöst
werden sollte.
Zum Abnehmen des Staubbeutels befolgen Sie die
Einbauprozedur in umgekehrter Reihenfolge.
Anbringen des Papierstaubbeutels
(optionales Zubehör)
Abb.6
Legen Sie den Papierstaubbeutel zum Montieren mit der
Vorderseite nach oben auf den Papierstaubbeutelhalter.
Führen Sie die vordere Kartonplatte des
Papierstaubbeutels in die Führungsrille des
Papierstaubbeutelhalters ein.
Drücken Sie dann die Oberkante der vorderen
Kartonplatte in Pfeilrichtung, bis sie in die Klauen
einrastet.
Abb.7
Schieben Sie die Aussparung des Papierstaubbeutels
auf die Führungsrille des Papierstaubbeutelhalters.
Bringen Sie dann den Papierstaubbeutelhaltersatz am
Werkzeug an.
Abb.8
Abb.9
ANMERKUNG:
• Wenn Sie einen Makita-Staubsammler an das
Werkzeug anschließen, können Sie effizienter und
sauberer arbeiten.
ARBEIT
Schleifbetrieb
Abb.10
ACHTUNG:
• Betreiben Sie das Werkzeug niemals ohne
Schleifpapier. Anderenfalls kann der Schleifteller
schwer beschädigt werden.
• Blockieren Sie nicht die Lüftungsschlitze des
Motors mit Ihrer Hand.
• Verwenden Sie das Werkzeug niemals mit Gewalt.
Übermäßiger Druck kann zu einer verminderten
Schleifleistung, Beschädigung des Schleifpapiers
und einer Verkürzung der Lebensdauer des
Werkzeugs führen.
Halten Sie das Werkzeug mit einer Hand am Schaltergriff
und mit der anderen am vorderen Griff fest, wenn Sie mit
dem Werkzeug arbeiten. Schalten Sie das Werkzeug ein
und warten Sie, bis es die volle Drehzahl erreicht hat.
Setzen Sie dann das Werkzeug vorsichtig auf die
Werkstück-Oberfläche. Halten Sie den Teller flach auf
dem Werkstück und üben Sie leichten Druck auf das
Werkzeug aus.
WARTUNG
ACHTUNG:
• Bevor Sie mit der Kontrolle oder Wartung des
Werkzeugs beginnen, überzeugen Sie sich immer,
dass es ausgeschaltet und der Stecker aus der
Steckdose herausgezogen ist.
• Verwenden Sie zum Reinigen niemals Kraftstoffe,
Benzin, Verdünnern, Alkohol oder ähnliches. Dies
1. Herkömmliches
Schleifpapier
2. Klemmhebel
3. Schleifteller

20
kann zu Verfärbungen, Verformungen oder Rissen
führen.
Zur Aufrechterhaltung der SICHERHEIT und
ZUVERLÄSSIGKEIT des Produkts müssen die
Reparaturen, die Kontrolle und der Wechsel der Kohlen
sowie alle Wartungen und Einstellungen von den
autorisierten Servicestellen der Firma Makita und unter
Verwendung der Ersatzteile von Makita durchgeführt
werden.
SONDERZUBEHÖR
ACHTUNG:
• Für Ihr Werkzeug Makita, das in dieser Anleitung
beschrieben ist, empfehlen wir folgende
Zubehörteile und Aufsätze zu verwenden. Bei der
Verwendung anderer Zubehörteile oder Aufsätze
kann die Verletzungsgefahr für Personen drohen.
Die Zubehörteile und Aufsätze dürfen nur für ihre
festgelegten Zwecke verwendet werden.
Wenn Sie nähere Informationen bezüglich dieses
Zubehörs benötigen, wenden Sie sich bitte an Ihre
örtliche Servicestelle der Firma Makita.
• Schleifpapier (mit vorgestanzten Löchern)
• Klettverschluss-Schleifpapier (mit vorgestanzten
Löchern)
• Verbindung 25 (zum Anschließen eines
Staubsaugers)
• Papierstaubbeutel
• Papierstaubbeutelhalter
ANMERKUNG:
• Einige der in der Liste aufgeführten Elemente sind
dem Werkzeugpaket als Standardzubehör
beigefügt. Diese können in den einzelnen Ländern
voneinander abweichen.
Pagina se încarcă ...
Pagina se încarcă ...
Pagina se încarcă ...
Pagina se încarcă ...
Pagina se încarcă ...
Pagina se încarcă ...
Pagina se încarcă ...
Pagina se încarcă ...
Pagina se încarcă ...
Pagina se încarcă ...
Pagina se încarcă ...
Pagina se încarcă ...
-
 1
1
-
 2
2
-
 3
3
-
 4
4
-
 5
5
-
 6
6
-
 7
7
-
 8
8
-
 9
9
-
 10
10
-
 11
11
-
 12
12
-
 13
13
-
 14
14
-
 15
15
-
 16
16
-
 17
17
-
 18
18
-
 19
19
-
 20
20
-
 21
21
-
 22
22
-
 23
23
-
 24
24
-
 25
25
-
 26
26
-
 27
27
-
 28
28
-
 29
29
-
 30
30
-
 31
31
-
 32
32


Makita 9046 Manual de utilizare
- Categorie
- Unelte electrice
- Tip
- Manual de utilizare
în alte limbi
- slovenčina: Makita 9046 Používateľská príručka
- polski: Makita 9046 Instrukcja obsługi
- Deutsch: Makita 9046 Benutzerhandbuch
Lucrări conexe
-
Makita BO5021 Manual de utilizare
-
Makita 906 Manual de utilizare
-
-
-
Makita 4329 Manual de utilizare
-
Makita BHP343 Manual de utilizare
-
-
-
-
Makita 6833 Manual de utilizare