Electrolux PURE I9 Instruction book
- Categorie
- Aspiratoare
- Tip
- Instruction book

Instruction Book
GB INSTRUCTION BOOK
FR MDE D’EMPLOI
BG
CZ PŘÍRUČKA K POUŽITÍ
DE ANLEITUNG
DK VEJLEDNING
EE KASUTUSJUHEND
ES
MANUAL DE INSTRUCCIONES
FI OHJEKIRJA
HR KNJIŽICA S UPUTAMA
HU HASZNÁLATI ÚTMUTATÓ
IT ISTRUZIONI
LT INSTRUKCIJŲ KNYGELĖ
LV LIETOŠANAS PAMĀCĪBA
NO BRUKSANVISNING
PL INSTRUKCJA OBSŁUGI
RO MANUAL DE INSTRUCIUNI
SR
RU
SE BRUKSANVISNING
SI NAVODILA ZA UPORABO
SK NÁVOD NA POUŽÍVANIE
TR TALİMAT KİTAPÇIĞI
UA

ENGLISH
FRANÇAIS
БЪЛГАРСКИ
ČEŠTINA
DEUTSCH
DANSK
EESTI
ESPAÑOL
Click!
SUOMI
HRVATSKI
MAGYAR
ITALIANO
LIETUVIŠKAI
LATVIEŠU
NORSK
POLSKI
CONTENTS
ROMÂNĂ
SRPSKI
РУССКИЙ
SVENSKA
SLOVENŠČINA
SLOVENČINA
TΫRKCE
УКРАЇНСЬКА

3www.electrolux.com
OVERVIEW OF THE ROBOT
HOW TO USE THE ROBOT VACUUM CLEANER
HOW TO CONNECT TO THE ”PUREI9” APP
TIPS ON HOW TO GET THE BEST RESULTS
EMPTYING THE DUST CONTAINER
CLEANING THE FILTER
MAINTENANCE
CHANGING THE BATTERIES
ERROR HANDLING
TROUBLESHOOTING
SAFETY PRECAUTIONS
CONSUMER INFORMATION AND SUSTAINABILITY POLICY
Click!
TABLE OF CONTENTS:

4www.electrolux.com
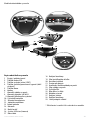
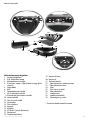
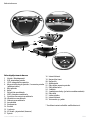
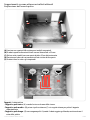
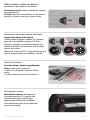
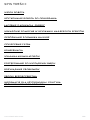
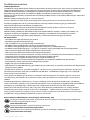
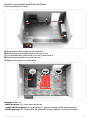
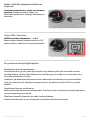
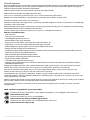
Overview of the robot
Description of your robot vacuum cleaner
1 Display / Control panel
2 ECO function button
3 SPOT cleaning button
4 Play/Pause button / O button (long press)
5 Home button
6 Clock
7 Dust container indicator
8 WIFI connection indicator
9 Scheduled cleaning indicator
10 Warning indicator
11 Battery status indicator
12 Fan unit
13 Air outlet
14 Bumper
15 Side brush
16 3D Vision System (Camera)
17 Main wheels
18 Charging connectors
19 Brush roll lid
20 Brush roll
21 Battery compartments
22 Dust container release button
23 Dust container lid
24 Filter
25 Filter frame (and mesh net)
26 Dust container
27 Charging base
28 Charging connectors
29 Power adaptor and cord
* Accessories may vary from model to model.
1717
21
19
15
20
18
12
22
23
24
25
26
14
15
13
16
27
29
28
6
7
9
10
11
8
2
4
1
3
5
22

5www.electrolux.com
How to use the robot vacuum cleaner
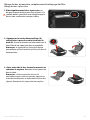
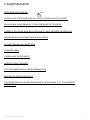
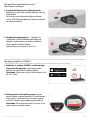
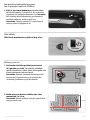
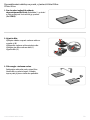
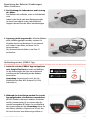
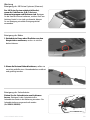
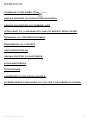
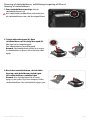
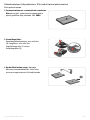
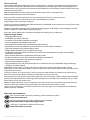
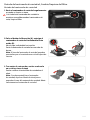
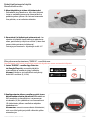
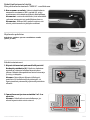
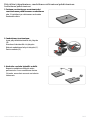
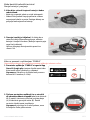
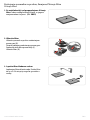
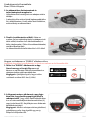
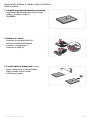
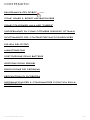
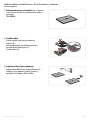
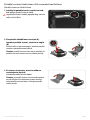
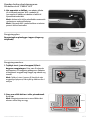
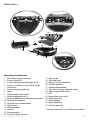
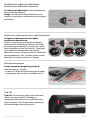
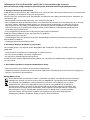
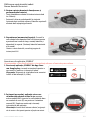
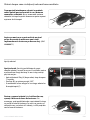
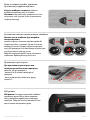
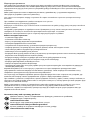
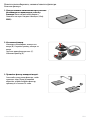
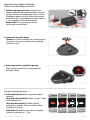
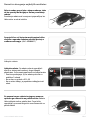
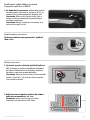
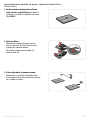
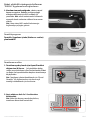
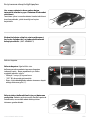
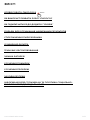
Installation of the robot vacuum cleaner
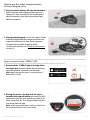
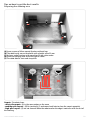
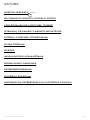
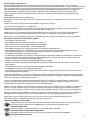
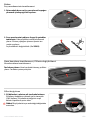
1. Place the Charging base on the oor against the
wall. Plug the adaptor to the power jack on the
side of the base. Connect the Power cord plug to the
main socket. Wind up excessive cord on the back of
the base. Make sure there is an empty area of 0.5 m
on the sides and 1.5 m in front of the Charging base.
WiFi model: Place the base in range of the WiFi
router.
2. Place the side brush.
Note: If the robot is used to clean rooms with wall-to-
wall carpet, remove the side brush for best cleaning
results.t
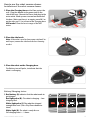
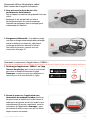
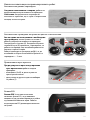
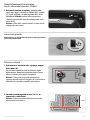
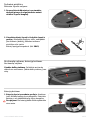
Battery/Charging status
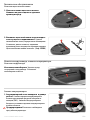
3. Place the robot on the Charging base.
The Battery icon will pulse, to indicate that the
robot is recharging.
1. Red battery (A) indicates that the robot needs to
get charged.
Red light pulse (B): The robot is charging – Low
charging level.
White light pulse (C):The robot has charged
enough to be used. (Press Play/Pause button to
clean.)
White light (D): The robot is ready for use.
Full charging time is ~ 3 hours.
0.5
m
1.5
m
0.5
m
A B C D

6www.electrolux.com
How to use the robot vacuum cleaner
Battery/Charging status
2. To preserve the battery life and performance:
- Always keep the robot charging when not in use.
- Charge it as soon as possible in the charging base
after the cleaning cycle. Waiting too long might
aect the batteries.
3. Storage (not plugged): In case the robot is stored
without being charged for a longer period of time,
remove the batteries and store them separately.
(Charge batteries before removing them).
To remove the batteries see “Changing the batteries”
on page 15.
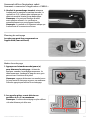
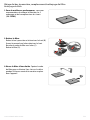
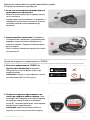
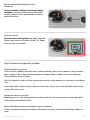
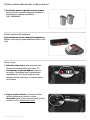
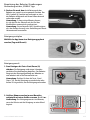
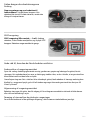
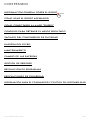
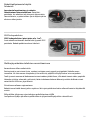
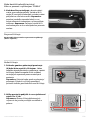
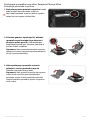
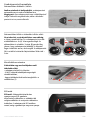
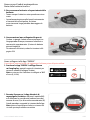
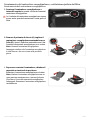
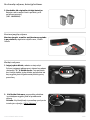
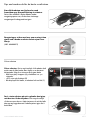
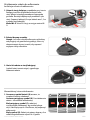
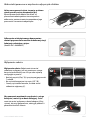
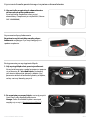
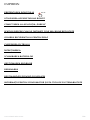
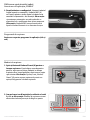
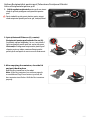
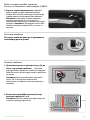
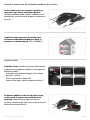
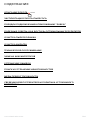
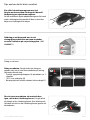
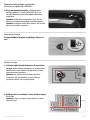
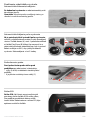
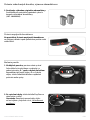
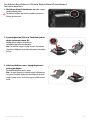
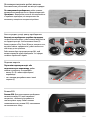
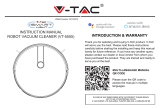
How to connect to the ”PUREi9” APP
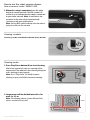
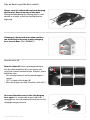
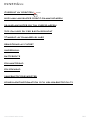
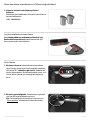
1. Download the ”PUREi9” App in the App Store
or Google play and then follow the instruction to
create the account and connect to the robot.
Note: Make sure that the phone is connected to the
home WiFi
(2.4 GHz).
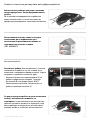
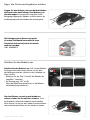
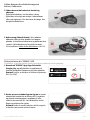
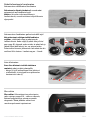
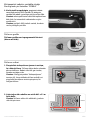
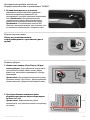
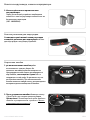
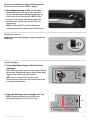
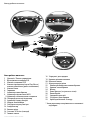
2. During the process the App will ask you to
turn the robot upside down to activate the WiFi
module and scan the serial number bar code (A) or
enter it manually (B). Then continue following the
instruction from the App.
Note: before turning the robot, make sure that it has
been switched on for at least one minute.
2.4 GHz
5 GHz
B
A
We recommend to download the App and update the software before the first use.

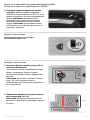
7www.electrolux.com
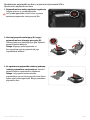
How to use the robot vacuum cleaner
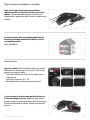
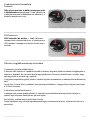
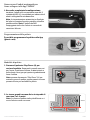
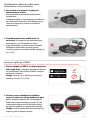
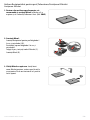
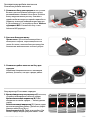
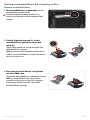
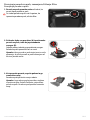
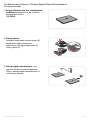
How to connect to the ”PUREi9” APP
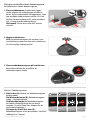
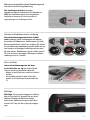
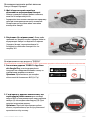
3. When the setup is completed, turn the robot
back to its normal position. The WiFi symbol (A)
will be lit up to indicate that the robot is connected
to your home network. Note: it could take a few
moments for the robot clock to automatically
synchronise with your mobile device.
Note: Pulsing WiFi symbol indicates that the robot is
trying to connect to the network.
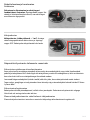
Cleaning schedule
Cleaning can be scheduled in the APP (Days & time)
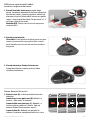
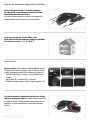
Cleaning modes
1. Press Play/Pause button (A) to start cleaning.
After a few seconds of start-up, cleaning will be
commenced. The robot will start cleaning alongside
walls, working its way inwards.
Note: Press “Play/Pause” (A) briefly to pause
cleaning, or press and hold to terminate cleaning.
2. Large rooms will be divided into cells of at
most 2 x 2.3 m.
Note: The cleaning pattern is more efficient if the
robot is started next to a wall.
A
PUREi9
A
~ 2.3 m

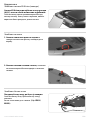
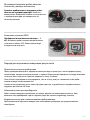
8www.electrolux.com
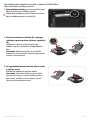
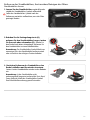
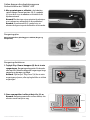
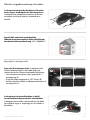
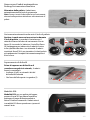
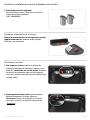
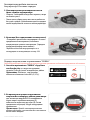
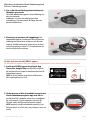
Should recharging be needed during cleaning,
the home button will light up and the robot will
return to the charging base. Home button (A) is lit. The
battery and Play/Pause button (B) ash to indicate
that the robot is charging and that it will resume
where it stopped.
The robot will recharge up to 90 % to resume cleaning
quicker. Charging time is ~ 2 hours.
How to use the robot vacuum cleaner
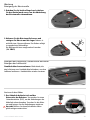
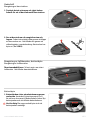
Auto Docking/Charging
When cleaning is completed, the robot
automatically returns to the charging base.
Note: If the robot is not started from the charging base,
it will return to the start position when finished.
Auto charging during cleaning cycle
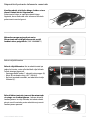
Crossing threshold
ECO Mode
Before crossing a threshold or climbing
over any obstacle, the robot will stop and
check:
- the heights (A & B) on both sides of the
threshold/obstacle
- that the area on the other side is clear to
operate (C)
ECO mode: For a lighter cleaning, press the
ECO button to reduce the power, prolong
the running time and reduce noise level. The
robot will stay in ECO mode until the button is
pressed again.
2h
B
A
A
B
C

9www.electrolux.com
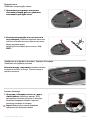
How to use the robot vacuum cleaner
Docking
Stop cleaning and send the robot to the
charging base: Press the Home button. If the robot
is not started from the charging base, it will return to
the starting position.
SPOT Cleaning
SPOT cleaning (small area, ~ 1 m): Place the robot
facing the spot and press the SPOT button. The robot
will will clean the area twice.
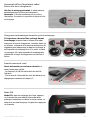
Tips on how to get the best results
Preparing the cleaning area
Before cleaning, remove smaller and fragile objects such as clothing, curtain strings, papers and power
cords from the oor. If the device passes over a power cord and drags it, there is a risk that an object could
be pulled o a table or shelf.
Larger/taller objects such as chairs can be left as the robot will clean around them.
Strong light, Mirrored walls, oor-to-ceiling windows and very shining objects could disturb the 3D Vision
system.
Limiting the cleaning area
The robot will clean all oors it can access. To limit the cleaning area, simply close doors or put an obstacle
in the way.
Dust emptying between scheduled cleanings
To get the most out of scheduled cleaning, empty the dust container regularly.

10www.electrolux.com
40 cm
22 mm
A
E
95 mm
D
C
B
D
C
A
B
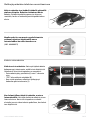
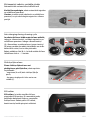
(A) Leave a space of 40 cm around furniture without legs.
(B) The robot easily crosses thresholds with a height up to 22 mm.
(C) It cleans under furniture with more than 95 mm space under.
(D) Place the charging base on the left side of a door.
(E) The robot detects stairs and steep clis.
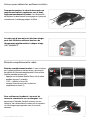
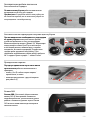
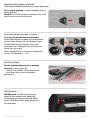
Carpets: The robot cleans
- short-pile carpets: (A) in the same pattern as the room
- medium-pile carpets : (B) rst around it (C) and comes back later to clean the carpet separately
- high-pile carpets: (D) are not cleaned. When the robot reaches the edge it continues with the rest of
the cleaning.
Tips on how to get the best results
Preparing the cleaning area

11www.electrolux.com
Tips on how to get the best results
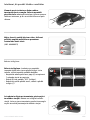
Always carry the robot with two hands keeping
the front up. Manual moving of the robot:
Moving the robot during the cleaning process is not
advised, as it might restart the cleaning from the
beginning.
A
B
Cleaning of a house with more than one oor
can be facilitated by using an extra charging
base on each oor. (ANC: 406000071)
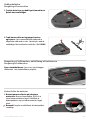
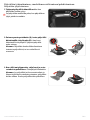
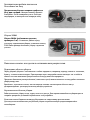
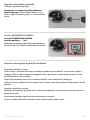
Turn the robot o: There is also the possibility to
turn the robot completely o, in case you are not
using it for a certain amount of time. To do this, please
follow the steps:
- Press the play button (A) on the robot for approx. 7
seconds.
- “OFF” is shown on the display (B).
- When the display turns dark, the robot is fully o (C ).
Turn the robot off
To restart the robot insert it into the charging
base again. It is also possible to turn it o in the
charging base, then you need to lift it and put it in the
charging base again to use it.
7 sec
A B C

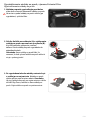
12www.electrolux.com
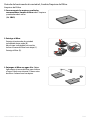
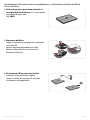
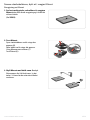
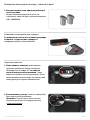
Emptying the Dust container, Replacing/Cleaning the Filter
A
B
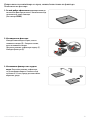
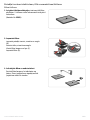
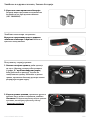
1. Empty the dust container regularly or when the
dust container icon lights up.
If the dust bin symbol remains lit up when the dust
bin is empty, please clean the lter.
2. Press Release button (A), remove the Dust
container by swinging it upwards (B).
Open the lid by swinging it upwards.
Empty the dust container into a waste bin.
Note: The dust container icon flashes to indicate that
the Dust container has been removed, or is not in the
right position.
Emptying the Dust container
3. After emptying the container, close the lid
and put it back in place
Ret the Dust container in the robot.
Note: If the Dust container has not been properly
assembled and Play/Pause button is pressed, the
dust container icon flashes. Refit the Dust container
properly.

13www.electrolux.com
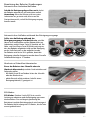
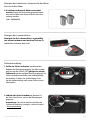
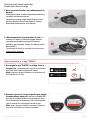
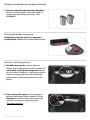
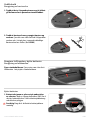
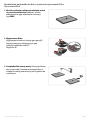
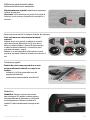
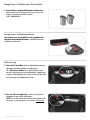
Cleaning the Filter
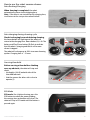
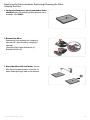
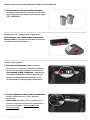
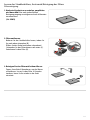
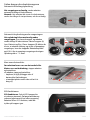
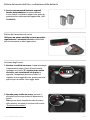
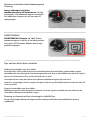
1. For best performance, we recommend to clean
the lter every 5th cleaning and to replace it every
6 months. (Ref: ERK2)
2. Remove the lter:
Remove the Dust container by swinging it
upwards (B). Open the lid by swinging it
upwards.
Swing the Filter frame downwards (C).
Remove the lter (D).
3. Rinse the lter with cold water. Tap the
lter frame to remove water. Let dry for 24
hours before placing it back in the machine.
A
B
C
D
Emptying the Dust container, Replacing/Cleaning the Filter

14www.electrolux.com
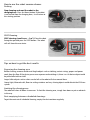
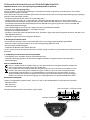
The 3D Vision System works best if the windows
(A,B,C) are kept clean and free from scratches.
Clean from light dust by using a dry soft cloth. If its
heavily soiled you can use a mild detergent to clean it.
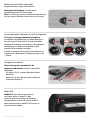
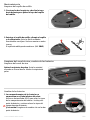
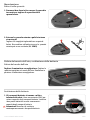
Maintenance
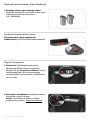
Cleaning the 3D Vision System (Camera)
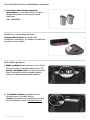
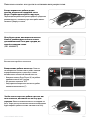
Cleaning the Wheels
1. Remove entangled hairs or such from the
main wheels so that they can turn freely.
Cleaning the Side brush
2. Should the small wheels get stuck, remove
them carefully by using a small screwdriver and
clean the wheels.
Pull the Side brush to remove it. Clean the Side
brush. Reattach the Side brush in the socket.
Side brush can be changed. (Ref: ERK2 / EBSB2)
A
B
C

15www.electrolux.com
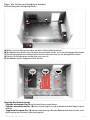
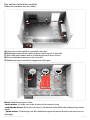
1. Press the two latches and slide the lid forward
to remove the brush roll lid.
Maintenance
Cleaning the Brush roll
2. Pull out the Brush roll and clean the brush and
bearings. Remove entangled threads by snipping
them away with scissors. Ret in reverse order.
Brush roll can be replaced. (Ref: ERK2)
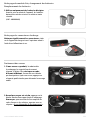
Cleaning the Air channel
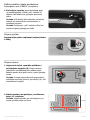
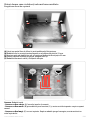
Changing the batteries
Remove the dust container. Remove clogged
debris in the air channel. Put the dust container into
place.
1. The battery compartments are located on
the bottom side of the robot. Use a screwdriver
(PH2) to unscrew the battery compartment lids.
Replace the battery packs and ret the battery
compartment lids.
Caution! Make sure to change the two battery
packs at the same time.
Cleaning the Air channel, Changing the batteries

16www.electrolux.com
2. Use only original supplier batteries.
Batteries must be removed and disposed of safely,
before desposing of the machine.
(ANC: 406000060)
Cleaning the Air channel, Changing the batteries
Cleaning the charging connectors
Use a dry soft cloth to clean regularly the
charging connectors on the charging base and
under the machine.
Error handling
1. If an error occurs, the robot stops cleaning.
The warning icon will pulse and the digits “E:”
followed by an error code, is shown on the
display. The speaker will also describe the error.
After an error has occured, press any button to play
the audio message again.
2. When an error is resolved, press Play/Pause
button to start cleaning.
Note: For a complete list of the error codes and
solutions, see instructions in “Troubleshooting”.

17www.electrolux.com
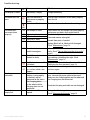
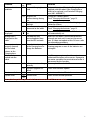
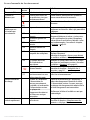
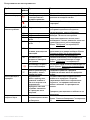
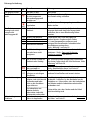
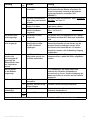
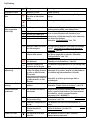
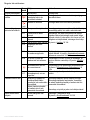
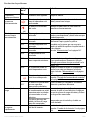
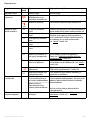
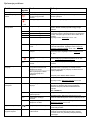
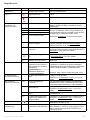
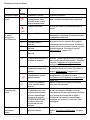
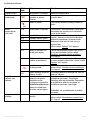
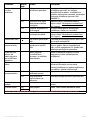
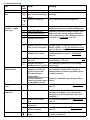
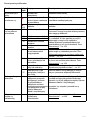
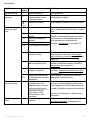
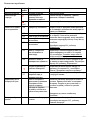
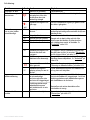
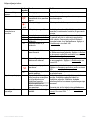
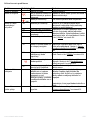
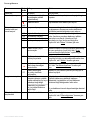
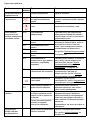
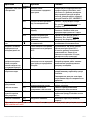
Troubleshooting
Problem
Error
Code
Cause Solution
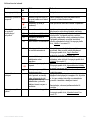
The display is blank. - The battery is empty. Charge the battery.
The robot does not
start.
The Dust container is
not present or properly
closed.
Place the Dust container in the robot, properly
close the lid.
(x3)
The robot is lifted. Place the robot on the oor before starting.
The robot does
not move/clean
properly.
E:10 The bumper is stuck
Please make sure the bumper can move properly
and remove any debris that might block it.
E:11 Right wheel is stuck Check that all parts turn freely.
Clean and remove entangled
threads from parts if needed.
Replace Brush roll or Side brush if damaged.
Check ”Maintenance” page 14.
E:12 Left wheel is stuck
E:13 Brush roll is stuck
E:14 Side brush is stuck
E:15 The robot is stuck or
unable to navigate.
Lift and place the robot where it can move
freely. Check ”Tips on how to get the best results”
page 9.
E:16 The 3D Vision System is
blocked or dusty.
Clean the 3D Vision System and make
sure nothing is blocking the sight. Check
”Maintenance” page 14.
The Dust container is full
or blocked.
Empty and/or clean the Dust Container. Check
”Emptying the Dust container” page 12.
E:17
The robot is operating
on a surface which is too
slippery.
Move the robot and charger to a new location
and start again.
No charge
indication
- The power cord and
adapter is not properly
assembled, and/or
connected to the mains.
Connect the adapter connector to the Charging
base. Connect the power cable to the mains.
Make sure the Charging plates on the robot and
the Charging base are connected.
Check that the plug and cable are not damaged.
The Charging plates
on the robot and the
Charging base are not
connected.
The batteries runs
empty fast
- The batteries life has
expired.
Change the 2 battery packs.
Check “Changing the batteries” page 15.

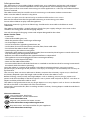
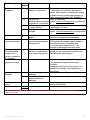
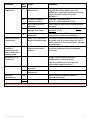
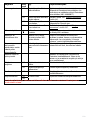
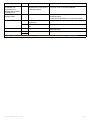
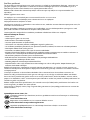
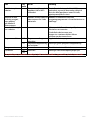
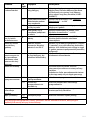
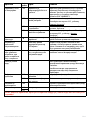
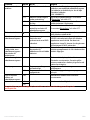
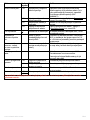
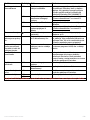
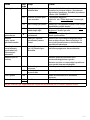
18www.electrolux.com
Problem
Error
Code
Cause Solution
Battery related
problems
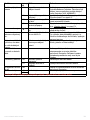
E:20 Incorrect Charging base is
used.
Only use the original Electrolux Charging base,
supplied with the robot. If the Charging base
needs to be replaced; use Electrolux Charging
base
(ANC: 406000071).
E:21 Batteries are
malfunctioning during
use.
Change the 2 battery packs.
Check “Changing the batteries” page 15.
E:22 Product temperature is
too high.
Let the robot paused outside the charging
station for 6 hours.
E:23 Batteries are not properly
connected to the robot.
Connect batteries to robot.
Check “Changing the batteries” page 15.
The time is not
displayed.
The current time is not
set.
When the robot is connected to WiFi the time
will automatically set.
Wrong time is
displayed on the
robot.
The robot has not
received updated time
from the WiFi network.
Make sure the robot is connected to the WiFi
network and wait until it receives the correct
time. If it does not update within 24 hours redo
the onboarding procedure.
The room is not
properly cleaned,
but the robot
returns to the
Charging base.
- The robot is returning
to the Charging base to
charge the batteries.
The robot will automatically continue the
cleaning program as soon as the batteries are
recharged.
Water has been
sucked into the
robot.
- - It will be necessary to replace the motor at an
authorized Electrolux service centre. Damage to
the motor caused by the penetration of water is
not covered by the warranty.
Software issue E:30 Software is not working
correctly.
Please update the robot’s software.
E:31 Software upgrade has
failed.
Please redo software update.
Service needed E:40 - Contact an authorized Electrolux service center.
System error E:41 Internal error. Please restart desired operation.
E:42
For any further problems, please check the service area in the APP or on our website.

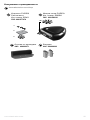
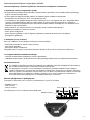
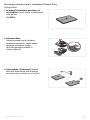
19www.electrolux.com
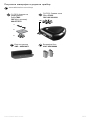
1x
3x
3x
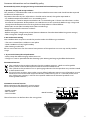
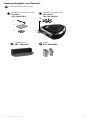
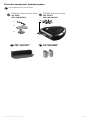
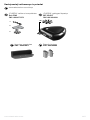
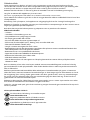
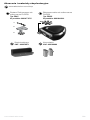
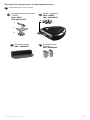
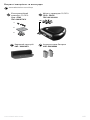
Consumables & Accessories
www.electrolux.com/shop
PUREi9 Performance kit
Ref: ERK2
PNC: 9001677674
Battery pack
ANC: 406000060
Charging base
ANC: 406000071
PUREi9 Power brush
REF: EBSB2
PNC: 9001683938
4x

20www.electrolux.com
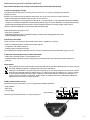
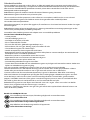
Safety precautions
This appliance can be used by children aged from 8 years and above and persons with reduced
physical, sensory or mental capabilities or lack of experience and knowledge if they have been
given supervision or instruction concerning use of the appliance in a safe way and understand the
hazards involved.
The robot should only be used for normal vacuuming in a domestic/indoor environment.
Make sure the robot is stored in a dry place.
All service or repairs must be carried out by an authorized Electrolux service centre.
Remove the robot from the charger before cleaning or maintaining your robot.
Do not allow children to play with the appliance.
Packaging material, e.g. plastic or fabric bags should not be accessible to children to avoid
suocation.
The robot is designed for a specic voltage. Check that your supply voltage is the same as that
stated on the rating plate on the charging adaptor.
Use only the original charging station and adaptor designed for the robot.
Never use the robot:
• In wet areas.
• Close to ammable gases, etc.
• When the product shows visible signs of damage.
• On sharp objects or uids.
• On hot or cold ashes, lighted cigarette butts, etc.
• On ne dust, for instance from plaster, concrete, our, hot or cold ashes.
• Do not leave the robot in direct sunlight.
• Avoid exposing the robot to strong heat.
• The battery pack within must not be dismantled, short circuited or placed against a metal surface. Use
only the battery pack designed for the robot.
• Batteries must be removed from the appliance before it is disposed of.
• The appliance must not be plugged in when removing the battery.
• The battery is to be disposed of safely.
• Never use the robot without lter.
• Do not touch the brush roll while the cleaner is switched on and the brush roll is turning. Do not touch
the wheels while the robot is operating.
Using the robot in a manner that conicts with above recommendations may cause serious
personal injury or damage to the product. Such injury or damage is not covered by the warranty or
by Electrolux.
The warranty does not cover reduction in battery runtime due to battery age or use, as the life of
the battery depends upon the length and number of times the robot is used.
Before cleaning, remove small and fragile objects such as clothing, curtain strings, papers and
power cords from the oor. If the device passes over a power cord and pulls it, there is a risk that an
object could be pulled o a table or shelf.
The robot is designed to not move any larger objects in its way. Objects such as chairs can therefore
be left on the oor as the robot will clean around them.
Strong light, mirrored walls, oor-to-ceiling windows and very shining objects could disturb the 3D
Vision system.
Visit our website to:
Get usage advice, brochures,
trouble shooter, service information:
www.electrolux.com
Register your product for better service:
www.electrolux.com/productregistration
Buy Accessories and Consumables for your appliance:
www.electrolux.com/shop
Pagina se încarcă...
Pagina se încarcă...
Pagina se încarcă...
Pagina se încarcă...
Pagina se încarcă...
Pagina se încarcă...
Pagina se încarcă...
Pagina se încarcă...
Pagina se încarcă...
Pagina se încarcă...
Pagina se încarcă...
Pagina se încarcă...
Pagina se încarcă...
Pagina se încarcă...
Pagina se încarcă...
Pagina se încarcă...
Pagina se încarcă...
Pagina se încarcă...
Pagina se încarcă...
Pagina se încarcă...
Pagina se încarcă...
Pagina se încarcă...
Pagina se încarcă...
Pagina se încarcă...
Pagina se încarcă...
Pagina se încarcă...
Pagina se încarcă...
Pagina se încarcă...
Pagina se încarcă...
Pagina se încarcă...
Pagina se încarcă...
Pagina se încarcă...
Pagina se încarcă...
Pagina se încarcă...
Pagina se încarcă...
Pagina se încarcă...
Pagina se încarcă...
Pagina se încarcă...
Pagina se încarcă...
Pagina se încarcă...
Pagina se încarcă...
Pagina se încarcă...
Pagina se încarcă...
Pagina se încarcă...
Pagina se încarcă...
Pagina se încarcă...
Pagina se încarcă...
Pagina se încarcă...
Pagina se încarcă...
Pagina se încarcă...
Pagina se încarcă...
Pagina se încarcă...
Pagina se încarcă...
Pagina se încarcă...
Pagina se încarcă...
Pagina se încarcă...
Pagina se încarcă...
Pagina se încarcă...
Pagina se încarcă...
Pagina se încarcă...
Pagina se încarcă...
Pagina se încarcă...
Pagina se încarcă...
Pagina se încarcă...
Pagina se încarcă...
Pagina se încarcă...
Pagina se încarcă...
Pagina se încarcă...
Pagina se încarcă...
Pagina se încarcă...
Pagina se încarcă...
Pagina se încarcă...
Pagina se încarcă...
Pagina se încarcă...
Pagina se încarcă...
Pagina se încarcă...
Pagina se încarcă...
Pagina se încarcă...
Pagina se încarcă...
Pagina se încarcă...
Pagina se încarcă...
Pagina se încarcă...
Pagina se încarcă...
Pagina se încarcă...
Pagina se încarcă...
Pagina se încarcă...
Pagina se încarcă...
Pagina se încarcă...
Pagina se încarcă...
Pagina se încarcă...
Pagina se încarcă...
Pagina se încarcă...
Pagina se încarcă...
Pagina se încarcă...
Pagina se încarcă...
Pagina se încarcă...
Pagina se încarcă...
Pagina se încarcă...
Pagina se încarcă...
Pagina se încarcă...
Pagina se încarcă...
Pagina se încarcă...
Pagina se încarcă...
Pagina se încarcă...
Pagina se încarcă...
Pagina se încarcă...
Pagina se încarcă...
Pagina se încarcă...
Pagina se încarcă...
Pagina se încarcă...
Pagina se încarcă...
Pagina se încarcă...
Pagina se încarcă...
Pagina se încarcă...
Pagina se încarcă...
Pagina se încarcă...
Pagina se încarcă...
Pagina se încarcă...
Pagina se încarcă...
Pagina se încarcă...
Pagina se încarcă...
Pagina se încarcă...
Pagina se încarcă...
Pagina se încarcă...
Pagina se încarcă...
Pagina se încarcă...
Pagina se încarcă...
Pagina se încarcă...
Pagina se încarcă...
Pagina se încarcă...
Pagina se încarcă...
Pagina se încarcă...
Pagina se încarcă...
Pagina se încarcă...
Pagina se încarcă...
Pagina se încarcă...
Pagina se încarcă...
Pagina se încarcă...
Pagina se încarcă...
Pagina se încarcă...
Pagina se încarcă...
Pagina se încarcă...
Pagina se încarcă...
Pagina se încarcă...
Pagina se încarcă...
Pagina se încarcă...
Pagina se încarcă...
Pagina se încarcă...
Pagina se încarcă...
Pagina se încarcă...
Pagina se încarcă...
Pagina se încarcă...
Pagina se încarcă...
Pagina se încarcă...
Pagina se încarcă...
Pagina se încarcă...
Pagina se încarcă...
Pagina se încarcă...
Pagina se încarcă...
Pagina se încarcă...
Pagina se încarcă...
Pagina se încarcă...
Pagina se încarcă...
Pagina se încarcă...
Pagina se încarcă...
Pagina se încarcă...
Pagina se încarcă...
Pagina se încarcă...
Pagina se încarcă...
Pagina se încarcă...
Pagina se încarcă...
Pagina se încarcă...
Pagina se încarcă...
Pagina se încarcă...
Pagina se încarcă...
Pagina se încarcă...
Pagina se încarcă...
Pagina se încarcă...
Pagina se încarcă...
Pagina se încarcă...
Pagina se încarcă...
Pagina se încarcă...
Pagina se încarcă...
Pagina se încarcă...
Pagina se încarcă...
Pagina se încarcă...
Pagina se încarcă...
Pagina se încarcă...
Pagina se încarcă...
Pagina se încarcă...
Pagina se încarcă...
Pagina se încarcă...
Pagina se încarcă...
Pagina se încarcă...
Pagina se încarcă...
Pagina se încarcă...
Pagina se încarcă...
Pagina se încarcă...
Pagina se încarcă...
Pagina se încarcă...
Pagina se încarcă...
Pagina se încarcă...
Pagina se încarcă...
Pagina se încarcă...
Pagina se încarcă...
Pagina se încarcă...
Pagina se încarcă...
Pagina se încarcă...
Pagina se încarcă...
Pagina se încarcă...
Pagina se încarcă...
Pagina se încarcă...
Pagina se încarcă...
Pagina se încarcă...
Pagina se încarcă...
Pagina se încarcă...
Pagina se încarcă...
Pagina se încarcă...
Pagina se încarcă...
Pagina se încarcă...
Pagina se încarcă...
Pagina se încarcă...
Pagina se încarcă...
Pagina se încarcă...
Pagina se încarcă...
Pagina se încarcă...
Pagina se încarcă...
Pagina se încarcă...
Pagina se încarcă...
Pagina se încarcă...
Pagina se încarcă...
Pagina se încarcă...
Pagina se încarcă...
Pagina se încarcă...
Pagina se încarcă...
Pagina se încarcă...
Pagina se încarcă...
Pagina se încarcă...
Pagina se încarcă...
Pagina se încarcă...
Pagina se încarcă...
Pagina se încarcă...
Pagina se încarcă...
Pagina se încarcă...
Pagina se încarcă...
Pagina se încarcă...
Pagina se încarcă...
Pagina se încarcă...
Pagina se încarcă...
Pagina se încarcă...
Pagina se încarcă...
Pagina se încarcă...
Pagina se încarcă...
Pagina se încarcă...
Pagina se încarcă...
Pagina se încarcă...
Pagina se încarcă...
Pagina se încarcă...
Pagina se încarcă...
Pagina se încarcă...
Pagina se încarcă...
Pagina se încarcă...
Pagina se încarcă...
Pagina se încarcă...
Pagina se încarcă...
Pagina se încarcă...
Pagina se încarcă...
Pagina se încarcă...
Pagina se încarcă...
Pagina se încarcă...
Pagina se încarcă...
Pagina se încarcă...
Pagina se încarcă...
Pagina se încarcă...
Pagina se încarcă...
Pagina se încarcă...
Pagina se încarcă...
Pagina se încarcă...
Pagina se încarcă...
Pagina se încarcă...
Pagina se încarcă...
Pagina se încarcă...
Pagina se încarcă...
Pagina se încarcă...
Pagina se încarcă...
Pagina se încarcă...
Pagina se încarcă...
Pagina se încarcă...
Pagina se încarcă...
Pagina se încarcă...
Pagina se încarcă...
Pagina se încarcă...
Pagina se încarcă...
Pagina se încarcă...
Pagina se încarcă...
Pagina se încarcă...
Pagina se încarcă...
Pagina se încarcă...
Pagina se încarcă...
Pagina se încarcă...
Pagina se încarcă...
Pagina se încarcă...
Pagina se încarcă...
Pagina se încarcă...
Pagina se încarcă...
Pagina se încarcă...
Pagina se încarcă...
Pagina se încarcă...
Pagina se încarcă...
Pagina se încarcă...
Pagina se încarcă...
Pagina se încarcă...
Pagina se încarcă...
Pagina se încarcă...
Pagina se încarcă...
Pagina se încarcă...
Pagina se încarcă...
Pagina se încarcă...
Pagina se încarcă...
Pagina se încarcă...
Pagina se încarcă...
Pagina se încarcă...
Pagina se încarcă...
Pagina se încarcă...
Pagina se încarcă...
Pagina se încarcă...
Pagina se încarcă...
Pagina se încarcă...
Pagina se încarcă...
Pagina se încarcă...
Pagina se încarcă...
Pagina se încarcă...
Pagina se încarcă...
Pagina se încarcă...
Pagina se încarcă...
Pagina se încarcă...
Pagina se încarcă...
Pagina se încarcă...
Pagina se încarcă...
Pagina se încarcă...
Pagina se încarcă...
Pagina se încarcă...
Pagina se încarcă...
Pagina se încarcă...
Pagina se încarcă...
Pagina se încarcă...
Pagina se încarcă...
Pagina se încarcă...
Pagina se încarcă...
Pagina se încarcă...
Pagina se încarcă...
Pagina se încarcă...
Pagina se încarcă...
Pagina se încarcă...
Pagina se încarcă...
Pagina se încarcă...
Pagina se încarcă...
Pagina se încarcă...
Pagina se încarcă...
Pagina se încarcă...
Pagina se încarcă...
Pagina se încarcă...
Pagina se încarcă...
Pagina se încarcă...
Pagina se încarcă...
Pagina se încarcă...
Pagina se încarcă...
Pagina se încarcă...
Pagina se încarcă...
Pagina se încarcă...
Pagina se încarcă...
Pagina se încarcă...
Pagina se încarcă...
Pagina se încarcă...
Pagina se încarcă...
Pagina se încarcă...
Pagina se încarcă...
Pagina se încarcă...
Pagina se încarcă...
Pagina se încarcă...
Pagina se încarcă...
Pagina se încarcă...
Pagina se încarcă...
Pagina se încarcă...
Pagina se încarcă...
Pagina se încarcă...
Pagina se încarcă...
Pagina se încarcă...
Pagina se încarcă...
Pagina se încarcă...
Pagina se încarcă...
Pagina se încarcă...
Pagina se încarcă...
Pagina se încarcă...
Pagina se încarcă...
Pagina se încarcă...
Pagina se încarcă...
Pagina se încarcă...
Pagina se încarcă...
Pagina se încarcă...
Pagina se încarcă...
Pagina se încarcă...
Pagina se încarcă...
Pagina se încarcă...
Pagina se încarcă...
Pagina se încarcă...
Pagina se încarcă...
Pagina se încarcă...
Pagina se încarcă...
Pagina se încarcă...
Pagina se încarcă...
Pagina se încarcă...
Pagina se încarcă...
Pagina se încarcă...
Pagina se încarcă...
Pagina se încarcă...
Pagina se încarcă...
Pagina se încarcă...
Pagina se încarcă...
Pagina se încarcă...
Pagina se încarcă...
Pagina se încarcă...
Pagina se încarcă...
Pagina se încarcă...
Pagina se încarcă...
Pagina se încarcă...
Pagina se încarcă...
Pagina se încarcă...
Pagina se încarcă...
Pagina se încarcă...
Pagina se încarcă...
Pagina se încarcă...
Pagina se încarcă...
Pagina se încarcă...
Pagina se încarcă...
Pagina se încarcă...
Pagina se încarcă...
Pagina se încarcă...
Pagina se încarcă...
Pagina se încarcă...
-
 1
1
-
 2
2
-
 3
3
-
 4
4
-
 5
5
-
 6
6
-
 7
7
-
 8
8
-
 9
9
-
 10
10
-
 11
11
-
 12
12
-
 13
13
-
 14
14
-
 15
15
-
 16
16
-
 17
17
-
 18
18
-
 19
19
-
 20
20
-
 21
21
-
 22
22
-
 23
23
-
 24
24
-
 25
25
-
 26
26
-
 27
27
-
 28
28
-
 29
29
-
 30
30
-
 31
31
-
 32
32
-
 33
33
-
 34
34
-
 35
35
-
 36
36
-
 37
37
-
 38
38
-
 39
39
-
 40
40
-
 41
41
-
 42
42
-
 43
43
-
 44
44
-
 45
45
-
 46
46
-
 47
47
-
 48
48
-
 49
49
-
 50
50
-
 51
51
-
 52
52
-
 53
53
-
 54
54
-
 55
55
-
 56
56
-
 57
57
-
 58
58
-
 59
59
-
 60
60
-
 61
61
-
 62
62
-
 63
63
-
 64
64
-
 65
65
-
 66
66
-
 67
67
-
 68
68
-
 69
69
-
 70
70
-
 71
71
-
 72
72
-
 73
73
-
 74
74
-
 75
75
-
 76
76
-
 77
77
-
 78
78
-
 79
79
-
 80
80
-
 81
81
-
 82
82
-
 83
83
-
 84
84
-
 85
85
-
 86
86
-
 87
87
-
 88
88
-
 89
89
-
 90
90
-
 91
91
-
 92
92
-
 93
93
-
 94
94
-
 95
95
-
 96
96
-
 97
97
-
 98
98
-
 99
99
-
 100
100
-
 101
101
-
 102
102
-
 103
103
-
 104
104
-
 105
105
-
 106
106
-
 107
107
-
 108
108
-
 109
109
-
 110
110
-
 111
111
-
 112
112
-
 113
113
-
 114
114
-
 115
115
-
 116
116
-
 117
117
-
 118
118
-
 119
119
-
 120
120
-
 121
121
-
 122
122
-
 123
123
-
 124
124
-
 125
125
-
 126
126
-
 127
127
-
 128
128
-
 129
129
-
 130
130
-
 131
131
-
 132
132
-
 133
133
-
 134
134
-
 135
135
-
 136
136
-
 137
137
-
 138
138
-
 139
139
-
 140
140
-
 141
141
-
 142
142
-
 143
143
-
 144
144
-
 145
145
-
 146
146
-
 147
147
-
 148
148
-
 149
149
-
 150
150
-
 151
151
-
 152
152
-
 153
153
-
 154
154
-
 155
155
-
 156
156
-
 157
157
-
 158
158
-
 159
159
-
 160
160
-
 161
161
-
 162
162
-
 163
163
-
 164
164
-
 165
165
-
 166
166
-
 167
167
-
 168
168
-
 169
169
-
 170
170
-
 171
171
-
 172
172
-
 173
173
-
 174
174
-
 175
175
-
 176
176
-
 177
177
-
 178
178
-
 179
179
-
 180
180
-
 181
181
-
 182
182
-
 183
183
-
 184
184
-
 185
185
-
 186
186
-
 187
187
-
 188
188
-
 189
189
-
 190
190
-
 191
191
-
 192
192
-
 193
193
-
 194
194
-
 195
195
-
 196
196
-
 197
197
-
 198
198
-
 199
199
-
 200
200
-
 201
201
-
 202
202
-
 203
203
-
 204
204
-
 205
205
-
 206
206
-
 207
207
-
 208
208
-
 209
209
-
 210
210
-
 211
211
-
 212
212
-
 213
213
-
 214
214
-
 215
215
-
 216
216
-
 217
217
-
 218
218
-
 219
219
-
 220
220
-
 221
221
-
 222
222
-
 223
223
-
 224
224
-
 225
225
-
 226
226
-
 227
227
-
 228
228
-
 229
229
-
 230
230
-
 231
231
-
 232
232
-
 233
233
-
 234
234
-
 235
235
-
 236
236
-
 237
237
-
 238
238
-
 239
239
-
 240
240
-
 241
241
-
 242
242
-
 243
243
-
 244
244
-
 245
245
-
 246
246
-
 247
247
-
 248
248
-
 249
249
-
 250
250
-
 251
251
-
 252
252
-
 253
253
-
 254
254
-
 255
255
-
 256
256
-
 257
257
-
 258
258
-
 259
259
-
 260
260
-
 261
261
-
 262
262
-
 263
263
-
 264
264
-
 265
265
-
 266
266
-
 267
267
-
 268
268
-
 269
269
-
 270
270
-
 271
271
-
 272
272
-
 273
273
-
 274
274
-
 275
275
-
 276
276
-
 277
277
-
 278
278
-
 279
279
-
 280
280
-
 281
281
-
 282
282
-
 283
283
-
 284
284
-
 285
285
-
 286
286
-
 287
287
-
 288
288
-
 289
289
-
 290
290
-
 291
291
-
 292
292
-
 293
293
-
 294
294
-
 295
295
-
 296
296
-
 297
297
-
 298
298
-
 299
299
-
 300
300
-
 301
301
-
 302
302
-
 303
303
-
 304
304
-
 305
305
-
 306
306
-
 307
307
-
 308
308
-
 309
309
-
 310
310
-
 311
311
-
 312
312
-
 313
313
-
 314
314
-
 315
315
-
 316
316
-
 317
317
-
 318
318
-
 319
319
-
 320
320
-
 321
321
-
 322
322
-
 323
323
-
 324
324
-
 325
325
-
 326
326
-
 327
327
-
 328
328
-
 329
329
-
 330
330
-
 331
331
-
 332
332
-
 333
333
-
 334
334
-
 335
335
-
 336
336
-
 337
337
-
 338
338
-
 339
339
-
 340
340
-
 341
341
-
 342
342
-
 343
343
-
 344
344
-
 345
345
-
 346
346
-
 347
347
-
 348
348
-
 349
349
-
 350
350
-
 351
351
-
 352
352
-
 353
353
-
 354
354
-
 355
355
-
 356
356
-
 357
357
-
 358
358
-
 359
359
-
 360
360
-
 361
361
-
 362
362
-
 363
363
-
 364
364
-
 365
365
-
 366
366
-
 367
367
-
 368
368
-
 369
369
-
 370
370
-
 371
371
-
 372
372
-
 373
373
-
 374
374
-
 375
375
-
 376
376
-
 377
377
-
 378
378
-
 379
379
-
 380
380
-
 381
381
-
 382
382
-
 383
383
-
 384
384
-
 385
385
-
 386
386
-
 387
387
-
 388
388
-
 389
389
-
 390
390
-
 391
391
-
 392
392
-
 393
393
-
 394
394
-
 395
395
-
 396
396
-
 397
397
-
 398
398
-
 399
399
-
 400
400
-
 401
401
-
 402
402
-
 403
403
-
 404
404
-
 405
405
-
 406
406
-
 407
407
-
 408
408
-
 409
409
-
 410
410
-
 411
411
-
 412
412
-
 413
413
-
 414
414
-
 415
415
-
 416
416
-
 417
417
-
 418
418
-
 419
419
-
 420
420
-
 421
421
-
 422
422
-
 423
423
-
 424
424
-
 425
425
-
 426
426
-
 427
427
-
 428
428
-
 429
429
-
 430
430
-
 431
431
-
 432
432
-
 433
433
-
 434
434
-
 435
435
-
 436
436
-
 437
437
-
 438
438
-
 439
439
-
 440
440
-
 441
441
-
 442
442
-
 443
443
-
 444
444
-
 445
445
-
 446
446
-
 447
447
-
 448
448
-
 449
449
-
 450
450
-
 451
451
-
 452
452
-
 453
453
-
 454
454
-
 455
455
-
 456
456
-
 457
457
-
 458
458
-
 459
459
-
 460
460


Electrolux PURE I9 Instruction book
- Categorie
- Aspiratoare
- Tip
- Instruction book
în alte limbi
- slovenčina: Electrolux PURE I9
Lucrări înrudite
Alte documente
-
AEG X PERFORMANCE RX7 Manual de utilizare
-
Tesla RoboStar iQ300 Manual de utilizare
-
Philips FC8810/01 Informații importante
-
Rowenta SMART FORCE CYCLONIC RR8043 WH Manualul proprietarului
-
-
 V-TAC VT-5555 Manual de utilizare
-
Rowenta RO7236EA Manualul proprietarului
-
Philips FC8812/01 Manual de utilizare
-
Tesla RoboStar IQ100 Manual de utilizare
-
