Geha OFFICE X17 CD Manualul proprietarului
- Categorie
- Tocătoare de hârtie
- Tip
- Manualul proprietarului
Acest manual este potrivit și pentru

Anleitung
Manual
SHREDDER
Office X17 CD
Manual_X17CD_Office.indd 1 15.07.10 15:40

www.geha.de
Manual_X17CD_Office.indd 2 15.07.10 15:40

3
D
GB
I
E
F
NL
UAE
RUS
S
GR
TR
RO
PL
CN
4
10
16
22
28
34
40
47
54
60
67
73
79
85
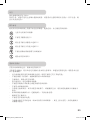
Wählen Sie Ihre Sprache.
Select your language.
Manual_X17CD_Office.indd 3 15.07.10 15:40

4
EINLEITUNG
Wir danken Ihnen für den Kauf dieses Geha Qualitätsproduktes. Bitte lesen Sie diese
Anleitung vor Inbetriebnahme sorgfältig durch. Beachten Sie insbesondere die Sicherheits-
hinweise; bei Nichtbeachtung besteht Verletzungsgefahr!
WARNSYMBOLE
Die Warnsymbole in dieser Bedienungsanleitung und auf dem Gerät sollen Ihnen helfen,
Gefahren zu vermeiden und das Gerät korrekt zu verwenden.
Das Gerät darf nicht von Kindern betrieben werden!
Fassen Sie mit den Händen nicht in das Schneidwerk!
Achten Sie darauf, dass keine Kleidung in den Papiereinzug gelangt!
Achten Sie darauf, dass keine Haare in den Papiereinzug gelangen!
Sprühen Sie keine entzündlichen Gase oder Flüssigkeiten in das Gerät!
Entfernen Sie alle Büroklammern!
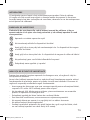
WICHTIGE SICHERHEITSHINWEISE
Bevor Sie den Aktenvernichter in Betrieb nehmen, lesen Sie bitte die Benutzeranweisungen.
Wenn Sie elektrische Geräte benutzen, sollten Sie stets grundsätzliche Vorsichtsmaßnahmen
ergreifen, um Risiken einer Verletzung auszuschließen. Bitte beachten Sie daher unbedingt
folgende Grundregeln:
- Dieser Aktenvernichter ist speziell zum Zerkleinern von Papier bzw. CDs vorgesehen.
Verwenden Sie ihn nicht für andere Zwecke.
- Führen Sie weder Folien, Etikettenpapier, Kleidung noch Kunststoffe in den
Aktenvernichter ein.
- Entfernen Sie alle Büroklammern, bevor Sie das Papier verkleinern.
- Sie dürfen das Gerät weder verändern noch umbauen noch reparieren.
- Legen Sie keine Gegenstände auf das Gerät und lehnen Sie keine Gegenstände dagegen.
- Besprühen Sie das Gerät nicht mit Wasser.
- Ziehen Sie den Netzstecker aus der Steckdose, bevor Sie den Papierkorb leeren,
wenn Sie das Gerät nicht mehr verwenden oder es umstellen möchten.
- Ziehen Sie zum Ausstecken des Geräts nur am Stecker, nicht am Kabel.
- Stellen Sie sicher, dass Sie die korrekte Spannung verwenden.
- Verwenden Sie nicht mehrere Verlängerungskabel.
Manual_X17CD_Office.indd 4 15.07.10 15:40

5
- Bei einem ungewöhnlichen Zustand des Geräts (z. B. seltsamer Geruch oder Rauch)
sollten Sie die Verwendung des Geräts sofort einstellen und den Netzstecker aus der
Steckdose ziehen.
DEN AKTENVERNICHTER AUFSTELLEN
1. Der Schwerpunkt liegt auf dem oberen Teil des Geräts. Stellen Sie das Gerät auf eine
ebene Fläche, damit es nicht umkippen kann.
2. Verwenden Sie das Gerät weder in der Nähe von Wärme- oder Kältequellen noch in
überhitzten, feuchten oder staubigen Umgebungen.
3. Platzieren Sie das Gerät in der Nähe einer Steckdose und stellen Sie keine Gegenstände
neben die Steckdose, sodass der Netzstecker problemlos aus der Steckdose gezogen
werden kann.
4. Achten Sie darauf, dass der Papierbehälter bis zum Anschlag
in das Gerät eingeschoben ist.
5. Verbinden Sie den Netzstecker mit einer üblichen
220-240 V Wechselstrom-Netzsteckdose.
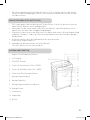
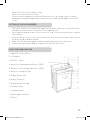
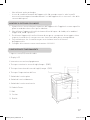
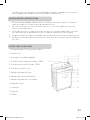
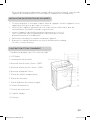
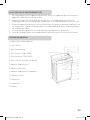
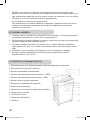
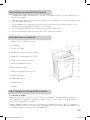
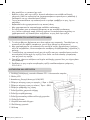
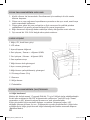
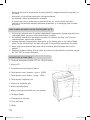
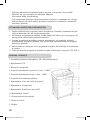
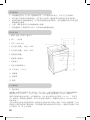
AUFBAU UND FUNKTION
1 Papier-/CD-/Kreditkarten-Einlass
2 LCD Display
3 ON-/OFF-Schalter
4 Taster für Vorwärtslauf / Zeit + (FWD)
5 Taster für Rückwärtslauf / Zeit - (REV)
6 Taster zum Einstellen der Uhrzeit
7 Anzeige Papierkorb voll
8 Anzeige Überhitzt
9 Anzeige Papierkorb nicht eingesetzt
10 Anzeige Power
11 Sichtfenster
12 Papierkorb
13 Rollen
Manual_X17CD_Office.indd 5 15.07.10 15:40

6
DEN AKTENVERNICHTER IN BETRIEB NEHMEN
A. Zuführung von Papier
Das Gerät kann max. 17 Blatt (DIN A4, 70 g/m²) auf einmal vernichten. Schalten Sie den
Aktenvernichter über den ON-/OFF–Schalter ein. Die grüne LED „Power“ leuchtet und im
LCD-Display werden der Betriebszustand (Ready) und die Uhrzeit angezeigt.
Papier im Papiereinlass wird automatisch erkannt und das Gerät startet; im LCD-Display
werden der Betriebszustand (In use) und die Uhrzeit angezeigt. Ist das Papier vernichtet und
kein Papier mehr im Papiereinlass, stoppt das Gerät automatisch (Standby Mode).
Eine automatische Rücklauf- und Stoppfunktion, bei Überlast durch zu viel Papier, verhindert
einen Papierstau. In diesem Fall nehmen Sie bitte das Papier aus dem Papiereinlass und
warten, bis das Gerät den automatischen Reinigungsprozess abgeschlossen hat und stoppt.
Führen Sie nun max.17 Blatt A4 70 g/m² in den Papiereinlass ein.
„FWD“ Wenn Sie ein schmales Blatt <14 cm seitlich in den Papiereinlass einführen, kann es
sein, dass die Lichtschranke dieses nicht erkennt und das Gerät nicht startet. Betäti-
gen Sie in diesem Fall den Taster: „FWD“, bis das Papier vollständig eingezogen ist.
„REV“ Mit dem Taster: „REV“ können Sie den „Rücklauf“ des Schneidwerkes veranlassen,
sollte widererwartend doch ein Papierstau auftreten.
Erkennt der Sensor, dass der Papierkorb voll ist, stoppt das Gerät automatisch und die rote
LED „Bin full“ leuchtet und im LCD-Display wird „Basket full“ angezeigt. Entfernen Sie das
Papier aus dem Papiereinlass und leeren dann den Papierkorb. Beachten Sie den Hinweis
unter dem Punkt „Wartung“.
B. Zuführung von CDs/DVDs und Kreditkarten
Dieses Gerät kann auch CDs/DVDs und Kreditkarten zerkleinern. Achten Sie darauf, dass
immer nur 1 CD/DVD oder 1 Kreditkarte dem Gerät zugeführt wird! Möchten Sie diesen Be-
trieb nutzen, gehen Sie wie folgt vor:
1. Schalten Sie den Aktenvernichter über den ON-/OFF–Schalter ein. Die grüne LED
„Power“ leuchtet und im LCD-Display werden der Betriebszustand (Ready) und die
Uhrzeit angezeigt.
2. CDs/DVDs und Kreditkarten im Einlass werden automatisch erkannt, das Gerät startet
und der Betriebszustand „In use“ wird im LCD-Display angezeigt.
CDs/DVDs und Kreditkarten werden in Partikel zerschnitten. Da bei diesen Materialien
immer die Gefahr des Splitterns besteht, halten Sie Ihr Gesicht beim Einführen von CDs/DVDs
in ausreichendem Abstand zum Einführschacht!
Das Schnittgut wird nicht in einem separaten Auffangbehälter gesammelt. Um eine umwelt-
gereche Entsorgung zu erleichtern, entleeren Sie den Papierkorb, bevor Sie das zu zerklei-
nernde Material wechseln!
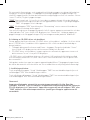
C. Einstellen der Uhrzeit
Drücken Sie einmal die Taste „Setup“. Mit der Taste „FWD“ können Sie nun die
Stundenanzeige erhöhen und mit der Taste „REV“ die Stundenanzeige verringern.
Drücken Sie zweimal die Taste „Setup“. Mit der Taste „FWD“ können Sie nun die
Minutenanzeige erhöhen und mit der Taste „REV“ die Minutenanzeige verringern.
Manual_X17CD_Office.indd 6 15.07.10 15:40

7
Wichtiger Hinweis:
Das Gerät schaltet sich automatisch ab, wenn die Motortemperatur zu hoch wird. Die
rote LED „Overheat“ leuchtet und weist darauf hin, dass sich der Überhitzungsschutz des
Geräts aktiviert hat, im LCD–Display wird „please wait“ angezeigt. Das Gerät reagiert in
diesem Fall nicht, wenn Sie die Taster „Rev“ oder „Fwd“ betätigen. Sobald die Motor-
temperatur abgekühlt ist, wechselt das Gerät wieder in den Normalbetrieb.
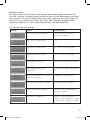
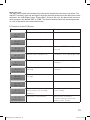
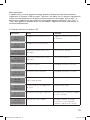
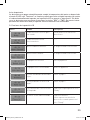
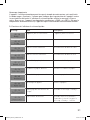
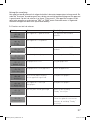
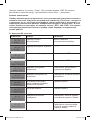
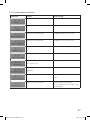
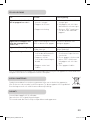
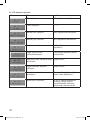
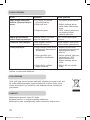
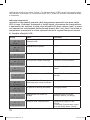
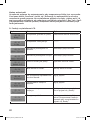
D. Funktionen der LCD-Anzeige
Anzeige Status Beschreibung
Das Gerät ist betriebsbereit. Das Gerät kann in Betrieb
genommen werden.
Das Gerät ist in Betrieb. -----
Manueller Vorwärtslauf. Der Taster FWD ist betätigt.
Manueller Rückwärtslauf. Der Taster REV ist betätigt.
Der Papierkorb ist voll. Bitte leeren Sie den Papierkorb.
Der Papierkorb ist nicht
eingesetzt.
Bitte setzen Sie den Papierkorb
ein.
Dem Gerät wurde eine zu hohe
Blattzahl zugeführt.
Entnehmen Sie das Papier!
Ein Papierstau wurde ausgelöst. Entnehmen Sie das Papier!
Das Schneidwerk reinigt sich. Warten Sie bis in der Anzeige
„Ready“ erscheint.
Der Motor ist überhitzt. Warten Sie min. 20 Minuten.
Setzen Sie den Betrieb fort, wenn
in der Anzeige „Ready“ erscheint.
Manual_X17CD_Office.indd 7 15.07.10 15:40

8
WARTUNG
Wichtig:
Bevor Sie den Aktenvernichter warten, müssen Sie den Netzstecker aus der Steckdose ziehen!
Wenn der Papierkorb voll ist, besteht die Gefahr, dass Schneidgut aus dem Papierkorb von
unten in das Schneidwerk gelangt. Leeren Sie den Papierkorb, bevor dieser voll ist.
Reinigen Sie die Außenseite mit einem feuchten Tuch. Achten Sie darauf, dass das Tuch nicht
in den Papiereinzug gelangt. Dieser Schritt gilt nur für die äußeren Teile des Geräts.
Der äußere Teil des Geräts besteht aus Kunststoff. Deshalb dürfen keine Lösungsmittel wie
Benzin und Benzol oder organischen Lösungsmittel wie Verdünner verwendet werden.
Reinigen Sie das Gerät nicht mit einem Fleckenentferner, um ein Verblassen, Brechen,
Auflösen oder Zerkratzen des Geräts zu vermeiden.
Achtung:
Achten Sie darauf, dass beim Reinigen der Außenseite kein Wasser in das Gerät gelangt.
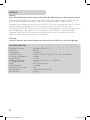
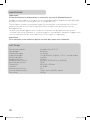
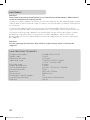
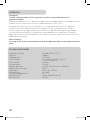
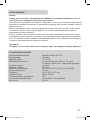
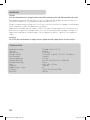
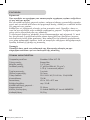
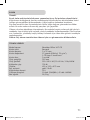
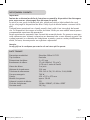
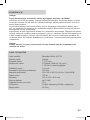
TECHNISCHE DATEN
Modellbezeichnung: Shredder Office X17 CD
Schnittart: Partikel
Schnittgröße: 3 x 25 mm
Schnittleistung: 17 Blatt ( DIN A4, 70 g/m²), 1 CD oder 1 Kreditkarte
Schnittgeschwindigkeit: 3 m/min
Eingabebreite: 310 mm
Eingangsspannung: 220-240 V AC/ 50-60 Hz; 3.0A/640W
Leistungsaufnahme: 700 W
Maße: 450 x 325 x 675 mm
Geräuschpegel: ca. 58 dB
Papierkorb – Volumen: 33 L
Betriebszyklus: 10 Min. EIN / 45 Min. AUS
Nettogewicht: 26,5 kg
Manual_X17CD_Office.indd 8 15.07.10 15:40

9
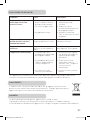
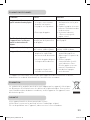
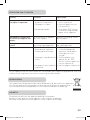
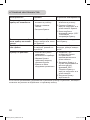
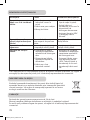
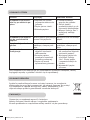
FEHLERBEHEBUNG
Wenn das Gerät nicht funktioniert, nachdem Sie die vorstehenden Lösungen angewandt haben,
ziehen Sie bitte den Netzstecker aus der Steckdose und wenden Sie sich an Ihren Händler.
ENTSORGUNG
Das Symbol mit der durchgestrichenen Mülltonne weist darauf hin, dass
elektrische Geräte nicht im normalen Hausmüll entsorgt werden dürfen.
Bitte bringen Sie dieses Gerät zur umweltfreundlichen Entsorgung
zu einem zugelassenen Wertstoffhof.
GARANTIE
Die Garantiezeit für Ihr Gerät beträgt 24 Monate.
Bewahren Sie unbedingt den Kaufbeleg und die Originalverpackung auf.
Bei einem Problem mit Ihrem Gerät wenden Sie sich bitte an Ihren Händler.
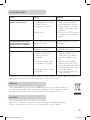
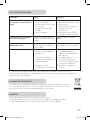
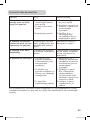
Fehler
Ursachen
Fehlerbehebung
Das Gerät startet nicht,
nachdem das Papier
eingeführt wurde.
1. Der Netzstecker wurde
nicht korrekt in die Steck-
dose gesteckt.
2. Das Papier ist zu dünn.
3. Papierstau.
1. Stecken Sie den Netz-
stecker noch einmal in die
Steckdose.
2. Falten Sie das Papier und
führen Sie es erneut in
den Aktenvernichter ein.
3. Betätigen Sie die „REV“-
Funktion und ziehen Sie
das eingeklemmte Papier
heraus.
Das Gerät schaltet sich
nach dem Zerkleinern des
Papiers nicht ab.
Der Sensor des Einzugs ist
durch Staub oder Papier
verdeckt.
Wischen Sie den Staub
weg oder entfernen Sie das
Papier.
Das Gerät ist sehr laut.
Das Gerät steht nicht auf
einer festen, ebenen Fläche.
Stellen Sie das Gerät auf
eine feste, ebene Fläche.
Das Gerät funktioniert nicht.
1. Die Papiermenge über-
schreitet die Kapazität des
Aktenvernichters.
2. Die Größe des Papiers
überschreitet die Breite
des Einzugs.
3. Das Papier wurde nicht
senkrecht eingeführt.
1. Stellen Sie sicher, dass
die Menge die Kapazität
des Aktenvernichters
nicht überschreitet.
2. Ziehen Sie das Papier
heraus; ggf. betätigen
Sie die „REV“-Funktion.
Falten Sie das Papier und
führen Sie es erneut ein.
3. Führen Sie das Papier
senkrecht ein.
Manual_X17CD_Office.indd 9 15.07.10 15:40

10
INTRODUCTION
Thank you for purchasing this Geha quality product. Please read this user manual carefully
before commissioning the device. Take particular note of the safety instructions, as non-
compliance may lead to injury!
WARNING SYMBOLS
The warning symbols used in this manual and on the machine are meant to help you avoid
hazards and use the device correctly.
This device may not be operated by children!
Never reach into the cutting mechanism!
Ensure that all clothing is kept well away from the paper feeder!
Ensure that long hair is kept well away from the paper feeder!
Never spray any flammable gas or liquid into the device!
Remove all staples before shredding!
IMPORTANT NOTES ON SAFETY
Please read the user manual carefully and in its entirety before commissioning the file
shredder.
When using electric devices, always take basic precautions to eliminate any risk of injury.
Always comply with the following basic precautions.
- This file shredder has been designed specifically for the shredding of paper and CDs.
Never use it for any other purpose.
- Do not attempt to feed foils, adhesive labels, clothing, or plastic materials into the file
shredder.
- Remove all paper clips before shredding paper.
- You are not permitted to modify or retrofit the device in any way, and may not carry out
any repairs yourself.
- Never place any objects on or leaning against the device.
- Do not spray water on the device.
- Remove the mains power plug from the wall socket before emptying the waste paper
container, when finished using the device, or if you wish to reposition it.
- Always pull on the plug and not on the power cable.
Manual_X17CD_Office.indd 10 15.07.10 15:40

11
- Ensure that the correct voltage is used.
- Never use several extension cords.
- In case the device displays any unusual characteristics (e.g. strange smell or smoke),
immediately stop operating the device and remove the mains power plug from the wall
socket.
SETTING UP THE FILE SHREDDER
1. The centre of gravity is located in the top part of the device. Make sure to position the file
shredder on an even surface to prevent it from toppling over.
2. Never operate the device near sources of heat or cold, or in an overheated, moist or dusty
environment.
3. Place the device close to a wall socket and ensure easy access to the wall socket, in case
the device needs to be deactivated.
4. Make sure that the waste paper container is pushed all the way into the device.
5. Connect the mains power plug to a regular 220-240 V AC wall socket.
STRUCTURE AND FUNCTION
1 Paper/CD, credit card slot
2 LCD display
3 ON/ OFF - switch
4 Button for forward operation/ time + (FWD)
5 Button for reversed operation/ time - (REV)
6 Button for setting the time
7 Display ‘Basket Full’
8 Display ‘Overheat’
9 Display ‘Basket missing’
10 Display ‘Power’
11 Viewing window
12 Waste paper container
13 Rollers
Manual_X17CD_Office.indd 11 15.07.10 15:40

12
COMMISSIONING THE FILE SHREDDER
A. Feeding Paper into the Device
The device can shred a maximum of 17 sheets (A4, 70 g/m²) simultaneously. Switch on the
file shredder by pressing the ON/OFF button. The green LED ‘Power’ lights up, and the
operating mode (Ready) and current time are shown in the LED display. (See section C for
setting the current time)
Any paper in the feeder is detected automatically and the device starts operating; the oper-
ating mode (In Use) and the current time are shown in the LCD display. Once all paper has
been shredded and no additional paper is fed into the machine, the device stops automati-
cally (Standby Mode).
An automatic reverse and stop function prevents a paper jam when the device is overloaded
with too much paper in the feeder. Should a paper jam occur, remove all paper from the
feeder and wait until the device has finished its automatic cleaning process and has stopped
operating. Only insert a maximum of 17 sheets A4, 70 g/m² into the feeder.
‘FWD‘ If you place a narrow piece of paper (< 14 cm) into the feeder sideways, then the pho-
toelectric barrier may not detect it and thus not start the device automatically. In that
case, press and hold the button ‘FWD‘ until the paper has been drawn in completely.
‘REV‘ By pressing the button ‘REV‘, you can initiate the reversed operation of the cutting
mechanism in case of a paper jam.
When the sensor detects that the waste paper container is full, the device stops automati-
cally and the red LED ‘Full‘ lights up, and the LCD display will show ‘Basket Full‘. First
remove all paper from the feeder, and then empty the waste paper container. Please note
the instructions in the section ‘Maintenance‘.
B. Feeding CDs/DVDs and Credit Cards into the Shredder
This device can also shred CDs/DVDs and credit cards. Make sure that only 1 CD/DVD or
1credit card is fed into the device at a time! If you would like to utilise this function, proceed
as follows:
1. Switch on the file shredder by pressing the power button on the rear of the device. The
green LED ‘Status’ lights up, and the operating mode (Ready) and current time are shown
in the LED display.
2. Any CDs/DVDs and credit cards in the slot are detected automatically, the device starts
up and the operating mode ‘In Use’ is shown on the LCD display.
CDs/DVDs and credit cards are shredded into particles. Make sure to keep your face well
away from the feeder slot when shredding CDs/DVDs, since these types of material always
pose a hazard of splintering!
The shredded material will not be collected in a separate container. Remove the shredded
material before changing the to a different medium in order to facilitate an environmentally
friendly disposal!
C. Setting the Current Time
Press the button ‘Setup‘ once. By pressing the button ‘FWD‘, you can now increase the hour
displayed, and by pressing the button ‘REV‘ you can decrease the hour displayed.
Press the button ‘Setup‘ twice. By pressing the button ‘FWD‘, you can now increase the min-
utes displayed, and by pressing the button ‘REV‘ you can decrease the minutes displayed.
Manual_X17CD_Office.indd 12 15.07.10 15:40

13
D. Functions of the LCD Display
Display Status Description
The device is ready for operation. The device can now be used.
The device is working. -----
Manual forward operation. The button ‘FWD‘ is being
pressed.
Manual reversed operation. The button ‘REV‘ is being pressed.
The waste paper container is full. Please empty the waste paper
container.
The waste paper container is
missing.
Please insert the waste paper
container.
The number of sheets fed in is
too high.
Remove the paper!
A paper jam is caused. Remove the paper!
The cutting mechanism is
performing a self-cleaning
operation.
Please wait until the display
shows ‘Ready‘.
The motor is overheated. Wait at least 20 minutes.
Continue operation when the
display shows ‘Ready‘.
Important note:
The device will switch off automatically if the motor temperature increases too much. The
red LED ‘Overheat‘ lights up and signals that the overheat protection of the device has been
activated - the LCD display shows ‘Please Wait‘. If that is the case, the device will not react
when you press the button ‘REV‘ or ‘FWD‘. The device switches back into normaloperation
as soon as the motor has cooled sufficiently.
Manual_X17CD_Office.indd 13 15.07.10 15:40

14
MAINTENANCE
Important:
Pull the mains power plug from the wall socket before carrying out any maintenance tasks
on the file shredder!
When the waste paper container is full, shredded material can be pushed upwards into the
cutting mechanism. Make sure to empty the waste paper container before it is filled
completely.
Clean the exterior of the file shredder with a moist cloth. Ensure that the cloth is kept well
away from the paper feed. This cleaning step is suitable only for the exterior of the device.
The exterior of the device is made of plastic. That is why no solvents like benzene or benzole,
or any organic solvents (e.g. thinner) may be used to clean the exterior of the device. Never
clean the device with a stain remover - this may cause the casing to fade, crack, dissolve or
graze.
Caution:
Make sure that no water gets into the device while cleaning the casing.
TECHNICAL DATA
Model: Shredder Office X17 CD
Cut type: Particles
Cut size: 3 x 25 mm
Cutting capacity: 17 sheets (A4, 70 g/m²), 1 CD or 1 credit card
Cutting speed: 3 m/min
In-feed width: 310 mm
Input voltage: 220-240 V AC/ 50-60 Hz; 3.0A/640W
Power consumption: 700 W
Dimensions: 450 x 325 x 675 mm
Noise level: approx. 58 dB
Waste paper container – volume: 33 l
Operating cycle: 10 min. ON/ 45 min. OFF
Net weight: 26.5 kg
Manual_X17CD_Office.indd 14 15.07.10 15:40

15
TROUBLESHOOTING
If the device is still not working after you have tried the above solutions, please remove the
mains power plug from the wall socket and consult your retailer.
DISPOSAL
The symbol depicting a crossed-out rubbish bin means that electrical devices
may not be disposed of with regular household waste. Please bring the device to
an approved recycling centre for environmentally firendly disposal.
GARANTIE
The warranty period for your device is 24 months.
Make sure to keep both your proof of purchase and the original packaging.
Please contact your retailer in case of any problems with the device.
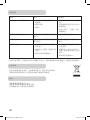
Faults
The device won‘t start, after
paper has been fed in.
The device does not switch
off automatically after the
paper has been shredded.
The device is very loud.
The device is not working.
1. The mains power plug was
not plugged into the wall
socket correctly.
2. The paper is too thin.
3. Paper jam.
The in-feed sensor is covered
with dust or paper.
The device is not standing on
a hard, level surface.
1. The amount of paper in the
feeder surpasses the
capacity of the file
shredder.
2. The paper is larger than
the width of the feeder.
3. The paper was not fed in
vertically.
1. Replace the mains power
plug in the wall socket,
ensuring proper seating.
2. Fold the paper over and
feed it into the file shred-
der again.
3. Activate the ‘REV‘ function
and pull out any jammed
paper.
Wipe off the dust or remove
the paper.
Reposition the device to stand
on a hard, level surface.
1. Make sure that the
amount of paper in the
feeder does not surpass
the file shredder‘s capa-
city.
2. Remove surplus paper
and/or activate the ‘REV‘
function if required. Fold
the paper and insert it into
the feeder again.
3. Insert the paper into the
feeder vertically.
Causes Remedy
Manual_X17CD_Office.indd 15 15.07.10 15:40

16
INTRODUZIONE
Vi ringraziamo per aver acquistato il nostro prodotto di qualità Geha. Vi preghiamo di leggere
attentamente queste istruzioni prima della messa in servizio. È necessario, in particolare,
osservare soprattutto le indicazioni di sicurezza, in quanto la non osservanza comporta
pericolo di ferite!
SIMBOLI DI AVVERTENZA
I simboli di avvertenza nel manuale d’istruzioni e sull’apparecchio devono aiutare ad evi-
tare pericoli ed utilizzare correttamente l’apparecchio.
L’apparecchio non deve essere utilizzato da bambini!
Non inserire le mani all’interno del sistema di taglio!
Fare attenzione a che non si impigli l’abbigliamento indossato nella porta d’ingresso
della carta!
Fare attenzione a che non si impiglino i capelli nella porta d’ingresso della carta!
Non spruzzare alcun gas o liquido sull’apparecchio!
Rimuovere tutte le graffette!
IMPORTANTI INDICAZIONI DI SICUREZZA
Prima di mettere in funzione il distruggi documenti, vi preghiamo di leggere le indicazioni di
sicurezza. Se utilizzate apparecchi elettrici, è necessario prendere particolari precauzioni
per evitare di incorrere nel rischio di qualche ferita. Vi preghiamo di osservare pertanto le
seguenti regole fondamentali:
- Questo distruggi documenti è particolarmente indicato per distruggere carta e CD.
È necessario che venga utilizzato unicamente per tali scopi.
- Non inserire nel distruggi documenti nè pellicole, carta per etichette, capi
d’abbigliamento, né elementi in plastica.
- Eliminate tutte le graffette prima di inserire i fogli.
- Non bisogna modificare, trasfromare o riparare in alcun modo l’apparecchio.
- Non appoggiate alcun oggetto sull’apparecchio o contro di esso.
- Non spruzzate acqua sull’apparecchio.
- Staccate la spina dalla presa di corrente prima di svuotare il cestino o quando non dovete
più utilizzare l’apparecchio o avete necessità di spostarlo.
- Per spegnere l’apparecchio staccare la spina, non tirare il cavo.
- Assicuratevi che venga utilizzata la tensione corretta.
Manual_X17CD_Office.indd 16 15.07.10 15:40

17
- Non utilizzate molte prolunghe.
- In caso di condizioni anomale dell’apparecchio (ad esempio rumori o odori strani)è
necessario interrompere immediatamente l’uso dell’apparecchio o staccare il cavo della
corrente dalla presa.
MONTARE IL DISTRUGGI DOCUMENTI
1. Il punto forte si trova sulla parte superiore dell’apparecchio. Poggiatelo su una superficie
piana in modo da evitare che si possa ribaltare.
2. Non utilizzare l’apparecchio nelle vicinanze di fonti d’acqua o di freddo, né in ambienti
troppo caldi, umidi o polverosi.
3. Posizionare l’apparecchio nelle vicinanze di una presa e non ponete alcun oggetto vicino
a questa, in modo che il cavo possa essere tirato fuori dalla presa senza problemi.
4. Fare attenzione a che il contenitore per carta sia bene inserito all’interno
dell’apparecchio.
5. Collegare alla corrente con un trasformatore 220-240 V.
COMPOSIZIONE E FUNZIONAMENTO
1 Ingresso carta/CD/carte di credito
2 Display LCD
3 Interruttore accensione/spegnimento
4 Tasto per rotazione in senso di taglio/tempo + (FWD)
5 Tasto per inversione del senso di taglio/ tempo - (REV)
6 Tasto per l’impostazione dell’ora
7 Simbolo del cestino pieno
8 Simbolo di surriscaldamento
9 Simbolo del cestino non inserito
10 Simbolo Power
11 Oblò
12 Cestino
13 Rotelle
Manual_X17CD_Office.indd 17 15.07.10 15:40

18
METTERE IN FUNZIONE IL DISTRUGGI DOCUMENTI
A. Inserimento di carta
L’apparecchio può distruggere al max. 17 fogli (DIN A4, 70 g/m²) alla volta. Accendere l’appa-
recchio con l’interruttore ON/OFF. Si illumina il LED verde di “Power“ e sul display LCD ven-
gono mostrati stato di funzionamento (Ready) e orario (per impostazione orario, vedi punto C).
I fogli nell’ingresso per carta vengono automaticamente riconosciuti e l’apparecchio si
avvia, sul display LCD appaiono lo stato di funzionamento (In use) e l’orario. Se il documento
inserito è stato distrutto e non c’è nessun altro documento da inserire, l’apparecchio si
ferma automaticamente (Standby Mode).
Una funzione di arresto e inversione rotazione si attiva automaticamente in caso di sovracca-
rico di carta, in modo da evitare ingorghi. In questo caso togliere i fogli dall’ingresso, atten-
dere che l’apparecchio termini il processo di pulizia automatico e si arresti. Inserire max. 17
fogli A4 70 g/m² nell’ingresso carta.
“FWD“ Quando si inseriscono piccoli fogli (<14 cm) nell’ingresso per carta, è possibile che
il sensore ottico non li riconosca e l’apparecchio. Premere, in questo, il tasto “FWD”
fino a che la carta non sia stata completamente distrutta.
“REV“ Con il tasto “REV“ è possibile avviare un’“inversione“ die rulli, nel caso in cui vi sia un
inceppamento della carta.
Quando il sensore riconosce che il cestino è pieno, arresta automaticamente l’apparecchio
e si illumina il LED rosso “Bin full“ e sul display LCD appare l’indicazione “Basket full“.
Rimuovere la carta dall’ingresso e svuotare il cestino. Seguire le indicazioni presenti al punto
“Manutenzione”.
B. Inserimento di CD/DVD e carte di credito
Queso apparecchio è dotato di un sistema di taglio autonomo per CD/DVD e carte di credito.
Fate sempre attenzione ad inserire solo 1 CD/DVD o una carta di credito per volta all’interno
dell’apparecchio. Qualora vogliate metterlo in funzione in questo senso, procedere come
segue:
1. Accendere l’apparecchio con l’interruttore. Si illumina il LED verde di “Status“ e sul
display LCD vengono mostrati stato di funzionamento (Ready) e orario.
2. CD/DVD, carte di credito e dischetti presenti nell’ingresso CD vengono automaticamente
riconosciuti, l’apparecchio si avvia e viene mostrato lo stato di funzionamento “In use“ sul
display LCD.
CD/DVD e carte di credito vengono tagliuzzati in striscette. Dato che si tratta sempre di
materiali che comportano pericolo di schegge, si prega di tenere il volto a debita distanza
dopo aver inserito il materiale nell’apparecchio!
Il materiale di risulta viene raccolto in un contenitore separato e lo smaltimento rifiuti viene
in qualche modo alleggerito. Per facilitare lo smaltimento si consiglia di gettare gli scarti in
carta prima dell’inserimento di questo tipo di materiale da tagliuzzare!
C. Impostazione dell’ora
Premere una volta sul tasto “Setup“. Con il tasto“FWD“ è possibile aumentare ora e con il
tasto “ REV“ diminuirla.
Premere due volte il tasto “Setup“. Con il tasto “FWD“ è possibile aumentare i minuti e con il
testo “REV“ è possibile diminuire i minuti.
Manual_X17CD_Office.indd 18 15.07.10 15:40

19
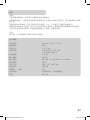
D. Funzioni mostrate sul display LCD
Indicazione Stato Comando
L’apparecchio è pronto all’uso. L’apparecchio può essere messo
in funzione.
L’apparecchio è in funzione. -----
Rotazione manuale nel senso
del taglio.
Il tasto FWD è attivato.
Inversione manuale nel senso
del taglio.
Il tasto REV è attivato.
Il cestino è pieno. Si prega di svuotare il cestino.
Il Cestino non e utilizzato Si prega di utilizzare il cestino
E’ stato inserito un volume di
fogli troppo grande.
Rimuovere dei fogli!
Si è verificato un inceppamento
di carta.
Rimuovere dei fogli!
Il dispositivo di taglio si pulisce. Attendere fino a che non compare
la scritta “Ready”.
Il motore è surriscaldato. Attendere almeno 20 minuti.
Rimettere in attività quando
compare l’indicazione “Ready”.
Nota importante:
L’apparecchio si arresta automaticamente quando la temperatura del motore diventa
troppo alta. Si illumina il LED rosso per “Overheat“ che indica che si è attivata la protezione
contro surriscaldamento; sul display LCD viene mostrato il messaggio “please wait“. In
questo caso l’apparecchio non reagisce in alcun modo quando si premono i tasti “Rev“ o
“Fwd“. Non appena la temperatura si sia raffreddata, l’apparecchio torna nuovamente al
normale funzionamento.
Manual_X17CD_Office.indd 19 15.07.10 15:40

20
MANUTENZIONE
Importante:
Prima di effettuare la manutenzione, è necessario staccare la spina dalla presa!
Quando il cestino è pieno, vi è il pericolo che alcuni pezzi tagliati vengano fuori dal distruggi
documenti. Svuotare il cestino prima che si riempia del tutto.
Pulire la parte esterna con un panno umido. Fare attenzione a che il panno non si incastri
nella fessura per la carta. Questo tipo di attività va condotta solo per la parte esterna
dell’apparecchio.
La parte esterna dell’apparecchio è in plastica. Pertanto non bisogna utilizzare alcuna
sostanza come alcool o benzina, o sostanza organica, come diluenti. Non pulire l’apparecchio
con uno smacchiatore per evitare abrasioni, rotture, graffi o scioglimenti.
Attenzione:
Fare attenzione a che durante la pulizia non entri dell’acqua nello strumento.
DATI TECNICI
Descrizione modello: Shredder Office X17 CD
Tipo di taglio: Pezzettini
Dimensione taglio: 3 x 25 mm
Capacità di taglio: 17 fogli (DIN A4, 70 g/m²), 1 CD o 1 carta di credito
Velocità di taglio: 3 m/min
Ampiezza fessura: 310 mm
Alimentazione elettrica: 220-240 V AC/50-60 Hz; 3.0A/640W
Massima prestazione: 700 W
Dimensioni: 450 x 325 x 675 mm
Sonorità: ca. 58 dB
Volume cestino carta: 33 L
Cliclo di funzionamento: 10 min. acceso/45 Min. spento
Peso netto: 26,5 kg
Manual_X17CD_Office.indd 20 15.07.10 15:40
Pagina se încarcă...
Pagina se încarcă...
Pagina se încarcă...
Pagina se încarcă...
Pagina se încarcă...
Pagina se încarcă...
Pagina se încarcă...
Pagina se încarcă...
Pagina se încarcă...
Pagina se încarcă...
Pagina se încarcă...
Pagina se încarcă...
Pagina se încarcă...
Pagina se încarcă...
Pagina se încarcă...
Pagina se încarcă...
Pagina se încarcă...
Pagina se încarcă...
Pagina se încarcă...
Pagina se încarcă...
Pagina se încarcă...
Pagina se încarcă...
Pagina se încarcă...
Pagina se încarcă...
Pagina se încarcă...
Pagina se încarcă...
Pagina se încarcă...
Pagina se încarcă...
Pagina se încarcă...
Pagina se încarcă...
Pagina se încarcă...
Pagina se încarcă...
Pagina se încarcă...
Pagina se încarcă...
Pagina se încarcă...
Pagina se încarcă...
Pagina se încarcă...
Pagina se încarcă...
Pagina se încarcă...
Pagina se încarcă...
Pagina se încarcă...
Pagina se încarcă...
Pagina se încarcă...
Pagina se încarcă...
Pagina se încarcă...
Pagina se încarcă...
Pagina se încarcă...
Pagina se încarcă...
Pagina se încarcă...
Pagina se încarcă...
Pagina se încarcă...
Pagina se încarcă...
Pagina se încarcă...
Pagina se încarcă...
Pagina se încarcă...
Pagina se încarcă...
Pagina se încarcă...
Pagina se încarcă...
Pagina se încarcă...
Pagina se încarcă...
Pagina se încarcă...
Pagina se încarcă...
Pagina se încarcă...
Pagina se încarcă...
Pagina se încarcă...
Pagina se încarcă...
Pagina se încarcă...
Pagina se încarcă...
Pagina se încarcă...
Pagina se încarcă...
Pagina se încarcă...
Pagina se încarcă...
-
 1
1
-
 2
2
-
 3
3
-
 4
4
-
 5
5
-
 6
6
-
 7
7
-
 8
8
-
 9
9
-
 10
10
-
 11
11
-
 12
12
-
 13
13
-
 14
14
-
 15
15
-
 16
16
-
 17
17
-
 18
18
-
 19
19
-
 20
20
-
 21
21
-
 22
22
-
 23
23
-
 24
24
-
 25
25
-
 26
26
-
 27
27
-
 28
28
-
 29
29
-
 30
30
-
 31
31
-
 32
32
-
 33
33
-
 34
34
-
 35
35
-
 36
36
-
 37
37
-
 38
38
-
 39
39
-
 40
40
-
 41
41
-
 42
42
-
 43
43
-
 44
44
-
 45
45
-
 46
46
-
 47
47
-
 48
48
-
 49
49
-
 50
50
-
 51
51
-
 52
52
-
 53
53
-
 54
54
-
 55
55
-
 56
56
-
 57
57
-
 58
58
-
 59
59
-
 60
60
-
 61
61
-
 62
62
-
 63
63
-
 64
64
-
 65
65
-
 66
66
-
 67
67
-
 68
68
-
 69
69
-
 70
70
-
 71
71
-
 72
72
-
 73
73
-
 74
74
-
 75
75
-
 76
76
-
 77
77
-
 78
78
-
 79
79
-
 80
80
-
 81
81
-
 82
82
-
 83
83
-
 84
84
-
 85
85
-
 86
86
-
 87
87
-
 88
88
-
 89
89
-
 90
90
-
 91
91
-
 92
92


Geha OFFICE X17 CD Manualul proprietarului
- Categorie
- Tocătoare de hârtie
- Tip
- Manualul proprietarului
- Acest manual este potrivit și pentru
în alte limbi
- Türkçe: Geha OFFICE X17 CD El kitabı
- français: Geha OFFICE X17 CD Le manuel du propriétaire
- русский: Geha OFFICE X17 CD Инструкция по применению
- English: Geha OFFICE X17 CD Owner's manual
- polski: Geha OFFICE X17 CD Instrukcja obsługi
- Deutsch: Geha OFFICE X17 CD Bedienungsanleitung
- italiano: Geha OFFICE X17 CD Manuale del proprietario
- español: Geha OFFICE X17 CD El manual del propietario
- svenska: Geha OFFICE X17 CD Bruksanvisning
- Nederlands: Geha OFFICE X17 CD de handleiding
Lucrări înrudite
-
Geha Office X12 CD Manual de utilizare
-
Geha Office X7 CD Manual de utilizare
-
Geha Office X12 Manual de utilizare
-
-
-
-
Geha Office S15 Manualul proprietarului
-
Geha Home & Office X7 CD Manualul proprietarului
-
-