Philips HQ6675/16 Manual de utilizare
- Categorie
- Aparate de bărbierit
- Tip
- Manual de utilizare
Acest manual este potrivit și pentru

HQ6676, HQ6675
ENGLISH 4
INDONESIA
13
한국어 23
BAHASA MELAYU
33
ภาษาไทย 43
51
繁體中文 61
简体中文 70

4
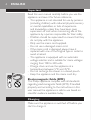
Important
Read this user manual carefully before you use the
appliance and save it for future reference.
This appliance is not intended for use by persons
(including children) with reduced physical, sensory
or mental capabilities, or lack of experience
and knowledge, unless they have been given
supervision or instruction concerning use of the
appliance by a person responsible for their safety.
Children should be supervised to ensure that they
do not play with the appliance.
Only use the mains cord supplied.
Do not use a damaged mains cord.
If the mains cord is damaged, always have it
replaced with one of the original type in order to
avoid a hazard.
The appliance is equipped with an automatic
voltage selector and is suitable for mains voltages
ranging from 100 to 240 volts.
Charge, store and use the appliance at a
temperature between 5°C and 35°C.
Do not recharge the shaver in a closed pouch.
Keep the appliance and the mains cord dry.
Electromagnetic elds (EMF)
This Philips appliance complies with all standards
regarding electromagnetic elds (EMF). If handled
properly and according to the instructions in this
user manual, the appliance is safe to use based on
scientic evidence available today.
Charging
Make sure the appliance is switched off before you
start to charge it.
-
-
-
-
-
-
-
-
-
ENGLISH

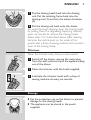
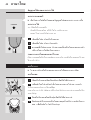
Charge the appliance for at least 8 hours, but not
more than 24 hours. Do not leave the appliance
connected to the mains continuously.
To prevent the battery from going at during shaving,
you can also charge the shaver in between shaves,
even if the battery is not completely empty yet. This
will not damage the battery.
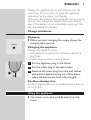
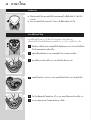
Charge indications
Charging
When you start charging the empty shaver, the
charging light goes on.
Charging the appliance
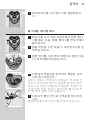
Charge the appliance when:
the appliance is new or has not been used for a
long time
motor stops or starts running slower
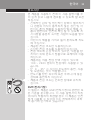
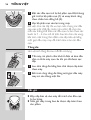
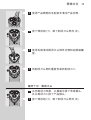
1 Put the appliance plug in the shaver.
2 Put the mains plug in the wall socket.
3 Remove the mains plug from the wall socket
and pull the appliance plug out of the shaver
when the battery has been fully charged.
Cordless shaving time
A fully charged shaver has a cordless shaving time of
up to 10 days.
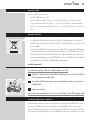
Using the appliance
The shaver cannot be used directly from the
mains.
,
-
-
,
CHARGECHARGE
ENGLISH 5

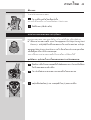
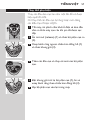
Shaving
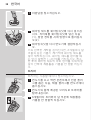
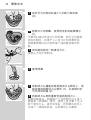
1 Switch on the shaver by pushing the on/off
slide to position I.
2 Move the shaving heads quickly over your skin,
making both straight and circular movements.
Shaving on a dry face gives the best results.
Your skin may need 2 or 3 weeks to get accustomed
to the Philips shaving system.
3 Switch off the shaver by pushing the on/off
slide to position 0.
4 Put the protection cap on the shaver every
time you have used it, to prevent damage.
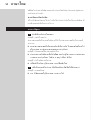
Trimming
For grooming sideburns and moustache.
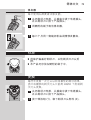
1 Open the trimmer by pushing the slide
upwards.
The trimmer can be activated while the motor is
running.
2 Close the trimmer (‘click’).
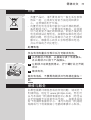
Cleaning and maintenance
Regular cleaning guarantees better shaving
performance.
For easy and optimal cleaning, the Philips Shaving
Head Cleaner (type HQ100) is available. Ask
your Philips dealer for information.
Note: The Philips Shaving Head Cleaner may not be
available in all countries. Contact the Customer Care
Centre in your country about the availability of this
accessory.
You can also clean the shaver in the following way:
,
ENGLISH6

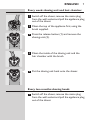
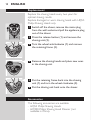
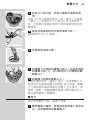
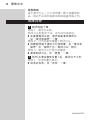
Every week: shaving unit and hair chamber
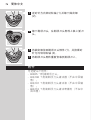
1 Switch off the shaver, remove the mains plug
from the wall socket and pull the appliance plug
out of the shaver.
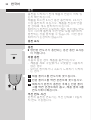
2 Cleanthetopoftheappliancerst,usingthe
brush supplied.
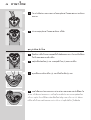
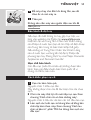
3 Press the release button (1) and remove the
shaving unit (2).
4 Clean the inside of the shaving unit and the
hair chamber with the brush.
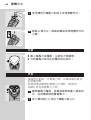
5 Put the shaving unit back onto the shaver.
Every two months: shaving heads
1 Switch off the shaver, remove the mains plug
from the wall socket and pull the appliance plug
out of the shaver.
2
1
2
1
ENGLISH 7

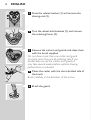
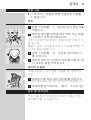
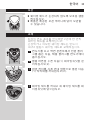
2 Press the release button (1) and remove the
shaving unit (2).
3 Turn the wheel anticlockwise (1) and remove
the retaining frame (2).
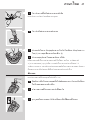
4 Remove the cutters and guards and clean them
with the brush supplied.
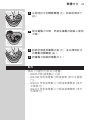
Do not clean more than one cutter and guard
at a time, since they are all matching sets. If you
accidentally mix up the cutters and guards, it
may take several weeks before optimal shaving
performance is restored.
5 Clean the cutter with the short-bristled side of
the brush.
Brush carefully in the direction of the arrow.
6 Brush the guard.
2
1
2
1
1
2
1
2
ENGLISH8

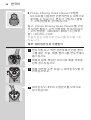
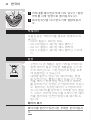
7 Put the shaving heads back into the shaving
unit. Put the retaining frame back into the
shaving unit (1) and turn the wheel clockwise
(2).
8 Put the shaving unit back onto the shaver.
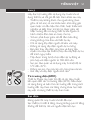
For extra thorough cleaning, clean the shaving heads
by putting them in a degreasing liquid (e.g. alcohol)
every six months. To remove the shaving heads,
follow steps 1 to 4 described above. After cleaning,
lubricate the central point on the inside of the
guards with a drop of sewing machine oil to prevent
wear of the shaving heads.
Trimmer
Clean the trimmer every time you have used it.
1 Switch off the shaver, remove the mains plug
from the wall socket and pull the appliance plug
out of the shaver.
2 Clean the trimmer with the brush supplied.
3 Lubricate the trimmer teeth with a drop of
sewing machine oil every six months.
Storage
Put the protection cap on the shaver to prevent
damage to the shaving heads.
The appliance can be stored in the pouch
supplied.
,
,
1
2
1
2
ENGLISH 9

Replacement
Replace the shaving heads every two years for
optimal shaving results.
Replace damaged or worn shaving heads with HQ55
Philips Shaving Heads only.
1 Switch off the shaver, remove the mains plug
from the wall socket and pull the appliance plug
out of the shaver.
2 Press the release button (1) and remove the
shaving unit (2).
3 Turn the wheel anticlockwise (1) and remove
the retaining frame (2).
4 Remove the shaving heads and place new ones
in the shaving unit.
5 Put the retaining frame back into the shaving
unit (1) and turn the wheel clockwise (2).
6 Put the shaving unit back onto the shaver.
Accessories
The following accessories are available:
HQ55 Philips Shaving Heads.
HQ100 Philips Shaving Head Cleaner (not
available in China).
-
-
2
1
2
1
1
2
1
2
1
2
1
2
ENGLISH10

HQ101 Philips Shaving Head Cleaning Fluid (not
available in China).
HQ110 Philips Shaving Head Cleaning Spray (not
available in China).
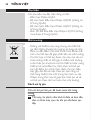
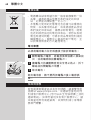
Environment
Do not throw the appliance away with the normal
household waste at the end of its life, but hand
it in at an ofcial collection point for recycling.
By doing this you will help to preserve the
environment.
The built-in rechargeable shaver battery contains
substances that may pollute the environment.
Always remove the battery before you discard
and hand in the shaver at an ofcial collection
point. Dispose of the battery at an ofcial
collection point for batteries. If you have trouble
removing the battery, you can also take the shaver
to a Philips service centre. The staff of this centre
will remove the battery for you and will dispose of
it in an environmentally safe way.
Disposal of the battery
Only remove the battery if it is completely empty.
1 Switch off the shaver, remove the mains plug
from the wall socket and pull the appliance plug
out of the shaver.
2 Let the shaver run until it stops, undo the
screws and open the shaver.
3 Remove the battery.
Do not connect the shaver to the mains again after
the battery has been removed.
-
-
-
-
ENGLISH 11

Guarantee & service
If you need information or if you have a problem,
please visit the Philips website at www.philips.com
or contact the Philips Customer Care Centre
in your country (you nd its phone number in
the worldwide guarantee leaet). If there is no
Customer Care Centre in your country, go to
your local Philips dealer or contact the Service
Department of Philips Domestic Appliances and
Personal Care BV.
Guarantee restrictions
The shaving heads (cutters and guards) are not
covered by the terms of the international guarantee
because they are subject to wear.
Troubleshooting
1
Reduced shaving performance
Cause 1: the shaving heads are dirty.
The shaver has not been cleaned well enough or has
not been cleaned for a long time.
Clean the shaver thoroughly before you continue
shaving. See chapter ‘Cleaning and maintenance’.
Cause 2: long hairs are obstructing the shaving heads.
Clean the cutters and guards with the brush
supplied. See chapter ‘Cleaning and maintenance’,
section ‘Every two months: shaving heads’.
Cause 3: the shaving heads are damaged or worn.
Replace the shaving heads. See chapter
‘Replacement’.
2 The shaver does not work when the on/off
slide is pushed to position I.
Cause 1: the battery is empty.
Recharge the battery. See chapter ‘Charging’.
,
,
,
,
ENGLISH12

13
Penting
Bacalah petunjuk pengguna ini secara seksama
sebelum Anda menggunakan alat dan simpan untuk
referensi di kemudian hari.
Alat ini tidak dimaksudkan untuk digunakan oleh
orang (termasuk anak-anak) dengan cacat sik,
indera atau kecakapan mental yang kurang, atau
kurang pengalaman dan pengetahuan, kecuali jika
mereka diberikan pengawasan atau pengarahan
mengenai penggunaan alat oleh orang yang
bertanggungjawab bagi keselamatan mereka.
Anak kecil harus diawasi untuk memastikan
mereka tidak bermain-main dengan alat ini.
Gunakan hanya kabel listrik yang disediakan.
Jangan menggunakan kabel listrik yang rusak.
Jika kabel listrik rusak, gantilah selalu dengan tipe
yang asli agar terhindar dari bahaya.
Alat cukur ini dilengkapi selektor tegangan
otomatis dan cocok untuk daya listrik antara
100 sampai 240 volt.
Lakukan pengisian baterai, penyimpanan dan
penggunaan alat ini pada suhu antara 5 °C dan
35 °C.
Jangan mengisi ulang pencukur di dalam kantong
tertutup.
Jaga agar perangkat dan kabel listrik tetap kering.
Medan elektromagnet (EMF)
Alat Philips ini mematuhi semua standar yang
berkenaan dengan medan elektromagnet (EMF). Jika
ditangani sebagaimana layaknya dan sesuai dengan
petunjuk pengguna ini, alat tersebut aman digunakan
menurut bukti ilmiah yang kini tersedia.
-
-
-
-
-
-
-
-
-
INDONESIA

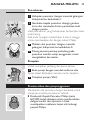
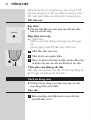
Pengisian daya
Pastikan alat telah dimatikan sebelum mengisi
baterainya.
Isi daya baterai alat minimal 8 jam, tapi jangan lebih
dari 24 jam. Jangan membiarkan alat terus-menerus
terhubung ke listrik.
Untuk mencegah agar baterai tidak habis sewaktu
sedang mencukur, Anda juga dapat mengisi baterai
alat cukur setiap kali selesai mencukur, meskipun
baterai belum habis. Hal ini tidak akan merusak
baterai.
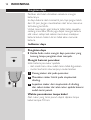
Indikator daya
Pengisian daya
Ketika Anda mulai mengisi daya pencukur yang
kosong, lampu pengisian akan menyala.
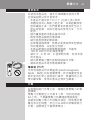
Mengisi baterai pencukur
Isilah baterai pencukur apabila:
alat masih baru atau sudah lama tidak digunakan
motor berhenti atau kerjanya mulai lamban
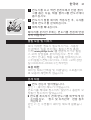
1 Pasang steker alat pada pencukur.
2 Masukkan steker listrik pada stopkontak
dinding.
3 Lepaskan steker dari stopkontak di dinding
dan cabut steker dari alat cukur apabila baterai
sudah terisi penuh.
Waktu pencukuran tanpa kabel
Alat cukur yang terisi penuh dapat dipakai tanpa
kabel sampai 10 hari.
,
-
-
CHARGECHARGE
INDONESIA14

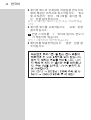
Menggunakan alat
Alat cukur tidak dapat digunakan secara langsung
dari stopkontak listrik.
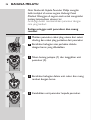
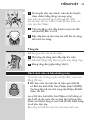
Mencukur
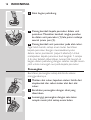
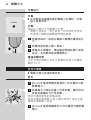
1 Hidupkan alat cukur dengan mendorong
geseran on/off ke posisi I.
2 Gerakkan kepala pencukur dengan cepat pada
kulit Anda, lakukan gerakan lurus maupun
memutar.
Mencukur pada kulit yang kering memberikan hasil
terbaik.
Kulit Anda mungkin memerlukan 2 atau 3 minggu
agar terbiasa dengan sistem pencukuran Philips.
3 Matikan alat cukur dengan mendorong geseran
on/off ke posisi 0.
4 Pasang tutup pelindung pada pencukur setiap
kali Anda selesai menggunakannya, agar tidak
rusak.
Memangkas
Untuk merapikan cambang dan kumis.
1 Buka pemangkas dengan menyorong geseran ke
atas.
Pemangkas dapat dihidupkan saat motor bekerja.
2 Tutup pemangkas (terdengar bunyi ‘klik’).
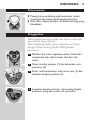
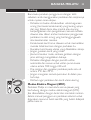
Pembersihan dan perawatan
Membersihkan secara teratur akan menjamin hasil
cukur yang lebih baik.
,
INDONESIA 15

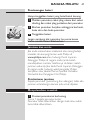
Untuk membersihkan dengan mudah dan
optimal, tersedia Philips Shaving Head Cleaner
(pembersih kepala pencukur, tipe HQ100).
Tanyakan pada penyalur Philips untuk
mendapatkan informasi.
Catatan: Philips Shaving Head Cleaner mungkin tidak
tersedia di semua negara. Hubungi Pusat Layanan
Pelanggan di negara Anda untuk ketersediaan aksesori
ini.
Anda juga dapat membersihkan pencukur dengan
cara berikut ini:
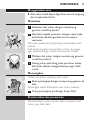
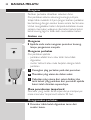
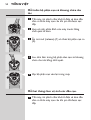
Seminggu sekali: unit pencukur dan ruang
rambut
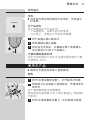
1 Matikan alat cukur, lepaskan steker listrik dari
stopkontak dan cabut steker alat dari alat
cukur.
2 Pertama-tama bersihkan bagian atas alat dengan
sikat yang disediakan.
3 Tekan tombol pelepas (1) lalu keluarkan unit
pencukur (2).
4 Bersihkan bagian dalam unit pencukur dan
ruang rambut dengan sikat.
,
2
1
2
1
INDONESIA16

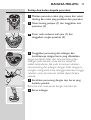
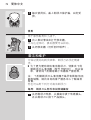
5 Pasang kembali unit pencukur pada alat cukur.
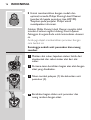
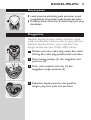
Tiap dua bulan: kepala pencukur
1 Matikan alat cukur, lepaskan steker listrik dari
stopkontak dan cabut steker alat dari alat
cukur.
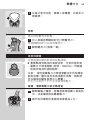
2 Tekan tombol pelepas (1) lalu keluarkan unit
pencukur (2).
3 Putar roda berlawanan arah jarum jam (1) dan
lepaskan bingkai penahan (2).
4 Lepaskan pemotong dan pelindung lalu
bersihkan dengan sikat yang disediakan.
Jangan membersihkan lebih dari satu pemotong
dan pelindung sekaligus, karena keduanya
merupakan pasangan. Jika secara tidak sengaja Anda
mencampuradukkan pemotong dan pelindung, akan
dibutuhkan beberapa minggu sebelum pencukuran
dapat kembali optimal.
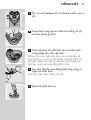
5 Bersihkan komponen pemotong dengan bagian
sikat yang berbulu pendek.
Sikat ke arah panah dengan hati-hati.
2
1
2
1
1
2
1
2
INDONESIA 17

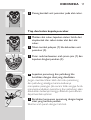
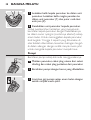
6 Sikat bagian pelindung.
7 Pasang kembali kepala pencukur dalam unit
pencukur. Masukkan kembali rangka penahan
ke dalam unit pencukur (1) lalu putar rodanya
searah jarum jam (2).
8 Pasang kembali unit pencukur pada alat cukur.
Agar lebih bersih, setiap enam bulan bersihkan
kepala pencukur dengan memasukkannya ke
dalam cairan pembersih (seperti alkohol). Untuk
melepaskan kepala pencukur, ikuti langkah 1 sampai
4 di atas. Setelah dibersihkan, lumasi titik tengah di
bagian dalam pelindung dengan setetes minyak mesin
jahit untuk mencegah aus pada kepala pencukur.
Pemangkas
Bersihkan pemangkas setiap kali Anda selesai
menggunakannya.
1 Matikan alat cukur, lepaskan steker listrik dari
stopkontak dan cabut steker alat dari alat
cukur.
2 Bersihkan pemangkas dengan sikat yang
disertakan.
3 Lumasi gigi pemangkas dengan satu tetes
minyak mesin jahit setiap enam bulan.
1
2
1
2
INDONESIA18

Penyimpanan
Pasang tutup pelindung pada pencukur untuk
mencegah kerusakan pada kepala pencukur.
Alat cukur dapat disimpan di dalam kantung yang
disediakan.
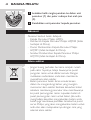
Penggantian
Ganti kepala pencukur setiap dua tahun untuk hasil
pencukuran yang optimal.
Ganti kepala pencukur yang rusak atau aus hanya
dengan Philips Shaving Head HQ55 [kepala
pencukur].
1 Matikan alat cukur, lepaskan steker listrik dari
stopkontak dan cabut steker alat dari alat
cukur.
2 Tekan tombol pelepas (1) lalu keluarkan unit
pencukur (2).
3 Putar roda berlawanan arah jarum jam (1) dan
lepaskan bingkai penahan (2).
4 Lepaskan kepala pencukur dan pasang kepala
pencukur yang baru pada unit pencukur.
,
,
2
1
2
1
1
2
1
2
INDONESIA 19

5 Masukkan kembali rangka penahan ke dalam
unit pencukur (1) lalu putar rodanya searah
jarum jam (2).
6 Pasang kembali unit pencukur pada alat cukur.
Aksesori
Tersedia aksesori berikut:
HQ55 Philips Shaving Heads [kepala pencukur]
HQ100 Philips Shaving Head Cleaner (tidak
tersedia di Cina).
HQ101 Philips Shaving Head Cleaning Fluid (tidak
tersedia di Cina).
HQ110 Philips Shaving Head Cleaning Spray
(tidak tersedia di Cina).
Lingkungan
Jangan membuang alat bersama limbah rumah
tangga biasa jika alat sudah tidak bisa dipakai
lagi, tetapi serahkan ke tempat pengumpulan
barang bekas yang resmi untuk didaur ulang.
Dengan melakukan hal ini, Anda ikut membantu
melestarikan lingkungan.
Baterai isi-ulang pencukur yang terpasang
mengandung bahan yang dapat mencemari
lingkungan. Selalu keluarkan baterai sebelum
membuang pencukur atau membawanya ke
tempat pengumpulan resmi. Buang baterai bekas
di tempat pengumpulan resmi untuk baterai. Jika
Anda sulit mengeluarkan baterai, Anda pun dapat
membawa pencukur tersebut ke pusat servis
Philips yang akan membantu Anda mengeluarkan
-
-
-
-
-
-
1
2
1
2
INDONESIA20

baterai dan membuangnya dengan cara yang
ramah lingkungan.
Pembuangan baterai
Keluarkan baterai hanya jika sudah benar-benar
kosong.
1 Matikan alat cukur, lepaskan steker listrik dari
stopkontak dan cabut steker alat dari alat
cukur.
2 Biarkan alat cukur berjalan sampai mati,
lepaskan sekrup dan buka pencukur.
3 Keluarkan baterai.
Jangan menghubungkan lagi alat cukur ke listrik
setelah baterai dikeluarkan.
Garansi & servis
Jika Anda memerlukan informasi atau mengalami
masalah, silakan kunjungi situs web Philips di
www.philips.com atau hubungi Pusat Layanan
Pelanggan Philips di negara Anda (Anda dapat
memperoleh nomor teleponnya dalam pamet
garansi yang berlaku di seluruh dunia). Jika tidak ada
Pusat Layanan Pelanggan di negara Anda, silakan
datang ke dealer Philips setempat atau hubungi
Bagian Servis dari Philips Domestic Appliances and
Personal Care BV.
Batasan garansi
Kepala cukur (pemotong dan pelindung) tidak
tercakup oleh ketentuan garansi internasional karena
tergantung pada pemakaian.
INDONESIA 21

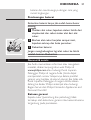
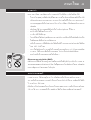
Pemecahan Masalah
1
Menurunnya kinerja
Penyebab 1: kepala pencukur kotor.
Alat cukur belum bersih benar atau sudah lama tidak
dibersihkan.
Bersihkan alat cukur secara saksama sebelum
Anda meneruskan pencukuran. Lihat bab
‘Pembersihan dan perawatan’.
Penyebab 2: rambut panjang menyumbat kepala
pencukur.
Bersihkan komponen pemotong dan pelindung
dengan sikat yang disediakan. Lihat bab
‘Pembersihan dan perawatan’ bagian ‘Setiap dua
bulan: kepala pencukur’.
Penyebab 3: kepala pencukur rusak atau aus.
Ganti kepala pencukur. Lihat bab ‘Penggantian’.
2 Alat cukur tidak bekerja ketika tombol on/off
digeser ke posisi I.
Penyebab 1: baterai kosong.
Isi ulang baterai. Lihat bab ‘Pengisian daya’.
,
,
,
,
INDONESIA22
Pagina se încarcă ...
Pagina se încarcă ...
Pagina se încarcă ...
Pagina se încarcă ...
Pagina se încarcă ...
Pagina se încarcă ...
Pagina se încarcă ...
Pagina se încarcă ...
Pagina se încarcă ...
Pagina se încarcă ...
Pagina se încarcă ...
Pagina se încarcă ...
Pagina se încarcă ...
Pagina se încarcă ...
Pagina se încarcă ...
Pagina se încarcă ...
Pagina se încarcă ...
Pagina se încarcă ...
Pagina se încarcă ...
Pagina se încarcă ...
Pagina se încarcă ...
Pagina se încarcă ...
Pagina se încarcă ...
Pagina se încarcă ...
Pagina se încarcă ...
Pagina se încarcă ...
Pagina se încarcă ...
Pagina se încarcă ...
Pagina se încarcă ...
Pagina se încarcă ...
Pagina se încarcă ...
Pagina se încarcă ...
Pagina se încarcă ...
Pagina se încarcă ...
Pagina se încarcă ...
Pagina se încarcă ...
Pagina se încarcă ...
Pagina se încarcă ...
Pagina se încarcă ...
Pagina se încarcă ...
Pagina se încarcă ...
Pagina se încarcă ...
Pagina se încarcă ...
Pagina se încarcă ...
Pagina se încarcă ...
Pagina se încarcă ...
Pagina se încarcă ...
Pagina se încarcă ...
Pagina se încarcă ...
Pagina se încarcă ...
Pagina se încarcă ...
Pagina se încarcă ...
Pagina se încarcă ...
Pagina se încarcă ...
Pagina se încarcă ...
Pagina se încarcă ...
-
 1
1
-
 2
2
-
 3
3
-
 4
4
-
 5
5
-
 6
6
-
 7
7
-
 8
8
-
 9
9
-
 10
10
-
 11
11
-
 12
12
-
 13
13
-
 14
14
-
 15
15
-
 16
16
-
 17
17
-
 18
18
-
 19
19
-
 20
20
-
 21
21
-
 22
22
-
 23
23
-
 24
24
-
 25
25
-
 26
26
-
 27
27
-
 28
28
-
 29
29
-
 30
30
-
 31
31
-
 32
32
-
 33
33
-
 34
34
-
 35
35
-
 36
36
-
 37
37
-
 38
38
-
 39
39
-
 40
40
-
 41
41
-
 42
42
-
 43
43
-
 44
44
-
 45
45
-
 46
46
-
 47
47
-
 48
48
-
 49
49
-
 50
50
-
 51
51
-
 52
52
-
 53
53
-
 54
54
-
 55
55
-
 56
56
-
 57
57
-
 58
58
-
 59
59
-
 60
60
-
 61
61
-
 62
62
-
 63
63
-
 64
64
-
 65
65
-
 66
66
-
 67
67
-
 68
68
-
 69
69
-
 70
70
-
 71
71
-
 72
72
-
 73
73
-
 74
74
-
 75
75
-
 76
76


Philips HQ6675/16 Manual de utilizare
- Categorie
- Aparate de bărbierit
- Tip
- Manual de utilizare
- Acest manual este potrivit și pentru
în alte limbi
Lucrări conexe
-
Philips HQ7360/17 Manual de utilizare
-
Philips HQ8150/16 Manual de utilizare
-
NIVEA HS8460/41 Manual de utilizare
-
Philips RQ1150 Manual de utilizare
-
Philips RQ1150 Manual de utilizare
-
Philips RQ1260/21 Manual de utilizare
-
Philips HP4828/00 Manual de utilizare
-
Philips FC9160/01 Informații importante
-
-
Philips HP4668/00 Manual de utilizare