Akai ACR-1001 Manual de utilizare
- Categorie
- Ceasuri cu alarmă
- Tip
- Manual de utilizare

MANUALUL UTILIZATORULUI
ACR-3888
Radio ceas cu proiectie

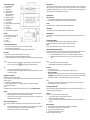
Componente
1. Buton PROIECTIE
2. Buton ON/OFF
3. Buton FM/USB
4. Buton TIME/SET/M+
5. Buton SNOOZE/ SLEEP/
DISPLAY HIGH/LOW/OFF
PAUSE/PLAY
6. Buton HOUR/TU- /PREV
7. Buton MIN/TU+/NEXT
8. Buton AL1/VOL-
9. Buton AL2/VOL+
10. Inel proiectie (pentru ajustarea unghiului)
11. PROIECTOR
12. Afisaj LED
13. Redare port USB
14. Iesire cablu incarcare USB
Panou spate
15. Compartiment baterii (rezerva alimentare)
16. Conectare sursa curent DC 5V
17. Control focalizare
18. Difuzor
19. Antena dipol
Prima utilizare a aparatului/Introducere
• Selectati un loc potrivit pentru asezarea aparatului. Este potrivita o suprafata uscata, dreapta si antiderapanta.
• Asigurati-va ca aparatul este ventilat suficient!
• In toate modurile, afisajul se comuta automat in/la afisarea orei dupa circa 10 secunde.
Alimentarea
1. Asigurati-va ca reteaua de joasa tensiune corespunde configurarilor de pe eticheta energetica.
2. Conectati cablul de alimentare al unitatii la o priza impamantata, instalata corespunzator.
3. Conectati dispozitivul la sursa de curent prin introducerea mufei cablului de alimentare la intrarea “DC 5V”.
Atentie:
• Acest dispozitiv ar trebui folosit doar cu sursa principala de alimentare la curent (inclusa). Nu o folositi
pentru alte dispozitive.
• Folositi doar o sursa de alimentare de 5V ( ). O alt fel de sursa de alimentare poate strica aparatul.
Nota
• Deconectati aparatul de la sursa principala de curent daca nu-l folositi perioade indelungate.
• Daca nu ati introdus baterii de rezerva, ora si postul de radio memorate nu se vor salva in cazul intreruperii
alimentarii cu energie.
Introducerea bateriilor de rezerva
(Bateriile nu sunt incluse la livrare)
In cazul intreruperilor de curent sau in cazul in care cablul de alimentare este scos din priza, setarile sunt pastrate doar
daca sunt introduse baterii de rezerva.
1. Deschideti compartimentul pentru baterii aflat in partea de jos.
2. Introduceti doua baterii de tip AAA/R031.5V. Verificati daca polaritatea este corecta (vezi compartimentul pentru
baterii).
3. Inchideti compartimentul pentru baterii.
Atentionare:
Bateriile nu trebuie expuse la caldura excesiva, cum ar fi razele solare, foc sau altele similare. Pericol de explozie!
ATENTIE:
• Din baterii se poate scurge acid. Daca aparatul nu este folosit pentru o perioada indelungata de timp,
scoateti bateriile.
• Nu trebuie folosite impreuna tipuri diferite de baterii sau baterii noi si folosite.
• Bateriile nu trebuie aruncate impreuna cu deseurile casnice. Aruncati bateriile la centrele de colectare sau
la dealer-ul dumneavoastra.
Mufa USB pentru incarcare
Puteti incarca telefonul mobil prin aceasta mufa. Folositi cablul USB al telefonului dumneavoatra pentru conectare.
Nota:
• Datorita faptului ca telefoanele mobile de azi sunt diferite, si capacitatea lor de incarcare este diferita,
durata de incarcare depinde de telefonul mobil folosit si conditiile sale de operare.
• Nu este posibila redarea fisierelor audio prin acest conector.
Redare prin port USB
Acest dispozitiv a fost dezvoltat in concordanta cu ultimele progrese tehnice in materie de USB. Gama larga de
dispozitive de memorare pe USB care se afla in prezsnt pe piata, din pacate nu ne permite sa garantam compatibilitate
completa cu toate dispozitivele de memorare USB. Din acest motiv, in cazuri rare pot aparea probleme in redarea
fisierelor de pe dispozitive de memorare USB. Acest lucru nu reprezinta o defectiune a dispozitivului.
Comenzi generale
Pornirea/oprirea dispozitivului
• Puteti comuta dispozitivul intre modul standby si radio, cu ajutorul butonului ON/OFF.
• Pentru a deconecta complet unitatea de la sursa principala de alimentare, scoateti cablul de alimentare din priza.
Volum
Prin apasarea butoanelor AL1/VOL− / AL2/VOL+ puteti regla volumul dorit.
Butonul FM/USB
Apasati butonul FM/USB pana cand apare pe afisaj modul dorit de operare.
Luminozitate afisaj
In modul de afisare, folositi butonul DISPLAY/HIGH/LOW/OFF pentru a regla luminozitatea afisajului. Selectati din:
luminos, intunecat si oprit.
Setarea orei (in standby)
1. Tineti apasat butonul TIME/SET/M+ pentru scurt timp. Indicatorul pentru ora incepe sa licare.
2. Setati ora cu ajutorul butonului HOUR/TU– si minutele cu ajutorul butonului MIN/TU+.
NOTA:
Daca nu apasati butonul in 4 secunde, setarile sunt acceptate automat.
Buton SNOOZE/SLEEP (inchidere intarziata)
Cand dispozitivul este pornit, puteti seta ora, dupa care dispozitivul va porni in modul standby; setati ora in interval de
10 minute, de la 90 la 10 minute. Aparatul se va opri automat dupa setarea orei.
1. Apasati butonul SNOOZE/SLEEP timp de 2 seconds. Pe afisaj va aparea notificarea “90”.
2. Apasati butonul in mod repetat pentru a reduce timpul in trepte de cate 10. Setarea “OFF” dezactiveaza
functia.
NOTA:
• Pentru a activa timpul ramas, apasati scurt butonul.
• Cand se activeaza, punctul luminos de pe afisaj din dreptul functiei “SLEEP” se lumineaza.
Mod Radio
1. Desfasurati complet firul antenei.
2. Apasati butonul FM/USB. se va aprinde un punct luminos pe afisaj, in dreptul functiei FM (modulatie de
frecventa).
3. Cautarea posturilor de radio:
Apasati scurt butoanele MIN/TU+ / HOUR/TU–, pana cand ati gasit postul de radio pe care-l cautati. Postul
presetat: Tineti apasat butonul TIME SET/M+ timp de aproximativ 3 seconds. Selectati o locatie presetata cu
ajutorul butoanelor MIN/TU+ / HOUR/TU–. Presetati butonul TIME SET/M+ inca o data. Postul de radio este
presetat.
NOTA:
• Daca receptia este prea slaba si exista interferente la postul de radio receptionat, incercati sa imbunatatiti receptia
prin schimbarea pozitiei si desfasurarea sau infasurarea antenei.
Selectarea postului de radio presetat
In modul de operare radio, apasati repetat butonul TIME/SET/M+ sau apasati butoanele MIN/TU+ / HOUR/TU-. Se vor
activa posturile de radio presetate, unul dupa altul.
Proiectia
Puteti folosi acest aparat cu proiectia orei pe perete sau pe tavan.
• Puteti porni sau opri aceasta functie cu ajutorul butonului PROJECTION.
• Rotiti PROIECTORUL in pozitia dorita.
• Partea spate a proiectorului are rotita pentru focalizare, cu ajutorul careia puteti sa reglati claritatea proiectiei.
Modul de redare USB
1. Apasati butonul FM/USB. Selectati functia USB si pe afisaj va aparea “USB”.
2. Introduceti USB in postul de redare pentru USB si muzica va incepe redarea.
3. Apasati butonul PREV pentru a reda ultimul cantec.

4. Apasati butonul NEXT pentru a reda urmatorul cantec.
5. Apasati butonul PAUSE pentru a pune melodia pe pauza.
Functia alarma
Informatii generale
• Doriti sa fiti trezit pe radio? Intai setati un post de radio. Aparatul se comuta pe ultimul post de radio FM setat.
• Cand s-a ajuns la timpul de alarma setat, in dreptul functiei “BUZZER AL1” sau “RADIO AL1” si/sau “BUZZER
AL2” sau “RADIO AL2” apare un punct care licare.
Setarea alarmei (in modul standby)
Puteti seta doua ore pentru alarma. Procedati dupa cum urmeaza:
1. Tineti apasat butonul AL1/VOL− timp de aproximativ 3 secunde. Indicatorul luminos incepe sa licare.
2. Setati orele cu ajutorul butonului HOUR/TU– si minutele cu ajutorul butonului MIN/TU+.
3. Apoi folositi butonul AL1/VOL− pentru a selecta modul in care doriti sa fiti trezit. Selectati intre:
• Buzzer (AL1 BUZZER):
Un sunet de tip “buzzer” se declanseaza cand se ajunge la ora setata. Volumul buzzer-ului nu poate fi reglat.
• Ultima frecventa de radio auzita (AL1 RADIO):
In momentul in care ora setata pentru alarma este afisata, radio-ul se porneste. Se reda ultimul post de
radio setat, la ultimul volum setat.
4. Dupa ce ati facut setarea, alarma selectata va licari timp de 3 secunde. Ora pentru alarma este memorata. Apoi
se va afisa ora curenta.
Pentru a seta a doua ora pentru alarma, repetati pasii de mai sus cu ajutorul butonului AL2/VOL+.
NOTA:
• In cazul in care exista o ora activata pentru alarma, se va aprinde un punct luminos in dreptul functiei “AL1
BUZZER/ AL1 RADIO“ si/sau “AL2 BUZZER/ AL2 RADIO“.
• Daca nu apasati butonul in 4 secunde, setarile sunt acceptate automat.
• Functionarea alarmei se opreste dupa aproximativ 60 de minute si aparatul se inchide.
Oprirea alarmei
Pentru a opri semnalul alarmei pana in ziua urmatoare, apasati butonul ON/OFF.
Interval automat pentru alarma
Functia de setare automata a alarmei poate fi oprita timp de aproximativ 9 minute cu ajutorul butonului
SNOOZE/SLEEP.
NOTA:
Daca functia este activata, punctul luminos din dreptul functiei “AL1 BUZZER” / AL1 RADIO” si/sau “AL2 BUZZER /
AL2 RADIO” va licari.
Dezactivarea functiei alarma (in modul standby)
Apasati butonul AL1/VOL− or AL2/VOL+ pana cand punctul luminos din dreptul functiei “AL1 BUZZER/ AL1 RADIO”
si/sau “AL2 BUZZER/AL2 RADIO” se stinge.
Date tehnice
Model: CT-3888
Alimentare: DC 5V, 1A
Consum: 5W
Baterii de rezerva: 2x 1.5V, AAA, R03
Gama de frecvente: FM 87.5 ~ 108.0MHz
Adaptor extern
Intrare: AC 100−240V, 50/60Hz, 0.18A
Iesire: DC 5V/1A
Polaritate:
Clasa de protectie: II
Ne rezervam dreptul de a face modificari tehnice si de design in decursul dezvoltarii continue a produsului.
Acest dispozitiv este in concordanta cu directivele CE, cum ar fi directive pentru compatibilitatea electromagnetica si
joasa tensiune si este fabricat in conformitate cu ultimele norme de siguranta.
INSTRUCTIUNI IMPORTANTE DE SIGURANTA
Atentionare:
1. Nu asezati pe aparat surse de foc deschis, cum ar fi lumanari aprinse.
2. Trebuie sa tineti cont de aspectele legate de protejarea mediului inconjurator atunci cand aruncati bateriile.
3. Nu instalati acest echipament intr-un spatiu inchis, cum ar fi un raft de biblioteca sau o unitate similara si sa
aiba conditii bune de ventilare. Ventilarea nu trebuie impiedicata prin acoperirea gaurilor de ventilatie cu
obiecte precum ziare, fete de masa, draperii etc.
4. ATENTIONARE: Folositi doar accesoriile specificate sau furnizate de producator.
5. ATENTIONARE: Puteti afla informatii referitoare la electricitate si siguranta, aflate pe eticheta din partea
exterioara a aparatului.
6. ATENTIONARE: Pentru a reduce riscul de incendiu sau electrocutare, nu expuneti aparatul la ploaie sau
umezeala. Aparatul nu va fi stropit si nici nu se vor aseza pe el obiecte pline cu lichide, cum ar fi vaze.
7. ATENTIONARE: Bateria (bateria, bateriile sau setul de baterii) nu trebuie expusa la caldura excesiva, cum
ar fi razele soarelui, foc sau altele similare.
8. ATENTIONARE: Adaptorul de alimentare este folosit ca dispozitiv de deconectare, aparatul deconectat va
fi inoperabil.
9. Cand nu il folositi sau in timpul miscarii, va rugam sa aveti grija de cablul de alimentare. Cand incepeti sa-l
folositi din nou, asigurati-va ca nu aveti avariat cablul de alimentare, iar daca acesta este avariat, va rugam
sa va adresati service-ului pentru a inlocui cablul, cu unul specificat de producator sau care are aceleasi
caracteristici cu cel original.
10. Folositi aparatul in medii ambiante moderate.
11. Aruncarea corecta a acestui produs. Acest symbol indica faptul ca produsul nu trebuie aruncat impreuna
cu alte deseuri casnice in niciun teritoriu UE. Pentru a preveni posibile daune aduse mediului inconjurator
sau sanatatii umane din cauza deseurilor aruncate incontrolabil, va rugam sa reciclati acest aparat intr-un
mod corespunzator, pentru a promova sustenabilitatea refolosirii resurselor materiale. Pentru a returna
aparatul folosit, va rugam sa folositi sistemul de returnare si colectare sau contactati comerciantul de unde
a fost achizitionat produsul. Acestia pot prelua produsul pentru reciclarea in siguranta.
12. Acest echipament face parte din Clasa II sau este un apparat electric dublu izolat. A fost
proiectat in asa fel incat nu solicita conectare sigura la impamantare.
Reciclarea echipamentelor electrice si electronice uzate
Acest simbol prezent pe produs sau pe ambalaj semnifica faptul ca produsul respectiv nu
trebuie tratat ca un deseu menajer obisnuit. Nu aruncati aparatul la gunoiul menajer la
sfarsitul duratei de functionare, ci duceti-l la un centru de colectare autorizat pentru reciclare.
In acest fel veti ajuta la protejarea mediului inconjurator si veti putea impidica eventualele
consecinte negative pe care le-ar avea asupra mediului si sanatatii umane.
Pentru a afla adresa celui mai apropiat centru de colectare :
- Contactati autoritatile locale ;
- Accesati pagina de internet: www.mmediu.ro
- Solicitati informatii suplimentare de la magazinul de unde ati achizitionat produsul

USER MANUAL
ACR-1001
Projection Clock Radio

Overview of the Components
15. PROJECTION button
16. ON/OFF button
17. FM/USB button
18. TIME/SET/M+ button
19. SNOOZE/ SLEEP/
DISPLAY HIGH/LOW/OFF
PAUSE/PLAY button
20. HOUR/TU- /PREV button
21. MIN/TU+/NEXT button
22. AL1/VOL- button
23. AL2/VOL+ button
24. PROJECTION RING (for angle adjustment)
25. PROJECTOR
26. LED display
27. USB playback port
28. USB-OUT CHARGE charging socket
Back side
15. Battery compartment (power reserve)
16. DC 5V power supply connection
17. Focus control
18. Speaker
19. Dipole antenna
First Use of the Device /Introduction
• Select a proper place for the device. A dry, level and slip proof surface is suitable.
• Make sure the device is vented sufficiently!
• In all modes, the display automatically switches to the time display after about 10 seconds.
Power supply
4. Make sure the grid voltage corresponds to the figures on the rating plate.
5. Plug the power supply unit into a properly installed protective contact socket.
6. Connect the device with the power supply unit by plugging the jack of the power supply unit into the “DC 5V” jack.
Caution:
• This device should only be used with the mains supply unit (included). Do not use it for other devices.
• Only use a 5V power supply unit ( ). A different supply unit may damage the device.
Note
• Disconnect from mains power supply during longer periods of non-use.
• If you did not insert another reserve battery, the time and the station memory will be lost as soon as the
power supply is interrupted.
•
Inserting the reserve batteries
(Batteries are not included in the scope of delivery)
In case of power failure or if the power supply unit is pulled from the plug, the settings are maintained if the reserve
batteries are inserted.
5. Open the battery compartment on the bottom side.
6. Insert two type AAA/R031.5Vbatteries. Check that the polarity is correct (see battery compartment).
7. Close the battery compartment.
Warning:
The batteries shall not be exposed to excessive heat such as sunshine, fire or the like. Danger of explosion!
CAUTION:
• Batteries can leak battery acid. If the device is out of use for a long period of time, remove the batteries.
• Different battery types or new and used batteries must not be used together.
• Batteries are not to be disposed of together with domestic wastes. Dispose of the used batteries at the
relevant collection bin or at your dealer’s.
USB-OUT CHARGE Charging Socket
You can charge your Smart phone through this jack. Use the USB cable of your Smart phone for the connection.
Note:
• Due to the different Smart phone types that are offered today, and their different charging capacities, the
loading duration is dependent on the Smart phone used and its operating condition.
• A playback of audio-files through this connector is not possible.
USB playback port
This device has been developed in line with the latest technical advances in the USB field. The wide range of different
USB storage devices of all types which are currently on the market, unfortunately do not allow us to guarantee full
compatibility with all USB storage devices. For this reason, in rare cases there may be problems in playing back files
from USB storage devices. This is not a malfunction of the device.
General Operation
Switch device on/off
• You can toggle the device between standby and radio mode with the ON/OFF button.
• To disconnect the unit completely from the mains, pull the mains plug from the socket.
Volume
By pressing the AL1/VOL− / AL2/VOL+ buttons you can adjust the desired volume.
FM/USB button
Press the FM/USB button until the desired operating mode is shown on the display.
Display Brightness
In time display mode, use the DISPLAY/HIGH/LOW/OFF button to adjust the display brightness. Select from: Light,
dark and off.
Setting the time (in standby)
3. Keep the TIME/SET/M+ button pressed for a short time. The time indicator begins to flash.
4. Set the hours with the HOUR/TU– button and the minutes with the MIN/TU+ button.
NOTE:
If you do not press a button within 4 seconds, the settings are automatically accepted.
SNOOZE/SLEEP button (Delayed switch-off)
When the device is switched on, you can set the time after which the device will turn into standby mode; set the time in
10 minutes’ intervals from 90 to 10 minutes. The device will turn off automatically after the preset time.
3. Press the SNOOZE/SLEEP button for 2 seconds. The notification “90” will appear in the display.
4. Press the button repeatedly to reduce the time in steps of 10. The “OFF” setting deactivates the
function.
NOTE:
• To call up the still remaining time, press the button briefly.
• When activated the dot in the display next to “SLEEP” is illuminated.
Radio Mode
4. Fully uncoil the wire antenna.
5. Press FM/USB button. A dot lights up on the display next to FM (frequency modulation)
6. Search for radio stations:
Briefly press the MIN/TU+ / HOUR/TU– buttons, until you have found the radio station which you are looking for.
Preset station: Keep the TIME SET/M+ button pressed for approx. 3 seconds. Select a preset location with the
buttons MIN/TU+ / HOUR/TU–. Preset the TIME SET/M+ button one more. The station is preset.
NOTE:
• If the reception is too weak and there is interference on the received station, try to improve the reception by
altering the position and uncoiling or coiling the antenna.
Select the preset radio station
While in radio operation, repeatedly press the TIME/SET/M+ button or press the buttons MIN/TU+ / HOUR/TU-. One
preset location after the other will be called up.
Projection
You can use this unit to project the time onto a wall or the ceiling.
• You can switch this function on and off with the PROJECTION button
• Swivel the PROJECTOR to the desired position.
• The back side of the projector has the FOCUS setting wheel with which you can adjust the sharpness of the
projection.
USB Playback Mode
6. Press FM/USB button. Select USB function and “USB” will appear on the LED display.
7. Insert USB into USB playback port and music will begin to play.
8. Press the PREV button to backward to last song.
9. Press the NEXT button to forward to next song.
10. Press PAUSE button to pause the song.

Alarm Function
General Information
• You’d like to be woken up by radio? First set a station. The deice switches on the last FM radio station that was
set.
• When the alarm time is reached, a dot flashes next to “BUZZER AL1” or “RADIO AL1” and/or “BUZZER AL2” or
RADIO AL2”.
Setting of the Alarm (in standby mode)
You can set two alarm times. Proceed as follows:
4. Keep the AL1/VOL− button pressed for approx.3 seconds. The indicator begins to flash.
5. Set the hours with the HOUR/TU– button and the minutes with the MIN/TU+ button.
6. Then use the AL1/VOL− button to select how you want to be woken up. Select from:
• Buzzer (AL1 BUZZER):
A buzzer sounds when the alarm time is reached. The volume of the buzzer cannot be adjusted.
• Last heard radio frequency (AL1 RADIO):
As soon as your set alarm time is shown, the radio switches on. The last tuned FM station plays at the last
set volume.
8. After you have made the setting, the selected alarm time flashes for ca.3seconds. The alarm time is stored. Then
the current time is displayed.
To set the second alarm time, repeat the above steps with the AL2/VOL+ button.
NOTE:
• In case of an activated alarm time, a dot will light up at “AL1 BUZZER/ AL1 RADIO“ and/or at “AL2
BUZZER/ AL2 RADIO“.
• If you do not press a button within 4 seconds, the settings are accepted automatically.
• The alarm function ends automatically after approx. 60 minutes and the device switches off.
Turning off the Alarm
To shut the alarm signal off until the next day, press the ON/OFF button.
Automatic Alarm Interval
The automatically set alarm function can be shut off for approximately 9 minutes with the SNOOZE/SLEEP button.
NOTE:
If the function is activated, the dot next to “AL1 BUZZER” / AL1 RADIO” and/or at “AL2 BUZZER / AL2 RADIO” will
flash.
Deactivate the Alarm Function (in standby mode)
Press AL1/VOL− or AL2/VOL+ until the dot at “AL1 BUZZER/ AL1 RADIO” and/or at “AL2 BUZZER/AL2 RADIO” goes
out.
Technical Data
Model: CT-3888
Power supply: DC 5V, 1A
Power consumption: 5W
Battery power reserve: 2x 1.5V, AAA, R03
Frequency range: FM 87.5 ~ 108.0MHz
External power adaptor
Input: AC 100−240V, 50/60Hz, 0.18A
Output: DC 5V/1A
Polarity:
Protection class: II
The right to make technical and design modifications in the course of continuous product development remains
reserved.
This device complies with all current CE directives, such as electromagnetic compatibility and low voltage directive and
is manufactured according to the latest safety regulations.
IMPORTANT SAFETY INSTRUCTIONS
Warning:
13. No naked flame sources, such as lighted candles, should be placed on the apparatus.
14. Attention should be drawn to environmental aspects of battery disposal.
15. Do not install this equipment in a confined or building-in space such as a book case or similar unit, and
remain a well ventilation conditions. The ventilation should not be impeded by covering the ventilation
openings with items such as newspaper, table-cloths, curtains etc.
16. WARNING: Only use attachments/accessories specified or provided by the manufacturer.
17. WARNING: Please refer the information on exterior bottom enclosure for electrical and safety information
before installing or operating the apparatus.
18. WARNING: To reduce the risk of fire or electric shock, do not expose this apparatus to rain or moisture.
The apparatus shall not be exposed to dripping or splashing and that objects filled with liquids, such as
vases, shall not be placed on apparatus.
19. WARNING: The battery (battery or batteries or battery pack) shall not be exposed to excessive heat such
as sunshine, fire or the like.
20. WARNING: The direct-plug switching adaptor is used as disconnect device, the disconnect device shall
remain readily operable.
21. When not in use and during movement, please take care of the power cord set. When put into use again,
please make sure the power cord set being not damaged, if any damages found, please look for the
service person to replace the power cord set specified by the manufacturer or have the same
characteristics as the original one.
22. Use of the apparatus in moderate climates.
23. Correct Disposal of this product. This marking indicates that this product should not be disposed with other
household wastes throughout the EU. To prevent possible harm to the environment or human health from
uncontrolled waste disposal, recycle it responsibly to promote the sustainable reuse of material resources.
To return your used device, please use the return and collection systems or contact the retailer where the
product was purchased. They can take this product for environmental safe recycling.
24. This equipment is a Class Ⅱ or double insulated electrical appliance. It has been designed in
such a way that it does not require a safety connection to electrical earth.
DISPOSAL OF ELECTRICAL AND ELECTRONIC EQUIPMENT
This symbol on the product or packaging means that the product should not be treated as household
waste. Do not throw garbage at the end of its life, but take it to a collection center for recycling. in this
way you will help to protect the environment and be able to prevent any negative consequences that
it would have on the environment and human health.
To find your nearest collection center:
-Contact local authorities
- Access the website: www.mmediu.ro
- Request additional information from the store where you purchased the product.
-
 1
1
-
 2
2
-
 3
3
-
 4
4
-
 5
5
-
 6
6


Akai ACR-1001 Manual de utilizare
- Categorie
- Ceasuri cu alarmă
- Tip
- Manual de utilizare
în alte limbi
- English: Akai ACR-1001 User manual