Philips GC2086/30 Manual de utilizare
- Categorie
- Fiare de călcat
- Tip
- Manual de utilizare
Acest manual este potrivit și pentru

Always there to help you
EasySpeed Plus Cordless
GC2078-GC2089 series
Specifications are subject to change without notice
© 2014 Koninklijke Philips N.V.
All rights reserved.
User manual
4239 000 95651

ENGLISH
c
d
g
h
i
e
f
b
a
m j
k
l
2 3 4
5
9
7 86
10 11 12 13
14
15 16 17
18

EasySpeed Plus Cordless GC2078-GC2089 series
ENGLISH 6
POLSKI 14
ROMÂNĂ 23
ΕΛΛΗΝΙΚΆ 32
ČEŠTINA 42
MAGYAR 50
SLOVENČINA 58
LIETUVIŲ 67
LATVIEŠU 75
EESTI 83
HRVATSKI 91
SLOVENŠČINA 99
БЪЛГАРСКИ 107
SRPSKI 116

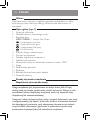
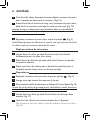
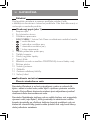
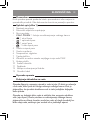
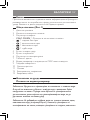
Important
Read the separate important information leaet and the user manual
carefully before you use the appliance. Save both documents for future
reference.
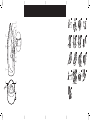
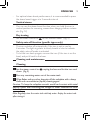
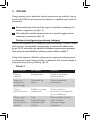
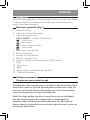
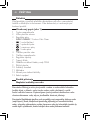
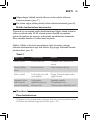
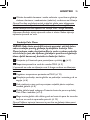
General description (Fig. 1)
1 Spray nozzle
2 Cap of lling opening
3 Steam control
- CALC CLEAN = Calc-Clean function
- = dry ironing
- = optimal steam
- = maximum steam
- = turbo steam
4 Steam boost button
5 Spray button
6 Temperature dial
7 Type plate
8 Water tank with MAX water level indication
9 Soleplate
10 Light ring
11 Base
12 Iron storage lock
13 Mains cord
Using the appliance
Filling the water tank
Note: Your appliance has been designed to be used with tap water. In case
you live in an area with hard water, fast scale build-up may occur. Therefore,
it is recommended to use distilled or de-mineralized water to prolong the
lifetime of your appliance.
Note: Do not add perfume, water from tumble dryer, vinegar, magnetically
treated water (e.g., Aqua+), starch, descaling agents, ironing aids, chemically
descaled water or other chemicals as they may cause water spitting, brown
staining, or damage to your appliance.
6 ENGLISH

7
ENGLISH
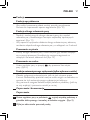
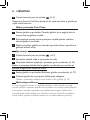
1 Set the steam control to position . (Fig. 2)
2 Fill the water tank up to the MAX indication (Fig. 3).
3 Closethecapofthellingopening.
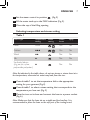
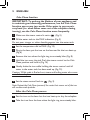
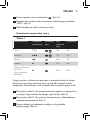
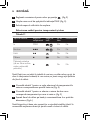
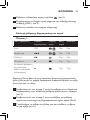
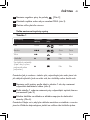
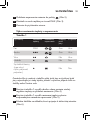
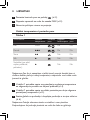
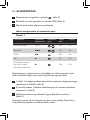
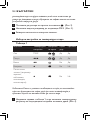
Selecting temperature and steam setting
Table 1
Fabric type Temperature
setting
Steam
setting
Steam
boost
Spray
Linen MAX
,
Yes Yes
Cotton
3
,
Yes Yes
Wool
2
No Yes
Silk
1
No No
Synthetic fabrics
(e.g. acrylic, nylon,
polyamide, polyester).
1
No No
Note: As indicated in the table above, do not use steam or steam boost at a
low temperature, otherwise hot water may leak from the iron.
1 Consult table 1 to set the temperature dial to the appropriate
setting for your garment (Fig 4)
2 Consult table 1 to select a steam setting that corresponds to the
temperature you have set. (Fig. 5)
3 Place the iron on its base and connect the base to a power socket.
(Fig 6.)
Note: Make sure that the base sits on a stable and level surface. It is
recommended to place the base on the soft part of the ironing board.

8
ENGLISH
4 Thelightringstartstoashbluelight,indicatingtheironisheating
up. (Fig 7.)
5 Whenthebluelightturnssteady,youcanstartironing.(Fig.8)
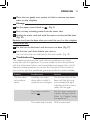
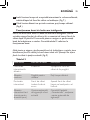
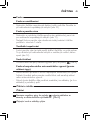
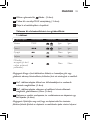
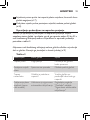
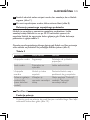
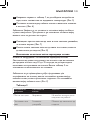
Operation of Smart Charging base
The iron is equipped with Smart Charging base. The light will indicate
thestatusoftheiron,andremindyoutochargetheironafter20to
25 seconds to ensure a good wrinkle removal performance. Please
refer to table 2 for the operation of the base.
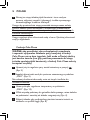
Note: to ensure good wrinkle removal performance, always put the iron on
its base during the resting period. Do not place the iron on its heel. (Fig.9)
Table 2
Light status Iron status Instructions
Flashing blue Heating up Wait for iron to be ready.
Steady blue Ready for use You can start ironing.
Flashing orange The iron needs to
be charged now
Put the iron back to the
base to charge it.
Slow breathing
blue (specic
types only)
Safety auto-off has
been activated
Refer to Chapter
“Features”, section “safety
auto-off”.
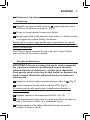
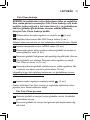
Features
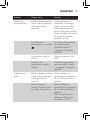
Spray function
- Press the spray button to moisten the garment to be ironed. This
helps remove stubborn creases (Fig. 10).
Steam boost function
- Press and release the steam boost button for a powerful boost of
steam to remove stubborn creases (Fig. 11).

9
ENGLISH
- For optimal steam boost performance, it is recommended to press
the steam boost trigger at a 5 seconds interval.
Vertical steam
- You can use the steam boost function when you hold the iron in
vertical position for removing creases from hanging clothes, curtains
etc. (Fig. 12)
Dry ironing
- Set the steam control to to iron without steam. (Fig. 2)
Safety auto-off function (specic types only)
- The iron switches off automatically if the iron is not in use for
8 minutes. The light ring starts to slowly breath in blue to indicate
the safety auto-off mode is activated.
- To let the iron heat up again, remove the iron (if the iron is on the
base) and put it back to the base.
Cleaning and maintenance
Cleaning
1 Set the steam control to ,unplugthebaseandlettheironcool
down. (Fig. 2)
2 Pour any remaining water out of the water tank.
3 Wipeakesandanyotherdepositsoffthesoleplatewithadamp
cloth and a non-abrasive (liquid) cleaning agent.
Caution:Tokeepthesoleplatesmooth,avoidhardcontactwithmetal
objects.Neveruseascouringpad,vinegarorotherchemicalstoclean
the soleplate.
Note: Regularly rinse the water tank with tap water. Empty the water tank
after rinsing it.

10
ENGLISH
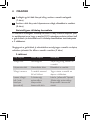
Calc-Clean function
IMPORTANT: To prolong the lifetime of your appliance and
to maintain good steaming performance, use the Calc-Clean
function once every two weeks. If the water in your area is
very hard (i.e. when akes come out of the soleplate during
ironing), use the Calc-Clean function more frequently.
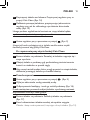
1 Make sure the steam control is set to . (Fig. 2)
2 Fill the water tank to the MAX indication. (Fig. 3)
Do not pour vinegar or other descaling agents into the water tank.
3 Set the temperature dial to MAX. (Fig. 13)
4 Pluginthebase,puttheirononthebaseandlettheironheatup.
(Fig. 6)
5 Remove the iron when the light ring turns steady blue. (Fig. 8)
6 Hold the iron over the sink. Push the steam control to the Calc-
Clean position and hold it. (Fig. 14)
7 Gently shake the iron while holding the steam control until all
water in the water tank has been used up. (Fig. 15)
Caution:Whilescaleisushedout,steamandboilingwateralsocome
out of the soleplate.
8 Set the steam control back to . (Fig. 2)
Note: Repeat the Calc-Clean process if the water that comes out of the iron
still contains scale particles.
After the Calc-Clean process
1 Put the iron on the base. Let the iron heat up to dry the soleplate.
2 Take the iron from the base when the light ring turns steady blue.

11
ENGLISH
3 Move the iron gently over a piece of cloth to remove any water
stains on the soleplate.
Storage
1 Set the steam control back to . (Fig. 2)
2 Pour out any remaining water from the water tank.
3 Unplug the mains cord and wind the mains cord around the base.
(Fig. 16)
Removeironfromthebasewhenyouwindthecord,asthesoleplate
could still be hot.
4 Put the iron on the base. Lock the iron to its base. (Fig. 17)
5 Let the iron cool down before you store it.
You can carry the iron and base by the iron handle. (Fig. 18)
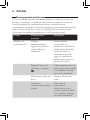
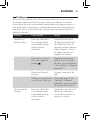
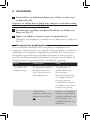
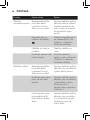
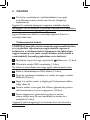
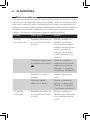
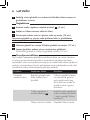
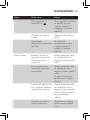
Troubleshooting
This chapter summarises the most common problems you could
encounter with the appliance. If you are unable to solve the problem
with the information below, visit www.philips.com/support for a list of
frequently asked questions or contact the Consumer Care Centre in
your country (see the worldwide guarantee leaet for contact details).
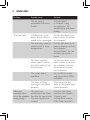
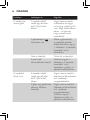
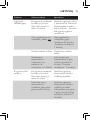
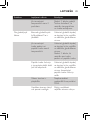
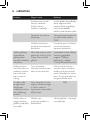
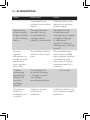
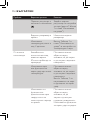
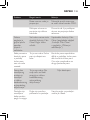
Problem Possible cause Solution
The iron does
not produce
steam.
Cordless iron cools
down after a while. It
needs to be recharged.
Put the iron back to the
base until the light ring
turns steady blue light,
indicating that the iron is
ready for use again.
The steam control is
set to .
Set the steam control to
a steam setting (consult
Table 1 in Chapter “using
the appliance”).
The water tank is empty. Fill the water tank.

12
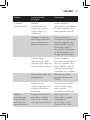
ENGLISH
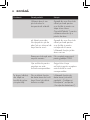
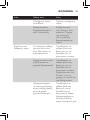
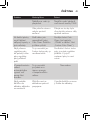
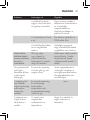
Problem Possible cause Solution
You are using a
temperature of below
2 dots.
Consult Table 1
in Chapter “using
the appliance” for
temperature and steam
setting.
The iron leaks. Cordless iron cools
down after a while. It
needs to be recharged.
Put the iron back to its
base to heat up and dry
the soleplate.
You are using steam or
steam boost at a low
temperature.
Put the iron back to its
base to heat up and dry
the soleplate.
Consult Table 1 for use
of steam and steam
boost.
You have used the
steam boost function
too often within a very
short period.
Put the iron back to its
base to heat up and dry
the soleplate. Use the
steam boost function
less frequently.
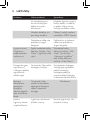
The water tank is
overlled.
Do not ll the water
tank beyond the MAX
indication.
The door of lling
opening is not closed
properly.
Make sure that the
door of lling opening is
closed properly.
Flakes and
impurities come
out of the soleplate
during ironing.
You have not
performed Calc-Clean
function for some time.
The iron need to be
cleaned.
Use the Calc-Clean
function (see chapter
‘Cleaning and
maintenance’, section
‘Calc-Clean function’).

13
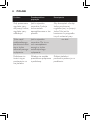
ENGLISH
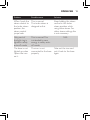
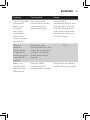
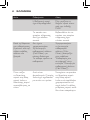
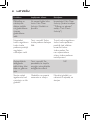
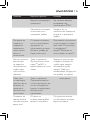
Problem Possible cause Solution
When I push the
steam control to
the turbo steam
position, the
steam control
jumps back.
This is normal.
The turbo steam is
designed as this.
Keep holding the steam
control in the turbo
steam position while
using turbo steam. For
other steam settings, this
is not necessary.
Only part of
the light ring is
lighted in safety
auto-off mode.
This is normal. This
is intended to save
energy in safety auto-
off mode.
N/A
The base is not
lighted up when
I place the iron
on it.
The iron is not
connected to the base
properly.
Take out the iron and
put it back to the base
again.

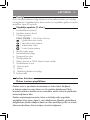
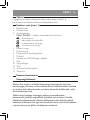
Ważne
Przed pierwszym użyciem urządzenia zapoznaj się dokładnie z ulotką
informacyjną oraz instrukcją obsługi. Zachowaj oba dokumenty na
przyszłość.
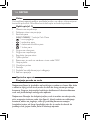
Opis ogólny (rys. 1)
1 Dysza spryskiwacza
2 Nasadka otworu wlewowego wody
3 Regulator pary
- CALC CLEAN = funkcja Calc-Clean
- = prasowanie na sucho
- = optymalna ilość pary
- = maksymalna ilość pary
- = funkcja turbo
4 Przycisk silnego uderzenia pary
5 Przycisk spryskiwacza
6 Pokrętło regulatora temperatury
7 Tabliczka znamionowa
8 Zbiorniczek wody ze wskaźnikiem poziomu wody „MAX”
9 Stopa
10 Podświetlany pierścień
11 Podstawa
12 Blokada do przechowywania żelazka
13 Przewód sieciowy
Zasady używania urządzenia
Napełnianie zbiorniczka wody
Uwaga: urządzenie jest przystosowane do wody z kranu. Jeśli w Twojej
okolicy woda jest twarda, szybko może osadzić się kamień. Dlatego, w celu
przedłużenia okresu eksploatacji urządzenia, zaleca się używanie wody
destylowanej lub zdemineralizowanej.
Uwaga: nie należy dodawać perfum, wody z suszarek bębnowych, octu, wody
namagnetyzowanej (np. Aqua+), krochmalu, środków do usuwania kamienia
lub ułatwiających prasowanie, wody odwapnionej chemicznie ani żadnych
innych środków chemicznych, gdyż może to spowodować wyciek wody,
powstawanie brązowych plam lub uszkodzenie urządzenia.
14 POLSKI

15
POLSKI
1 Ustawregulatorparywpołożeniu . (Rys. 2)
2 Napełnijzbiorniczekwodądopoziomuoznaczonegosymbolem
„MAX”. (Rys. 3)
3 Załóżnasadkęnaotwórwlewowywody.
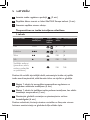
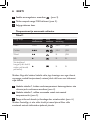
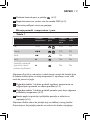
Ustawianie temperatury i pary
Tabela 1
Rodzajmateriału Ustawienie
temperatury
Ustawienie
pary
Silne
uderzenie
pary
Spryskiwacz
Linen MAX
,
Tak Tak
Bawełna
3
,
Tak Tak
Wełna
2
Nie Tak
Jedwab
1
Nie Nie
Tkaniny sztuczne
(np. akryl,
nylon, poliamid,
poliester)
1
Nie Nie
Uwaga: zgodnie z informacjami podanymi w powyższej tabeli, nie używaj
funkcji pary ani silnego uderzenia pary w przypadku wybrania niskiej
temperatury. W przeciwnym razie z żelazka może wyciekać gorąca woda.
1 Skorzystajztabeli1,abyustawićpokrętłoregulatoratemperatury
wpozycjiodpowiedniejdladanegotypuubrania.(Rys.4)
2 Skorzystajztabeli1,abywybraćustawienieparyodpowiadające
wybranejtemperaturze.(Rys.5)
3 Postawżelazkonapodstawieipodłączjądogniazdka
elektrycznego.(Rys.6)

16
POLSKI
Uwaga: upewnij się, że podstawa została umieszczona na stabilnej i równej
powierzchni. Zaleca się umieszczenie podstawy na miękkiej części deski do
prasowania.
4 Podświetlanypierścieńzaczniemigaćnaniebiesko,wskazując,że
żelazkorozgrzewasię.(Rys.7)
5 Gdyniebieskieświatłozacznieświecićwsposóbciągły,możesz
rozpocząćprasowanie.(Rys.8)
Działanie inteligentnej podstawy ładującej
Żelazkojestwyposażonewinteligentnąpodstawęładującą.Wskaźnikbędzie
informowaćostanieżelazkaiprzypominaćokoniecznościnaładowania
gopo20–25sekundach,abyzapewnićdokładnerozprasowaniezagnieceń.
Informacjenatematdziałaniapodstawymożnaznaleźćwtabeli2.
Uwaga: aby zapewnić dokładne rozprasowanie zagnieceń, podczas przerw
w prasowaniu zawsze stawiaj żelazko na podstawie. Nie stawiaj żelazka w
pozycji pionowej (poza podstawą). (Rys. 9)
Tabela 2
Stanwskaźnika Stanżelazka Instrukcje
Miga na
niebiesko
Rozgrzewanie Zaczekaj, aż żelazko
będzie gotowe.
Świeci na
niebiesko w
sposób ciągły
Gotowość do
użycia
Można rozpocząć
prasowanie.
Miga na
pomarańczowo
Żelazko wymaga
naładowania
Postaw żelazko z
powrotem na podstawie,
aby je naładować.
Wolno miga
na niebiesko
(tylko wybrane
modele)
Tryb
automatycznego
wyłączenia jest
aktywny
Patrz rozdział „Funkcje”,
część „Funkcja
automatycznego
wyłączania”.

17
POLSKI
Funkcje
Funkcja spryskiwacza
- Aby zwilżyć prasowaną odzież, naciśnij przycisk spryskiwacza.
Pomoże to rozprasować oporne zagniecenia. (Rys. 10)
Funkcja silnego uderzenia pary
- Naciśnij i zwolnij przycisk silnego uderzenia pary, aby uzyskać
uderzenie pary umożliwiające usunięcie najbardziej uporczywych
zagnieceń. (Rys. 11)
- Aby zapewnić optymalne działanie silnego uderzenia pary, zalecamy
naciskanie włącznika silnego uderzenia pary w odstępach co 5 sekund.
Prasowanie w pionie
- Funkcji silnego uderzenia pary można używać, gdy żelazko znajduje
się w pozycji pionowej. Umożliwia to usunięcie zagnieceń na
wiszących ubraniach, zasłonach itd. (Rys. 12)
Prasowanie na sucho
- Ustaw regulator pary w pozycji , aby prasować bez użycia
pary. (Rys. 2)
Funkcja automatycznego wyłączania (tylko wybrane modele)
- Żelazko wyłącza się automatycznie, jeśli nie jest używane przez
8 minut. Podświetlany pierścień zaczyna wolno migać na niebiesko, co
oznacza, że tryb automatycznego wyłączenia jest aktywny.
- Aby ponownie rozgrzać żelazko, zdejmij żelazko z podstawy (jeśli się
na niej znajduje) i ponownie umieść je na niej.
Czyszczenie i konserwacja
Czyszczenie
1 Ustawregulatorparywpołożeniu ,wyjmijwtyczkępodstawyz
gniazdkaelektrycznegoizaczekaj,ażżelazkoostygnie.(Rys.2)
2 Wylejzezbiorniczkapozostałąwodę.

18
POLSKI
3 Zetrzyjzestopyżelazkapłytkikamieniaiinneosadyza
pomocąwilgotnejszmatkii(płynnego)środkaczyszczącego
niezawierającegośrodkówściernych.
Uwaga:abypowierzchniastopypozostałaniezarysowana,należy
chronićżelazkoprzedkontaktemzmetalowymiprzedmiotami.
Doczyszczeniastopyniewolnoużywaćczyścików,octuaniinnych
środkówchemicznych.
Uwaga: regularnie płucz zbiorniczek wodą z kranu. Opróżniaj zbiorniczek
wody po wypłukaniu.
Funkcja Calc-Clean
WAŻNE: aby przedłużyć okres eksploatacji urządzenia
i zapewnić optymalne działanie pary, korzystaj z funkcji
Calc-Clean raz na dwa tygodnie. Jeśli woda w Twojej okolicy
jest bardzo twarda (tzn. gdy podczas prasowania ze stopy
żelazka spadają płytki kamienia), z funkcji Calc-Clean należy
korzystać częściej.
1 Upewnijsię,żeregulatorparyzostałustawionywpozycji .
(Rys. 2)
2 Napełnijzbiorniczekwodądopoziomuoznaczonegosymbolem
„MAX”. (Rys. 3)
Niewlewajdozbiorniczkawodyoctuaniinnychśrodkówdo
usuwania kamienia.
3 Ustawpokrętłoregulatoratemperaturywpołożeniu
„MAX”. (Rys. 13)
4 Włóżwtyczkępodstawydogniazdkaelektrycznego,ustawżelazko
napodstawieizaczekaj,ażżelazkorozgrzejesię.(Rys.6)
5 Zdejmijżelazko,gdypodświetlanypierścieńzacznieświecićna
niebieskowsposóbciągły.(Rys.8)

19
POLSKI
6 Przytrzymajżelazkonadzlewem.Przytrzymajregulatorparyw
pozycjiCalc-Clean.(Rys.14)
7 Delikatniepotrząsajżelazkiem,przytrzymującjednocześnie
regulatorpary,ażdocałkowitegoopróżnieniazbiorniczka
wody. (Rys. 15)
Uwaga:podczaswypłukiwaniakamieniazestopyżelazkabędzie
wydostawaćsięrównieżparaigorącawoda.
8 Ustawregulatorparyzpowrotemwpozycji . (Rys. 2)
Uwaga: jeśli woda wydostająca się z żelazka nadal zawiera cząstki
kamienia, ponownie użyj funkcji Calc-Clean.
Po czyszczeniu przy użyciu funkcji Calc-Clean
1 Postawżelazkonapodstawie.Zaczekaj,ażżelazkorozgrzejesięi
stopa wyschnie.
2 Zdejmijżelazkozpodstawy,gdypodświetlanypierścieńzacznie
świecićnaniebieskowsposóbciągły.
3 Abyusunąćzaciekiwodne,któremogłypowstaćnastopieżelazka,
delikatnieprzeciągnijżelazkopokawałkutkaniny.
Przechowywanie
1 Ustawregulatorparyzpowrotemwpozycji . (Rys. 2)
2 Wylejzezbiorniczkawodypozostałąwodę.
3 Odłączprzewódzasilającyiowińgowokółpodstawy.(Rys.16)
Przednawinięciemprzewoduzdejmijżelazkozpodstawy,ponieważ
stopażelazkamożebyćnadalgorąca.
4 Postawżelazkonapodstawie.Zablokujżelazkonapodstawie.
(Rys. 17)
5 Przedodstawieniemżelazkazaczekaj,ażzupełnieostygnie.
Żelazko i bazę można przenosić, trzymając uchwyt żelazka. (Rys. 18)

20
POLSKI
Rozwiązywanie problemów
W tym rozdziale opisano najczęstsze problemy, z którymi można się
zetknąć, korzystając z urządzenia. Jeśli poniższe wskazówki okażą się
niewystarczające do rozwiązania problemu, odwiedź stronę
www.philips.com/support, na której znajduje się lista często zadawanych
pytań, lub skontaktuj się z Centrum Obsługi Klienta w swoim kraju
(informacje kontaktowe znajdują się w ulotce gwarancyjnej).
Problem Prawdopodobna
przyczyna
Rozwiązanie
Żelazko nie
wytwarza pary.
Żelazko
bezprzewodowe
stygnie po pewnym
czasie. Należy je
naładować.
Postaw żelazko
z powrotem na
podstawie i zaczekaj, aż
podświetlany pierścień
zacznie świecić na
niebiesko w sposób
ciągły, co oznacza, że
żelazko jest ponownie
gotowe do użytku.
Regulator pary jest
ustawiony w pozycji
.
Ustaw regulator pary w
pozycji pary (patrz tabela
1 w rozdziale „Zasady
używania urządzenia”).
Zbiorniczek wody jest
pusty.
Napełnij zbiorniczek
wody.
Ustawiono
temperaturę poniżej 2
kropek.
Informacje o
ustawieniach
temperatury i pary
można znaleźć w tabeli
1 w rozdziale „Zasady
używania urządzenia”.

21
POLSKI
Problem Prawdopodobna
przyczyna
Rozwiązanie
Z żelazka
wycieka woda.
Żelazko
bezprzewodowe
stygnie po pewnym
czasie. Należy je
naładować.
Postaw żelazko z
powrotem na podstawie,
aby się rozgrzało i aby
stopa żelazka wyschła.
Używasz funkcji pary
lub silnego uderzenia
pary z ustawieniem
niskiej temperatury.
Postaw żelazko z
powrotem na podstawie,
aby się rozgrzało i aby
stopa żelazka wyschła.
Skorzystaj z tabeli 1,
aby uzyskać informacje
na temat funkcji pary i
silnego uderzenia pary.
Funkcja silnego
uderzenia pary była
używana zbyt często w
bardzo krótkim czasie.
Postaw żelazko z
powrotem na podstawie,
aby się rozgrzało i aby
stopa żelazka wyschła.
Używaj funkcji silnego
uderzenia pary rzadziej.
Zbiorniczek wody jest
przepełniony.
Nie nalewaj wody
powyżej oznaczenia
„MAX”.
Klapka otworu
wlewowego wody nie
została prawidłowo
zamknięta.
Upewnij się, że klapka
otworu wlewowego
wody została
prawidłowo zamknięta.
Podczas
prasowania ze
stopy żelazka
wydostają się
zanieczyszczenia.
Przez pewien czas nie
korzystano z funkcji
Calc-Clean. Żelazko
wymaga wyczyszczenia.
Użyj funkcji Calc-
Clean (patrz rozdział
„Czyszczenie i
konserwacja”, część
„Funkcja Calc-Clean”).

22
POLSKI
Problem Prawdopodobna
przyczyna
Rozwiązanie
Gdy przesuwam
regulator pary
do pozycji turbo,
regulator pary
odskakuje.
Jest to zjawisko
normalne. Funkcja
turbo została
zaprojektowana w ten
sposób.
Aby skorzystać z funkcji
turbo, przytrzymaj
regulator pary w pozycji
turbo. Nie jest to
konieczne w przypadku
innych ustawień pary.
Tylko część
podświetlanego
pierścienia świeci
się w trybie
automatycznego
wyłączenia.
Jest to zjawisko
normalne. Ma to na
celu oszczędzanie
energii w trybie
automatycznego
wyłączenia.
nie dot.
Podstawa nie
świeci się po
postawieniu na
niej żelazka.
Żelazko nie zostało
prawidłowo połączone
z podstawą.
Zdejmij żelazko i
ponownie postaw je na
podstawie.
Pagina se încarcă...
Pagina se încarcă...
Pagina se încarcă...
Pagina se încarcă...
Pagina se încarcă...
Pagina se încarcă...
Pagina se încarcă...
Pagina se încarcă...
Pagina se încarcă...
Pagina se încarcă...
Pagina se încarcă...
Pagina se încarcă...
Pagina se încarcă...
Pagina se încarcă...
Pagina se încarcă...
Pagina se încarcă...
Pagina se încarcă...
Pagina se încarcă...
Pagina se încarcă...
Pagina se încarcă...
Pagina se încarcă...
Pagina se încarcă...
Pagina se încarcă...
Pagina se încarcă...
Pagina se încarcă...
Pagina se încarcă...
Pagina se încarcă...
Pagina se încarcă...
Pagina se încarcă...
Pagina se încarcă...
Pagina se încarcă...
Pagina se încarcă...
Pagina se încarcă...
Pagina se încarcă...
Pagina se încarcă...
Pagina se încarcă...
Pagina se încarcă...
Pagina se încarcă...
Pagina se încarcă...
Pagina se încarcă...
Pagina se încarcă...
Pagina se încarcă...
Pagina se încarcă...
Pagina se încarcă...
Pagina se încarcă...
Pagina se încarcă...
Pagina se încarcă...
Pagina se încarcă...
Pagina se încarcă...
Pagina se încarcă...
Pagina se încarcă...
Pagina se încarcă...
Pagina se încarcă...
Pagina se încarcă...
Pagina se încarcă...
Pagina se încarcă...
Pagina se încarcă...
Pagina se încarcă...
Pagina se încarcă...
Pagina se încarcă...
Pagina se încarcă...
Pagina se încarcă...
Pagina se încarcă...
Pagina se încarcă...
Pagina se încarcă...
Pagina se încarcă...
Pagina se încarcă...
Pagina se încarcă...
Pagina se încarcă...
Pagina se încarcă...
Pagina se încarcă...
Pagina se încarcă...
Pagina se încarcă...
Pagina se încarcă...
Pagina se încarcă...
Pagina se încarcă...
Pagina se încarcă...
Pagina se încarcă...
Pagina se încarcă...
Pagina se încarcă...
Pagina se încarcă...
Pagina se încarcă...
Pagina se încarcă...
Pagina se încarcă...
Pagina se încarcă...
Pagina se încarcă...
Pagina se încarcă...
Pagina se încarcă...
Pagina se încarcă...
Pagina se încarcă...
Pagina se încarcă...
Pagina se încarcă...
Pagina se încarcă...
Pagina se încarcă...
Pagina se încarcă...
Pagina se încarcă...
Pagina se încarcă...
Pagina se încarcă...
Pagina se încarcă...
Pagina se încarcă...
Pagina se încarcă...
Pagina se încarcă...
-
 1
1
-
 2
2
-
 3
3
-
 4
4
-
 5
5
-
 6
6
-
 7
7
-
 8
8
-
 9
9
-
 10
10
-
 11
11
-
 12
12
-
 13
13
-
 14
14
-
 15
15
-
 16
16
-
 17
17
-
 18
18
-
 19
19
-
 20
20
-
 21
21
-
 22
22
-
 23
23
-
 24
24
-
 25
25
-
 26
26
-
 27
27
-
 28
28
-
 29
29
-
 30
30
-
 31
31
-
 32
32
-
 33
33
-
 34
34
-
 35
35
-
 36
36
-
 37
37
-
 38
38
-
 39
39
-
 40
40
-
 41
41
-
 42
42
-
 43
43
-
 44
44
-
 45
45
-
 46
46
-
 47
47
-
 48
48
-
 49
49
-
 50
50
-
 51
51
-
 52
52
-
 53
53
-
 54
54
-
 55
55
-
 56
56
-
 57
57
-
 58
58
-
 59
59
-
 60
60
-
 61
61
-
 62
62
-
 63
63
-
 64
64
-
 65
65
-
 66
66
-
 67
67
-
 68
68
-
 69
69
-
 70
70
-
 71
71
-
 72
72
-
 73
73
-
 74
74
-
 75
75
-
 76
76
-
 77
77
-
 78
78
-
 79
79
-
 80
80
-
 81
81
-
 82
82
-
 83
83
-
 84
84
-
 85
85
-
 86
86
-
 87
87
-
 88
88
-
 89
89
-
 90
90
-
 91
91
-
 92
92
-
 93
93
-
 94
94
-
 95
95
-
 96
96
-
 97
97
-
 98
98
-
 99
99
-
 100
100
-
 101
101
-
 102
102
-
 103
103
-
 104
104
-
 105
105
-
 106
106
-
 107
107
-
 108
108
-
 109
109
-
 110
110
-
 111
111
-
 112
112
-
 113
113
-
 114
114
-
 115
115
-
 116
116
-
 117
117
-
 118
118
-
 119
119
-
 120
120
-
 121
121
-
 122
122


Philips GC2086/30 Manual de utilizare
- Categorie
- Fiare de călcat
- Tip
- Manual de utilizare
- Acest manual este potrivit și pentru
în alte limbi
- slovenčina: Philips GC2086/30 Používateľská príručka
- eesti: Philips GC2086/30 Kasutusjuhend
Lucrări înrudite
-
Philips GC4595/40 Manual de utilizare
-
Philips GC2045/40 Manual de utilizare
-
Philips GC3581/30 Manual de utilizare
-
Philips GC3580/20 Manual de utilizare
-
-
Philips GC1434/20 Manual de utilizare
-
Philips GC4595/40 Manual de utilizare
-
-
Philips GC1020/78 Manual de utilizare
-
Philips GC1029/90 Manual de utilizare