
IAN 407589_2207
THERMOSTAT-WANNENFÜLLARMATUR/THERMOSTAT-DUSCHARMA TUR/
THERMOSTATIC BATH MIXER TAP/THERMOSTATIC SHOWER MIXER/MITIGEUR
DE BAIGNOIRE THERMOSTATIQUE/MITIGEUR DE DOUCHE THERMOSTATIQUE
THERMOSTAT-W ANNENFÜLLARMATUR/
THERMOSTAT-DUSCHARMA TUR
Montage-, Bedienungs- und Sicherheitshinweise
THERMOSTATIC BATH MIXER TAP/
THERMOSTATIC SHOWER MIXER
Assembly, operating and safety instructions
TERMOSTATICKÁ VANOVÁ BATERIE/
TERMOSTATICKÁ SPRCHOVÁ BATERIE
Pokyny k montáži, obsluze a bezpečnostní pokyny
BATERIA WANNOWA Z TERMOSTATEM/
BATERIA PRYSZNICOWA Z TERMOSTATEM
Wskazówki montażu, obsługi i bezpieczeństwa
TERMOSTATSKA ARMATURA ZA KAD/
TERMOSTATSKA ARMATURA ZA PRHO
Navodila za montažo, uporabo in varnostna navodila
FÜRDŐKÁD CSAPTELEP/
ZUHANY CSAPTELEP
Szerelési, használati és biztonsági tudnivalók
BLANDINGSBATTERI TIL BADEKAR/
BLANDINGSBATTERI TIL BRUSER
Monterings-, betjenings- og sikkerhedshenvisninger
MISCELATORE PER VASCA DA BAGNO CON TERMOSTATO/
MISCELATORE PER DOCCIA CON TERMOSTATO
Istruzioni di montaggio, d’uso e di sicurezza
THERMOSTATISCHE BADVULKRAAN/
THERMOSTATISCHE DOUCHEKRAAN
Montage-, bedienings- en veiligheidsinstructies
MITIGEUR DE BAIGNOIRE THERMOSTATIQUE/
MITIGEUR DE DOUCHE THERMOSTATIQUE
Instructions de montage, d‘utilisation et consignes de sécurité
GRIFERÍA DE BAÑERA CON TERMOSTATO/
GRIFERÍA DE DUCHA CON TERMOSTATO
Instrucciones de montaje, de uso y de seguridad
BATÉRIA NA VAŇU S TERMOSTATOM/
SPRCHOVÁ BATÉRIA S TERMOSTATOM
Pokyny pre montáž, obsluhu a bezpečnostné pokyny
СМЕСИТЕЛ С ТЕРМОСТАТ ЗА ВАНА/
СМЕСИТЕЛ С ТЕРМОСТАТ ЗА ДУШ
Инструкции за монтаж, обслужване и безопасност
ΜΠΑΤΑΡΊΑ ΜΠΑΝΊΈΡΑΣ ΘΈΡΜΟΣΤΑΤΊΚΉ/
ΜΠΑΤΑΡΊΑ ΝΤΟΥΖΊΈΡΑΣ ΘΈΡΜΟΣΤΑΤΊΚΉ
Οδηγίες συναρμολόγησης, χειρισμού και ασφάλειας
MIJEŠALICA ZA KADU S TERMOSTATOM/
MIJEŠALICA ZA TUŠ S TERMOSTATOM
Upute za montažu, uporabu i sigurnost
BATERIE DE CADĂ CU TERMOSTAT/
BATERIE DE DUȘ CU TERMOSTAT
Indicaţii de montaj-, utilizare- şi siguranţă

MISCELATORE PER VASCA DA BAGNO CON TERMOSTATO/
MISCELATORE PER DOCCIA CON TERMOSTATO
Istruzioni di montaggio, d’uso e di sicurezza
DE/AT/CH Montage-, Bedienungs- und Sicherheitshinweise Seite 5
GB/IE Assembly, operating and safety instructions Page 11
FR/BE Instructions de montage, d‘utilisation et consignes de sécurité Page 16
NL/BE Montage-, bedienings- en veiligheidsinstructies Pagina 23
PL Wskazówki montażu, obsługi i bezpieczeństwa Strona 29
CZ Pokyny k montáži, obsluze a bezpečnostní pokyny Strana 35
SK Pokyny pre montáž, obsluhu a bezpečnostné pokyny Strana 40
ES Instrucciones de montaje, de uso y de seguridad Página 45
DK Monterings-, betjenings- og sikkerhedshenvisninger Side 51
IT Istruzioni di montaggio, d’uso e di sicurezza Pagina 56
HU Szerelési, használati és biztonsági tudnivalók Oldal 62
SI Navodila za montažo, uporabo in varnostna navodila Stran 68
HR Upute za montažu, uporabu i sigurnost Stranica 74
RO Indicaţii de montaj-, utilizare- şi siguranţă Pagina 80
BG Инструкции за монтаж, обслужване и безопасност Cтраница 86
GR Οδηγίες συναρμολόγησης, χειρισμού και ασφάλειας Σελίδα 93

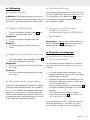
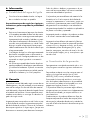
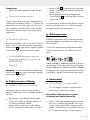
Sie benötigen · You need · Il vous faut · U hebt nodig · Wymagane · Potřebujete
Potrebujete Necesita · Du skal bruge · Vi servono · Szükséges szerszámok · Potrebujete
Potrebno Vam je · Aveţi nevoie de următoarele · Необходими са Ви · Χρειάζεστε:
A
1
2
54 b
7
4 b
HG00625A
HG00625B
4 a
4
6
3
7
6
1
2
4
3
4 c
4 c

54 a
B C
D E F
G H I
J
8

5 DE/AT/CH
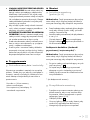
Legende der verwendeten Piktogramme ........................................................... Seite 6
Einleitung ......................................................................................................................................... Seite 6
Bestimmungsgemäße Verwendung ....................................................................................................Seite 6
Teilebeschreibung ...............................................................................................................................Seite 6
Technische Daten ................................................................................................................................Seite 6
Sicherheitshinweise ................................................................................................................Seite 6
Vorbereitung ................................................................................................................................Seite 7
Benötigtes Werkzeug und Material ...................................................................................................Seite 7
Montage ...........................................................................................................................................Seite 7
Armatur installieren .............................................................................................................................Seite 7
Armatur durchspülen ...........................................................................................................................Seite 7
Bedienung ......................................................................................................................................Seite 8
In Betrieb nehmen ...............................................................................................................................Seite 8
Wasserfluss einstellen .........................................................................................................................Seite 8
Wassertemperatur einstellen ..............................................................................................................Seite 8
Temperaturbegrenzung ......................................................................................................................Seite 8
Eco-Stopp-Funktion .............................................................................................................................. Seite 8
Umschalter Wassereinlauf Wanne / Duschbrause ...........................................................................Seite 8
Wartung und Reinigung .....................................................................................................Seite 8
Armatur pflegen und reinigen ............................................................................................................Seite 8
Entsorgung .....................................................................................................................................Seite 9
Informationen .............................................................................................................................Seite 9
Trinkbarkeit von Leitungswasser ......................................................................................................... Seite 9
Garantie ........................................................................................................................................... Seite 9
Abwicklung im Garantiefall ................................................................................................................Seite 10
Service .................................................................................................................................................Seite 10
V2.0

6 DE/AT/CH
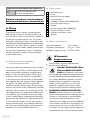
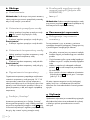
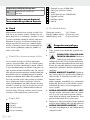
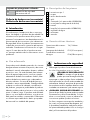
Legende der verwendeten Piktogramme
Sicherheitshinweise
Handlungsanweisungen
Thermostat-Wannenfüllarmatur/
Thermostat-Duscharmatur
Einleitung
Wir beglückwünschen Sie zum Kauf Ihres neuen
Produkts. Sie haben sich damit für ein hochwertiges
Produkt entschieden. Machen Sie sich vor der ersten
Inbetriebnahme mit dem Produkt vertraut. Lesen Sie
hierzu aufmerksam die nachfolgende Bedienungs-
anleitung und die Sicherheitshinweise. Benutzen Sie
das Produkt nur wie beschrieben und für die ange-
gebenen Einsatzbereiche. Bewahren Sie diese An-
leitung an einem sicheren Ort auf. Händigen Sie alle
Unterlagen bei Weitergabe des Produktes an Dritte
mit aus
.
Bestimmungsgemäße
Verwendung
Dieses Produkt ist für alle druckfesten Warmwasser-
systeme wie Zentralheizung, Durchlauferhitzer,
Druckboiler o. Ä. geeignet. Nicht geeignet ist es für
Niederdruck-Warmwasserbereiter wie z. B. Holz-
oder Kohlebadeöfen, Öl- oder Gasbadeöfen, offene
Elektrospeicher. Im Zweifelsfall wenden Sie sich bitte
an einen Installateur oder Fachberater. Eine andere
Verwendung als zuvor beschrieben oder eine Ver-
änderung des Produkts ist nicht zulässig und führt
zur Beschädigung. Darüber hinaus können weitere
lebensgefährliche Gefahren und Verletzungen die
Folgen sein. Das Produkt ist nur zur Eigenanwendung,
nicht für den medizinischen oder kommerziellen
Gebrauch vorgesehen. Für durch unsachgemäße
Verwendung entstandene Schäden übernimmt der
Hersteller keine Haftung.
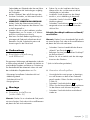
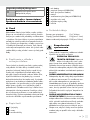
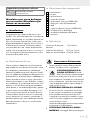
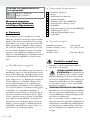
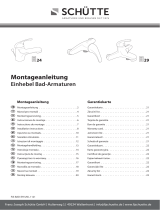
Teilebeschreibung
1 2 S-Anschlüsse
2 2 Rosetten
3 2 Dichtungsringe
4 1 Armaturenkörper
4a 1 Umschalter (nur für HG00625A)
4b 1 Gewinde (für den Brauseschlauch)
4c 2 Muttern
5 1 Mischdüse (nur für HG00625A)
6 1 Regler Wasserfluss
7 1 Regler Wassertemperatur
8 1 Kartusche
Technische Daten
Anschlussmaße: 136/164 mm
Anschlüsse (Brauseschlauch): G½ (ca. 21 mm)
Mutter der Wasseranschlüsse:
G¾
(ca. 30 mm)
Sicherheitshinweise
Halten Sie das Produkt von Kindern fern. Das
Produkt ist kein Spielzeug.
VORSICHT VOR ELEKTRISCHEM
SCHLAG! Undichtigkeiten oder
Wasseraustritt können zu Lebensgefahr
durch elektrischen Schlag führen. Prüfen Sie alle
Verbindungen sorgfältig auf Dichtigkeit. Stellen
Sie zudem sicher, dass alle Leitungen von elek-
trischen Geräten korrekt und sicher installiert sind.
VORSICHT! VERLETZUNGSGEFAHR!
Stellen Sie sicher, dass alle Teile unbeschädigt
und sachgerecht montiert sind. Bei unsachge-
mäßer Montage besteht Verletzungsgefahr.
Bitte beachten Sie, dass Unterlegscheiben und
Dichtungen Verschleißteile sind, welche von
Zeit zu Zeit ausgetauscht werden müssen.
Beschädigte Teile können die Sicherheit und
Funktion beeinflussen.
ACHTUNG! GEFAHR DER SACHBESCHÄ-
DIGUNG! Lassen Sie die Montage nur durch
fachkundige Personen durchführen. Undichtig-
keiten oder Wasseraustritt können zu erheblichen

7 DE/AT/CH
Sachschäden an Gebäude oder Hausrat führen.
Prüfen Sie daher alle Verbindungen sorgfältig
auf Dichtigkeit.
Achten Sie darauf, dass alle Dichtungen den
korrekten Sitz haben, um Wasseraustritt durch
Undichtigkeit zu verhindern.
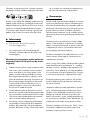
VORSICHT! VERBRÜHUNGSGEFAHR!
Achten Sie bei der Warmwassereinstellung
darauf, dass die Temperatur des Wassers nicht
zu heiß eingestellt ist.
Machen Sie sich vor der Installation mit allen
Gegebenheiten vor Ort vertraut, z. B. Wasser-
anschluss und Absperrvorrichtung.
Bitte lesen Sie diese Bedienungsanleitung vor
Montage und Gebrauch aufmerksam durch.
Bewahren Sie alle Sicherheitshinweise und
Anweisungen für die Zukunft auf!
Vorbereitung
Benötigtes Werkzeug
und Material
Die genannten Werkzeuge und Materialien sind nicht
im Lieferumfang enthalten. Es handelt sich hierbei um
unverbindliche Angaben und Werte zur Orientie
rung.
Die Beschaffenheit des Materials richtet sich nach
den individuellen Gegebenheiten vor Ort.
- Rohrzange/verstellbarer Schraubenschlüssel
- Abdichtungsband
- Sechskantschlüssel S3
- Reinigungsbürste
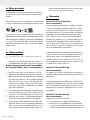
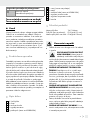
Montage
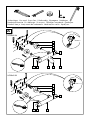
Armatur installieren
(siehe Abb. A)
Hinweis: Decken Sie zu schraubende Teile jeweils
mit einem feuchten Tuch oder mit Kunststoffklammern
ab, damit die Teile nicht zerkratzen.
Drehen Sie vor der Installation die Haupt-
Wasserzufuhr ab, um Wasseraustritt durch
Undichtigkeit zu verhindern.
Installieren Sie die Armatur an den Wand-
anschluss, wie in Abbildung A dargestellt.
Umwickeln Sie die S-Anschlüsse 1 mit
Abdichtungsband.
Schrauben Sie die Muttern 4c mit einer Rohr-
zange oder einem verstellbaren Schrauben-
schlüssel fest.
Zubehör (Duschkopf und Brauseschlauch)*
anschließen:
Hinweis: Decken Sie zu schraubende Teile jeweils
mit einem feuchten Tuch oder mit Kunststoffklammern
ab, damit die Teile nicht zerkratzen.
Schrauben Sie einen handelsüblichen Brause-
schlauch* am Gewinde 4b fest.
Befestigen Sie einen handelsüblichen Duschkopf*
am Brauseschlauch*.
Richten Sie sich zusätzlich nach den Montage-
hinweisen des Zubehörs.
* (nicht im Lieferumfang enthalten)
Armatur durchspülen
Um mögliche Verunreinigungen zu beseitigen,
muss die Armatur vor dem ersten Gebrauch
gespült werden. Gehen Sie dazu wie folgt vor
(s. Abb. B).
Schrauben Sie die Mischdüse 5 ab.
Öffnen Sie die Haupt-Wasserzufuhr und lassen
Sie das Wasser zwei Minuten lang laufen.
Schrauben Sie die Mischdüse anschließend
wieder an.

8 DE/AT/CH
Bedienung
In Betrieb nehmen
Hinweis: Spülen Sie nach längerem Nichtgebrauch
der Armatur die Leitungen zunächst gründlich durch,
um Trinkwasser-Stagnation und Rückstände aufzulösen.
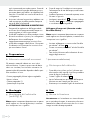
Wasserfluss einstellen
Drehen Sie den Regler für den Wasserfluss 6,
um die Stärke des Wasserflusses einzustellen.
Erhöhen:
Drehen Sie den Regler für den Wasserfluss
nach oben.
Verringern:
Drehen Sie den Regler für den Wasserfluss
nach unten.
Wassertemperatur einstellen
Drehen Sie den Regler für die Wassertemperatur
7, um die Wassertemperatur einzustellen.
Erhöhen:
Drehen Sie den Regler für die Wassertemperatur
nach unten.
Senken:
Drehen Sie den Regler für die Wassertemperatur
nach oben.
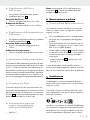
Temperaturbegrenzung
Eine Temperaturbegrenzung verhindert eine versehe
nt-
liche Einstellung der Wassertemperatur über 38 °C.
Falls Sie eine höhere Temperatur wünschen, drücken
Sie den Druckknopf auf dem Temperaturwahlgriff
und drehen Sie dabei gleichzeitig den Temperatur-
wahlgriff nach unten, bis die gewünschte Tempera-
tur erreicht ist.
Eco-Stopp-Funktion
Die Armatur verfügt über eine Eco-Stopp-Funktion,
die den Wasserdurchfluss begrenzt. Drücken Sie den
Druckknopf auf dem Regler für den Wasserfluss 6
und drehen Sie dabei gleichzeitig den Regler für den
Wasserfluss nach oben, um einen höheren Wasser-
durchfluss einzustellen.
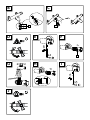
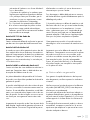
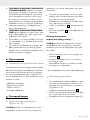
Umschalter Wassereinlauf
Wanne/Duschbrause
(nur für HG00625A)
Siehe Abb. C.
Hinweis:
Wenn Sie den Wasserfluss mit dem Regler
Wasserfluss 6 abstellen, schaltet die Armatur auto-
matisch auf Wannenfüllung um.
Wartung und Reinigung
Armatur pflegen und reinigen
Beachten Sie, dass Sanitärarmaturen einer
besonderen Pflege bedürfen. Beachten Sie daher
die folgenden Anweisungen:
Verwenden Sie keine ätzenden oder alkohol-
haltigen Mittel zur Reinigung, da diese das
Produkt beschädigen könnten.
Reinigen Sie Ihre Armaturen nur mit klarem
Wasser, milden Reinigungsmitteln und einem
weichen Tuch bzw. Leder.
Schrauben Sie die Mischdüse 5 in regel-
mäßigen Abständen heraus und entfernen
Sie kalkhaltige Rückstände oder Fremdkörper.
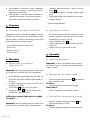
So vermeiden Sie Kalkablagerungen:
· Schrauben Sie die Kartusche 8 heraus und
reinigen Sie sie alle 3 Monate (siehe Abb. D–J).
Bei Nichtbeachtung der Pflegeanleitung muss mit
Schäden an der Oberfläche gerechnet werden.
Garantieansprüche können dann nicht geltend
gemacht werden.

9 DE/AT/CH
Entsorgung
Die Verpackung besteht aus umweltfreundlichen
Materialien, die Sie über die örtlichen Recycling-
stellen entsorgen können.
Möglichkeiten zur Entsorgung des ausgedienten
Produkts erfahren Sie bei Ihrer Gemeinde- oder
Stadtverwaltung.
Das Produkt inkl. Zubehör und die Verpackungsmateri-
alien sind recyclebar und unterliegen einer erweiterten
Herstellerverantwortung. Entsorgen
Sie diese getrennt,
den abgebildeten Info-tri (Sortierinformation) folgend, f
ür
eine bessere Abfallbehandlung. Das Triman-Logo gilt
nur für Frankreich.
Informationen
Trinkbarkeit von Leitungswasser
Informieren Sie sich bei Ihren örtlichen Behörden
über die Trinkbarkeit des Wassers in Ihrer Stadt/
Gemeinde.
Generell gilt für die Trinkbarkeit von
Leitungswasser folgende Empfehlung:
Lassen Sie Wasser aus Leitungen eine kurze
Zeit laufen, wenn es länger als vier Stunden in
den Leitungen stagniert hat. Verwenden Sie
kein Stagnationswasser zur Zubereitung von
Speisen und Getränken, besonders nicht bei
der Ernährung von Säuglingen. Andernfalls
können gesundheitliche Beschwerden auftreten.
Frisches Wasser können Sie daran erkennen,
dass es spürbar kühler die Leitung verlässt, als
Stagnationswasser.
Verwenden Sie kein Stagnationswasser aus
verchromten Leitungen zur Ernährung und/
oder zur Körperpflege, wenn Sie gegen Nickel
allergisch sind. Solches Wasser kann stark
nickelhaltig sein und eine allergische Reaktion
hervorrufen.
Nutzen Sie kein Trinkwasser aus Bleileitungen
für die Zubereitung von Säuglingsnahrung und/
oder während der Schwangerschaft für die
Zubereitung von Lebensmitteln. Blei wird ins
Trinkwasser abgegeben und ist für Säuglinge
und Kleinkinder besonders gesundheitsschädlich.
Garantie
Das Produkt wurde nach strengen Qualitätsrichtlinien
hergestellt und vor der Auslieferung sorgfältig geprüft.
Im Falle von Material- oder Herstellungsfehlern haben
Sie gegenüber dem Verkäufer des Produkts gesetz-
liche Rechte. Ihre gesetzlichen Rechte werden in kei-
ner Weise durch unsere unten aufgeführte Garantie
eingeschränkt.
Die Garantie für dieses Produkt beträgt 5 Jahre ab
Kaufdatum. Die Garantiezeit beginnt mit dem Kauf-
datum. Bewahren Sie den Originalkaufbeleg an einem
sicheren Ort auf, da dieses Dokument als Nachweis
des Kaufs erforderlich ist.
Alle Schäden oder Mängel, die bereits zum Zeitpunkt
des Kaufs vorhanden sind, müssen unverzüglich nach
dem Auspacken des Produkts gemeldet werden.
Sollte das Produkt innerhalb von 5 Jahren ab Kauf-
datum einen Material- oder Herstellungsfehler auf-
weisen, werden wir es – nach unserer Wahl – kostenlos
für Sie reparieren oder ersetzen. Die Garantiezeit
verlängert sich durch einen stattgegebenen Gewähr-
leistungsanspruch nicht. Dies gilt auch für ersetzte
und reparierte Teile.
Diese Garantie erlischt, wenn das Produkt beschädigt
oder unsachgemäß verwendet oder gewartet wurde.
Die Garantie deckt Material- und Herstellungsfehler
ab. Diese Garantie erstreckt sich weder auf Produkt-
teile, die normalem Verschleiß unterliegen, und somit
als Verschleißteile gelten (z. B. Batterien, Akkus, Schläu-
che,
Farbpatronen), noch auf Schäden an zerbrech-
lichen Teilen, z. B. Schalter oder Teile aus Glas.

10 DE/AT/CH
Abwicklung im Garantiefall
Um eine schnelle Bearbeitung Ihres Anliegens zu ge-
währleisten, folgen Sie bitte den folgenden Hinweisen:
Bitte halten Sie für alle Anfragen den Kassenbon
und die Artikelnummer (IAN 407589_2207) als
Nachweis für den Kauf bereit.
Die Artikelnummer entnehmen Sie bitte dem Typen-
schild, einer Gravur, auf dem Titelblatt Ihrer Bedie-
nungsanleitung (unten links) oder als Aufkleber auf
der Rück- oder Unterseite des Produkts.
Sollten Funktionsfehler oder sonstige Mängel auftreten,
kontaktieren Sie zunächst die nachfolgend benannte
Serviceabteilung telefonisch oder per E-Mail.
Ein als defekt erfasstes Produkt können Sie dann
unter Beifügung des Kaufbelegs (Kassenbon) und
der Angabe, worin der Mangel besteht und wann
er aufgetreten ist, für Sie portofrei an die Ihnen mit-
geteilte Service-Anschrift übersenden.
Service
Service Deutschland
Tel.: 0800 5435 111
E-Mail: o[email protected]
Service Österreich
Tel.: 0800 292726
E-Mail: [email protected]
Service Schweiz
Tel.: 0800562153
E-Mail: [email protected]

11 GB/IE
List of pictograms used ........................................................................................................ Page 12
Introduction ................................................................................................................................... Page 12
Proper use ............................................................................................................................................Page 12
Description of parts ............................................................................................................................. Page 12
Technical data ..................................................................................................................................... Page 12
Safety advice ...............................................................................................................................Page 12
Preparation ...................................................................................................................................Page 13
Required tools and material ...............................................................................................................Page 13
Installation .....................................................................................................................................Page 13
Installing the tap .................................................................................................................................. Page 13
Flushing the tap ...................................................................................................................................Page 13
Operation .......................................................................................................................................Page 13
Bringing into use ..................................................................................................................................Page 13
Adjusting the flow ...............................................................................................................................Page 13
Adjusting the water temperature ........................................................................................................ Page 14
Temperature limit .................................................................................................................................Page 14
Eco-stop function .................................................................................................................................Page 14
Changeover knob water inlet bath / shower head ........................................................................... Page 14
Maintenance and cleaning ............................................................................................... Page 14
Tap care and cleaning .......................................................................................................................Page 14
Disposal ............................................................................................................................................Page 14
Information....................................................................................................................................Page 14
Potability of mains water ....................................................................................................................Page 14
Warranty ......................................................................................................................................... Page 15
Warranty claim procedure ................................................................................................................. Page 15
Service .................................................................................................................................................Page 15

12 GB/IE
List of pictograms used
Safety information
Instructions for use
Thermostatic Bath Mixer Tap/
Thermostatic Shower Mixer
Introduction
We congratulate you on the purchase of your new
product. You have chosen a high quality product.
Familiarise yourself with the product before using it
for the first time. In addition, please carefully refer to
the operating instructions and the safety advice be-
low. Only use the product as instructed and only for
the indicated field of application. Keep these instruc-
tions in a safe place. If you pass the product on to
anyone else, please ensure that you also pass on all
the documentation with it.
Proper use
This product is suitable for all pressure-tight hot water
systems such as central heating boilers, instantaneous
water heaters, pressurised boilers and the like. It is
not suitable for low-pressure water heaters such as
wood or coal burning bath geysers, oil or gas bath
geysers, open electrically heated water tanks. If in
doubt please seek the advice of a plumber or heating
engineer. Any use other than that described here or
modification to the product is not permitted and may
lead to damage to persons or property. There is
also the risk of injury and loss of life. The product is
intended for personal use only and not for medical or
commercial use. The manufacturer accepts no liability
for loss or damage arising from improper use.
Description of parts
1 2 S-connectors
2 2 Rosettes
3 2 Sealing rings
4 1 Tap body
4a 1 Changeover button (for HG00625A only)
4b 1 Threaded connector (for the shower hose)
4c 2 Nuts
5 1 Mixer nozzle (for HG00625A only)
6 1 Water flow switch
7 1 Water temperature switch
8 1 Cartridge
Technical data
Connection spacing: 136/164 mm
Connections (Shower hose): G½
(approx. 21 mm)
Water connection nut: G¾
(approx. 30 mm)
Safety advice
Keep the product away from children. The product
is not a toy.
CAUTION - RISK OF ELECTRIC
SHOCK! Leaks or the escape of
water can lead to danger to life from
electric shock. Check all connections for leaks
carefully. In addition, ensure that all cables from
electrical devices are correctly and safely installed.
CAUTION! RISK OF INJURY! Please ensure
that no parts are damaged and that all parts are
correctly assembled. Incorrect assembly could
lead to injury.
Please note that seals are wear parts and there-
fore will require to be replaced from time to time.
Damaged parts could adversely affect safety
and proper function.
CAUTION! RISK OF DAMAGE TO
PROPERTY! Have the installation done by
experienced persons only. Leaks or escape of
water can lead to serious damage to buildings
or household fittings and furniture. Check all
connections for leaks carefully.
Ensure that all seals are correctly seated to
prevent leakage of water.

13 GB/IE
CAUTION! DANGER OF SCALDING!
When making the hot water setting please ensure
that the temperature of the water is not too high.
Before installation, make yourself familiar with
all the existing services, e.g. water connection
and stopcocks.
Please read carefully through these operating
instructions before installing and using the product.
Keep all the safety advice and instructions in a
safe place for future reference!
Preparation
Required tools and material
The tools and materials specified are not included.
This information and these values are non-binding
and they are only for guidance. The nature of the ma-
terial is determined by the individual local conditions.
- spanner or adjustable wrench
- sealing tape
- hex key S3
- cleaning brush
Installation
Installing the tap (see Fig. A)
Note: To protect the parts from scratches while
being screwed together cover them with a damp
cloth or use plastic clamps.
Before you start installation turn off the main
water supply to prevent serious leakage of water.
Install the tap at the wall connection as shown
in Figure A.
Wrap the S-connecter 1 with sealing tape.
Screw the nuts 4c with a spanner or an adjust-
able wrench.
Connecting the accessories (shower head
and shower hose)*:
Note: So that the parts do not get scratched while
being screwed together, protect them with a damp
cloth or use plastic clamps.
Screw an ordinary shower hose* firmly on to
the thread 4b.
Attach an ordinary shower head* to the
shower hose*.
Observe the installation instructions for the
accessories.
* (not included)
Flushing the tap
The tap must be flushed through before first use
to remove any dirt. To do this, follow these steps
(see Fig. B):
Screw the mixer nozzle 5 off.
Before using the tap for the first time, open the
main water supply and allow the water to run for
two minutes so that any residues are dissolved
away.
Then screw the mixer nozzle on again.
Operation
Bringing into use
Note: If the tap has not been used for a long period
flush the pipes through thoroughly in order to avoid
stagnation and build-up of residues in the drinking
water supply.
Adjusting the flow
Turn the water flow switch 6 to adjust the
water flow.
Increase:
Turn the water flow switch upward.
Reduce:
Turn the water flow switch downward.

14 GB/IE
Adjusting the water
temperature
Turn the temperature control switch 7 to
adjust the water temperature.
To raise:
Turn the temperature control switch downward.
To lower:
Turn the temperature control switch upward.
Temperature limit
Limiting the water temperature prevents accidentally
setting the water temperature above 38 °C. For a
higher water temperature press the push button on
the temperature control knob whilst turning the tem-
perature control knob downward until the desired
temperature is reached.
Eco-stop function
This fitting features Eco-stop function limiting the
water-flow. Press the push button on the water flow
switch 6 whilst turning the water flow switch
upwards to increase the water flow rate.
Changeover knob water
inlet bath/shower head
(for HG00625A only)
Please see Fig. C.
Note: If you turn off the water flow using the water
flow switch 6 then the fitting automatically switches
to bath filling.
Maintenance and cleaning
Tap care and cleaning
Please note that sanitary fittings require special
care and attention. Therefore you should follow
the following advice:
Never use corrosive or alcohol-based materials
for cleaning, as these could damage the product.
Clean your fittings with clean water, mild detergent
and a soft cloth or leather only.
Screw out the mixer nozzle 5 at regular intervals
and remove lime deposits or foreign bodies.
To avoid limescale accumulation, you can:
· Screw out the cartridge 8 and clean it every
3 months (see Fig. D–J).
Non-observance of the above care advice can be
expected to result in damage to the surface of the
fittings. In this event your rights under the warranty
may be invalidated.
Disposal
The packaging is made entirely of recyclable mate-
rials, which you may dispose of at local recycling
facilities.
Contact your local refuse disposal authority for
more details of how to dispose of your worn-out
product.
The product incl. accessories and packaging materials
are recyclable and are subject to extended producer
responsibility. Dispose them separately, following the
illustrated Info-tri (sorting information), for better waste
treatment. The Triman logo is valid in France only.
Information
Potability of mains water
Find out about the potability of your mains water
supply. Your local water authority or water supply
company will be able to inform you.

15 GB/IE
The following general recommendations
apply to the potability of the water from
your pipework:
Let the water run freely for a short time if it has
been stagnating in the pipework for more than
four hours. Do not use any of this stagnant water
in the preparation of food or for drinking. This
applies particularly as far as babies and infants
are concerned. Failure to observe this advice
may result in risks to health. Fresh water can
be readily distinguished from stagnant as fresh
water is noticeably cooler.
Do not use stagnant water from chromium-
plated pipework for the preparation of food or
for drinking or for personal hygiene if you are
allergic to nickel. This water may contain high
quantities of nickel and trigger an allergic reaction.
Do not use water from lead pipework for pre-
paring food or drink for babies or infants. Do
not use it for preparing food or drink during
pregnancy. Lead dissolves in drinking water
and is particularly damaging to the health of
babies and young children.
Warranty
The product has been manufactured to strict quality
guidelines and meticulously examined before delivery.
In the event of material or manufacturing defects you
have legal rights against the retailer of this product.
Your legal rights are not limited in any way by our
warranty detailed below.
The warranty for this product is 5 years from the date
of purchase. The warranty period begins on the date
of purchase. Keep the original sales receipt in a safe
location as this document is required as proof of
purchase.
Any damage or defects already present at the time
of purchase must be reported without delay after
unpacking the product.
Should the product show any fault in materials or
manufacture within 5 years from the date of purchase,
we will repair or replace it – at our choice – free of
charge to you. The warranty period is not extended
as a result of a claim being granted. This also applies
to replaced and repaired parts.
This warranty becomes void if the product has been
damaged, or used or maintained improperly.
The warranty covers material or manufacturing
defects. This warranty does not cover product parts
subject to normal wear and tear, thus considered
consumables (e.g. batteries, rechargeable batteries,
tubes, cartridges), nor damage to fragile parts, e.g.
switches or glass parts.
Warranty claim procedure
To ensure quick processing of your case, please
observe the following instructions:
Please have the till receipt and the item number
(
IAN 407589_2207) available as proof of purch
ase.
You will find the item number on the rating plate,
an engraving on the front page of the instructions
for use (bottom left), or as a sticker on the rear or
bottom of the product.
If functional or other defects occur, please contact
the service department listed either by telephone or
by e-mail.
You can return a defective product to us free of
charge to the service address that will be provided
to you. Ensure that you enclose the proof of pur-
chase (till receipt) and information about what the
defect is and when it occurred.
Service
Service Great Britain
Tel.: 08000569216
E-Mail: [email protected]
Service Ireland
Tel.: 1800 200736
E-Mail: [email protected]

16 FR/BE
Légende des pictogrammes utilisés .......................................................................... Page 17
Introduction ................................................................................................................................... Page 17
Utilisation conforme ............................................................................................................................Page 17
Descriptif des pièces ...........................................................................................................................Page 17
Caractéristiques techniques ................................................................................................................Page 17
Consignes de sécurité ...........................................................................................................Page 17
Préparation ...................................................................................................................................Page 18
Outils et matériel nécessaires ............................................................................................................. Page 18
Montage ...........................................................................................................................................Page 18
Installation de la robinetterie ..............................................................................................................Page 18
Rinçage de la robinetterie ..................................................................................................................Page 18
Utilisation ........................................................................................................................................Page 19
Mise en service ...................................................................................................................................Page 19
Régler le débit d‘eau ..........................................................................................................................Page 19
Régler la température de l‘eau ..........................................................................................................Page 19
Limitation de la température ............................................................................................................... Page 19
Fonction Eco-Stop................................................................................................................................Page 19
Inverseur arrivée d‘eau baignoire / douche ......................................................................................Page 19
Entretien et nettoyage..........................................................................................................Page 19
Entretien et nettoyage de la robinetterie ...........................................................................................Page 19
Mise au rebut ............................................................................................................................... Page 20
Informations .................................................................................................................................Page 20
Potabilité de l’eau du robinet .............................................................................................................Page 20
Garantie ........................................................................................................................................... Page 20
Faire valoir sa garantie .......................................................................................................................Page 21
Service après-vente .............................................................................................................................Page 22

17 FR/BE
Légende des pictogrammes utilisés
Instructions de sécurité
Instructions de manipulation
Mitigeur de baignoire
thermostatique/Mitigeur
de douche thermostatique
Introduction
Nous vous félicitons pour l‘achat de votre nouveau
produit. Vous avez opté pour un produit de grande
qualité. Avant la première mise en service, vous
devez vous familiariser avec toutes les fonctions du
produit. Veuillez lire attentivement le mode d’emploi
ci-dessous et les consignes de sécurité. N’utilisez
le produit que pour l’usage décrit et les domaines
d’application cités. Conserver ces instructions dans
un lieu sûr. Si vous donnez le produit à des tiers,
remettez-leur également la totalité des documents.
Utilisation conforme
Ce produit convient pour tout type de système d’eau
chaude résistant à la pression comme un chauffage
central, un chauffe-eau instantané, un chauffe-eau
à pression, etc. Il ne convient pas aux chauffe-eau
à basse pression tels que les chauffe-eau pour bains
à bois ou à charbon, les chauffe-eau pour bains à
mazout ou à gaz, les fourneaux électriques à accu-
mulation ouverts. En cas de doute, consultez un in-
stallateur ou un spécialiste. Toute autre utilisation que
celle décrite précédemment ou modification de ce
produit est interdite et peut causer son endommage-
ment. Il peut en outre en résulter des risques mortels
ou des blessures. Le produit est uniquement destiné
à un usage domestique, il n‘est pas prévu pour une
utilisation médicale ou commerciale. Le fabricant
décline toute responsabilité en cas d‘utilisation non
conforme à l‘usage prévu.
Descriptif des pièces
1 2 raccords S
2 2 rosettes
3 2 bagues d‘étanchéité
4 1 corps de robinetterie
4a 1 commutateur (uniquement pour HG00625A)
4b 1 vis filetée (pour le flexible de douche)
4c 2 écrous
5 1 buse de mélange (uniquement pour
HG00625A)
6 1 régulateur pour le débit d‘eau
7 1 régulateur pour la température de l‘eau
8 1 cartouche
Caractéristiques techniques
Dimensions des raccords : 136/164 mm
Raccords
(flexible de douche) : G½ (environ 21 mm)
Écrous des
raccordements d´eau : G¾ (env. 30 mm)
Consignes de sécurité
Tenez le produit éloigné des enfants. Ce
produit n’est pas un jouet.
ATTENTION AU RISQUE
D‘ÉLECTROCUTION ! Toute fuite
ou écoulement d’eau peut représenter
un danger de mort par décharge électrique.
Contrôlez minutieusement l’étanchéité de tous
les raccords. Il faut en outre s’assurer que tous
les câbles des appareils électriques soient in-
stallés correctement et en toute sécurité.
ATTENTION ! RISQUE DE BLESSURE !
Vérifier que toutes les pièces sont en parfait état
et correctement montées. Risque de blessures
en cas de montage incorrect.
N´oubliez pas que les rondelles et garnitures
sont des pièces d’usure qui doivent être rem-
placées de temps en temps.

18 FR/BE
Les pièces endommagées peuvent avoir un
impact sur la sécurité et le fonctionnement du
matériel.
ATTENTION ! RISQUE DE DOMMAGE
MATÉRIEL ! Confiez exclusivement le mon-
tage à des techniciens qualifiés. Des fuites ou
écoulements d‘eau peuvent entraîner des dé-
gâts considérables dans les bâtiments ou sur le
mobilier. Veuillez donc contrôler soigneusement
l’étanchéité de tous les raccords.
Vérifiez que tous les joints sont correctement
positionnés pour éviter toute fuite d‘eau par
défaut d‘étanchéité.
ATTENTION ! RISQUE DE BRÛLURE À
L‘EAU BOUILLANTE ! Lors du réglage de
l’eau chaude, veillez à ce que la température
de l’eau ne soit pas trop chaude.
Familiarisez-vous avant l’installation avec toutes
les particularités sur place, par ex. avec les
raccords d’eau et les dispositifs d’arrêt.
Lire attentivement le mode d‘emploi avant le
montage et l‘utilisation du produit. Conserver
toutes les consignes de sécurité et instructions
pour consultation ultérieure!
Préparation
Outils et matériel nécessaires
Les outils et matériels indiqués ne sont pas fournis.
Il s'agit là de données et de valeurs à titre indicatif
afin de vous permettre de vous orienter. Les pro-
priétés du matériel dépendent des conditions spéci-
fiques sur place.
- Pince à tube/clé de serrage ajustable
- Bande d'étanchéité
- Clé à six pans S3
- Brosse de nettoyage
Montage
Installation de la robinetterie
(voir Fig. A)
Indication : Recouvrez les parties à visser d´un
linge humide ou d´une gaine en plastique afin que
les pièces ne soient pas rayées.
Fermez l´arrivée d´eau principale avant instal-
lation, pour éviter une sortie d´eau par manque
d´étanchéité.
Installer la robinetterie au raccord mural,
comme indiqué sur la figure A.
Enveloppez les raccords en S 1 avec la
bande d'étanchéité.
Vissez fermement les écrous 4c à l'aide de la
pince à tube ou de la clé de serrage ajustable.
Raccordement des accessoires (tête de
douche et flexible de douche)* :
Indication : Recouvrez les parties à visser d´un
linge humide ou d´une gaine en plastique afin que
les pièces ne soient pas rayées.
Vissez un flexible de douche standard* sur
le filetage 4b .
Fixez une tête de douche standard* sur le
flexible de douche*.
Suivez en outre les directives de montage
des accessoires.
* (ne fait pas partie de la livraison)
Rinçage de la robinetterie
Afin d’éliminer toutes éventuelles impuretés, il
convient de rincer la robinetterie avant la pre-
mière utilisation. Procéder comme suit (voir fig. B).
Dévisser la buse de mélange 5.
Ouvrir l’alimentation principale en eau et laisser
l’eau couler pendant deux minutes.
Revisser la buse de mélange.

19 FR/BE
Utilisation
Mise en service
Indication : Rincez généreusement les conduites
de la robinetterie après une longue période
d´inactivité
pour éliminer eaux stagnantes et possibles résidus.
Régler le débit d‘eau
Tournez le régulateur du débit d‘eau 6 pour
régler l‘intensité du débit d‘eau.
Augmenter :
Tournez le régulateur du débit d‘eau vers
le haut.
Diminuer :
Tournez le régulateur du débit d‘eau vers
le bas.
Régler la température de l‘eau
Tournez le régulateur de la température d‘eau 7
pour régler la température de l‘eau.
Augmenter :
Tournez le régulateur de la température d‘eau
vers le bas.
Diminuer :
Tournez le régulateur de la température d‘eau
vers le haut.
Limitation de la température
Une limitation de la température empêche un réglage
involontaire de la température de l‘eau supérieure
à 38 °C. Si vous désirez une température plus élevée,
appuyez sur le bouton-poussoir de la poignée de
sélection de la température et tournez en même temps
la poignée de sélection de la température vers le bas
jusqu‘à atteindre la température désirée.
Fonction Eco-Stop
La robinetterie est équipée d’une fonction Eco-Stop
qui limite le débit d’eau. Enfoncer le bouton poussoir
sur le régulateur pour le débit d‘eau 6 et tourner
simultanément le régulateur du débit vers le haut
pour augmenter le débit.
Inverseur arrivée d‘eau
baignoire/douche
(uniquement pour HG00625A)
Voir illustration C.
Remarque : Si vous coupez le débit d‘eau par le
biais du régulateur 6, la robinetterie passe auto-
matiquement en remplissage baignoire.
Entretien et nettoyage
Entretien et nettoyage
de la robinetterie
Les robinetteries sanitaires requièrent un entretien
particulier. Veuillez donc respecter les instructions
suivantes:
N´utilisez pas de produits décapants ni de
produit contenant de l´alcool car ils pourraient
endommagés le dispositif.
Nettoyez uniquement votre robinetterie à l‘eau
claire avec un détergent neutre et un chiffon doux
ou une peau de chamois.
Dévissez régulièrement la buse de mélange 5
et éliminez les dépôts de calcaire ou les corps
étrangers.
Voici comment éviter les dépôts calcaires:
· Dévissez la cartouche 8 et la nettoyer tous
les 3 mois (voir ill. D–J).
Le non-respect des instructions d‘entretien peut ent-
raîner des dommages sur la surface. Il est alors
impossible de revendiquer les droits de garantie.

20 FR/BE
Mise au rebut
L’emballage se compose de matières recyclables
pouvant être mises au rebut dans les déchetteries
locales.
Votre mairie ou votre municipalité vous renseigneront
sur les possibilités de mise au rebut des produits usagés.
Le produit ainsi que les accessoires et les matériaux
d’emballage sont recyclables et relèvent de la respon-
sabilité élargie du producteur. Éliminez-les séparément,
en suivant l’Info-tri illustrée, dans l’intérêt d’un meilleur
traitement des déchets. Le logo Triman n’est valable
qu’en France.
Informations
Potabilité de l’eau du robinet
Informez-vous auprès des autorités locales sur
la potabilité de l’eau dans votre ville/commune.
D’une façon générale, pour la potabilité
de l’eau du robinet, nous recommandons :
Laisser couler l’eau un bref moment si elle a
stagné plus de quatre heures dans les tuyauteries.
de ne pas utiliser d‘eau stagnante pour préparer
les repas et les boissons, et tout particulièrement
pour les nourrissons. Sinon, cela présente des
risques pour la santé. L’eau qui sort du robinet
est bonne lorsqu’elle est nettement plus fraîche
que l’eau stagnante.
N´utilisez pas d’eau stagnante venant de tuyau-
teries chromées pour la nourriture et/ou le soin
corporel si vous êtes allergique au nickel. Une
telle eau peut contenir une grande quantité de
nickel et provoquer des réactions allergiques.
N’utilisez pas d’eau potable venant de tuyau-
teries de plomb pour la préparation d’aliments
pour nourrisson et/ou pendant la grossesse. Le
plomb pénètre dans l’eau potable, ce qui est
particulièrement dangereux pour la santé des
nourrissons et des jeunes enfants.
Garantie
Article L217-16 du Code de
la consommation
Lorsque l‘acheteur demande au vendeur, pendant
le cours de la garantie commerciale qui lui a été
consentie lors de l‘acquisition ou de la réparation
d‘un bien meuble, une remise en état couverte par
la garantie, toute période d‘immobilisation d‘au
moins sept jours vient s‘ajouter à la durée de la
garantie qui restait à courir. Cette période court à
compter de la demande d‘intervention de l‘ache-
teur ou de la mise à disposition pour réparation du
bien en cause, si cette mise à disposition est posté-
rieure à la demande d‘intervention.
Indépendamment de la garantie commerciale sous-
crite, le vendeur reste tenu des défauts de confor-
mité du bien et des vices rédhibitoires dans les
conditions prévues aux articles L217-4 à L217-13
du Code de la consommation et aux articles 1641
à 1648 et 2232 du Code Civil.
Article L217-4 du Code de
la consommation
Le vendeur livre un bien conforme au contrat et ré-
pond des défauts de conformité existant lors de la
délivrance.
Il répond également des défauts de conformité ré-
sultant de l‘emballage, des instructions de montage
ou de l‘installation lorsque celle-ci a été mise à sa
charge par le contrat ou a été réalisée sous sa res-
ponsabilité.
Article L217-5 du Code de
la consommation
Le bien est conforme au contrat :
1° S´il est propre à l‘usage habituellement at-
tendu d‘un bien semblable et, le cas échéant :
- s‘il correspond à la description donnée par le
vendeur et posséder les qualités que celui-ci a
Pagina se încarcă...
Pagina se încarcă...
Pagina se încarcă...
Pagina se încarcă...
Pagina se încarcă...
Pagina se încarcă...
Pagina se încarcă...
Pagina se încarcă...
Pagina se încarcă...
Pagina se încarcă...
Pagina se încarcă...
Pagina se încarcă...
Pagina se încarcă...
Pagina se încarcă...
Pagina se încarcă...
Pagina se încarcă...
Pagina se încarcă...
Pagina se încarcă...
Pagina se încarcă...
Pagina se încarcă...
Pagina se încarcă...
Pagina se încarcă...
Pagina se încarcă...
Pagina se încarcă...
Pagina se încarcă...
Pagina se încarcă...
Pagina se încarcă...
Pagina se încarcă...
Pagina se încarcă...
Pagina se încarcă...
Pagina se încarcă...
Pagina se încarcă...
Pagina se încarcă...
Pagina se încarcă...
Pagina se încarcă...
Pagina se încarcă...
Pagina se încarcă...
Pagina se încarcă...
Pagina se încarcă...
Pagina se încarcă...
Pagina se încarcă...
Pagina se încarcă...
Pagina se încarcă...
Pagina se încarcă...
Pagina se încarcă...
Pagina se încarcă...
Pagina se încarcă...
Pagina se încarcă...
Pagina se încarcă...
Pagina se încarcă...
Pagina se încarcă...
Pagina se încarcă...
Pagina se încarcă...
Pagina se încarcă...
Pagina se încarcă...
Pagina se încarcă...
Pagina se încarcă...
Pagina se încarcă...
Pagina se încarcă...
Pagina se încarcă...
Pagina se încarcă...
Pagina se încarcă...
Pagina se încarcă...
Pagina se încarcă...
Pagina se încarcă...
Pagina se încarcă...
Pagina se încarcă...
Pagina se încarcă...
Pagina se încarcă...
Pagina se încarcă...
Pagina se încarcă...
Pagina se încarcă...
Pagina se încarcă...
Pagina se încarcă...
Pagina se încarcă...
Pagina se încarcă...
Pagina se încarcă...
Pagina se încarcă...
Pagina se încarcă...
-
 1
1
-
 2
2
-
 3
3
-
 4
4
-
 5
5
-
 6
6
-
 7
7
-
 8
8
-
 9
9
-
 10
10
-
 11
11
-
 12
12
-
 13
13
-
 14
14
-
 15
15
-
 16
16
-
 17
17
-
 18
18
-
 19
19
-
 20
20
-
 21
21
-
 22
22
-
 23
23
-
 24
24
-
 25
25
-
 26
26
-
 27
27
-
 28
28
-
 29
29
-
 30
30
-
 31
31
-
 32
32
-
 33
33
-
 34
34
-
 35
35
-
 36
36
-
 37
37
-
 38
38
-
 39
39
-
 40
40
-
 41
41
-
 42
42
-
 43
43
-
 44
44
-
 45
45
-
 46
46
-
 47
47
-
 48
48
-
 49
49
-
 50
50
-
 51
51
-
 52
52
-
 53
53
-
 54
54
-
 55
55
-
 56
56
-
 57
57
-
 58
58
-
 59
59
-
 60
60
-
 61
61
-
 62
62
-
 63
63
-
 64
64
-
 65
65
-
 66
66
-
 67
67
-
 68
68
-
 69
69
-
 70
70
-
 71
71
-
 72
72
-
 73
73
-
 74
74
-
 75
75
-
 76
76
-
 77
77
-
 78
78
-
 79
79
-
 80
80
-
 81
81
-
 82
82
-
 83
83
-
 84
84
-
 85
85
-
 86
86
-
 87
87
-
 88
88
-
 89
89
-
 90
90
-
 91
91
-
 92
92
-
 93
93
-
 94
94
-
 95
95
-
 96
96
-
 97
97
-
 98
98
-
 99
99


în alte limbi
- français: LIVARNO 407589 Le manuel du propriétaire
- slovenčina: LIVARNO 407589 Návod na obsluhu
- italiano: LIVARNO 407589 Manuale del proprietario
Lucrări înrudite
Alte documente
-
Hans Grohe Axor Citterio Instructions For Use/Assembly Instructions
-
Hansgrohe 13112000 Manual de utilizare
-
GROHE Precision joy Ghid de instalare
-
 Schütte Single lever bathroom faucets Manual de utilizare
-
 Schütte Mitigeur MAGNA Chromé Instrucțiuni de utilizare
-
GROHE VITALIO 27 298 Manual de utilizare
-
Hansgrohe ecoStat Manual de utilizare

