Teesa TSA0527 Manualul proprietarului
- Categorie
- Aparate de tuns
- Tip
- Manualul proprietarului

Corded
hair clipper
TSA0527
HU
DE
CS
NL
EN
PL
FR
RO
GR
SK
Instrukcja obsługi
Manuel d’utilisation
Manual de utilizare
Εγχειρίδιο χρήσης
Gebruiksaanwijzing
Owner’s manual
Návod na použitie
Használati utasítás
Bedienungsanleitung
Návod k obsluze


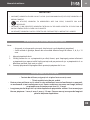
CS DE EN GR FR
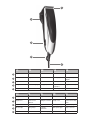
Čepel Messer Blade Κοπτικό Lame
Páka stínování Kegelhebel Taper lever Κωνικός μοχλός Levier pour couper en
dégradé
Vypínač Ein/Aus Schalter On/o switch Διακόπτης On/o Interrupteur
Rukojeť na zavěšení Öse für Aufhängung Hanging loop Δαχτυλίδι
κρεμάσματος
Support d’accrochage
Napájecí kabel Netzkabel Power cord Καλώδιο τροφοδοσίας Câble d’alimentation
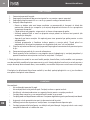
HU NL PL RO SK
Penge Mes Nożyk Lamă Nôž
Árnyékoló kar Hendel voor het
uitdunnen
Dźwignia cieniowania Pârghie conică Páčka nastavenia dĺžky
strihu
Kapcsoló Schakelaar Włącznik Comutator pornire/oprire Prepínač zap. / vyp.
Akasztó kampó Ophangbeugel Uchwyt do
zawieszania
Buclă pentru agățat Úchyt na zavesenie
Tápkábel Stroomkabels Przewód zasilający Cablu de alimentare Napájací kábel
1
2
3
4
5
1
2
3
4
5
1
2
3
4
5

Návod k obsluze 5
CS
Děkujeme, že jste si koupili zařízení TEESA. Před použitím si pečlivě přečtěte uživatelskou
příručku a uložte ji pro pozdější použití. Výrobce neodpovídá za nesprávné používání a
provoz tohoto zařízení.
BEZPEČNOSTNÍ OPATŘENÍ
Při manipulaci s elektrickým zařízením je třeba dodržovat základní bezpečnostní opatření,
aby nedošlo k poškození zařízení nebo zranění, včetně níže uvedených:
1. Před použitím si pozorně přečtěte návod k použití, i když jste dříve podobné zařízení
používali.
2. Před připojením zařízení zkontrolujte, zda je napětí zásuvky a zařízení kompatibilní.
3. Zařízení je určeno pouze pro domácí použití. Výrobek není určen pro profesionální
použití.
4. Zařízení nepoužívejte k jiným účelům, než je popsáno v níže uvedeném návodu.
5. Zařízení čistěte a skladujte podle pokynů uvedených v části „Čištění“ a „Skladování”.
6. Zařízení vždy vypněte a odpojte od zdroje napájení:
• pokud zařízení nefunguje správně,
• pokud zvuky při provozu zařízení nejsou běžné nebo svědčí o anomálii,
• před demontáží,
• před čištěním,
• před prováděním servisních činností.
7. Při odpojování zařízení od zdroje napájení uchopte a táhněte za zástrčku, nikoliv za kabel
/ šňůru
8. Toto zařízení smí používat děti mladší 8 let a osoby s omezenými fyzickými, smyslovými
nebo duševními schopnostmi, stejně jako osoby, které nemají žádné zkušenosti a nejsou
seznámeny se zařízením, pokud je zajištěn dohled nebo školení týkající se používání
zařízení takovým způsobem, aby rizika s ním spojená byla srozumitelná. Děti by měly
být poučeny, aby s přístrojem nezacházely jako s hračkou. Čištění a údržbu zařízení by
neměly provádět děti bez dozoru.
9. Zařízení uchovávejte mimo dosah děti.
10. Neodpojitelný napájecí kabel smí vyměnit pouze autorizovaný servis.
11. Zařízení a napájecí kabel by měly být chráněny před teplem, vodou, vlhkostí, ostrými
hranami a dalšími faktory, které by mohly zařízení nebo kabel poškodit.
12. Buďte obzvláště opatrní, aby se napájecí kabel nedotýkal horkých / ostrých hran.
13. Používejte pouze originální díly.
14. Pokud je napájecí kabel poškozen nebo zařízení nefunguje správně, nelze je používat.
15. Zařízení nesmíte opravovat sami. V případě poškození, obraťte se na autorizovaný servis
s žádostí o kontrolu/opravu. Demontáž zařízení je zakázána.

Návod k obsluze6
CS
NASAZENÍ A SEJMUTÍ HŘEBENOVÝCH NÁSTAVCŮ
Upozornění:
• Před nasazením a sejmutím hřebenových nástavců se ujistěte se, že je zařízení
vypnuto.
• Sada obsahuje čtyři nástavce, z nichž každý má různé délky stříhání - 3, 6, 9 a 12 mm.
1. Vyberte požadovaný nástavec.
2. Umístěte horní část nástavce na zuby čepele a poté přitlačte spodní část nástavce k
čepeli tak, aby výstupek nástavce zapadl do čepele (uslyšíte kliknutí).
3. Chcete-li nástavec sejmout, silně zatlačte výstupek nástavce nahoru.
WITCHTIG!
• NEPONOŘUJTE ZAŘÍZENÍ DO VODY ANI JEJ NEPOUŽÍVEJTE MOKRÝMA RUKAMA. NEPOUŽÍVEJTE
ZAŘÍZENÍ V BLÍZKOSTI VANY, UMYVADLA NEBO JINÝCH NÁDOB NAPLNĚNÝCH VODOU.
• NESKLADUJTE ZAŘÍZENÍ NA MÍSTECH, KDE BY MOHLO SPADNOUT DO VODY NEBO DO NÍ
BÝT VRŽENO.
• POKUD ZAŘÍZENÍ SPADNE DO VODY, NEVYTAHUJTE JEJ, ALE OKAMŽITĚ ODPOJTE ZÁSTRČKU OD
ZDROJE NAPÁJENÍ.
• NENECHÁVEJTE ZAŘÍZENÍ BĚHEM PROVOZU BEZ DOZORU.
TIPY PŘED ZAHAJENÍM STŘÍHÁNÍ
• Před stříháním se ujistěte, že jsou vlasy čisté a suché.
• Doporučuje se stříhat malé části vlasů najednou.
• Doporučuje se, aby při prvním použití zařízení nebo když uživatel není se zařízením
obeznámen, nestříhat vlasy příliš krátce. K tomu použijte nástavce s vyšším číselným
označením (9, 12 mm).
• Délka vlasů po stříhání závisí na typu použitého hřebenového nástavce. Každý z nich
má číselné označení: 3 mm, 6 mm, 9 mm a 12 mm. Odpovídají délce vlasů, jaká bude
po stříhání.

Návod k obsluze 7
CS
ČIŠTĚNÍ
Obecné:
• Neponořujte zařízení do vody.
• Čepel nečistěte pod tekoucí vodou. K očištění od nečistot použijte přiložený kartáč.
• K čištění tohoto zařízení nepoužívejte chemikálie ani detergenty.
• Kryt přístroje by měl být čištěn měkkým a mírně vlhkým hadříkem.
• Zařízení čistěte po každém použití. Pravidelné čištění zajišťuje lepší výsledky holení.
1. Ujistěte se, že je zařízení vypnuto a odpojeno od zdroje napájení.
2. K čištění čepele použijte přiložený kartáček.
1. Připojte zařízení do síťové zásuvky.
2. Posunutím přepínače ON/ OFF nahoru, zapnete zařízení.
3. Upozornění: Pokud bude strojek používán s nástavcem, měl by být připojen před
zapnutím zařízení (viz část „Nasazení a sejmutí hřebenových nástavců“).
4. Posunutím páky stínováni* nahoru a dolů vyberte požadované nastavení. Dostupné
délky jsou 0,8 mm; 1,6 mm; 2,5 mm a 3,3 mm.
• Začnete stříhání:
• Pro dosažení nejlepších výsledků se doporučuje začít stříhat od spodní části hlavy a
směřovat strojek nahoru.
• Pokud používáte strojek s připojeným nástavcem, střihejte co nejblíže k pokožce.
• K přesnému stříhání (například na spáncích) bystě měli používat strojek bez
nasazeného nástavce.
• Zařízení má ostrou čepel. Během stříhání netlačte strojek příliš silně na pokožku
hlavy.
• Ke stříhání vlasů můžete také použít přiložený hřeben a nůžky. Kadeře vlasů, které
mají být zastřiženy, by měly být drženy hřebenem a poté stříhány nůžkami nebo
strojkem.
5. Po dokončení stříhání vypněte strojek posunutím přepínače on/o dolů.
6. Odpojte zařízení od síťové zásuvky.
7. Sejměte nástavec z čepele (byl-li použit) a očistěte jej a zařízení podle pokynů v části
„Čištění“.
* Při nejvyšším nastavení páky je pevná a pohyblivá čepel blízko sebe, což vede ke krátkému
střihu. Po nastavení nejnižší polohy čepele se od sebe vzdálí, díky čemuž je délka vlasů po
stříhání delší.
OBSLUHA
Pokud se vlasy zaseknou mezi pohyblivou a pevnou čepelí, změňte polohu nastavení
stínováni několikrát, dokud se vlasy neuvolní.

Návod k obsluze8
CS
SKLADOVÁNÍ
• Než strojek odložíte, ujistěte se, že je čistý, suchý a odpojený od zdroje napájení.
• Ujistěte se, že kabel není během skladování omotaný kolem zařízení.
• Rukojeť na zavěšení slouží k praktickému uložení zařízení.
• Zařízení uchovávejte na suchém, chladném místě a mimo dosah děti.
SPECIFIKACE
3. Nástavec očistěte kartáčem nebo opláchnutím pod tekoucí vodou. Před opětovným
sestavením je otřete do sucha.
HLAVNÍ VLASTNOSTI
4 hřebenové nástavce: 3, 6, 9, 12 mm
Čepel z nerezové oceli
Rukojeť na zavěšení
TECHNICKÉ ÚDAJE
Šířka čepele: 45 mm
Nastavitelná délka: 0,8 mm, 1,6 mm, 2,5 mm, 3,3 mm
Úroveň hluku: < 75 dB
Příkon: 9 W
Napájení: 220 – 240 V; 50 Hz
Váha: 369,5 g
Rozměry: 185 x 60 x 37 mm
Délka kabelu: 1,8 m
Součástí balení: 4 hřebenové nástavce, čisticí kartáč, hřeben, nůžky, ochranný kryt, návod k
použití

Návod k obsluze 9
CS
Čeština
Správná likvidace výrobku
(opotřebované elektrické a elektronické vybavení)
Označení umístěné na výrobku anebo v textech, které se ho týkají, poukazuje na skutečnost, že po vypršení doby
používání je zakázáno likvidovat tento výrobek společně s ostatním domovním odpadem. Pro to, abyste se vyhnuli
škodlivému vlivu na přírodní prostředí a lidské zdraví v důsledku nekontrolované likvidace odpadů, oddělte tento
výrobek od odpadů jiného typu a zodpovědně ho recyklujte za účelem propagace opětovného využití hmotných
zdrojů coby stálé praxe. Pro více informací ohledně místa a způsobu recyklace tohoto výrobku, která bude bezpečná
pro životní prostředí, domácí uživatelé mohou kontaktovat maloobchodní prodejnu, v níž výrobek zakoupili, nebo
orgán místní samosprávy. Firemní uživatelé mohou kontaktovat dodavatele a zkontrolovat podmínky kupní smlouvy.
Neodstraňujte výrobek společně s ostatními komerčními odpady.
Vyrobeno v ČLR pro Lechpol Electronics Leszek Sp.k., ul. Garwolińska 1, 08-400 Miętne, Polsko.

Bedienungsanleitung10
DE
Danke für den Kauf des TEESA Gerätes. Bitte lesen Sie diese Bedienungsanleitung sorgfältig
und bewahren diese auf für späteres Nachschlagen. Der Händler übernimmt keine
Verantwortung für Schäden, die durch unsachgemäße Handhabung und Verwendung des
Produktes verursacht wurden.
SICHERHEITSANLEITUNGEN
Um die Gefahr von Feuer, Stromschlag oder anderen Verletzungen zu vermeiden, befolgen
Sie die grundlegenden Sicherheitsvorkehrungen bei der Verwendung elektrischer Geräte,
einschließlich der folgenden:
1. Lesen Sie diese Bedienungsanleitung sorgfältig, auch wenn Sie mit dem Gerät vertraut
sind. Bewahren Sie die Bedienungsanleitung auf für späteres Nachschlagen.
2. Vor dem Anschluss des Gerätes an Netzsteckdose, stellen Sie sicher, dass die auf dem
Gerät angegebene Spannung mit der Spannung der Steckdose übereinstimmt.
3. Gerät ist nur für den Hausgebrauch. Nicht für den gewerblichen Einsatz.
4. Das Produkt nicht für andere Zwecke verwenden, als in dieser Bedienungsanleitung
angegeben.
5. Reinigen und Lagern Sie das Gerät gemäß den Anweisungen im Kapitel „Reinigung und
Aufbewahrung“.
6. Schalten Sie das Gerät IMMER aus und trennen es von der Stromversorgung:
• wenn es nicht richtig funktioniert,
• wenn es ein seltenes Geräusch bei der Verwendung gibt,
• vor dem Zerlegen des Gerätes,
• vor der Reinigung,
• bei Nichtgebrauch.
7. Ziehen Sie beim Trennen des Netzkabels von der Steckdose, am Stecker und nicht am
Kabel.
8. Das Gerät kann von Kindern benutzt werden, die älter als 8 Jahre alt sind und von
Personen mit eingeschränkten physischen, sensorischen oder geistigen Fähigkeiten oder
Mangel an Erfahrung und Wissen, wenn sie von einer Person beaufsichtigt und geleitet
werden, die für ihre Sicherheit zuständig ist, in einer vorsichtigen Art und Weise und die
alle Sicherheits-Vorkehrungen verstanden hat und befolgen wird.
9. Halten Sie das Gerät außerhalb der Reichweite von Kindern.
10. Ein beschädigtes Netzkabel kann nur in einem autorisierten Kundendienst ersetzt
werden.
11. Halten Sie das Gerät und sein Kabel fern von Hitze, Wasser, Feuchtigkeit, scharfen Kanten
und andere Faktoren, die das Gerät oder das Netzkabel beschädigen könnten.
12. Stellen Sie sicher dass das Netzkabel keine heißen oder scharfen Elemente berührt.
13. Verwenden Sie kein unautorisiertes Zubehör.
14. VERWENDEN SIE NICHT das Gerät wenn das Kabel oder der Netzstecker beschädigt ist,
oder das Gerät defekt ist.
15. Versuchen Sie nicht, dieses Gerät selbst zu reparieren. Im Schadensfall, wenden Sie sich
an einen autorisierten Kundendienst für Überprüfung / Reparatur. Das Gerät nie zerlegen.

Bedienungsanleitung 11
DE
EINSTECKEN UND ENTFERNEN VON KÄMMEN
Hinweise:
• Vergewissern Sie sich dass das Gerät ausgeschaltet ist, wenn Sie die Kämme
einstecken oder entfernen.
• Das Set beinhaltet vier Kammführungen, jede von Ihnen mit verschiedenen
Schneidlängen- 3, 6, 9 und 12 mm.
1. Wählen Sie den gewünschten Kamm.
2. Schieben Sie den oberen Teil des Kamms auf die Zähne der Klinge und drücken dann
den unteren Teil des Kamms auf das Gerät, so dass der Vorsprung an der Unterseite
des Kamms an der Klinge einrastet (Sie hören ein Klicken).
3. Entfernen Sie den Kamm, indem Sie den Vorsprung des Kamms fest nach oben
drücken.
WITCHTIG!
• STELLEN SIE DAS GERÄT NICHT IN WASSER ODER ANDERE FLÜSSIGKEITEN. NICHT MIT NASSEN
ODER FEUCHTEN HÄNDEN BEDIENEN / BENUTZEN.
• VERWENDEN SIE DAS GERÄT NICHT IN DER NÄHE VON WASSERBEHÄLTERN IN
BADEWANNEN, WASCHBECKEN ODER ANDEREN BEHÄLTERN.
• STELLEN ODER LAGERN SIE DAS GERÄT NICHT AN ORTEN, AN DENEN ES IN EINE WANNE ODER EIN
WASCHBECKEN FALLEN ODER GELANGEN KANN.
• GREIFEN SIE NICHT NACH DEM GERÄT, DAS INS WASSER GEFALLEN IST. TRENNEN SIE ES SOFORT
VOM STROMNETZ.
TIPPS VOR DEM TRIMMEN
• Stellen Sie vor dem Trimmen sicher, dass das Haar trocken und sauber ist.
• Schneiden Sie eine kleine Menge Haar auf einmal.
• Beim ersten Gebrauch oder wenn der Benutzer mit dem Gerät nicht vertraut ist, wird
empfohlen, nicht auf einen kurzen Haarschnitt zu trimmen. Um einen längeren Haarschnitt
zu erzielen, verwenden Sie einen Kamm mit höheren Markierungen (9, 12 mm).
• Die Haarlänge nach dem Trimmen hängt vom verwendeten Kamm ab. Auf jedem
der Kämme benden sich Markierungen: 3 mm, 6 mm, 9 mm und 12 mm. Jede
Markierung entspricht der nach dem Trimmen erreichten Haarlänge.

Bedienungsanleitung12
DE
REINIGEN
Allgemein:
• Das Gerät nicht ins Wasser tauchen.
• Die Klinge nicht unter ießendem Wasser reinigen. Nur mit der mitgelieferten Bürste
reinigen
• Verwenden Sie keine Chemikalien oder Scheuermittel, um dieses Produkt zu reinigen.
• Reinigen Sie das Gehäuse nur mit einem weichen und leicht feuchten Tuch.
• Reinigen Sie das Gerät nach jedem Gebrauch. Regelmäßige Reinigung sorgt für eine
bessere Leistung.
1. Verbinden Sie das Gerät mit dem Stromnetz.
2. Schieben Sie den Ein/Aus Schalter nach oben um das Gerät einzuschalten.
3. Drücken Sie den Kegelhebel nach oben oder unten, um die gewünschte Einstellung
zu wählen.
4. Schneiden Sie Ihre Haare:
• Um die besten Ergebnisse zu erzielen, empehlt es sich, den Schnitt von der
Rückseite und der Unterseite des Kopfes vorzunehmen und den Haarschneider
nach oben in Richtung Kopf zu bewegen.
• Beim Schneiden von Haaren mit einem angebrachtem Kamm, stellen Sie sicher,
dass die Klinge in der Nähe der Haut bleibt;
• Verwenden Sie das Gerät ohne angebrachten Kamm, das für eine genauere
Trimmung (z. B. an den Schläfen).
• Das Gerät hat eine scharfe Klinge. Drücken Sie den Haarschneider daher nicht zu
fest auf die Haut, um Verletzungen zu vermeiden.
• Verwenden Sie den mitgelieferten Kamm und die Schere, um Ihr Haar weiter zu
stylen. Halten Sie die Haare mit dem Kamm und schneiden Sie über dem Kamm mit
dem Haarschneider oder der Schere.
5. Nach dem trimmen, schalten Sie das Gerät aus, indem Sie den Ein/Aus Schalter nach
unten schieben.
6. Trennen Sie das Gerät von der Steckdose.
7. Wenn das Gerät mit einem angebrachten Kamm benutzt wurde, entfernen und
reinigen Sie den Kamm und das gesamte Gerät gemäß den Anweisungen im Abschnitt
“Reinigung”.
* Wenn der Hebel auf die höchste Position eingestellt ist, sind die feststehenden und
beweglichen Klingen nahe beieinander, was zu einem kurzen Haarschnitt führt. Stellen Sie
den Hebel auf die niedrigste Position, um den Abstand zwischen den feststehenden und
beweglichen Klingen zu erhöhen und dadurch einen längeren Haarschnitt zu erzielen.
BEDIENUNG
Wenn sich Haare zwischen der beweglichen Klinge und der feststehenden Klinge verfangen
haben, drücken Sie den Hebel einige Male auf und ab, bis die Haare freigegeben sind.

Bedienungsanleitung 13
DE
LAGERUNG
• Vor der Aufbewahrung sicherstellen, dass das Gerät sauber und vollständig trocken
und das Gerät von der Steckdose getrennt ist.
• Achten Sie beim Aufbewahren darauf, dass das Netzkabel nicht um das Gerät
gewickelt ist.
• Benutzen Sie die Öse zum aufhängen um das Gerät in einer hängenden Position
aufzubewahren.
• Das Gerät kühl und trocken aufbewahren, außerhalb der Reichweite von Kindern.
TECHNISCHE DATEN
1. Vergewissern Sie sich, dass das Gerät ausgeschaltet und vom Netz getrennt ist.
2. Verwenden Sie die mitgelieferte Bürste, um die Klinge und die Haarkammer zu
reinigen.
3. Die Kämme mit dem Pinsel reinigen oder unter ießendem Wasser abspülen. Achten
Sie darauf, diese vor dem erneuten Verwenden trocken zu wischen.
HAUPTMERKMALE
4 Aufschiebekämme (3, 6, 9, 12 mm)
Edelstahlklinge
Öse für Aufhängung
TECHNISCHE DATEN
Schneidbreite: 45 mm
Längeneinstellungen: 0,8 mm, 1,6 mm, 2,5 mm, 3,3 mm
Geräuschpegel: < 75 dB
Leistung: 9 W
Stromversorgung: 220 – 240 V; 50 Hz
Gewicht: 369,5 g
Abmessungen: 185 x 60 x 37 mm
Netzkabel Länge: 1,8 m
Im Set: 4 K ämme, Reinigungsbürste, Kamm, Scheren, Schneidkopfschutz, Bedienungsanleitung

Bedienungsanleitung14
DE
Deutsch
Korrekte Entsorgung dieses Produkts
(Elektromüll)
(Anzuwenden in den Ländern der Europäischen Union und anderen europäischen Ländern mit einem separaten
Sammelsystem)
Die Kennzeichnung auf dem Produkt bzw. auf der dazugehörigen Literatur gibt an, dass es nach seiner Lebensdauer
nicht zusammen mit dam normalen Haushaltsmüll entsorgt werden darf. Entsorgen Sie dieses Gerät bitte getrennt von
anderen Abfällen, um der Umwelt bzw. der menschilchen Gesundheit nicht durch unkontrollierte Müllbeseitigung zu
schaden. Recyceln Sie das Gerät, um die nachhaltige Wiederverwertung von stoichen Ressourcen zu fördern. Private
Nutzer sollten den Händler, bei dem das Produkt gekauft wurde, oder die zuständigen Behörden kontaktieren, um in
Erfahrung zu bringen, wie sie das Gerät auf umweltfreundliche Weise recyceln können. Gewerbliche Nutzer sollten
sich an Ihren Lieferanten wenden und die Bedingungen des Verkaufsvertrags konsultieren. Dieses Produkt darf nicht
zusammen mit anderem Gewerbemüll entsorgt werden.
Hergestellt in China für Lechpol Electronics Leszek Sp.k., ul. Garwolińska 1, 08-400 Miętne.

Owner’s manual 15
EN
Thank you for purchasing TEESA appliance. Please read this operation instruction carefully
before use, and keep it for future use. Producer does not take responsibility for damages
caused by inappropriate handling and use of the product.
In order to reduce the risk of any injury, follow basic safety precautions applied when
using any electrical device, including the following:
1. Read this instruction manual carefully, even if you are familiar with the appliance.
2. Before connecting the device to power supply socket, make sure the voltage indicated
on the appliance corresponds to the voltage in the power supply socket.
3. Product intended for household use only. Not for commercial use.
4. Do not use the product for purposes/uses dierent from what displayed in this
operating manual.
5. Clean and store this appliance in accordance to instructions listed in “Cleaning” and
“Storage” section.
6. ALWAYS turn o the device and disconnect it from the mains supply:
• if it’s not operating correctly,
• if there’s an uncommon voice when using,
• before disassembling the device,
• before cleaning,
• before servicing.
7. When you disconnect the power cord, grasp and pull the plug, not the cord/cable.
8. This appliance may be used by children who are above 8 years old and by persons with
reduced physical, sensory or mental capabilities, or lack of experience and knowledge,
if they are supervised and guided by a person who is responsible for their safety in a
cautious manner, and all the safety precautions are understood and followed. Children
should not play with this device. Children should not perform cleaning and servicing
of the device unsupervised.
9. Keep the appliance out of the reach of children.
10. Fixed power cable may only be replaced in an authorized service point.
11. Keep the device and its cord/cable away from heat, water, moisture, sharp edges and
any other factor which may damage the appliance or its cord.
12. Make sure the power cord does not touch any hot or sharp elements.
13. Use only original/authorized accessories.
14. DO NOT use this appliance if the cord or the plug is damaged, or the appliance is
broken.
15. Do not attempt to repair this appliance yourself. In case of damage, contact with an
authorized service point for check-up/repair. Never disassemble this appliance.
SAFETY INSTRUCTIONS

Owner’s manual16
EN
INSERTING AND REMOVING THE COMBS
Notes:
• Make sure that the appliance is turned o when attaching or removing the combs.
• The set includes four combs, each of them having dierent cutting lengths- 3, 6, 9 and
12 mm.
1. Choose the desired comb.
2. Slide the upper part of the comb onto the teeth of the cutter and then push lower part
of the comb on the appliance so that the projection at the bottom of the comb locks
on the cutter (you will hear a click). Remove the comb from the blade by pushing it
upwards.
3. Remove the comb by pushing the projection of the comb upwards.
IMPORTANT!
• DO NOT PLACE THE APPLIANCE IN WATER OR ANY LIQUID; NOR HANDLE/ USE IT WITH WET OR
MOIST HANDS.
• DO NOT USE THE APPLIANCE NEAR WATER CONTAINED IN BATHTUBS, SINKS OR IN OTHER
CONTAINERS.
• DO NOT PLACE OR STORE THE APPLIANCE WHERE IT CAN FALL OR BE PULLED INTO A TUB OR
SINK.
• DO NOT REACH FOR THE APPLIANCE THAT HAS FALLEN INTO WATER. UNPLUG IT IMMEDIATELY.
TIPS BEFORE TRIMMING
• Prior to trimming, make sure hair is dry and clean.
• Trim small amount of hair at a time.
• For the rst use or when the user is not acquainted with the appliance, it is
recommended not to trim to a short haircut. To achieve longer haircut, use a comb
with higher markings (9, 12 mm).
• Hair length after trimming depends on the comb used. There are markings on each
of the combs: 3 mm, 6 mm, 9 mm and 12 mm. Each marking corresponds to the hair
length achieved after trimming.

Owner’s manual 17
EN
OPERATION
1. Connect the appliance to the power supply socket.
2. Push the on/o switch upwards to turn on the appliance.
3. Push the taper lever up or down to choose desired setting.
4. Start cutting your hair:
• To achieve best results it is recommended to stat trimming from the back and
bottom of the head and moving the hair clipper upwards towards the top of the
head.
• When cutting hair with a comb attached, make sure the cutter stays close to the
skin.
• Use the appliance without comb attached for more precise trim (for example on
the temples).
• The appliance has a sharp cutter. Therefore do not press the hair clipper too hard on
the skin to avoid injuries.
• Use the included comb and scissors to further style your hair. Hold the hair with the
comb and cut over the comb with the hair clipper or scissors.
5. After trimming, turn o the appliance by pushing the on/o switch downwards.
6. Disconnect the appliance from power supply socket.
7. If the appliance was used with the comb attached, remove and clean the comb and
the whole appliance according to the instructions included in “Cleaning” section.
* When the lever is set to the highest position, the stationary and moving blades are close
to each other, resulting in a short haircut. Set the lever to the lowest position to increase the
distance between the two blades and as a result achieve longer haircut.
General:
• Do not immerse the appliance in water.
• Do not clean the cutter under running water. Clean it only with the included brush.
• Do not use any abrasives or chemical agents to clean this product.
• Clean only the casing with a soft and slightly damp cloth.
• Clean the appliance after each use. Regular cleaning guarantees better shaving
performance.
1. Make sure the appliance is turned o and disconnected from power mains.
2. Use the included brush to clean the cutter.
3. Clean the combs using the brush or rinse them under running water. Make sure to
wipe them dry before retting.
CLEANING
When hair jams in between the moving and stationary blade, push the lever up and down a
few times until hair are released.

Owner’s manual18
EN
SPECIFICATION
English
Correct Disposal of This Product
(Waste Electrical & Electronic Equipment)
(Applicable in the European Union and other European countries with separate collection systems) This marking
shown on the product or its literature, indicates that it should not be disposed with other household wastes at the
end of its working life. To prevent possible harm to the environment or human health from uncontrolled waste
disposal, please separate this from other types of wastes and recycle it responsibly to promote the sustainable reuse of
material resources. Household users should contact either the retailer where they purchased this product, or their local
government oce, for details of where and how they can take this item for environmentally safe recycling. Business
users should contact their supplier and check the terms and conditions of the purchase contract. This product should
not be mixed with other commercial wastes for disposal.
Made in China for Lechpol Electronics Leszek Sp.k., ul. Garwolińska 1, 08-400 Miętne.
STORAGE
• Before storing the appliance, make sure it is clean, dry and disconnected from the
power supply.
• Make sure that while storing the power cord is not wrapped around the appliance.
• Use a hanging loop to store the device in a hanging position.
• Store the appliance in a dry, cool place, out of the reach of children.
MAIN FEATURES
4 attached combs (3, 6, 9, 12 mm)
Stainless steel cutter
Hanging loop
TECHNICAL DATA
Cutter width: 45 mm
Length settings: 0,8 mm, 1,6 mm, 2,5 mm, 3,3 mm
Noise level: < 75 dB
Power: 9 W
Power supply: 220 – 240 V; 50 Hz
Weight: 369,5 g
Dimensions: 185 x 60 x 37 mm
Power cord length: 1,8 m
In set: 4 combs, cleaning brush, comb, scissors, cutting head guard, user’s manual

Manuel d’utilisation 19
FR
Merci d’avoir acheter l’appareil TEESA. Avant l’utilisation de l’appareil, lire attentivement
le mode d’emploi et le garder pour une consultation ultérieure. Le fabricant n’est pas
responsable d’une utilisation inappropriée du produit.
SÉCURITÉ
Pour éviter les dommages et les blessures, respecter les consignes de sécurité essentielles
appliquées pour l’utilisation des appareils électriques, y compris celles détaillées ci-après:
1. Avant l’utilisation, lire attentivement le mode d’emploi, même si un appareil similaire a
déjà été utilisé.
2. Avant de brancher l’appareil, vérier la conformité de la tension de courant dans la prise
secteur avec la tension de l’appareil.
3. L’appareil est exclusivement destiné à une utilisation ménagère. Il n’est pas destiné à un
usage professionnel.
4. Ne pas utiliser l’appareil à d’autres ns que celles décrites dans le présent mode d’emploi.
5. Nettoyer et entreposer l’appareil conformément aux consignes indiquées dans la
rubrique«Nettoyage» et «Entreposage».
6. Toujours éteindre l’appareil et le débrancher de l’alimentation électrique:
• si l’appareil ne fonctionne pas correctement,
• si le bruit produit par l’appareil n’est pas typique pour son fonctionnement ou témoigne
d’une anomalie,
• avant le démontage,
• avant le nettoyage,
• avant des interventions de service.
7. Pour débrancher l’appareil de l’alimentation, saisir et tirer par la che. Ne jamais tirer par
le câble.
8. Cet appareil peut être utilisé par des enfants âgés d’au moins 8 ans et par des personnes
ayant des capacités physiques, sensorielles ou mentales réduites ainsi que par des
personnes ne possédant pas d’expérience ni de connaissances, si ces personnes sont
surveillées ou si des instructions concernant l’utilisation de l’appareil en toute sécurité
leur ont été fournies,de manière à ce que tous les risques encourus soient compris.
Informer les enfants que cet appareil n’est pas un jouet. Le nettoyage et la maintenance
de l’appareil ne doivent pas être réalisés par des enfants sans surveillance.
9. Entreposer l’appareil dans un endroit hors de portée des enfants.
10. Le câble d’alimentation inséparable peut être remplacé uniquement dans un service
agréé.
11. Garder l’appareil et le câble d’alimentation loin des sources de chaleur, d’eau, d’humidité,
de bords tranchants et d’autres facteurs qui pourraient endommager l’appareil ou le
câble.
12. Veiller particulièrement à ce que le câble d’alimentation ne touche pas les bords
tranchants / les surfaces chaudes.
13. Ne pas utiliser d’accessoires qui ne sont pas d’origine.
14. Il est interdit d’utiliser l’appareil, si le câble d’alimentation est endommagé ou
l’équipement ne fonctionne pas correctement.
15. Il est interdit de réparer l’appareil par vous-même. En cas de dommage, contactez un
service technique agréé pour contrôle/réparation. Il est interdit de démonter l’appareil.

Manuel d’utilisation20
FR
FIXER ET RETIRER UN GUIDE DE COUPE
Remarques :
• S’assurer que l’appareil est éteint quand vous xez ou retirez un guide de coupe.
• Quatre guides de coupe sont fournis avec l’appareil, chacun à une longueur de
coupe diérente - 3, 6, 9 et 12 mm.
1. Choisir le guide voulu.
2. Placer la partie supérieure du guide sur les dents de la lame et ensuite, appuyer sur la
partie inférieure du guide de coupe, de manière à ce que le tenon du guide de coupe
soit bloqué sur la lame (un clic se fait entendre).
3. Pour retirer le guide de coupe, pousser fort le tenon vers le haut.
IMPORTANT!
• NE PAS PLONGER L’APPAREIL DANS L’EAU, NI L’UTILISER AVEC LES MAINS MOUILLÉES. NE PAS
UTILISER L’APPAREIL À PROXIMITÉ DES BAIGNOIRES, DES LAVABOS OU AUTRES RÉSERVOIRS
REMPLIS D’EAU.
• NE PAS PLACER L’APPAREIL NI NE L’ENTREPOSER DANS UN ENDROIT OÙ IL PEUT TOMBER
DANS L’EAU OU ÊTRE JETER DANS L’EAU.
• SI L’APPAREIL TOMBE DANS L’EAU, NE PAS ESSAYER DE LE RETIRER. DÉBRANCHER IMMÉDIATEMENT
LA FICHE DE LA PRISE D’ALIMENTATION.
• NE PAS LAISSER L’APPAREIL SANS SURVEILLANCE LORS DE SON FONCTIONNEMENT.
CONSEILS AVANT DE COUPER
• Avant de commencer l’utilisation de l’appareil, s’assurer que les cheveux sont
propres et secs.
• Il est conseillé de couper en une fois de petites sections de cheveux.
• Il est conseiller de ne pas couper trop court, si vous utilisez l’appareil pour la
première fois ou si l’utilisateur ne connaît pas encore l’appareil. Pour ce faire, utiliser
les guides de coupe avec les nombres plus grands (9, 12 mm).
• La longueur des cheveux après la coupe dépend du type de guide de coupe utilisé.
Sur chacun se trouvent des indications de longueur : 3 mm, 6 mm, 9 mm et 12 mm.
Ces indications correspondent à la longueur des cheveux obtenue après la coupe.
Pagina se încarcă...
Pagina se încarcă...
Pagina se încarcă...
Pagina se încarcă...
Pagina se încarcă...
Pagina se încarcă...
Pagina se încarcă...
Pagina se încarcă...
Pagina se încarcă...
Pagina se încarcă...
Pagina se încarcă...
Pagina se încarcă...
Pagina se încarcă...
Pagina se încarcă...
Pagina se încarcă...
Pagina se încarcă...
Pagina se încarcă...
Pagina se încarcă...
Pagina se încarcă...
Pagina se încarcă...
Pagina se încarcă...
Pagina se încarcă...
Pagina se încarcă...
Pagina se încarcă...
Pagina se încarcă...
Pagina se încarcă...
Pagina se încarcă...
Pagina se încarcă...
Pagina se încarcă...
Pagina se încarcă...
Pagina se încarcă...
Pagina se încarcă...
-
 1
1
-
 2
2
-
 3
3
-
 4
4
-
 5
5
-
 6
6
-
 7
7
-
 8
8
-
 9
9
-
 10
10
-
 11
11
-
 12
12
-
 13
13
-
 14
14
-
 15
15
-
 16
16
-
 17
17
-
 18
18
-
 19
19
-
 20
20
-
 21
21
-
 22
22
-
 23
23
-
 24
24
-
 25
25
-
 26
26
-
 27
27
-
 28
28
-
 29
29
-
 30
30
-
 31
31
-
 32
32
-
 33
33
-
 34
34
-
 35
35
-
 36
36
-
 37
37
-
 38
38
-
 39
39
-
 40
40
-
 41
41
-
 42
42
-
 43
43
-
 44
44
-
 45
45
-
 46
46
-
 47
47
-
 48
48
-
 49
49
-
 50
50
-
 51
51
-
 52
52


Teesa TSA0527 Manualul proprietarului
- Categorie
- Aparate de tuns
- Tip
- Manualul proprietarului
în alte limbi
- français: Teesa TSA0527 Le manuel du propriétaire
- slovenčina: Teesa TSA0527 Návod na obsluhu
- polski: Teesa TSA0527 Instrukcja obsługi
- Deutsch: Teesa TSA0527 Bedienungsanleitung
- Nederlands: Teesa TSA0527 de handleiding
Lucrări înrudite
-
Teesa TSA0527 Manualul proprietarului
-
Teesa TSA0523 CUT PRO Hair clipper Manualul proprietarului
-
-
Teesa TSA3232 Manualul proprietarului
-
-
Teesa TSA0166 Manualul proprietarului
-
-
Teesa TSA8019 Manualul proprietarului
Alte documente
-
Alpina SF-5032 Fișa cu date
-
Solac CP7322 Manualul proprietarului
-
Solac IVORY SPORT Mod CP7311 Manualul proprietarului
-
Remington G5 Graphite Series Personal Groomer PG5000 Manualul proprietarului
-
Remington HC5950 Manualul proprietarului
-
-
-
Remington HC7130 PRO POWER TITANIUM Manual de utilizare