Teesa TSA4009 Manualul proprietarului
- Categorie
- Aparate de cafea
- Tip
- Manualul proprietarului

CS
Bedienungsanleitung
Návod k obsluze
Owner’s manual
Manuel de l'Utilisateur
Εγχειρίδιο χρήσης
Használati utasítás
Handleiding
Instrukcja obsługi
TSA4009
RO
SK
Manual de utilizare
Návod na použitie

1
7
8
2
6
3
4
5
CS DE EN FR
Ohřívací deska na
šálky
Tassen-
Wärmeplatte
Cup warming tray Plaque chauante
pour les tasses
Ovládací panel
Kontrollpaneel
Control panel Panneau de
commande
Filtr Filter Filter Filtre
Držák ltru
Filterhalter
Filter holder Support du ltre
Odměrka na kávu
se šlehačem
Messlöel mit
Stampfer
Measuring spoon
with tamper
Doseur de café
avec tasseur
Tryska na pěnění
Dampfstab
Steam wand Buse du mousseur
Zásobník na vodu
Wassertank Water tank
Réservoir d’eau
Odkapávací miska
Abtropfschale
Drip tray Égouttoir
1
2
3
4
5
6
7
GR HU NL
Δίσκος προθέρμανσης
φλυτζανιών
Fűtőlap csészékhez Kop-warmhoudplaat
Πίνακας ελέγχου
Kezelőpanel Bedieningspaneel
Φίλτρο
Filter Filter
Στήριγμα φίλτρου
Filter tartó Filterhouder
Μεζούρα με tamper
Mérőkanál döngölővel Koemaat met garde
Ράβδος ατμού
Habosító fúvóka Opschuimpijpje
Δεξαμενή νερού
Víztartály Waterreservoir
Δίσκος σταγόνων
Csepegtető tálca Lekbak
1
2
3
4
5
6
7
8
PL RO SK
Płyta grzewcza na liżanki
Tava de încălzire a cănilor Tácka na ohrev šálok
Panel sterujący
Panou de control Ovládací panel
Filtr
Filtru Filter
Uchwyt ltra
Suport ltru Páka s držiakom ltra
Miarka do kawy z
ubijakiem
Lingură de măsurat Odmerka na kávu s
tamperom
Dysza spieniacza
Dozator pentru abur Napeňovacia dýza
Zbiornik na wodę
Rezervor de apă Nádoba na vodu
Tacka ociekowa
Tavă de picurare Odkvapkávacia tácka
1
2
3
4
5
6
7
8
8

CS DE EN FR
Indikátor páry
Dampfanzeige
Steam indicator Indicateur de
vapeur
Indikátor kávy
Kaeeanzeige
Coee indicator Indicateur de café
Indikátor napájení
Betriebsanzeige
Power indicator Indicateur
d’alimentation
Knoík páry
Dampfregler
Steam knob Bouton rotatif de
vapeur
Tlačítko páry
Taste Dampf
Steam button Touche de vapeur
Tlačítko kávy
Taste Kaee
Coee button Touche de café
Tlačítko zapnutí
ON/OFF
Taste EIN/AUS [ON/
OFF] ON/OFF button
Touche ON/OFF
1
2
3
4
5
6
7
GR HU NL
Ένδειξη ατμού
Gőzjelző Stoomindicator
Ένδειξη καφέ
Kávéjelző Koe-indicator
Ενδειξη λειτουργίας
Tápellátásjelző Stroomindicator
Πόμολο ατμού
Gőzölő beállító Stoomknop
Κουμπί Ατμού
Gőzölő gomb Stoomtoets
Κουμπί καφέ
Kávé gomb Stroomindicator
Κουμπί ON/OFF
ON/OFF táp nyomógomb ON / OFF-toets
1
2
3
4
5
6
7
PL RO SK
Wskaźnik pary
Indicator de abur Indikátor pary
Wskaźnik kawy
Indicator cafea Indikátor kávy
Wskaźnik zasilania
Indicator de alimentare Indikátor napájania
Pokrętło pary
Comutator abur Regulátor pary
Przycisk pary
Buton pentru abur Tlačidlo pary
Przycisk kawy
Buton pentru cafea Tlačidlo kávy
Przycisk włączania ON/
OFF
Buton ON/OFF Tlačidlo zapnutia ON/OFF
1
2
3
4
5
6
7
1
5 6 7
2 3 4

6 7Návod k obsluze Návod k obsluze
CS CS
OTÁZKY BEZPEČNOSTI
Děkujeme, že jste si koupili zařízeníTEESA. Před použitím si pečlivě přečtěte uživatelskou příručku
a uložte ji pro pozdější použití. Výrobce neodpovídá za nesprávné používání a provoz tohoto
zařízení.
Aby nedošlo k poškození nebo zranění, dodržujte základní bezpečnostní opatření používaná k
provozuelektrickýchzařízení,včetněnásledujících:
1. Před použitím si pozorně přečtěte návod k použití, i když jste dříve podobné zařízení používali.
Návod uschovejte pro pozdější použití.
2. Před připojením zařízení zkontrolujte, zda je napětí zásuvky a zařízení kompatibilní.
3. Zařízení je určeno pouze pro domácí použití.
4. Zařízení čistěte a skladujte podle pokynů uvedených v části "Čištění“.
5. Zařízení vždy vypněte a odpojte od zdroje napájení:
• pokud zařízení nefunguje správně,
• pokud zvuky při provozu zařízení nejsou běžné nebo svědčí o anomálii,
• před demontáží,
• před čištěním,
• pokud není používáno.
6. Při odpojování zařízení od zdroje napájení uchopte a táhněte za zástrčku, nikoliv za kabel / šňůru
7. Nedoporučuje se používat toto zařízení v případě, že zásobník na vodu je prázdný.
8. Nebezpečí popálení! Je zakázáno směrovat proud horké vody a páry na sebe nebo na jiné osoby.
9. Proto vždy manipulujte se zařízením pomocí rukojetí a knoíků.
10.Nedotýkejte se zařízení, když je v provozu, hrozí nebezpečí popálení.
11.Dávejte pozor, abyste se neopařili párou a nepopálili horkým povrchem, když zařízení pracuje.
12.Během vaření kávy nevyjímejte držák ltru ze zařízení. Filtr lze z přístroje oddělit až po dokončení
přípravy nápoje.Buďteobzvláštěopatrní,protožekovovéčástimohou býtstálehorké.Přiodpojování
od kávovaru držte držák ltru za rukojeť a zajistěte ltr páčkou, abyste se zbavili zbytků kávy.
13.Zařízení uchovávejte mimo dosah děti.
14.Toto zařízení smí používat děti mladší 8 let a osoby s omezenými fyzickými, smyslovými nebo
duševními schopnostmi, stejně jako osoby, které nemají žádné zkušenosti a nejsou seznámeny se
zařízením, pokudjezajištěndohlednebo školenítýkajícíse používánízařízenítakovým způsobem,
aby rizika s ním spojená byla srozumitelná. Děti by měly být poučeny, aby s přístrojem nezacházely
jako s hračkou. Čištění a údržbu zařízení by neměly provádět děti bez dozoru.
15.Neodpojitelnýnapájecíkabelmůžebýtvyměněnvýrobcem,pracovníkemservisunebokvalikovanou
osobou.
16.Zařízení a napájecí kabel by měly být chráněny před teplem, vodou, vlhkostí, ostrými hranami
a dalšími faktory, které by mohly zařízení nebo kabel poškodit.
17.Buďte obzvláště opatrní, aby se napájecí kabel nedotýkal horkých / ostrých hran.
18.Zařízení nepoužívejte k jiným účelům, než je popsáno v níže uvedeném návodu.
19.Neponořujte zařízení do vody ani jej nepoužívejte mokrýma rukama.
20.Během provozu, nenechávejte zařízení bez dozoru.
21.Pokud zařízení nepoužíváte, vždy jej odpojte od zdroje napájení.
22.Pokud je napájecí kabel poškozen nebo zařízení nefunguje správně, nelze je používat.
23.Zařízení nesmíte opravovat sami. Zařízení neobsahuje žádné součásti, které by uživatel mohl
sám opravit. Demontáž zařízení je zakázána.
24.Používejte pouze originální díly.
MONTÁŽ FILTRU
Součástí balení jsou dva ltry. Hlubší ltr vám umožní získat větší sílu a silnější vůni kávy.
1. Aby bylo možné vložit ltr do držáku, zarovnejte jazýček ve ltru se zářezem v držáku. Poté
otáčejte ltrem, dokud nezapadne do držáku.
PŘED PRVNÍM POUŽITÍM
1. Odpojte nádrž na vodu od zařízení. Poté nalijte vodu do nádrže. Hladina vody by neměla
překročit značku "MAX“ na nádrži. Umístěte nádrž na dříve zaujaté místo.
2. Vložte ltr do držáku (ve ltru by neměla být žádná káva), poté nasaďte držák do zařízení
(Obr.1) a otáčejte doleva, dokud neucítíte odpor (Obr.2 a Obr.3).
Obr.1 Obr.2 Obr.3
3. Umístěte šálek na odkapávací misku. Ujistěte se, že knoík páry je otočen maximálně
doprava (do polohy ).
4. Připojte zařízení k napájení a stisknutím tlačítka ON/OFF zařízení zapněte. Indikátor
napájení se rozsvítí červeně.
5. Stiskněte tlačítko kávy . Jakmile voda začne vytékat, opětovným stisknutím tlačítka kávy
proces zastavíte.
6. Ujistěte se, že není stisknuto tlačítko páry . Chvíli počkejte - zařízení zahájilo proces
ohřevu. Blikající zelený indikátor kávy znamená, že proces předehřívání je dokončen.
7. Stiskněte znovu tlačítko kávy – přístroj začne čerpat vodu.

8 9Návod k obsluze Návod k obsluze
CS CS
8. Po jedné minutě stiskněte tlačítko kávy. Vylijte horkou vodu z šálku. Nyní můžete začít
připravovat kávu.
Upozornění: Při prvním čerpání vody může být slyšet hluk. Jedná se o normální jev. Asi po
20 sekundách by měl hluk zmizet.
OHŘÍVÁNÍ
PŘÍPRAVA ESPRESA
Před vařením kávy se doporučuje zahřát ltr, držák ltru a šálek, ve kterém se bude káva vařit. Tím je
zajištěno, že chuť kávy nebude narušena chladnými součástmi.
1. Odpojte nádrž a naplňte ji vodou. Hladina vody by měla být mezi úrovněmi MAX a MIN.
Umístěte nádrž na dříve zaujaté místo.
2. Vložte ltr do držáku (ve ltru by neměla být žádná káva), poté nasaďte držák do zařízení
(Obr.1) a otáčejte doleva, dokud neucítíte odpor (Obr.2 a Obr.3).
3. Umístěte šálek na odkapávací misku.
4. Připojte zařízení k elektrické síti. Ujistěte se, že knoík páry je otočen maximálně doprava.
5. Stisknutím tlačítka ON/OFF zařízení zapnete. Indikátor napájení se rozsvítí červeně. Ujistěte
se, že není stisknuto tlačítko páry.
6. Stiskněte tlačítko kávy. Jakmile zařízení začne čerpat vodu, stiskněte znovu tlačítko kávy,
abyste proces zastavili. Účelem výše uvedeného kroku je čerpání vody z nádrže do zařízení.
7. Stiskněte tlačítko kávy znovu, když se kontrolka kávy rozsvítí zeleně a přístroj začne čerpat
vodu.
8. Po 20 sekundách stiskněte tlačítko kávy. Proces zahřívání byl dokončen.
1. Pomocí odměrky na kávu nasypte mletou kávu do zvoleného ltru (z jedné lžíce mleté kávy
připravíte šálek kvalitní kávy) a poté kávu našlehejte metličkou.
Upozornění: Ujistěte se, že káva není na okraji ltru!
2. Vložte ltr do držáku, poté držák nainstalujte do zařízení a otáčejte doleva, dokud neucítíte
odpor.
3. Vylijte horkou vodu z šálku. Poté položte horký šálek na odkapávací misku.
4. Ujistěte se, že je knoík páry otočen zcela doprava a že není stisknuto tlačítko páry.
5. Indikátor kávy by měl svítit zeleně – v tomto okamžiku stiskněte tlačítko kávy. Po chvíli by
mělo zařízení začít vařit kávu.
6. Stiskněte tlačítko kávy, jakmile získáte požadované množství nápoje nebo barva začne
výrazně blednout.
7. Po dokončení přípravy kávy stiskněte tlačítko ON/OFF. Indikátory napájení a kávy zhasnou
a zařízení se vypne.
UPOZORNĚNÍ: Během provozu nenechávejte zařízení bez dozoru!
Upozornění: Během přípravy kávy nebo výroby páry může indikátor připravenosti blednout -
to je normální a indikuje to, že se zařízení zahřívá, aby udrželo správnou teplotu.
8. Pro odpojení držáku ltru od zařízení otočte jej doprava, poté zajistěte ltr v držáku páčkou
a odstraňte zbytky kávy.
9. Nechte jednotlivé díly vychladnout a poté je opláchněte pod tekoucí vodou.
PŘÍPRAVA CAPPUCCINA
POZOR Při výrobě páry musí být držák ltru připevněn k zařízení.
1. Stiskněte tlačítko nastavení. Počkejte, dokud se indikátor páry nerozsvítí zeleně.
2. Naplňte nádobu mlékem (pro přípravu jednoho cappuccina potřebujete asi 100 ml mléka).
Doporučuje se používat pasterizované mléko vytažené přímo z chladničky bezprostředně
před použitím (nepoužívejte teplé mléko).
3. Pro získání většího objemu napěněného mléka se doporučuje otočit knoíkem páry úplně
doleva asi na 15 sekund, protože z trysky napěňovače zpočátku vytéká příliš mnoho vody.
Asi po 15 sekundách otočte knoíkem co nejvíce doprava a přejděte k dalšímu kroku.
4. Ponořte napěňovací trysku do mléka do hloubky asi 2 cm a poté pomalu otáčejte knoíkem
páry doleva. Z trysky napěňovače začne vycházet pára. Pro napěnění mléka pohybujte
džbánem nahoru a dolů krouživými pohyby.
Upozornění:
• Nedotýkejte se výstupu páry, hrozí nebezpečí popálení.
• Neotáčejte knoíkem páry prudce, protože to může rychle vytvořit velké množství páry,
což může zvýšit riziko výbuchu.
5. Po dokončení napěňování mléka otočte knoík maximálně doprava.
6. Vyčistěte napěňovací trysku a výstup páry, jak je popsáno v kapitole„Čištění a údržba“.
7. Stisknutím tlačítka ON/OFF zařízení vypnete.
8. Nalijte mléčnou pěnu do předem připraveného espressa.
Upozornění: Aby bylo možné připravit kávu po napěnění mléka, stiskněte tlačítko kávy a
ujistěte se, že není stisknuté tlačítko páry. Stroj bude čerpat vodu, dokud kontrolka kávy
nezhasne. Stiskněte tlačítko kávy a počkejte, až se kontrolka kávy znovu rozsvítí.
PNení možné připravit kávu, pokud se současně rozsvítí indikátory kávy a páry. Pro přípravu kávy
opakujte výše uvedené kroky.
NAPĚNĚNÍ MLÉKA/VYTVOŘENÍ PÁRY PRO OHŘEV TEKUTIN
Napěňovací trysku lze použít k napěnění mléka nebo k přípravě nápojů, jako je horká čokoláda.
1. Odpojte nádrž a naplňte ji vodou (hladina vody v nádrži by neměla překročit značku MAX).
Umístěte nádrž na dříve zaujaté místo.
2. Připojte zařízení k elektrické síti.
3. Stisknutím tlačítka ON/OFF zařízení zapnete. Indikátor napájení se rozsvítí červeně.
4. Stiskněte tlačítko kávy. Ujistěte se, že není stisknuto tlačítko páry. Jakmile zařízení začne čerpat
vodu, stiskněte znovu tlačítko kávy, abyste proces zastavili.
5. Stiskněte tlačítko páry a počkejte několik sekund. Zařízení spustí proces ohřevu. Když se rozsvítí
zelený indikátor, znamená to, že proces ohřevu je dokončen.

10 11Návod k obsluze Návod k obsluze
CS CS
ČIŠTĚNÍ A SKLADOVÁNÍ
Przed czyszczeniem należy odłączyć urządzenie od źródła zasilania i pozostawić je do ostygnięcia.
1. Kryt zařízení čistěte měkkým mírně vlhkým hadříkem. Neponořujte zařízení do vody.
2. Pravidelně oplachujte vnitřek nádrže na vodu. Před opětovnou instalací do zařízení se
ujistěte, že je nádrž suchá.
3. Vyčistěte odkapávací misku jemným čisticím prostředkem, poté ji opláchněte pod tekoucí
vodou a otřete do sucha.
4. Opláchněte držák ltru altry pod tekoucí vodou a otřete je do sucha.
Upozornění: Držák ltru nemyjte v myčce na nádobí!
5. K čištění tohoto zařízení nepoužívejte chemikálie ani detergenty.
6. Po každém použití vyčistěte trysku napěňovače avýstup páry, aby nedošlo k jejich ucpání:
Umístěte prázdnou nádobu pod napěňovací trysku, poté otočte knoíkem páry a stiskněte
tlačítko kávy. Zařízení začne čerpat vodu. Přibližně po 30 sekundách znovu stiskněte tlačítko
kávy. Vyčistěte napěňovací trysku vlhkou houbou. Zachovejte zvláštní opatrnost, hrozí
nebezpečí popálení!
7. Pokud dojde k zablokování výstupu páry, nejprve otočte knoíkem páry úplně doprava
a nechte zařízení asi půl hodiny vychladnout. Poté několikrát vyčistěte výstup páry jehlou o
průměru asi 1 mm. Stiskněte tlačítko páry, a když se příslušný ukazatel rozsvítí zeleně, otočte
knoíkem páry doleva a zkontrolujte, zda zařízení již vyrábí páru. Pokud i přes výše uvedené
kroky zařízení stále nevytváří páru, obraťte se na autorizované servisní středisko.
6. Vložte napěňovací trysku do nádoby obsahující kapalinu, která má být zahřátá. Při napěňování
mléka ponořte napěňovací trysku do mléka do hloubky asi 2 cm. Pomalu otočte knoíkem páry
doleva, aby zahájit vytváření páry.
7. Po dokončení napěňování otočte knoíkem páry co nejvíce doprava.
8. Stisknutím a uvolněním tlačítka ON/OFF zařízení vypnete.
ODVÁPNĚNÍ
Pro zajištění správné funkce spotřebiče, udržení čistoty systému cirkulace vody a zachování co nejlepší
chuti a aroma kávy je třeba odstraňovat vodní kámen každý jeden až dva měsíce.
1. Naplňte nádržku vodou a odvápňovacím prostředkem až po úroveň MAX (poměr vody a
odvápňovacího prostředku je 4:1; podrobnosti viz pokyny k odvápnění).
2. Připevněte držák ltru (bez kávy) ke stroji a postavte konvici na odkapávací misku.
3. Stisknutím tlačítka ON/OFF zařízení zapnete. Indikátor napájení se rozsvítí červeně. Stiskněte
tlačítko kávy a ujistěte se, že není stisknuto tlačítko páry. Jakmile zařízení začne čerpat vodu,
stiskněte znovu tlačítko kávy, abyste proces zastavili. Po krátké chvíli zařízení zahájí proces
ohřevu.
4. Když se rozsvítí zelený indikátor, znamená to, že proces ohřevu je dokončen. Stiskněte tlačítko
kávy a připravte přibližně 60 ml (dva šálky) vody. Opětovným stisknutím tlačítka kávy zastavte
čerpání vody a počkejte asi 5 sekund.
5. Stiskněte tlačítko páry a počkejte, dokud se indikátor nerozsvítí zeleně. Páru vytvářejte
přibližně 2 minuty, poté otočte knoíkem páry maximálně doprava, abyste proces zastavili.
Stisknutím tlačítka ON/OFF zařízení vypnete. Nechte zařízení alespoň 15 minut odpočívat.
6. Po uplynutí této doby znovu spusťte zařízení a opakujte kroky 3-5 alespoň třikrát.
7. Poté uvolněte tlačítko páry. Jakmile se rozsvítí zelená kontrolka, stiskněte tlačítko pro přípravu
kávy a nechte zařízení čerpat vodu, dokud se nádržka zcela nevyprázdní.
8. Poté naplňte nádrž čistou vodou až po úroveň MAX a začněte znovu čerpat vodu (bez použití
kávy). Opakujte kroky 4-6 třikrát (v kroku č. 5 není třeba čekat 15 minut), poté nechte zařízení
čerpat vodu, dokud se nádrž zcela nevyprázdní.
9. Opakujte krok 8 alespoň 3x, abyste se ujistili, že je systém vodního oběhu čistý.
ODSTRAŇOVÁNÍ ZÁVAD
Problém Možná příčina Možné řešení
Kovové části nádrže
zrezivěly
Nevhodný odstraňovač vodního
kamene může vést k tvorbě rzi na
kovových částech uvnitř nádrže
Použijte vhodný odvápňovací
prostředek
Únik vody pod zařízením Odkapávací miska je plná Vyprázdněte odkapávací
misku
Zařízení nefunguje Kontaktujte autorizované
servisní středisko
Voda vytéká z ltru Na okraji ltru je káva Vyčistěte okraj ltru
Kyselá (octová) příchuť v
espressu
Cyklus oplachování po
odvápnění nebyl proveden
správně
Zařízení několikrát opláchněte
podle pokynů v kapitole„Před
prvním použitím“
Káva je skladována na teplém a
vlhkém místě po dlouhou dobu
Káva je znehodnocena
Použijte nové balení kávy
nebo jej uložte na chladném
a suchém místě Po otevření
nového balení kávy je třeba
jej znovu uzavřít a uložit do
chladničky, aby byla
zachována čerstvost kávy
Zařízení nefunguje Zařízení je nesprávně připojeno k
napájení
Připojte zařízení správně ke
zdroji napájení; pokud
zařízení stále nefunguje,
kontaktujte autorizované
servisní středisko
Napěňovací tryska
nefunguje
Indikátor páry nesvítí Zařízení vytváří páru pouze
tehdy, pokud svítí indikátor
páry
Nádoba je příliš velká nebo její
tvar je nevhodný
Použijte vysokou a úzkou
nádobu
Bylo použito odtučněné mléko Doporučuje se používat buď
plnotučné nebo polotučné
mléko

12 13Návod k obsluze Návod k obsluze
CS CS
SPECIFIKACE
Funkce a nejdůležitější součástky
Nahřívání šálků
Napěňovač mléka
Funkce páry
Odnímatelná odkapávací miska
Odnímatelný zásobník vody
Protiskluzové nožičky
Technické údaje
Druh kávy: mletá káva
Tlak čerpadla: 15 barů
Objem zásobníku vody: 1,2 l
Max. Výška šálku: 80 mm
Maximální výkon: 850 W
Délka kabelu: 95 cm
Napájení: 220-240 V~; 50/60 Hz
Váha: 2,9 kg
Rozměry: 26,8 x 22,5 x 31,2 cm
Součástí balení: 2x ltr, odměrka na kávu s metličkou
Čeština
Správná likvidace výrobku
(opotřebované elektrické a elektronické vybavení)
Označení umístěné na výrobku anebo v textech, které se ho týkají, poukazuje na skutečnost, že po vypršení doby
používání je zakázáno likvidovat tento výrobek společně s ostatním domovním odpadem. Pro to, abyste se vyhnuli
škodlivému vlivu na přírodní prostředí a lidské zdraví v důsledku nekontrolované likvidace odpadů, oddělte tento výrobek
od odpadů jiného typu a zodpovědně ho recyklujte za účelem propagace opětovného využití hmotných zdrojů coby stálé
praxe. Pro více informací ohledně místa a způsobu recyklace tohoto výrobku, která bude bezpečná pro životní prostředí,
domácí uživatelé mohou kontaktovat maloobchodní prodejnu, v níž výrobek zakoupili, nebo orgán místní samosprávy.
Firemní uživatelé mohou kontaktovat dodavatele a zkontrolovat podmínky kupní smlouvy. Neodstraňujte výrobek
společně s ostatními komerčními odpady.
Vyrobeno v ČLR pro Lechpol Electronics Leszek Sp.k., ul. Garwolińska 1, 08-400 Miętne, Polsko.
12 13Bedienungsanleitung Bedienungsanleitung
DEDE
UmdieGefahrvonBeschädigungen,Feuer,StromschlagoderanderenVerletzungenzuvermeiden,
befolgenSiediegrundlegendenSicherheitsvorkehrungenbeiderVerwendungelektrischerGeräte,
einschließlichderfolgenden:
1. Lesen Sie diese Bedienungsanleitung sorgfältig, vor beginn der Installation und Montage.
Bewahren Sie die Bedienungsanleitung auf für späteres Nachschlagen
2. Vor dem Anschluss des Gerätes an Netzsteckdose, stellen Sie sicher, dass die auf dem Gerät
angegebene Spannung mit der Spannung der Steckdose übereinstimmt.
3. Gerät ist nur für den Hausgebrauch.
4. Reinigen und Lagern Sie das Gerät gemäß den Anweisungen im Kapitel„Reinigung“
5. Schalten Sie das Gerät IMMER aus und trennen es von der Stromversorgung:
• Wenn es nicht richtig funktioniert
• Wenn ein seltenes Geräusch bei der Verwendung gibt
• Vor dem Zerlegen
• Vor der Reinigung
• Bei Nichtgebrauch
6. Ziehen Sie beim Trennen des Netzkabels von der Steckdose, am Stecker und nicht am Kabel.
7. Das Gerät niemals einschalten wenn der Wasserbehälter leer ist!
8. Verbrühungsgefahr! Niemals den heißen Dampf- oder Wasser-Strahl auf sich selbst oder
andere Leute richten!
9. Um die Kaeemaschine zu bedienen, verwenden Sie immer Grie oder Knöpfe.
10.Berühren Sie die Kaeemaschine nicht, wenn diese funktioniert, daVerbrennungsgefahr besteht.
11.Wenn heißesWasser oder Dampf aus den Düsen erzeugt wird, halten Sie Ihren Körper von der
Kaeemaschine entfernt, um Verbrennungen zu vermeiden.
12.Entfernen Sie NICHT den Filterhalter, während Sie Kaee zubereiten. Bitte entfernen Sie diesen,
um nach dem Brühen zusätzlichen Kaee zuzubereiten. Auch beim Entfernen des Filterhalters ist
Vorsicht geboten, da die Metallteile heiß sind. Bitte achten Sie darauf, ihn am Gri zu halten und
den Filterhalteclip zu verwenden, um den Kaeesatz zu entsorgen.
13.Halten Sie das Gerät außerhalb der Reichweite von Kindern.
14. Das Gerät kann von Kindern benutzt werden, die älter als 8 Jahre alt sind und von Personen mit
eingeschränktenphysischen,sensorischenodergeistigenFähigkeitenoderMangelanErfahrungund
Wissen,wennsievoneinerPerson beaufsichtigt und geleitetwerden,diefürihre Sicherheit zuständig
ist, in einer vorsichtigen Art und Weise und die alle Sicherheits-Vorkehrungen verstanden hat und
befolgen wird. Kinder sollten nicht mit diesem Gerät spielen. Kinder sollten nicht die Reinigung und
Wartung des Gerätes ohne Aufsicht durchführen.
15.Ein beschädigtes Netzkabel kann nur in einem autorisierten Kundendienst ersetzt werden.
16.Halten Sie das Gerät und sein Kabel fern von Hitze,Wasser, Feuchtigkeit, sc harfen Kanten und
andere Faktoren, die das Gerät oder das Netzkabel beschädigen könnten.
17.Stellen Sie sicher dass das Netzkabel keine heißen oder scharfen Elemente berührt.
18.Das Produkt nicht für andere Zwecke verwenden, als in dieser Bedienungsanleitung angegeben.
19.Stellen Sie das Gerät nicht ins Wasser oder andere Flüssigkeiten; verwenden Sie es nicht mit
nassen oder feuchten Händen.
SICHERHEITSANLEITUNGEN
Danke für den Kauf des TEESA Gerätes. Bitte lesen Sie diese Bedienungsanleitung sorgfältig und
bewahren diese auf für späteres Nachschlagen. Der Hersteller übernimmt keine Verantwortung für
Schäden,diedurchunsachgemäßeHandhabungundVerwendungdesProduktesverursachtwurden.

14 15Bedienungsanleitung Bedienungsanleitung
DEDE
20.Lassen Sie das Gerät nicht unbeaufsichtigt, wenn es funktioniert.
21.IMMER das Gerät von der Stromversorgung trennen, wenn es nicht verwendet wird.
22.VERWENDEN SIE NICHT das Gerät wenn das Kabel oder der Netzstecker beschädigt ist, oder
das Gerät defekt ist.
23.Versuchen Sie nicht, dieses Gerät selbst zu reparieren, nur autorisiertes und qualiziertes
Personal darf dieses Produkt reparieren. Das Gerät nie zerlegen.
24.Verwenden Sie kein unautorisiertes Zubehör.
EINSETZEN DES FILTERS
Das Gerät verfügt über zwei Filter. Verwenden Sie einen tieferen Filter um einen stärkeren und
aromatischeren Kaee zu erzielen..
1. Achten Sie beim Einsetzen des Filters in den Filterhalter darauf, den Vorsprung am Filter mit
der Nut im Inneren des Filterhalters auszurichten. Drehen Sie dann den Filter, um ihn sicher
in der Halterung zu verriegeln.
VOR DER ERSTEN BENUTZUNG
1. Entnehmen Sie den Wassertank vom Gerät und füllen Wasser in den Tank (der Wasserstand
sollte die „MAX“ Markierung im Wassertank nicht überschreiten). Setzen Sie dann den
Wassertank wieder in das Gerät ein.
2. Setzen Sie den Filter in den Filterhalter ein (kein Kaee im Filter). Setzen Sie dann den
Filterhalter unter der Filterhalterbefestigung (siehe Abb. 1) ein und xieren diesen, indem
Sie ihn gegen den Uhrzeigersinn drehen (siehe Abb. 2 und Abb. 3).
Abb.1 Abb.2 Abb.3
3. Stellen Sie eine Kanne auf die Abtropfschale. Stellen Sie sicher, dass der Dampfregler
maximal nach rechts gedreht ist (er bendet sich in der Position ).
4. Schließen Sie das Gerät an die Stromquelle an und drücken die Taste EIN/AUS um das Gerät
einzuschalten. Betriebsanzeige leuchtet rot.
5. Drücken Sie die Taste Kaee . Nachdem Wasser geossen ist, drücken Sie erneut die
Taste Kaee zum stoppen.
6. Achten Sie darauf, dass die Taste Dampf nicht heruntergedrückt ist. Warten Sie einen
Moment, während das Gerät mit dem Vorheizen beginnt. Wenn die Kaeeanzeige grün
leuchtet, bedeutet dies, dass das Vorheizen beendet ist.
7. Drücken Sie erneut dieTaste Kaee – Wasser ießt heraus.
8. Nachdem dasWasser 1 Minute lang geossen ist, drücken Sie dieTaste Kaee. Gießen Sie das
Wasser aus der Tasse. Jetzt können Sie mit der Kaeezubereitung beginnen.
Hinweis: Beim ersten Pumpen von Wasser kann es zu Geräuschen kommen – das ist normal.
Nach etwa 20 Sekunden sollte das Geräusch verschwinden.
VORHEIZUNG
ESPRESSO ZUBEREITEN
Vor der Kaeezubereitung wird empfohlen, das Gerät einschließlich Filterhalter, Filter und Tasse
vorzuheizen, damit der Kaeegeschmack nicht durch kalte Teile beeinusst wird.
1. Entnehmen Sie den Wassertank vom Gerät und füllen den Tank mit der gewünschten
Wassermenge. Der Wasserstand sollte sich zwischen der „MAX“ Markierung und „MIN“
Markierung im Tank benden). Setzen Sie dann den Wassertank wieder in das Gerät ein.
2. Setzen Sie den Filter in den Filterhalter ein (kein Kaee im Filter). Setzen Sie dann den
Filterhalter unter der Filterhalterbefestigung (siehe Abb. 1) ein und xieren diesen, indem
Sie ihn gegen den Uhrzeigersinn drehen (siehe Abb. 2 und Abb. 3).
3. Stellen Sie eine Tasse auf die Abtropfschale.
4. Schließen Sie das Gerät an die Stromversorgung an. Stellen Sie sicher, dass der Dampfregler
maximal nach rechts gedreht ist.
5. Drücken Sie die Taste EIN/AUS um das Gerät einzuschalten. Die Betriebsanzeige leuchtet
rot. Achten Sie darauf, dass die Taste Dampf nicht heruntergedrückt ist.
6. Drücken Sie die Taste Kaee. Wenn Wasser ausießt, drücken Sie sofort die Taste Kaee, um
das Pumpen des Wassers zu stoppen. Der Zweck dieses Schritts besteht darin, Wasser aus
dem Wassertank in den Boiler zu pumpen.
7. Wenn die Kaeeanzeige grün leuchtet, drücken Sie erneut die Taste Kaee – heißes Wasser
ießt heraus.
8. Nachdem Wasser für 20 Sekunden geossen ist, drücken Sie die Taste Kaee. Das Vorheizen
ist beendet.
1. Geben Sie gemahlenen Kaee mit einem Messlöel in den ausgewählten Filter (ein Löel
gemahlener Kaee kann ungefähr eine Tasse erstklassigen Kaee ergeben), drücken Sie
dann den gemahlenen Kaee mit dem Stamper fest.
Hinweis: Achten Sie darauf, dass sich kein Kaee am Rand des Filters bendet!
2. Setzen Sie den Filter in den Filterhalter ein und setzen dann den Filterhalter in das Gerät ein
und xieren diesen, indem Sie ihn gegen den Uhrzeigersinn drehen.

16 17Bedienungsanleitung Bedienungsanleitung
DEDE
3. GießenSiedas heißeWasseraus derTasse. StellenSiedanndieheißeTasse auf die Abtropfschale.
4. Stellen Sie sicher, dass der Dampfregler maximal nach rechts gedreht ist und die taste
dampf nicht heruntergedrückt ist.
5. Zu diesem Zeitpunkt leuchtet die Kaeeanzeige grün – drücken Sie dieTaste Kaee, warten
einen Moment und es ießt Kaee heraus.
6. Wenn Ihre gewünschte Kaeemenge erreicht ist oder sich die Farbe des Kaees deutlich
verändert, drücken Sie erneut die Taste Kaee.
7. Nachdem Sie die Kaeezubereitung beendet haben, drücken Sie die Taste EIN/AUS und die
Betriebsanzeige und die Kaeeanzeige erlöschen und das Gerät hört auf zu funktionieren.
WARNUNG: Lassen Sie das Gerät während der Kaeezubereitung nicht unbeaufsichtigt,
da Sie manchmal manuell arbeiten müssen!
Hinweis: Während der Kaee- oder Dampfzubereitung ist es normal, dass die Betriebsanzeige
wahrscheinlich erlischt, dies bedeutet nur, dass die Heizung aufheizt, um die Temperatur im
Standardbereich zu halten.
8. Nachdem Sie mit der Kaeezubereitung fertig sind, nehmen Sie den Filterhalter heraus,
indem Sie ihn im Uhrzeigersinn drehen, und gießen dann Kaeereste aus, während der Filter
durch die Filterhalteklammer gedrückt wird.
9. Lassen Sie diese vollständig abkühlen und spülen alle Teile unter ießendem Wasser ab.
CAPPUCCINO ZUBEREITEN
WICHTIG Während der Dampferzeugung muss der Filterhalter in Position montiert sein.
1. Drücken Sie die Taste Dampf herunter. Warten Sie, bis die Dampfanzeige grün leuchtet.
2. Füllen Sie eine Kanne mit Milch (etwa 100 Gramm Milch für jeden zuzubereitenden
Cappuccino). Es wird empfohlen,Vollmilch mit Kühlschranktemperatur zu verwenden (keine
warme Milch verwenden).
3. Um einen besseren Milchschaum zu erhalten, wird empfohlen, den Dampfregler etwa 15
Sekunden lang oen zu halten, da der frühe Dampf zu viel Wasser enthält. Drehen Sie
anschließend den Regler ganz nach rechts und führen den nächsten Schritt aus.
4. Stecken Sie die Dampfdüse etwa zwei Zentimeter in die Milch und drehen dann den
Dampfregler langsam gegen den Uhrzeigersinn. Aus dem Dampfstab tritt Dampf aus.
Milchschaum wird hergestellt, indem die Kanne von oben nach unten bewegt wird.
Hinweise:
• Berühren Sie während der Dampferzeugung niemals den Dampfauslass und achten
darauf, sich nicht zu verbrennen.
• Drehen Sie den Dampfregler niemals zu schnell, da sich der Dampf in kurzer Zeit schnell
ansammelt, was das Explosionsrisiko erhöhen kann.
5. Wenn der gewünschte Zweck erreicht ist, können Sie den Dampfregler ganz nach rechts
drehen.
6. Reinigen Sie die Dampfstab und den Dampfauslass wie im Abschnitt „Reinigung und
Wartung“ beschrieben.
7. Drücken Sie die Taste EIN/AUS, um das Gerät auszuschalten.
8. Gießen Sie die aufgeschäumte Milch in den zubereiteten Espresso, jetzt ist der Cappuccino
fertig.
Hinweis:Wenn Sie nach dem Aufschäumen von Milch erneut Kaee zubereiten möchten, drücken
Sie die Taste Kaee und vergewissern sich, dass die Taste Dampf nicht gedrückt ist. Die Pumpe
pumpt Wasser, bis die Kaeeanzeige erlischt. Drücken Sie dann die Taste Kaee und warten, bis
die Kaeeanzeige wieder aueuchtet..
Wenn während des Betriebs die Kaee- und die Dampfanzeige gleichzeitig aueuchten, können
Sie keinen Kaee zubereiten. Wenn Sie Kaee zubereiten möchten, wiederholen Sie die obigen
Schritte.
REINIGUNG UND WARTUNG
Trennen Sie das Gerät von der Stromversorgung und lasen es vor der Reinigung komplett abkühlen.
1. Reinigen Sie das Gehäuse des Gerätes regelmäßig mit einem weichen, leicht angefeuchteten
Tuch. Tauchen Sie das Gehäuse zum Reinigen niemals in Wasser.
2. Spülen Sie das Innere des Wassertanks regelmäßig aus. Achten Sie darauf, diesen zu
trocknen, bevor Sie diesen wieder am Gerät anbringen.
3. Reinigen Sie die Abtropfschale mit einem milden Reinigungsmittel, spülen Sie diese unter
ießendem Wasser ab und wischen diese gut ab.
4. Spülen Sie den Filterhalter und die Filter unter ießendem Wasser ab und wischen diese
dann gut ab.
Hinweis: Waschen Sie den Filterhalter nicht in der Spülmaschine.
5. Das Gerät oder Teile des Gerätes nicht mit Alkohol oder Lösungsmitteln.
6. Reinigen Sie die Dampfdüse nach jedem Gebrauch, um ein Verstopfen zu verhindern.
Stellen Sie eine leere Kanne unter die Dampfdüse, drehen dann den Dampfregler und
drücken Sie die Taste Kaee. Die Pumpe pumpt Wasser. Nachdem das Wasser 30 Sekunden
lang herausgeossen ist, drücken Sie erneut die Taste Kaee. Am Ende mit einem feuchten
Schwamm abwischen. Achten Sie darauf, sich nicht zu verbrennen!
MILCH AUFSCHÄUMEN / ERZEUGUNG VON DAMPF UM FLÜSSIGKEITEN ZU ERWÄRMEN
Die Dampfdüse kann zum Aufschäumen von Milch und zum Zubereiten von Heißgetränken wie
Trinkschokolade und Wasser verwendet werden.
1. Entfernen Sie denTank und füllen diesen mit der gewünschtenWassermenge (derWasserstand
sollte die„MAX“ Markierung im Tank nicht überschreiten). Setzen Sie dann den Tank richtig in
das Gerät ein.
2. Schließen Sie dann das Gerät an die Stromversorgung an.
3. Drücken Sie dieTaste EIN/AUS, um das Gerät einzuschalten. Die Betriebsanzeige leuchtet rot.
4. Drücken Sie die Taste Kaee. Stellen Sie sicher, dass die Taste Dampf nicht gedrückt ist. Wenn
Wasser herausießt, drücken Sie erneut dieTaste Kaee, zum stoppen.
5. Drücken Sie dieTaste Dampf und warten einen Moment. Das Gerät beginnt zu heizen. Wenn die
grüne Anzeige aueuchtet, bedeutet dies, dass die Erwärmung beendet ist.
6. Tauchen Sie die Dampfdüse in die zu erhitzende Flüssigkeit. Wenn Sie Milch aufschäumen
möchten, tauchen Sie die Dampfdüse etwa 2 Zentimeter in die Milch ein. Drehen Sie den
Dampfregler langsam gegen den Uhrzeigersinn, um mit der Dampferzeugung zu beginnen.
7. Wenn das gewünschte Ergebnis erreicht ist, können Sie den Dampfregler ganz nach rechts
drehen.
8. Drücken Sie kurz dieTaste EIN/AUS, um das Gerät auszuschalten.

18 19Bedienungsanleitung Bedienungsanleitung
DEDE
FEHLERBEHEBUNG
Symptom Mögliche Ursache Mögliche Lösung
Die Metallteile im Tank
sind verrostet
Entkalker ist nicht der
empfohlene Typ. Er kann die
Metallteile im Tank korrodieren
Benutzen Sie den vom
Hersteller empfohlenen
Entkalker
Wasser tritt aus dem
Boden der
Kaeemaschine aus
Es bendet sich viel Wasser in der
Abtropfschale
Bitte Abtropfschale leeren
Die Kaeemaschine funktioniert
nicht richtig
Wenden Sie sich an einen
autorisierten Kundendienst
für Reparatur
Wasser tritt an der
Außenseite des Filters aus
Es bendet sich etwas
Kaeepulver am Filterrand
Kaeepulver entfernen
Im Espressokaee ist ein
saurer (Essig-)Geschmack
vorhanden
Das Gerät wurde nach dem
Entkalken nicht richtig gereinigt
Kaeemaschine mehrmals
wie im Abschnitt„Vor dem
ersten Gebrauch“
beschrieben reinigen
Das Kaeepulver wird lange an
einem heißen, nassen Ort
gelagert. Das Kaeepulver wird
schlecht
Bitte verwenden Sie frisches
Kaeepulver oder lagern
unbenutztes Kaeepulver an
einem kühlen, trockenen Ort.
Nachdem Sie eine Packung
Kaeepulver geönet haben,
verschließen Sie diese wieder
fest und bewahren diese im
Kühlschrank auf, um ihre
Frische zu bewahren
Die Kaeemaschine kann
nicht mehr funktionieren
Das Gerät ist nicht richtig an die
Stromversorgung angeschlossen
Stecken Sie das Netzkabel
richtig in eine
Wandsteckdose, wenn das
Gerät immer noch nicht
funktioniert, wenden Sie sich
bitte an einen autorisierten
Kundendienst für Reparatur
Der Dampf kann nicht
aufschäumen
Die Dampfbereitschaftsanzeige
leuchtet nicht
Erst wenn die Anzeige Dampf
leuchtet, kann der Dampf
zum Aufschäumen
verwendet werden
Der Behälter ist zu groß oder die
Form passt nicht
Verwenden Sie einen hohen
und schmalen Behälter
Sie haben Magermilch
verwendet
Verwenden Sie Vollmilch
oder teilentrahmte Milch
7. Wenn der Dampfauslass blockiert ist, drehen Sie zuerst den Dampfregler ganz nach rechts
und lassen das Gerät etwa eine halbe Stunde abkühlen. Dann mit einer Nadel von etwa 1 mm
DurchmessermehrmalsindenDampfauslassstechen.DrückenSieanschließenddieTasteDampf
und drehen den Dampfregler nach links, um zu prüfen, ob das Gerät normal Dampf erzeugen
kann, wenn die Dampfanzeige grün leuchtet.Wenden Sie sich bitte an den Kundendienst, wenn
das Gerät nach dem oben beschriebenen Betrieb keinen Dampf erzeugen kann.
ENTKALKEN
Um sicherzustellen, dass Ihre Kaeemaschine ezient arbeitet, die internen Leitungen sauber sind
und der Kaeegeschmack optimal ist, sollten Sie alle 1-2 Monate die zurückgebliebenen Mineral-
Ablagerungen entfernen.
1. Füllen Sie den Wassertank mit Wasser und Entkalker bis zum Füllstand MAX (das Verhältnis
von Wasser und Entkalker beträgt 4:1; Einzelheiten nden Sie in der Anleitung des Entkalkers).
2. Setzen Sie den Filterhalter ein (kein gemahlener Kaee darin) und stellen eine Kanne auf die
Abtropfschale.
3. Drücken Sie dieTaste EIN/AUS um das Gerät einzuschalten, die Betriebsanzeige leuchtet rot.
Drücken Sie dieTaste Kaee und vergewissern sich, dass sich dieTaste Dampf nicht gedrückt
ist.WennWasser herausießt, drücken Sie dieTaste Kaee, um das Pumpen zu stoppen, und
warten einen Moment. Das Gerät beginnt mit dem heizen.
4. Wenn die rote Anzeige grün wird, zeigt dies an, dass das Heizen beendet ist. Drücken Sie die
Taste Kaee und bereiten zwei Tassen Kaee zu (etwa 60 ml). Drücken Sie die Taste Kaee,
um das Pumpen zu stoppen und warten 5 Sekunden.
5. Drücken Sie die Taste Dampf und warten, bis die Anzeige grün leuchtet. Bereiten Sie 2
Minuten lang Dampf zu und drehen dann den Dampfregler maximal nach rechts, um die
Dampferzeugung zu stoppen. Drücken Sie die Taste EIN/AUS, um das Gerät sofort
auszuschalten, lassen Sie den Entkalker mindestens 15 Minuten im Gerät ablagern.
6. Drücken Sie die Taste EIN/AUS, um das Gerät neu zu starten und wiederholen die Schritte 3-
5 mindestens 3 Mal.
7. Drücken Sie kurz die Taste Dampf. Wenn die Anzeige grün leuchtet drücken Sie die Taste
Kaee, um zu brühen, bis kein Entkalker mehr vorhanden ist.
8. Brühen Sie mit Leitungswasser (ohne Kaeepulver) in der MAX-Stufe, wiederholen die
Schritte 4-6 dreimal (es ist nicht notwendig 15 Minuten bei Schritt 5 zu warten) und brühen
dann, bis kein Wasser mehr im Wassertank ist.
9. Wiederholen Sie den Schritt 8 mindestens dreimal um sicherzustellen das die Leitungen rein
sind.

Deutsch
Korrekte Entsorgung dieses Produkts
(Elektromüll)
(Anzuwenden in den Ländern der Europäischen Union und anderen europäischen Ländern mit einem separaten Sammelsystem)
Die Kennzeichnung auf dem Produkt bzw. auf der dazugehörigen Literatur gibt an, dass es nach seiner Lebensdauer nicht
zusammen mit dam normalem Haushaltsmüll entsorgt werden darf. Entsorgen Sie dieses Gerät bitte getrennt von
anderen Abfällen, um der Umwelt bzw. der menschlichen Gesundheit nicht durch unkontrollierte Müllbeseitigung zu
schaden. Recyceln Sie das Gerät, um die nachhaltige Wiederverwertung von stoichen Ressourcen zu fördern. Private
Nutzer sollten den Händler, bei dem das Produkt gekauft wurde, oder die zuständigen Behörden kontaktieren, um in
Erfahrung zu bringen, wie sie das Gerät auf umweltfreundliche Weise recyceln können. Gewerbliche Nutzer sollten sich an
Ihren Lieferanten wenden und die Bedingungen des Verkaufsvertrags konsultieren. Dieses Produkt darf nicht zusammen
mit anderem Gewerbemüll entsorgt werden.
Hergestellt in China für Lechpol Electronics Leszek Sp.k., ul. Garwolińska 1, 08-400 Miętne.
20 21Bedienungsanleitung Bedienungsanleitung
DEDE
20 21Owner’s manualOwner’s manual
ENEN
SAFETY INSTRUCTIONS
Thank you for purchasing TEESA appliance. Read this instruction manual and keep it for future
reference. Producer does not take responsibility for damages caused by inappropriate handling
and use of the product.
In order to reduce the risk of injuries or damages, follow basic safety precautions applied
when using any electrical device, including the following:
1. Read the entire instruction manual before you start installation and assembly and keep it for
future reference. Keep the manual for future reference.
2. Before connecting the device to power supply socket, make sure the voltage indicated on the
device corresponds to the voltage in the power supply socket.
3. Appliance for household use only.
4. Clean and store this appliance in accordance to instructions listed in“Cleaning”section.
5. ALWAYS turn o the device and disconnect it from the mains supply:
• if it’s not operating correctly
• if there’s an uncommon voice when using
• before disassembling the device
• before cleaning
• when not in use
6. When you disconnect the power cord of the device, grasp and pull the plug, not the cord/cable.
7. Do not turn on the device if the water tank is empty.
8. Danger of scalding! Never direct the jet of hot steam or water towards yourself or other people!
9. To operate the coee machine always use handles or knobs.
10.Do not touch the coee machine when it is working as this brings the risk of burning
11.When hot water is being generated from the nozzles keep your body at the distance from the
coee machine to prevent scorch.
12.DO NOT remove the lter holder while brewing coee. Please remove it to make additional
coee after nish brewing for more than 10 seconds. Caution should also be taken while
removing the lter holder since the metal parts will be hot. Please make sure to hold it by the
handle and to use the lter holding clip to dispose the grounds.
13.Keep the device out of the reach of children.
14.This appliance may be used by children who are above 8 years old and by persons with
reduced physical, sensory or mental capabilities, or lack of experience and knowledge, if they
are supervised and guided by a person who is responsible for their safety in a cautious
manner for all the safety precautions being understood and followed. Children should be
supervised to ensure that they do not play with the appliance. Children should not perform
cleaning and servicing of the device unsupervised.
15.Fixed power cable may only be replaced in an authorized service point.
16.Keep the device and its cord/cable away from heat, water, moisture, sharp edges and any
other factor which may damage the appliance or its cord.
17.Make sure the power cord does not touch any hot or sharp elements.
18.Do not use the product for purposes dierent from displayed in this operating manual.
19.Do not place the appliance in water or any liquid; nor handle/use it with wet or moist hands.
20.Do not leave the appliance unattended when it’s working.
21.ALWAYS disconnect the product form the power mains when it is not in use.
22.DO NOT use this device if the cord or the plug is damaged, or the appliance is broken.
TECHNISCHE DATEN
Funktionen
Tassenwärmer
Milchschäumer
Dampunktion
Entfernbare Tropfschale
Entfernbarer Wasserbehälter
Rutschfeste Gummibasis
Technische Daten
Kaeetyp: Gemahlener Kaee
Pumpendruck: 15 bar
Wasserbehälterkapazität: 1,2 l
Maximale Tassenhöhe: 80 mm
Maximale Leistung: 850 W
Kabellänge: 95 cm
Stromversorgung: 220-240 V~; 50/60 Hz
Gewicht: 2,9 kg
Abmessungen: 26,8 x 22,5 x 31,2 cm
Im Set: 2x Filter, Messlöel mit Stampfer

22 23Owner’s manualOwner’s manual
ENEN
23.Do not attempt to repair this device yourself. Only authorized and qualied personnel may
repair this device. Never disassemble this device.
24.Use only authorized accessories.
INSERTING THE FILTER
There are two lters provided within the appliance. Use deeper lter to achieve a stronger and more
aromatic coee.
1. To insert the lter in the lter holder, make sure to align the protrusion on the lter with the
groove inside the lter holder. Then rotate the lter to lock it securely in the holder.
BEFORE THE FIRST USE
1. Pull out the water tank of the coee maker. Pour water into the water tank. The water level
should not exceed the“MAX”mark in the tank. Then insert it into the appliance.
2. Set the lter into the lter holder (no coee in the lter), then put the lter holder under the
lter holder mount (see Fig.1) and turn it anticlockwise until it is xed tightly (see Fig.2 and
Fig.3).
Fig.1 Fig.2 Fig.3
3. Place a cup on the drip tray. Make sure the steam knob is turned maximally right (it is at the
position).
4. Connect the appliance into power supply and press the ON/OFF button to turn on the
appliance. The power indicatora will be illuminated red.
5. Press down the coee button . After water has own, press the coee button again to
stop..
6. Make sure the steam button is not pressed down. Wait for a moment as the appliance
begins preheating.When the coee indicator illuminates green, it means that the preheating
is nished.
7. Press down the coee button again- water will ow out.
8. After water has own for 1 minute, press the coee button. Pour out water from the cup.
Now you can start brewing coee.
Note: There may be noise when pumping the water for the rst time. It is normal, as the
applianceisreleasingthe airinthe appliance. Afterabout20seconds, the noiseshoulddisappear.
PREHEATING
MAKING ESPRESSO
Before making coee, it is recommended to preheat the appliance, including the lter, lter holder
and the cup, so that the coee avor will not be inuenced by the cold parts.
1. Remove the water tank and ll it with desired amount of water. The water level should be
between the “MAX” mark and the “MIN” mark in the tank. Then insert the tank into the
appliance properly.
2. Set the lter into the lter holder (no coee in the lter), then put the lter holder under the lter
holder mount (see Fig.1), and turn it anticlockwise until it is xed tightly (see Fig.2 and Fig.3).
3. Place a cup on the drip tray.
4. Then connect the appliance into power supply. Make sure the steam knob is turned
maximally right.
5. Press the ON/OFF button to turn on the appliance. The power indicator will illuminate red.
Make sure the steam button is not pressed down.
6. Press down the coee button. When there is water owing out, press the coee button
immediately to stop. The purpose of the step is to pump the water from the tank into the
housing.
7. When the coee indicator illuminates green, press down the coee button again- there will
be hot water owing out.
8. After water has own for 20 seconds, press the coee button. The preheating is nished.
1. Add ground coee to the selected lter with measuring spoon (a spoon of ground coee
can make about a cup of top-grade coee) then press the ground coee tightly with the
tamper.
Note: Make sure there is no coee on the edge of the lter!
2. Set the lter into the lter holder, then put the lter holder in the lter holder mount and
turn it anticlockwise until it is xed tightly.
3. Pour out the hot water from the cup. Then place the hot cup on the drip tray.

24 25Owner’s manualOwner’s manual
ENEN
MAKE CAPPUCCINO
4. Make sure the steam knob is turned maximally right and the steam button is not pressed
down.
5. At the time, the coee indicator is illuminated green- press down the coee button, wait for
a moment and there will be coee owing out.
6. Press the coee button when desired coee is obtained or the color of coee changes weak
obviously.
7. After nishing making coee, press the ON/OFF button and the power indicator and coee
indicator go out and the appliance stops working.
WARNING: Do not leave the appliance unattended during making coee, as you need operate
manually sometimes!
Note: During brewing coee or making steam, it is normal that the ready indicator is likely to
extinguish, it only means that the heater is heating up to keep the temperature at the standard
range.
8. You can take the lter holder out by turning clockwise, then pour the coee residue out with
the lter pressed by the lter holding clip.
9. Let them cool down completely, then rinse under running water.
IMPORTANT During making steam, the lter holder must be assembled in position.
1. Press down the steam button. Wait until the steam indicator illuminates green.
2. Fill a jug with milk (about 100 grams of milk for each cappuccino to be prepared). It is
recommended to use whole milk at refrigerator temperature (do not use warm milk).
3. In order to get better milk foam, it is recommended to keep the steam knob at open position
for approximately 15 seconds, since the early steam contains too much water. Afterwards
turn the knob maximally right and conduct next step.
4. Insert the steam wand into the milk about two centimeters, then turn the steam knob slowly
anticlockwise. Steam will come out from the steam wand. Frothed milk is produced by
moving the jug round from up to down.
Notes:
• Never touch the steam outlet during steam producing and be careful not to get burnt.
• Never turn the steam knob rapidly, as the steam will accumulate rapidly in short time
which may increase the potential of the risk of explosion.
5. When the required purpose is reached, you can turn the steam knob maximally right.
6. Clean the steam wand and steam outlet as described in the “Cleaning and maintenance”
section.
7. Press the ON/OFF button to turn o the appliance.
8. Pour the frothed milk into the espresso prepared, now the cappuccino is ready.
Note: If you want to make coee again after frothing milk, press down the coee button and
make sure the steam button is not pressed down. The pump will pump water until the coee
indicator turns o.Then press the coee button and wait until the coee indicator lights up again.
During operation, if the coee and steam indicator lights up at the same time, you cannot make
coee. If you want to make coee, repeat the above steps.
CLEANING AND MAINTENANCE
Disconnect the appliance from power supply and let it cool down completely before cleaning.
1. Clean the housing of the appliance with a soft, slightly damp cloth regularly. Never immerse
the housing in water for cleaning.
2. Rinse the inside of the water tank regularly. Make sure to dry it before reattaching to the
appliance.
3. Clean the drip tray with mild detergent, rinse under running water then wipe it well.
4. Rinse the lter holder and lters under running water, then wipe them well.
Note: Do not wash the lter holder in a dishwasher!
5. Do not clean the appliance or its parts with alcohol or solvent cleanser.
6. Clean the steam wand and steam outlet after each use to avoid it being blocked. Put an
empty jug under the steam wand, then turn the steam knob and press down the coee button.
The pump will pump water. After the water is owing out for 30 seconds, press the coee
button again. Finally, clean the steam wand with wet sponge. Be careful not to get burned!
7. If the steam outlet is blocked rstly turn the steam knob maximally right and let the
appliance cool down for about half an hour.Then poke the steam outlet for several times with
a needle about 1 mm in diameter. Finally, press down the steam button and turn the steam
knob left to check if the appliance can produce steam normally when the steam indicator
illuminates green. Please contact the service department if the appliance cannot produce
steam after operate as above.
FROTHING MILK/ PRODUCING STEAM TO HEAT LIQUIDS
The steam wand can be used to froth milk and make hot beverages like drinking chocolate and water.
1. Remove the tank and ll it with desired amount of water (the water level should not exceed the
“MAX”mark in the tank).Then insert the tank into the appliance properly.
2. Then connect the appliance to power supply.
3. Press down the ON/OFF button to turn on the appliance.The power indicator illuminates red.
4. Press down the coee button. Make sure the steam button is not pressed down. When there is
water owing out, press the coee button again to stop.
5. Press down the steam button and wait for a moment. The appliance begins to heat. When the
green lamp illuminates, it means the heating is nished.
6. Dip the steam wand into the liquid to be heated. If you want to froth milk, dip the steam wand
about2centimetersintothe milk.Slowly turnthesteamknobanticlockwisetostartmakingsteam.
7. When the desired result is achieved, you can turn the steam knob maximally right.
8. Press and release the ON/OFF button to turn o the appliance.

26 27Owner’s manualOwner’s manual
ENEN
DESCALING
To make sure your coee maker operates eciently, internal piping is clean and the avor of coee
is optimal, you should clean away the mineral deposits left every 1-2 months.
1. Fill the tank with water and descaler to the MAX level (the proportion of water and descaler
is 4:1; for details refer to the instruction of descaler).
2. Install the lter holder (no ground coee in it) and place a jug on the drip tray.
3. Press down the ON/OFF button to turn on the appliance. The power indicator will be
illuminated red. Press the coee button and make sure the steam button is not pressed
down.When there is water owing out, close the pump by pressing the coee button again,
then wait for a moment. The coee maker begins to heat.
4. When the ready indicator illuminates green, it shows the heating is nished. Press down the
coee button and make make two cups coee (about 60 ml). Then press the coee button
again to close the pump and wait for 5 seconds.
5. Press down the steam button and wait until the green indicator is illuminated. Make steam
for 2 minutes, then turn the steam knob maximally right to stop making steam. Press the
ON/OFF button to turn o the appliance immediately. Make the descalers deposit in the unit
at least 15 minutes.
6. Restart the appliance and repeat the steps of 3-5 at least 3 times.
7. Then press and release the steam button. When the green lamp is illuminated, press down
the coee button to brew until no descaler is left.
8. Then brew (no coee powder) with tap water in the MAX level. Repeat the steps of 4-6 for 3
times (it is not necessary to wait 15 minutes in step 5), then brew until no water is left in the tank.
9. Repeat the step 8 at least 3 times to make sure the piping is clean.
TROUBLESHOOTING
Symptom Possible cause Possible solution
The metal parts in the tank
have rusted
Descaler is not
recommended type. It may
corrode the metal parts in
the tank
Use the descaler
recommended by
manufacturer
Water leaks from the bottom
of coee maker
There is much water in the
drip tray
Please empty the drip tray
The coee maker
malfunctions
Please contact with the
authorized service facility for
repairing
Water leaks out of outer side
of lter
There is some coee powder
on lter edge
Get rid of them
Acid (vinegar) taste exists in
espresso coee
The unit wasn’t cleaned
correctly after descaling
Clean coee maker as
described in the“before the
rst use”section for several
times
The coee powder is stored
in a hot, wet place for a long
time. The coee powder
turns bad
Please use fresh coee
powder, or store unused
coee powder in a cool, dry
place. After opening a
package of coee powder,
reseal it tightly and store it in
a refrigerator to maintain its
freshness
The coee maker cannot
work any more
The power outlet is not
plugged well
Plug the power cord into a
wall outlet correctly, if the
appliance still does not work,
please contact with the
authorized service facility for
repairing
The steam cannot froth The steam ready indicator is
not illuminated
Only after the steam ready
indicator is illuminated, the
steam can be used to froth
The container is too big or
the shape is not t
Use high and narrow cup
You have used skimmed milk Use whole milk or half-
skimmed milk

English
Correct Disposal of This Product
(Waste Electrical & Electronic Equipment)
(Applicable in the European Union and other European countries with separate collection systems)This marking shown on
the product or its literature, indicates that it should not be disposed with other household wastes at the end of its working
life. To prevent possible harm to the environment or human health from uncontrolled waste disposal, please separate this
from other types of wastes and recycle it responsibly to promote the sustainable reuse of material resources. Household
users should contact either the retailer where they purchased this product, or their local government oce, for details of
where and how they can take this item for environmentally safe recycling. Business users should contact their supplier and
check the terms and conditions of the purchase contract.This product should not be mixed with other commercial wastes
for disposal.
Made in China for Lechpol Electronics Leszek Sp.k., ul. Garwolińska 1, 08-400 Miętne.
SPECIFICATION
Functions
Cup warming
Milk frother
Steam function
Removable drip tray
Removable water container
Anti-slip feet
Technical data
Coee type: ground coee
Pump pressure: 15 bar
Water container capacity: 1,2 l
Max. cup height: 80 mm
Maximum power: 850 W
Cord length: 95 cm
Power supply: 220-240 V~; 50/60 Hz
Weight: 2,9 kg
Dimensions: 26,8 x 22,5 x 31,2 cm
In set: 2x lter, measuring spoon with tamper
28 29Owner’s manualOwner’s manual
ENEN
28 29Manuel de l'Utilisateur Manuel de l'Utilisateur
FRFR
SÉCURITÉ
Merci d’avoir acheter l’appareil TEESA. Avant l’utilisation de l’appareil, lire attentivement le
mode d’emploi et le garder pour une consultation ultérieure. Le fabricant n’est pas responsable
d’une utilisation inappropriée du produit.
Pour éviter les dommages et les blessures, respecter les consignes de sécurité essentielles
appliquéespourl’utilisationdesappareilsélectriques,ycompriscellesdétailléesci-après:
1. Avant l’utilisation, lire attentivement le mode d’emploi, même si un appareil similaire a déjà
été utilisé. Garder le mode d’emploi pour le consulter ultérieurement.
2. Avant de brancher l’appareil, vérier la conformité de la tension de courant dans la prise
secteur avec la tension de l’appareil.
3. L’appareil est exclusivement destiné à une utilisation ménagère.
4. Nettoyer et entreposer l’appareil conformément aux consignes indiquées dans la
rubrique« Nettoyage ».
5. Toujours éteindre l’appareil et le débrancher de l’alimentation électrique :
• si l’appareil ne fonctionne pas correctement,
• si le bruit produit par l’appareil n’est pas typique pour son fonctionnement ou témoigne
d’une anomalie,
• avant le démontage,
• avant le nettoyage,
• si l’appareil n’est pas utilisé.
6. Pour débrancher l’appareil de l’alimentation, saisir et tirer par la che. Ne jamais tirer par le câble.
7. Ne pas mettre en marche l’appareil si le réservoir d’eau est vide.
8. Danger de brûlures ! Il est interdit de diriger le jet d’eau chaude et de vapeur sur soi ou sur
d’autres personnes.
9. Toujours manipuler l’appareil à l’aide des poignées et des boutons.
10.Ne pas toucher l’appareil lors de son fonctionnement, car ceci entraîne un risque de brûlures.
11.Pour éviter les brûlures, faire particulièrement attention et rester à distance sûre de l’appareil,
lorsque de l’eau et de la vapeur chaudes s’en dégagent.
12.Ne pas débrancher le support du ltre de l’appareil lors de la préparation du café. Le ltre
peut être débranché de l’appareil une fois que la préparation de la boisson est terminée. Faire
très attention car les pièces en métal peuvent être toujours chaudes. Lors du débranchement
de l’appareil, tenir le support du ltre par la poignée et bloquer le ltre à l’aide du levier pour
se débarrasser des restes du café.
13.Entreposer l’appareil dans un endroit hors de portée des enfants.
14.Cet appareil peut être utilisé par des enfants âgés d’au moins 8 ans et par des personnes
ayant des capacités physiques, sensorielles ou mentales réduites ainsi que par des personnes
ne possédant pas d’expérience ni de connaissances, si ces personnes sont surveillées ou si
des instructions concernant l’utilisation de l’appareil en toute sécurité leur ont été fournies,de
manière à ce que tous les risques encourus soient compris. Informer les enfants que cet
appareil n’est pas un jouet. Le nettoyage et la maintenance de l’appareil ne doivent pas être
réalisés par des enfants sans surveillance.
15.Seul le fabricant, un service agréé ou une personne dûment qualiée peuvent remplacer le
câble d’alimentation non détachable.
16.Garder l’appareil et le câble d’alimentation loin des sources de chaleur, d’eau, d’humidité, de
bords tranchants et d’autres facteurs qui pourraient endommager l’appareil ou le câble.

30 31Manuel de l'Utilisateur Manuel de l'Utilisateur
FRFR
17.Veiller particulièrement à ce que le câble d’alimentation ne touche pas les bords tranchants /
les surfaces chaudes.
18.Ne pas utiliser l’appareil à d’autres ns que celles décrites dans le présent mode d’emploi.
19.Ne pas plonger l’appareil dans l’eau, ni l’utiliser avec les mains mouillées.
20.Ne pas laisser l’appareil sans surveillance lors de son fonctionnement.
21.Toujours débrancher l’appareil de l’alimentation électrique, s’il n’est pas utilisé.
22.Il est interdit d’utiliser l’appareil, si le câble d’alimentation est endommagé ou l’équipement
ne fonctionne pas correctement.
23.Il est interdit de réparer l’appareil par vous-même. Seules les personnes autorisées et dûment
qualiées peuvent réparer l’appareil. Il est interdit de démonter l’appareil.
24.Ne pas utiliser d’accessoires qui ne sont pas d’origine.
MONTAGE DU FILTRE
L’appareil est fourni avec deux ltres. Le ltre plus profond permet d’obtenir un café plus fort et plus
aromatique.
1. Pour pouvoir placer le ltre dans son support, aligner la projection sur le ltre avec la fente
dans le support. Tourner ensuite le ltre et le verrouiller dans le support.
AVANT LA PREMIÈRE UTILISATION
1. Débrancher le réservoir d’eau de l’appareil. Verser de l’eau dans le réservoir. Le niveau d’eau ne
doit pas dépasser l’indication « MAX » dans le réservoir. Installer le réservoir à l’emplacement
précédent.
2. Placer le ltre dans le support (dans le ltre il ne doit pas y avoir de café), monter ensuite le
support dans l’appareil (Fig. 1) et le tourner à gauche jusqu’au bout (Fig. 2 et Fig.3).
Fig.1 Fig.2 Fig.3
3. Placer une tasse sur l’égouttoir. S’assurer que le bouton rotatif de vapeur est tourné au
maximum à droite (sur la position ).
4. Brancher l’appareil à l’alimentation et appuyer sur la touche ON/OFF pour mettre en
marche l’appareil. L’indicateur d’alimentation s’allumera en rouge.
5. Appuyer sur le bouton de café . Quand l’eau commence à sortir, appuyer de nouveau sur
la touche de café pour arrêter le processus.
6. S’assurer que la touche de vapeur n’est pas pressée. Attendre un moment - l’appareil
lance le processus de réchauement. L’indicateur de café qui clignote en vert signie que le
processus de réchauement est terminé.
7. Appuyer de nouveau sur la touche de café, l’appareil commence à pomper l’eau.
8. Après une minute, appuyer sur la touche de café. Déverser l’eau de la tasse. Maintenant, la
préparation du café peut commencer.
Attention:Lors du premier pompage d’eau, un bruit peut se faire entendre. C’est un phénomène
normal. Après environ 20 secondes le bruit devrait s’arrêter.
RÉCHAUFFEMENT
Avant de commencer la préparation de café, il est recommandé de chauer le ltre, le support du ltre
et la tasse où sera préparé le café. Ainsi, le goût du café ne sera pas détérioré par les pièces froides.
1. Débrancher le réservoir et le remplir d’eau. Le niveau d’eau doit être entre les indications
MAX et MIN. Installer le réservoir à l’emplacement précédent.
2. Placer le ltre dans le support (dans le ltre il ne doit pas y avoir de café), monter ensuite le
support dans l’appareil (Fig. 1) et le tourner à gauche jusqu’au bout (Fig. 2 et Fig.3).
3. Placer une tasse sur l’égouttoir.
4. Brancher l’appareil à l’alimentation. S’assurer que le bouton rotatif de vapeur est tourné au
maximum à droite.
5. Appuyer sur la touche ON/ OFF, pour mettre en marche l’appareil. L’indicateur d’alimentation
s’allumera en rouge. S’assurer que la touche de vapeur n’est pas pressée.
6. Appuyer sur la touche de café . Quand l’appareil commence à pomper l’eau, appuyer de
nouveau sur la touche de café pour arrêter le processus. L’objectif de l’opération mentionnée
ci-dessus est de pomper l’eau du réservoir dans l’appareil.
7. Appuyer de nouveau sur la touche de café quand l’indicateur de café s’allume en vert,
l’appareil commence alors à pomper l’eau.
8. Après 20 secondes, appuyer sur la touche de café. Le processus de réchauement est terminé.
PRÉPARATION DE L’EXPRESSO
1. À l’aide du doseur à café, verser le café moulu dans le ltre choisi ( une cuillère de café moulu
permet d’avoir une tasse de café de bonne qualité), tasser ensuite le café à l’aide du tasseur.
Attention : S’assurer que le café ne se trouve pas sur le bord du ltre !
2. Placer le ltre dans le support, monter ensuite le support dans l’appareil et le tourner à
gauche jusqu’au bout.
3. Déverser l’eau chaude de la tasse. Placer ensuite la tasse chaude sur l’égouttoir.
4. S’assurer que le bouton rotatif de vapeur est tourné au maximum à droite et que la touche
de vapeur n’est pas pressée.

32 33Manuel de l'Utilisateur Manuel de l'Utilisateur
FRFR
PRÉPARATION DE CAPPUCCINO
ATTENTION Lors de la formation de la vapeur, le support du ltre doit être xé à l’appareil.
1. Appuyer sur la touche de vapeur. Attendre que l’indicateur de vapeur s’allume en vert.
2. Remplir le pot de lait (pour la préparation d’un cappuccino, vous avez besoin d’environ
100ml de lait). Il conseillé d’utiliser du lait pasteurisé, sorti directement du frigo avant
l’utilisation (ne pas utiliser de lait tiède).
3. Pour avoir un plus grand volume de lait en mousse, il est recommandé de tourner le bouton
rotatif de vapeur complètement à gauche pour environ 15 secondes, car au début une trop
grande quantité d’eau est dégagée de la buse du mousseur. Après environ 15 secondes,
tourner le bouton rotatif complètement à droite et passer à l’étape suivante.
4. Plonger la buse du mousseur dans le lait à une profondeur d’environ 2 cm et ensuite, tourner
doucement le bouton rotatif de vapeur à gauche. De la vapeur commence à sortir de la buse
du mousseur. Pour mousser le lait, faire tourner le récipient en le soulevant et baissant.
Remarques :
• Ne pas toucher la sortie de vapeur car ceci entraine un risque de brûlures.
• Ne pas tourner brusquement le bouton rotatif de vapeur, car ceci peut entrainer une
accumulation rapide d’une grande quantité de vapeur, ce qui peut accroitre le risque
d’explosion.
5. Après avoir moussé le lait, tourner le bouton rotatif de vapeur complètement à droite.
6. Nettoyer la buse du mousseur et la sortie de vapeur selon les consignes décrites dans le
chapitre « Nettoyage et maintenance ».
7. Appuyer sur la touche ON/ OFF, pour arrêter l’appareil.
8. Verser la mousse de lait dans l’expresso préparé auparavant.
Attention : Pour pouvoir préparer du café après la préparation de la mousse, appuyer sur la
touche de café et s’assurer que la touche de vapeur n’est pas pressée. L’appareil commence à
pomper l’eau jusqu’à ce que l’indicateur de café s’éteigne. Appuyer sur la touche de café et
attendre que l’indicateur de café s’allume de nouveau.
La préparation de café est impossible si l’indicateur de café et de vapeur s’allument en même
temps. Pour préparer du café, répéter les étapes décrites ci-dessus.
MOUSSER LE LAIT /CRÉER DE LA VAPEUR POUR CHAUFFER LES BOISSONS
La buse du mousseur peut être utilisée pour mousser le lait ou pour préparer des boissons comme le
chocolat chaud.
1. Débrancher le réservoir et y verser de l’eau (le niveau d’eau dans le réservoir ne doit pas dépasser
l’indication MAX). Installer le réservoir à l’emplacement précédent.
2. Brancher l’appareil à l’alimentation.
3. Appuyer sur la touche ON/ OFF, pour mettre en marche l’appareil. L’indicateur d’alimentation
s’allumera en rouge.
4. Appuyer sur la touche de café . S’assurer que la touche de vapeur n’est pas pressée. Quand
l’appareil commence à pomper l’eau, appuyer de nouveau sur la touche de café pour arrêter le
processus.
5. Appuyer sur la touche de vapeur et attendre quelques secondes. L’appareil commence le
processus de réchauement. L’indicateur qui s’allume en vert indique la n du processus de
réchauement.
6. Glisserlabusedumousseurdanslerécipient oùsetrouvelaboissonquidoitêtrechauée. Sivous
moussez du lait, plonger la buse du mousseur dans le lait à une profondeur d’environ 2 cm.
Tourner doucement le bouton rotatif de vapeur à gauche pour lancer la formation de vapeur.
7. Après avoir moussé le lait, tourner le bouton rotatif de vapeur complètement à droite.
8. Appuyer sur la touche ON/ OFF et la relâcher, pour arrêter l’appareil.
NETTOYAGE ET ENTREPOSAGE
Avant le nettoyage, débrancher l’appareil de l’alimentation et le laisser refroidir.
1. Nettoyer le boîtier de l’appareil uniquement à l’aide d’un chion doux humide. Ne pas
plonger l’appareil dans l’eau.
2. Rincer régulièrement l’intérieur du réservoir d’eau. S’assurer que le réservoir est sec avant
de l’installer de nouveau dans l’appareil.
3. Nettoyer l’égouttoir à l’aide d’un détergent doux, rincer ensuite à l’eau courante et sécher
soigneusement.
4. Rincer le support du ltre et les ltres à l’eau courante et les sécher soigneusement.
Attention : Ne pas laver le support du ltre dans un lave-vaisselle !
5. Ne pas utiliser de produits chimiques ou de détergents pour nettoyer l’appareil.
6. Nettoyer la buse du mousseur et la sortie de vapeur après chaque utilisation pour
empêcher son obturation : Placer un pot vide sous la buse du mousseur, tourner ensuite le
bouton rotatif de vapeur et appuyer sur la touche de café. L’appareil commence à pomper
l’eau. Après environ 30 secondes, appuyer de nouveau sur la touche de café. Nettoyer la buse
du mousseur à l’aide d’une éponge humide. Faire très attention, il y a risque de brûlures !
7. Si la sortie de vapeur se bloque, tourner d’abord le bouton rotatif de vapeur
complètement à droite et laisser refroidir l’appareil pendant environ une demi-heure.
Ensuite, dégager plusieurs fois la sortie de vapeur à l’aide d’une aiguille d’un diamètre
5. L’indicateur de café devrait s’allumer en vert, à ce moment il faut appuyer sur la touche de
café. Après un moment, l’appareil devrait commencer la préparation de café.
6. Appuyer sur la touche de café quand la quantité souhaitée est préparée ou quand la
couleur de la boisson devient beaucoup moins intense.
7. Après la préparation du café, appuyer sur la touche ON/OFF. Les indicateurs d’alimentation
et de café s’éteignent et l’appareil s’arrête.
ATTENTION : Ne pas laisser l’appareil fonctionner sans surveillance !
Attention : Lors de la préparation du café ou de la production de vapeur, l’indicateur prêt peut
s’éteindre et s’allumer en alternance, c’est un phénomène normal qui indique l’appareil se
chaue pour maintenir la bonne température.
8. Pour débrancher le support du ltre de l’appareil, tourner le support à droite et bloquer
ensuite le ltre dans le support à l’aide du levier et se débarrasser des restes de café.
9. Laisser les pièces refroidir et les rincer ensuite sous l’eau courante.

34 35Manuel de l'Utilisateur Manuel de l'Utilisateur
FRFR
RÉSOLUTION DES PROBLÈMES
Problème Cause possible Solution possible
Les pièces en métal dans
le réservoir ont rouillé
Produit détartrant inadapté Il
peut conduire à la formation de
rouille sur les pièces en métal à
l’intérieur du réservoir
Utiliser un produit détartrant
adapté
L’eau fuit sous l’appareil L’égouttoir est plein Vider l’égouttoir
L’appareil ne fonctionne pas Contacter un service technique
agréé
L’eau s’écoule du ltre Du café se trouve sur le bord du
ltre
Nettoyer le bord du ltre
Goût acide (vinaigre) de
l’expresso
Le cycle de rinçage après le
détartrage n’a pas été
correctement réalisé
Rincer plusieurs fois l’appareil
conformément aux consignes
indiquées dans le chapitre
« Avant la première utilisation »
Le café est conservé dans un
endroit chaud et humide
pendant une longue période de
temps Le café est périmé
Utiliser un nouveau café ou
conserver le café dans un
endroit frais et sec Après
l’ouverture du nouvel emballage
de café, bien le refermer après et
le conserver au frigo pour
maintenir la fraicheur du café
L’appareil ne fonctionne
pas
L’appareil n’est pas branché
correctement à l’alimentation
Brancher correctement
l’appareil à l’alimentation ; si
malgré ceci l’appareil ne
fonctionne pas, contacter un
service technique agréé
La buse du mousseur ne
fonctionne pas
L’indicateur de la vapeur n’est
pas allumé
L’appareil produit de la vapeur
seulement si l’indicateur de la
vapeur est allumé
Le récipient est trop grand ou sa
forme n’est pas adaptée
Utiliser un récipient haut et n
Du lait écrémé a été utilisé Il est conseillé d’utiliser du lait
entier ou partiellement écrémé
d’environ 1 mm. Appuyer sur la touche de vapeur et quand l’indicateur correspondant
s’allumera en vert, tourner le bouton rotatif de vapeur à gauche pour vérier si l’appareil est
capable de former de la vapeur. Si, malgré la réalisation des opérations mentionnées,
l’appareil ne peut toujours pas former de vapeur, contacter un service technique agréé.
DÉTARTRAGE
Pour assurer le fonctionnement correct de l’appareil, la propreté du circuit d’eau et le meilleur goût
et arôme du café, détartrer l’appareil tous les un à deux mois.
1. Remplir le réservoir avec de l’eau et le produit détartrant jusqu’au niveau MAX (les proportions
d’eau et de produit détartrant sont de 4:1 ; les informations détaillées se trouvent dans le mode
d’emploi du produit détartrant).
2. Fixer le support du ltre (sans café) à l’appareil et poser un pot sur l’égouttoir.
3. Appuyer sur la touche ON/ OFF, pour mettre en marche l’appareil. L’indicateur d’alimentation
s’allumera en rouge. Appuyer sur la touche de café et s’assurer que la touche de vapeur n’est
pas pressée. Quand l’appareil commence à pomper l’eau, appuyer de nouveau sur la touche de
cafépour arrêterleprocessus. Aprèsunmomentl’appareil lanceleprocessusderéchauement.
4. L’indicateur qui s’allume en vert indique la n du processus de réchauement. Appuyer sur
la touche de café et préparer environ 60 ml (deux tasses) d’eau. Appuyer de nouveau sur la
touche de café pour arrêter le pompage d’eau et attendre environ 5 secondes.
5. Appuyer sur la touche de vapeur et attendre que l’indicateur s’allume en vert. Former la vapeur
pendant environ 2 minutes, tourner ensuite le bouton rotatif de vapeur complètement à droite
pourarrêterleprocessus. Appuyersur latoucheON/ OFF,pourarrêterl’appareil.Laisserl’appareil
pour au moins 15 minutes.
6. Après ce temps, mettre de nouveau en marche l’appareil et répéter les étapes 3-5 au moins
3 fois.
7. Relâcher ensuite la touche de vapeur. Quand l’indicateur s’allumera en vert, appuyer sur la
touche de café et laisser l’appareil pomper l’eau jusqu’à ce que le réservoir soit complètement
vide.
8. Ensuite, remplir le réservoir d’eau claire jusqu’à l’indication MAX et lancer de nouveau le
pompage de l’eau (sans café). Répéter les opérations de 4 à 6 fois (à l’étape numéro 5, il n’est
pas nécessaire d’attendre 15 minutes), laisser ensuite l’appareil pomper l’eau jusqu’à ce que
le réservoir soit complètement vide.
9. Répéter l’étape 8 au moins 3 fois, pour s’assurer que le circuit d’eau est propre.

France
Élimination appropriée du produit
(déchets d’équipements électriques et électroniques)
Les marquages apposés sur le produit ou dans les textes y correspondants indiquent que l’appareil, une fois le délai
d’usage passé, doit être éliminé avec les autres déchets ménagers. Pour éviter les eets néfastes sur l’environnement et la
santé humaine, suite à une élimination de déchets non contrôlée, veuillez séparer le produit des autres déchets et recycler
de manière responsable, pour promouvoir la réutilisation des matériaux comme une pratique durable. Pour de plus
amples informations concernant le lieu et le recyclage en toute sécurité du produit, les utilisateurs dans les ménages
doivent contacter le distributeur chez qui ils ont acheté le produit ou une autorité locale compétente dans le domaine. Les
utilisateurs dans les entreprises doivent contacter leur fournisseur et vérier les conditions du contrat d’achat. Ne pas
éliminer le produit avec d’autres déchets commerciaux.
Fabriqué en RPC pour Lechpol Electronics Leszek Sp.k., ul. Garwolińska 1, 08-400 Miętne.
SPÉCIFICATION
Fonctions
Chaue-tasses
Mousseur à lait
Fonction vapeur
Bac de récupération amovible
Réservoir d’eau amovible
Pieds antidérapants
Données techniques
Type de café : café moulu
Pression de la pompe : 15 bars
Capacité du réservoir d’eau : 1,2 l
Max. Hauteur de la tasse : 80 mm
Puissance maximale : 850 W
Longueur du câble : 95 cm
Alimentation : 220-240 V~; 50/60 Hz
Poids : 2,9 kg
Dimensions : 26,8 x 22,5 x 31,2 cm
Fournis : 2x ltre, doseur de café avec tasseur
36 37Manuel de l'Utilisateur Manuel de l'Utilisateur
FRFR
36 37Εγχειρίδιο χρήσης Εγχειρίδιο χρήσης
GRGR
ΟΔΗΓΙΕΣ ΑΣΦΑΛΕΙΑΣ
Σας ευχαριστούμε για την αγορά της συσκευής TEESA. Διαβάστε προσεκτικά αυτές τις οδηγίες
χρήσης πριν τη χρήση και φυλάξτε τες για μελλοντική χρήση.Ο παραγωγός δεν αναλαμβάνει
την ευθύνη για ζημιές που προκλήθηκαν από ακατάλληλο χειρισμό και χρήση του προϊόντος.
Γιαναμειώσετετονκίνδυνοτραυματισμού,ακολουθήστετιςβασικέςπροφυλάξειςασφαλείαςπου
εφαρμόζονται κατά τη χρήση οποιασδήποτε ηλεκτρικής συσκευής, συμπεριλαμβανομένων των
παρακάτω:
1. Διαβάστε ολόκληρο το εγχειρίδιο οδηγιών πριν ξεκινήσετε την εγκατάσταση και τη
συναρμολόγηση και φυλάξτε το για μελλοντική αναφορά. Φυλάξτε το εγχειρίδιο για
μελλοντική αναφορά.
2. Πριν συνδέσετε τη συσκευή στην πρίζα, βεβαιωθείτε ότι η τάση που αναφέρεται στη συσκευή
αντιστοιχεί στην τάση στην πρίζα.
3. Συσκευή μόνο για οικιακή χρήση.
4. Καθαρίστε και αποθηκεύστε αυτήν τη συσκευή σύμφωνα με τις οδηγίες που αναφέρονται
στην ενότητα «Καθαρισμός».
5. ΚΛΕΙΣΤΕ ΠΑΝΤΑ τη συσκευή και αποσυνδέστε την από την παροχή ρεύματος:
• εάν δεν λειτουργεί σωστά
• εάν ακούγεται ασυνήθιστος ήχος κατά τη χρήση
• πριν από την αποσυναρμολόγηση της συσκευής
• πριν τον καθαρισμό
• όταν δεν χρησιμοποιείται
6. Όταν αποσυνδέετε το καλώδιο τροφοδοσίας της συσκευής, πιάστε και τραβήξτε το φις και όχι
το καλώδιο.
7. Μην ενεργοποιείτε τη συσκευή εάν το δοχείο νερού είναι άδειο.
8. Κίνδυνος εγκαυμάτων! Ποτέ μην κατευθύνετε την εκτόξευση ζεστού ατμού ή νερού προς τον
εαυτό σας ή άλλους ανθρώπους!
9. Για τη λειτουργία της καφετιέρας χρησιμοποιείτε πάντα λαβές ή κουμπιά.
10.Μην αγγίζετε τη μηχανή του καφέ όταν λειτουργεί, καθώς υπάρχει κίνδυνος εγκαύματος.
11.Όταν δημιουργείται ζεστό νερό ή ατμός από τα ακροφύσια, κρατήστε το σώμα σας σε
απόσταση από τη μηχανή του καφέ για να αποφύγετε τυχόν εγκαύματα.
12.ΜΗΝ αφαιρείτε τη βάση του φίλτρου κατά την παρασκευή καφέ. Αφαιρέστε τη για να
φτιάξετε επιπλέον καφέ μετά την ολοκλήρωση της παρασκευής. Θα πρέπει επίσης να δίνεται
προσοχή κατά την αφαίρεση της θήκης φίλτρου, καθώς τα μεταλλικά μέρη θα είναι ζεστά.
Φροντίστε να το κρατάτε από τη λαβή και να χρησιμοποιείτε το κλιπ συγκράτησης του
φίλτρου για να απορρίψετε τους κόκκους.
13.Κρατήστε τη συσκευή μακριά από παιδιά.
14.Αυτή η συσκευή μπορεί να χρησιμοποιηθεί από παιδιά άνω των 8 ετών και από άτομα με
μειωμένη σωματική, αισθητηριακή ή διανοητική ικανότητα ή έλλειψη εμπειρίας και γνώσης,
εάν εποπτεύεται και καθοδηγείται από άτομο που είναι υπεύθυνο για την ασφάλειά του με
προσοχή για να κατανοούνται και να τηρούνται όλες οι προφυλάξεις ασφαλείας. Τα παιδιά
πρέπει να επιβλέπονται για να διασφαλιστεί ότι δεν παίζουν με τη συσκευή. Τα παιδιά δεν
πρέπει να εκτελούν καθαρισμό και συντήρηση της συσκευής χωρίς επίβλεψη.
15.Το σταθερό καλώδιο τροφοδοσίας μπορεί να αντικατασταθεί μόνο σε εξουσιοδοτημένο
σημείο σέρβις.

38 39Εγχειρίδιο χρήσης Εγχειρίδιο χρήσης
GRGR
16.Κρατήστε τη συσκευή και το καλώδιο μακριά από θερμότητα, νερό, υγρασία, αιχμηρές άκρες και
οποιονδήποτε άλλο παράγοντα που μπορεί να προκαλέσει ζημιά στη συσκευή ή το καλώδιο.
17.Βεβαιωθείτε ότι το καλώδιο τροφοδοσίας δεν αγγίζει ζεστά ή αιχμηρά στοιχεία.
18.Μη χρησιμοποιείτε το προϊόν για διαφορετικούς σκοπούς από αυτούς που εμφανίζονται σε
αυτό το εγχειρίδιο λειτουργίας.
19.Μην τοποθετείτε τη συσκευή σε νερό ή υγρό. ούτε χειριστείτε / χρησιμοποιήστε τη με βρεγμένα
ή υγρά χέρια.
20.Μην αφήνετε τη συσκευή χωρίς επίβλεψη όταν λειτουργεί.
21.Αποσυνδέετε ΠΑΝΤΑ το προϊόν από την πρίζα όταν δεν χρησιμοποιείται.
22.ΜΗΝ χρησιμοποιείτε αυτήν τη συσκευή εάν το καλώδιο ή το βύσμα είναι κατεστραμμένο ή η
συσκευή έχει σπάσει.
23.Μην επιχειρήσετε να επιδιορθώσετε μόνοι σας αυτήν τη συσκευή. Μόνο εξουσιοδοτημένο και
εξειδικευμένο προσωπικό μπορεί να επισκευάσει αυτήν τη συσκευή. Μην αποσυναρμολογείτε
ποτέ αυτήν τη συσκευή.
24.Χρησιμοποιείτε μόνο εξουσιοδοτημένα αξεσουάρ.
ΤΟΠΟΘΕΤΗΣΗ ΤΟΥ ΦΙΛΤΡΟΥ
Υπάρχουν δύο φίλτρα που παρέχονται μέσα στη συσκευή. Χρησιμοποιήστε βαθύτερο φίλτρο για να
πετύχετε έναν πιο δυνατό και πιο αρωματικό καφέ.
1. Για να τοποθετήσετε το φίλτρο στη θήκη φίλτρου, βεβαιωθείτε ότι έχετε ευθυγραμμίσει την
προεξοχή στο φίλτρο με την εγκοπή μέσα στη θήκη φίλτρου. Στη συνέχεια, περιστρέψτε το
φίλτρο για να ασφαλίσει καλά στη θήκη.
ΠΡΙΝ ΤΗΝ ΠΡΩΤΗ ΧΡΗΣΗ
1. Τραβήξτε έξω το δοχείο νερού της καφετιέρας. Ρίξτε νερό στη δεξαμενή νερού. Η στάθμη
του νερού δεν πρέπει να υπερβαίνει την ένδειξη «MAX» στη δεξαμενή. Στη συνέχεια,
τοποθετήστε το στη συσκευή.
2. Τοποθετήστε το φίλτρο στη θήκη φίλτρου (χωρίς καφέ στο φίλτρο), στη συνέχεια
τοποθετήστε το στήριγμα φίλτρου κάτω από τη βάση στήριξης φίλτρου (βλ. Εικ. 1) και
περιστρέψτε το αριστερόστροφα μέχρι να στερεωθεί σφιχτά (βλ. Εικ. 2 και Εικ. 3).
βλ. Εικ.1 βλ. Εικ.2 βλ. Εικ.3
3. Τοποθετήστε ένα φλιτζάνι στο δίσκο συλλογής υγρών. Βεβαιωθείτε ότι το κουμπί ατμού
είναι γυρισμένο στο μέγιστο προς τα δεξιά (είναι στη θέση ).
4. υνδέστε τη συσκευή στο τροφοδοτικό και πατήστε το κουμπί ON/OFF για να
ενεργοποιήσετε τη συσκευή. Η ένδειξη ισχύος θα ανάψει με κόκκινο χρώμα.
5. Πατήστε το κουμπί καφέ . Αφού τρέξει το νερό, πατήστε ξανά το κουμπί του καφέ για να
σταματήσει.
6. Βεβαιωθείτε ότι το κουμπί ατμού δεν είναι πατημένο. Περιμένετε για λίγο καθώς η
συσκευή αρχίζει να προθερμαίνεται. Όταν η ένδειξη καφέ ανάβει με πράσινο χρώμα,
σημαίνει ότι η προθέρμανση έχει ολοκληρωθεί.
7. Πατήστε ξανά το κουμπί του καφέ - θα τρέξει νερό.
8. Αφού τρέξει το νερό για 1 λεπτό, πατήστε το κουμπί καφέ. Αδειάστε το φλυτζάνι. Τώρα
μπορείτε να ξεκινήσετε την παρασκευή καφέ.
Σημείωση: Μπορεί να υπάρχει θόρυβος κατά την άντληση του νερού για πρώτη φορά. Είναι
φυσιολογικό, καθώς η συσκευή απελευθερώνει τον αέρα μέσα στη συσκευή. Μετά από περίπου
20 δευτερόλεπτα, ο θόρυβος πρέπει να εξαφανιστεί.
ΠΡΟΘΕΡΜΑΝΣΗ
Πριν φτιάξετε καφέ, συνιστάται να προθερμάνετε τη συσκευή, συμπεριλαμβανομένου του φίλτρου,
της βάσης φίλτρου και του φλυτζανιού, έτσι ώστε η γεύση του καφέ να μην επηρεάζεται από τα κρύα
μέρη.
1. Αφαιρέστε το δοχείο νερού και γεμίστε το με την επιθυμητή ποσότητα νερού. Η στάθμη του
νερού πρέπει να είναι μεταξύ της ένδειξης «MAX» και της ένδειξης «MIN» στη δεξαμενή. Στη
συνέχεια, τοποθετήστε σωστά τη δεξαμενή στη συσκευή.
2. Τοποθετήστε το φίλτρο στη θήκη φίλτρου (χωρίς καφέ στο φίλτρο), στη συνέχεια
τοποθετήστε το στήριγμα φίλτρου κάτω από τη βάση στήριξης φίλτρου (βλ. Εικ. 1) και
περιστρέψτε το αριστερόστροφα μέχρι να στερεωθεί σφιχτά (βλ. Εικ. 2 και Εικ. .3).
3. Τοποθετήστε ένα φλιτζάνι στο δίσκο συλλογής υγρών.
4. Στη συνέχεια συνδέστε τη συσκευή στο τροφοδοτικό. Βεβαιωθείτε ότι το κουμπί ατμού
είναι γυρισμένο στο μέγιστο προς τα δεξιά.
5. Πατήστε το κουμπί ON/OFF για να ενεργοποιήσετε τη συσκευή. Η ένδειξη τροφοδοσίας θα
ανάψει με κόκκινο χρώμα. Βεβαιωθείτε ότι το κουμπί ατμού δεν είναι πατημένο.
6. Πατήστε το κουμπί καφέ προς τα κάτω. Όταν τρέχει νερό, πατήστε αμέσως το κουμπί του
καφέ για να σταματήσει. Ο σκοπός του βήματος είναι η άντληση του νερού από τη δεξαμενή
στο περίβλημα.
Pagina se încarcă...
Pagina se încarcă...
Pagina se încarcă...
Pagina se încarcă...
Pagina se încarcă...
Pagina se încarcă...
Pagina se încarcă...
Pagina se încarcă...
Pagina se încarcă...
Pagina se încarcă...
Pagina se încarcă...
Pagina se încarcă...
Pagina se încarcă...
Pagina se încarcă...
Pagina se încarcă...
Pagina se încarcă...
Pagina se încarcă...
Pagina se încarcă...
Pagina se încarcă...
Pagina se încarcă...
Pagina se încarcă...
Pagina se încarcă...
Pagina se încarcă...
Pagina se încarcă...
Pagina se încarcă...
-
 1
1
-
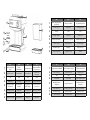 2
2
-
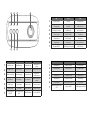 3
3
-
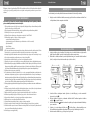 4
4
-
 5
5
-
 6
6
-
 7
7
-
 8
8
-
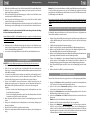 9
9
-
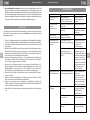 10
10
-
 11
11
-
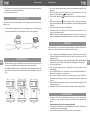 12
12
-
 13
13
-
 14
14
-
 15
15
-
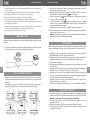 16
16
-
 17
17
-
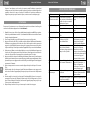 18
18
-
 19
19
-
 20
20
-
 21
21
-
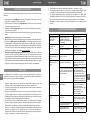 22
22
-
 23
23
-
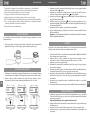 24
24
-
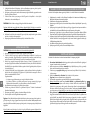 25
25
-
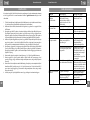 26
26
-
 27
27
-
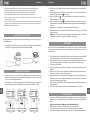 28
28
-
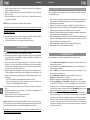 29
29
-
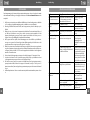 30
30
-
 31
31
-
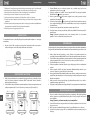 32
32
-
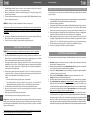 33
33
-
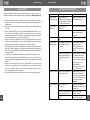 34
34
-
 35
35
-
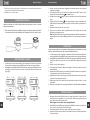 36
36
-
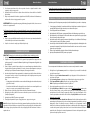 37
37
-
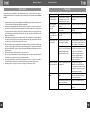 38
38
-
 39
39
-
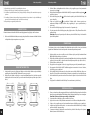 40
40
-
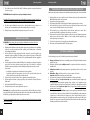 41
41
-
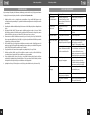 42
42
-
 43
43
-
 44
44
-
 45
45


Teesa TSA4009 Manualul proprietarului
- Categorie
- Aparate de cafea
- Tip
- Manualul proprietarului
în alte limbi
- français: Teesa TSA4009 Le manuel du propriétaire
- slovenčina: Teesa TSA4009 Návod na obsluhu
- polski: Teesa TSA4009 Instrukcja obsługi
- Deutsch: Teesa TSA4009 Bedienungsanleitung
- Nederlands: Teesa TSA4009 de handleiding
Lucrări înrudite
Alte documente
-
Zelmer ZCM7295 Espresso Coffee Machine Manual de utilizare
-
Beko CEP5152B Manual de utilizare
-
Beko CEP5152 Manualul proprietarului
-
Gorenje ESCM15DBK Manualul proprietarului
-
Krups XP344040 Manualul proprietarului
-
-
Rowenta PERFECTO AUTO Manualul proprietarului
-
KitchenAid XP2240 Manual de utilizare
-
Zelmer ZMF0550 Manual de utilizare