Philips HP4674 Manual de utilizare
- Categorie
- Coafori
- Tip
- Manual de utilizare
Acest manual este potrivit și pentru

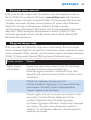
HP4674

2

3
1

4

HP4674
ENGLISH 6
14
22
30
38
46
54
63
71
79
88
96
105
113
121
129

6
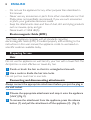
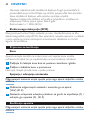
Introduction
Congratulations on your purchase and welcome to Philips! To fully benet
from the support that Philips offers, register your product at www.philips.
com/welcome.
The new Philips Airstylist Ion has been specially designed to give beautiful
styling results in a fast and easy way. The styler comes with exchangeable
attachments for various hairstyles. The ioniser produces streams of ions
which surround and condition your hair. The ions reduce frizz and static
electricity and leave your hair looking soft, smooth and shiny.
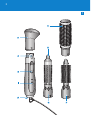
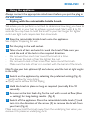
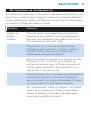
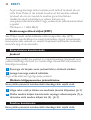
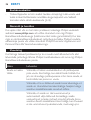
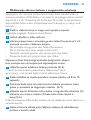
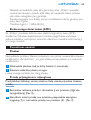
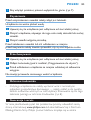
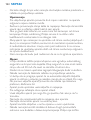
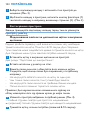
General description (Fig. 1)
Air inlet grille
B Control slide
m: Off
~ : gentle airow for easy styling
6 (red): warm airow for fast styling
6 (blue): cool airow
C Release button
D Volume brush
E Bristle retraction knob
F Super Shine natural bristle brush
G Retractable bristle brush
H Nozzle
I Ion on/off switch
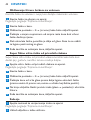
Important
Read this user manual carefully before you use the appliance and save it
for future reference.
Danger
Keep the appliance away from water. Do not use it near or over
water contained in baths, washbasins, sinks etc. When you use the
appliance in a bathroom, unplug it after use. The proximity of water
presents a risk, even when the appliance is switched off.
-
-
-
-
-
ENGLISH

Do not insert metal objects into the air inlet grille to avoid electric
shock.
Warning
Check if the voltage indicated on the appliance corresponds to the
local mains voltage before you connect the appliance.
Check the condition of the mains cord regularly. Do not use the
appliance if the plug, the mains cord or the appliance itself is damaged.
If the mains cord is damaged, you must have it replaced by Philips, a
service centre authorised by Philips or similarly qualied persons in
order to avoid a hazard.
This appliance is not intended for use by persons (including children)
with reduced physical, sensory or mental capabilities, or lack of
experience and knowledge, unless they have been given supervision
or instruction concerning use of the appliance by a person
responsible for their safety.
Children should be supervised to ensure that they do not play with
the appliance.
Caution
For additional protection, we advise you to install a residual current
device (RCD) in the electrical circuit that supplies the bathroom. This
RCD must have a rated residual operating current not higher than
30mA. Ask your installer for advice.
The attachments become hot during use. Prevent contact with the
skin.
Never block the air inlet grille.
If the appliance overheats, it switches off automatically. Unplug the
appliance and let it cool down for a few minutes. Before you switch
the appliance back on, check the grilles to make sure they are not
blocked by uff, hair, etc.
Always unplug the appliance after use.
Wait until the appliance has cooled down before you store it.
Always switch off the appliance before you put it down, even if it is
only for a moment.
Do not wind the mains cord round the appliance.
Do not use the appliance on articial hair.
-
-
-
-
-
-
-
-
-
-
-
-
-
-
-
ENGLISH 7

Do not use the appliance for any other purpose than described in
this manual.
Never use any accessories or parts from other manufacturers or that
Philips does not specically recommend. If you use such accessories
or parts, your guarantee becomes invalid.
Keep the attachments clean and free of dust, dirt and styling products
such as mousse, spray and gel.
Noise level: Lc= 80.8 dB(A)
This Philips appliance complies with all standards regarding
electromagnetic elds (EMF). If handled properly and according to the
instructions in this user manual, the appliance is safe to use based on
scientic evidence available today.
Preparing for use
Hair
Do not use the appliance on wet hair, dry your hair with a towel rst. The
Airstylist Ion is most effective on towel-dry hair.
1 Comb or brush the hair so that it is untangled and smooth.
2 Use a comb to divide the hair into locks.
Do not put too much hair in one lock.
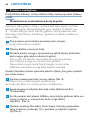
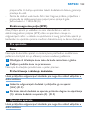
Connecting and disconnecting attachments
Always connect the appropriate attachment before you put the plug in
the wall socket.
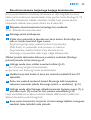
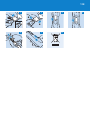
1 Choose the appropriate attachment and snap it onto the appliance
(‘click’) (Fig. 2).
2 To remove the attachment from the appliance, press the release
button (1) and pull the attachment off the appliance (2). (Fig. 3)
-
-
-
-
ENGLISH8

Always connect the appropriate attachment before you put the plug in
the wall socket.
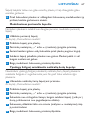
Styling with the retractable bristle brush
We advise you to perform a curl test to determine how long you have to
hold the brush in your hair to achieve a good result. Start with 8 to 10
seconds. You may have to hold the brush in your hair longer for tighter
curls. Less tight curls require less than 8 seconds.
1 Snap the retractable bristle brush onto the appliance.
See chapter ‘Preparing for use’.
2 Put the plug in the wall socket.
3 Take a lock of hair and wind it round the brush. Make sure you
wind the end of the lock in the required direction.
Do not wind too much hair round the brush at a time.
The thinner the lock of hair, the tighter the curl.
Do not wind a lock of hair more than twice round the brush.
Make sure the lock of hair is in contact with the barrel of the brush.
Note: To give your hair optimum lift and volume, wind the hair at right angles
to the scalp.
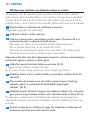
4 Switch on the appliance by selecting the preferred setting (Fig. 4).
~: gentle airow for easy styling
6 (red): warm airow for fast styling
5 Hold the brush in place as long as required (normally 8 to 10
seconds).
6 Assoonasthehairfeelsdry,xthecurlwithacoolairow(blue
6 setting) for long-lasting results. (Fig. 5)
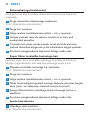
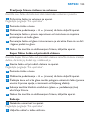
7 Switch off the appliance. Press the retractable bristle knob (1) and
turn it in the direction of the arrow (2) to remove the brush from
your hair (Fig. 6)
Make sure you hold the brush away from the underlying hair when you
remove it to preserve underlying curls.
-
-
-
-
ENGLISH 9

8 Letthecurlscooldownbeforeyoucomb,brushornger-comb
thehairintoitsnalstyle.
Styling with the volume brush
Use the volume brush to add maximum volume and body to your hair.
1 Snap the volume brush onto the appliance.
See chapter ‘Preparing for use’.
2 Place the brush in the hair.
3 Select setting ~ or 6 (red) to switch on the appliance.
4 Brush against the direction of hair growth while you touch your
scalp with the brush pins.
5 Move the brush away from the head while turning the brush. The
hair is lifted and falls lightly back onto the head.
6 Whenyouhavenishedstylingyourhair,switchofftheappliance.
Super Shine natural bristle brush
Use the Super Shine natural bristle brush to add shine and create texture,
especially for medium-length hair
1 Snap the natural bristle brush onto the appliance.
See chapter ‘Preparing for use’.
2 Place the brush in the hair.
3 Select setting ~ or 6 (red) to switch on the appliance.
4 Make brushing movements from the top of the head downwards
while you slightly turn the brush (inwards or outwards, depending
on the desired effect).
5 Finishoffwithacoolairow(blue6setting)toxyourstyle.
6 Whenyouhavenishedstylingyourhair,switchofftheappliance.
Drying
1 Snap the nozzle onto the appliance.
ENGLISH10

See chapter ‘Preparing for use’.
2 Put the plug in the wall socket.
3 Select the preferred setting to switch on the appliance (Fig. 4).
4 Whenyouhavenisheddryingyourhair,switchofftheappliance.
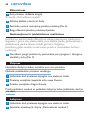
Reducing frizz and static electricity
The ioniser inside the hairstyler produces streams of ions that surround
and condition your hair. The ions reduce frizz and static electricity and
leave your hair looking soft, smooth and shiny.
You can use the ioniser at any setting and with any attachment.
1 To activate the ioniser, push the ion on/off slide upwards (Fig. 7).
Cleaning
Remove the attachments from the appliance before you clean them.
Never rinse the appliance with water.
1 Make sure the appliance is unplugged.
2 Clean the appliance with a small brush or a dry cloth.
3 Clean the attachments with a moist cloth.
Make sure the attachments are dry before you use or store them.
Storage
1
Make sure the appliance is unplugged.
2 Detach the attachment (see chapter ‘Preparing for use’).
3 Put the appliance in a safe place and let it cool down before you
store it.
Do not wind the mains cord round the appliance.
ENGLISH 11

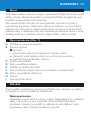
Environment
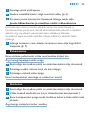
Do not throw away the appliance with the normal household waste
at the end of its life, but hand it in at an ofcial collection point for
recycling. By doing this, you help to preserve the environment (Fig. 8).
Guarantee & service
If you need information or if you have a problem, please visit the Philips
website at www.philips.com or contact the Philips Customer Care
Centre in your country (you nd its phone number in the worldwide
guarantee leaet). If there is no Customer Care Centre in your country,
go to your local Philips dealer or contact the Service Department of
Philips Domestic Appliances and Personal Care BV.
If problems arise with your hairstyler and you are unable to solve them
with the information below, please contact the nearest Philips service
centre or the Philips Customer Care Centre in you country.
Problem Solution
The appliance
does not work
at all.
Perhaps there is a power failure or the socket is not
live. Check if the power supply works. If it works,
plug another appliance into the socket to check
whether the socket is live.
Perhaps you did not switch on the appliance. Make
sure the appliance is plugged in. Then select the
preferred setting to switch on the appliance.
Perhaps the appliance overheated and switched itself
off. Unplug the appliance and let it cool down for a
few minutes. Before you switch the appliance back
on, make sure the grille is not blocked by uff, hair,
etc.
-
ENGLISH12

Problem Solution
Perhaps the appliance is not suitable for the voltage
to which it is connected. Make sure that the voltage
indicated on the appliance corresponds to the local
mains voltage.
If the mains cord is damaged, you must have it
replaced by Philips, a service centre authorised by
Philips or similarly qualied persons in order to avoid
a hazard.
ENGLISH 13

14
Поздравления за вашата покупка и добре дошли във Philips! За да се
възползвате изцяло от предлаганата от Philips поддръжка,
регистрирайте продукта си на www.philips.com/welcome.
Новият Airstylist Ion на Philips е проектиран специално за бързо и
лесно оформяне на прекрасни прически. Уредът е комплектован със
сменяеми приставки за разнообразни фризури. Йонизаторът създава
струи йонизиран въздух, които обграждат косата и подобряват
нейното състояние. Йоните намаляват чупливостта и
наелектризираността и правят косата ви да изглежда мека, гладка и
лъскава.
Решетка за приток на въздух
B Плъзгащ ключ
m: Изключено
~ : умерена въздушна струя за лесно оформяне на прическа
6 (червено): топла въздушна струя за бързо оформяне на
прическа
6 (синьо): хладна въздушна струя
C Бутон за освобождаване
D Четка за обем
E Бутон за прибиране на зъбците на четката
F Четка Super Shine с естествен косъм
G Четка с прибиращи се зъбци
H Накрайник
I Ключ за включване/изключване на йонизатора
Преди да използвате уреда, прочетете внимателно това
ръководство за експлоатация и го запазете за справка в бъдеще.
Пазете уреда от вода! Не го използвайте близо до или над вода
в баня, вана, мивка и др. Ако използвате уреда в банята, след
-
-
-
-
-

употреба го изключвайте от контакта. Близостта до вода води
до риск, дори когато уредът е изключен.
За избягване на токов удар не пъхайте метални предмети през
решетката за приток на въздух.
Преди да свържете уреда към мрежата, проверете дали
посоченото върху уреда напрежение отговаря на напрежението
на местната електрическа мрежа.
Проверявайте редовно състоянието на захранващия кабел. Не
използвайте уреда, ако са повредени щепселът, захранващият
кабел или самият уред.
Ако захранващият кабел се повреди, той трябва винаги да се
подменя от Philips, упълномощен сервиз на Philips или подобни
квалифицирани лица, за да се избегне опасност.
Този уред не е предназначен за ползване от хора (включително
деца) с намалени физически усещания или умствени недъзи или
без опит и познания, ако са оставени без наблюдение и не са
инструктирани от страна на отговарящо за тяхната безопасност
лице относно начина на използване на уреда.
Наглеждайте децата, за да не си играят с уреда.
За допълнителна защита ви съветваме да инсталирате в
захранващата мрежа на банята дефектно-токова защита (RCD) с
номинален работен ток на утечка не повече от 30mA. Обърнете
се за съвет към квалифициран електротехник.
Приспособленията се нагорещяват при употреба. Избягвайте
допир с кожата.
Никога не блокирайте притока на въздух към решетката на
уреда.
При прегряване уредът се изключва автоматично. Изключете го
от контакта и го оставете няколко минути да изстине. Преди да
го включите отново, проверете дали решетките не са задръстени
с пух, косми и др.
Винаги изключвайте уреда от захранващата мрежа след употреба.
Изчакайте уреда да изстине, преди да го приберете.
-
-
-
-
-
-
-
-
-
-
-
-
15

Винаги изключвайте уреда, преди да го оставите, дори да е само
за момент.
Не навивайте захранващия кабел около уреда.
Не използвайте уреда на изкуствена коса.
Не използвайте уреда за цели, различни от указаното в това
ръководство.
Никога не използвайте аксесоари или части от други
производители или такива, които не са специално препоръчвани
от Philips. При използване на такива аксесоари или части вашата
гаранция става невалидна.
Пазете приставките чисти и без прах, замърсявания и фризьорски
препарати като лосиони за коса, спрейове и гел.
Ниво на шума: Lc= 80,8 dB [A]
Този уред Philips е в съответствие с всички стандарти по отношение
на електромагнитните излъчвания (EMF). Ако се употребява
правилно и съобразно напътствията в Ръководството, уредът е
безопасен за използване според наличните досега научни факти.
Не използвайте уреда на мокра коса; първо подсушете косата си с
кърпа. Airstylist Ion е най-ефикасен, когато косата е подсушена с
кърпа.
1 Срешетеилиизчеткайтекосата,заданеесплетенаидае
гладка.
2 Разделетесгребенкосатанакичури.
Не хващайте твърде много коса в един кичур.
Предидавключитещепселавконтакта,сглобетеправилно
необходиматаприставкакъмуреда.
-
-
-
-
-
-
-
16

1 Изберетежеланатаприставкаиянаденетевърхууреда(със
щракване)(фиг.2).
2 Задасвалитеприставкатаотуреда,натиснетебутоназа
освобождаване(1)ииздърпайтеприставкатаотуреда
(2).(фиг.3)
Предидавключитещепселавконтакта,сглобетеправилно
необходиматаприставкакъмуреда.
Съветваме ви да направите малък тест, за да установите колко време
трябва да държите четката в косата, за да постигнете добър
резултат. Започнете с 8 до 10 секунди. За по-стегнати къдрици може
би ще трябва да държите четката по-дълго в косата. За по-отпуснати
къдрици ще са необходими по-малко от 8 секунди.
1 Поставетечеткатасприбиращисезъбцивърхууреда.
Вж. “Подготовка за употреба”.
2 Включетещепселавконтакта.
3 Хванетеединкичуркосаигонавийтеоколочетката.
Проверетедаликраятнакичураенавитвжеланатапосока.
Не навивайте прекалено много коса наведнъж върху четката.
Колкото по-малък е кичурът, толкова по-стегната ще бъде
къдрицата.
Не навивайте един кичур коса повече от два пъти около четката.
Проверете дали кичурът е допрял до стеблото на четката.
Забележка: За да получите оптимално повдигане и обем на косата,
навивайте я под прав ъгъл спрямо скалпа.
4 Включетеуреда,катоизберетежеланотоположение(фиг.4).
~: умерена въздушна струя за лесно оформяне на прическа
6 (червено): топла въздушна струя за бързо оформяне на прическа
-
-
-
-
17

5 Задръжтечеткатанаедномястоколкотоенеобходимо
(обикновено8до10секунди).
6 Щомусетитекосатакатовечеизсъхнала,фиксирайте
къдрицатасхладнавъздушнаструя(положение
6-синьо)
така,чедасеполучитраенрезултат.(фиг.5)
7 Изключетеуреда.Натиснетебутонаначеткатасприбиращисе
зъбци(1)иязавъртетепопосоканастрелката(2),задая
извадитеоткосатаси(фиг.6).
Когато сваляте четката, дръжте я далече от косата под нея, за да
запазите по-долните къдрици.
8 Оставетекъдрицитедасеохладят,предидасресвате,четкате
илибухватеспръстикосатазаокончателнооформянена
прическата.
Използвайте обемната четка за придаване на максимален обем и
пухкавост на косата си.
1 Поставетеобемнатачеткавърхууреда.
Вж. “Подготовка за употреба”.
2 Поставетечеткатавкосата.
3 Изберетеположение~или6(червено),задавключитеуреда.
4 Четкайтесрещупосокатанарастежанакосата,катодокосвате
скалпасисъсзъбцитеначетката.
5 Отдръпвайтечеткатаотглаватаседновременнозавъртане.
Косатащесеповдигнеищесеотпуснелекообратновърху
главата.
6 Когатосвършитеоформянетонаприческата,изключетеуреда.
Използвайте четката Super Shine с естествен косъм, за да добавите
блясък и обем, особено при средно дълга коса.
18

1 Поставетечеткатасестественкосъмвърхууреда.
Вж. “Подготовка за употреба”.
2 Поставетечеткатавкосата.
3 Изберетеположение~или6(червено),задавключитеуреда.
4 Извършвайтечеткащидвиженияотвърханаглаватанадолу,
катосъщевременнолекозавъртатечетката(навътреилинавън,
взависимостотжеланиярезултат).
5 Завършетесхладнавъздушнаструя(положение6-синьо),за
дафиксиратеприческатаси.
6 Когатосвършитеоформянетонаприческата,изключетеуреда.
1 Поставетенакрайникавърхууреда.
Вж. “Подготовка за употреба”.
2 Включетещепселавконтакта.
3 Включетеуреда,катоизберетежеланотоположение(фиг.4).
4 Когатосвършитесушенетонакосата,изключетеуреда.
Йонизаторът вътре във фризьорския уред създава струи йонизиран
въздух, които обграждат косата и подобряват нейното състояние.
Йоните намаляват чупливостта и наелектризираността и правят
косата ви да изглежда мека, гладка и лъскава.
Йонизаторът може да се използва при всяка настройка и с всяка
приставка.
1 Задействайтейонизаторачрезпреместваненагоренаплъзгача
завключванетоиизключванетому(фиг.7).
Свалетеприставкитеотуреда,предидагипочиствате.
Никоганеизплаквайтеуредасвода.
19

1 Проверетедалиуредътеизключенотконтакта.
2 Почиствайтеуредасмалкачеткаилисухакърпа.
3 Почиствайтеприставкитесвлажнакърпа.
Предидаизползватеилидаприберетеприставките,проверете
далисасухи.
1
Проверетедалиуредътеизключенотконтакта.
2 Откачетеприставката(вж.раздел“Подготовказаупотреба”).
3 Поставетеуреданабезопасномястоигооставетедаизстине,
предидагоприберете.
Ненавивайтезахранващиякабелоколоуреда.
След края на срока на експлоатация на уреда не го изхвърляйте
заедно с нормалните битови отпадъци, а го предайте в
официален пункт за събиране, където да бъде рециклиран. По
този начин вие помагате за опазването на околната
среда (фиг. 8).
Ако се нуждаете от информация или имате проблем, посетете
Интернет сайта на Philips на адрес www.philips.com или се обърнете
към Центъра за обслужване на клиенти на Philips във вашата страна
(телефонния му номер можете да намерите в международната
гаранционна карта). Ако във вашата страна няма Център за
обслужване на клиенти, обърнете се към местния търговец на уреди
на Philips или се свържете с Отдела за сервизно обслужване на
битови уреди на Philips [Service Department of Philips Domestic
Appliances and Personal Care BV].
-
20
Pagina se încarcă...
Pagina se încarcă...
Pagina se încarcă...
Pagina se încarcă...
Pagina se încarcă...
Pagina se încarcă...
Pagina se încarcă...
Pagina se încarcă...
Pagina se încarcă...
Pagina se încarcă...
Pagina se încarcă...
Pagina se încarcă...
Pagina se încarcă...
Pagina se încarcă...
Pagina se încarcă...
Pagina se încarcă...
Pagina se încarcă...
Pagina se încarcă...
Pagina se încarcă...
Pagina se încarcă...
Pagina se încarcă...
Pagina se încarcă...
Pagina se încarcă...
Pagina se încarcă...
Pagina se încarcă...
Pagina se încarcă...
Pagina se încarcă...
Pagina se încarcă...
Pagina se încarcă...
Pagina se încarcă...
Pagina se încarcă...
Pagina se încarcă...
Pagina se încarcă...
Pagina se încarcă...
Pagina se încarcă...
Pagina se încarcă...
Pagina se încarcă...
Pagina se încarcă...
Pagina se încarcă...
Pagina se încarcă...
Pagina se încarcă...
Pagina se încarcă...
Pagina se încarcă...
Pagina se încarcă...
Pagina se încarcă...
Pagina se încarcă...
Pagina se încarcă...
Pagina se încarcă...
Pagina se încarcă...
Pagina se încarcă...
Pagina se încarcă...
Pagina se încarcă...
Pagina se încarcă...
Pagina se încarcă...
Pagina se încarcă...
Pagina se încarcă...
Pagina se încarcă...
Pagina se încarcă...
Pagina se încarcă...
Pagina se încarcă...
Pagina se încarcă...
Pagina se încarcă...
Pagina se încarcă...
Pagina se încarcă...
Pagina se încarcă...
Pagina se încarcă...
Pagina se încarcă...
Pagina se încarcă...
Pagina se încarcă...
Pagina se încarcă...
Pagina se încarcă...
Pagina se încarcă...
Pagina se încarcă...
Pagina se încarcă...
Pagina se încarcă...
Pagina se încarcă...
Pagina se încarcă...
Pagina se încarcă...
Pagina se încarcă...
Pagina se încarcă...
Pagina se încarcă...
Pagina se încarcă...
Pagina se încarcă...
Pagina se încarcă...
Pagina se încarcă...
Pagina se încarcă...
Pagina se încarcă...
Pagina se încarcă...
Pagina se încarcă...
Pagina se încarcă...
Pagina se încarcă...
Pagina se încarcă...
Pagina se încarcă...
Pagina se încarcă...
Pagina se încarcă...
Pagina se încarcă...
Pagina se încarcă...
Pagina se încarcă...
Pagina se încarcă...
Pagina se încarcă...
Pagina se încarcă...
Pagina se încarcă...
Pagina se încarcă...
Pagina se încarcă...
Pagina se încarcă...
Pagina se încarcă...
Pagina se încarcă...
Pagina se încarcă...
Pagina se încarcă...
Pagina se încarcă...
Pagina se încarcă...
Pagina se încarcă...
Pagina se încarcă...
Pagina se încarcă...
Pagina se încarcă...
Pagina se încarcă...
Pagina se încarcă...
Pagina se încarcă...
Pagina se încarcă...
Pagina se încarcă...
-
 1
1
-
 2
2
-
 3
3
-
 4
4
-
 5
5
-
 6
6
-
 7
7
-
 8
8
-
 9
9
-
 10
10
-
 11
11
-
 12
12
-
 13
13
-
 14
14
-
 15
15
-
 16
16
-
 17
17
-
 18
18
-
 19
19
-
 20
20
-
 21
21
-
 22
22
-
 23
23
-
 24
24
-
 25
25
-
 26
26
-
 27
27
-
 28
28
-
 29
29
-
 30
30
-
 31
31
-
 32
32
-
 33
33
-
 34
34
-
 35
35
-
 36
36
-
 37
37
-
 38
38
-
 39
39
-
 40
40
-
 41
41
-
 42
42
-
 43
43
-
 44
44
-
 45
45
-
 46
46
-
 47
47
-
 48
48
-
 49
49
-
 50
50
-
 51
51
-
 52
52
-
 53
53
-
 54
54
-
 55
55
-
 56
56
-
 57
57
-
 58
58
-
 59
59
-
 60
60
-
 61
61
-
 62
62
-
 63
63
-
 64
64
-
 65
65
-
 66
66
-
 67
67
-
 68
68
-
 69
69
-
 70
70
-
 71
71
-
 72
72
-
 73
73
-
 74
74
-
 75
75
-
 76
76
-
 77
77
-
 78
78
-
 79
79
-
 80
80
-
 81
81
-
 82
82
-
 83
83
-
 84
84
-
 85
85
-
 86
86
-
 87
87
-
 88
88
-
 89
89
-
 90
90
-
 91
91
-
 92
92
-
 93
93
-
 94
94
-
 95
95
-
 96
96
-
 97
97
-
 98
98
-
 99
99
-
 100
100
-
 101
101
-
 102
102
-
 103
103
-
 104
104
-
 105
105
-
 106
106
-
 107
107
-
 108
108
-
 109
109
-
 110
110
-
 111
111
-
 112
112
-
 113
113
-
 114
114
-
 115
115
-
 116
116
-
 117
117
-
 118
118
-
 119
119
-
 120
120
-
 121
121
-
 122
122
-
 123
123
-
 124
124
-
 125
125
-
 126
126
-
 127
127
-
 128
128
-
 129
129
-
 130
130
-
 131
131
-
 132
132
-
 133
133
-
 134
134
-
 135
135
-
 136
136
-
 137
137
-
 138
138
-
 139
139
-
 140
140


Philips HP4674 Manual de utilizare
- Categorie
- Coafori
- Tip
- Manual de utilizare
- Acest manual este potrivit și pentru
în alte limbi
- slovenčina: Philips HP4674 Používateľská príručka
Lucrări înrudite
-
Philips HP4671/00 Manual de utilizare
-
Philips HP4653/01 Manual de utilizare
-
Philips HP4624/00 Manual de utilizare
-
-
-
Philips HP8666 Manual de utilizare
-
Philips HP8631/00 Manual de utilizare
-
-
Philips HP8656-00 Manual de utilizare
-