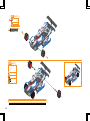
Meccano CHAMPIONSHIP RACE CAR 27 in 1 Instrucțiuni de utilizare
- Tip
- Instrucțiuni de utilizare

CHAMPIONSHIP RACE CAR
VOITURE DE COURSE
2727
11
EN
IN
MODELS•MODÈLES
19205
MOTORIZED
MOTORISÉE
e Instructions f Instructions de montage E Instrucciones de construcción
d Bauanleitung n Bouwinstructie i Istruzioni p Instruções
r Инструкции P Instrukcja c Pokyny s Pokyny h Útmutató
R Instrucţiuni g Οδηγίες C Upute B Инструкции l Navodila

2

2
48
59
19
7
32
EN.
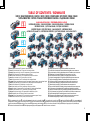
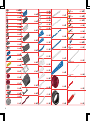
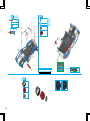
Content: 343 parts, 6V electrical motor with LED, 2 real tools and 1 instruction sheet for 5 models.
FR.
Contenu: 343pièces, moteur électrique 6V avec LED, 2vrais outils et 1livret de montage pour 5modèles.
ES.
Contenido: 343 piezas, motor eléctrico de 6V con luces LED, 2 herramientas reales y 1 guía de instrucciones para 5 modelos.
DE.
Inhalt: 343Teile, 6-V-Elektromotor mit LED, 2echte Werkzeuge und 1Bauanleitung für 5Modelle.
NL.
Inhoud: 343 onderdelen, elektrische motor van 6 V met LED, 2 stuks gereedschap en 1 bouwinstructie voor 5 modellen.
I T.
Contenuto: 343 pezzi, motore elettrico 6 V con LED, 2 attrezzi e 1 guida per l'uso per 5 modelli.
P T.
Conteúdo: 343 peças, motor elétrico de 6V com LED, 2 ferramentas reais e 1 folha de instruções para 5 modelos.
RU.
В комплекте: 343 детали, электрический двигатель мощностью 6В со светодиодами, 2 настоящих инструмента и 1 инструкция по сборке 5 моделей.
PL.
Zawartość: 343elementy, silnik elektryczny o mocy 6V z podświetleniem LED, 2prawdziwe narzędzia i 1karta z instrukcjami dla 5modeli.
CZ.
Obsah: 343dílů, 6V elektrický motorek sLED, 2skutečné nástroje a1list spokyny pro 5modelů.
SK.
Obsah: 343dielov, 6V elektrický motor sLED diódou, 2skutočné nástroje a1hárok spokynmi pre 5modelov.
HU.
Tartalom: 343 db alkatrész, 6 V-os elektromos motor LED-del, 2 db valódi szerszám és 1 db 5 modellhez tartozó felhasználói útmutató.
RO.
Conţinut: 343 de piese, motor electric de 6 V cu LED, 2 instrumente reale şi 1 fişă cu instrucţiuni pentru 5 modele.
EL.
Περιεχόμενα: 343 κομμάτια, ηλεκτρικό μοτέρ 6V με LED, 2 πραγματικά εργαλεία και 1 φυλλάδιο οδηγιών για 5 μοντέλα.
HR.
Sadržaj: 343 dijela, električni motor od 6V s LED svjetlom, 2 prava alata i 1 list s uputama za 5 modela.
BG.
Съдържание: 343 части, 6 V електрически мотор с LED, 2 истински инструмента и 1 ръководство с инструкции за 5-те модела.
SL.
Vsebina: 343 delov, 6V električni motor z LED-lučko, 2 pravi orodji in 1 list z navodili za 5 modelov.
EN. Building instructions for the 22 other models are available at www.meccano.com.
FR. Les instructions de montage des 22 autres modèles sont disponibles sur www.meccano.com.
ES. Hay instrucciones de construcción disponibles para los otros 22 modelos en www.meccano.com.
DE. Bauanleitungen für die anderen 22 Modelle sind auf www.meccano.com zu finden.
NL. Bouwinstructies voor de andere 22 modellen zijn verkrijgbaar op www.meccano.com.
IT. Le istruzioni di montaggio degli altri 22 modelli sono disponibili alla pagina www.meccano.com.
PT. Instruções de montagem dos restantes 22 modelos disponíveis em www.meccano.com.
RU. Инструкции по сборке 22 других моделей можно найти на сайте www.meccano.com.
PL. Instrukcje montażu pozostałych 22 modeli można znaleźć na stronie www.meccano.com.
CZ. Sestavovací pokyny pro dalších 22 modelů naleznete na webu www.meccano.com.
SK. Pokyny na stavanie pre ďalších 22 modelov sú dostupné na webovej lokalite www.meccano.com.
HU. A www.meccano.com weboldalon további 22 modellhez tartozó összerakási útmutatót talál.
RO. Instrucţiunile de construire pentru 22 de alte modele sunt disponibile la adresa www.meccano.com.
EL. Οι οδηγίες κατασκευής για τα υπόλοιπα 22 μοντέλα διατίθενται στη διεύθυνση www.meccano.com.
HR. Upute za sastavljanje ostalih 22 modela dostupne su na stranici www.meccano.com.
BG. Инструкциите за сглобяване на другите 22 модела са достъпни на www.meccano.com.
SL. Navodila za sestavljanje drugih 22 modelov so na voljo na www.meccano.com.
EN.
Only one model can be built at a time.
FR.
Les pièces fournies ne permettent de monter qu'un seul modèle à la fois.
ES.
Solo es posible construir un modelo a la vez.
DE.
Jeweils nur eins der Modelle baubar.
NL.
Er kan maar een model tegelijk
worden gebouwd.
IT.
Permette di realizzare un solo modello per volta.
PT.
Só é possível montar um modelo de cada vez.
RU.
Одновременно можно построить только одну модель.
PL.
Jednocześnie można zbudować tylko jeden model.
CZ.
Najednou
lze sestavit pouze jeden model.
SK.
Modely sa dajú vytvoriť len po jednom.
HU.
Egyszerre csak egy modell rakható össze.
RO.
Nu pot fi construite mai multe modele în acelaşi timp.
EL.
Μπορείτε να δημιουργείτε μόνο ένα μοντέλο κάθε φορά.
HR.
Istovremeno ne možete sastaviti više modela.
BG.
Само един модел може да бъде сглобен едновременно.
SL.
Sestavite lahko samo en model naenkrat.
3
AVA IL A BL E ON LI N E / DISPONIBLES EN LIGNE
DISPONIBLES EN LÍNEA / ONLINE VERFÜGBAR / ONLINE VERKRIJGBAAR / DISPONIBILI ONLINE
DISPONÍVEL ONLINE / ДОСТУПНЫ ОНЛАЙН /
DOSTĘPNE W INTERNECIE
K DISPOZICI ONLINE / DOSTUPNÝ ONLINE / ONLINE ELÉRHETŐ / DISPONIBILE ONLINE
ΔΙΑΤΙΘΕΝΤΑΙ ΣΤΟ ΔΙΑΔΙΚΤΥΟ / DOSTUPNO NA INTERNETU / ДОСТЪПНО ОНЛАЙН / NA VOLJO NA SPLETU
TABLE OF CONTENTS / SOMMAIRE
ÍNDICE / INHALTSVERZEICHNIS / INHOUD / INDICE / ÍNDICE / СОДЕРЖАНИЕ / SPIS TREŚCI / OBSAH / OBSAH
TARTALOMJEGYZÉK / CUPRINS / ΠΙΝΑΚΑΣ ΠΕΡΙΕΧΟΜΕΝΩΝ / SADRŽAJ / СЪДЪРЖАНИЕ / VSEBINA

EN: FCC STATEMENT: This device complies with Part 15 of the FCC rules. Operation is subject to the following two conditions: (1) This device may not cause harmful interference, and (2) This device must accept
any interference received, including interference that may cause undesired operation.
This equipment has been tested and found to comply with the limits for Class B digital devices pursuant to Part 15 of the FCC rules. These limits are designed to provide reasonable protection against harmful
interference to radio communications. This equipment generates, uses and can radiate radio frequency energy and, if not installed and used in accordance with the instruction, may cause harmful interference to
radio communication. However, there is no guarantee that interference will not occur in a particular installation. If this toy does cause interference to radio or television reception (you can check this by turning the
toy off and on while listening for the interference), one or more of the following measures may be useful:
• Reorient or relocate the receiving antenna
• Increase the separation between the toy and the radio or the TV
• Consult the dealer or an experienced TV-radio technician for help.
NOTE: Changes, adjustments or modifications to this unit, including but not limited to, replacement of any transmitter component (crystal, semiconductor, etc) could result in a violation of FCC rules under part 15
and/or 95 and must be expressly approved by Spin Master Ltd or they could void the user’s authority to operate the equipment. Spin Master Inc., PMB #10053, 300 International Drive, Suite 100, Williamsville, NY
14221. To contact the responsible party please visit fcc.spinmaster.com
FR : DÉCLARATION FCC : Le présent appareil est conforme à l’article 15 de la réglementation de la FCC. L'exploitation est autorisée aux deux conditions suivantes : (1) l'appareil ne doit pas produire de brouillage,
et (2) l'appareil doit accepter tout brouillage radioélectrique subi, même si le brouillage est susceptible d'en compromettre le fonctionnement.
Cet équipement a été testé et jugé conforme aux limites de la classe B pour les équipements numériques en vertu de l’article 15 de la réglementation de la FCC. Ces limites ont été instaurées pour assurer une
protection raisonnable contre toute interférence nuisible avec les communications radio. Cet équipement génère, utilise et peut émettre de l’énergie de fréquence radio. S’il n’est pas installé et utilisé selon le mode
d’emploi, il peut causer des interférences nuisibles aux communications radio. Cependant, il n'existe aucune garantie contre ces interférences dans le cas où l'installation ne serait pas conforme. Si ce jouet cause
des interférences à la réception radio ou télévisée (ce qui est vérifiable en l’éteignant, puis en le rallumant tout en écoutant s’il y a des interférences), suivre une ou plusieurs des recommandations suivantes :
• Réorienter ou déplacer l’antenne réceptrice
• Augmenter la distance entre le jouet et la radio ou la télévision
• Consulter le revendeur ou demander l’aide d’un technicien radio/T.V. expérimenté.
REMARQUE : tout changement, réglage ou modification de cet appareil, incluant mais ne se limitant pas au remplacement de tout composant du transmetteur (cristal, semi-conducteur, etc.), pourrait constituer
une violation de l’article 15 et/ou 95 de la règlementation de la FCC, et doit être expressément approuvé par Spin Master Ltd., sous peine d’entraîner l’annulation du droit de l’utilisateur d’exploiter l’équipement.
Spin Master Inc., PMB #10053, 300 International Drive, Suite 100, Williamsville, NY 14221. Pour contacter la partie responsable, rendez-vous sur fcc.spinmaster.com
ES: DECLARACIÓN DE LA FCC: Este dispositivo cumple con la sección 15 de la normativa de la FCC. El funcionamiento está sujeto a estas dos siguientes condiciones: (1) el dispositivo no debe causar
interferencias dañinas, y (2) el dispositivo debe admitir la recepción de cualquier tipo de interferencia, incluidas aquellas que puedan causar un funcionamiento indeseado.
Este equipo ha sido probado y cumple los límites para dispositivos de clase B digital establecidos en la sección 15 de la normativa de la FCC. Estos límites han sido diseñados para proporcionar una protección
razonable contra la interferencia dañina en las comunicaciones por radio. Este equipo genera, utiliza y emite energía en forma de radiofrecuencias, por lo que si no se instala y utiliza como indican las
instrucciones, podría provocar interferencias dañinas en comunicaciones de radio. No obstante, no se puede garantizar que no habrá interferencias en una instalación determinada. Si este juguete provoca
interferencias en la recepción de radio o televisión (puede comprobarlo apagando y encendiendo el juguete mientras escucha si se producen interferencias), puede tomar alguna de las siguiente medidas:
• Reorientar o cambiar de lugar la antena receptora
• Aumentar la separación entre el juguete y la radio o el televisor
• Consultar con el vendedor o un técnico de televisión y radio si necesita asistencia adicional.
NOTA: Los cambios, los ajustes o las modificaciones realizadas en este dispositivo, como, entre otros, la sustitución de cualquier componente transmisor (cristal, semiconductor, etc.) podría suponer la infracción
de las secciones 15 o 95 de la normativa de la FCC, y debe ser explícitamente aprobada por Spin Master Ltd.; en caso contrario, el usuario podría verse privado del derecho de operar el equipo. Spin Master Inc.,
PMB #10053, 300 International Drive, Suite 100, Williamsville, NY 14221. Para ponerse en contacto con la parte responsable, visite fcc.spinmaster.com
CAN ICES-3(B) / NMB-3(B)
4
AAA
AAA
AAA
AAA
5
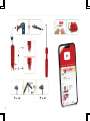
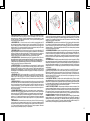
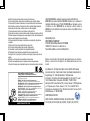
e HOW TO INSTALL BATTERIES: 1. Open the battery door with a screwdriver. 2. If used batteries are present,
remove these batteries from the unit by pulling up on one end of each battery. DO NOT remove or install
batteries using sharp or metal tools. 3. Install new batteries as shown in the polarity diagram (+/-) inside
the battery compartment. 4. Replace battery door securely. 5. Check your local laws and regulations for
correct recycling and/or battery disposal.
f INSTALLATION DES PILES : 1. À l’aide d’un tournevis, ouvrir le couvercle du compartiment des piles. 2. Si
des piles usagées sont présentes, les extraire en tirant sur l'une des extrémités. NE PAS utiliser d’objet
coupant ou métallique pour extraire ou installer les piles. 3. Installer des piles neuves comme indiqué sur le
schéma de polarité (+/-) du compartiment des piles. 4. Bien refermer le compartiment des piles. 5. Consulter
la législation locale concernant le recyclage et/ou l’élimination des piles.
E INSTALACIÓN DE LAS PILAS: 1. Abra el compartimento de las pilas con la ayuda de un destornillador. 2. Si
las pilas están gastadas, tire hacia arriba de uno de sus extremos para extraerlas. NO utilice herramientas
metálicas o puntiagudas para instalar o extraer las pilas. 3. Coloque las pilas nuevas en el compartimento
correspondiente, tal y como se indica en el diagrama de polaridad (+/-). 4. Cierre bien la tapa del compartimento
de las pilas. 5. Consulte la normativa local relativa al reciclaje y a la eliminación de las pilas.
d EINLEGEN DER BATTERIEN: 1. Batteriefachabdeckung mit einem Schraubenzieher öffnen. 2. Wenn sich
gebrauchte Batterien darin befinden, diese einzeln herausziehen. Batterien NICHT mit scharfen oder metallenen
Gegenständen entfernen oder einlegen. 3. Neue Batterien unter Beachtung des Polaritätsdiagramms (+/-)
in das Batteriefach einlegen. 4. Batteriefachabdeckung wieder anbringen. 5. Örtliche Gesetze und Bestimmungen
für das Recycling bzw. die Entsorgung von Altbatterien beachten.
n DE BATTERIJEN PLAATSEN: 1. Open het batterijdeksel met een schroevendraaier. 2. Verwijder eventueel
gebruikte aanwezige batterijen uit de unit door één kant van elke batterij omhoog te trekken. Verwijder of
plaats batterijen NIET met behulp van scherpe of metalen voorwerpen. 3. Plaats de nieuwe batterijen zoals
weergegeven op het polariteitsdiagram (+/-) aan de binnenkant van het batterijvak. 4. Sluit het vak af met
het batterijdeksel. 5. Lees de plaatselijke voorschriften en regelgeving om de batterijen op de juiste wijze te
recyclen of af te voeren.
i COME INSTALLARE LE PILE: 1. Aprire lo scomparto pile con un cacciavite. 2. Se sono presenti pile usate,
rimuoverle dall'unità sollevandole da un'estremità. NON usare oggetti metallici o appuntiti per rimuovere o
installare le pile. 3. Inserire le pile nuove con le polarità (+/-) direzionate come indicato. 4. Richiudere
correttamente lo scomparto pile. 5. Eliminare e/o riciclare le pile secondo quanto previsto dalle normative
locali vigenti.
p COMO COLOCAR AS PILHAS: 1. Abra a tampa do compartimento das pilhas com uma chave de fenda. 2. Se
houver pilhas usadas, retire-as da unidade individualmente, puxando pela extremidade de cada uma. NÃO
retire ou coloque pilhas com qualquer acessório pontiagudo ou metálico. 3. Instale pilhas novas seguindo
o diagrama de polaridade (+/-) dentro do compartimento das pilhas. 4. Coloque de novo a porta do
compartimento com cuidado. 5. Consulte as leis, as normas e os regulamentos locais de reciclagem e/ou
descarte de pilhas e baterias.
r УСТАНОВКА ЭЛЕМЕНТОВ ПИТАНИЯ: 1. Откройте крышку отсека элементов питания с помощью отвертки.
2. Извлеките старые или истощенные элементы питания из отсека (при их наличии), подняв каждый
элемент питания за край. ЗАПРЕЩАЕТСЯ извлекать или устанавливать элементы питания с помощью
острых или металлических предметов. 3. Установите новые элементы питания внутри отсека, соблюдая
полярность (+/-). 4. Надежно закройте крышку отсека. 5. Ознакомьтесь с законами и нормативами
вашей страны, установленными в отношении правил переработки и/или утилизации элементов
питания.
P WKŁADANIE BATERII: 1. Otwórz drzwiczki komory baterii za pomocą śrubokrętu. 2. Jeśli w komorze znajdują
się zużyte baterie, wyjmij je, podważając każdą za jeden z końców. Do wyjmowania i wkładania baterii NIE
wolno stosować ostrych narzędzi. 3. Umieść nowe baterie w komorze zgodnie z oznaczeniami biegunowości
(+/-). 4. Starannie zamknij drzwiczki komory baterii. 5. Zapoznaj się z lokalnymi przepisami izaleceniami
prawnymi dotyczącymi prawidłowego recyklingu i/lub utylizacji baterii.
c VLOŽENÍ BATERIÍ: 1. Pomocí šroubováku otevřete dvířka baterií. 2. Jestliže se zde nacházejí použité baterie,
vyndejte je zjednotky postupným vytahováním za jejich konec. NEVYNDÁVEJTE ANI NEVKLÁDEJTE baterie
pomocí ostrých nebo kovových nástrojů. 3. Nové baterie vkládejte podle schématu polarity (+/-) uvnitř oddílu
pro baterie. 4. Pevně nasaďte dvířka baterií zpět na místo. 5. Seznamte se smístními zákony apředpisy
ohledně správné recyklace či likvidace baterií.
s INŠTALÁCIA BATÉRIÍ: 1. Dvierka batérií otvorte skrutkovačom. 2. Ak sú prítomné použité batérie, odstráňte
ich zjednotky tak, že každú batériu vytiahnete za jeden koniec. NEODSTRAŇUJTE ani nevkladajte batérie
pomocou ostrého alebo kovového predmetu. 3. Vložte nové batérie do priestoru pre batérie, ako je zobrazené
na diagrame polarity (+/–). 4. Pevne znova nasaďte dvierka batérií. 5. Pozrite si miestne predpisy a nariadenia
osprávnej recyklácii alebo likvidácii batérií.
h AZ ELEMEK BEHELYEZÉSÉNEK MÓDJA: 1. Nyissa ki az elemtartó fedelét egy csavarhúzóval. 2. Ha használt elemek
vannak benne, távolítsa el ezeket az elemeket a készülékből úgy, hogy az elemeket egyik végüknél felfelé emeli.
Az elemek eltávolításához vagy behelyezéséhez NE használjon éles vagy fémeszközöket. 3. Helyezze az új
elemeket az elemtartóba a polaritási ábrának (+/-) megfelelően. 4. Helyezze vissza biztonságosan az elemtartó
fedelét. 5. Ellenőrizze az elemek újrahasznosítására és/vagy ártalmatlanítására vonatkozó helyi törvényeket és
rendelkezéseket.
R INSTALAREA BATERIILOR: 1. Deschideţi uşa compartimentului bateriilor cu ajutorul unei şurubelniţe. 2. Dacă
sunt prezente baterii uzate, scoateţi-le pe acestea din unitate trăgând în sus de capătul fiecărei baterii. NU
demontaţi sau instalaţi bateriile cu ajutorul unor instrumente ascuţite sau metalice. 3. Instalaţi bateriile noi
după cum indică marcajele de polaritate (+/-) din interiorul compartimentului bateriei. 4. Închideţi bine uşa
compartimentului bateriei. 5. Consultaţi legile şi reglementările locale pentru reciclarea şi/sau eliminarea
corectă a bateriei.
g ΤΟΠΟΘΕΤΗΣΗ ΜΠΑΤΑΡΙΩΝ: 1. Ανοίξτε το πορτάκι των μπαταριών με ένα κατσαβίδι. 2. Εάν υπάρχουν
χρησιμοποιημένες μπαταρίες, αφαιρέστε τις από τη μονάδα, τραβώντας προς τα επάνω το άκρο της κάθε μπαταρίας.
ΜΗΝ αφαιρείτε ή τοποθετείτε μπαταρίες χρησιμοποιώντας αιχμηρά ή μεταλλικά εργαλεία. 3. Τοποθετήστε τις νέες
μπαταρίες σύμφωνα με το διάγραμμα πολικότητας (+/-) μέσα στη θήκη των μπαταριών. 4. Τοποθετήστε καλά το
πορτάκι των μπαταριών. 5. Ελέγξτε τους τοπικούς νόμους και κανονισμούς για πληροφορίες σχετικά με τη σωστή
ανακύκλωση και/ή απόρριψη των μπαταριών.
C KAKO UMETNUTI BATERIJE: 1. Odvijačem otvorite vratašca odjeljka za baterije. 2. Ako se u odjeljku
nalaze iskorištene baterije, izvadite ih tako da podignete jedan od krajeva baterije. Za vađenje ili umetanje
baterija NEMOJTE upotrebljavati oštre ili metalne alate. 3. Nove baterije umetnite u skladu s oznakom polova
(+/-) koja se nalazi u odjeljku za baterije. 4. Pričvrstite vratašca odjeljka za baterije. 5. Informacije o pravilnom
recikliranju i/ili odlaganju baterija potražite u lokalnim zakonima i propisima.
B КАК СЕ ПОСТАВЯТ БАТЕРИИТЕ: 1. Отворете капака на батериите с помощта на отвертка. 2. Ако
са налични използвани батерии, извадете ги от устройството, като издърпате нагоре единия край на
всяка батерия. НЕ изваждайте и не поставяйте батерии с помощта на остри или метални инструменти.
3. Поставете нови батерии, както е показано на диаграмата за полярност (+/–) в гнездото за батериите.
4. Поставете сигурно капака на батериите обратно на мястото му. 5. Прегледайте местните закони и
разпоредби за правилното рециклиране и/или изхвърляне на батериите.
l NAMESTITEV BATERIJ: 1. Z izvijačem odprite pokrovček predalčka za baterije. 2. Morebitne rabljene
baterije odstranite iz enote, tako da posamezne baterije pridvignete ob strani. Baterij NE odstranjujte ali
nameščajte z ostrim ali kovinskim orodjem. 3. Pri nameščanju novih baterij upoštevajte pravilno polarnost
(+/-), prikazano v predalčku za baterije. 4. Znova trdno namestite pokrovček predalčka za baterije. 5. Za
pravilno recikliranje in/ali odlaganje baterij upoštevajte lokalne zakone in predpise.

D036 x2
D292 x3
D377 x1
D490 x1
D349 x3
D347 x4
D348 x4
D559 x1
A420 x2
D566 x4
D373 x2
C867 x1
A128 x1
A420 x2
A423 x2
D103 x3
D488 x2
C330 x4
D567 x1
D406 x2
D358 x2
A238 x4
D101 x2
D049 x1
B222 x2
A631 x1
A444 x2
A737 x6
A259 x3
A138 x5
A337 x86
A411 x14
D005 x25
A511 x39
A637 x32
A247 x6
C994 x1
D499 x1
S1
S2
S3
S5
B1
B3
D353 x3
C773 x1
D207 x2
D207 x4
D140 x4
D126 x1
D296 x2
D424 x4
C972 x4
C483 x4
A713 x2
A812 x6
A437 x2
A416 x2
D281 x2
D282 x2
D111 x2
D111 x1
D314 x1
D230 x1
D294 x2
D209 x2
C779 x1
B205 x2
5.8 mm
A347 x4
A912 x2
A318 x1
D593 x1
B908 x4
9.5 mm
12 mm
14.7 mm
23 mm
25.4 mm
40 mm
133.4 mm
120 mm
6
7
S2
S2
S2
S3
S3
S3
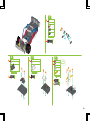
1
x 2
x 4
x 2
x 1
x 1
x 2
x 1
S2
S2
S2
S2
S2
3
x 4
x 4
x 2
x 2
S2
S2
2
x 2
x 2
x 1
50 10
mm
12 mm
S3
S2 9.5 mm
40 mm
50 10
15 20 25 30 35 40
mm
50 10 15 20
mm
S2 9.5 mm
50 10 15 20
mm
S2 9.5 mm
180°
S2

D036 x2
D292 x3
D377 x1
D490 x1
D349 x3
D347 x4
D348 x4
D559 x1
A420 x2
D566 x4
D373 x2
C867 x1
A128 x1
A420 x2
A423 x2
D103 x3
D488 x2
C330 x4
D567 x1
D406 x2
D358 x2
A238 x4
D101 x2
D049 x1
B222 x2
A631 x1
A444 x2
A737 x6
A259 x3
A138 x5
A337 x86
A411 x14
D005 x25
A511 x39
A637 x32
A247 x6
C994 x1
D499 x1
S1
S2
S3
S5
B1
B3
D353 x3
C773 x1
D207 x2
D207 x4
D140 x4
D126 x1
D296 x2
D424 x4
C972 x4
C483 x4
A713 x2
A812 x6
A437 x2
A416 x2
D281 x2
D282 x2
D111 x2
D111 x1
D314 x1
D230 x1
D294 x2
D209 x2
C779 x1
B205 x2
5.8 mm
A347 x4
A912 x2
A318 x1
D593 x1
B908 x4
9.5 mm
12 mm
14.7 mm
23 mm
25.4 mm
40 mm
133.4 mm
120 mm
6
7
S2
S2
S2
S3
S3
S3
1
x 2
x 4
x 2
x 1
x 1
x 2
x 1
S2
S2
S2
S2
S2
3
x 4
x 4
x 2
x 2
S2
S2
2
x 2
x 2
x 1
50 10
mm
12 mm
S3
S2 9.5 mm
40 mm
50 10
15 20 25 30 35 40
mm
50 10 15 20
mm
S2 9.5 mm
50 10 15 20
mm
S2 9.5 mm
180°
S2

S2
S2
S2
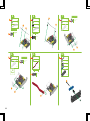
5
x 2
x 2
3+4
S2
4
x 2
x 2
x 1
x 2
50 10 15 20
mm
S2 9.5 mm
50 10 15 20
mm
S2 9.5 mm
180°
S2
S2
8

S2
S2
S2
5
x 2
x 2
3+4
S2
4
x 2
x 2
x 1
x 2
50 10 15 20
mm
S2 9.5 mm
50 10 15 20
mm
S2 9.5 mm
180°
S2
S2
8
7
x 1
x 2
x 1
x 1
6
x 1
x 1
x 1
x 1
S5
S5
S5
9
x 2
x 2
x 2
x 1
x 1
S2
S2
S2
S2
S2
8
x 4
x 4
x 2
50 10 15 20
mm
S2 9.5 mm
180°
180°
133.4 mm
50 10
15 20 25 30 35 40 45 50 55 60 65 70 75 80 85 90 95
100
115 120 125 130 135
110105
mm
50 10
15 20 25 30 45 40
25.4 mm
S5
mm
9

S2
S2
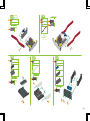
11
x 1
x 1
x 1
S2
S2
S2
10
x 2
x 2
x 1
S1
S1
S1
13
x 2
x 2
x 2
x 2
50 10 15 20
mm
5.8 mm
S1
S1
S1
12
x 1
x 1
x 1
50 10 15 20
mm
5.8 mm
S1
50 10 15 20
mm
S2 9.5 mm
50 10 15 20
mm
S2 9.5 mm
10

S2
S2
11
x 1
x 1
x 1
S2
S2
S2
10
x 2
x 2
x 1
S1
S1
S1
13
x 2
x 2
x 2
x 2
50 10 15 20
mm
5.8 mm
S1
S1
S1
12
x 1
x 1
x 1
50 10 15 20
mm
5.8 mm
S1
50 10 15 20
mm
S2 9.5 mm
50 10 15 20
mm
S2 9.5 mm
10
S1
S1
S1
S1
S1
S1
15
x 2
x 2
x 1
50 10 15 20
mm
5.8 mm
S1
14
x 2
x 2
x 2
x 2
50 10 15 20
mm
5.8 mm
S1
S1
S1
S1
17
x 2
x 2
x 2
50 10 15 20
mm
5.8 mm
S1
16
x 2
x 1
180°
180°
11

S1
S1
S1
19
x 2
x 2
x 2
50 10 15 20
mm
5.8 mm
S1
S2
S2
S2
21
x 2
x 2
x 2
S1
S1
S1
20
x 2
x 2
x 2
50 10 15 20
mm
5.8 mm
S1
S1
S1
S1
18
x 2
x 2
x 2
50 10 15 20
mm
5.8 mm
S1
50 10 15 20
mm
S2 9.5 mm
180°
12

S1
S1
S1
19
x 2
x 2
x 2
50 10 15 20
mm
5.8 mm
S1
S2
S2
S2
21
x 2
x 2
x 2
S1
S1
S1
20
x 2
x 2
x 2
50 10 15 20
mm
5.8 mm
S1
S1
S1
S1
18
x 2
x 2
x 2
50 10 15 20
mm
5.8 mm
S1
50 10 15 20
mm
S2 9.5 mm
180°
12
S2
S2 S2
23
x 2
x 2
x 1
S1
S1
S1
22
x 2
x 4
x 2
x 2
50 10 15 20
mm
5.8 mm
S1
B1
B1
B1
25
x 2
x 2
x 2
S2
S2
S2
S2
S2
24
x 4
x 4
x 2
50 10 15 20
mm
S2 9.5 mm
50 10 15 20
mm
S2 9.5 mm
14.7 mm
50 10 15 20
mm
B1
13

S2
S2
S2
27
x 2
x 2
x 2
S3
S3
S3
26
x 2
x 2
x 1
29
x 4
x 2
x 2
S1
S1
S1
28
x 2
x 2
x 1
50 10 15 20
mm
5.8 mm
S1
50 10
mm
12 mm
S3
50 10 15 20
mm
S2 9.5 mm
14

S2
S2
S2
27
x 2
x 2
x 2
S3
S3
S3
26
x 2
x 2
x 1
29
x 4
x 2
x 2
S1
S1
S1
28
x 2
x 2
x 1
50 10 15 20
mm
5.8 mm
S1
50 10
mm
12 mm
S3
50 10 15 20
mm
S2 9.5 mm
14
S1
S1
S1
31
x 2
x 2
x 1
50 10 15 20
mm
5.8 mm
S1
S1
S1
S1
30
x 2
x 2
x 2
x 2
x 2
50 10 15 20
mm
5.8 mm
S1
S1
S1
32
x 1
x 1
x 1
x 1
50 10 15 20
mm
5.8 mm
S1
15

S2
S2
34
x 2
x 2
x 1
36
x 2
x 1
S1
S1
S1
S1
S1
35
x 4
x 4
x 2
x 2
x 2
50 10 15 20
mm
5.8 mm
S1
S2 S2
S2
S2
33
x 2
x 2
x 1
50 10 15 20
mm
S2 9.5 mm
50 10 15 20
mm
S2 9.5 mm
16

S2
S2
34
x 2
x 2
x 1
36
x 2
x 1
S1
S1
S1
S1
S1
35
x 4
x 4
x 2
x 2
x 2
50 10 15 20
mm
5.8 mm
S1
S2 S2
S2
S2
33
x 2
x 2
x 1
50 10 15 20
mm
S2 9.5 mm
50 10 15 20
mm
S2 9.5 mm
16
S1
S1
S1
38
x 2
x 3
x 2
x 1
x 1
50 10 15 20
mm
5.8 mm
S1
40
x 2
x 4
x 4
S1
S1
S1
39
x 2
x 2
x 2
50 10 15 20
mm
5.8 mm
S1
S2
S2
S2
37
x 2
x 2
x 1
x 2
50 10 15 20
mm
S2 9.5 mm
17

42
x 2
x 2
41
x 2
x 2
40+41
B3
B3
B3
43
x 2
x 2
x 2
40+42
50 10
15 20 25 30
mm
23 mm
B3
18

42
x 2
x 2
41
x 2
x 2
40+41
B3
B3
B3
43
x 2
x 2
x 2
40+42
50 10
15 20 25 30
mm
23 mm
B3
18
S3
S3
S3
1
x 2
x 2
x 2
x 1
S2
S2
S2
2
x 2
x 2
x 1
12 mm
S3
50 10 15 20
mm
S2
S2
S2
3
x 2
x 2
x 1
x 1
50 10 15 20
mm
S2 9.5 mm
50 10 15 20
mm
S2 9.5 mm
40 mm
50 10
15 20 25 30 35 40
mm
19

50 10 15 20
mm
S2 9.5 mm
S2
S2
S2
4
x 2
x 2
x 2
x 2
S2
S2
6
x 1
x 1
x 1
x 1
50 10 15 20
mm
S2 9.5 mm
S2
5
x 2
x 2
x 2
180°
20
Pagina se încarcă...
Pagina se încarcă...
Pagina se încarcă...
Pagina se încarcă...
Pagina se încarcă...
Pagina se încarcă...
Pagina se încarcă...
Pagina se încarcă...
Pagina se încarcă...
Pagina se încarcă...
Pagina se încarcă...
Pagina se încarcă...
Pagina se încarcă...
Pagina se încarcă...
Pagina se încarcă...
Pagina se încarcă...
Pagina se încarcă...
Pagina se încarcă...
Pagina se încarcă...
Pagina se încarcă...
Pagina se încarcă...
Pagina se încarcă...
Pagina se încarcă...
Pagina se încarcă...
Pagina se încarcă...
Pagina se încarcă...
Pagina se încarcă...
Pagina se încarcă...
Pagina se încarcă...
Pagina se încarcă...
Pagina se încarcă...
Pagina se încarcă...
Pagina se încarcă...
Pagina se încarcă...
Pagina se încarcă...
Pagina se încarcă...
Pagina se încarcă...
Pagina se încarcă...
Pagina se încarcă...
Pagina se încarcă...
Pagina se încarcă...
Pagina se încarcă...
Pagina se încarcă...
Pagina se încarcă...
Pagina se încarcă...
Pagina se încarcă...
Pagina se încarcă...
Pagina se încarcă...
-
 1
1
-
 2
2
-
 3
3
-
 4
4
-
 5
5
-
 6
6
-
 7
7
-
 8
8
-
 9
9
-
 10
10
-
 11
11
-
 12
12
-
 13
13
-
 14
14
-
 15
15
-
 16
16
-
 17
17
-
 18
18
-
 19
19
-
 20
20
-
 21
21
-
 22
22
-
 23
23
-
 24
24
-
 25
25
-
 26
26
-
 27
27
-
 28
28
-
 29
29
-
 30
30
-
 31
31
-
 32
32
-
 33
33
-
 34
34
-
 35
35
-
 36
36
-
 37
37
-
 38
38
-
 39
39
-
 40
40
-
 41
41
-
 42
42
-
 43
43
-
 44
44
-
 45
45
-
 46
46
-
 47
47
-
 48
48
-
 49
49
-
 50
50
-
 51
51
-
 52
52
-
 53
53
-
 54
54
-
 55
55
-
 56
56
-
 57
57
-
 58
58
-
 59
59
-
 60
60
-
 61
61
-
 62
62
-
 63
63
-
 64
64
-
 65
65
-
 66
66
-
 67
67
-
 68
68


Meccano CHAMPIONSHIP RACE CAR 27 in 1 Instrucțiuni de utilizare
- Tip
- Instrucțiuni de utilizare
în alte limbi
Lucrări înrudite
-
Meccano SUPERCAR 25 in 1 Instrucțiuni de utilizare
-
Meccano OFF-ROAD TRUCK 27 in 1 - A,B,C,D,E Instrucțiuni de utilizare
-
-
-
-
-
Meccano MeccaSpider Manualul proprietarului
-
-
-