Makita UH014 Manual de utilizare
- Categorie
- Aparate de tuns gard viu
- Tip
- Manual de utilizare
Acest manual este potrivit și pentru

UH013G
UH014G
EN Cordless Hedge Trimmer INSTRUCTION MANUAL 8
PL Akumulatorowe nożyce do
żywopłotu INSTRUKCJA OBSŁUGI 18
HU Akkumulátoros sövénynyíró HASZNÁLATI KÉZIKÖNYV 29
SK Akumulátorové nožnice na
živé ploty NÁVOD NA OBSLUHU 40
CS Akumulátorový zastřihovač NÁVOD K OBSLUZE 51
UK Акумуляторна пила для
підрізання живоплоту ІНСТРУКЦІЯ З
ЕКСПЛУАТАЦІЇ 61
RO Maşină de tuns gardul viu
fără cablu MANUAL DE INSTRUCŢIUNI 73
DE Akku-Heckenschere BETRIEBSANLEITUNG 84

2 3
1
1
Fig.1
1
2
Fig.2
1
Fig.3
1
Fig.4
2
1
3
Fig.5
2
1
Fig.6
2
1
Fig.7
2

2
1
Fig.8
2
1
Fig.9
1
Fig.10
1
2
Fig.11
1
2
Fig.12
2
1
3
4
Fig.13
Fig.14
3

1
2
Fig.15
1
Fig.16
1
2
3
Fig.17
12
3
4
Fig.18
1
Fig.19
1
Fig.20
4

1
Fig.21
1
Fig.22
1
2
3
Fig.23
1
2
Fig.24
1
2
Fig.25
2
1
Fig.26
2
1
Fig.27
2
1
Fig.28
5

2
1
Fig.29
(1)
(2)
Fig.30
Fig.31
Fig.32
Fig.33
Fig.34
Fig.35
Fig.36
6

Fig.37
Fig.38
1
Fig.39
Fig.40
1
2
Fig.41
1
Fig.42
1
Fig.43
21
Fig.44
7

8ENGLISH
ENGLISH (Original instructions)
SPECIFICATIONS
Model: UH013G UH014G
Blade length 600 mm 750 mm
Strokes per minute 2,000 / 3,600 / 5,000 min-1
Overall length 1,085 mm 1,225 mm
Rated voltage D.C. 36 V - 40 V max
Net weight 3.9 - 4.5 kg 4.0 - 4.7 kg
Protection degree IPX4
• Duetoourcontinuingprogramofresearchanddevelopment,thespecicationshereinaresubjecttochange
without notice.
• Specicationsmaydierfromcountrytocountry.
• Theweightmaydierdependingontheattachment(s),includingthebatterycartridge.Thelightestandheavi-
estcombination,accordingtoEPTA-Procedure01/2014,areshowninthetable.
Applicable battery cartridge and charger
Batterycartridge BL4020* / BL4025* / BL4040* / BL4050F
*:Recommendedbattery
Charger DC40RA/DC40RB/DC40RC
• Someofthebatterycartridgesandchargerslistedabovemaynotbeavailabledependingonyourregionof
residence.
WARNING: Only use the battery cartridges and chargers listed above.Useofanyotherbatterycartridges
andchargersmaycauseinjuryand/orre.
Recommended cord connected power source
Portablepowerpack PDC01 / PDC1200
• Thecordconnectedpowersource(s)listedabovemaynotbeavailabledependingonyourregionofresidence.
• Beforeusingthecordconnectedpowersource,readinstructionandcautionarymarkingsonthem.
Symbols
Thefollowingsshowthesymbolswhichmaybeused
fortheequipment.Besurethatyouunderstandtheir
meaningbeforeuse.
Read instruction manual.
DANGER-Keephandsawayfromblade.
Wearsafetyglasses.
Ni-MH
Li-ion
OnlyforEUcountries
Due to the presence of hazardous com-
ponents in the equipment, waste electrical
and electronic equipment, accumulators
andbatteriesmayhaveanegativeimpact
on the environment and human health.
Do not dispose of electrical and electronic
appliancesorbatterieswithhousehold
waste!
InaccordancewiththeEuropeanDirective
on waste electrical and electronic equip-
mentandonaccumulatorsandbatteries
andwasteaccumulatorsandbatteries,
as well as their adaptation to national law,
wasteelectricalequipment,batteriesand
accumulatorsshouldbestoredseparately
and delivered to a separate collection point
for municipal waste, operating in accor-
dance with the regulations on environmen-
tal protection.
Thisisindicatedbythesymbolofthe
crossed-outwheeledbinplacedonthe
equipment.
Intended use
The tool is intended for trimming hedges.

9ENGLISH
Noise
Applicablestandard:EN62841-4-2
Model Sound pressure level Sound power level
LpA(dB(A)) UncertaintyK
(dB(A))
LWA(dB(A)) UncertaintyK
(dB(A))
UH013G 80 391 3
UH014G 81 392 3
NOTE:Thedeclarednoiseemissionvalue(s)hasbeenmeasuredinaccordancewithastandardtestmethodand
maybeusedforcomparingonetoolwithanother.
NOTE:Thedeclarednoiseemissionvalue(s)mayalsobeusedinapreliminaryassessmentofexposure.
WARNING: Wear ear protection.
WARNING: The noise emission during actual use of the power tool can dier from the declared val-
ue(s) depending on the ways in which the tool is used especially what kind of workpiece is processed.
WARNING: Be sure to identify safety measures to protect the operator that are based on an estimation
of exposure in the actual conditions of use (taking account of all parts of the operating cycle such as the
times when the tool is switched o and when it is running idle in addition to the trigger time).
Vibration
Thevibrationtotalvalue(tri-axialvectorsum)determinedaccordingtoEN62841-4-2:
Model Front handle Rear handle
ah (m/s2)Uncertainty K
(m/s2)ah (m/s2)Uncertainty K
(m/s2)
UH013G 2.5 1.5
2.5 m/s2 or less
1.5
UH014G 3.2 1.5
2.5 m/s2 or less
1.5
NOTE:Thedeclaredvibrationtotalvalue(s)hasbeenmeasuredinaccordancewithastandardtestmethodand
maybeusedforcomparingonetoolwithanother.
NOTE:Thedeclaredvibrationtotalvalue(s)mayalsobeusedinapreliminaryassessmentofexposure.
WARNING: The vibration emission during actual use of the power tool can dier from the declared
value(s) depending on the ways in which the tool is used especially what kind of workpiece is processed.
WARNING: Be sure to identify safety measures to protect the operator that are based on an estimation
of exposure in the actual conditions of use (taking account of all parts of the operating cycle such as the
times when the tool is switched o and when it is running idle in addition to the trigger time).
EC Declaration of Conformity
For European countries only
TheECdeclarationofconformityisincludedasAnnexA
to this instruction manual.
SAFETY WARNINGS
General power tool safety warnings
WARNING: Read all safety warnings, instruc-
tions, illustrations and specications provided
with this power tool. Failure to follow all instructions
listedbelowmayresultinelectricshock,reand/or
seriousinjury.
Save all warnings and instruc-
tions for future reference.
Theterm"powertool"inthewarningsreferstoyour
mains-operated(corded)powertoolorbattery-operated
(cordless)powertool.
Cordless Hedge Trimmer Safety
Warnings
1. Keep all parts of the body away from the blade.
Do not remove cut material or hold material
to be cut when blades are moving. Blades
continuetomoveaftertheswitchisturnedo.A
moment of inattention while operating the hedge
trimmermayresultinseriouspersonalinjury.
2. Carry the hedge trimmer by the handle with the
blade stopped and taking care not to operate
any power switch.Propercarryingofthehedge
trimmer will decrease the risk of inadvertent start-
ingandresultantpersonalinjuryfromtheblades.

10 ENGLISH
3. When transporting or storing the hedge trim-
mer, always t the blade cover. Proper handling
of the hedge trimmer will decrease the risk of
personalinjuryfromtheblades.
4. When clearing jammed material or servicing
the unit, make sure all power switches are o
and the battery pack is removed or discon-
nected. Unexpected actuation of the hedge trim-
merwhileclearingjammedmaterialorservicing
mayresultinseriouspersonalinjury.
5.
Hold the hedge trimmer by insulated gripping
surfaces only, because the blade may contact
hidden wiring.Bladescontactinga"live"wiremay
make exposed metal parts of the hedge trimmer
"live" and could give the operator an electric shock.
6. Keep all power cords and cables away from
cutting area.Powercordsorcablesmaybehid-
deninhedgesorbushesandcanbeaccidentally
cutbytheblade.
7. Do not use the hedge trimmer in bad weather
conditions, especially when there is a risk of
lightning.Thisdecreasestheriskofbeingstruck
bylightning.
Additional Safety Instructions
Preparation
1. Check the hedges and bushes for foreign
objects, such as wire fences or hidden wiring
before operating the tool.
2. The tool must not be used by children or
young persons under 18 years of age. Young
personsover16yearsofagemaybeexempted
fromthisrestrictioniftheyareundergoingtraining
under the supervision of an expert.
3. First-time users should have an experienced
user show them how to use the tool.
4.
Use the tool only if you are in good physical
condition.Ifyouaretired,yourattentionwillbe
reduced.Beespeciallycarefulattheendofawork-
ingday.Performallworkcalmlyandcarefully.The
userisresponsibleforalldamagestothirdparties.
5. Never use the tool when under the inuence of
alcohol, drugs or medication.
6. Work gloves of stout leather are part of the
basic equipment of the tool and must always
be worn when working with it. Also wear
sturdy shoes with anti-skid soles.
7. Before starting work check to make sure that
the tool is in good and safe working order.
Ensure guards are tted properly. The tool
must not be used unless fully assembled.
Operation
1. Hold the tool rmly with both hands when
using the tool.
2. The tool is intended to be used by the operator
at ground level. Do not use the tool on ladders
or any other unstable support.
3. DANGER - Keep hands away from blade.
Contactwithbladewillresultinseriouspersonal
injury.
4. Make sure you have a secure footing before
starting operation.
5. Do not operate the tool at no-load
unnecessarily.
6. Immediately switch o the tool and remove the
battery cartridge if the shear blades should
come into contact with a fence or other hard
object. Check the blades for damage, and if
damaged, replace the blades immediately.
7. Before checking the shear blades, taking care
of faults, or removing material caught in the
shear blades, always switch o the tool and
remove the battery cartridge.
8.
Never point the shear blades to yourself or others.
9. If the blades stop moving due to the stuck of
foreign objects between the blades during
operation, switch o the tool and remove the
battery cartridge, and then remove the foreign
objects using tools such as pliers. Removing
theforeignobjectsbyhandmaycauseaninjury
forthereasonthatthebladesmaymoveinreac-
tiontoremovingtheforeignobjects.
10.
When you use the tool on muddy ground, wet slope,
or slippery place, pay attention to your footing.
11. Do not submerge the tool into a puddle.
12. Do not leave the tool unattended outdoors in
the rain.
Electrical and battery safety
1. Avoid dangerous environment. Don't use the
tool in dump or wet locations or expose it to
rain. Water entering the tool will increase the risk
of electric shock.
2. Do not dispose of the battery(ies) in a re.
Thecellmayexplode.Checkwithlocalcodesfor
possiblespecialdisposalinstructions.
3.
Do not open or mutilate the battery(ies). Released
electrolyteiscorrosiveandmaycausedamageto
theeyesorskin.Itmaybetoxicifswallowed.
4.
Do not charge battery in rain, or in wet locations.
5. Do not charge the battery outdoors.
6. Do not handle charger, including charger plug,
and charger terminals with wet hands.
7. Do not replace the battery with wet hands.
8. Do not replace the battery in the rain.
9. Do not wet the terminal of battery with liquid
such as water, or submerge the battery. Do not
leave the battery in the rain, nor charge, use,
or store the battery in a damp or wet place. If
theterminalgetswetorliquidentersinsideofbat-
tery,thebatterymaybeshortcircuitedandthereis
ariskofoverheat,re,orexplosion.
10. After removing the battery from the tool or
charger, be sure to attach the battery cover to
the battery and store it in a dry place.
11. If the battery cartridge gets wet, drain the
water inside and then wipe it with a dry cloth.
Dry the battery cartridge completely in a dry
place before use.
Maintenance and storage
1. Switch o the tool and remove the battery
cartridge before doing any maintenance work.
2. When moving the tool to another location,
including during work, always remove the
battery cartridge and put the blade cover on
the shear blades. Never carry or transport the
tool with the blades running. Never grasp the
blades with your hands.

11 ENGLISH
3. Clean the tool and especially the shear blades
after use, and before putting the tool into stor-
age for extended periods. Lightly oil the blades
and put on the blade cover.
4. Store the tool with the blade cover on, in a dry
room. Keep it out of reach of children. Never
store the tool outdoors.
5. Do not dispose of the battery(ies) in a re. The
cell may explode. Check with local codes for
possible special disposal instructions.
6.
Do not open or mutilate the battery(ies). Released
electrolyte is corrosive and may cause damage to
the eyes or skin. It may be toxic if swallowed.
7.
Do not charge battery in rain, or in wet locations.
8. When storing the tool, avoid direct sunlight
and rain, and store it in a place where it does
not get hot or humid.
SAVE THESE INSTRUCTIONS.
WARNING: DO NOT let comfort or familiarity
with product (gained from repeated use) replace
strict adherence to safety rules for the subject
product. MISUSE or failure to follow the safety
rules stated in this instruction manual may cause
serious personal injury.
Important safety instructions for
battery cartridge
1.
Before using battery cartridge, read all instruc-
tions and cautionary markings on (1) battery char-
ger, (2) battery, and (3) product using battery.
2.
Do not disassemble or tamper the battery cartridge.
Itmayresultinare,excessiveheat,orexplosion.
3. If operating time has become excessively
shorter, stop operating immediately. It may
result in a risk of overheating, possible burns
and even an explosion.
4.
If electrolyte gets into your eyes, rinse them out
with clear water and seek medical attention right
away. It may result in loss of your eyesight.
5. Do not short the battery cartridge:
(1) Do not touch the terminals with any con-
ductive material.
(2) Avoid storing battery cartridge in a con-
tainer with other metal objects such as
nails, coins, etc.
(3) Do not expose battery cartridge to water
or rain.
A battery short can cause a large current
ow, overheating, possible burns and even a
breakdown.
6. Do not store and use the tool and battery car-
tridge in locations where the temperature may
reach or exceed 50 °C (122 °F).
7. Do not incinerate the battery cartridge even if
it is severely damaged or is completely worn
out. The battery cartridge can explode in a re.
8. Do not nail, cut, crush, throw, drop the battery
cartridge, or hit against a hard object to the
battery cartridge.Suchconductmayresultina
re,excessiveheat,orexplosion.
9. Do not use a damaged battery.
10.
The contained lithium-ion batteries are subject to
the Dangerous Goods Legislation requirements.
Forcommercialtransportse.g.bythirdparties,
forwarding agents, special requirement on pack-
agingandlabelingmustbeobserved.
Forpreparationoftheitembeingshipped,consult-
ing an expert for hazardous material is required.
Pleasealsoobservepossiblymoredetailed
national regulations.
Tapeormaskoopencontactsandpackupthe
batteryinsuchamannerthatitcannotmove
around in the packaging.
11. When disposing the battery cartridge, remove
it from the tool and dispose of it in a safe
place. Follow your local regulations relating to
disposal of battery.
12. Use the batteries only with the products
specied by Makita.Installingthebatteriesto
non-compliantproductsmayresultinare,exces-
siveheat,explosion,orleakofelectrolyte.
13. If the tool is not used for a long period of time,
the battery must be removed from the tool.
14. During and after use, the battery cartridge may
take on heat which can cause burns or low
temperature burns. Pay attention to the han-
dling of hot battery cartridges.
15. Do not touch the terminal of the tool imme-
diately after use as it may get hot enough to
cause burns.
16. Do not allow chips, dust, or soil stuck into the
terminals, holes, and grooves of the battery
cartridge.Itmaycauseheating,catchingre,
burstandmalfunctionofthetoolorbatterycar-
tridge,resultinginburnsorpersonalinjury.
17. Unless the tool supports the use near
high-voltage electrical power lines, do not use
the battery cartridge near a high-voltage elec-
trical power lines.Itmayresultinamalfunction
orbreakdownofthetoolorbatterycartridge.
18. Keep the battery away from children.
SAVE THESE INSTRUCTIONS.
CAUTION: Only use genuine Makita batteries.
Useofnon-genuineMakitabatteries,orbatteriesthat
havebeenaltered,mayresultinthebatterybursting
causingres,personalinjuryanddamage.Itwill
alsovoidtheMakitawarrantyfortheMakitatooland
charger.
Tips for maintaining maximum
battery life
1. Charge the battery cartridge before completely
discharged. Always stop tool operation and
charge the battery cartridge when you notice
less tool power.
2.
Never recharge a fully charged battery cartridge.
Overcharging shortens the battery service life.
3.
Charge the battery cartridge with room tempera-
ture at 10 °C - 40 °C (50 °F - 104 °F). Let a hot
battery cartridge cool down before charging it.
4. When not using the battery cartridge, remove
it from the tool or the charger.
5. Charge the battery cartridge if you do not use
it for a long period (more than six months).

12 ENGLISH
FUNCTIONAL DESCRIPTION
CAUTION: Always be sure that the tool is
switched o and the battery cartridge is removed
before adjusting or checking function on the tool.
Installing or removing battery cartridge
CAUTION: Always switch o the tool before
installing or removing of the battery cartridge.
CAUTION: Hold the tool and the battery car-
tridge rmly when installing or removing battery
cartridge.Failuretoholdthetoolandthebattery
cartridgermlymaycausethemtoslipoyourhands
andresultindamagetothetoolandbatterycartridge
andapersonalinjury.
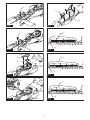
►Fig.1: 1. Red indicator 2. Button 3.Batterycartridge
Toremovethebatterycartridge,slideitfromthetool
whileslidingthebuttononthefrontofthecartridge.
Toinstallthebatterycartridge,alignthetongueonthe
batterycartridgewiththegrooveinthehousingandslip
itintoplace.Insertitallthewayuntilitlocksinplace
withalittleclick.Ifyoucanseetheredindicatoras
showninthegure,itisnotlockedcompletely.
CAUTION: Always install the battery cartridge
fully until the red indicator cannot be seen. If not,
itmayaccidentallyfalloutofthetool,causinginjuryto
youorsomeonearoundyou.
CAUTION: Do not install the battery cartridge
forcibly.Ifthecartridgedoesnotslideineasily,itis
notbeinginsertedcorrectly.
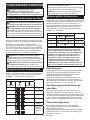
Indicating the remaining battery capacity
Pressthecheckbuttononthebatterycartridgetoindi-
catetheremainingbatterycapacity.Theindicatorlamps
light up for a few seconds.
►Fig.2: 1. Indicator lamps 2.Checkbutton
Indicator lamps Remaining
capacity
Lighted O Blinking
75% to 100%
50% to 75%
25% to 50%
0% to 25%
Charge the
battery.
Thebattery
mayhave
malfunctioned.
NOTE: Depending on the conditions of use and the
ambienttemperature,theindicationmaydierslightly
fromtheactualcapacity.
NOTE:Therst(farleft)indicatorlampwillblinkwhen
thebatteryprotectionsystemworks.
Tool / battery protection system
Thetoolisequippedwithatool/batteryprotection
system.Thissystemautomaticallycutsopowerto
themotortoextendtoolandbatterylife.Thetoolwill
automaticallystopduringoperationifthetoolisplaced
under one of the following conditions:
►Fig.3: 1. Caution lamp
Caution lamp Status
Color On Blinking
Green Overload
Red (tool)/ (battery) Overheat
Red Over
discharge
NOTICE: Depending on the usage conditions,
the tool automatically stops without any indica-
tion if the branches or debris are entangled in the
tool. In this case, switch o the tool and remove
the battery cartridge, and then remove entangled
branches or debris using tools such as pliers.
After removing the branches or debris, install the
battery cartridge and turn on the tool again.
Overload protection
Ifthetoolorbatteryisoverloadedbyentangled
branchesorotherdebris,thetoolautomaticallystops
andthecautionlampstartsblinkingingreen.
Inthissituation,turnthetooloandstoptheapplication
thatcausedthetooltobecomeoverloaded.Thenturn
the tool on to restart.
Overheat protection for tool or
battery
Ifthetoolorbatterycartridgeisoverheated,thetool
stopsautomatically.Whenthetoolisoverheated,the
cautionlamplightsupinred.Whenthebatterycartridge
isoverheated,thecautionlampblinksinred.Letthe
tooland/orbatterycooldownbeforeturningthetoolon
again.
Overdischarge protection
Whenthebatterycapacitybecomeslow,thetoolstops
automaticallyandthecautionlampstartsblinkinginred.
If the tool does not operate even when the switches are
operated,removethebatterycartridgefromthetooland
charge it.

13 ENGLISH
Protections against other causes
Protectionsystemisalsodesignedforothercauses
that could damage the tool and allows the tool to stop
automatically.Takeallthefollowingstepstoclearthe
causes,whenthetoolhasbeenbroughttoatemporary
halt or stop in operation.
1. Turnthetoolo,andthenturnitonagainto
restart.
2. Chargethebattery(ies)orreplaceit/themwith
rechargedbattery(ies).
3. Letthemachineandbattery(ies)cooldown.
Ifnoimprovementcanbefoundbyrestoringprotection
system,thencontactyourlocalMakitaServiceCenter.
Power switch action
WARNING: For your safety, this tool is
equipped with lever which prevents the tool from
unintended starting. NEVER use the tool if it runs
when you simply pull the switch triggers without
pressing the lever. Return the tool to our autho-
rized service center for proper repairs BEFORE
further usage.
WARNING: NEVER tape down or defeat pur-
pose and function of the lever.
WARNING: Before installing the battery
cartridge on the tool, always check to see that
the switch triggers and lever actuate properly
and return to the "OFF" position when released.
Operating a tool with a switch that does not actuate
properlycanleadtolossofcontrolandseriousper-
sonalinjury.
CAUTION: Never put your nger on the
switch triggers when carrying.Thetoolmaystart
unintentionallyandcauseinjury.
NOTICE: Do not pull the switch trigger hard
without pressing the lever. This can cause switch
breakage.
Pressthemainpowerbuttontoturnonthetool.Toturn
othetool,pressandholdthemainpowerbuttonuntil
thespeedindicatorsgoo.
►Fig.4: 1.Mainpowerbutton
NOTE:Thecautionlampbrinksiftheswitchtrigger
ispulledunderunoperatableconditions.Thecaution
lampblinksifyouturnonthemainpowerswitchwhile
holding down the lever and the switch trigger.
NOTE:Thistoolemploystheautopower-ofunction.
To avoid unintentional start up, the main power switch
willautomaticallyshutdownwhentheswitchtrigger
is not pulled for a certain period after the main power
switch is turned on.
Topreventtheswitchtriggerfrombeingaccidentally
pulled, the lever is provided. To start the tool, pull the
front switch trigger, and then pull the rear switch trigger
whilepressingthelever.Whenyoureleaseeitherofthe
switch triggers, the tool stops.
►Fig.5: 1. Lever 2. Rear switch trigger 3. Front switch
trigger
Speed adjusting
Youcanadjustthetoolspeedbypressingthemain
powerbutton.Eachtimeyoupressthemainpower
button,thelevelofspeedchanges.
►Fig.6: 1. Speed indicator 2.Mainpowerbutton
Speed indicator Mode Stroke speed
High 5,000 min-1
Medium 3,600 min-1
Low 2,000 min-1
Reverse button for debris removal
WARNING: If the entangled branches or
debris cannot be removed by the reverse func-
tion, switch o the tool and remove the bat-
tery cartridge, and then remove the entangled
branches or debris using tools such as pliers.
Failuretoswitchothetoolandremovethebat-
terycartridgemayresultinseriouspersonalinjury
from accidental start-up. Removing the entangled
branchesordebrisbyhandmaycauseaninjury,
sincetheshearbladesmaymoveinreactionto
removing them.
Thistoolhasareversebuttontochangethedirection
ofshearbladesmovement.Itisonlyforremoving
branchesanddebrisentangledinthetool.
Toreversetheshearbladesmovement,pressthe
reversebuttonwhentheshearbladeshavestopped,
then pull the front switch trigger, and then pull the rear
switch trigger while pressing the lever. The speed
indicatorsstartblinking,andtheshearbladesmovein
reverse direction.
Whenentangledbranchesanddebrisareremoved,
the tool returns to the regular movement and the speed
indicatorsstopblinkingandlightup.
►Fig.7: 1. Speed indicator 2.Reversebutton
NOTE:Iftheentangledbranchesordebriscannotbe
removed, release the switch triggers, then press the
reversebutton,andthenpulltheswitchtriggersuntil
theyareremoved.
NOTE:Ifyoutapthereversebuttonwhiletheshear
bladesarestillmoving,thetoolcomestostopandto
bereadyforreversemovement.

14 ENGLISH
Electronic function
The tool is equipped with the electronic functions for
easyoperation.
• Constant speed control
The speed control function provides the constant
rotation speed regardless of load conditions.
• Electricbrake
Thistoolisequippedwithanelectricbrake.Ifthe
toolconsistentlyfailstoquicklystoptheshear
bladesafterreleasingtheswitchtrigger,havethe
toolservicedatMakitaAuthorizedServiceCenter.
• Accidentalre-startpreventivefunction
Evenifyouinstallthebatterycartridgewhilepull-
ing the switch trigger, the tool does not start. To
startthetool,rstreleasetheswitchtrigger,and
then pull the switch trigger.
ASSEMBLY
CAUTION: Always be sure that the tool is
switched o and the battery cartridge is removed
before carrying out any work on the tool.
CAUTION: When replacing the shear blades,
always wear gloves so that your hands do not
directly contact the blades.
NOTICE: When replacing the shear blades, do
not wipe o grease from the gear and crank.
Installing or removing the shear blades
CAUTION: Attach the blade cover before
removing or installing the shear blades.
Youcaninstall600mmor750mmshearbladestoyour
tool.
NOTE:Ifyouchangetheshearbladestoadierent
length,replacethechipreceiverwithonewhichts
theblades.
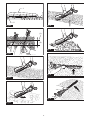
1. Removefourscrews(forUH013G)orvescrews
(forUH014G),andthenremovethechipreceiverfrom
the tool.
For UH013G
►Fig.8: 1. Chip receiver 2. Screw
For UH014G
►Fig.9: 1. Chip receiver 2. Screw
2. Place the tool upside down, and then remove six
bolts.
►Fig.10: 1. Bolt
3. Remove the cover and the plate.
►Fig.11: 1. Cover 2. Plate
NOTE:Theplatemayremainonthecover.
4. Removetherodandthebearing.
►Fig.12: 1. Rod 2. Bearing
NOTE:Therodorbearingmayremainonthecover.
5. Remove three screws, three sleeves and the felt
pad,andthenremovetheshearblades.
►Fig.13: 1. Screw 2. Sleeve 3. Felt pad 4. Shear
blades
NOTICE: Be careful not to lose the screws.
6. Removethebladecover,andthenattachittothe
newshearblades.
►Fig.14
7. Adjustthecranksothattwoholesarelinedupon
the alignment line.
►Fig.15: 1. Hole 2.Alignmentline
8. Aligntheprotrusionsontheshearbladesvertically
at the same position.
►Fig.16: 1. Protrusion
9. Insert the screw removed in step 5 into the holes
onthebladecoverandtheshearbladestotemporarily
xtheshearblades,andthenattachthefeltpadtothe
shearblades.
►Fig.17: 1. Screw 2. Felt pad 3. Hole
10. Inserttheprotrusionontheshearbladestothe
hole on the rod, then align the position of the felt pad
withtheholesonthetool.Attachtwonewsleeves.
►Fig.18: 1. Felt pad 2. Protrusion 3. Hole 4. Sleeve
NOTICE: Apply a small amount of grease to the
inner periphery of the hole of the rod.
NOTICE: Be careful not to lose the sleeves.
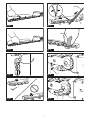
11. Aligntheholesonthesleevesandshearblades
with the holes on the tool, and then tighten two screws
totemporarilyxtheshearblades.
►Fig.19: 1. Screw
12. Remove the screw inserted into the hole on the
shearbladesinstep9,andthenslidethebladecover.
►Fig.20: 1. Screw
13. Attachanewsleeve.
►Fig.21: 1. Sleeve
14. Tightenthescrewtogetherwiththesleevetox
theshearblades.
►Fig.22: 1. Screw
15. Firmlytightenthescrewswhichweretemporarily
xedinstep11.
16. Attachthebearingandtherod.
►Fig.23: 1. Rod 2. Small hole 3. Bearing
NOTICE: Apply a small amount of grease to the
inner periphery of the small hole of the rod.
NOTICE: Make sure that the protrusion on the
shear blades ts in the small hole on the rod.
17. Attachtheplate.
►Fig.24: 1. Protrusion 2. Plate
NOTICE: Make sure that the protrusion on the
shear blades ts in the hole on the plate.
18. Attachthecover,andthentightensixbolts.
►Fig.25: 1. Bolt 2. Cover

15 ENGLISH
19. Attachthechipreceivertothetoolbytightening
fourscrews(forUH013G)orvescrews(forUH014G).
For UH013G
►Fig.26: 1. Chip receiver 2. Screw
For UH014G
►Fig.27: 1. Chip receiver 2. Screw
NOTICE: If the shear blades do not move
smoothly, the shear blades are not engaged with
the rods properly. Install the shear blades again.
NOTICE: If the parts other than the shear
blades such as the rods are worn out, ask Makita
Authorized Service Centers for parts replacement
or repairs.
Removing or installing the chip receiver
CAUTION: When installing or removing the
chip receiver, always wear gloves so that your
hands do not directly contact the shear blades.
The chip receiver gathers discarded leaves and makes
clean-up afterward much easier.
To remove the chip receiver, remove four screws
(forUH013G)orvescrews(forUH014G),andthen
remove the chip receiver from the tool. To install the
chip receiver, follow the removal procedure in reverse.
For UH013G
►Fig.28: 1. Chip receiver 2. Screw
For UH014G
►Fig.29: 1. Chip receiver 2. Screw
OPERATION
WARNING: Keep hands away from shear
blades.
CAUTION: Avoid operating the tool in very
hot weather as much as practicable. When operat-
ing the tool, be careful of your physical condition.
CAUTION: Be careful not to accidentally
contact a metal fence or other hard objects while
trimming.Theshearbladesmaybreakandcause
aninjury.
CAUTION: Be careful not to allow the shear
blades to contact the ground.Thetoolmayrecoil
andcauseaninjury.
CAUTION: Overreaching with a hedge trim-
mer, particularly from a ladder, is extremely
dangerous.Donotworkwhilestandingonanything
wobblyorinrm.
NOTICE: Do not attempt to cut branches thicker
than 10 mm in diameter with the tool.Cutbranches
to10cmlowerthanthecuttingheightusingbranch
cuttersbeforeusingthetool.
►Fig.30: (1) Cutting height (2) 10 cm
NOTICE: Do not cut down dead trees or similar
hard objects.Doingsomaydamagethetool.
NOTICE: Do not trim the grass or weeds while
using the shear blades.Theshearbladesmay
becometangledinthegrassorweeds.
Holdthefrontgripwithyourrighthandandthereargrip
withyourlefthand.Pullthefrontswitchtrigger,thenpull
the rear switch trigger while pressing the lever, and then
move the tool forward.
►Fig.31
Forbasicoperation,tilttheshearbladestowardthe
trimmingdirectionandmoveitcalmlyandslowlyatthe
speed rate of 3 to 4 seconds per meter.
►Fig.32
Tocutahedgetopevenly,tieastringatthedesired
height and trim along it.
►Fig.33
The chip receiver gathers discarded leaves and makes
clean-up afterward much easier.
►Fig.34
Tocutahedgesideevenly,cutfromthebottomtotop.
►Fig.35
Whentrimmingtomakearoundshape(trimmingbox-
woodorrhododendron,etc.),trimfromtheroottothe
topforabeautifulnish.
►Fig.36
MAINTENANCE
CAUTION: Always be sure that the tool is
switched o and the battery cartridge is removed
before attempting to perform inspection or
maintenance.
TomaintainproductSAFETYandRELIABILITY,
repairs,anyothermaintenanceoradjustmentshould
beperformedbyMakitaAuthorizedorFactoryService
Centers,alwaysusingMakitareplacementparts.
Cleaning the tool
Cleanthetoolbywipingodustwithadryclothorone
dippedinsoapywaterandwrungout.
NOTICE: Never use gasoline, benzine, thinner,
alcohol or the like. Discoloration, deformation or
cracks may result.

16 ENGLISH
Shear blade maintenance
Before the operation or once per hour during operation,
applylow-viscosityoil(machineoil,orspray-typelubri-
catingoil)totheshearblades.
►Fig.37
Afteroperation,removedustfromtheshearbladeswith
awiredbrush,wipeitowithaclothandthenapply
low-viscosityoil(machineoil,orspray-typelubricating
oil)totheshearblades.
►Fig.38
NOTICE: Do not wash the shear blades in water.
Doingsomaycauserustordamagetothetool.
NOTICE: Dirt and corrosion cause excessive
blade friction and shorten the operating time per
battery charge.
Storage
Thehookholeinthetoolbottomisconvenientforhang-
ing the tool from a nail or screw on the wall.
Removethebatterycartridgefromthetool,andthen
attachthebladecovertotheshearbladessothatthe
bladesarenotexposed.Storethetooloutofthereach
of children. Store the tool in a place not exposed to
moisture or rain.
►Fig.39: 1. Hole
Grinding the shear blades
NOTICE: If the shear blades have considerably
deformed by grinding, replace the shear blades
with new ones.
1. Installthebatterycartridgetothetool.
2. Turnonandstartthetoolsothattheupperblade
andlowerbladearepositionedalternately.
►Fig.40
3. Turnothetoolandremovethebatterycartridge
from the tool.
4. Settheangleofaleto45°,andgrindtheupper
bladefrom3directionswiththele.
►Fig.41: (1) File (2)45°
CAUTION: Before grinding the shear blades,
make sure that the tool is switched o and the
battery cartridge is removed from the tool.
5. Place the tool upside down, and then remove the
burrsfromtheshearbladeswiththedressingstone.
►Fig.42: 1. Dressing stone
6. Settheangleoftheleto45°,andgrindthelower
bladefrom3directionswiththele.
7. Return the tool to normal position, and then
removetheburrsfromtheshearbladeswiththedress-
ing stone.
Grease lubrication
Interval of lubrication:Every50operatinghours
1. Removetheboltfromtheholeforlubrication.
►Fig.43: 1. Bolt
2. Removethecapfromthegreasevessel.Alignthe
outlet of the grease vessel with the hole on the cover,
and then press the outlet of the grease vessel onto the
hole.
►Fig.44: 1.Greasevessel2. Hole
3. Applythegreasetothetool(Approximately5gas
aguide).
4. Tightenthebolt.

17 ENGLISH
TROUBLESHOOTING
Beforeaskingforrepairs,conductyourowninspectionrst.Ifyoundaproblemthatisnotexplainedinthemanual,
donotattempttodismantlethetool.Instead,askMakitaAuthorizedServiceCenters,alwaysusingMakitareplace-
ment parts for repairs.
State of abnormality Probable cause (malfunction) Remedy
Motor does not run. Batterycartridgeisnotinstalled. Installthebatterycartridge.
Batteryproblem(undervoltage) Rechargethebattery.Ifrechargingisnoteective,
replacebattery.
Thedrivesystemdoesnotwork
correctly. Askyourlocalauthorizedservicecenterforrepair.
Motor stops running after a little use. Battery'schargelevelislow. Rechargethebattery.Ifrechargingisnoteective,
replacebattery.
Overheating. Stop using of tool to allow it to cool down.
Tool does not reach maximum RPM. Batteryisinstalledimproperly. Installthebatterycartridgeasdescribedinthis
manual.
Batterypowerisdropping. Rechargethebattery.Ifrechargingisnoteective,
replacebattery.
Thedrivesystemdoesnotwork
correctly. Askyourlocalauthorizedservicecenterforrepair.
Shearbladesdonotmove:
stopthemachineimmediately!
Foreignobjectsarecaughtbetweenthe
shearblades. 1.Usethereversebutton.
2.Switchothetoolandremovethebatterycar-
tridge,andthenremovetheforeignobjectsusing
tools such as pliers.
Thedrivesystemdoesnotwork
correctly. Askyourlocalauthorizedservicecenterforrepair.
Abnormalvibration:
stopthemachineimmediately!
Shearbladesarebroken,bentorworn. Replacetheshearblades.
Thedrivesystemdoesnotwork
correctly. Askyourlocalauthorizedservicecenterforrepair.
Shearbladesandmotorcannotstop:
Removethebatteryimmediately!
Electricmalfunction. Removethebatteryandaskyourlocalauthorized
service center for repair.
OPTIONAL
ACCESSORIES
CAUTION: These accessories or attachments
are recommended for use with your Makita tool
specied in this manual.Theuseofanyother
accessories or attachments might present a risk of
injurytopersons.Onlyuseaccessoryorattachment
for its stated purpose.
Ifyouneedanyassistanceformoredetailsregard-
ingtheseaccessories,askyourlocalMakitaService
Center.
• Shearbladeassembly
• Chip receiver
• Greasevessel
• Makitagenuinebatteryandcharger
NOTE:Someitemsinthelistmaybeincludedinthe
toolpackageasstandardaccessories.Theymay
dierfromcountrytocountry.

18 POLSKI
POLSKI (Instrukcja oryginalna)
DANE TECHNICZNE
Model: UH013G UH014G
Długośćostrza 600 mm 750 mm
Liczbaoscylacjinaminutę 2 000 / 3 600 / 5 000 min-1
Długośćcałkowita 1 085 mm 1 225 mm
Napięcieznamionowe Prądstały36V–40Vmaks.
Masa netto 3,9–4,5kg 4,0–4,7kg
Stopieńochrony IPX4
• Wzwiązkuzestaleprowadzonymprzeznasząrmęprogramembadawczo-rozwojowymniniejszedanemogą
uleczmianombezwcześniejszegopowiadomienia.
• Danetechnicznemogąróżnićsięwzależnościodkraju.
• Masamożebyćróżnawzależnościodosprzętu,wtymakumulatora.Wtabeliprzedstawionajestnajlżejszai
najcięższakonguracja,zgodniezprocedurąEPTA01/2014.
Kompatybilne akumulatory i ładowarki
Akumulator BL4020* / BL4025* / BL4040* / BL4050F
*:Zalecanyakumulator
Ładowarka DC40RA/DC40RB/DC40RC
• Pewnezwymienionychpowyżejakumulatorówiładowarekmogąbyćniedostępnewregioniezamieszkania
użytkownika.
OSTRZEŻENIE: Należy używać wyłącznie akumulatorów i ładowarek wymienionych powyżej.
Używanieinnychakumulatorówiładowarekmożestwarzaćryzykowystąpieniaobrażeńciałalubpożaru.
Zalecane źródło zasilania podłączane za pomocą przewodu
Przenośnajednostkazasilająca PDC01 / PDC1200
• Wymienionepowyżejźródłozasilaniapodłączanezapomocąprzewodumożebyćniedostępnewregionie
zamieszkaniaużytkownika.
• Przedużyciemźródłazasilaniapodłączanegozapomocąprzewodunależyzapoznaćsięzinstrukcjąiumiesz-
czonyminanimznakamiostrzegawczymi.
Symbole
Poniżejpokazanosymbole,jakiemogąbyćzastoso-
wanenaurządzeniu.Przedrozpoczęciemużytkowania
należyzapoznaćsięzichznaczeniem.
Przeczytaćinstrukcjęobsługi.
NIEBEZPIECZEŃSTWO—Niezbliżaćrąk
do ostrza.
Nosićokularyochronne.
Ni-MH
Li-ion
DotyczytylkopaństwUE
Zuwaginaobecnośćwsprzęcienie-
bezpiecznychskładników,zużytysprzęt
elektryczny,elektroniczny,akumulatory
orazbateriemogąpowodowaćnegatywny
wpływnaśrodowiskoizdrowieludzi.
Niewyrzucajurządzeńelektrycznych,
elektronicznychlubakumulatorówwrazz
odpadami z gospodarstwa domowego!
ZgodniezEuropejskąDyrektywąwsprawie
zużytegosprzętuelektrycznegoielektronicz-
negoorazdotyczącąakumulatorówibaterii
orazzużytychakumulatorówibaterii,atakże
dostosowaniemichdoprawakrajowego,zużyte
urządzeniaelektryczne,elektroniczne,baterie
iakumulatory,należyskładowaćosobnoi
przekazywaćdopunktuselektywnejzbiórki
odpadówkomunalnych,działającegozgodniez
przepisamidotyczącymiochronyśrodowiska.
Informujeotymsymbolprzekreślonego
kołowegokonteneranaodpadyumiesz-
czonynasprzęcie.
Przeznaczenie
Narzędzietojestprzeznaczonedoprzycinania
żywopłotów.

19 POLSKI
Hałas
Obowiązującanorma:EN62841-4-2
Model Poziomciśnieniaakustycznego Poziomnatężeniadźwięku
LpA(dB(A)) NiepewnośćK
(dB(A))
LWA(dB(A)) NiepewnośćK
(dB(A))
UH013G 80 391 3
UH014G 81 392 3
WSKAZÓWKA:Deklarowanawartośćemisjihałasuzostałazmierzonazgodniezestandardowąmetodątestowąi
możnająwykorzystaćdoporównywanianarzędzi.
WSKAZÓWKA:Deklarowanąwartośćemisjihałasumożnatakżewykorzystaćwewstępnejocenienarażenia.
OSTRZEŻENIE: Nosić ochronniki słuchu.
OSTRZEŻENIE: Poziom hałasu wytwarzanego podczas rzeczywistego użytkowania elektronarzędzia
może się różnić od wartości deklarowanej w zależności od sposobu użytkowania narzędzia, a w szczegól-
ności od rodzaju obrabianego elementu.
OSTRZEŻENIE:
W oparciu o szacowane narażenie w rzeczywistych warunkach użytkowania należy okre-
ślić środki bezpieczeństwa w celu zapewnienia ochrony operatora (uwzględniając wszystkie elementy cyklu dzia-
łania, tj. czas, kiedy narzędzie jest wyłączone i kiedy pracuje na biegu jałowym, a także czas, kiedy jest włączone).
Drgania
Całkowitawartośćpoziomudrgań(sumawektoróww3osiach)określonazgodnieznormąEN62841-4-2:
Model Uchwyt przedni Uchwyt tylny
ah (m/s2)
Niepewność K
(m/s2)
ah (m/s2)
Niepewność K
(m/s2)
UH013G 2,5 1,5
2,5 m/s2lubmniej
1,5
UH014G 3,2 1,5
2,5 m/s2lubmniej
1,5
WSKAZÓWKA:Deklarowanawartośćpoziomudrgańzostałazmierzonazgodniezestandardowąmetodą
testowąimożnająwykorzystaćdoporównywanianarzędzi.
WSKAZÓWKA:Deklarowanąwartośćpoziomudrgańmożnatakżewykorzystaćwewstępnejocenienarażenia.
OSTRZEŻENIE: Drgania wytwarzane podczas rzeczywistego użytkowania elektronarzędzia mogą się
różnić od wartości deklarowanej w zależności od sposobu użytkowania narzędzia, a w szczególności od
rodzaju obrabianego elementu.
OSTRZEŻENIE: W oparciu o szacowane narażenie w rzeczywistych warunkach użytkowania należy
określić środki bezpieczeństwa w celu zapewnienia ochrony operatora (uwzględniając wszystkie elementy
cyklu działania, tj. czas, kiedy narzędzie jest wyłączone i kiedy pracuje na biegu jałowym, a także czas,
kiedy jest włączone).
Deklaracja zgodności WE
Dotyczy tylko krajów europejskich
DeklaracjazgodnościWEjestdołączonajakozałącznik
Adoniniejszejinstrukcjiobsługi.
OSTRZEŻENIA
DOTYCZĄCE
BEZPIECZEŃSTWA
Ogólne zasady bezpiecznej
eksploatacji elektronarzędzi
OSTRZEŻENIE: Należy zapoznać się z
ostrzeżeniami dotyczącymi bezpieczeństwa,
instrukcjami, ilustracjami i danymi technicz-
nymi dołączonymi do tego elektronarzędzia.
Niezastosowaniesiędopodanychponiżejinstrukcji
możeprowadzićdoporażeniaprądem,pożarui/lub
poważnychobrażeńciała.

20 POLSKI
Wszystkie ostrzeżenia i instruk-
cje należy zachować do wykorzy-
stania w przyszłości.
Pojęcie„elektronarzędzie”,występującewwymienio-
nychtuostrzeżeniach,odnosisiędoelektronarzędzia
zasilanegozsiecielektrycznej(zprzewodemzasilają-
cym)lubdoelektronarzędziaakumulatorowego(bez
przewoduzasilającego).
Ostrzeżenia dotyczące
bezpieczeństwa dla akumulatorowych
nożyc do żywopłotu
1. Nie wolno zbliżać żadnych części ciała do
ostrza. Ciętego materiału nie wolno usuwać
ani przytrzymywać, kiedy ostrza są w ruchu.
Ostrzaporuszająsięnawetpoustawieniuprze-
łącznikawpozycjiwyłączenia.Momentnieuwagi
podczaspracyznożycamidożywopłotumoże
spowodowaćpoważneobrażeniaciała.
2.
Nożyce do żywopłotu należy przenosić przy zatrzy-
manych ostrzach, trzymając narzędzie za uchwyt
i uważając, by nie nacisnąć żadnego przełącznika
zasilania.Prawidłoweprzenoszenienożycdożywo-
płotuzmniejszaryzykoichniezamierzonegowłączenia
idoznaniaurazówspowodowanychprzezostrza.
3. Podczas transportu lub przechowywania
nożyc do żywopłotu na ostrza zawsze powinna
być założona osłona.Prawidłoweobchodzenie
sięznożycamidożywopłotuzmniejszaryzyko
doznaniaurazówspowodowanychprzezostrza.
4. Przed usunięciem zablokowanego mate-
riału lub przystąpieniem do serwisowania
narzędzia należy koniecznie sprawdzić, czy
wszystkie przełączniki zasilania są wyłączone,
a akumulator został wyjęty lub odłączony.
Niespodziewaneuruchomienienożycdożywo-
płotupodczasusuwaniazablokowanegomateriału
lubserwisowaniamożedoprowadzićdopoważ-
nychobrażeńciała.
5.
Ponieważ ostrze może zetknąć się z ukry-
tymi przewodami elektrycznymi, nożyce do
żywopłotu należy trzymać tylko za izolowane
uchwyty.Zetknięcieostrzyzprzewodemelektrycz-
nymznajdującymsiępodnapięciemspowoduje,że
odsłonięteelementymetalowenożycdożywopłotu
równieżznajdąsiępodnapięciem,stwarzając
ryzykoporażeniaoperatoraprądemelektrycznym.
6. Wszystkie przewody elektryczne należy
trzymać z dala od obszaru cięcia.Przewody
elektrycznemogąbyćukrytewzaroślachizostać
przypadkowoprzecięteprzezostrze.
7. Nie używać nożyc do żywopłotu przy złej
pogodzie, w szczególności podczas burzy.
Zmniejszytoryzykouderzeniapiorunem.
Dodatkowe zalecenia dotyczące
bezpieczeństwa
Przygotowanie
1. Przed uruchomieniem narzędzia należy spraw-
dzić, czy w żywopłocie lub krzewach nie ma
elementów takich jak ogrodzenia z drutu lub
niewidoczne przewody elektryczne.
2. Narzędzia nie wolno obsługiwać dzieciom i
młodzieży poniżej 18 roku życia.Młodeosoby
powyżej16rokużyciamożnawyłączyćztego
zastrzeżenia,jeżeliodbywająszkoleniepodnad-
zorem fachowca.
3. Osoba mająca praktyczne doświadczenie
powinna poinstruować użytkownika, który
jeszcze nie pracował z takim narzędziem.
4.
Narzędzie powinno być używane tylko wtedy,
gdy osoba je obsługująca jest w odpowied-
niej formie zycznej.Wprzypadkuzmęczenia
koncentracjaoperatorajestobniżona.Zachować
szczególnąostrożnośćpodkoniecdniarobo-
czego.Wszelkieczynnościpowinnybyćwykony-
wanespokojnieiostrożnie.Użytkownikodpowiada
zawszelkieszkodywyrządzoneosobomtrzecim.
5. Zabrania się używania narzędzia po spożyciu
alkoholu, narkotyków lub leków.
6. Rękawice robocze z grubej skóry należą do
podstawowego wyposażenia podczas pracy
z narzędziem i zawsze należy je nosić. Należy
też nosić mocne buty z antypoślizgowymi
podeszwami.
7. Przed rozpoczęciem pracy należy się upewnić,
że narzędzie jest w dobrym i zapewniającym
bezpieczeństwo stanie. Należy sprawdzić, czy
osłony są zamocowane prawidłowo. Narzędzia
nie wolno używać, jeśli nie zostało całkowicie
zmontowane.
Obsługa
1. Narzędzie podczas pracy należy trzymać pew-
nie i oburącz.
2. Operator używający narzędzia powinien znaj-
dować się na poziomie podłoża. Nie można
używać narzędzia na drabinie lub innej niesta-
bilnej podporze.
3. NIEBEZPIECZEŃSTWO - Nie wolno zbliżać rąk
do ostrza.Kontaktzostrzemmożespowodować
poważneobrażeniaciała.
4. Przed rozpoczęciem pracy należy sprawdzić,
czy grunt pod nogami jest pewny.
5. Nie należy bez potrzeby uruchamiać narzędzia
bez obciążenia.
6. Kiedy ostrza nożyc zetkną się z elementami
ogrodzenia lub innym twardym przedmiotem,
należy natychmiast wyłączyć urządzenie i
wyjąć akumulator. Sprawdzić, czy ostrza nie
zostały uszkodzone, i w razie potrzeby natych-
miast je wymienić.
7. Przed sprawdzeniem ostrzy nożyc, usunięciem
uszkodzeń lub materiału zablokowanego w
ostrzach nożyc narzędzie należy zawsze wyłą-
czyć i wyjąć akumulator.
8. Nigdy nie kierować ostrzy nożyc w swoją
stronę ani w stronę innych osób.
9. Jeśli podczas pracy ostrza przestaną się poru-
szać z powodu utknięcia między nimi przed-
miotów obcych, należy wyłączyć narzędzie,
wyjąć akumulator, a następnie usunąć przed-
mioty obce za pomocą odpowiednich narzędzi,
takich jak szczypce.Wyjmowanieprzedmiotów
obcychdłoniągroziodniesieniemobrażeń,ponie-
ważostrzamogąporuszyćsięwreakcjinausu-
nięcieprzedmiotuobcego.
Pagina se încarcă...
Pagina se încarcă...
Pagina se încarcă...
Pagina se încarcă...
Pagina se încarcă...
Pagina se încarcă...
Pagina se încarcă...
Pagina se încarcă...
Pagina se încarcă...
Pagina se încarcă...
Pagina se încarcă...
Pagina se încarcă...
Pagina se încarcă...
Pagina se încarcă...
Pagina se încarcă...
Pagina se încarcă...
Pagina se încarcă...
Pagina se încarcă...
Pagina se încarcă...
Pagina se încarcă...
Pagina se încarcă...
Pagina se încarcă...
Pagina se încarcă...
Pagina se încarcă...
Pagina se încarcă...
Pagina se încarcă...
Pagina se încarcă...
Pagina se încarcă...
Pagina se încarcă...
Pagina se încarcă...
Pagina se încarcă...
Pagina se încarcă...
Pagina se încarcă...
Pagina se încarcă...
Pagina se încarcă...
Pagina se încarcă...
Pagina se încarcă...
Pagina se încarcă...
Pagina se încarcă...
Pagina se încarcă...
Pagina se încarcă...
Pagina se încarcă...
Pagina se încarcă...
Pagina se încarcă...
Pagina se încarcă...
Pagina se încarcă...
Pagina se încarcă...
Pagina se încarcă...
Pagina se încarcă...
Pagina se încarcă...
Pagina se încarcă...
Pagina se încarcă...
Pagina se încarcă...
Pagina se încarcă...
Pagina se încarcă...
Pagina se încarcă...
Pagina se încarcă...
Pagina se încarcă...
Pagina se încarcă...
Pagina se încarcă...
Pagina se încarcă...
Pagina se încarcă...
Pagina se încarcă...
Pagina se încarcă...
Pagina se încarcă...
Pagina se încarcă...
Pagina se încarcă...
Pagina se încarcă...
Pagina se încarcă...
Pagina se încarcă...
Pagina se încarcă...
Pagina se încarcă...
Pagina se încarcă...
Pagina se încarcă...
Pagina se încarcă...
Pagina se încarcă...
-
 1
1
-
 2
2
-
 3
3
-
 4
4
-
 5
5
-
 6
6
-
 7
7
-
 8
8
-
 9
9
-
 10
10
-
 11
11
-
 12
12
-
 13
13
-
 14
14
-
 15
15
-
 16
16
-
 17
17
-
 18
18
-
 19
19
-
 20
20
-
 21
21
-
 22
22
-
 23
23
-
 24
24
-
 25
25
-
 26
26
-
 27
27
-
 28
28
-
 29
29
-
 30
30
-
 31
31
-
 32
32
-
 33
33
-
 34
34
-
 35
35
-
 36
36
-
 37
37
-
 38
38
-
 39
39
-
 40
40
-
 41
41
-
 42
42
-
 43
43
-
 44
44
-
 45
45
-
 46
46
-
 47
47
-
 48
48
-
 49
49
-
 50
50
-
 51
51
-
 52
52
-
 53
53
-
 54
54
-
 55
55
-
 56
56
-
 57
57
-
 58
58
-
 59
59
-
 60
60
-
 61
61
-
 62
62
-
 63
63
-
 64
64
-
 65
65
-
 66
66
-
 67
67
-
 68
68
-
 69
69
-
 70
70
-
 71
71
-
 72
72
-
 73
73
-
 74
74
-
 75
75
-
 76
76
-
 77
77
-
 78
78
-
 79
79
-
 80
80
-
 81
81
-
 82
82
-
 83
83
-
 84
84
-
 85
85
-
 86
86
-
 87
87
-
 88
88
-
 89
89
-
 90
90
-
 91
91
-
 92
92
-
 93
93
-
 94
94
-
 95
95
-
 96
96


Makita UH014 Manual de utilizare
- Categorie
- Aparate de tuns gard viu
- Tip
- Manual de utilizare
- Acest manual este potrivit și pentru
în alte limbi
- slovenčina: Makita UH014 Používateľská príručka
- polski: Makita UH014 Instrukcja obsługi
Lucrări înrudite
-
Makita EN402MP Manual de utilizare
-
Makita DUN600L Manual de utilizare
-
Makita DUH604S Manual de utilizare
-
Makita DUH502 Manual de utilizare
-
Makita UH013G Manual de utilizare
-
-
Makita DUH601Z Manual de utilizare
-
Makita UH004G Manual de utilizare
-
Makita MP001G Manual de utilizare
-