
S1110, S1100


S1110
1
7
8
2
3
4
9
6
5

empty page before TOC


English
Introduction
Congratulations on your purchase and welcome to
Philips! To fully benefit from the support that
Philips offers, register your product at
www.philips.com/welcome.
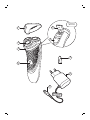
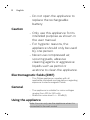
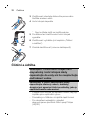
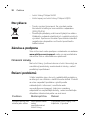
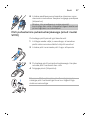
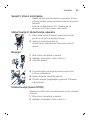
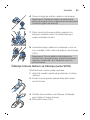
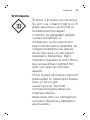
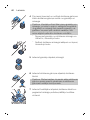
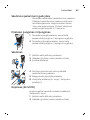
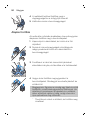
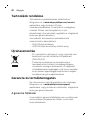
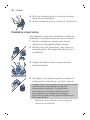
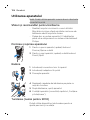
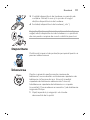
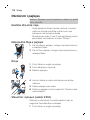
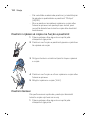
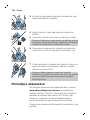
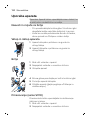
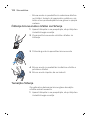
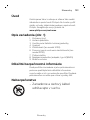
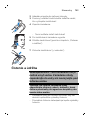
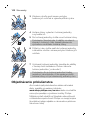
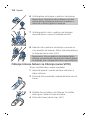
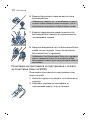
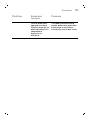
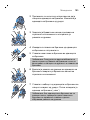
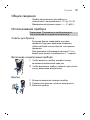
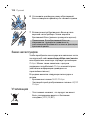
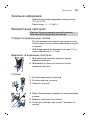
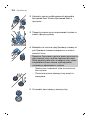
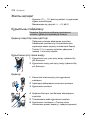
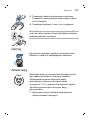
General description (Fig. 1)
1 Protection cap
2 Shaving unit
3 Shaving unit release button
4 On/off button
5 Trimmer (S1110 only)
6 Trimmer release slide (S1110 only)
7 Cleaning brush
8 Supply unit (adapter, type HQ8505)
9 Small plug
Important safety information
Read this important information carefully before
you use the appliance and its accessories and
save it for future reference. The accessories
supplied may vary for different products.
Danger
- Keep the appliance and the
mains cord dry.
6
English

Warning
- The appliance is a Class III
construction.
- This appliance can be used by
children aged from 8 years and
above and persons with
reduced physical, sensory or
mental capabilities or lack of
experience and knowledge if
they have been given
supervision or instruction
concerning use of the
appliance in a safe way and
understand the hazards
involved. Children shall not play
with the appliance. Cleaning
and user maintenance shall not
be made by children without
supervision.
- Always check the appliance
before you use it. Do not use
the appliance if it is damaged,
as this may cause injury. Always
replace a damaged part with
one of the original type.
7
English

- Do not open the appliance to
replace the rechargeable
battery.
Caution
- Only use this appliance for its
intended purpose as shown in
the user manual.
- For hygienic reasons, the
appliance should only be used
by one person.
- Never use compressed air,
scouring pads, abrasive
cleaning agents or aggressive
liquids such as petrol or
acetone to clean the appliance.
Electromagnetic fields (EMF)
- This Philips appliance complies with all
applicable standards and regulations regarding
exposure to electromagnetic fields.
General
- The appliance is suitable for mains voltages
ranging from 100 to 240 volts.
- Maximum noise level: Lc = 69 dB(A)
Using the appliance
Note: You can only use the appliance when it is
connected to the wall socket.
8
English

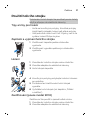
Shaving tips & tricks
- Make circular movements during use. Circular
movements provide better shaving results than
straight movements.
- Your skin may need 2 or 3 weeks to get
accustomed to the Philips shaving system.
Switching the appliance on and off
1 To switch on the appliance, press the on/off
button once.
2 To switch off the appliance, press the on/off
button once.
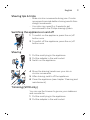
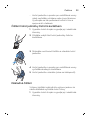
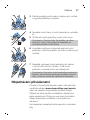
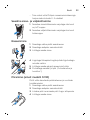
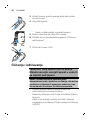
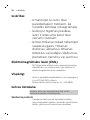
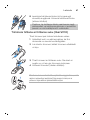
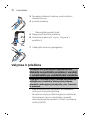
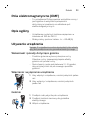
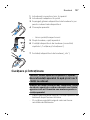
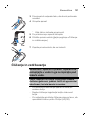
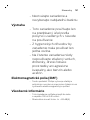
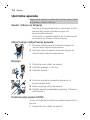
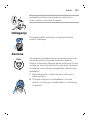
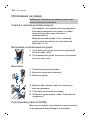
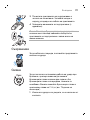
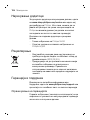
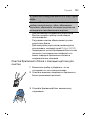
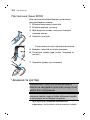
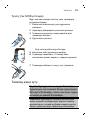
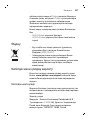
Shaving
1
2
1 Put the small plug in the appliance.
2 Put the adapter in the wall socket.
3 Switch on the appliance.
4 Move the shaving heads over your skin in
circular movements.
5 After shaving, switch off the appliance.
6 Clean the appliance (see chapter 'Cleaning and
maintenance').
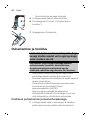
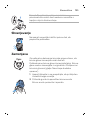
Trimming (S1110 only)
You can use the trimmer to groom your sideburns
and moustache.
1 Put the small plug in the appliance.
2 Put the adapter in the wall socket.
9
English

3 Push the trimmer slide downwards to open the
trimmer.
4 Switch on the appliance.
-
You can now start trimming.
5 After trimming, switch off the appliance.
6 Clean the trimmer (see chapter ‘Cleaning and
maintenance’).
7 Close the trimmer (‘click’).
Cleaning and maintenance
Danger: This appliance is not washable.
Never immerse the appliance in water,
nor rinse it under the tap.
Caution: Never use compressed air, scouring
pads, abrasive cleaning agents or aggressive
liquids such as petrol or acetone to clean the
appliance.
- Clean the appliance after every shave for
optimal shaving performance.
- Regular cleaning guarantees better shaving
performance.
- For the best cleaning results, we advise you to
use the Philips Cleaning spray (HQ110).
10
English

- Never clean the shaving unit and the hair
chamber with a towel or tissue, as this may
damage the shaving heads and the coupling
spindles.
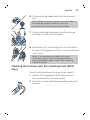
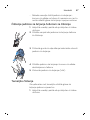
Cleaning the shaving unit with the cleaning brush
1 Switch off the appliance and make sure it is
disconnected from the wall socket.
2 Clean the outside of the shaving unit with the
cleaning brush.
3 Press the release button to open the shaving
unit.
4 Clean the shaving unit and hair chamber with
the brush supplied.
5 Close the shaving unit ('click').
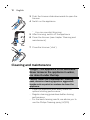
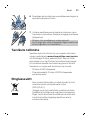
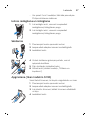
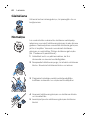
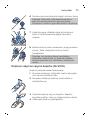
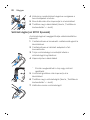
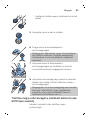
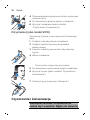
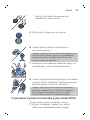
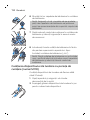
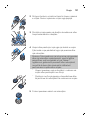
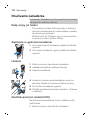
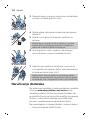
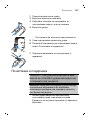
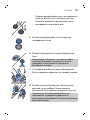
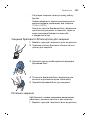
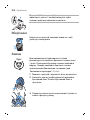
Thorough cleaning
Clean the shaving heads thoroughly once a month
for optimal performance.
1 Switch off the appliance and make sure it is
disconnected from the wall socket.
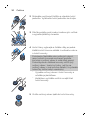
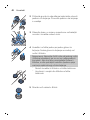
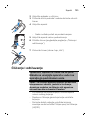
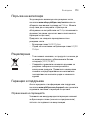
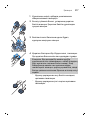
11
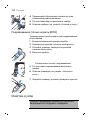
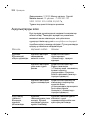
English

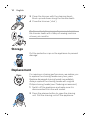
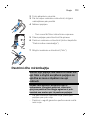
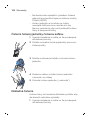
2 Press the release button to open the shaving
unit. Pull the shaving unit off the appliance.
2
1
3 Turn the lock anticlockwise and remove the
retaining frame.
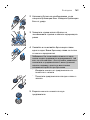
4 Remove and clean one shaving head at a time.
Each shaving head consists of a cutter and a
guard.
Note: Do not clean more than one cutter and
guard at a time, since they are all matching sets.
If you accidentally mix up the cutters and
guards, it may take several weeks before
optimal shaving performance is restored.
-
Remove the cutter from the shaving guard
and clean it with the brush.
-
Clean the inside and outside of the shaving
guard with the brush.
5 Put the cutter back into the guard.
12
English

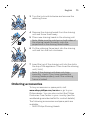
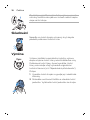
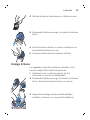
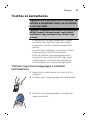
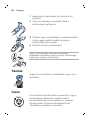
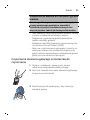
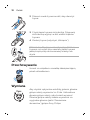
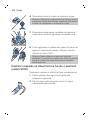
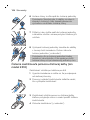
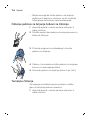
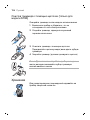
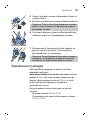
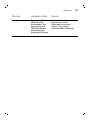
6 Put the shaving heads back into the shaving
unit.
Note: Make sure the notches on both sides of
the shaving heads fit exactly onto the
projections in the shaving head holder.
1
2
7 Put the retaining frame back into the shaving
unit and turn the lock clockwise.
8 Insert the lug of the shaving unit into the slot in
the top of the appliance. Then close the shaving
unit ('click').
Note: If the shaving unit does not close
smoothly, check if you have inserted the
shaving heads properly and if the retaining
frame is locked.
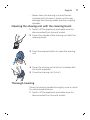
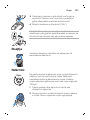
Cleaning the trimmer with the cleaning brush (S1110
only)
Clean the trimmer every time you have used it.
1 Switch off the appliance and make sure it is
disconnected from the wall socket.
2 Push the trimmer slide downwards to open the
trimmer.
13
English

3 Clean the trimmer with the cleaning brush.
Brush up and down along the trimmer teeth.
4 Close the trimmer (‘click’).
Tip: For optimal trimming performance, lubricate
the trimmer teeth with a drop of sewing machine
oil every six months.
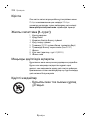
Storage
Put the protection cap on the appliance to prevent
damage.
Replacement
2yrs
For maximum shaving performance, we advise you
to replace the shaving heads every two years.
Replace damaged shaving heads immediately.
Always replace the shaving heads with original
Philips shaving heads (see 'Ordering accessories').
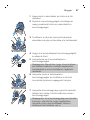
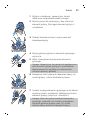
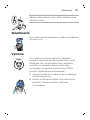
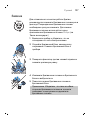
1 Switch off the appliance and make sure it is
disconnected from the wall socket.
2 Press the release button to open the shaving
unit. Pull the shaving unit off the appliance.
14
English

2
1
3 Turn the lock anticlockwise and remove the
retaining frame.
4 Remove the shaving heads from the shaving
unit and throw them away.
5 Place new shaving heads in the shaving unit.
Note: Make sure the notches on both sides of
the shaving heads fit exactly onto the
projections in the shaving head holder.
1
2
6 Put the retaining frame back into the shaving
unit and turn the lock clockwise.
7 Insert the lug of the shaving unit into the slot in
the top of the appliance. Then close the shaving
unit ('click').
Note: If the shaving unit does not close
smoothly, check if you have inserted the
shaving heads properly and if the retaining
frame is locked.
Ordering accessories
To buy accessories or spare parts, visit
www.shop.philips.com/service or go to your
Philips dealer. You can also contact the Philips
Consumer Care Center in your country (see the
worldwide guarantee leaflet for contact details).
The following accessories and spare parts are
available:
- SH30 Philips Shaving Heads.
15
English

- HQ110 Philips shaving head cleaning spray
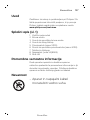
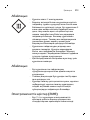
Recycling
- This symbol means that this product shall not
be disposed of with normal household waste
(2012/19/EU).
- Follow your country's rules for the separate
collection of electrical and electronic products.
Correct disposal helps prevent negative
consequences for the environment and human
health.
Guarantee and support
If you need information or support, please visit
www.philips.com/support or read the separate
worldwide guarantee leaflet.
Guarantee restrictions
The shaving heads (cutters and guards) are not
covered by the terms of the international
guarantee because they are subject to wear.
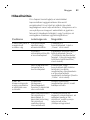
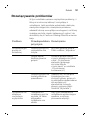
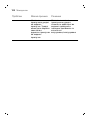
Troubleshooting
This chapter summarizes the most common
problems you could encounter with the appliance.
If you are unable to solve the problem with the
information below, visit www.philips.com/support for
a list of frequently asked questions or contact the
Consumer Care Center in your country.
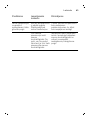
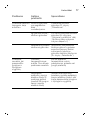
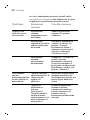
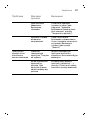
Problem Possible cause Solution
The appliance
does
not shave as
well as it used to.
The shaving heads
are
damaged or
worn.
Replace the shaving heads.
See chapter
'Replacement'.
16
English

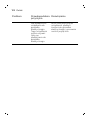
Problem Possible cause Solution
Long hairs obstruct
the shaving heads.
Clean the shaving heads
one by one (see section
'Cleaning the shaving unit
with the cleaning brush' in
chapter 'Cleaning and
maintenance').
You have not
inserted the
shaving heads
properly.
Make sure the notches on
both sides of the shaving
heads fit exactly onto the
projections in the shaving
head holder (see chapter
'Replacement').
The appliance
does not work
when I press the
on/off button.
The temperature of
the appliance is too
high. In this case,
the appliance does
not work.
As soon as the
temperature of the
appliance has dropped
sufficiently, you can switch
on the appliance again.
You have not
connected the
appliance to the
wall socket. This
appliance can only
be used directly
from the wall
socket.
Put the small plug in the
appliance, put the adapter
in the wall socket, and
press the on/off button
again.
17
English

Čeština
Úvod
Společnost Philips Vám gratuluje ke koupi a vítá
Vás! Chcete-li využívat všech výhod podpory
nabízené společností Philips, zaregistrujte svůj
výrobek na stránkách www.philips.com/welcome.
Všeobecný popis (obr. 1)
1 Ochranný kryt
2 Holicí jednotka
3 Uvolňovací tlačítko holicí jednotky
4 Vypínač
5 Zastřihovač (pouze model S1110)
6 Posuvná pojistka pro uvolnění zastřihovače
(pouze model S1110)
7 Čisticí kartáč
8 Napájecí jednotka (adaptér, typ HQ8505)
9 Malá zástrčka
Důležité bezpečnostní informace
Před použitím přístroje a jeho příslušenství si
pečlivě přečtěte tuto příručku s důležitými
informacemi a uschovejte ji pro budoucí použití.
Dodané příslušenství se může pro různé výrobky
lišit.
Nebezpečí
- Holicí strojek a síťovou šňůru
uchovávejte v suchu.
18
Čeština

Varování
- Tento holicí strojek je
spotřebičem třídy III.
- Tento holicí strojek mohou
používat děti od 8 let věku.
Osoby s omezenými fyzickými,
smyslovými nebo duševními
schopnostmi nebo
nedostatkem zkušeností
a znalostí jej mohou používat,
pokud jsou pod dohledem
nebo byly poučeny
o bezpečném používání
holicího strojku a pokud chápou
související rizika. Děti si
s holicím strojkem nesmí hrát.
Děti nesmí provádět bez
dozoru čištění a uživatelskou
údržbu.
- Před použitím přístroj vždy
zkontrolujte. Přístroj
nepoužívejte, je-li poškozený,
aby nedošlo ke zranění.
Poškozenou součástku
vyměňujte vždy za původní typ.
19
Čeština

- Neotvírejte přístroj, ani se
nepokoušejte vyměnit
akumulátor.
Upozornění
- Přístroj používejte pouze
k účelu, ke kterému je určen, jak
je vyobrazeno v uživatelské
příručce.
- Z hygienických důvodů by měla
přístroj používat pouze jedna
osoba.
- K čištění přístroje nikdy
nepoužívejte stlačený vzduch,
kovové žínky, abrazivní ani
agresivní čisticí prostředky, jako
je například benzín nebo
aceton.
Elektromagnetická pole (EMP)
- Tento přístroj Philips odpovídá všem platným
normám a předpisům týkajícím se vystavení
účinkům elektromagnetických polí.
Obecné informace
- Přístroj lze připojit do sítě o napětí v rozmezí
100 až 240 V.
- Maximální hladina hluku: Lc = 69 dB(A)
20
Čeština
Pagina se încarcă...
Pagina se încarcă...
Pagina se încarcă...
Pagina se încarcă...
Pagina se încarcă...
Pagina se încarcă...
Pagina se încarcă...
Pagina se încarcă...
Pagina se încarcă...
Pagina se încarcă...
Pagina se încarcă...
Pagina se încarcă...
Pagina se încarcă...
Pagina se încarcă...
Pagina se încarcă...
Pagina se încarcă...
Pagina se încarcă...
Pagina se încarcă...
Pagina se încarcă...
Pagina se încarcă...
Pagina se încarcă...
Pagina se încarcă...
Pagina se încarcă...
Pagina se încarcă...
Pagina se încarcă...
Pagina se încarcă...
Pagina se încarcă...
Pagina se încarcă...
Pagina se încarcă...
Pagina se încarcă...
Pagina se încarcă...
Pagina se încarcă...
Pagina se încarcă...
Pagina se încarcă...
Pagina se încarcă...
Pagina se încarcă...
Pagina se încarcă...
Pagina se încarcă...
Pagina se încarcă...
Pagina se încarcă...
Pagina se încarcă...
Pagina se încarcă...
Pagina se încarcă...
Pagina se încarcă...
Pagina se încarcă...
Pagina se încarcă...
Pagina se încarcă...
Pagina se încarcă...
Pagina se încarcă...
Pagina se încarcă...
Pagina se încarcă...
Pagina se încarcă...
Pagina se încarcă...
Pagina se încarcă...
Pagina se încarcă...
Pagina se încarcă...
Pagina se încarcă...
Pagina se încarcă...
Pagina se încarcă...
Pagina se încarcă...
Pagina se încarcă...
Pagina se încarcă...
Pagina se încarcă...
Pagina se încarcă...
Pagina se încarcă...
Pagina se încarcă...
Pagina se încarcă...
Pagina se încarcă...
Pagina se încarcă...
Pagina se încarcă...
Pagina se încarcă...
Pagina se încarcă...
Pagina se încarcă...
Pagina se încarcă...
Pagina se încarcă...
Pagina se încarcă...
Pagina se încarcă...
Pagina se încarcă...
Pagina se încarcă...
Pagina se încarcă...
Pagina se încarcă...
Pagina se încarcă...
Pagina se încarcă...
Pagina se încarcă...
Pagina se încarcă...
Pagina se încarcă...
Pagina se încarcă...
Pagina se încarcă...
Pagina se încarcă...
Pagina se încarcă...
Pagina se încarcă...
Pagina se încarcă...
Pagina se încarcă...
Pagina se încarcă...
Pagina se încarcă...
Pagina se încarcă...
Pagina se încarcă...
Pagina se încarcă...
Pagina se încarcă...
Pagina se încarcă...
Pagina se încarcă...
Pagina se încarcă...
Pagina se încarcă...
Pagina se încarcă...
Pagina se încarcă...
Pagina se încarcă...
Pagina se încarcă...
Pagina se încarcă...
Pagina se încarcă...
Pagina se încarcă...
Pagina se încarcă...
Pagina se încarcă...
Pagina se încarcă...
Pagina se încarcă...
Pagina se încarcă...
Pagina se încarcă...
Pagina se încarcă...
Pagina se încarcă...
Pagina se încarcă...
Pagina se încarcă...
Pagina se încarcă...
Pagina se încarcă...
Pagina se încarcă...
Pagina se încarcă...
Pagina se încarcă...
Pagina se încarcă...
Pagina se încarcă...
Pagina se încarcă...
Pagina se încarcă...
Pagina se încarcă...
Pagina se încarcă...
Pagina se încarcă...
Pagina se încarcă...
Pagina se încarcă...
Pagina se încarcă...
Pagina se încarcă...
Pagina se încarcă...
Pagina se încarcă...
Pagina se încarcă...
Pagina se încarcă...
Pagina se încarcă...
Pagina se încarcă...
Pagina se încarcă...
Pagina se încarcă...
Pagina se încarcă...
Pagina se încarcă...
Pagina se încarcă...
Pagina se încarcă...
Pagina se încarcă...
Pagina se încarcă...
Pagina se încarcă...
Pagina se încarcă...
Pagina se încarcă...
Pagina se încarcă...
Pagina se încarcă...
Pagina se încarcă...
Pagina se încarcă...
Pagina se încarcă...
Pagina se încarcă...
Pagina se încarcă...
Pagina se încarcă...
Pagina se încarcă...
Pagina se încarcă...
Pagina se încarcă...
Pagina se încarcă...
Pagina se încarcă...
Pagina se încarcă...
Pagina se încarcă...
Pagina se încarcă...
Pagina se încarcă...
Pagina se încarcă...
Pagina se încarcă...
Pagina se încarcă...
Pagina se încarcă...
Pagina se încarcă...
Pagina se încarcă...
Pagina se încarcă...
Pagina se încarcă...
Pagina se încarcă...
Pagina se încarcă...
Pagina se încarcă...
Pagina se încarcă...
Pagina se încarcă...
Pagina se încarcă...
Pagina se încarcă...
Pagina se încarcă...
Pagina se încarcă...
Pagina se încarcă...
Pagina se încarcă...
Pagina se încarcă...
Pagina se încarcă...
Pagina se încarcă...
Pagina se încarcă...
Pagina se încarcă...
Pagina se încarcă...
Pagina se încarcă...
Pagina se încarcă...
Pagina se încarcă...
Pagina se încarcă...
Pagina se încarcă...
Pagina se încarcă...
Pagina se încarcă...
Pagina se încarcă...
Pagina se încarcă...
Pagina se încarcă...
Pagina se încarcă...
Pagina se încarcă...
Pagina se încarcă...
-
 1
1
-
 2
2
-
 3
3
-
 4
4
-
 5
5
-
 6
6
-
 7
7
-
 8
8
-
 9
9
-
 10
10
-
 11
11
-
 12
12
-
 13
13
-
 14
14
-
 15
15
-
 16
16
-
 17
17
-
 18
18
-
 19
19
-
 20
20
-
 21
21
-
 22
22
-
 23
23
-
 24
24
-
 25
25
-
 26
26
-
 27
27
-
 28
28
-
 29
29
-
 30
30
-
 31
31
-
 32
32
-
 33
33
-
 34
34
-
 35
35
-
 36
36
-
 37
37
-
 38
38
-
 39
39
-
 40
40
-
 41
41
-
 42
42
-
 43
43
-
 44
44
-
 45
45
-
 46
46
-
 47
47
-
 48
48
-
 49
49
-
 50
50
-
 51
51
-
 52
52
-
 53
53
-
 54
54
-
 55
55
-
 56
56
-
 57
57
-
 58
58
-
 59
59
-
 60
60
-
 61
61
-
 62
62
-
 63
63
-
 64
64
-
 65
65
-
 66
66
-
 67
67
-
 68
68
-
 69
69
-
 70
70
-
 71
71
-
 72
72
-
 73
73
-
 74
74
-
 75
75
-
 76
76
-
 77
77
-
 78
78
-
 79
79
-
 80
80
-
 81
81
-
 82
82
-
 83
83
-
 84
84
-
 85
85
-
 86
86
-
 87
87
-
 88
88
-
 89
89
-
 90
90
-
 91
91
-
 92
92
-
 93
93
-
 94
94
-
 95
95
-
 96
96
-
 97
97
-
 98
98
-
 99
99
-
 100
100
-
 101
101
-
 102
102
-
 103
103
-
 104
104
-
 105
105
-
 106
106
-
 107
107
-
 108
108
-
 109
109
-
 110
110
-
 111
111
-
 112
112
-
 113
113
-
 114
114
-
 115
115
-
 116
116
-
 117
117
-
 118
118
-
 119
119
-
 120
120
-
 121
121
-
 122
122
-
 123
123
-
 124
124
-
 125
125
-
 126
126
-
 127
127
-
 128
128
-
 129
129
-
 130
130
-
 131
131
-
 132
132
-
 133
133
-
 134
134
-
 135
135
-
 136
136
-
 137
137
-
 138
138
-
 139
139
-
 140
140
-
 141
141
-
 142
142
-
 143
143
-
 144
144
-
 145
145
-
 146
146
-
 147
147
-
 148
148
-
 149
149
-
 150
150
-
 151
151
-
 152
152
-
 153
153
-
 154
154
-
 155
155
-
 156
156
-
 157
157
-
 158
158
-
 159
159
-
 160
160
-
 161
161
-
 162
162
-
 163
163
-
 164
164
-
 165
165
-
 166
166
-
 167
167
-
 168
168
-
 169
169
-
 170
170
-
 171
171
-
 172
172
-
 173
173
-
 174
174
-
 175
175
-
 176
176
-
 177
177
-
 178
178
-
 179
179
-
 180
180
-
 181
181
-
 182
182
-
 183
183
-
 184
184
-
 185
185
-
 186
186
-
 187
187
-
 188
188
-
 189
189
-
 190
190
-
 191
191
-
 192
192
-
 193
193
-
 194
194
-
 195
195
-
 196
196
-
 197
197
-
 198
198
-
 199
199
-
 200
200
-
 201
201
-
 202
202
-
 203
203
-
 204
204
-
 205
205
-
 206
206
-
 207
207
-
 208
208
-
 209
209
-
 210
210
-
 211
211
-
 212
212
-
 213
213
-
 214
214
-
 215
215
-
 216
216
-
 217
217
-
 218
218
-
 219
219
-
 220
220
-
 221
221
-
 222
222
-
 223
223
-
 224
224
-
 225
225
-
 226
226
-
 227
227
-
 228
228


Philips S1100/04 Manual de utilizare
- Tip
- Manual de utilizare
- Acest manual este potrivit și pentru
în alte limbi
- slovenčina: Philips S1100/04 Používateľská príručka
- eesti: Philips S1100/04 Kasutusjuhend
Lucrări înrudite
-
Philips PT735/16 Manual de utilizare
-
Philips HQ6906 Manual de utilizare
-
Philips PT731/16 Manual de utilizare
-
Philips HQ7300 Manual de utilizare
-
Philips HQ7100/16 Manual de utilizare
-
Philips HQ9020/16 Manual de utilizare
-
Philips HQ6645/16 Manual de utilizare
-
-
Philips AT750/16 Manual de utilizare
-
Philips CRP136/01 Product Datasheet