
M211951EN-D
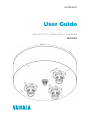
User Guide
Vaisala Multi-Observation Gateway
MOG100

PUBLISHED BY
Vaisala Oyj
Vanha Nurmijärventie 21, FI-01670 Vantaa, Finland
P.O. Box 26, FI-00421 Helsinki, Finland
+358 9 8949 1
Visit our Internet pages at www.vaisala.com.
© Vaisala Oyj 2019
No part of this document may be
reproduced, published or publicly
displayed in any form or by any
means, electronic or mechanical
(including photocopying), nor
may its contents be modified,
translated, adapted, sold or
disclosed to a third party without
prior written permission of the
copyright holder. Translated
documents and translated
portions of multilingual
documents are based on the
original English versions. In
ambiguous cases, the English
versions are applicable, not the
translations.
The contents of this document are
subject to change without prior
notice.
Local rules and regulations may
vary and they shall take
precedence over the information
contained in this document.
Vaisala makes no representations
on this document’s compliance
with the local rules and
regulations applicable at any
given time, and hereby disclaims
any and all responsibilities related
thereto.
This document does not create
any legally binding obligations for
Vaisala towards customers or end
users. All legally binding
obligations and agreements are
included exclusively in the
applicable supply contract or the
General Conditions of Sale and
General Conditions of Service of
Vaisala.
This product contains software
developed by Vaisala or third
parties. Use of the software is
governed by license terms and
conditions included in the
applicable supply contract or, in
the absence of separate license
terms and conditions, by the
General License Conditions of
Vaisala Group.
This product may contain open
source software (OSS)
components. In the event this
product contains OSS
components, then such OSS is
governed by the terms and
conditions of the applicable OSS
licenses, and you are bound by
the terms and conditions of such
licenses in connection with your
use and distribution of the OSS in
this product. Applicable OSS
licenses are included in the
product itself or provided to you
on any other applicable media,
depending on each individual
product and the product items
delivered to you.

Table of Contents
1. About This Document................................................................................... 3
1.1 Version Information.......................................................................................... 3
1.2 Related Manuals................................................................................................3
1.3 Documentation Conventions...........................................................................4
1.4 Trademarks........................................................................................................ 4
2. Product Overview........................................................................................... 5
2.1 Vaisala Multi-Observation Gateway MOG100................................................5
2.2 Safety................................................................................................................. 6
2.2.1 ESD Protection........................................................................................... 7
2.3 Regulatory Compliances.................................................................................. 7
2.3.1 Applicable European Directives...............................................................7
2.3.2 FCC Compliance.........................................................................................8
2.3.3 Ocial Modem Identification...................................................................8
3. Overview to Configuration and Installation.........................................9
4. Configuration.................................................................................................. 10
4.1 Installing SIM Card.......................................................................................... 10
4.2 Installing AQ Tool..............................................................................................11
4.3 Establishing Maintenance Connection..........................................................12
4.4 Configuring Wireless Communication.......................................................... 13
4.5 Registering MOG100 in Beacon Cloud..........................................................13
5. Installation........................................................................................................ 15
5.1 Installing MOG100........................................................................................... 15
5.1.1 Installing Mounting Bracket on 60 ... 100‑mm Mast.............................16
5.1.2 Installing Mounting Bracket on Sensor Support Arm or
35 ... 40‑mm Mast.....................................................................................16
5.1.3 Installing Mounting Bracket on Wall...................................................... 18
5.1.4 Installing MOG100 on Mounting Bracket...............................................18
5.2 Installing AQT400/WXT530.......................................................................... 21
5.3 Connecting Cables and Powering................................................................. 21
5.4 Verifying Installation...................................................................................... 23
6. Troubleshooting............................................................................................ 24
6.1 Writing Problem Report................................................................................ 24
7. MOG100 Specifications..............................................................................25
Appendix A:
EU Declaration of Conformity............................................. 27
Warranty............................................................................................................29
Technical Support............................................................................................29
Recycling........................................................................................................... 29
Table of Contents
1

MOG100 User Guide M211951EN-D
2

1. About This Document
1.1 Version Information
This document provides information about the installation and operation of Vaisala Multi-
Observation Gateway MOG100.
Table 1 Document Versions
Document
Code
Date Description
M211951EN-D March 2019 • Operating altitude added
• Regulatory compliance information updated
• Simplified EU Declaration of Conformity added
M211951EN-C June 2018 • Beacon View changed to Beacon Cloud
• Beacon Cloud web address update
M211951EN-B February 2018 • MOG100 registration instructions updated.
• New 3.5G modem in MOG100.
• Change of UI application names:
• AQ-View changed to Beacon View.
• AQT Configuration Tool changed to AQ Tool.
1.2 Related Manuals
Table 2 Related Manuals
Document Code Name
M211942EN Vaisala Air Quality Transmitter AQT400 Series User Guide
M212056EN Vaisala Multi-Observation Gateway MOG100 Configuration Guide
M212019EN Vaisala Observation Network Manager NM10 Configuration and Maintenance
Manual
M211840EN Vaisala Weather Transmitter WXT530 Series User Guide
The documentation is available online at www.vaisala.com.
Chapter 1 – About This Document
3

1.3 Documentation Conventions
Warning alerts you to a serious hazard. If you do not read and
follow instructions carefully at this point, there is a risk of injury or even death.
WARNING!
Caution warns you of a potential hazard. If you do not read and
follow instructions carefully at this point, the product could be damaged or
important data could be lost.
CAUTION!
Note highlights important information on using the product.
Tip gives information for using the product more eciently.
Lists tools needed to perform the task.
Indicates that you need to take some notes during the task.
1.4 Trademarks
Vaisalaâ is a registered trademark of Vaisala Oyj.
Microsoftâ and Windowsâ are either registered trademarks or trademarks of Microsoft
Corporation in the United States and other countries.
All other product or company names that may be mentioned in this publication are trade
names, trademarks, or registered trademarks of their respective owners.
MOG100 User Guide M211951EN-D
4

2. Product Overview
2.1 Vaisala Multi-Observation Gateway MOG100
Vaisala Multi-Observation Gateway MOG100 is a gateway and logger device for Vaisala Air
Quality Transmitter AQT400 Series and Vaisala Weather Transmitter WXT530 Series. MOG100
includes the following components:
• GSM module for wireless communication
• Battery regulator for solar panel and battery input
• Memory for data logging and local buering
MOG100 sends the measuring data from the air quality or weather transmitters to Vaisala
Beacon Cloud, Vaisala Observation Network Manager NM10, and third-party servers, using the
integrated 3.5G (4‑band GSM) cellular modem. MOG100 communicates using the secure HTTP
over TCP/IP protocol (HTTPS).
MOG100 is enclosed in an IP66‑rated weatherproof aluminum casing and can be installed
outdoors. The unit has dedicated connectors for AQT400, WXT530, and for power and
maintenance.
Table 3 MOG100 Options and Accessories
Option Details Order Code
MOG100 unit -
4G/3G/2G GSM antenna - 250327
Mounting kit - ASM211983
Sensor cable, M12/8(F)‑open for power/
maintenance
5 m (16 ft 5 in) 223283
Chapter 2 – Product Overview
5

Option Details Order Code
Sensor cable, M12/8(F)‑M12/8(F) for
AQT400/WXT536
0.8 m (2 ft 7 in) 248086
1.8 m (5 ft 10 in) 248090
Optional Accessories
Mounting kit for pole mast For 60 mm (2.36 in) pole APPKP60-SET1/2
For 75 mm (2.95 in) pole APPKP75-SET1/2
For 86 mm (3.39 in) pole APPKP86-SET1/2
For 100 mm (3.94 in) pole APPKP100-SET1/2
Sensor cable, M12/8(F)-M12/8(F) for
WXT536
5 m (16 ft 5 in) 248091
Service cable kit, including adapter,
cable, power supply, and USB-RS-232
converter
- 253163SET
2.2 Safety
This product has been tested for safety. Note the following precautions:
Do not substitute parts or modify the system, or install
unsuitable parts in the system. Improper modification can damage the product
or lead to malfunction.
WARNING!
Do not perform installation or maintenance procedures when
there is a risk of thunderstorm or lightning activity in the area.
WARNING!
Follow the risk assessments you have carried out for the
installation work. To ensure safety, make sure that all work is organized and
planned, and carried out by competent persons.
WARNING!
Follow local and state legislation and regulations on occupational
safety.
WARNING!
MOG100 User Guide M211951EN-D
6

Failure to comply with these precautions or with specific
warnings elsewhere in these instructions violates safety standards of design,
manufacture, and intended use of the product. Vaisala assumes no liability for
the customer's failure to comply with these requirements.
WARNING!
If the equipment is used in a manner not specified by Vaisala, the
protection provided by the equipment may be impaired.
WARNING!
2.2.1 ESD Protection
Electrostatic Discharge (ESD) can damage electronic circuits. Vaisala products are adequately
protected against ESD for their intended use. However, it is possible to damage the product by
delivering electrostatic discharges when touching, removing, or inserting any objects in the
equipment housing.
To avoid delivering high static voltages to the product:
• Handle ESD-sensitive components on a properly grounded and protected ESD workbench
or by grounding yourself to the equipment chassis with a wrist strap and a resistive
connection cord.
• If you are unable to take either precaution, touch a conductive part of the equipment
chassis with your other hand before touching ESD-sensitive components.
• Hold component boards by the edges and avoid touching component contacts.
2.3
Regulatory Compliances
2.3.1 Applicable European Directives
The device is in conformity with the following EC directives:
• RoHS Directive 2011/65/EU
• EMC Directive 2014/30/EU
• RE Directive 2014/53/EU(*)
* When applicable, the product conforms to the corresponding RED articles:
RF spectrum eciently, Article 3 (2); EMC, Article 3 (1b); Safety, Article 3 (1a)
This product complies with the following test standards:
• EN 301489-1
• EN 55032 Class B / CISPR 32
• EN 61010-1
Chapter 2 – Product Overview
7

Compliance with the following test standards is derived from Telit HE910 cellular module's
declaration of conformity:
• EN 62311:2008
• EN 301 489-1 V2.1.1, Draft EN 301 489-52 V1.1.0
• Final draft EN 301 489-3 V2.1.1
• EN 300 440 V2.1.1 / EN 301 511 V12.5.1
• EN 301 908-1 V11.1.1 / EN 301 908-2 V11.1.1
To comply with RE directive one must use only the antenna provided with the product
package.
2.3.2 FCC Compliance
This product contains a transmitter module FCC ID RI7HE910.
MOG100 complies with FCC Chapter 47 Part 15, 22H, and 24E. Operating is subject to the
following two conditions:
• This device may not cause harmful interference, and
• This device must accept any interference received, including interference that may cause
undesired operation.
This equipment has been tested and found to comply with the limits for a Class B
digital device, pursuant to part 15 of the FCC Rules. These limits are designed to
provide reasonable protection against harmful interference in a residential
installation. This equipment generates, uses and can radiate radio frequency
energy and, if not installed and used in accordance with the instructions, may
cause harmful interference to radio communications. However, there is no
guarantee that interference will not occur in a particular installation. If this
equipment does cause harmful interference to radio or television reception, which
can be determined by turning the equipment o and on, the user is encouraged
to try to correct the interference by one or more of the following measures:
• Reorient or relocate the receiving antenna.
• Increase the separation between the equipment and receiver.
• Connect the equipment into an outlet on a circuit dierent from that to which
the receiver is connected.
• Consult the dealer or an experienced radio/TV technician for help.
2.3.3 Ocial Modem Identification
This product contains part identified as follows by national authorities:
• FCC ID: RI7HE910
• IC ID: 5131A-HE910
• GITEKI (MIC) ID: 005-100269
• JATE ID: AD12-0318001
MOG100 User Guide M211951EN-D
8

3. Overview to Configuration and
Installation
First set up MOG100 configuration and verify that it is sending data. Next, install MOG100 to
the selected location.
In configuring MOG100 you need:
• Laptop computer
• Mobile phone or another device for unlocking SIM
• Mobile subscription from service provider, including SIM card
• T10 Torx key
In installing MOG100 you need:
• 5‑mm Allen key
• T10 Torx key
• Crosshead screwdriver
Chapter 3 – Overview to Configuration and Installation
9

4. Configuration
4.1 Installing SIM Card
• Mobile phone or another device for unlocking SIM
• Mobile subscription from service provider, including SIM card
• T10 Torx key
To enable wireless communication, install the SIM card in MOG100.
1. Insert the SIM card in a mobile phone or a similar device and disable the PIN code query
(SIM card lock). Remove the SIM card from the phone.
2. Remove the 6 screws that hold the cover of MOG100.
3. To unlock the SIM card holder, push and lift it.
4. Insert the SIM card on the device with the chip facing down.
5. To lock the SIM in place, turn the SIM card holder down and push to locking position.
6. Reattach the cover and tighten the 6 screws.
MOG100 User Guide M211951EN-D
10

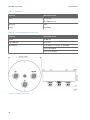
7. Connect the GSM antenna to the antenna connector in the middle.
Figure 1 MOG100 Connectors
1 M12 connector for WXT530
2 M12 connector for AQT400
3 SMA connector for GSM antenna
4 M12 connector for power and
maintenance
4.2 Installing AQ Tool
You need a computer with one of the following operating systems:
• Microsoft Windows 7
• Microsoft Windows 8
• Microsoft Windows 10
With AQ Tool, you can configure where AQT400 sends measurement data.
1. Search www.vaisala.com downloadable files for "AQT" and save the AQ Tool installer on
your computer (AQT Configuration Tool + USB Driver).
2. Unpack the files and double-click the EXE file to start the installer. If prompted about
trusting the program, select Run.
3. Follow the onscreen instructions and accept the default installation location or select
Browse to select a dierent location.
4. To complete the installation, select Finish.
Chapter 4 – Configuration
11

4.3 Establishing Maintenance Connection
To change and check MOG100 settings, establish a maintenance connection with RS-232 and
AQ Tool.
1. Use the service cable kit to connect your computer to the PWR COMM connector in
MOG100.
Leave the protective caps on the connectors in MOG100 that you are not
going to use.
2. Connect the open-ended cables of the power source to the adapter and attach the
adapter to the DC power connector.
Wire Color
Power
Red +
Black −
Alternatively, connect your own power source directly to the DC power connector.
3. On your computer, select Start > AQ Tool.
4. To connect to the device, select Connect in AQ Tool.
AQ Tool shows the device information in Communication and Configuration.
MOG100 User Guide M211951EN-D
12

4.4 Configuring Wireless Communication
Before configuring wireless communication, make sure that you have installed the SIM card
and AQ Tool, and established a maintenance connection.
Make sure to disable the PIN code query, for example, with a mobile device.
To enable wireless connection, define the APN settings using AQ Tool.
1. In AQ Tool Configuration, set the following parameters:
Parameter Alias Description
GSM APN address gsm_apn Access point name (APN) supplied by the
SIM card provider.
GSM username gsm_username Username supplied by the SIM card
provider. If not supplied, leave empty.
GSM password gsm_password Password supplied by the SIM card
provider. If not supplied, leave empty.
2. To save the edited parameters in AQ Tool, select Write to eeprom.
3. Connect power and wait for 15 ... 30 minutes for the device to start sending data to
Beacon Cloud. The device starts to collect data and you can view the data in Beacon
Cloud when you have registered the device.
4.5
Registering MOG100 in Beacon Cloud
Before you start the registration, make sure that MOG100 has been connected to a power
source for 15 ... 30 minutes so that the device has started to send data to Beacon Cloud.
Registering MOG100 links the device with a user account in Beacon Cloud.
1. Locate the test report that is in the product package.
2. In the test report, scan the QR code, for example, with your mobile device.
Beacon Cloud shows the service number and device key. Check that they match with the
ones in the test report.
3. If you are new to Beacon Cloud, select Create Account and give the required information.
Beacon Cloud sends an email that contains the username and password.
If you have a user account in Beacon Cloud, log in to complete the registration.
4. Alternatively, if you cannot use the QR code, go to http://beacon.vaisala.com/mobile.php.
a. Give the serial number and device key and select Next.
b. Continue from step 3.
Beacon Cloud confirms whether the registration was successful.
Chapter 4 – Configuration
13

5. In Overview in Beacon Cloud, check that MOG100 is listed and its status is Active.
If you have multiple devices, repeat the procedure using the QR code or in Beacon Cloud,
select Overview > Add Device.
Disconnect the service cable.
MOG100 User Guide M211951EN-D
14

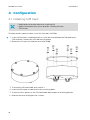
5. Installation
5.1 Installing MOG100
Install MOG100 to a dierent height and away from the air quality transmitter.
First attach the mounting bracket on a mast, sensor support arm, or wall, depending on your
choice of installation, and then attach MOG100 on the mounting bracket:
• Installing Mounting Bracket on 60 ... 100‑mm Mast (page 16)
• Installing Mounting Bracket on Sensor Support Arm or 35 ... 40‑mm Mast (page 16)
• Installing Mounting Bracket on Wall (page 18)
• Installing MOG100 on Mounting Bracket (page 18)
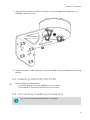
Figure 2 MOG100 Installation Options
Chapter 5 – Installation
15

5.1.1 Installing Mounting Bracket on 60 ... 100‑mm Mast
• 5‑mm Allen key
For optimum installation, the material of the tube or mast is a minimum of 3 mm
(0.12 in) thick and the outside diameter of the tube or mast is 60 … 100 mm
(2.36 ... 3.94 in).
For masts with a diameter of 60 ... 100 mm (2.36 ... 3.94 in), use the APPKP mounting kit. The
options are:
• APPKP60-SET1/2: Ø 60 mm (2.36 in) pole mast
• APPKP75-SET1/2: Ø 75 mm (2.95 in) pole mast
• APPKP86-SET1/2: Ø 86 mm (3.39 in) pole mast
• APPKP100-SET1/2: Ø 100 mm (3.94 in) pole mast
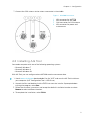
1. Attach the mounting bracket to the clamp and mount the assembly on the mast.
1 Mounting bracket
2 Clamp
3 Nut DIN985 M6 (2 pcs)
4 Washer DIN125 M6 (4 pcs)
5 Spring washer DIN127 M6 (2 pcs)
6 Hex screw DIN912 M6×16 (2 pcs)
7 Nut DIN929 M6 (2 pcs)
8 Spring washer DIN127 M6 (2 pcs)
9 Hex screw DIN912 M6×25 (2 pcs)
5.1.2 Installing Mounting Bracket on Sensor Support Arm or
35 ... 40‑mm Mast
• 5‑mm Allen key
MOG100 User Guide M211951EN-D
16

For optimum installation, the material of the tube or mast is a minimum of 3 mm
(0.12 in) thick and the outside diameter of the tube or mast is 35 … 40 mm
(1.38 ... 1.57 in).
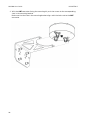
1. Attach the mounting bracket on a sensor support arm or mast.
1 Sockethead hex screw M6×60 DIN912 A4 (4 pcs)
2 Flat washer A6,4 DIN125 A4 (4 pcs)
3 Clamp plate
4 Mounting bracket
5 Sensor support arm
Chapter 5 – Installation
17

5.1.3 Installing Mounting Bracket on Wall
• Screws (2 pcs), suitable for the wall material
• Screwdriver
1. Drill holes into the wall. Use the mounting bracket as a guide.
1 Hole for wall mounting (2 pcs)
2 Mounting bracket
2. Attach the mounting bracket on a wall.
Use wall plugs if necessary, and screws that are suitable for the wall material.
5.1.4 Installing MOG100 on Mounting Bracket
• Crosshead screwdriver
MOG100 User Guide M211951EN-D
18
Pagina se încarcă...
Pagina se încarcă...
Pagina se încarcă...
Pagina se încarcă...
Pagina se încarcă...
Pagina se încarcă...
Pagina se încarcă...
Pagina se încarcă...
Pagina se încarcă...
Pagina se încarcă...
Pagina se încarcă...
Pagina se încarcă...
Pagina se încarcă...
Pagina se încarcă...
-
 1
1
-
 2
2
-
 3
3
-
 4
4
-
 5
5
-
 6
6
-
 7
7
-
 8
8
-
 9
9
-
 10
10
-
 11
11
-
 12
12
-
 13
13
-
 14
14
-
 15
15
-
 16
16
-
 17
17
-
 18
18
-
 19
19
-
 20
20
-
 21
21
-
 22
22
-
 23
23
-
 24
24
-
 25
25
-
 26
26
-
 27
27
-
 28
28
-
 29
29
-
 30
30
-
 31
31
-
 32
32
-
 33
33
-
 34
34


în alte limbi
- English: Vaisala MOG100 User manual
Lucrări înrudite
Alte documente
-
DeLOCK 88488 Fișa cu date
-
TP-LINK Archer C6 Manualul utilizatorului
-
Yamaha BRK-TV2 Ghid de instalare
-
Ransomes HF600 Manualul proprietarului
-
Linksys WRK54G Manual de utilizare
-
Tetra 12V GEPS12W-60M Signage Power Supply Ghid de instalare
-
SMA Sunny Tripower CORE2 Quick Reference Manual
-
Mellanox Technologies SB7700 Manual de utilizare
-
 Serioux SRX-WR150WH Manual de utilizare
-
Asus WL500g-Deluxe Manualul proprietarului
