
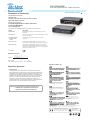
POE-GSH604ATU
4 Port PoE Gigabit RJ45 with 1 RJ45 1 SFP Switch
Quick Setup Guide
Declaration of Conformity
We, Manufacturer/Importer
Declare that the product
4 Port PoE Gigabit RJ45 with 1 RJ45 1 SFP Switch
AirLive POE-GSH604ATU
is in conformity with
In accordance with 2004/108/EC Directive and 1999/5 EC-R & TTE Directive
Clause
Manufacturer/Importer
Description
OvisLink Corp.
5F, No.6, Lane 130, Min-Chuan Rd., Hsin-Tien Dist.,
New Taipei City 231, Taiwan
■
■
■
CE marking
Signature
:
Name:Albert Yeh
Position/ Title : Vice President
EN 55032:2012
EN 55024:2010
Electromagnetic compatibility of multimedia equipment - Emission
requirements
Information technology equipment - Immunity characteristics - Limits and
methods of measurement
■
EN 61000-3-2:2014
Electromagnetic compatibility (EMC) - Part 3-2: Limits - Limits for
harmonic current emissions (equipment input current ≤ 16 A per phase)
■
EN 61000-3-3:2013 Electromagnetic compatibility (EMC) - Part 3-3: Limits - Limitation of
voltage changes, voltage fluctuations and flicker in public low-voltage
supply systems, for equipment with rated current <= 16 A per phase and
not subject to conditional connection
■
EN 60950-1:2006+A11
+A1:2010+A12:2011
+A2:2013
Information technology equipment - Safety - Part 1: General
requirements
Date:2016/09/09
Place : Republic of China (Taiwan)
HR
OvisLink Corp. izjavljuje da je ovaj uređaj u
skladu sa neophodnimpreporukama i ostalim
važnim odredbama Directive 1999/5/EC.
RO
OvisLink Corporation declara ca acest
dispozitiv este în conformitate cu cerintele
esentiale si alte prevederi relevante ale
Directivei 1999/5/EC
ID
OvisLink Corporation menyatakan bahwa
perangkat ini telah sesuai dengan persyaratan
utama dan ketentuan terkait lainnya direktif
1999/5/EC.
Directive 1999 / 5 / EC
Tested To Comply
With FCC Standards.
FOR HOME OR OFFICE USE
This equipment may be used in AT, BE, CY, CZ, DK, EE, FI, FR, DE, GR, HR, HU, ID, IE, IT,
LV, LT, LU, MT, NL, PL, PT, SK, SI, ES, SE, GB, IS, LI, NO, CH, BG, RO, TR
OvisLink Corporation declares that this device is in
compliance with the essential requirements and
other relevant provisions of directive 1999/5/EC.
Regulatory Approvals
15.105 Class A
This equipment has been tested and found to comply with the limits for a
Class A digital device, pursuant to part 15 of the FCC Rules. These limits are
designed to provide reasonable protection against harmful interference when
the equipment is operated in a commercial environment. This equipment
generates, uses, and can radiate radio frequency energy and, if not installed
and used in accordance with the instruction manual, may cause harmful
interference to radio communications. Operation of this equipment in a
residential area is likely to cause harmful interference in which case the user
will be required to correct the interference at his own expense.
Warning: This equipment is compliant with Class A of
CISPR 32. In a residential environment this
equipment may cause radio interference.

Installation Guide
Note:
Installation Step:
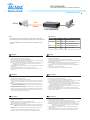
1. Remove the switch and accessories from the package.
2. Connect power to the switch. Make sure that “Power” LED is on.
3. Connect your IEEE802.3af/at compliant Power Devices (PD) to Ports 1 to 8 and the Switch will
automatically supply power through these ports (see Figure A).
Note: If you connect a legacy device that is not PoE compatible, the Switch will not deliver power
to the legacy device. This feature allows you to freely and safely mix legacy and PoE
compatible devices on your network
4. Check the “PoE” LED indicator status. When PoE device is connected and the port is supplying
power, it light on.
5. Port 5 to 6 are standard Ethernet. Connect any legacy device to these ports.
6. Check whether the “Link” light is on. If not, please make sure that power is on for the other
device or PC.
English
EN
Česky
CZ
Instalační kroky :
1. Vybalte switch a příslušenství.
2. Připojte switch k elektrické energii. Ujistěte se, že LEDka “Power” svítí.
3. Připojte Vaše IEEE802.3af/at kompatibilní zařízení k portu 1 až 8 a switch automaticky začne
napájet elektrickou energií (obr. A).
Důležité: Když připojíte zařízení, které nepodporuje PoE, switch nebude posílat elektrickou
energii. Díky tomu, můžete bezpečně připojit jakékoliv síťové zařízení.
4. Zkontrolujte “PoE” LED. Když je připojeno PoE zařízení a je doručována elektrická energie,
LEDka svítí.
5. Porty 5 až 6 jsou pro standardní síťová zařízení.
6. Zkontrolujte LED “Link”. Když nesvítí, zkontrolujte připojené zařízení.
- It is recommended that you install the switch with an UPS (Un-interrupted
Power Supply) to prevent costly equipment damage and to protect power surge.
- The Quick Installation Guide can be downloaded on the website, www.air-
live.com
Power
Data
IPCam
LED Indicator Color Status Meaning
LED indicators
POWER Orange ON Power is on
LINK (Port 6) Green ON Port is for connection
LINK (Port 1-5) Green ON Port is for connection
Green Flashing Data is transmitting or receiving
PoE Orange ON Port is linked to Power Device
Português
PT
Passos de Instalação:
1. Remova o switch e os acessórios da embalagem.
2. Ligue a energia ao switch. Certifique-se que o “Power” LED está aceso.
3. Ligue os seus Dispositivos Energia (PD) compatíveis IEEE802.3af/ nas Portas 1 a 8 o Switch
irá automaticamente fornecer energia através dessas portas (ver Figura A).
Nota: Se você conectar um dispositivo antigo não compatível PoE, o Switch não irá fornecer
energia aos dispositivos antigos. Esta característica permite-lhe misturar livremente e em
segurança dispositivos antigos e compatíveis PoE na sua rede
4. Verifique o estado do indicador LED do “PoE”. Quando o dispositivo PoE está conectado e a
porta está fornecendo energia, ele acende.
5. Portas 5 a 6 são standard Ethernet. Conecte qualquer dispositivo antigo nessas portas.
6. Verifique se a luz do “Link” está acesa. Se não, certifique-se por favor se o power está aceso
para os outros dispositivos ou PC.
Español
ES
Pasos de instalación:
1. Sacar de la caja el switch y los accesorios.
2. Conectar la corriente. “Power” LED debe estar encendido.
3. Conectar el IEEE802.3af/at compatible con los dispositivos de corriente (Power Devices, PD) a
los puertos 1 a 8 y el switch automáticamente proveerá energía por medio de estos puertos
(Figura A).
Nota: Si conecta un dispositivo legacy que no es compatible con PoE, el Switch no enviará
corriente. Esta característica le permite libremente y seguramente mezclar los dispositivos
legacy y PoE en su conexión de red.
4. Para verificar el estado del “PoE” LED. Cuando el dispositivo PoE está conectado y el puerto
está proporcionando corriente, se iluminará.
5. Puerto 5 a 6 son conexiones Ethernet estándar, conectar dispositivos legacy a estos puertos.
6. Para verificar el estado del “Link” debe estar encendida. Si no, favor de asegurarse de que la
corriente esté encendido para otros dispositivos o PC.
Slovensky
SK
Postup inštalácie:
1. Vyberte zariadenie a príslušenstvo z balenia.
2. Pripojte napájanie k prepínaču a uistite sa, že LED kontrolka „Power“ svieti.
3. Pripojte napájané zariadenia, ktoré spĺňajú štandard IEEE802.3af do portov 1 až 8 a prepínač
ich bude cez tieto porty automaticky napájať elektrickou energiou (viď obrázok A).
Poznámka: Ak pripojíte zariadenie, ktoré nie je kompatibilné s PoE, tak ho prepínač nebude
napájať. Táto funkcia vám dovoľuje voľne a bezpečne mixovať v sieti zariadenia,
ktoré sú aj nie sú kompatibilné s PoE.
4. LED kontrolka „PoE“ svieti, keď je do portu zapojené PoE zariadenie a port ho napája
elektrickou energiou.
5. Porty 5 až 6 sú štandardné sieťové porty. Pripojte do nich akékoľvek sieťové zariadenie.
6. Kontrolka „Link“ by mala svietiť. Ak nie, uistite sa, že pripojené zariadenie je zapnuté.
Hrvatska
HR
Instalacijski koraci:
1. Izvadite switch i pribor iz pakiranja.
2. Priključite switch na mrežni napon. Provjerite da “Power” LED svijetli.
3. Spojite vaše IEEE802.3af/at sukladne napojne uređaje (PD) na Portove 1 do 8 i switch će ih
atomatski napajati kroz te portove( vidi sliku A).
Napomena: Ako spojite stariji uređaj koji nije PoE kompatibilan, switch ga neće napajati. Na taj
način možete slobodno miješati starije uređaje i PoE kompatibilne uređaje na vašoj
mreži
4. Provjerite status “PoE” LED indikatora. Kad je PoE uređaj priključen i port ga napaja, LED
svijetli
5. Portovi 5 do 6 su standardni Ethernet. Priključite bilo koji stariji uređaj na te portove.
6. Provjerite ako “Link” LED svjetli Ako ne, provjerite da li su drugi uređaji i PC uključeni.
POE-GSH604ATU
POE-GSH604ATU
4 Port PoE Gigabit RJ45 with 1 RJ45 1 SFP Switch
-
 1
1
-
 2
2


Air Live POE-GSH604ATU Quick Setup Manual
- Tip
- Quick Setup Manual
- Acest manual este potrivit și pentru
în alte limbi
- English: Air Live POE-GSH604ATU
- slovenčina: Air Live POE-GSH604ATU
- español: Air Live POE-GSH604ATU
Lucrări înrudite
Alte documente
-
Tenda TEF1126P-24-410W Ghid de instalare
-
Ubiquiti US-16-150W Ghid de inițiere rapidă
-
-
-
-
Ubiquiti Edge Point EP-R8 Ghid de inițiere rapidă
-
-
Ubiquiti ES-24-250W Ghid de inițiere rapidă
-
-
AirLive WN-370USB Quick Setup Manual