
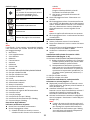
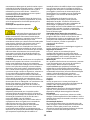
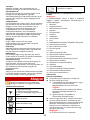
0
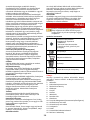
Wildlife Camera
Quick Start Guide
User Manual


2
A
A1
45
7
9
8
6
1
2
3
10
13
11 12
A2
45
7
9
8
2
1
3
10 13
11

3
A3
45
1
2
8
6
3
9
10
11
12
13
7
A4
21
22
45
1
2
8
6
3
9
20
10
11
12
13
7

4
14 15 16
19
18
17 3*
DC12VIN
25*
23*
24*
B

5
B1
B2
B2.1
11 12*
MicroSIM*MicroSD
10

6
B2.2
10
11
12
7
MicroSIMMicroSD
B3
①
②

7
C
C1*
C2

8
OFF ON
C4
OFF ON
C3

9
C3 (For A3 and A4 Type)
DC12VIN
C4
①
②

10
D
-45°~45°
30°~ 90°
21
22
20

11
E
E1
1600 mm (62.99 in.)
Ø95~450 mm (3.7~17.7 in.)

12
E2
1/4 UNC Screw
F

13
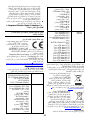
English
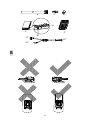
Product appearance is for reference only
and may differ from the actual product.
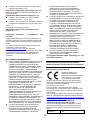
Symbols and Marks
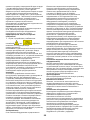
i. Not necessarily included accessory.
ii. Variable accessory amount.
iii. Skip this step if not required.
Other situations
Purchase separately
Disposal
Turn to page A and continue.
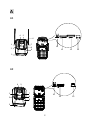
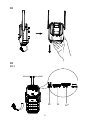
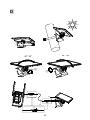
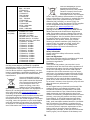
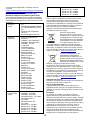
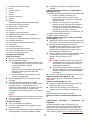
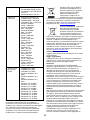
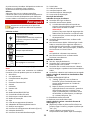
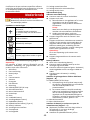
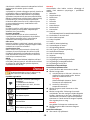
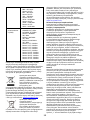
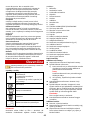
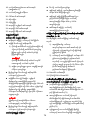
Interface and Parts Description (Page 2 – A)
Note:
The interface or cable varies with the models.
Please refer to the product datasheet for details.
1. Microphone
2. Supplement Light
3. Battery Compartment
4. Lens
5. Photoresistance
6. Antenna
7. Indicator
8. PIR Detector
9. Case
10. DEBUG/RESET/SETUP Button
11. MicroSD Card Slot
12. Micro SIM Card Slot
13. Dialing Button
14. Strap
15. Battery Charging Cable
16. Battery Power Adapter
17. Chargeable Battery
18. Battery Charging Interface (Type-C)
19. Battery Indicator
20. Power Input Interface
21. Solar Panel
22. Extension Cable
23. Debug Network Interface
24. Debug Power Interface
25. Debug Serial Port
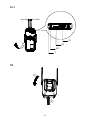
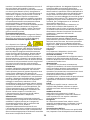
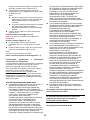
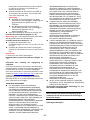
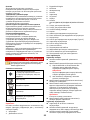
Indicator Description
Camera Body Indicator:
Solid red: Power up the camera.
Fast-flashing red:
1) MicroSD card is not inserted or microSD
card exception occurs. You can try to
format the card.
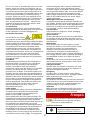
Caution:
Back up the data first before formatting the
microSD card.
2) Other exceptions, such as temperature
sensor exception.
Slow-flashing red: The camera is not activated.
Fast-flashing blue: Connecting to network failed.
It might be caused by the following reasons:
SIM card is not inserted, SIM card does not
connect to network, dialing failed, the camera
is dialing, or the signal strength is weak.
Note:
This applies to the camera with antennas.
Slow-flashing blue: The camera works normally.
Battery Indicator:
No light: Battery exception.
Solid red: The battery is charging and the power
is within 80%.
Solid red and flashing green: The battery is
charging and the power is 80% to 100%.
Solid green: The battery is fully charged.
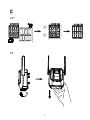
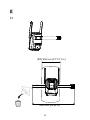
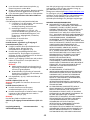
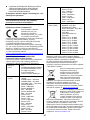
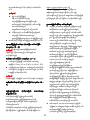
Install the Memory Card or Micro SIM Card (Page 4
– B)
10: DEBUG/RESET/SETUP Button
1) Debug: When the camera is running, press
this button to switch standby mode or
performance mode.
2) Reset the camera: Press reset button for
about 10 s when the camera is powering on
or rebooting to restore the default settings,
including the user name, password, IP
address, port No., etc.
11: MicroSD Card Slot
12: Micro SIM Card Slot
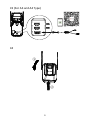
Install the Battery and Activate and Access Network
Camera (Page 7 – C)
(Optional) Install the dry cells to the lower row
first. Prepare 10 AA size dry cells first. (C1)
Install the chargeable battery or dry cell
compartment. After installation, switch the
dialing button to ON to power on the camera
with battery. (C2)
Activate and access the camera by connecting the
cable to the computer. Scan the QR code for details.
(C3)
Note:
The cable and the serial port are only for
debugging. Refer to datasheet for details
about the interface requirement.
The debug power interface is used for
debugging only when the device is not on
battery power.
Close the top cover and press the snap. (C4).
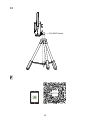
Install the Solar Panel (Page 10– D)
Note: This applies to the camera supplied with solar
panel.
Install the Camera (Page 11 – E)

14
Install the camera with strap. Installation height:
0.5 m to 1.5 m (1.6 ft. to 4.9 ft.). (E1)
Install the camera with tripod. Fix the camera
on the tripod with a 1/4 UNC screw. (E2)
Note:
You need to purchase a tripod first.
Activate and Access Network Camera (Page 12 – F)
Regulatory Compliance and Safety Information
Read all information and instructions in this
document carefully before using the device and
keep it for further reference.
For more device information and instructions, please
visit our website at https://www.hikvision.com. You
can also refer to other documents (if any)
accompanying the device or scan the QR code (if any)
on the packaging to get more information.
About this Document
This Document includes instructions for using
and managing the Product. Pictures, charts,
images and all other information hereinafter
are for description and explanation only.
The information contained in the Document is
subject to change, without notice, due to
firmware updates or other reasons. Please find
the latest version of the Document at the
Hikvision website (https://www.hikvision.com).
Unless otherwise agreed, Hangzhou Hikvision
Digital Technology Co., Ltd. or its affiliates
(hereinafter referred to as "Hikvision") makes
no warranties, express or implied.
Please use the Document with the guidance
and assistance of professionals trained in
supporting the Product.
About this Product
This product can only enjoy the after-sales service
support in the country or region where the
purchase is made.
Acknowledgment of Intellectual Property Rights
Hikvision owns the copyrights and/or patents
related to the technology embodied in the
Products described in this Document, which
may include licenses obtained from third
parties.
Any part of the Document, including text,
pictures, graphics, etc., belongs to Hikvision. No
part of this Document may be excerpted,
copied, translated, or modified in whole or in
part by any means without written permission.
and other Hikvision’s trademarks
and logos are the properties of Hikvision in
various jurisdictions.
Other trademarks and logos mentioned are the
properties of their respective owners.
LEGAL DISCLAIMER
TO THE MAXIMUM EXTENT PERMITTED BY
APPLICABLE LAW, THIS DOCUMENT AND THE
PRODUCT DESCRIBED, WITH ITS HARDWARE,
SOFTWARE AND FIRMWARE, ARE PROVIDED
"AS IS" AND "WITH ALL FAULTS AND ERRORS".
HIKVISION MAKES NO WARRANTIES, EXPRESS
OR IMPLIED, INCLUDING WITHOUT LIMITATION,
MERCHANTABILITY, SATISFACTORY QUALITY,
OR FITNESS FOR A PARTICULAR PURPOSE. THE
USE OF THE PRODUCT BY YOU IS AT YOUR OWN
RISK. IN NO EVENT WILL HIKVISION BE LIABLE
TO YOU FOR ANY SPECIAL, CONSEQUENTIAL,
INCIDENTAL, OR INDIRECT DAMAGES,
INCLUDING, AMONG OTHERS, DAMAGES FOR
LOSS OF BUSINESS PROFITS, BUSINESS
INTERRUPTION, OR LOSS OF DATA,
CORRUPTION OF SYSTEMS, OR LOSS OF
DOCUMENTATION, WHETHER BASED ON
BREACH OF CONTRACT, TORT (INCLUDING
NEGLIGENCE), PRODUCT LIABILITY, OR
OTHERWISE, IN CONNECTION WITH THE USE
OF THE PRODUCT, EVEN IF HIKVISION HAS
BEEN ADVISED OF THE POSSIBILITY OF SUCH
DAMAGES OR LOSS.
YOU ACKNOWLEDGE THAT THE NATURE OF THE
INTERNET PROVIDES FOR INHERENT SECURITY
RISKS, AND HIKVISION SHALL NOT TAKE ANY
RESPONSIBILITIES FOR ABNORMAL OPERATION,
PRIVACY LEAKAGE OR OTHER DAMAGES
RESULTING FROM CYBER-ATTACK, HACKER
ATTACK, VIRUS INFECTION, OR OTHER
INTERNET SECURITY RISKS; HOWEVER,
HIKVISION WILL PROVIDE TIMELY TECHNICAL
SUPPORT IF REQUIRED.
YOU AGREE TO USE THIS PRODUCT IN
COMPLIANCE WITH ALL APPLICABLE LAWS,
AND YOU ARE SOLELY RESPONSIBLE FOR
ENSURING THAT YOUR USE CONFORMS TO THE
APPLICABLE LAW. ESPECIALLY, YOU ARE
RESPONSIBLE, FOR USING THIS PRODUCT IN A
MANNER THAT DOES NOT INFRINGE ON THE
RIGHTS OF THIRD PARTIES, INCLUDING
WITHOUT LIMITATION, RIGHTS OF PUBLICITY,
INTELLECTUAL PROPERTY RIGHTS, OR DATA
PROTECTION AND OTHER PRIVACY RIGHTS.
YOU SHALL NOT USE THIS PRODUCT FOR ANY
PROHIBITED END-USES, INCLUDING THE
DEVELOPMENT OR PRODUCTION OF WEAPONS
OF MASS DESTRUCTION, THE DEVELOPMENT
OR PRODUCTION OF CHEMICAL OR BIOLOGICAL
WEAPONS, ANY ACTIVITIES IN THE CONTEXT
RELATED TO ANY NUCLEAR EXPLOSIVE OR
UNSAFE NUCLEAR FUEL-CYCLE, OR IN SUPPORT
OF HUMAN RIGHTS ABUSES.
IN THE EVENT OF ANY CONFLICTS BETWEEN
THIS DOCUMENT AND THE APPLICABLE LAW,
THE LATTER PREVAILS.
© Hangzhou Hikvision Digital Technology Co., Ltd.
All rights reserved.
These clauses apply only to the products bearing
the corresponding mark or information.
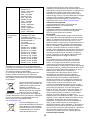
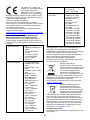
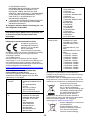
EU/UK Compliance Statement

15
This product and - if applicable
- the supplied accessories too
are marked with "CE" and
comply therefore with the
applicable harmonized
European standards listed under the Directive
2014/30/EU (EMCD), Directive 2014/35/EU (LVD),
Directive 2011/65/EU (RoHS).
This product and - if applicable
- the supplied accessories too
are marked with "UKCA" and
comply therefore with the
following directives:
Electromagnetic Compatibility
Regulations 2016, Electrical
Equipment (Safety) Regulations 2016, the
Restriction of the Use of Certain Hazardous
Substances in Electrical and Electronic Equipment
Regulations 2012, wireless device: Radio Equipment
Regulations 2017.
*For wireless device:
Hereby, Hangzhou Hikvision Digital Technology Co.,
Ltd. declares that this device (refer to the label) is in
compliance with Directive 2014/53/EU.
The full text of the EU declaration of conformity is
available at the following internet address:
https://www.hikvision.com/en/support/compliance/d
eclaration-of-conformity.
EXPOSURE TO RADIO FREQUENCY RF
Frequency Bands and Power (for CE/UKCA)
The frequency bands and transmitting power
(radiated and/or conducted) nominal limits
applicable to the following radio equipment are as
follows:
Band and
Mode
2G:
GSM850/GSM900/DCS1800
3G: WCDMA Band I/V/VIII
4G: FDD-LTE
Band1/3/5/7/8/20/28
TDD-LTE Band38/40/41
Frequency
Range
Tx Frequency Range:
GSM850: 824 – 849 MHz
GSM900: 880 – 915 MHz
DCS1800: 1710 – 1785 MHz
WCDMA Band I:
1920 – 1980 MHz
WCDMA Band V:
824 – 849 MHz
WCDMA Band VIII:
880 – 915 MHz
LTE Band 1:
1920 – 1980 MHz
LTE Band 3:
1710 – 1785 MHz
LTE Band 5: 824 – 849 MHz
LTE Band 7:
2500 – 2570 MHz
LTE Band 8: 880 – 915 MHz
LTE Band 20:
832 – 862 MHz
LTE Band 28:
703 – 748 MHz
LTE Band 38:
2570 – 2620 MHz
LTE Band 40:
2300 – 2400 MHz
LTE Band 41:
2555 – 2655 MHz
Power
Transmission
(EIRP)
GSM850: 33.5 dBm
GSM900: 33.5 dBm
DCS1800: 32.5 dBm
WCDMA Band I: 26.5 dBm
WCDMA Band V: 24.5 dBm
WCDMA Band VIII: 24.5
dBm
LTE Band 1: 26 dBm
LTE Band 3: 26 dBm
LTE Band 5: 24 dBm
LTE Band 7: 26 dBm
LTE Band 8: 24 dBm
LTE Band 20: 24 dBm
LTE Band 28: 24 dBm
LTE Band 38: 26 dBm
LTE Band 40: 26 dBm
LTE Band 41: 26 dBm
Frequency Bands and Power (for device model
name containing LA)
The frequency bands and transmitting power
(radiated and/or conducted) nominal limits
applicable to the following radio equipment are as
follows:
Band and
Mode
2G:
GSM850/GSM900/DCS1800/D
CS1900
3G: WCDMA Band
1/2/3/4/5/8
4G: FDD-LTE
Band1/3/5/7/8/20/28
TDD-LTE Band38/40
Frequency
Range
Tx Frequency Range:
GSM850: 824 – 849 MHz
GSM900: 880 – 915 MHz
DCS1800: 1710 – 1785 MHz
DCS1900: 1850 – 1910 MHz
WCDMA Band 1:
1920 – 1980 MHz
WCDMA Band 2:
1850 – 1910 MHz
WCDMA Band 3:
1710 - 1785 MHz
WCDMA Band 4:
1710-1755 MHz
WCDMA Band 5:
824 – 849 MHz
WCDMA Band 8:
880 – 915 MHz
LTE Band 1:
1920 – 1980 MHz
LTE Band 2:
1850-1910 MHz
LTE Band 3:
1710 – 1785 MHz
LTE Band 4:
1710-1755 MHz
LTE Band 5:
824 – 849 MHz
LTE Band 7:
2500 – 2570 MHz

16
LTE Band 8:
880 – 915 MHz
LTE Band 12:
699 – 716 MHz
LTE Band 17:
704-716 MHz
LTE Band 28:
703 – 748 MHz
LTE Band 66:
1710 – 1780 MHz
LTE Band 38:
2570 – 2620 MHz
LTE Band 40:
2300 – 2400 MHz
Power
Transmissi
on (EIRP)
GSM850: 33.5 dBm
GSM900: 33.5 dBm
DCS1800: 32.5 dBm
DCS1900: 32.5 dBm
WCDMA Band I: 26.5 dBm
WCDMA Band V: 24.5 dBm
WCDMA Band VIII: 24.5 dBm
LTE Band 1: 26 dBm
LTE Band 2: 26 dBm
LTE Band 3: 26 dBm
LTE Band 4: 26 dBm
LTE Band 5: 24 dBm
LTE Band 7: 26 dBm
LTE Band 8: 24 dBm
LTE Band 12: 24 dBm
LTE Band 17: 24 dBm
LTE Band 28: 24 dBm
LTE Band 66: 26 dBm
LTE Band 38: 26 dBm
LTE Band 40: 26 dBm
For the device without a supplied power adapter,
use the power adapter provided by a qualified
manufacturer. Refer to the product specification for
detailed power requirements.
For the device without a supplied battery, use the
battery provided by a qualified manufacturer. Refer
to the product specification for detailed battery
requirements.
Directive 2012/19/EU (WEEE
Directive): Products marked with
this symbol cannot be disposed
of as unsorted municipal waste
in the European Union. For
proper recycling, return this
product to your local supplier
upon the purchase of equivalent new equipment, or
dispose of it at designated collection points. For
more information see: www.recyclethis.info.
According to the Waste Electrical and Electronic
Equipment Regulations 2013: Products marked with
this symbol cannot be disposed of as unsorted
municipal waste in the United Kingdom. For proper
recycling, return this product to your local supplier
upon the purchase of equivalent new equipment,
or dispose of it at designated collection points. For
more information see: www.recyclethis.info.
Directive 2006/66/EC and its
amendment 2013/56/EU
(Battery Directive): This product
contains a battery that cannot
be disposed of as unsorted
municipal waste in the European
Union. See the product documentation for specific
battery information. The battery is marked with this
symbol, which may include lettering to indicate
cadmium (Cd), lead (Pb), or mercury (Hg). For
proper recycling, return the battery to your supplier
or to a designated collection point. For more
information see: www.recyclethis.info.
According to the Batteries and Accumulators
(Placing on the Market) Regulations 2008 and the
Waste Batteries and Accumulators Regulations
2009: This product contains a battery that cannot
be disposed of as unsorted municipal waste in the
United Kingdom. See the product documentation
for specific battery information. The battery is
marked with this symbol, which may include
lettering to indicate cadmium (Cd), lead (Pb), or
mercury (Hg). For proper recycling, return the
battery to your supplier or to a designated
collection point. For more information see:
www.recyclethis.info.
Safety Information
Please read all the safety information carefully
before using.
Laws and Regulations
The device should be used in compliance with local
laws, electrical safety regulations, and fire
prevention regulations.
Electricity
In the use of the product, you must be in strict
compliance with the electrical safety regulations of
the nation and region. Provide a surge suppressor
at the inlet opening of the device under special
conditions such as the mountain top, iron tower,
and forest. For the device powered on and off only
by power plug and socket-outlet, the socket-outlet
shall be installed near the device and easily
accessible. Do not touch the bare components
(such as the metal contacts of the inlets) and wait
for at least 5 minutes, since electricity may still exist
after the device is powered off.
Battery
Do not ingest battery. Chemical burn hazard! This
product contains a coin/button cell battery. If the
coin/button cell battery is swallowed, it can cause
severe internal burns in just 2 hours and can lead to
death. Keep new and used batteries away from
children. If the battery compartment does not close
securely, stop using the product and keep it away
from children. If you think batteries might have
been swallowed or placed inside any part of the
body, seek immediate medical attention. CAUTION:
Risk of explosion if the battery is replaced by an
incorrect type. Dispose of used batteries according
to the instructions. Improper replacement of the
battery with an incorrect type may defeat a
safeguard (for example, in the case of some lithium
battery types). Do not dispose of the battery into

17
fire or a hot oven, or mechanically crush or cut the
battery, which may result in an explosion. Do not
leave the battery in an extremely high temperature
surrounding environment, which may result in an
explosion or the leakage of flammable liquid or gas.
Do not subject the battery to extremely low air
pressure, which may result in an explosion or the
leakage of flammable liquid or gas. + identifies the
positive terminal(s) of equipment which is used
with, or generates direct current. - identifies the
negative terminal(s) of equipment which is used
with, or generates direct current.
Fire Prevention
No naked flame sources, such as lighted candles,
should be placed on the equipment. The serial port
of the equipment is used for debugging only.
Hot Surface Prevention
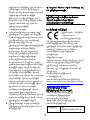
For the device with sticker or ,
pay attention to the following cautions:
CAUTION: Hot parts! Burned fingers when handling
the parts. Wait one-half hour after switching off
before handling parts. This sticker is to indicate that
the marked item can be hot and should not be
touched without taking care. For device with this
sticker, this device is intended for installation in a
restricted access location, access can only be gained
by service persons or by users who have been
instructed about the reasons for the restrictions
applied to the location and about any precautions
that shall be taken.
Installation
Install the device according to the instructions in
Quick Start Guide. To prevent injury, this device
must be securely attached to the installation
surface in accordance with the installation
instructions. Never place the device in an unstable
location. The device may fall, causing serious
personal injury or death. If the device needs to be
wired by yourself, select the corresponding wire to
supply power according to the electric parameters
labeled on the device. Strip off wire with a standard
wire stripper at corresponding position. To avoid
serious consequences, the length of stripped wire
shall be appropriate, and conductors shall not be
exposed. Make sure that the power has been
disconnected before you wire, install, or
disassemble the device.
Power Supply
Device powered by Safety Extra-Low Voltage(SELV):
The power source should meet limited power
source or PS2 requirements according to IEC
60950-1 or IEC 62368-1 standard.
Device powered by AC mains supply voltage: The
equipment must be connected to an earthed mains
socket-outlet. An appropriate readily accessible
disconnect device shall be incorporated external to
the equipment. An appropriate overcurrent
protective device shall be incorporated external to
the equipment, not exceeding the specification of
the building. An all-pole mains switch shall be
incorporated in the electrical installation of the
building. Ensure correct wiring of the terminals for
connection to an AC mains supply. The equipment
has been designed, when required, modified for
connection to an IT power distribution system.
If a power adapter is provided in the device package,
use the provided adapter only. If no power adapter
is provided, ensure the power adapter or other
power supply complies with Limited Power Source.
Refer to the product label for the power supply
output parameters.
White Light Illuminator (If supported)
Possibly hazardous optical radiation emitted from
this product. DO NOT stare at operating light source.
May be harmful to the eyes. Wear appropriate eye
protection or DO NOT turn on the white light when
you assemble, install or maintain the camera.
Transportation
Keep the device in original or similar packaging
while transporting it.
System Security
Please understand that you have the responsibility
to configure all the passwords and other security
settings about the device, and keep your user name
and password.
Maintenance
If the product does not work properly, please
contact your dealer or the nearest service center.
We shall not assume any responsibility for
problems caused by unauthorized repair or
maintenance. A few device components (e.g.,
electrolytic capacitor) require regular replacement.
The average lifespan varies, so periodic checking is
recommended. Contact your dealer for details.
Cleaning
Please use a soft and dry cloth when clean inside
and outside surfaces of the product cover. Do not
use alkaline detergents.
Using Environment
DO NOT place the camera in extremely hot, cold,
dusty or damp locations, and do not expose it to
high electromagnetic radiation.
Emergency
If smoke, odor, or noise arises from the device,
immediately turn off the power, unplug the power
cable, and contact the service center.
Time Synchronization
Set up device time manually for the first time access
if the local time is not synchronized with that of the
network. Visit the device via Web browse/client
software and go to time settings interface.
Reflection
Make sure that no reflective surface is too close to
the device lens. The IR light from the device may
reflect back into the lens causing reflection.
Français
L’image du produit est donnée uniquement à
titre de référence et le produit réel peut
présenter un aspect différent.
Symboles et marques
i. Accessoire non forcément inclus.
ii. Nombre variable d’accessoires.
iii. Ignorez cette étape si elle n’est

18
pas nécessaire.
Autres situations
À acheter séparément
Mise au rebut
Passez à la page A et continuez.
Interface et description des pièces (page 2 – A)
Remarque :
L’interface ou le câble varie selon les modèles.
Veuillez vous référer à la fiche technique du produit
pour plus de détails.
1. Microphone
2. Éclairage supplémentaire
3. Compartiment à pile
4. Objectif
5. Photorésistance
6. Antenne
7. Indicateur
8. Détecteur PIR
9. Boîtier
10. Bouton de
DÉBOGAGE/RÉINITIALISATION/CONFIGURATIO
N
11. Logement de carte microSD
12. Logement de la carte micro SIM
13. Bouton de numérotation
14. Sangle
15. Câble de charge de la batterie
16. Adaptateur d’alimentation de la batterie
17. Batterie rechargeable
18. Interface de charge de la batterie (type C)
19. Témoin de batterie
20. Interface d’entrée d’alimentation
21. Panneau solaire
22. Câble rallonge
23. Interface réseau pour débogage
24. Interface d’alimentation pour débogage
25. Port série pour débogage
Description de l’indicateur
Voyant du boîtier de la caméra :
Rouge fixe : mise sous tension de la caméra.
Clignotement rapide en rouge :
1) La carte microSD n’est pas insérée ou une
anomalie de carte microSD s’est produite.
Essayez de formater la carte.
Attention :
Sauvegardez d’abord les données avant de
formater la carte microSD.
2) Autres anomalies, par exemple du capteur
de température.
Clignotement lent en rouge : la caméra n’est
pas activée.
Clignotement rapide en bleu : échec de la
connexion au réseau. Cela peut être dû aux
causes suivantes : carte SIM non insérée, échec
de la connexion de la carte SIM au réseau,
échec de la numérotation, numérotation de la
caméra en cours ou puissance du signal faible.
Remarque :
Cela s’applique à la caméra avec antennes.
Clignotement lent en bleu : la caméra
fonctionne normalement.
Témoin de batterie :
Aucun voyant : anomalie de batterie.
Rouge fixe : la charge de la batterie est en cours
et le niveau d’énergie est inférieur à 80 %.
Rouge fixe et clignotement en vert : la charge
de la batterie est en cours et le niveau
d’énergie est compris entre 80 % et 100 %.
Vert fixe : la batterie est entièrement chargée.
Installation de la carte mémoire ou de la carte
micro SIM (page 4 – B)
10 : Bouton de
DÉBOGAGE/RÉINITIALISATION/CONFIGURATION
1) Débogage : la caméra en cours de
fonctionnement, appuyez sur ce bouton
pour commuter entre le mode veille et le
mode fonctionnement.
2) Réinitialiser la caméra : Appuyez sur le
bouton de réinitialisation pendant environ
10 s lors de la mise en marche ou du
redémarrage de la caméra pour restaurer
les paramètres par défaut, notamment le
nom d’utilisateur, le mot de passe,
l’adresse IP, le numéro de port, etc.
11 : Logement de carte microSD
12 : Logement de la carte micro SIM
Installation de la batterie, activation et accès à la
caméra réseau (page 7 – C)
(Facultatif) Installez d’abord les cellules sèches
au niveau de la rangée inférieure. Commencez
par préparer 10 cellules sèches de taille AA.
(C1)
Installez la batterie rechargeable ou le
compartiment de cellules sèches. Après
l’installation, réglez le bouton de numérotation
sur Activé pour mettre la caméra sous tension à
partir de la batterie. (C2)
Activez et accédez à la caméra en connectant le
câble à l’ordinateur. Scannez le code QR pour
plus de détails. (C3)
Remarque :
Le câble et le port série ne servent qu’au
débogage. Reportez-vous à la fiche
technique pour plus de détails sur les
caractéristiques de l’interface.
L’interface d’alimentation pour le
débogage est réservée au seul débogage

19
lorsque l’appareil n’est pas alimenté par la
batterie.
Fermez le capot supérieur et procédez à
l’insertion du module. (C4).
Installation du panneau solaire (page 10 – D)
Remarque : cette procédure ne s’applique qu’à la
caméra fournie avec un panneau solaire.
Installation de la caméra (page 11 – E)
Installez la caméra avec la sangle. Hauteur
d’installation : 0,5 à 1,5 m. (E1)
Installez la caméra avec le trépied. Fixez la
caméra sur le trépied à l’aide d’une vis UNC 1/4.
(E2)
Remarque :
Vous devez d’abord acheter un trépied.
Activation et accès à la caméra réseau (Page 12 –
F)
Conformité à la réglementation et consignes de
sécurité
Lisez soigneusement toutes les informations et
instructions de ce document avant d’utiliser
l’appareil et conservez-le pour toute référence
ultérieure.
Pour plus d’informations et d’instructions sur
l’appareil, veuillez consulter notre site Internet à
l’adresse https://www.hikvision.com. Vous pouvez
également consulter les autres documents (le cas
échéant) accompagnant l’appareil ou scanner le
code QR (le cas échéant) sur l’emballage pour
obtenir plus d’informations.
MENTIONS LÉGALES
DANS LES LIMITES AUTORISÉES PAR LA LOI EN
VIGUEUR, LE PRÉSENT DOCUMENT ET LE
PRODUIT DÉCRIT, AINSI QUE SON MATÉRIEL,
SES LOGICIELS ET SES MICROLOGICIELS, SONT
FOURNIS « EN L’ÉTAT » ET « AVEC CES DÉFAUTS
ET ERREURS ». HIKVISION NE FAIT AUCUNE
GARANTIE, EXPLICITE OU IMPLICITE, Y COMPRIS,
MAIS SANS S’Y LIMITER, DE QUALITÉ
MARCHANDE, DE QUALITÉ SATISFAISANTE, OU
D’ADÉQUATION À UN USAGE PARTICULIER.
VOUS UTILISEZ LE PRODUIT À VOS PROPRES
RISQUES. HIKVISION NE SERA EN AUCUN CAS
TENU RESPONSABLE POUR TOUT DOMMAGE
SPÉCIAL, CONSÉCUTIF, ACCESSOIRE OU
INDIRECT, Y COMPRIS, ENTRE AUTRES, LES
DOMMAGES RELATIFS À LA PERTE DE PROFITS
D’ENTREPRISE, À L’INTERRUPTION D’ACTIVITÉS
COMMERCIALES, OU LA PERTE DES DONNÉES,
LA CORRUPTION DES SYSTÈMES, OU LA PERTE
DES DOCUMENTS, S’ILS SONT BASÉS SUR UNE
VIOLATION DE CONTRAT, UNE FAUTE (Y
COMPRIS LA NÉGLIGENCE), LA RESPONSABILITÉ
EN MATIÈRE DE PRODUITS, OU AUTRE, EN
RAPPORT AVEC L’UTILISATION DU PRODUIT,
MÊME SI HIKVISION A ÉTÉ INFORMÉ DE LA
POSSIBILITÉ D’UN TEL DOMMAGE OU D’UNE
TELLE PERTE.
VOUS RECONNAISSEZ QUE LA NATURE
D’INTERNET EST SOURCE DE RISQUES DE
SÉCURITÉ INHÉRENTS, ET HIKVISION SE DÉGAGE
DE TOUTE RESPONSABILITÉ EN CAS DE
FONCTIONNEMENT ANORMAL, DIVULGATION
D’INFORMATIONS CONFIDENTIELLES OU
AUTRES DOMMAGES DÉCOULANT D’UNE
CYBERATTAQUE, D’UN PIRATAGE
INFORMATIQUE, D’UNE INFECTION PAR DES
VIRUS, OU AUTRES RISQUES DE SÉCURITÉ LIÉS À
INTERNET ; TOUTEFOIS, HIKVISION FOURNIRA
UNE ASSISTANCE TECHNIQUE DANS LES DÉLAIS,
LE CAS ÉCHÉANT.
VOUS ACCEPTEZ D’UTILISER CE PRODUIT
CONFORMÉMENT À L’ENSEMBLE DES LOIS EN
VIGUEUR. IL EST DE VOTRE RESPONSABILITÉ
EXCLUSIVE DE VEILLER À CE QUE VOTRE
UTILISATION SOIT CONFORME À LA LOI
APPLICABLE. IL VOUS APPARTIENT SURTOUT
D’UTILISER CE PRODUIT D’UNE MANIÈRE QUI
NE PORTE PAS ATTEINTE AUX DROITS DE TIERS,
Y COMPRIS, MAIS SANS S’Y LIMITER, LES
DROITS DE PUBLICITÉ, LES DROITS DE
PROPRIÉTÉ INTELLECTUELLE, OU LA
PROTECTION DES DONNÉES ET D’AUTRES
DROITS À LA VIE PRIVÉE. VOUS NE DEVEZ PAS
UTILISER CE PRODUIT POUR TOUTE
UTILISATION FINALE INTERDITE, NOTAMMENT
LA MISE AU POINT OU LA PRODUCTION
D’ARMES DE DESTRUCTION MASSIVE, LA MISE
AU POINT OU LA FABRICATION D’ARMES
CHIMIQUES OU BIOLOGIQUES, LES ACTIVITÉS
DANS LE CONTEXTE LIÉ AUX EXPLOSIFS
NUCLÉAIRES OU AU CYCLE DU COMBUSTIBLE
NUCLÉAIRE DANGEREUX, OU SOUTENANT LES
VIOLATIONS DES DROITS DE L’HOMME.
EN CAS DE CONFLIT ENTRE CE DOCUMENT ET
LES LOIS EN VIGUEUR, CES DERNIÈRES
PRÉVALENT.
© Hangzhou Hikvision Digital Technology Co. Ltd.
Tous droits réservés.
Ces clauses ne s’appliquent qu’aux produits
portant la marque ou l’information
correspondante.
Déclaration de conformité UE
Ce produit et, le cas échéant,
les accessoires qui
l’accompagnent, sont
estampillés « CE » et sont donc
conformes aux normes
européennes harmonisées en vigueur répertoriées
sous la directive 2014/30/UE (EMCD), la
directive 2014/35/UE (LVD) et la
directive 2011/65/UE (RoHS).
* Pour l’appareil sans fil :
Par la présente, Hangzhou Hikvision Digital
Technology Co., Ltd. déclare que cet appareil (se
référer à l’étiquette) est conforme à la
directive 2014/53/UE.
L’intégralité du texte de la Déclaration UE de
Pagina se încarcă...
Pagina se încarcă...
Pagina se încarcă...
Pagina se încarcă...
Pagina se încarcă...
Pagina se încarcă...
Pagina se încarcă...
Pagina se încarcă...
Pagina se încarcă...
Pagina se încarcă...
Pagina se încarcă...
Pagina se încarcă...
Pagina se încarcă...
Pagina se încarcă...
Pagina se încarcă...
Pagina se încarcă...
Pagina se încarcă...
Pagina se încarcă...
Pagina se încarcă...
Pagina se încarcă...
Pagina se încarcă...
Pagina se încarcă...
Pagina se încarcă...
Pagina se încarcă...
Pagina se încarcă...
Pagina se încarcă...
Pagina se încarcă...
Pagina se încarcă...
Pagina se încarcă...
Pagina se încarcă...
Pagina se încarcă...
Pagina se încarcă...
Pagina se încarcă...
Pagina se încarcă...
Pagina se încarcă...
Pagina se încarcă...
Pagina se încarcă...
Pagina se încarcă...
Pagina se încarcă...
Pagina se încarcă...
Pagina se încarcă...
Pagina se încarcă...
Pagina se încarcă...
Pagina se încarcă...
Pagina se încarcă...
Pagina se încarcă...
Pagina se încarcă...
Pagina se încarcă...
Pagina se încarcă...
Pagina se încarcă...
Pagina se încarcă...
Pagina se încarcă...
Pagina se încarcă...
Pagina se încarcă...
Pagina se încarcă...
Pagina se încarcă...
Pagina se încarcă...
Pagina se încarcă...
Pagina se încarcă...
Pagina se încarcă...
Pagina se încarcă...
Pagina se încarcă...
Pagina se încarcă...
Pagina se încarcă...
Pagina se încarcă...
Pagina se încarcă...
Pagina se încarcă...
Pagina se încarcă...
Pagina se încarcă...
Pagina se încarcă...
Pagina se încarcă...
Pagina se încarcă...
Pagina se încarcă...
Pagina se încarcă...
Pagina se încarcă...
Pagina se încarcă...
Pagina se încarcă...
Pagina se încarcă...
-
 1
1
-
 2
2
-
 3
3
-
 4
4
-
 5
5
-
 6
6
-
 7
7
-
 8
8
-
 9
9
-
 10
10
-
 11
11
-
 12
12
-
 13
13
-
 14
14
-
 15
15
-
 16
16
-
 17
17
-
 18
18
-
 19
19
-
 20
20
-
 21
21
-
 22
22
-
 23
23
-
 24
24
-
 25
25
-
 26
26
-
 27
27
-
 28
28
-
 29
29
-
 30
30
-
 31
31
-
 32
32
-
 33
33
-
 34
34
-
 35
35
-
 36
36
-
 37
37
-
 38
38
-
 39
39
-
 40
40
-
 41
41
-
 42
42
-
 43
43
-
 44
44
-
 45
45
-
 46
46
-
 47
47
-
 48
48
-
 49
49
-
 50
50
-
 51
51
-
 52
52
-
 53
53
-
 54
54
-
 55
55
-
 56
56
-
 57
57
-
 58
58
-
 59
59
-
 60
60
-
 61
61
-
 62
62
-
 63
63
-
 64
64
-
 65
65
-
 66
66
-
 67
67
-
 68
68
-
 69
69
-
 70
70
-
 71
71
-
 72
72
-
 73
73
-
 74
74
-
 75
75
-
 76
76
-
 77
77
-
 78
78
-
 79
79
-
 80
80
-
 81
81
-
 82
82
-
 83
83
-
 84
84
-
 85
85
-
 86
86
-
 87
87
-
 88
88
-
 89
89
-
 90
90
-
 91
91
-
 92
92
-
 93
93
-
 94
94
-
 95
95
-
 96
96
-
 97
97
-
 98
98


