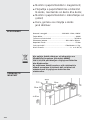
Hisense XB2612C Manual de utilizare
- Categorie
- Microunde
- Tip
- Manual de utilizare

H23MOBSD1H

Instruction manual / Microwave oven
EN ...................................................................................................................... ..3
Bruksanvisning / Mikrobølgeovn
NO ...................................................................................................................... ..24
Instrukcja obsługi / Kuchenka mikrofalowa
PL .........................................................................................................45
RO ...................................................................................................................... 87
Návod na obsluhu / Mikrovlnná rúra
SK .......................................................................................................................129
SE .......................................................................................................................108
Navodila za uporabo / Mikrovalovna pečica
SLO .................................................................................................................... 150
Manual udhëzues/Mikrovalë
SQ ...................................................................................................................... 171
Uputstvo za upotrebu/Mikrotalasna rerna
SR ...................................................................................................................... 192
UK...................................................................................................................... 213
Manual de instruções / Forno de micro-ondas
PT ........................................................................................................................66
Bruksanvisning / Mikrobųlgeoven
Інструкція з експлуатації / Мікрохвильова піч

MICROWAVE OVEN
DEAR CUSTOMER
We sincerely thank you for your purchase. We believe you
will soon find ample evidence that you can really rely on
our products. To make the use of the appliance easier, we
attach these comprehensive instruction manual.
The instructions should aid you in getting familiar with
your new appliance. Please, read them carefully before
using the appliance for the first time.
In any case, please make sure the appliance was supplied
to you undamaged. Should you identify and transport
damage, contact your sales representative or the regional
warehouse from where the product was delivered. You
will find the telephone number on the receipt or delivery
report.
We wish you a lot of pleasure with your new household
appliance.
The appliance for household use for heating
food and beverages using electromagnetic
energy, for indoor use only.
INSTRUCTIONS FOR
USE
These instructions are intended for the user.
They describe the cooker and how to use it. They also
apply to different types of appliances, therefore you may
find some descriptions of functions that may not apply to
your appliance.
We reserve the right to any changes and errors in the
instructions for use.
EN
3

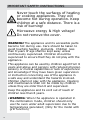
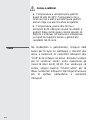
IMPORTANT SAFETY INSTRUCTIONS
Never touch the surfaces of heating
or cooking appliances. They will
become hot during operation. Keep
children at a safe distance. There is a
risk of burning!
Microwave energy & High voltage!
Do not remove the cover.
WARNING! The appliance and its accessible parts
become hot during use. Care should be taken to
avoid touching heating
elements.
Children
less
than 8 years of age shall be kept away unless
continuously supervised. Children should be
supervised to ensure that they do not play with the
appliance.
This appliance can be used by children aged from 8
years and above and persons with reduced physical,
sensory or mental capabilities or lack of experience
and knowledge if they have been given supervision
or instruction concerning use of the appliance in
a safe way and understand the hazards involved.
Children shall not play with the appliance. Cleaning
and maintenance shall not be made by children
unless they are older than 8 and supervised.
Keep the appliance and its cord out of reach of
children less than 8 years.
•
WARNING: When the appliance is operated in
the combination mode, children should only
use the oven under adult supervision due to the
temperatures generated; (Only for the model with
grill function)
4

•
WARNING: If the door or door seals are damaged,
the oven must not be operated until it has been
repaired by a competent person;
•
WARNING: It is hazardous for anyone other than
a competent person to carry out any service or
repair operation that involves the removal of a
cover which gives protection against exposure to
microwave energy;
•
WARNING: liquids and other foods must not be
heated in sealed containers since they are liable to
explode.
•
Children should be supervised to ensure that they
do not play with the appliance.
•
Don't remove oven's feet, do not block air events
of the oven.
•
Only use utensils that are suitable for use in
microwave ovens.
•
When heating food in plastic or paper containers,
keep an eye on the oven due to the possibility of
ignition;
•
If smoke is observed, switch off or unplug the
appliance and keep the door closed in order to
stifle any flames;
•
Microwave heating of beverages can result in
delayed eruptive boiling, therefore care must be
taken when handling the container;
•
The contents of feeding bottles and baby food
jars shall be stirred or shaken and the temperature
checked before consumption, in order to avoid
burns;
5

•
Eggs in their shell and whole hard-boiled eggs
should not be heated in microwave ovens since
they may explode, even after microwave heating
has ended;
•
When cleaning surfaces of door, door seal, cavity
of the oven, use only mild, nonabrasive soaps, or
detergents applied with a sponge or soft cloth.
•
The oven should be cleaned regularly and any food
deposits removed;
•
Failure to maintain the oven in a clean condition
could lead to deterioration of the surface that
could adversely affect the life of the appliance and
possibly result in a hazardous situation;
•
If the supply cord is damaged, it must be replaced
by the manufacturer, its service agent or similarly
qualified persons in order to avoid a hazard.
•
Do not let the cord hang over the edge of the table
or worktop.
•
Never connect this appliance to an external timer
switch or remote control system in order to avoid a
hazardous situation.
•
Never replace the light bulb inside the oven. It must
always be replaced by Hisense service.
•
Do not clean the appliance with steam cleaners,
high-pressure cleaners, sharp objects, abrasive
cleaning agents, and abrasive sponges and stain
removers.
6

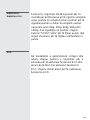
Listed below are, as with all appliances, certain rules to
follow and safeguards to assure top performance from this
oven:
1.
Always have the glass tray, roller arms, coupling and
roller track in place when operating the oven.
2.
Do not use the oven for any reason other than food
preparation, such as for drying clothes, paper, or any
other nonfood items, or for sterilizing purposes.
3.
Do not operate the oven when empty. This could
damage the oven.
4.
Do not use the oven cavity for any type of storage,
such a papers, cookbooks, etc.
5.
Do not cook any food surrounded by a membrane,such
as egg yolks, potatoes, chicken livers, etc without first
being pierced several times with a fork.
6.
Do not insert any object into the openings on the outer
case.
7.
Do not at any time remove parts from the oven such as
the feet, coupling, screws, etc.
8.
Do not cook food directly on the glass tray. Place food
in/on proper cooking utensil before placing in the oven.
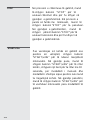
IMPORTANT - COOKWARE NOT TO USE IN YOUR
MICROWAVE OVEN
–
Do not use metal pans or dishes with metal handles.
–
Do not use anything with metal trim.
–
Do not use paper covered wire twist-ties on plastic
bags.
–
Do not use melamine dishes as they contain a
material which will absorb microwave energy. This
may cause the dishes to crack or char and will slow
down the cooking speed.
–
Do not use Centura Tableware. The glaze is not
suitable for microwave use. Corelle Livingware
closed handle cups should not be used.
–
Do not cook in a container with a restricted opening,
such as a pop bottle or sealed oil bottle, as they
may explode if heated in a microwave oven.
–
Do not use conventional meat or candy
thermometers.
–
There are the thermometers available specifically for
microwave cooking. These may be used.
9.
Microwave utensils should be used only in accordance
with manufacturer's instructions.
10.
Do not attempt to deep-fry foods in this oven.
11.
Please remember that a microwave oven only heats
the liquid in a container rather than the container itself.
Therefore, even though the lid of a container is not
SAFETY INSTRUCTIONS
FOR GENERAL USE
7

hot to the touch when removed from the oven, please
remember that the food/liquid inside will be releasing
the same amount of steam and/or spitting when the lid
is removed as in conventional cooking.
12.
Always test the temperature of cooked food yourself
especially if you are heating or cooking food/liquid for
babies. It is advisable never to consume food/liquid
straight from the oven but allow it to stand for a few
minutes and stir food/liquid to distribute heat evenly.
13.
Food containing a mixture of fat and water,
e.g.stock,should stand for 30-60 seconds in the oven
after it has been turned off. This is to allow the mixture
to settle and to prevent bubbling when a spoon is
placed in the food/liquid or a stock cube is added.
14.
When preparing/cooking food/liquid and remember
that there are certain foods, e.g. Christmas puddings,
jam and mincemeat, which heat up very quickly. When
heating or cooking foods with a high fat or sugar
content do not use plastic containers.
15.
Cooking utensil may become hot because of heat
transferred from the heated food. This is especially true
if plastic wrap has been covering the top and handles
of the utensil. Potholders may be needed to handle the
utensil.
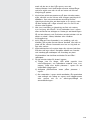
16.
To reduce the risk of fire in the oven cavity:
a)
Do not overcook food. Carefully attend microwave
oven if paper, plastic, or other combustible materials
are placed inside the oven to facilitate cooking.
b)
Remove wire twist-ties from bags before placing
bag in oven.
c)
If materials inside the oven should ignite, keep oven
door closed, turn the oven off at the wall switch, or
shut off power at the fuse or circuit breaker panel.
8

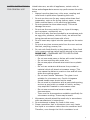
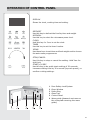
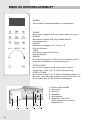
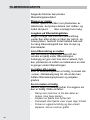
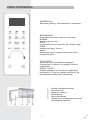
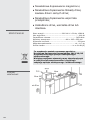
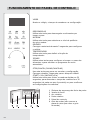
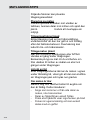
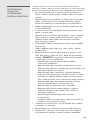
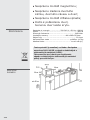
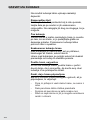
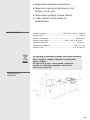
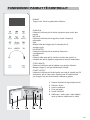
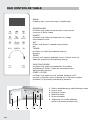
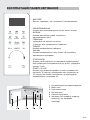
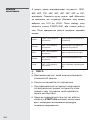
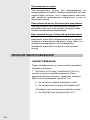
OPERATION OF CONTROL PANEL…。。。。。。。 。
DISPLAY
Shows the clock, cooking time and setting.
DEFROST
Use this key to defrost the food by time and weight
MICROW.
Use this key to select the microwave power level.
CLOCK
Hold this key for 3 sec to set the clock.
TIMER
Use this key to set the timer function.
ICONS
Use these keys to set time and food weight and to choose
the auto menu programmes.
STOP/CANCEL
Use this key to stop or cancel the setting. Hold 3sec for
child lock
START/+30 SEC
Use this key to do quick start cooking of 30 seconds,
increase cooking time by 30 s econds (by each p ress), o r
confirm cooking settings.
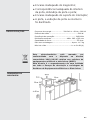
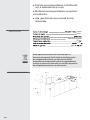
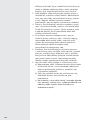
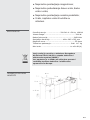
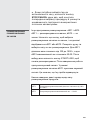
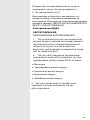
1.
Door Safety Lock System
2.
Oven Window
3.
Roller Ring
4.
Glass Tray
5.
Control Panel
6.
Wave guide (please do not remove
the mica plate covering the wave
guide)
9

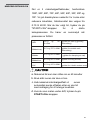
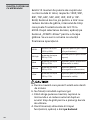
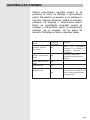
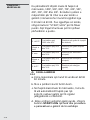
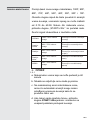
MICROWAVE FUNCTION
There are ten microwave power levels, 100P,
90P, 80P, 70P, 60P, 50P, 40P, 30P, 20P and
10P, respectively. Turn the below knob to
increase or decrease cooking time, the
time range can be selected from 0:10 to
60:00. After select the time, press
“START/+30s” button to start work. An
buzzing sound to notify completion of the
operation.
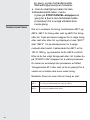
HIGH 100% and 90% (Applicable for quick and
thorough cooking) power output
M.High 80% and 70% power
output
(Applicable for medium
express cooking)
Med 60% and 50% power
output (Applicable for steaming food)
M.Low40% and 30% power
output
(Applicable for defrosting
food)
LOW 20% and 10% power
output (Applicable for keeping warm)
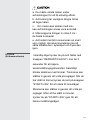
a. The max time which can be set is 60 minutes
b. Never operate the oven empty.
c. At the maximum microwave power,
the oven will automatically lower the
power after a certain time of cooking to
lengthen the service life.
d. If you turn the food during operation, press
the START/+30s
10

button once and the preset cooking procedure
will continue.
e. If you intend to remove the food before
the preset time, you
must press STOP/CANCEL button once
to clear the preset procedure to avoid
unintended operation of next time use.
There are two defrost mode, dEF1 and dEF2,
respectively. dEF1 for defrost by weight and
dEF2 for defrost by time. Press this button
to select defrost by weight or by time, and
the display screen will display "dEF1" or
"dEF2". Turn the knob to select food weight or
defrost time. The weight range of dEF1 is
from 100 to 1500g, and the maximum time of
dEF2 is 60:00. After selecting the defrost
weight or time, press the “START/+30s” button
start to work. An buzzing sound to notify
completion of the operation. The dEF1 defrost
mode by weight will have a beeping sound to
prompt the food to be turned over during
defrosting.
Below is some food defrosting time advice:
dEF1 For defrosting, the weight range from 100 to 1500g.
dEF2 For defrosting, the maximum time is 60:00.
DEFROST/CLOCK
DEFROST
11

a. It is necessary to turn over the food
during operation to obtain uniform effect.
b. Usually defrosting will need longer time
than that of cooking the food.
c. f the food can be cut by knife, the
defrosting process can be considered
completed.
d. Microwave penetrates around 4cm into
most food
e. Defrosted food should be consumed as
soon as possible, it is not advised to put
back to fridge and freeze again.
In standby mode, press and hold down the
“DEFROST/CLOCK” button for more than 3
seconds to enter the clock setting interface.
At the same time, the display screen blinks
in hours. The hour time can be set by
turning the knob. After setting the hour,
press the "START/+30s" button for a short
time to switch to the setting minute mode.
The minutes can be set by turning the
knob. After setting minutes, press the
"START/+30s" button again to exit the
setting mode.
CLOCK (24-
hour clock)
12

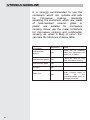
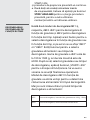
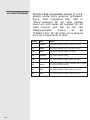
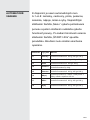
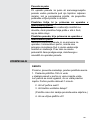
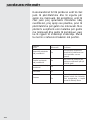
AUTO COOKING There are eight automatic menus A.1~A.8,
Potato, Pasta, Pizza, Popcorn, Vegetable,
Beverage, Meat and Fish respectively.
Press the “Menu” button continuously to
select the desired menu, then turn the
knob to select the weight of the menu.
After selecting the cooking weight, press
“START/+30s” button to start work. An
buzzing sound to notify completion of the
operation.
Display Kind Method
A.1 Potato The optional weight are 250g, 500g and 750g
A.2 Pasta The optional weight are 50g, 100g and 150g
A.3 Pizza The optional weight are 200g and 400g
A.4 Popcorn The optional weight is100g
A.5 Vegetable The optional weight are 200g, 400g and 600g
A.6 Beverage The optional weight are 1 cup, 2 cups or 3 cups,
each one about 250ml.
A.7 Meat The optional weight are 200g, 400g and 600g
A.8 Fish The optional weight are 200g, 400g and 600g
13

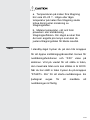
a. The temperature of food before cooking
would be 20-25℃. Higher or lower
temperature of the food before cooking
would require increase or decrease of
cooking time.
b. The temperature, weight and shape of
food will largely influence the cooking
effect. If any deviation has been found to
the factor noted on above menu, you can
adjust the cooking time for best result.
TIMER In standby mode, press this button to enter the
setting interface, and the countdown function
icon and "0:00" will be displayed on the display
screen. Turn the knob to set the time, the
maximum time that can be input is 60:00. After
setting the time, press the "START/+30s" button
to begins the countdown. An buzzing sound to
notify completion of the countdown
14

REHEAT/ECO
REHEAT
ECO
Reheat function is mainly to facilitate users to
heat food according to the weight of food,
turn the knob to select the appropriate
weight of food, the optional weights are
200g, 400g, 600g, 800g and 1000g. After
select the weight, press “START/+30s” button
to start work. An buzzing sound to notify
completion of the operation.
In standby mode, press and hold down
the Reheat button for 3s to turn on ECO, and
the
display will turn off. When turning on
ECO, press any button to turn off the ECO
function.
15

STOP
START/+30s
In the process of cooking settings, can
press “STOP” button to cancel the settings
and return to standby state. In the process
of microwave oven working, can press
“STOP” button to pause. In the standby
state, can press “STOP” button again to
cancel the function and return to standby
state.
After setting the cooking time or
food weight, press the “START/+30s”
button to start the microwave oven
immediately. In working state, can press
“START/+30s” button to increase time,
press one time to increase 30 seconds,
but the menu mode and weight defrosting
mode can not adjust time. In pause state,
can press “START/+30s” button to
continue the microwave oven before
cooking mode.
16

1) Set lock: In standby mode, press the
"STOP" button for more than 3 seconds, the
child lock function is locked, and all buttons
of the microwave oven can not be operated.
2) Cancel lock: In the child lock state, press
the "STOP" button for more than 3 seconds
to cancel the child lock function.
CHILD LOCK FUNCTION
EXPRESS In standby mode, after the food is put
in and the door is closed, press the
"START/+30s" button to quickly start the
microwave. The default working time is
30 seconds. In the process of working,
press the "START/+30s" button once for 30
seconds. An buzzing sound to notify
completion of the operation.
Use this feature to lock the control panel
when you are cleaning or so that children
can not use the oven unsupervised. All
the buttons are rendered inoperable in this
mode.
17

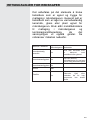
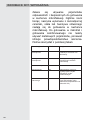
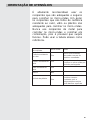
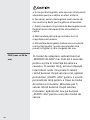
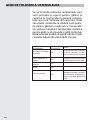
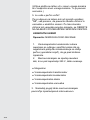
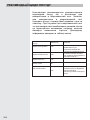
.UTENSILS GUIDELINE……
It is strongly recommended to use the
containers which are suitable and safe
for microwave cooking. Generally
speaking, the containers which are made
of heat-resistant ceramic, glass or
plastic are suitable for microwave
cooking. Never use the metal containers
for microwave cooking and combination
cooking as spark is likely to occur. You
can take the reference of below table.
Material
of container Microwave Notes
Heat-resistant Never use the ceramics
which are decorated with
metal rim or glazed
ceramic Yes
Heat-resistant plastic Yes Cannot be used for long
time microwave cooking
Heat-resistant glass Yes
Grill rack No
It should not be used
when cooking meat or
chops as the
over-temperature may do
damage to the film
Plastic film Yes
18

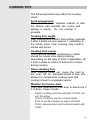
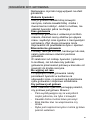
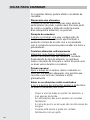
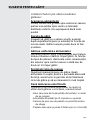
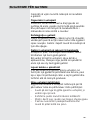
.COOKING TIPS……
The following factors may affect the cooking
result:
Food arrangement
Place thicker areas towards outside of dish,
the thinner part towards the centre and
spread it evenly. Do not overlap if
possible.
Cooking time length
Start cooking with a short time setting, evaluate
it after it times out and extend it according to
the actual need. Over cooking may result in
smoke and burns.
Cooking food evenly
Food such as chicken, hamburger or steak
should be turned once during cooking.
Depending on the type of food, if applicable, stir
it from outside to centre of dish once or twice
during cooking
Allow standing time
After cooking times out, leave the food in
the oven for an adequate length of time, this
allows it to complete its cooking cycle and
cooling it down in a gradual manner
Whether the food is done
Color and hardness of food help to determine if
it is done, these include:
- Steam coming out from all parts of food, not
just the edge
- Joints of poultry can be moved easily
-Pork or poultry shows no signs of blood
- Fish is opaque and can be sliced easily with
a fork
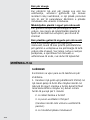
19

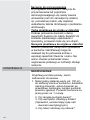
Browning dish
When using a browning dish or self-heating
container, always place a heat-resistant
insulator such as a porcelain plate under it to
prevent damage to the turntable and rotating
ring.
Microwave safe plastic wrap
When cooking food with high fat content, do
not allow the plastic wrap come into contact
with food as it may melt
Microwave safe plastic cookware
Some microwave safe plastic cookware might
not be suitable for cooking foods with high
fat and sugar content. Also, the
preheating time specified in the dish
instruction manual must not be exceeded
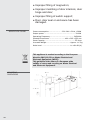
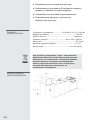
.MAINTENANCE…
SERVICING
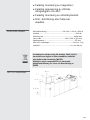
Please check the following before calling for
services.
1. Place one cup of water (approx.150ml) in
a glass measure in the oven and close the
door securely. Oven lamp should go off if the
door is closed properly. Let the oven work for
1 min.
2. Does the oven lamp light?
3. Does the cooling fan work?
(Put your hand over the rear ventilation
openings.)
4. Does the turntable rotate?
20
Pagina se încarcă ...
Pagina se încarcă ...
Pagina se încarcă ...
Pagina se încarcă ...
Pagina se încarcă ...
Pagina se încarcă ...
Pagina se încarcă ...
Pagina se încarcă ...
Pagina se încarcă ...
Pagina se încarcă ...
Pagina se încarcă ...
Pagina se încarcă ...
Pagina se încarcă ...
Pagina se încarcă ...
Pagina se încarcă ...
Pagina se încarcă ...
Pagina se încarcă ...
Pagina se încarcă ...
Pagina se încarcă ...
Pagina se încarcă ...
Pagina se încarcă ...
Pagina se încarcă ...
Pagina se încarcă ...
Pagina se încarcă ...
Pagina se încarcă ...
Pagina se încarcă ...
Pagina se încarcă ...
Pagina se încarcă ...
Pagina se încarcă ...
Pagina se încarcă ...
Pagina se încarcă ...
Pagina se încarcă ...
Pagina se încarcă ...
Pagina se încarcă ...
Pagina se încarcă ...
Pagina se încarcă ...
Pagina se încarcă ...
Pagina se încarcă ...
Pagina se încarcă ...
Pagina se încarcă ...
Pagina se încarcă ...
Pagina se încarcă ...
Pagina se încarcă ...
Pagina se încarcă ...
Pagina se încarcă ...
Pagina se încarcă ...
Pagina se încarcă ...
Pagina se încarcă ...
Pagina se încarcă ...
Pagina se încarcă ...
Pagina se încarcă ...
Pagina se încarcă ...
Pagina se încarcă ...
Pagina se încarcă ...
Pagina se încarcă ...
Pagina se încarcă ...
Pagina se încarcă ...
Pagina se încarcă ...
Pagina se încarcă ...
Pagina se încarcă ...
Pagina se încarcă ...
Pagina se încarcă ...
Pagina se încarcă ...
Pagina se încarcă ...
Pagina se încarcă ...
Pagina se încarcă ...
Pagina se încarcă ...
Pagina se încarcă ...
Pagina se încarcă ...
Pagina se încarcă ...
Pagina se încarcă ...
Pagina se încarcă ...
Pagina se încarcă ...
Pagina se încarcă ...
Pagina se încarcă ...
Pagina se încarcă ...
Pagina se încarcă ...
Pagina se încarcă ...
Pagina se încarcă ...
Pagina se încarcă ...
Pagina se încarcă ...
Pagina se încarcă ...
Pagina se încarcă ...
Pagina se încarcă ...
Pagina se încarcă ...
Pagina se încarcă ...
Pagina se încarcă ...
Pagina se încarcă ...
Pagina se încarcă ...
Pagina se încarcă ...
Pagina se încarcă ...
Pagina se încarcă ...
Pagina se încarcă ...
Pagina se încarcă ...
Pagina se încarcă ...
Pagina se încarcă ...
Pagina se încarcă ...
Pagina se încarcă ...
Pagina se încarcă ...
Pagina se încarcă ...
Pagina se încarcă ...
Pagina se încarcă ...
Pagina se încarcă ...
Pagina se încarcă ...
Pagina se încarcă ...
Pagina se încarcă ...
Pagina se încarcă ...
Pagina se încarcă ...
Pagina se încarcă ...
Pagina se încarcă ...
Pagina se încarcă ...
Pagina se încarcă ...
Pagina se încarcă ...
Pagina se încarcă ...
Pagina se încarcă ...
Pagina se încarcă ...
Pagina se încarcă ...
Pagina se încarcă ...
Pagina se încarcă ...
Pagina se încarcă ...
Pagina se încarcă ...
Pagina se încarcă ...
Pagina se încarcă ...
Pagina se încarcă ...
Pagina se încarcă ...
Pagina se încarcă ...
Pagina se încarcă ...
Pagina se încarcă ...
Pagina se încarcă ...
Pagina se încarcă ...
Pagina se încarcă ...
Pagina se încarcă ...
Pagina se încarcă ...
Pagina se încarcă ...
Pagina se încarcă ...
Pagina se încarcă ...
Pagina se încarcă ...
Pagina se încarcă ...
Pagina se încarcă ...
Pagina se încarcă ...
Pagina se încarcă ...
Pagina se încarcă ...
Pagina se încarcă ...
Pagina se încarcă ...
Pagina se încarcă ...
Pagina se încarcă ...
Pagina se încarcă ...
Pagina se încarcă ...
Pagina se încarcă ...
Pagina se încarcă ...
Pagina se încarcă ...
Pagina se încarcă ...
Pagina se încarcă ...
Pagina se încarcă ...
Pagina se încarcă ...
Pagina se încarcă ...
Pagina se încarcă ...
Pagina se încarcă ...
Pagina se încarcă ...
Pagina se încarcă ...
Pagina se încarcă ...
Pagina se încarcă ...
Pagina se încarcă ...
Pagina se încarcă ...
Pagina se încarcă ...
Pagina se încarcă ...
Pagina se încarcă ...
Pagina se încarcă ...
Pagina se încarcă ...
Pagina se încarcă ...
Pagina se încarcă ...
Pagina se încarcă ...
Pagina se încarcă ...
Pagina se încarcă ...
Pagina se încarcă ...
Pagina se încarcă ...
Pagina se încarcă ...
Pagina se încarcă ...
Pagina se încarcă ...
Pagina se încarcă ...
Pagina se încarcă ...
Pagina se încarcă ...
Pagina se încarcă ...
Pagina se încarcă ...
Pagina se încarcă ...
Pagina se încarcă ...
Pagina se încarcă ...
Pagina se încarcă ...
Pagina se încarcă ...
Pagina se încarcă ...
Pagina se încarcă ...
Pagina se încarcă ...
Pagina se încarcă ...
Pagina se încarcă ...
Pagina se încarcă ...
Pagina se încarcă ...
Pagina se încarcă ...
Pagina se încarcă ...
Pagina se încarcă ...
Pagina se încarcă ...
Pagina se încarcă ...
Pagina se încarcă ...
Pagina se încarcă ...
Pagina se încarcă ...
Pagina se încarcă ...
Pagina se încarcă ...
Pagina se încarcă ...
Pagina se încarcă ...
Pagina se încarcă ...
Pagina se încarcă ...
Pagina se încarcă ...
Pagina se încarcă ...
Pagina se încarcă ...
Pagina se încarcă ...
-
 1
1
-
 2
2
-
 3
3
-
 4
4
-
 5
5
-
 6
6
-
 7
7
-
 8
8
-
 9
9
-
 10
10
-
 11
11
-
 12
12
-
 13
13
-
 14
14
-
 15
15
-
 16
16
-
 17
17
-
 18
18
-
 19
19
-
 20
20
-
 21
21
-
 22
22
-
 23
23
-
 24
24
-
 25
25
-
 26
26
-
 27
27
-
 28
28
-
 29
29
-
 30
30
-
 31
31
-
 32
32
-
 33
33
-
 34
34
-
 35
35
-
 36
36
-
 37
37
-
 38
38
-
 39
39
-
 40
40
-
 41
41
-
 42
42
-
 43
43
-
 44
44
-
 45
45
-
 46
46
-
 47
47
-
 48
48
-
 49
49
-
 50
50
-
 51
51
-
 52
52
-
 53
53
-
 54
54
-
 55
55
-
 56
56
-
 57
57
-
 58
58
-
 59
59
-
 60
60
-
 61
61
-
 62
62
-
 63
63
-
 64
64
-
 65
65
-
 66
66
-
 67
67
-
 68
68
-
 69
69
-
 70
70
-
 71
71
-
 72
72
-
 73
73
-
 74
74
-
 75
75
-
 76
76
-
 77
77
-
 78
78
-
 79
79
-
 80
80
-
 81
81
-
 82
82
-
 83
83
-
 84
84
-
 85
85
-
 86
86
-
 87
87
-
 88
88
-
 89
89
-
 90
90
-
 91
91
-
 92
92
-
 93
93
-
 94
94
-
 95
95
-
 96
96
-
 97
97
-
 98
98
-
 99
99
-
 100
100
-
 101
101
-
 102
102
-
 103
103
-
 104
104
-
 105
105
-
 106
106
-
 107
107
-
 108
108
-
 109
109
-
 110
110
-
 111
111
-
 112
112
-
 113
113
-
 114
114
-
 115
115
-
 116
116
-
 117
117
-
 118
118
-
 119
119
-
 120
120
-
 121
121
-
 122
122
-
 123
123
-
 124
124
-
 125
125
-
 126
126
-
 127
127
-
 128
128
-
 129
129
-
 130
130
-
 131
131
-
 132
132
-
 133
133
-
 134
134
-
 135
135
-
 136
136
-
 137
137
-
 138
138
-
 139
139
-
 140
140
-
 141
141
-
 142
142
-
 143
143
-
 144
144
-
 145
145
-
 146
146
-
 147
147
-
 148
148
-
 149
149
-
 150
150
-
 151
151
-
 152
152
-
 153
153
-
 154
154
-
 155
155
-
 156
156
-
 157
157
-
 158
158
-
 159
159
-
 160
160
-
 161
161
-
 162
162
-
 163
163
-
 164
164
-
 165
165
-
 166
166
-
 167
167
-
 168
168
-
 169
169
-
 170
170
-
 171
171
-
 172
172
-
 173
173
-
 174
174
-
 175
175
-
 176
176
-
 177
177
-
 178
178
-
 179
179
-
 180
180
-
 181
181
-
 182
182
-
 183
183
-
 184
184
-
 185
185
-
 186
186
-
 187
187
-
 188
188
-
 189
189
-
 190
190
-
 191
191
-
 192
192
-
 193
193
-
 194
194
-
 195
195
-
 196
196
-
 197
197
-
 198
198
-
 199
199
-
 200
200
-
 201
201
-
 202
202
-
 203
203
-
 204
204
-
 205
205
-
 206
206
-
 207
207
-
 208
208
-
 209
209
-
 210
210
-
 211
211
-
 212
212
-
 213
213
-
 214
214
-
 215
215
-
 216
216
-
 217
217
-
 218
218
-
 219
219
-
 220
220
-
 221
221
-
 222
222
-
 223
223
-
 224
224
-
 225
225
-
 226
226
-
 227
227
-
 228
228
-
 229
229
-
 230
230
-
 231
231
-
 232
232
-
 233
233
-
 234
234


Hisense XB2612C Manual de utilizare
- Categorie
- Microunde
- Tip
- Manual de utilizare
în alte limbi
- slovenčina: Hisense XB2612C Používateľská príručka
- dansk: Hisense XB2612C Brugermanual
- português: Hisense XB2612C Manual do usuário
Alte documente
-
Heinner HMW-D2060BK Manualul proprietarului
-
-
AEG MSB2057D-B Manual de utilizare
-
Zelmer ZKM 2021EB Manual de utilizare
-
Tesla MW2391MB Manual de utilizare
-
-
Gorenje AG820B8F Manual de utilizare
-
Panasonic NNGD358W Instrucțiuni de utilizare
-
Panasonic NNGD359WEPG Manualul proprietarului
-
Panasonic NNJ161MM Manualul proprietarului