Candy CFT610/5S Manualul proprietarului
- Categorie
- Hote pentru aragaz
- Tip
- Manualul proprietarului

E
N
AR
B
U
C
Z
D
A
G
E
S
P
FI
N
F
R
C
R
N
GLISH(
E
R
ABIC (
AR
U
LGARIA
Z
ECH (C
S
A
NISH(D
A
E
RMAN (
D
P
ANISH (
E
N
NISH (
F
R
ENCH (
F
R
OATIAN
C
F
C
F
E
N)-------
-
R
)--------
-
N (BG) -
-
S
)---------
-
A
) --------
-
D
E) -----
-
E
S) ------
F
I) --------
-
F
R) ------
-
(HR) ---
-
F
T6
1
F
T6
1
C
Ins
t
-
-----------
-
-----------
-
-
-----------
-
-----------
-
-----------
-
-----------
-
-----------
-
-
-----------
-
-----------
-
-
----------
-
1
0/5
X
1
0/4
N
C
oo
k
t
ruc
t
-----------
-
-
----------
-
-----------
-
-----------
-
-----------
-
-
----------
-
-
-----------
-----------
-
-
----------
-
-
-----------
-
X
,C
N
,
C
k
er
H
t
ion
-
-----------
-
-----------
-
-
-----------
-
-----------
-
-
-----------
-
-----------
-
-----------
-
-
-----------
-
-
-----------
-
-
-----------
FT6
1
C
FT
6
H
oo
d
Ma
n
-
----------
-
-
----------
-
-----------
-
-
----------
-
-
----------
-
-
-----------
-
-----------
-
-
----------
-
-
----------
-
-----------
-
1
0/4
6
10/
5
d
n
ual
-
-----------
-
-
-----------
-
-
-----------
-
-
-----------
-
-
-----------
-
-----------
-
-
----------
-
-
-----------
-
-
-----------
-
-
-----------
W
5
S
-
----------
-
-
-----------
-
----------
-
-
----------
-
-
----------
-
-
-----------
-
-----------
-
-
----------
-
-
-----------
-----------
-
-
-PAGE
0
--PAGE
0
-
-PAGE
0
-
-PAGE
0
-
-PAGE
0
--PAGE
0
-
-PAGE
0
-
-PAGE
0
--PAGE
0
-
-PAGE
1
0
01
0
12
0
23
0
34
0
45
0
56
0
67
0
78
0
89
1
00

ITALIAN (IT) --------------------------------------------------------------------------------PAGE 111
DUTCH (NL) --------------------------------------------------------------------------------PAGE 122
NORWEGIAN (NO) -----------------------------------------------------------------------PAGE 133
ROMANIAN (RO) -------------------------------------------------------------------------PAGE 144
RUSSIAN (RU) ----------------------------------------------------------------------------PAGE 155
SLOVENIAN(SL) --------------------------------------------------------------------------PAGE 166
SWEDISH (SV) ----------------------------------------------------------------------------PAGE 177

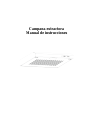
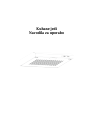
Cooker Hood
Instruction Manual

Content
1…………………………………..………………………………Safety instructions
2…………………………………..………………………………Installation
3…………………………………..………………………………Start using your cooker hood
4…………………………………..………………………………Troubleshooting
5…………………………………..………………………………Maintenance and cleaning
6…………………………………..………………………………Environment protection
O

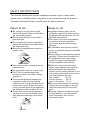
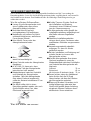
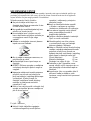
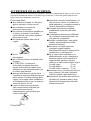
SAFETY INSTRUCTIONS
This manual explains the proper installation and use of your cooker hood,
please read it carefully before using even if you are familiar with the product.
The manual should be kept in a safe place for future reference.
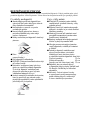
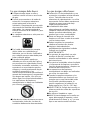
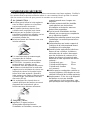
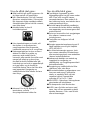
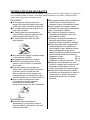
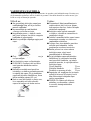
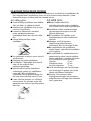
Never to do:
● Do not try to use the cooker hood
without the grease filters or if the filters
are excessively greasy!
●Do not install above a cooker with a
high level grill.
●Do not leave frying pans unattended
during use because overheated fats or
oils might catch fire.
●Never leave naked flames under the
cooker hood.
●If the cooker hood is damaged, do not
attempt to use.
●Do not flambé under the cooker hood.
●CAUTION: Accessible parts may
become hot when used with cooking
appliances.
●The minimum distance between the
supporting surface for the cooking
vessels on the hob and the lowest part
of the cooker hood. (When the cooker
hood is located above a gas appliance,
this distance shall be at least 65 cm)
●The air must not be discharged into a
flue that is used for exhausting fumes
from appliances burning gas or other
fuels.
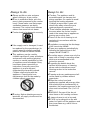
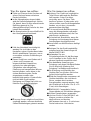
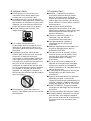
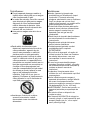
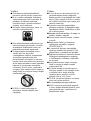
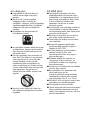
Always to do:
● Important! Always switch off the
electricity supply at the mains during
installation and maintenance such as
light bulb replacement.
●The cooker hood must be installed in
accordance with the installation
instructions and all measurements
followed.
●All installation work must be carried
out by a competent person or qualified
electrician.
●Please dispose of the packing material
carefully. Children are vulnerable to it.
● Pay attention to the sharp edges
inside the cooker hood especially
during installation and cleaning.
●When the cooker hood is located
above a gas appliance,the minimum
distance between the supporting
surface for the cooking vessels on the
hob and the lowest part of the cooker
hood that distance must be:
Gas cookers: 75 cm
Electric cookers: 65 cm
Coal or oil cookers: 75 cm
●Make sure the ducting has no bends
sharper than 90 degrees as this will
reduce the efficiency of the cooker
hood.
●Warning: Failure to install the screws
or fixing device in accordance with
these instructions may result in
electrical hazards

Always to do:
●Always put lids on pots and pans
when cooking on a gas cooker.
●When in extraction mode, air in the
room is being removed by the cooker
hood. Please make sure that proper
ventilation measures are being
observed. The cooker hood removes
odours from room but not steam.
●Cooker hood is for domestic use only.
●If the supply cord is damaged, it must
be replaced by the manufacturer, its
service agent or similarly qualified
persons in order to avoid a hazard.
●This appliance can be used by
children aged from 8 years and above
and persons with reduced physical,
sensory or mental capabilities or lack
of experience and knowledge if they
have been given supervision or
instruction concerning use of the
appliance in a safe way and
understand the hazards involved.
Children shall not play with the
appliance. Cleaning and user
maintenance shall not be made by
children without supervision.
●Warning: Before obtaining access to
terminals, all supply circuits must be
disconnected.
Always to do:
● Caution: The appliance and its
accessible parts can become hot
during operation. Be careful to avoid
touching the heating elements.
Children younger than 8 years old
should stay away unless they are
under permanent supervision.
● There shall be adequate ventilation of
the room when the cooker hood is
used at the same time as appliances
burning gas or other fuels.
●There is a fire risk if cleaning is not
carried out in accordance with the
instructions
●Regulations concerning the discharge
of air have to be fulfilled.
●Clean your appliance periodically by
following the method given in the
chapter MAINTENANCE.
●For safety reason, please use only the
same size of fixing or mounting screw
which are recommended in this
instruction manual.
●Regarding the details about the
method and frequency of cleaning,
please refer to maintenance and
cleaning section in the instruction
manual.
●Cleaning and user maintenance shall
not be made by children without
supervision.
●When the cooker hood and
appliances supplied with energy other
than electricity are simultaneously in
operation, the negative pressure in the
room must not exceed 4 Pa (4 x 10⁻⁵
bar).
●WARNING: Danger of fire: do not
store items on the cooking surfaces.
●A steam cleaner is not to be used.
●NEVER try to extinguish a fire with
water, but switch off the appliance and
then cover flame e.g. with a lid or a
fire blanket.

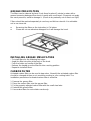
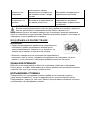
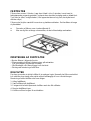
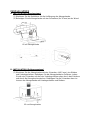
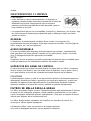
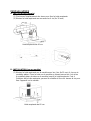
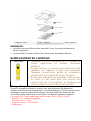
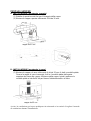
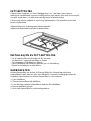
INSTALLATION
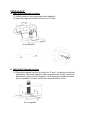
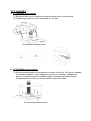
A.
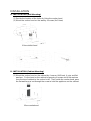
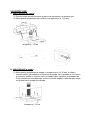
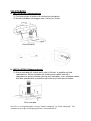
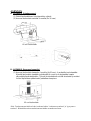
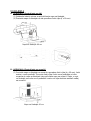
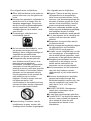
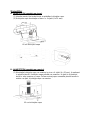
INSTALLATION (Wall Mounting)
(1) Decide the location of the holes for fixing the cooker hood.
(2) Mount the cooker hood on the wall by 4 screws (4x 30mm)
60cm cooker hood
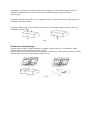
B.
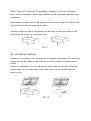
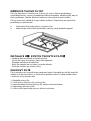
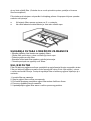
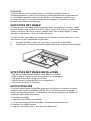
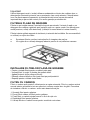
INSTALLATION (Cabinet Mounting)
(1) Mount the cooker hood on the cabinet by 4 screws (4x35mm), 4 nuts and flat
washers. Fix the hood on the cabinet by passing 4 screws and 4 flat washers
from the top of cabinet to the cooker hood. Then inside the cooker hood, pass
the flat washer and nut through the screw to hold the appliance on the cabinet.
60cm cookerhood

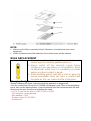
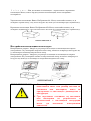
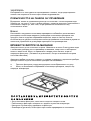
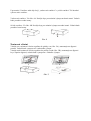
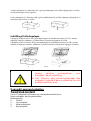
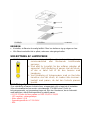
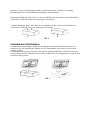
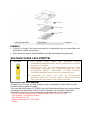
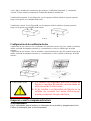
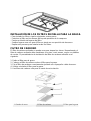
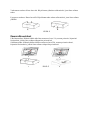
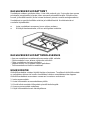
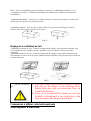
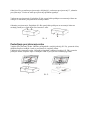
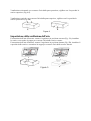
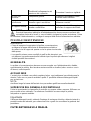
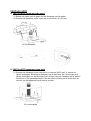
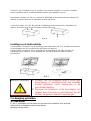
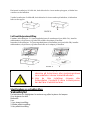
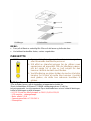
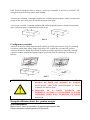
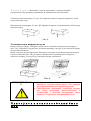
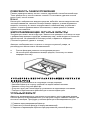
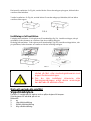
Noice: There are 2 methods for ventilation, including ' horizontal ventilation'
and ' vertical ventilation'. Please pay attention to the ventilation method when
installation.
Horizontal ventilation: See Pic 4A, please use the cover to seal the outlet on the
top, then the air can be vented from back.
Vertical ventilation: See Pic 4B, please use the cover to seal the outlet on the
back, then the air can be vented from top.
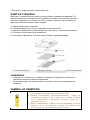
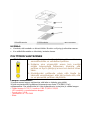
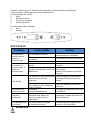
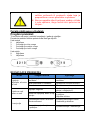
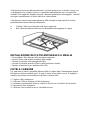
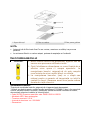
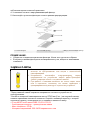
Air ventilation setting
Outdoor air ventilation: Turn the adjuster to outdoor position(pic.5A), install the
outlet, turn on the cooker hood, then the air will be vented from the outside
outlet.
Indoor air ventilation: Turn the adjuster to indoor position (pic.5B), install the
outlet cover, turn on the cooker hood, then the air can be vented from the
inside outlet.
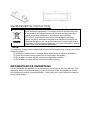
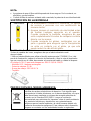
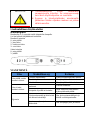
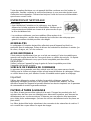
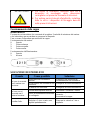
S

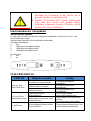
WARNING:
For safety reason, please use only the same
size of fixing or mounting screw which are
recommended in this instruction manual.
Failure to install the screws or fixing device in
accordance with these instructions may result in
electrical hazards.
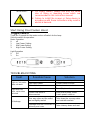
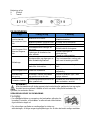
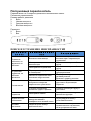
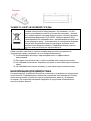
Start Using Your Cooker Hood
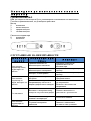
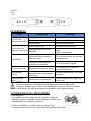
Toggle switch
There are 3 speeds for the motor and on off switch for the lamp.
Slide the switch for operation.
Motor Operation
0- off
1- Low Power Setting
2- Mid Power Setting
3- High Power Setting
Light Operation
0- Off
1- On
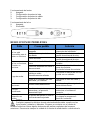
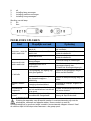
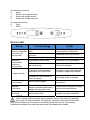
TROUBLESHOOTING
Fault Possible Cause Solution
Light on, but motor
does not work
Fan switch turned off Select a fan switch position.
Fan switch failed Contact service center.
Motor failed Contact service center.
Light does not
work, motor does
not work
House fuses blown Reset/Replace fuses.
Power cord loose or
disconnected
Refit cord to power outlet.
Switch power outlet on.
Oil leakage
One way valve and the outlet
are not tightly sealed
Take down the one way valve
and seal with sealant.
Leakage from the connection of
chimney and cover
Take chimney down and seal.

Lights not working Broken/Faulty globes
Replace globes as per this
instruction.
Insufficient suction
The distance between the
cooker hood and the gas top is
too far
Refit the cooker hood to the
correct distance.
The Cooker hood
inclines
The fixing screw not tight
enough
Tighten the hanging screw and
make it horizontal.
NOTE:
Any electrical repairs to this appliance must conform to your local, state and
federal laws.Please contact the service centre if in any doubt before
undertaking any of the above.Always disconnect the unit from the power source when
opening the unit.
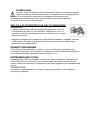
MAINTENANCE AND CLEANING
Caution:
• Before maintenance or cleaning is carried out, the cooker
hood should be disconnected from the main power supply.
Ensure that the cooker hood is switched off at the wall socket
and the plug removed.
• External surfaces are susceptible to scratches and abrasions, so please follow the
cleaning instructions to ensure the best possible result is achieved without damage.
GENERAL
Cleaning and maintenance should be carried out with the appliance cold especially
when cleaning.Avoid leaving alkaline or acid substances (lemon juice, vinegar etc.) on
the surfaces.
STAINLESS STEEL
The stainless steel must be cleaned regularly (e.g.weekly) to ensure long life
expectancy.Dry with a clean soft cloth. A specialized stainless steel cleaning fluid may
be used.
NOTE:
Ensure that wiping is done along with the grain of the stainless steel to prevent any
unsightly crisscross scratching patterns from appearing.
CONTROL PANEL SURFACE
The inlay control panel can be cleaned using warm soapy water. Ensure the cloth is
clean and well wrung before cleaning. Use a dry soft cloth to remove any excess
moisture left after cleaning.
Important
Using neutral detergents and avoid using harsh cleaning chemicals, strong household
detergents or products containing abrasives,as this will affect the appliance
appearance and potentially remove any printing of artwork on the control panel and
will void manufactures warrantee.

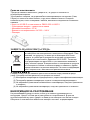
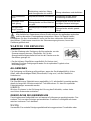
GREASE MESH FILTERS
The filters can be cleaned by hand. Soak them for about 3 minute in water with a
grease-loosening detergent then brush it gently with a soft brush. Please do not apply
too much pressure, avoid to damage it . (Leave to dry naturally out of direct sun light)
Filters should be washed separately to crockery and kitchen utensils. it is advisable
not to use rinse aid.
● Removing the filters as the instruction in Pic.below.
● Please do not use abrasive detergent for it will damage the hood.
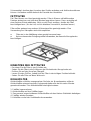
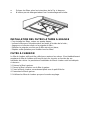
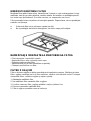
INSTALLING GREASE MESH FILTERS
• To install filters for the following four steps .
- Angle the filter into slots at the back of the hood.
- Push the button on handle of the filter.
- Release the handle once the filter fits into a resting position.
- Repeat to install all filters.
CARBON FILTER
Activated carbon filter can be used to trap odors. Normally the activated carbon filter
should be changed at three or six months according to your cooking habit. The
installation procedure of activated carbon filter is as below.
1. Remove the grease filter.
2. Place the carbon filter onto the grease filter.
3. Fix the properly-adjusted carbon filter with the small steel wire.
4. Reinstall the grease filter.
5. Use carbon filters for recirculation mode only.

NOTE:
• Make sure the filter is securely locked. Otherwise, it would loosen and cause
dangerous.
• When activated carbon filter attached, the suction power will be lowered.
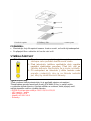
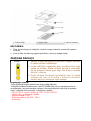
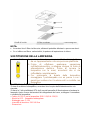
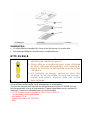
BULB REPLACEMENT
Important :
The bulb must be replaced by the manufacturer, its
service agent or similarly qualified persons.
Always switch off the electricity supply before
carrying out any operations on the appliance. When
handling bulb, make sure it is completely cool down
before any direct contact to hands.
When handling globes hold with a cloth or gloves to
ensure perspiration does not come in contact with
the globe as this can reduce the life of the globe.
Changing the light:
*Before changing the lights, make sure that the appliance is plugged off.
*Use the screw driver loosen the ST4*8MM self tapping screw (2pcs) from the lighting
panel, take out the lighting fixture. Open the terminal box that connected with the wire,
disconnect the wire connector and replace the lamp.
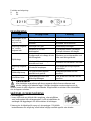
• ILCOS D code for this lamp is: DBS-2.5/65-H-120/33
– LED modules –rectangle lamp
– Max wattage: 2.5 W
– Voltage range: AC 220-240V
– Dimensions:

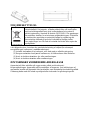
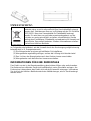
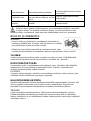
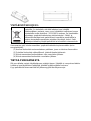
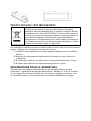
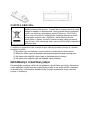
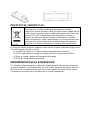
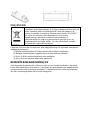
ENVIRONMENTAL PROTECTION:
This product is marked with the symbol on the selective sorting of
waste electronic equipment. This means that this product must not
be disposed of with household waste but must be supported by a
system of selective collection in accordance with Directive
2012/19/EU. It will then be recycled or dismantled to minimize
impacts on the environment, electrical and electronic products are
potentially dangerous for the environment and human health due to
the presence of hazardous substances.For more information, please
contact your local or regional authorities.
NOTE:
The following shows how to reduce total environmental impact (e.g. energy use) of the
cooking process).
(1) Install the cooker hood in a proper place where there is efficient ventilation.
(2) Clean the cooker hood regularly so as not to block the airway.
(3) Remember to switch off the cooker hood light after cooking.
(4) Remember to switch off the cooker hood after cooking.
INFORMATION FOR DISMANTLING
Do not dismantle the appliance in a way which is not shown in the user manual. The
appliance could not be dismantled by user. At the end of life, the appliance should
not be disposed of with household waste. Check with you Local Authority or retainer
for recycling advice.
NN

ﺯﺎﺟﺎﺗﻮﺒﻟﺍ ﻁﺎﻔﺷ
ﻡﺍﺪﺨﺘﺳﻻﺍ ﻞﻴﻟﺩ

ﺕﺎﻳﻮﺘﺤﻤﻟﺍ
1………………………………..……………………………ﺔﻣﻼﺴﻟﺍ ﺕﺎﻤﻴﻠﻌﺗ
2………………………………..……………………………ﺐﻴﻛﺮﺘﻟﺍ
3………………………………..……………………………ﻚﺑ ﺹﺎﺨﻟﺍ ﺯﺎﺟﺎﺗﻮﺒﻟﺍ ﻁﺎﻔﺷ ﻡﺍﺪﺨﺘﺳﺍ ءﺪﺑ
4………………………………..……………………………ﺎﻬﺣﻼﺻﺇﻭ ﻝﺎﻄﻋﻷﺍ ﻑﺎﺸﻜﺘﺳﺍ
5………………………………..……………………………ﻒﻴﻈﻨﺘﻟﺍﻭ ﺔﻧﺎﻴﺼﻟﺍ
6………………………………..……………………………ﺔﺌﻴﺒﻟﺍ ﺔﻳﺎﻤﺣ

ﺔﻣﻼﺴﻟﺍ ﺕﺎﻤﻴﻠﻌﺗ
ﻞﺒﻗ ﺔﻳﺎﻨﻌﺑ ﻪﺗءﺍﺮﻗ ﻰﺟﺮﻳ ﺍﺬﻟ ،ﻚﺑ ﺹﺎﺨﻟﺍ ﺯﺎﺟﺎﺗﻮﺒﻟﺍ ﻁﺎﻔﺷ ﻡﺍﺪﺨﺘﺳﺍ ﺔﻴﻔﻴﻛﻭ ﺔﺤﻴﺤﺼﻟﺍ ﺐﻴﻛﺮﺘﻟﺍ ﺔﻘﻳﺮﻃ ﻞﻴﻟﺪﻟﺍ ﺍﺬﻫ ﺢﺿﻮﻳ
.ﻞﺒﻘﺘﺴﻤﻟﺍ ﻲﻓ ﻪﻴﻟﺇ ﻉﻮﺟﺮﻠﻟ ﻦﻣﺁ ﻥﺎﻜﻣ ﻲﻓ ﻞﻴﻟﺪﻟﺎﺑ ﻅﺎﻔﺘﺣﻻﺍ ﺐﺠﻳﻭ .ﺞﺘﻨﻤﻟﺎﺑ ﺔﻳﺍﺭﺩ ﻰﻠﻋ ﺖﻨﻛ ﻥﺇﻭ ﻰﺘﺣ ﻡﺍﺪﺨﺘﺳﻻﺍ
:ﻲﻠﻳ ﺎﻣ ﻰﻠﻋ ﺎًﻣﻭﺩ ﻆﻓﺎﺣ
ﻦﻣ ءﺎﺑﺮﻬﻜﻟﺍ ﺭﺪﺼﻣ ﻞﺼﻓ ﻰﻠﻋ ﺎًﻣﻭﺩ ﺹﺮﺣﺍ !ﻢﻬﻣ ●
ﺔﻧﺎﻴﺼﻟﺍﻭ ﺐﻴﻛﺮﺘﻟﺍ ﻝﺎﻤﻋﺃ ءﺍﺮﺟﺇ ءﺎﻨﺛﺃ ﻲﺴﻴﺋﺮﻟﺍ ﺭﺪﺼﻤﻟﺍ
.ﺓءﺎﺿﻹﺍ ﺡﺎﺒﺼﻣ ﻝﺍﺪﺒﺘﺳﺍ ﻞﺜﻣ
● ﺐﻴﻛﺮﺘﻟﺍ ﺕﺍﺩﺎﺷﺭﻹ ﺎًﻘﻓﻭ ﺯﺎﺟﺎﺗﻮﺒﻟﺍ ﻁﺎﻔﺷ ﺐﻴﻛﺮﺗ ﺐﺠﻳ
.ﺔﻌﺒﺘﻤﻟﺍ ﺲﻴﻳﺎﻘﻤﻟﺍﻭ
● ﺺﺨﺷ ﻞﺒﻗ ﻦﻣ ﺐﻴﻛﺮﺘﻟﺍ ﻝﺎﻤﻋﺃ ﻊﻴﻤﺟ ءﺍﺮﺟﺇ ﺐﺠﻳ
.ﻞﻫﺆﻣ ﻲﺋﺎﺑﺮﻬﻛ ﻭﺃ ﺺﺘﺨﻣ
● ﺮﺜﻛﺃ ﻝﺎﻔﻃﻷﺎﻓ .ﺔﻳﺎﻨﻌﺑ ﻒﻴﻠﻐﺘﻟﺍ ﺩﺍﻮﻣ ﻦﻣ ﺺﻠﺨﺘﻟﺍ ﻰﺟﺮُﻳ
.ﺎﻬﻟ ﺔﺿﺮﻋ
● ﻁﺎﻔﺷ ﻞﺧﺍﺪﺑ ﺓﺩﻮﺟﻮﻤﻟﺍ ﺓﺩﺎﺤﻟﺍ ﻑﺍﻮﺤﻟﺍ ﻦﻣ ﺱﺮﺘﺣﺍ
.ﻒﻴﻈﻨﺘﻟﺍﻭ ﺐﻴﻛﺮﺘﻟﺍ ءﺎﻨﺛﺃ ﺎﻤﻴﺳ ﻻﻭ ﺯﺎﺟﺎﺗﻮﺒﻟﺍ
● ،ﺯﺎﻐﻟﺎﺑ ﻞﻤﻌﻳ ﺯﺎﻬﺟ ﻰﻠﻋﺃ ﺯﺎﺟﺎﺗﻮﺒﻟﺍ ﻁﺎﻔﺷ ﺖﻴﺒﺜﺗ ﺪﻨﻋ
ﺔﻴﻋﻭﻷ ﻞﻣﺎﺤﻟﺍ ﺢﻄﺴﻟﺍ ﻦﻴﺑ ﺔﻓﺎﺴﻤﻟﺍ ﻥﻮﻜﺗ ﻥﺃ ﺐﺠﻳ
ﻁﺎﻔﺸﻟ ﻲﻠﻔﺴﻟﺍ ءﺰﺠﻟﺍﻭ ﺪﻗﻮﻤﻟﺍ ﺡﻮﻟ ﻰﻠﻋ ﻲﻬﻄﻟﺍ
:ﻲﻠﻳ ﺎﻤﻛ ﺯﺎﺟﺎﺗﻮﺒﻟﺍ
:ﺯﺎﻐﻟﺍ ﺕﺍﺯﺎﺟﺎﺗﻮﺑ75 ﻢﺳ
:ءﺎﺑﺮﻬﻜﻟﺍ ﺕﺍﺯﺎﺟﺎﺗﻮﺑ65 ﻢﺳ
:ﻂﻔﻨﻟﺍ ﻭﺃ ﻢﺤﻔﻟﺍ ﺕﺍﺯﺎﺟﺎﺗﻮﺑ75 ﻢﺳ
● ﻦﻣ ﺪﺣﺃ ﺕﺍءﺎﻨﺤﻧﺍ ﻰﻠﻋ ﻱﻮﺘﺤﺗ ﻻ ﺕﺍﻮﻨﻘﻟﺍ ﻥﺃ ﻦﻣ ﺪﻛﺄﺗ
90 ﻁﺎﻔﺷ ﺓءﺎﻔﻛ ﻦﻣ ﻞﻠﻘﻴﺳ ﻚﻟﺫ ﻥﺇ ﺚﻴﺣ ﺔﺟﺭﺩ
.ﺯﺎﺟﺎﺗﻮﺒﻟﺍ
● ﺯﺎﻬﺠﻟﺍ ﺖﻴﺒﺜﺗ ﻭﺃ ﻲﻏﺍﺮﺒﻟﺍ ﺖﻴﺒﺜﺗ ﻡﺪﻋ ﻱﺩﺆﻳ ﺪﻗ :ﺮﻳﺬﺤﺗ
ﺔﻴﺑﺮﻬﻛ ﺮﻃﺎﺨﻤﻟ ﺽﺮﻌﺘﻟﺍ ﻰﻟﺇ ﺕﺍﺩﺎﺷﺭﻹﺍ ﻩﺬﻬﻟ ﺎًﻘﻓﻭ
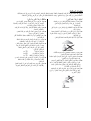
:ﻲﻠﻳ ﺎﻤﻋ ﺎًﻣﻭﺩ ﺪﻌﺘﺑﺍ
● ﺕﺎﺤﺷﺮﻣ ﻥﻭﺩ ﺯﺎﺟﺎﺗﻮﺒﻟﺍ ﻁﺎﻔﺷ ﻡﺍﺪﺨﺘﺳﺍ ﻝﻭﺎﺤﺗ ﻻ
ﻰﻠﻋ ﻁﺍﺮﻓﺈﺑ ﻡﻮﺤﺸﻟﺍ ﻢﻛﺍﺮﺗ ﻝﺎﺣ ﻲﻓ ﻭﺃ ﻡﻮﺤﺸﻟﺍ
!ﺕﺎﺤﺷﺮﻤﻟﺍ
● ﻲﻓ ﺔﻳﺍﻮﺸﺑ ﺩﻭﺰﻣ ﺯﺎﺟﺎﺗﻮﺑ ﻕﻮﻓ ﻁﺎﻔﺸﻟﺍ ﺐﻴﻛﺮﺘﺑ ﻢﻘﺗ ﻻ
.ٍﻝﺎﻋ ﻯﻮﺘﺴﻣ
● ﺚﻴﺣ ﻡﺍﺪﺨﺘﺳﻻﺍ ءﺎﻨﺛﺃ ﺔﻌﺑﺎﺘﻣ ﻥﻭﺩ ﻲﻠﻘﻟﺍ ﻲﻧﺍﻭﺃ ﻙﺮﺘﺗ ﻻ
ﻁﺮﻔﻣ ﻞﻜﺸﺑ ﺕﻮﻳﺰﻟﺍﻭ ﻥﻮﻫﺪﻟﺍ ﻦﻴﺨﺴﺗ ﺐﺒﺴﺘﻳ ﻥﺃ ﻦﻜﻤُﻳ
.ﺎﻬﻗﺍﺮﺘﺣﺍ ﻲﻓ
● .ﺯﺎﺟﺎﺗﻮﺒﻟﺍ ﻁﺎﻔﺷ ﺖﺤﺗ ﺎًﻓﻮﺸﻜﻣ ﺎًﺒﻬﻟ ﺍًﺪﺑﺃ ﻙﺮﺘﺗ ﻻ
● .ﻒﻠﺘﻠﻟ ﻪﺿﺮﻌﺗ ﻝﺎﺣ ﻲﻓ ﻁﺎﻔﺸﻟﺍ ﻡﺍﺪﺨﺘﺳﺍ ﻝﻭﺎﺤﺗ ﻻ
● .ﺯﺎﺟﺎﺗﻮﺒﻟﺍ ﻁﺎﻔﺷ ﺖﺤﺗ ﺬﻴﺒﻨﻟﺍ ﻞﻌﺸُﺗ ﻻ
● ﺔﻨﺧﺎﺳ ﺎﻬﻴﻟﺇ ﻝﻮﺻﻮﻟﺍ ﻦﻜﻤﻳ ﻲﺘﻟﺍ ءﺍﺰﺟﻷﺍ ﺢﺒﺼﺗ ﺪﻗ :ﻪﻴﺒﻨﺗ
.ﻲﻬﻄﻟﺍ ﺕﺍﻭﺩﺃ ﻊﻣ ﺎﻬﻣﺍﺪﺨﺘﺳﺍ ﺪﻨﻋ
● ﺩﻮﺟﻮﻤﻟﺍ ﻲﻬﻄﻟﺍ ﺔﻴﻋﻭﻷ ﻞﻣﺎﺤﻟﺍ ﺢﻄﺴﻟﺍ ﻦﻴﺑ ﺔﻓﺎﺴﻣ ﻞﻗﺃ
ﺪﻨﻋ) .ﺯﺎﺟﺎﺗﻮﺒﻟﺍ ﻁﺎﻔﺸﻟ ﻲﻠﻔﺴﻟﺍ ءﺰﺠﻟﺍﻭ ﺪﻗﻮﻤﻟﺍ ﺡﻮﻟ ﻰﻠﻋ
ﺐﺠﻳ ،ﺯﺎﻐﻟﺎﺑ ﻞﻤﻌﻳ ﺯﺎﻬﺟ ﻕﻮﻓ ﺯﺎﺟﺎﺗﻮﺒﻟﺍ ﻁﺎﻔﺷ ﻊﺿﻭ
ﻦﻋ ﺔﻓﺎﺴﻤﻟﺍ ﻞﻘﺗ ﻻﺃ65 (ﻢﺳ
● ﻡﺪﺨﺘﺴﻤﻟﺍ ﺕﺍﺯﺎﻐﻟﺍ ﻑﺮﺼﻣ ﺮﺒﻋ ءﺍﻮﻬﻟﺍ ﻎﻳﺮﻔﺗ ﺐﺠﻳ ﻻ
ﻉﺍﻮﻧﺃ ﻭﺃ ﺯﺎﻐﻟﺎﺑ ﻞﻤﻌﺗ ﻲﺘﻟﺍ ﺓﺰﻬﺟﻷﺍ ﻡﺩﺎﻋ ﺔﻨﺧﺩﺃ ﺝﺍﺮﺧﻹ
.ﻯﺮﺧﻷﺍ ﺩﻮﻗﻮﻟﺍ

:ﻲﻠﻳ ﺎﻣ ﻰﻠﻋ ﺎًﻣﻭﺩ ﻆﻓﺎﺣ
ﻦﻜﻤﻳ ﻲﺘﻟﺍ ﻩﺅﺍﺰﺟﺃﻭ ﺯﺎﻬﺠﻟﺍ ﺢﺒﺼﻳ ﻥﺃ ﻦﻜﻤﻳ :ﻪﻴﺒﻨﺗ ●
ﻱﺩﺎﻔﺗ ﻰﻠﻋ ﺹﺮﺣﺍ .ﻞﻴﻐﺸﺘﻟﺍ ءﺎﻨﺛﺃ ﺔﻨﺧﺎﺳ ﺎﻬﻴﻟﺇ ﻝﻮﺻﻮﻟﺍ
ﻞﻘﺗ ﻦﻳﺬﻟﺍ ﻝﺎﻔﻃﻷﺍ ﻰﻠﻋ ﺐﺠﻳ .ﺔﻨﺧﺎﺴﻟﺍ ﺮﺻﺎﻨﻌﻟﺍ ﺲﻤﻟ
ﻦﻋ ﻢﻫﺭﺎﻤﻋﺃ8 ﺖﺤﺗ ﺍﻮﻧﻮﻜﻳ ﻢﻟ ﺎﻣ ﺍًﺪﻴﻌﺑ ءﺎﻘﺒﻟﺍ ﺕﺍﻮﻨﺳ
.ﻢﺋﺍﺩ ﻑﺍﺮﺷﺇ
● ﻁﺎﻔﺷ ﻞﻴﻐﺸﺗ ﺪﻨﻋ ﻥﺎﻜﻤﻠﻟ ﺔﺒﺳﺎﻨﻣ ﺔﻳﻮﻬﺗ ﺮﻓﻮﺗ ﺐﺠﻳ
ﻰﻠﻋ ﻞﻤﻌﺗ ﻯﺮﺧﺃ ﺓﺰﻬﺟﺃ ﻞﻴﻐﺸﺗ ﺖﻗﻭ ﻲﻓ ﺯﺎﺟﺎﺗﻮﺒﻟﺍ
.ﻯﺮﺧﻷﺍ ﺩﻮﻗﻮﻟﺍ ﻉﺍﻮﻧﺃ ﻭﺃ ﺯﺎﻐﻟﺍ
● ﻢﺘﻳ ﻢﻟ ﺍﺫﺇ ﻖﻳﺮﺤﻟﺍ ﺮﻃﺎﺨﻤﻟ ﺽﺮﻌﺘﻟﺍ ﻞﻤﺘﺤﻤﻟﺍ ﻦﻣ
ﺕﺎﻤﻴﻠﻌﺘﻠﻟ ﺎًﻘﻓﻭ ﻒﻴﻈﻨﺘﻟﺍ
● .ءﺍﻮﻬﻟﺍ ﻎﻳﺮﻔﺘﺑ ﺔﻘﻠﻌﺘﻤﻟﺍ ﺕﺎﻤﻴﻠﻌﺘﻟﺍ ﺬﻴﻔﻨﺗ ﺐﺠﻳ
● ﻲﻓ ﺓﺩﺭﺍﻮﻟﺍ ﺔﻘﻳﺮﻄﻟﺍ ﻉﺎﺒﺗﺍ ﻝﻼﺧ ﻦﻣ ﺎﻳﺭﻭﺩ ﻙﺯﺎﻬﺟ ﻒّﻈﻧ
."ﺔﻧﺎﻴﺼﻟﺍ" ﻞﺼﻓ
● ﻭﺃ ﺖﻴﺒﺜﺗ ﻲﻏﺍﺮﺑ ﻡﺍﺪﺨﺘﺳﺍ ﻰﺟﺮُﻳ ،ﺔﻣﻼﺴﻟﺎﺑ ﻖﻠﻌﺘﺗ ﺏﺎﺒﺳﻷ
ﻞﻴﻟﺩ ﻲﻓ ﺎﻬﺑ ﻰﺻﻮﻤﻟﺍ ﺎﻬﺴﻔﻧ ﺕﺎﺳﺎﻘﻤﻟﺎﺑ ﺐﻴﻛﺮﺗ
.ﻂﻘﻓ ﺍﺬﻫ ﻡﺍﺪﺨﺘﺳﻻﺍ
● ،ﻪﺋﺍﺮﺟﺇ ﺕﺍﺮﻣ ﺩﺪﻋﻭ ﺔﻘﻳﺮﻃ ﻝﻮﺣ ﻞﻴﺻﺎﻔﺘﻟﺎﺑ ﻖﻠﻌﺘﻳ ﺎﻤﻴﻓ
ﻞﻴﻟﺩ ﻲﻓ ﻒﻴﻈﻨﺘﻟﺍﻭ ﺔﻧﺎﻴﺼﻟﺍ ﻢﺴﻗ ﻰﻟﺇ ﻉﻮﺟﺮﻟﺍ ﻰﺟﺮﻳ
.ﻡﺍﺪﺨﺘﺳﻻﺍ
● ﺔﻧﺎﻴﺻ ﻝﺎﻤﻋﺃﻭ ﻒﻴﻈﻨﺘﻟﺎﺑ ﻝﺎﻔﻃﻷﺍ ﻡﻮﻘﻳ ﻥﺃ ﺐﺠﻳ ﻻ
.ﻑﺍﺮﺷﺇ ﻥﻭﺩ ﻡﺪﺨﺘﺴﻤﻟﺍ
● ﻞﻤﻌﺗ ﻲﺘﻟﺍ ﺓﺰﻬﺟﻷﺍﻭ ﺯﺎﺟﺎﺗﻮﺒﻟﺍ ﻁﺎﻔﺷ ﻞﻴﻐﺸﺗ ﻝﺎﺣ ﻲﻓ
ﻻﺃ ﺐﺠﻳ ،ﺪﺣﺍﻭ ﺖﻗﻭ ﻲﻓ ءﺎﺑﺮﻬﻜﻟﺍ ﺮﻴﻏ ﺔﻗﺎﻃ ﺭﺩﺎﺼﻤﺑ
ﻥﺎﻜﻤﻟﺍ ﻲﻓ ﻲﺴﻜﻌﻟﺍ ﻂﻐﻀﻟﺍ ﺯﻭﺎﺠﺘﻳ4ﻝﺎﻜﺳﺎﺑ
) 4 × 10⁻⁵ .(ﺭﺎﺑ
● ﺢﻄﺳﺃ ﻰﻠﻋ ﺽﺍﺮﻏﻷﺍ ﻥّﺰﺨﺗ ﻻ :ﻖﻳﺮﺤﻟﺍ ﺮﻄﺧ :ﺮﻳﺬﺤﺗ
.ﻲﻬﻄﻟﺍ
● .ﻱﺭﺎﺨﺑ ﻒﻈﻨﻣ ﻡﺍﺪﺨﺘﺳﺍ ﺐﺠﻳ ﻻ
● ﻞﻴﻐﺸﺗ ﻒﻗﻭﺃ ﻦﻜﻟﻭ ،ءﺎﻤﻟﺎﺑ ﻖﻳﺮﺤﻟﺍ ءﺎﻔﻃﺇ ﻝﻭﺎﺤﺗ ﻻ
ﻭﺃ ءﺎﻧﺇ ءﺎﻄﻏ ﻡﺍﺪﺨﺘﺳﺎﺑ ﺐﻬﻠﻟﺍ ﺔﻴﻄﻐﺘﺑ ﻢﻗ ﻢﺛ ﺯﺎﻬﺠﻟﺍ
.ﺎًﻠﺜﻣ ﻖﻳﺮﺤﻟﺍ ءﺎﻔﻃﻹ ﺔﻴﻧﺎﻄﺑ
:ﻲﻠﻳ ﺎﻣ ﻰﻠﻋ ﺎًﻣﻭﺩ ﻆﻓﺎﺣ
● ﻲﻟﺎﻘﻤﻟﺍﻭ ﻲﻧﺍﻭﻷﺍ ﻰﻠﻋ ﺔﻴﻄﻏﺃ ﻊﺿﻭ ﻰﻠﻋ ﺎًﻤﺋﺍﺩ ﺹﺮﺣﺍ
.ﺯﺎﻏ ﺕﺍﺯﺎﺟﺎﺗﻮﺑ ﻰﻠﻋ ﻲﻬﻄﻟﺍ ﺪﻨﻋ
● ﻦﻣ ءﺍﻮﻬﻟﺍ ﺩﺮﻃ ﻢﺘﻳ ،ﺝﺍﺮﺧﻹﺍ ﻊﺿﻭ ﻲﻓ ﻥﻮﻜﻳ ﺎﻣﺪﻨﻋ
ﻦﻣ ﺪﻛﺄﺘﻟﺍ ﻰﺟﺮُﻳ ﺍﺬﻟﻭ .ﺯﺎﺟﺎﺗﻮﺒﻟﺍ ﻁﺎﻔﺷ ﺔﻄﺳﺍﻮﺑ ﺔﻓﺮﻐﻟﺍ
ﺯﺎﺟﺎﺗﻮﺒﻟﺍ ﻁﺎﻔﺷ ﺩﺮﻄﻳ .ﺔﺒﺳﺎﻨﻤﻟﺍ ﺔﻳﻮﻬﺘﻟﺍ ﺮﻴﺑﺍﺪﺗ ﺓﺎﻋﺍﺮﻣ
.ﺭﺎﺨﺒﻟﺍ ﺩﺮﻄﻳ ﻻﻭ ﺔﻓﺮﻐﻟﺍ ﻦﻣ ﺢﺋﺍﻭﺮﻟﺍ
● .ﻂﻘﻓ ﻲﻟﺰﻨﻤﻟﺍ ﻝﺎﻤﻌﺘﺳﻼﻟ ﺺﺼﺨﻣ ﺯﺎﺟﺎﺗﻮﺒﻟﺍ ﻁﺎﻔﺷ
● ﺔﻄﺳﺍﻮﺑ ﻪﻟﺍﺪﺒﺘﺳﺍ ﺐﺠﻳ ،ﺔﻳﺬﻐﺘﻟﺍ ﻞﺑﺎﻛ ﻒﻠﺗ ﻝﺎﺣ ﻲﻓ
ﻭﺃ ،ﺎﻬﺑ ﺹﺎﺨﻟﺍ ﺔﻣﺪﺨﻟﺍ ﻞﻴﻛﻭ ﻭﺃ ،ﺔﻌﻨﺼﻤﻟﺍ ﺔﻛﺮﺸﻟﺍ
ﺽﺮﻌﺘﻟﺍ ﻱﺩﺎﻔﺘﻟ ﻞﺛﺎﻤﻣ ﻞﻜﺸﺑ ﻦﻴﻠﻫﺆﻤﻟﺍ ﺹﺎﺨﺷﻷﺍ
.ﺮﻄﺨﻠﻟ
● ﻢﻫﺮﻤﻋ ﻎﻟﺎﺒﻟﺍ ﻝﺎﻔﻃﻷﺍ ﺔﻄﺳﺍﻮﺑ ﺯﺎﻬﺠﻟﺍ ﺍﺬﻫ ﻡﺍﺪﺨﺘﺳﺍ ﻦﻜﻤُﻳ
8 ﺺﻘﻧ ﻦﻣ ﻥﻮﻧﺎﻌﻳ ﻦﻳﺬﻟﺍ ﺹﺎﺨﺷﻷﺍﻭ ﺮﺜﻛﺃ ﻭﺃ ﺕﺍﻮﻨﺳ
ﺹﺎﺨﺷﻷﺍ ﻭﺃ ﺔﻴﻠﻘﻌﻟﺍ ﻭﺃ ﺔﻴﺴﺤﻟﺍ ﻭﺃ ،ﺔﻴﻧﺪﺒﻟﺍ ﺕﺍﺭﺪﻘﻟﺍ ﻲﻓ
ﺍﻮﻌﻀﺧ ﺍﺫﺇ ﺔﻓﺮﻌﻤﻟﺍ ﻭﺃ ﺓﺮﺒﺨﻟﺍ ﻲﻓ ﺺﻘﻧ ﻢﻫﺪﻨﻋ ﻦﻳﺬﻟﺍ
ﺯﺎﻬﺠﻟﺍ ﻡﺍﺪﺨﺘﺳﺍ ﻥﺄﺸﺑ ﺕﺎﻤﻴﻠﻌﺗ ﻢﻬﻟ ﺖﻣﺪُﻗ ﻭﺃ ﻑﺍﺮﺷﻺﻟ
ﺐﺠﻳ .ﺎﻬﻴﻠﻋ ﻱﻮﻄﻨﻳ ﻲﺘﻟﺍ ﺮﻃﺎﺨﻤﻟﺍ ﻢﻬﻓﻭ ﺔﻨﻣﺁ ﺔﻘﻳﺮﻄﺑ
ﻝﺎﻔﻃﻷﺍ ﻡﻮﻘﻳ ﻥﺃ ﺐﺠﻳ ﻻ .ﺯﺎﻬﺠﻟﺎﺑ ﻝﺎﻔﻃﻷﺍ ﺐﻌﻠﻳ ﻻﺃ
.ﻑﺍﺮﺷﺇ ﻥﻭﺩ ﻡﺪﺨﺘﺴﻤﻟﺍ ﺔﻧﺎﻴﺻ ﻝﺎﻤﻋﺃﻭ ﻒﻴﻈﻨﺘﻟﺎﺑ
● ﻞﺼﻓ ﺐﺠﻳ ،ﻑﺍﺮﻃﻷﺍ ﻰﻟﺇ ﻝﻮﺻﻮﻟﺍ ﺔﻟﻭﺎﺤﻣ ﻞﺒﻗ :ﺮﻳﺬﺤﺗ
.ﺩﺍﺪﻣﻹﺍ ﺮﺋﺍﻭﺩ ﻊﻴﻤﺟ

ﺐﻴﻛﺮﺘﻟﺍ
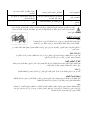
A. U(ﻂﺋﺎﺤﻟﺍ ﻰﻠﻋ ﺖﻴﺒﺜﺘﻟﺍ) ﺖﻴﺒﺜﺘﻟﺍ
)1( .ﺯﺎﺟﺎﺗﻮﺒﻟﺍ ﻁﺎﻔﺷ ﺖﻴﺒﺜﺘﻟ ﺏﻮﻘﺜﻟﺍ ﻊﻗﺍﻮﻣ ﺩﺪﺣ
)2( ﻡﺍﺪﺨﺘﺳﺎﺑ ﻂﺋﺎﺤﻟﺍ ﻰﻠﻋ ﺯﺎﺟﺎﺗﻮﺒﻟﺍ ﻁﺎﻔﺷ ﺖّﺒﺛ4) ﺱﺎﻘﻣ ﻲﻏﺍﺮﺑ 4x 30 (ﻢﻣ
ﺯﺎﺟﺎﺗﻮﺑ ﻁﺎﻔﺷ60 ﻢﺳ
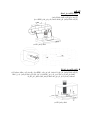
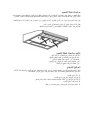
B. U (ﺔﻧﺍﺰﺨﻟﺍ ﻰﻠﻋ ﺖﻴﺒﺜﺗ) ﺖﻴﺒﺜﺘﻟﺍ
)1( ﻡﺍﺪﺨﺘﺳﺎﺑ ﺔﻧﺍﺰﺨﻟﺍ ﻰﻠﻋ ﺯﺎﺟﺎﺗﻮﺒﻟﺍ ﻁﺎﻔﺷ ﺖّﺒﺛ4) ﺱﺎﻘﻣ ﻲﻏﺍﺮﺑ 4x35ﻭ ،(ﻢﻣ 4 ﺖ ّﺒ ﺛ .ﺔﺤﻄﺴﻣ ﺕﺎﻘﻠﺣﻭ ،ﺕﻻﻮﻣﺎﺻ
ﺮﻳﺮﻤﺗ ﻝﻼﺧ ﻦﻣ ﺔﻧﺍﺰﺨﻟﺍ ﻰﻠﻋ ﻁﺎﻔﺸﻟﺍ4ﻭ ﻲﻏﺍﺮﺑ 4 ﺔﻘﻠﺤﻟﺍ ﺭّﺮﻣ ﻢﺛ .ﺯﺎﺟﺎﺗﻮﺒﻟﺍ ﻁﺎﻔﺷ ﻰﻟﺇ ﺔﻧﺍﺰﺨﻟﺍ ﻰﻠﻋﺃ ﻦﻣ ﺕﺎﻘﻠﺣ
.ﺔﻧﺍﺰﺨﻟﺍ ﻰﻠﻋ ﺯﺎﻬﺠﻟﺍ ﺖﻴﺒﺜﺘﻟ ﺯﺎﺟﺎﺗﻮﺒﻟﺍ ﻁﺎﻔﺷ ﻞﺧﺍﺩ ﻲﻏﺍﺮﺒﻟﺍ ﺮﺒﻋ ﺔﻟﻮﻣﺎﺼﻟﺍﻭ ﺔﺤﻄﺴﻤﻟﺍ
ﺯﺎﺟﺎﺗﻮﺑ ﻁﺎﻔﺷ60 ﻢﺳ
500 ﻢﻣ
475 ﻢﻣ
350 ﻢﻣ
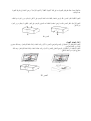
225 ﻢﻣ

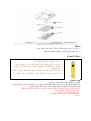
ﺔﻳﻮﻬﺘﻟﺍ ﺔﻘﻳﺮﻃ ﻰﻟﺇ ﻩﺎﺒﺘﻧﻻﺍ ﻰﺟﺮﻳ ."ﺔﻴﺳﺃﺮﻟﺍ ﺔﻳﻮﻬﺘﻟﺍ"ﻭ "ﺔﻴﻘﻓﻷﺍ ﺔﻳﻮﻬﺘﻟﺍ" ﻚﻟﺫ ﻲﻓ ﺎﻤﺑ ،ﺔﻳﻮﻬﺘﻠﻟ ﻥﺎﺘﻘﻳﺮﻃ ﻙﺎﻨﻫ :ﺔﻤﻬﻣ ﺔﻈﺣﻼﻣ
.ﺐﻴﻛﺮﺘﻟﺍ ﺪﻨﻋ
ﺓﺭﻮﺼﻟﺍ ﺮﻈﻧﺍ :ﺔﻴﻘﻓﻷﺍ ﺔﻳﻮﻬﺘﻟﺍ4.ﻒﻠﺨﻟﺍ ﻦﻣ ءﺍﻮﻬﻟﺍ ﺭﻭﺮﻣ ﻦﻜﻤﻳ ﻢﺛ ،ﻰﻠﻋﻷﺍ ﻲﻓ ﺩﻮﺟﻮﻤﻟﺍ ﺬﻔﻨﻤﻟﺍ ﺪﺴﻟ ءﺎﻄﻐﻟﺍ ﻡﺍﺪﺨﺘﺳﺍ ﻰﺟﺮُﻳ ،ﺃ
ﺓﺭﻮﺼﻟﺍ ﺮﻈﻧﺍ :ﺔﻴﺳﺃﺮﻟﺍ ﺔﻳﻮﻬﺘﻟﺍ4 ءﺍﻮﻬﻟﺍ ﺭﻭﺮﻣ ﻦﻜﻤﻳ ﻢﺛ ،ﻲﻔﻠﺨﻟﺍ ءﺰﺠﻟﺍ ﻲﻓ ﺩﻮﺟﻮﻤﻟﺍ ﺝﺮﺨﻤﻟﺍ ﺪﺴﻟ ءﺎﻄﻐﻟﺍ ﻡﺍﺪﺨﺘﺳﺍ ﻰﺟﺮُﻳ ،ﺏ
.ﻰﻠﻋﻷﺍ ﻦﻣ
ءﺍﻮﻬﻟﺍ ﺪﻳﺪﺠﺗ ﺩﺍﺪﻋﺇ
ﺓﺭﻮﺼﻟﺍ) ﻲﺟﺭﺎﺨﻟﺍ ﻊﺿﻮﻟﺍ ﻰﻟﺇ ﻢﻈﻨﻤﻟﺍ ﺭﺩﺃ :ﺔﻴﺟﺭﺎﺨﻟﺍ ﺔﻳﻮﻬﺘﻟﺍ5 ﺝﺮﺨﻴﺳ ﻚﻟﺫ ﺪﻌﺑﻭ ،ﺯﺎﺟﺎﺗﻮﺒﻟﺍ ﻁﺎﻔﺷ ﻞّﻐﺷﻭ ،ﺬﻔﻨﻤﻟﺍ ﺐﻛﺭﻭ ،(ﺃ
.ﻲﺟﺭﺎﺨﻟﺍ ﺬﻔﻨﻤﻟﺍ ﻦﻣ ءﺍﻮﻬﻟﺍ
ﺓﺭﻮﺼﻟﺍ) ﻲﻠﺧﺍﺪﻟﺍ ﻊﺿﻮﻟﺍ ﻰﻟﺇ ﻢﻈﻨﻤﻟﺍ ﺭﺩﺃ :ﺔﻴﻠﺧﺍﺪﻟﺍ ﺔﻳﻮﻬﺘﻟﺍ5 ﻚﻟﺫ ﺪﻌﺑﻭ ،ﺯﺎﺟﺎﺗﻮﺒﻟﺍ ﻁﺎﻔﺷ ﻞّﻐﺷﻭ ،ﺬﻔﻨﻤﻟﺍ ءﺎﻄﻏ ﺐﻛﺭﻭ ،(ﺏ
.ﻲﻠﺧﺍﺪﻟﺍ ﺬﻔﻨﻤﻟﺍ ﻦﻣ ءﺍﻮﻬﻟﺍ ﺝﺮﺨﻴﺳ
ﺓﺭﻮﺼﻟﺍ4
ﺓﺭﻮﺼﻟﺍ5
ﺃ
ﺏ
ﺩ
ﺝ

:ﺮﻳﺬﺤﺗ
ﺐﻴﻛﺮﺗ ﻭﺃ ﺖﻴﺒﺜﺗ ﻲﻏﺍﺮﺑ ﻡﺍﺪﺨﺘﺳﺍ ﻰﺟﺮﻳ ،ﺔﻣﻼﺴﻟﺎﺑ ﻖﻠﻌﺘﺗ ﺏﺎﺒﺳﻷ
.ﻂﻘﻓ ﺍﺬﻫ ﻡﺍﺪﺨﺘﺳﻻﺍ ﻞﻴﻟﺩ ﻲﻓ ﺎﻬﺑ ﻰﺻﻮﻤﻟﺍ ﺕﺎﺳﺎﻘﻤﻠﻟ ﺔﻠﺛﺎﻤﻣ ﺕﺎﺳﺎﻘﻤﺑ
ﺕﺍﺩﺎﺷﺭﻹﺍ ﻩﺬﻬﻟ ﺎًﻘﻓﻭ ﺯﺎﻬﺠﻟﺍ ﺖﻴﺒﺜﺗ ﻭﺃ ﻲﻏﺍﺮﺒﻟﺍ ﺖﻴﺒﺜﺗ ﻡﺪﻋ ﻱﺩﺆﻳ ﺪﻗ
.ﺔﻴﺑﺮﻬﻛ ﺮﻃﺎﺨﻤﻟ ﺽﺮﻌﺘﻟﺍ ﻰﻟﺇ
ﻚﺑ ﺹﺎﺨﻟﺍ ﺯﺎﺟﺎﺗﻮﺒﻟﺍ ﻁﺎﻔﺷ ﻡﺍﺪﺨﺘﺳﺍ ءﺪﺑ
ﻞﻳﺪﺒﺘﻟﺍ ﺡﺎﺘﻔﻣ
ﺪﺟﻮﺗ3.ﺡﺎﺒﺼﻤﻟﺍ ﻑﺎﻘﻳﺇ/ﻞﻴﻐﺸﺗ ﺡﺎﺘﻔﻣﻭ ﻙﺮﺤﻤﻠﻟ ﺕﺎﻋﺮﺳ
.ﻞﻴﻐﺸﺘﻠﻟ ﺡﺎﺘﻔﻤﻟﺍ ﻙّﺮﺣ
ﻙﺮﺤﻤﻟﺍ ﻞﻴﻐﺸﺗ
0- ﻞﻴﻐﺸﺘﻟﺍ ﻑﺎﻘﻳﺇ
1- ﺔﻀﻔﺨﻨﻤﻟﺍ ﺔﻗﺎﻄﻟﺍ ﻊﺿﻭ
2- ﺔﻄﺳﻮﺘﻤﻟﺍ ﺔﻗﺎﻄﻟﺍ ﻊﺿﻭ
3- ﺔﻴﻟﺎﻌﻟﺍ ﺔﻗﺎﻄﻟﺍ ﻊﺿﻭ
ﺡﺎﺒﺼﻤﻟﺍ ﻞﻴﻐﺸﺗ
0- ﻞﻴﻐﺸﺘﻟﺍ ﻑﺎﻘﻳﺇ
1- ﻞﻴﻐﺸﺗ
ﺎﻬﺣﻼﺻﺇﻭ ﻝﺎﻄﻋﻷﺍ ﻑﺎﺸﺘﻛﺍ
ﻞﻄﻌﻟﺍ ﻞﻤﺘﺤﻤﻟﺍ ﺐﺒﺴﻟﺍ ﻞﺤﻟﺍ
ﻦﻜﻟﻭ ،ﻞﻴﻐﺸﺘﻟﺍ ﺪﻴﻗ ﺡﺎﺒﺼﻤﻟﺍ
.ﻞﻤﻌﻳ ﻻ ﻙﺮﺤﻤﻟﺍ
ﺔﺣﻭﺮﻤﻟﺍ ﺡﺎﺘﻔﻣ ﻞﻴﻐﺸﺗ ﻑﺎﻘﻳﺇ ﻢﺗ .ﺔﺣﻭﺮﻤﻟﺍ ﺡﺎﺘﻔﻣ ﻊﺿﻭ ﺩّﺪﺣ
ﺔﺣﻭﺮﻤﻟﺍ ﺡﺎﺘﻔﻣ ﻞﻄﻌﺗ .ﺔﻣﺪﺨﻟﺍ ﺰﻛﺮﻤﺑ ﻞﺼﺗﺍ
ﻙﺮﺤﻤﻟﺍ ﻞﻄﻌﺗ .ﺔﻣﺪﺨﻟﺍ ﺰﻛﺮﻤﺑ ﻞﺼﺗﺍ
ﻒﻗﻮﺗﻭ ،ﻞﻤﻌﻳ ﻻ ﺡﺎﺒﺼﻤﻟﺍ
ﻞﻤﻌﻟﺍ ﻦﻋ ﻙﺮﺤﻤﻟﺍ
ﻲﻠﺧﺍﺪﻟﺍ ﺮﻬﺼﻨﻤﻟﺍ ﻒﻠﺗ .ﺕﺍﺮﻬﺼﻨﻤﻟﺍ ﻝﺪﺒﺘﺳﺍ/ﻦﻴﻴﻌﺗ ﺪﻋﺃ
ﻞﺼﺘﻣ ﺮﻴﻏ ﻭﺃ ﻙﻮﻜﻔﻣ ﺭﺎﻴﺘﻟﺍ ﻚﻠﺳ
.ﺔﻗﺎﻄﻟﺍ ﺲﺒﻘﻤﺑ ﻚﻠﺴﻟﺍ ﻞﻴﺻﻮﺗ ﺪﻋﺃ
.ﺔﻗﺎﻄﻟﺍ ﺲﺒﻘﻣ ﻞّﻐﺷ
ﺖﻳﺰﻟﺍ ﺏﺮﺴﺗ
ﻦﻴﻘﻠﻐﻣ ﺮﻴﻏ ﺬﻔﻨﻤﻟﺍﻭ ﻩﺎﺠﺗﻻﺍ ﻱﺩﺎﺣﺃ ﻡﺎﻤﺼﻟﺍ
ﻡﺎﻜﺣﺈﺑ
ﺓﺩﺎﻤﺑ ﺎﻫﺪﺴﺑ ﻢﻗﻭ ﻩﺎﺠﺗﻻﺍ ﻱﺩﺎﺣﺃ ﻡﺎﻤﺼﻟﺍ ﻝﺰﻧﺃ
.ﺏﺮﺴﺘﻠﻟ ﺔﻌﻧﺎﻣ
ﻦﻴﺑ ﺓﺩﻮﺟﻮﻤﻟﺍ ﺔﻠﻴﺻﻮﺘﻟﺍ ﻦﻣ ﻡﺩﺎﻗ ﺏﺮﺴﺘﻟﺍ
ءﺎﻄﻐﻟﺍﻭ ﺔﻨﺧﺪﻤﻟﺍ
.ﺎﻫﺪﺴﺑ ﻢﻗﻭ ﺔﻨﺧﺪﻤﻟﺍ ﻝﺰﻧﺃ
Pagina se încarcă...
Pagina se încarcă...
Pagina se încarcă...
Pagina se încarcă...
Pagina se încarcă...
Pagina se încarcă...
Pagina se încarcă...
Pagina se încarcă...
Pagina se încarcă...
Pagina se încarcă...
Pagina se încarcă...
Pagina se încarcă...
Pagina se încarcă...
Pagina se încarcă...
Pagina se încarcă...
Pagina se încarcă...
Pagina se încarcă...
Pagina se încarcă...
Pagina se încarcă...
Pagina se încarcă...
Pagina se încarcă...
Pagina se încarcă...
Pagina se încarcă...
Pagina se încarcă...
Pagina se încarcă...
Pagina se încarcă...
Pagina se încarcă...
Pagina se încarcă...
Pagina se încarcă...
Pagina se încarcă...
Pagina se încarcă...
Pagina se încarcă...
Pagina se încarcă...
Pagina se încarcă...
Pagina se încarcă...
Pagina se încarcă...
Pagina se încarcă...
Pagina se încarcă...
Pagina se încarcă...
Pagina se încarcă...
Pagina se încarcă...
Pagina se încarcă...
Pagina se încarcă...
Pagina se încarcă...
Pagina se încarcă...
Pagina se încarcă...
Pagina se încarcă...
Pagina se încarcă...
Pagina se încarcă...
Pagina se încarcă...
Pagina se încarcă...
Pagina se încarcă...
Pagina se încarcă...
Pagina se încarcă...
Pagina se încarcă...
Pagina se încarcă...
Pagina se încarcă...
Pagina se încarcă...
Pagina se încarcă...
Pagina se încarcă...
Pagina se încarcă...
Pagina se încarcă...
Pagina se încarcă...
Pagina se încarcă...
Pagina se încarcă...
Pagina se încarcă...
Pagina se încarcă...
Pagina se încarcă...
Pagina se încarcă...
Pagina se încarcă...
Pagina se încarcă...
Pagina se încarcă...
Pagina se încarcă...
Pagina se încarcă...
Pagina se încarcă...
Pagina se încarcă...
Pagina se încarcă...
Pagina se încarcă...
Pagina se încarcă...
Pagina se încarcă...
Pagina se încarcă...
Pagina se încarcă...
Pagina se încarcă...
Pagina se încarcă...
Pagina se încarcă...
Pagina se încarcă...
Pagina se încarcă...
Pagina se încarcă...
Pagina se încarcă...
Pagina se încarcă...
Pagina se încarcă...
Pagina se încarcă...
Pagina se încarcă...
Pagina se încarcă...
Pagina se încarcă...
Pagina se încarcă...
Pagina se încarcă...
Pagina se încarcă...
Pagina se încarcă...
Pagina se încarcă...
Pagina se încarcă...
Pagina se încarcă...
Pagina se încarcă...
Pagina se încarcă...
Pagina se încarcă...
Pagina se încarcă...
Pagina se încarcă...
Pagina se încarcă...
Pagina se încarcă...
Pagina se încarcă...
Pagina se încarcă...
Pagina se încarcă...
Pagina se încarcă...
Pagina se încarcă...
Pagina se încarcă...
Pagina se încarcă...
Pagina se încarcă...
Pagina se încarcă...
Pagina se încarcă...
Pagina se încarcă...
Pagina se încarcă...
Pagina se încarcă...
Pagina se încarcă...
Pagina se încarcă...
Pagina se încarcă...
Pagina se încarcă...
Pagina se încarcă...
Pagina se încarcă...
Pagina se încarcă...
Pagina se încarcă...
Pagina se încarcă...
Pagina se încarcă...
Pagina se încarcă...
Pagina se încarcă...
Pagina se încarcă...
Pagina se încarcă...
Pagina se încarcă...
Pagina se încarcă...
Pagina se încarcă...
Pagina se încarcă...
Pagina se încarcă...
Pagina se încarcă...
Pagina se încarcă...
Pagina se încarcă...
Pagina se încarcă...
Pagina se încarcă...
Pagina se încarcă...
Pagina se încarcă...
Pagina se încarcă...
Pagina se încarcă...
Pagina se încarcă...
Pagina se încarcă...
Pagina se încarcă...
Pagina se încarcă...
Pagina se încarcă...
Pagina se încarcă...
Pagina se încarcă...
Pagina se încarcă...
Pagina se încarcă...
Pagina se încarcă...
Pagina se încarcă...
Pagina se încarcă...
Pagina se încarcă...
Pagina se încarcă...
Pagina se încarcă...
Pagina se încarcă...
Pagina se încarcă...
Pagina se încarcă...
Pagina se încarcă...
-
 1
1
-
 2
2
-
 3
3
-
 4
4
-
 5
5
-
 6
6
-
 7
7
-
 8
8
-
 9
9
-
 10
10
-
 11
11
-
 12
12
-
 13
13
-
 14
14
-
 15
15
-
 16
16
-
 17
17
-
 18
18
-
 19
19
-
 20
20
-
 21
21
-
 22
22
-
 23
23
-
 24
24
-
 25
25
-
 26
26
-
 27
27
-
 28
28
-
 29
29
-
 30
30
-
 31
31
-
 32
32
-
 33
33
-
 34
34
-
 35
35
-
 36
36
-
 37
37
-
 38
38
-
 39
39
-
 40
40
-
 41
41
-
 42
42
-
 43
43
-
 44
44
-
 45
45
-
 46
46
-
 47
47
-
 48
48
-
 49
49
-
 50
50
-
 51
51
-
 52
52
-
 53
53
-
 54
54
-
 55
55
-
 56
56
-
 57
57
-
 58
58
-
 59
59
-
 60
60
-
 61
61
-
 62
62
-
 63
63
-
 64
64
-
 65
65
-
 66
66
-
 67
67
-
 68
68
-
 69
69
-
 70
70
-
 71
71
-
 72
72
-
 73
73
-
 74
74
-
 75
75
-
 76
76
-
 77
77
-
 78
78
-
 79
79
-
 80
80
-
 81
81
-
 82
82
-
 83
83
-
 84
84
-
 85
85
-
 86
86
-
 87
87
-
 88
88
-
 89
89
-
 90
90
-
 91
91
-
 92
92
-
 93
93
-
 94
94
-
 95
95
-
 96
96
-
 97
97
-
 98
98
-
 99
99
-
 100
100
-
 101
101
-
 102
102
-
 103
103
-
 104
104
-
 105
105
-
 106
106
-
 107
107
-
 108
108
-
 109
109
-
 110
110
-
 111
111
-
 112
112
-
 113
113
-
 114
114
-
 115
115
-
 116
116
-
 117
117
-
 118
118
-
 119
119
-
 120
120
-
 121
121
-
 122
122
-
 123
123
-
 124
124
-
 125
125
-
 126
126
-
 127
127
-
 128
128
-
 129
129
-
 130
130
-
 131
131
-
 132
132
-
 133
133
-
 134
134
-
 135
135
-
 136
136
-
 137
137
-
 138
138
-
 139
139
-
 140
140
-
 141
141
-
 142
142
-
 143
143
-
 144
144
-
 145
145
-
 146
146
-
 147
147
-
 148
148
-
 149
149
-
 150
150
-
 151
151
-
 152
152
-
 153
153
-
 154
154
-
 155
155
-
 156
156
-
 157
157
-
 158
158
-
 159
159
-
 160
160
-
 161
161
-
 162
162
-
 163
163
-
 164
164
-
 165
165
-
 166
166
-
 167
167
-
 168
168
-
 169
169
-
 170
170
-
 171
171
-
 172
172
-
 173
173
-
 174
174
-
 175
175
-
 176
176
-
 177
177
-
 178
178
-
 179
179
-
 180
180
-
 181
181
-
 182
182
-
 183
183
-
 184
184
-
 185
185
-
 186
186
-
 187
187
-
 188
188
-
 189
189


Candy CFT610/5S Manualul proprietarului
- Categorie
- Hote pentru aragaz
- Tip
- Manualul proprietarului
în alte limbi
- français: Candy CFT610/5S Le manuel du propriétaire
- italiano: Candy CFT610/5S Manuale del proprietario
- svenska: Candy CFT610/5S Bruksanvisning
- dansk: Candy CFT610/5S Brugervejledning
Lucrări înrudite
Alte documente
-
Belling CHIM903GSS Cooker Hood Manual de utilizare
-
-
Belling FARMHOUSE 90 CHIM BLACK Manualul proprietarului
-
ELICA NikolaTesla Prime+ BL/F/83 Manual de utilizare
-
Teka TL1 52 Manual de utilizare
-
-
Hilti DD 150-U Instrucțiuni de utilizare
-
Whirlpool C 34S G (W) EX Manualul utilizatorului
-
-