Weber 17587 Manual de utilizare
- Categorie
- Termometre digitale pentru corp
- Tip
- Manual de utilizare

01/17 Rev A.
17587
DIGITAL MEAT THERMOMETER, WIRELESS
TERMÓMETRO DIGITAL INALÁMBRICO PARA CARNE
THERMOMÈTRE À VIANDE NUMÉRIQUE SANS FIL
DIGITALES FLEISCHTHERMOMETER, DRAHTLOS
LANGATON DIGITAALINEN LIHALÄMPÖMITTARI
DIGITALT STEKETERMOMETER, TRÅDLØST
DIGITALT STEGETERMOMETER, TRÅDLØST
TRÅDLÖS DIGITAL TERMOMETER
DIGITALE VLEESTHERMOMETER, DRAADLOOS
TERMOMETRO DIGITALE WIRELESS PER CARNE
TERMÓMETRO DIGITAL PARA CARNE, SEM FIOS
BEZPRZEWODOWY, CYFROWY TERMOMETR DO MIĘSA ZE ZNAKIEM
ЦИФРОВОЙ ТЕРМОМЕТР ДЛЯ МЯСА, БЕСПРОВОДНОЙ
DIGITÁLNÍ TEPLOMĚR NA MASO, BEZDRÁTOVÝ
DIGITALNI TERMOMETER ZA ŽAR, BREZŽIČNI
DIGITÁLIS HÚSHŐMÉRŐ, VEZETÉK NÉLKÜLI
TERMOMETRU DIGITAL FĂRĂ FIR PENTRU CARNE
DIGITALNI TERMOMETER ZA ŽAR, BREZŽIČNI
DIGITALNI TERMOMETAR ZA MESO, BEŽIČNI
DIGITAALNE LIHATERMOMEETER, JUHTMEVABA
BEZVADU DIGITĀLAIS GAĻAS TERMOMETRS
SKAITMENINIS BELAIDIS MĖSOS TERMOMETRAS
20170123_WeberOriginal_Digital Thermometer_IM.indd 1 23/01/2017 11.22

20170123_WeberOriginal_Digital Thermometer_IM.indd 2 23/01/2017 11.22

3
WWW.WEBER.COM
Date: 24.10.2016
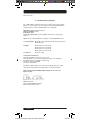
CE – DECLARATION OF CONFORMITY
We, company Weber-Stephen Products LLC, located at 1415 S. Roselle Road,
Palatine, IL, 60067, USA, declare herewith that the following ACCESSORY is
manufactured in accordance with R&TTE Directive 1999/5/EC:
Model Name: Digital Meat Thermometer
Weber Item Number: 17587
Brand Name: Weber
Product Description: Weber Premium Digital Thermometer, single probe,
wireless
Applied specifications/standards according to corresponding R&TTE article:
3.1a Safety/Health: EN 60950-1:2006+A11:2009+A1:2010+A12:2011+A2:2013
EN 62479:2010
3.1b EMC: EN 300 220-2 V2.4.1 (2012-05)
EN 300 220-1 V2.4.1 (2012-05)
EN 301 489-3 V1.6.1 (2013-08)
EN 301 489-1 V1.9.2 (2011-09)
3.2 Food safe: EN 13130-1:2004
Testing and certification by:
SGS-CSTS Standards technical Service Co., Ltd.
198 kezhu Road, Scientech Park, Guangzhou Economic & Technological
Development District, Guangzhou, China 510663
Telephone: +86 (0) 2082155555
Fax: +86 (0) 2082075059
We, Weber-Stephen Products LLC 1415 S Roselle Road, Palatine IL, 60067,
USA, hereby confirm that the following address is our branch address:
Weber-Stephen Products (EMEA) GmbH, Leipziger Straße 124, 10117
Berlin, Germany
Ralph N. Ten Bruin
Director, Global Regulatory Affairs
Weber-Stephen Products LLC
20170123_WeberOriginal_Digital Thermometer_IM.indd 3 23/01/2017 11.22

4
5
4
1
1
5
3
6
1
2
3
5
2
1
2
3
3
4
1
2
2
7
6
6
4
1
2
3
4
5
20170123_WeberOriginal_Digital Thermometer_IM.indd 4 23/01/2017 11.22

5
WWW.WEBER.COM
6
7
9
8
A
8
B
8
C
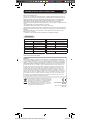
BEEF LAMB VEAL HAMBURGER
PORK TURKEY CHICKEN FISH
20170123_WeberOriginal_Digital Thermometer_IM.indd 5 23/01/2017 11.22

6
DIGITAL MEAT THERMOMETER, WIRELESS
NOTE: Please keep this manual handy as you use your new product. It contains practical
step-by-step instructions, as well as technical specifications and warnings you should know
about.
OVERVIEW
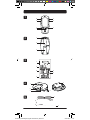
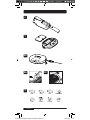
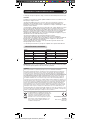
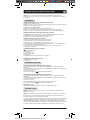
MONITOR FRONT VIEW (ILLUSTRATION 1 PAGE 2)
1. MEAT: Select meat type
2. MODE: Select °C or °F + set temperature manually + stop alarm temporarily
3. TASTE: Select doneness level
4. CLEAR: Reset TIMER
5. TIMER: Begin / end the stopwatch and timer
6. MIN (+): Select minutes for timer (+ increase target temperature)
7. SEC (-) : Select seconds for timer (+ decrease target temperature)
MONITOR BACK VIEW (ILLUSTRATION 2 PAGE 2)
1. POWER / LIGHT: Activate/deactivate unit + turn on light for 5 seconds
2. Belt Clip - for wearing the monitor on your belt
3. Battery compartment (Batteries are not included)
LCD SCREEN (ILLUSTRATION 3 PAGE 2)
1. Meat type - Displays type of meat selected for cooking
2. Low battery indicator for both monitor and transmitter
3. Doneness level - Displays specific doneness level selected
4. Target temperature - Displays pre-programmed cooking temperature for meat type and
manually set cooking temperatures
5. Current temperature - Displays internal meat temperature from probe tip
6. Stopwatch time
TRANSMITTER (ILLUSTRATION 4 PAGE 2)
1.
Activate transmitter
2. LED indicator
3. Monitor housing
4. Probe socket cover
5. Probe socket
6. Battery compartment (Batteries are not included)
PROBE (ILLUSTRATION 5 PAGE 2)
1. Probe connector wire
2. Probe tip
GETTING STARTED
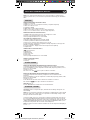
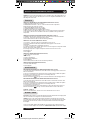
INSTALLING THE BATTERIES IN THE MONITOR (ILLUSTRATION 6 PAGE 3)
1. Slide then lift up and remove the battery compartment cover on the back of the monitor.
2. Place two AAA batteries in the compartment as indicated by the polarity symbols (+ and -)
(Batteries are not included).
3. Replace the cover.
If the LCD screen shows
, please replace the batteries of monitor.
INSTALLING THE BATTERIES IN THE TRANSMITTER (ILLUSTRATION 7 PAGE 3)
1. Slide then lift up and remove the battery compartment cover on the bottom of the
transmitter
2. Place two AAA batteries into the compartment as indicated by the polarity symbols (+ and -)
(Batteries are not included).
3. Replace the cover.
4. The LED indicator will flash 3 times to indicate the transmitter is activated.
If the LCD shows
, please replace the batteries of transmitter.
SELECTING °C or °F
Press the MODE button to switch between Celsius and Fahrenheit.
OPERATION COOKING
CAUTION The probe is a sharp metal object, and will become hot during cooking. Take care
when handling.
NOTE: Place the transmitter and monitor away from direct sunlight and heat or flames and do
not rest the probe on the cooking surface or in open flames of the barbeque. Doing so could
damage the thermistor inside the probe.
1. Pull out the probe socket cover carefully on the transmitter, plug the probe connector into
the socket (ILLUSTRATION 8A PAGE 3) and insert the probe into the meat. To prevent the lid
from crimping the probe wire on gas grills, feed the wire out through the slot on the side of the
cookbox (ILLUSTRATION 8B PAGE 3). For charcoal grilling (ILLUSTRATION 8C PAGE 3), route
the probe wire away from the direct heat of the charcoal briquettes.
NOTE: If the probe is not connected to the transmitter the current temperature will display as
“LLL” or “--.-“.
20170123_WeberOriginal_Digital Thermometer_IM.indd 6 23/01/2017 11.22

7
WWW.WEBER.COM
DIGITAL MEAT THERMOMETER, WIRELESS
2. Press and hold the POWER / LIGHT button for 3 seconds to switch on the monitor.
3. Press and hold the
button on the top of the transmitter to switch on the transmitter. Once
the transmitter is turned on, a red LED light on the transmitter will flash fast one time
followed by 2-3 flashes. The current temperature will be displayed on the monitor.
4. Press the MEAT button to select type of meat. The monitor displays the type of meat, the
thermometer is ready to measure. Each press will change the display in the sequence as
shown in ILLUSTRATION 9 PAGE 3.
5. To select the doneness level of the meat, press the TASTE button. The different taste options
are: WELL / M WELL / MEDIUM / M RARE / RARE. The corresponding preset temperature will
show on the monitor as “Target Temp”.
6. To manually set the target temperature:
Press and hold the MODE button for 3 seconds, “Target Temp” will start to flash.
Press MIN (+) or SEC (-) buttons to select the desired temperature.
Press the MODE button to confirm your setting.
NOTE: Once the desired temperature is reached, the monitor will start to beep and the
“Current Temp” will begin to blink.
• To stop the alarm temporarily, press the MODE button.
• To stop the alarm completely, remove the probe from the meat.
NOTE: The maximum operating temperature for the probe is 380°C (716°F). When the probe
temperature exceeds the maximum display temperature (300°C / 572°F) the LCD will show “HHH”.
AFTER COOKING
• Once cooking is finished, remove the probe from the meat using oven mitt or gloves.
• Press and hold POWER / LIGHT on the monitor and
on the transmitter for about 2 seconds
to turn them off. The transmitter will flash 3 times continuously.
• Disconnect the probe from the transmitter and replace the socket cover.
CLEANING
Clean the probe, monitor and transmitter by wiping with a damp cloth and mild detergent.
NOTE: Do not clean the probe, monitor or transmitter in a dishwasher or immerse in water or
liquid.
TO OPERATE THE TIMER
The count up and count down timer operate independently of the temperature sensor.
To start the count up timer press the TIMER button when 00:00 is displayed on the monitor. To
stop the timer, press the TIMER button. To restart after stopping, press TIMER button. To reset
to 00:00, press the TIMER button followed by the CLEAR button.
To start the count down timer, first set the minutes and seconds. Press the MIN button to set
the minutes and press the SEC button to set the seconds. Press the TIMER button to start the
count down. To stop the count down, press the TIMER and to restart, press the TIMER again.
To reset press the TIMER followed by the CLEAR button. Once the count down has finished, the
monitor will beep and the MIN:SEC will flash on the screen. Press any button to stop the
alarm.
BACKLIGHT
Press the POWER / LIGHT button to illuminate the screen for 5 seconds.
NOTE: The backlight will turn on when any button is pressed, but then settings will also
change.
TRANSMITTER DATA TRANSMISSION
Place the transmitter within 60 m (196 ft) of the monitor.
NOTE: The LED indicator flashes during transmission.
IMPORTANT: The transmitter will transmit the temperature every 30 seconds if the
temperature does not change. Once the temperature changes the transmitter will update
automatically.
PRECAUTIONS
This product is engineered to give you years of satisfactory service if you handle it carefully.
Here are a few precautions:
• Do not subject the unit to excessive force, shock, dust, temperature or humidity, which may
result in malfunction, shorter electronic life span, battery damaged or deterioration of parts.
• Placement of this product on wood surfaces with certain types of finishes, such as clear
varnish, may result in damage to the finish. Consult the furniture manufacturer’s care
instructions for direction as to the types of objects that may safely be placed on the wood
surface. Weber-Stephen Products Co. shall not be responsible for any damage to wood
surfaces from contact with this product.
• Do not immerse the unit in water. If you spill liquid over it, dry it immediately with a soft,
lint-free cloth.
• Do not clean the unit with abrasive or corrosive materials.
• Do not use the thermometer in a microwave oven or oven.
20170123_WeberOriginal_Digital Thermometer_IM.indd 7 23/01/2017 11.22

8
DIGITAL MEAT THERMOMETER, WIRELESS
This symbol indicates that the product cannot be
disposed of with household refuse. For instructions
regarding proper disposal of this product in Europe,
please visit www.weber.com®, and contact the importer
listed for your country. If you do not have internet access,
contact your dealer for the importer’s name, address and
telephone number.
COUNTRIES RITTE APPROVAL
COMPLIED
All EU countries, Swizerland
and Norway
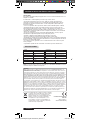
MONITOR
LxWxH 129x65x32mm (5.1x2.6x1.3 in)
Weight 87g (3.1 oz) without battery
Temperature unit °C / °F
Max. operating temperature 50 °C (140 °F)
Temperature resolution 1°C (2°F)
Signal frequency 433 MHz
Power 2xUM - 4 AAA 1.5V batteries
TRANSMITTER
LxWxH 96x69x22mm (3.8x2.7x0.9 in)
Weight 36g (1.3 oz) without battery
Transmission range 60m (197 ft) unobstructed
Power 2xUM - 4 AAA 1.5V batteries
PROBE
Max. operating temperature 380 °C (716 °F)
• Do not tamper with the unit’s internal components. Doing so will invalidate the warranty on
the unit and may cause unnecessary damage. The unit contains no user-serviceable parts.
• Only use fresh batteries as specified in the user’s instructions. Do not mix new and old
batteries.
• Risk of explosion if battery is replaced by an incorrect type. Dispose used batteries according
to the instructions.
• The contents of this manual may not be reproduced without the permission of the
manufacturer.
SPECIFICATIONS
NOTE: The technical specifications for this product and the contents of the user manual are
subject to change without notice.
WARRANTY
Weber-Stephen Products Co., (Weber®) hereby warrants to the ORIGINAL PURCHASER of this digital
meat thermometer, that it will be free from defects in material and workmanship from the date of
purchase as follows: 2 year(s) when assembled, and operated in accordance with the printed instruc-
tions accompanying it. Weber may require reasonable proof of your date of purchase. THEREFORE,
YOU SHOULD RETAIN YOUR SALES RECEIPT OR INVOICE. This Limited Warranty shall be limited to
the repair or replacement of parts that prove defective under normal use and service and which on
examination shall indicate, to Weber’s satisfaction, that they are defective. If Weber confirms the defect
and approves the claim, Weber will elect to repair or replace such parts without charge. This Limited
Warranty does not cover any failures or operating difficulties due to accident, abuse, misuse, alteration,
misapplication, vandalism, improper installation or improper maintenance or service, or failure to
perform normal and routine maintenance. Deterioration or damage due to severe weather conditions
such as hail, hurricanes, earthquakes or tornadoes, discolouration due to exposure to chemicals either
directly or in the atmosphere, is not covered by this Limited Warranty. Weber shall not be liable under
this or any implied warranty for incidental or consequential damages.
20170123_WeberOriginal_Digital Thermometer_IM.indd 8 23/01/2017 11.22

9
WWW.WEBER.COM
TERMÓMETRO DIGITAL INALÁMBRICO PARA CARNE
NOTA Tenga al alcance este manual durante el uso de su nuevo producto. Contiene
instrucciones prácticas “paso a paso”, así como especificaciones técnicas y advertencias que
debe conocer.
VISTA GENERAL
VISTA GENERAL: VISTA FRONTAL DEL MONITOR (ILUSTRACIÓN 1, PÁGINA 2)
1. MEAT: Seleccionar un tipo de carne
2. MODE: Seleccionar °C o °F + ajustar manualmente la temperatura + detener temporal-
mente la alarma
3. TASTE: Seleccionar un nivel de cocción
4. CLEAR: Restablecer el temporizador
5. TIMER: Iniciar/detener el cronómetro y el temporizador
6. MIN (+): Ajustar los minutos del temporizador (+ incrementar la temperatura deseada)
7. SEC (-): Ajustar los segundos del temporizador (+ reducir la temperatura deseada)
VISTA GENERAL: VISTA POSTERIOR DEL MONITOR (ILUSTRACIÓN 2, PÁGINA 2)
1. POWER / LIGHT: Activar/desactivar el dispositivo + activar la iluminación durante 5
segundos
2. Pinza para cinturón (permite llevar el monitor en el cinturón)
3. Compartimento de las pilas (pilas no incluidas)
VISTA GENERAL: PANTALLA LCD (ILUSTRACIÓN 3, PÁGINA 2)
1. Tipo de carne: muestra el tipo de carne seleccionado para cocinar
2. Indicador de nivel bajo de batería del monitor y el transmisor
3. Nivel de cocción: muestra el nivel de cocción seleccionado
4. Temperatura deseada: muestra la temperatura de cocción preprogramada para el tipo de
carne y permite ajustar manualmente las temperaturas de cocción
5. Temperatura actual: muestra la temperatura interna de la carne, medida a través de la
punta de la sonda
6. Cronómetro
VISTA GENERAL: TRANSMISOR (ILUSTRACIÓN 4, PÁGINA 2)
1.
Activar el transmisor
2. Indicador LED
3. Carcasa del monitor
4. Cubierta protectora de la toma de la sonda
5. Toma de la sonda
6. Compartimento de las pilas (pilas no incluidas)
VISTA GENERAL: SONDA (ILUSTRACIÓN 5, PÁGINA 2)
1. Cable de conexión de la sonda
2. Punta de la sonda
PRIMEROS PASOS
INSTALACIÓN DE LAS PILAS EN EL MONITOR (ILUSTRACIÓN 6, PÁGINA 3)
1. Deslice y levante a continuación la cubierta del compartimento de las pilas, situado en la
parte posterior del monitor.
2. Introduzca dos pilas AAA en el compartimento, de acuerdo con los símbolos de polaridad + y
- (pilas no incluidas).
3. Instale de nuevo la cubierta.
Si la pantalla LCD muestra el símbolo
, cambie las pilas del monitor.
INSTALACIÓN DE LAS PILAS EN EL TRANSMISOR (ILUSTRACIÓN 7, PÁGINA 3)
1. Deslice y levante a continuación la cubierta del compartimento de las pilas, situado en la
parte inferior del transmisor.
2. Introduzca dos pilas AAA en el compartimento, de acuerdo con los símbolos de polaridad + y
- (pilas no incluidas).
3. Instale de nuevo la cubierta.
4. El indicador LED parpadeará 3 veces para indicar que el transmisor se encuentra activo.
Si la pantalla LCD muestra el símbolo
, cambie las pilas del transmisor.
SELECCIÓN DE °C O °F
Pulse el botón MODE para cambiar entre grados centígrados y grados Fahrenheit.
FUNCIONAMIENTO: COCCIÓN
PRECAUCIÓN La sonda es un objeto metálico afilado y se calienta durante la cocción. Extreme
la precaución durante su manipulación.
NOTA No exponga el monitor ni el transmisor a la incidencia directa de la luz solar ni a
entornos demasiado cálidos o llamas; no apoye la sonda sobre la superficie de cocción ni la
exponga a las llamas generadas por la barbacoa. Si lo hace, podría dañar el termistor que
contiene la sonda.
1. Extraiga con cuidado la cubierta protectora de la toma de la sonda, conecte el conector de la
sonda a la toma (ILUSTRACIÓN 8A, PÁGINA 3) e inserte la sonda en la carne. Para evitar que la
tapa dañe el cable de la sonda en parrillas de gas, introduzca el cable a través de la ranura
20170123_WeberOriginal_Digital Thermometer_IM.indd 9 23/01/2017 11.22

10
TERMÓMETRO DIGITAL INALÁMBRICO PARA CARNE
situada en el lateral de la caja de cocción (ILUSTRACIÓN 8B, PÁGINA 3). Para parrillas de
carbón vegetal (ILUSTRACIÓN 8C, PÁGINA 3), pase el cable de modo que no reciba
directamente el calor generado por las briquetas de carbón vegetal.
NOTA Si la sonda no se conecta al transmisor, este mostrará el mensaje “LLL” o “--.-” en
lugar de la temperatura actual.
2. Mantenga pulsado el botón POWER / LIGHT durante 3 segundos para encender el monitor.
3. Mantenga pulsado el botón
, situado en la parte superior del transmisor, para encenderlo.
Una vez encendido el transmisor, el indicador LED del transmisor emitirá un destello rápido,
seguido de 2-3 destellos. La temperatura actual se mostrará en el monitor.
4. Pulse el botón MEAT para seleccionar el tipo de carne. El monitor mostrará el tipo de carne
y el termómetro se encontrará listo para medir. Cada pulsación dará lugar a una nueva
selección en la pantalla, como se muestra en la ILUSTRACIÓN 9, PÁGINA 3.
5. Para seleccionar el nivel de cocción de la carne, pulse el botón TASTE.
Los diferentes niveles de cocción son: WELL/M WELL/MEDIUM/M RARE/RARE.
La temperatura predefinida correspondiente se mostrará en el monitor junto al indicador
“Target Temp”.
6. Para ajustar manualmente la temperatura deseada:
Mantenga pulsado el botón MODE durante 3 segundos, hasta que el indicador “Target Temp”
comience a parpadear.
Pulse los botones MIN (+) o SEC (-) para seleccionar la temperatura deseada.
Pulse el botón MODE para confirmar el ajuste.
NOTA Una vez alcanzada la temperatura deseada, el monitor emitirá un sonido y el indicador
“Current Temp” comenzará a parpadear.
• Para detener temporalmente la alarma, pulse el botón MODE.
• Para detener la alarma por completo, extraiga la sonda de la carne.
NOTA La temperatura máxima de funcionamiento de la sonda es de 380 °C (716 °F). Si la
temperatura de la sonda supera la temperatura máxima de la pantalla (300 °C/572 °F), esta
mostrará el mensaje “HHH”.
TRAS LA COCCIÓN
• Una vez finalizada la cocción, extraiga la sonda de la carne empleando guantes de horno o
cocina.
• Mantenga pulsado el botón POWER / LIGHT del monitor y el botón
del transmisor durante
unos 2 segundos para apagar ambos componentes. El transmisor parpadeará 3 veces
continuamente.
• Desconecte la sonda del transmisor y coloque de nuevo la cubierta protectora de la toma.
LIMPIEZA
Limpie la sonda, el monitor y el transmisor empleando un paño húmedo y un detergente
suave.
NOTA No limpie la sonda, el monitor ni el transmisor en un lavavajillas ni sumergiéndolos en
agua ni ningún otro líquido.
PARA USAR EL TEMPORIZADOR
El temporizador de cuenta hacia delante y cuenta atrás funciona de forma independiente del
sensor de temperatura.
Para iniciar una cuenta hacia delante, pulse el botón TIMER cuando se muestre 00:00 en el
monitor. Para detener el temporizador, pulse el botón TIMER. Para reiniciar el temporizador
tras detenerlo, pulse el botón TIMER. Para restablecer el temporizador a 00:00, pulse el botón
TIMER y, a continuación, el botón CLEAR.
Para iniciar una cuenta atrás, ajuste primero los minutos y segundos. Pulse el botón MIN para
ajustar los minutos y, a continuación, el botón SEC para ajustar los segundos. Pulse el botón
TIMER para iniciar la cuenta atrás. Para detener la cuenta atrás, pulse el botón TIMER; para
reiniciarla, pulse de nuevo el botón TIMER.
Para restablecer la cuenta atrás, pulse el botón TIMER y, a continuación, el botón CLEAR. Una
vez que la cuenta atrás haya llegado a su fin, el monitor emitirá un sonido y el mensaje
MIN:SEC parpadeará en la pantalla. Pulse cualquier botón para detener la alarma.
LUZ DE FONDO
Pulse el botón POWER / LIGHT para iluminar la pantalla durante 5 segundos.
NOTA La luz de fondo se activará al pulsar cualquier botón; no obstante, dicha acción dará
lugar a una operación.
TRANSMISIÓN DE DATOS DEL TRANSMISOR
Sitúe el transmisor a menos de 60 m (196 ft) del monitor.
NOTA El indicador LED parpadeará durante la transmisión.
IMPORTANTE El transmisor transmitirá la temperatura cada 30 segundos si esta no cambia. Si
la temperatura cambia, el transmisor la actualizará automáticamente.
20170123_WeberOriginal_Digital Thermometer_IM.indd 10 23/01/2017 11.22

11
WWW.WEBER.COM
GARANTÍA
Weber-Stephen Products Co. (Weber®) garantiza por la presente al COMPRADOR ORIGINAL de este
TERMÓMETRO DIGITAL PARA CARNE que el dispositivo se encontrará libre de defectos de materiales
y mano de obra a partir de la fecha de compra y hasta transcurridos 2 años, siempre que su montaje y
uso tengan lugar de acuerdo con las instrucciones descritas en el manual impreso que lo acompaña.
Weber podrá exigir la presentación de una prueba razonable que demuestre la veracidad de la fecha de
compra. CONSERVE EL RECIBO DE COMPRA O LA FACTURA PARA SATISFACER TAL REQUISITO. Esta
garantía limitada se limitará a la reparación o sustitución de aquellas piezas que, al ser sometidas a un
régimen de uso y servicio normales, presenten algún defecto posteriormente corroborado por Weber
como tal. Si Weber confirma el defecto y admite la reclamación, reparará o sustituirá las piezas, a
elección propia, sin coste alguno para el comprador. Esta garantía limitada no cubre aquellas averías o
problemas de uso derivados de accidentes, abusos, usos indebidos, alteraciones, malos usos, actos de
vandalismo o instalaciones incorrectas, la realización de una operación de mantenimiento o servicio de
forma incorrecta, o negligencias relacionadas con la ejecución de las operaciones de mantenimiento
normales y rutinarias. El deterioro o los daños sufridos por el producto como resultado de condiciones
meteorológicas adversas de carácter grave, como granizadas, huracanes, terremotos o tornados,
así como la decoloración resultante de la exposición, directa o atmosférica, a productos químicos, no
forman parte del ámbito de esta garantía limitada. Weber no será responsable, ni al amparo de esta
garantía ni al de cualquier otra de tipo implícito, de daño accidental o resultante alguno.
Este símbolo indica que el producto no debe ser eliminado
en conjunto con los residuos domésticos. Si desea obtener
información acerca de la correcta eliminación de este
producto en Europa, visite el sitio web www.weber.com®
y póngase en contacto con la empresa importadora
correspondiente a su país. Si no dispone de acceso a
Internet, póngase en contacto con su distribuidor; este
le proporcionará el nombre, el domicilio y el número de
teléfono de la empresa importadora.
COUNTRIES RITTE APPROVAL
COMPLIED
All EU countries,
Swizerland and Norway
TERMÓMETRO DIGITAL INALÁMBRICO PARA CARNE
MONITOR
LxWxH 129x65x32mm (5.1x2.6x1.3 in)
Weight 87g (3.1 oz) without battery
Temperature unit °C / °F
Max. operating temperature 50 °C (140 °F)
Temperature resolution 1°C (2°F)
Signal frequency 433 MHz
Power 2xUM - 4 AAA 1.5V batteries
TRANSMITTER
LxWxH 96x69x22mm (3.8x2.7x0.9 in)
Weight 36g (1.3 oz) without battery
Transmission range 60m (197 ft) unobstructed
Power 2xUM - 4 AAA 1.5V batteries
PROBE
Max. operating temperature 380 °C (716 °F)
PRECAUCIONES
Este producto ha sido diseñado para proporcionar un servicio satisfactorio durante años si se
manipula con cuidado.
A continuación se señalan algunas precauciones que conviene tomar:
• No someta el dispositivo a fuerzas excesivas, impactos, entornos muy polvorientos,
temperaturas extremas o grandes niveles de humedad; ello podría dar lugar a fallos de
funcionamiento, perjudicar la vida útil de la electrónica del producto, dañar la batería y
deteriorar las piezas.
• Colocar este producto sobre superficies de madera con determinados tipos de acabado,
como barniz transparente, puede causar daños al mismo. Solicite las instrucciones de
mantenimiento al fabricante del mueble y consulte el tipo de objetos que pueden colocarse
con seguridad sobre la superficie de madera. Weber-Stephen Products Co. no se hace
responsable de los daños que pudieran sufrir las superficies de madera como resultado del
contacto con este producto.
• No sumerja el dispositivo en agua. Si derrama algún líquido sobre el mismo, séquelo
inmediatamente empleando un paño suave que no deposite pelusas.
• No limpie el dispositivo empleando materiales abrasivos o corrosivos.
• No use el termómetro en un horno microondas o un horno convencional.
• No manipule los componentes internos del dispositivo. Si lo hace, la garantía del dispositivo
quedará invalidada y el dispositivo podría sufrir daños innecesarios. El dispositivo no contiene
piezas que el usuario pueda reparar.
• Use sólo pilas nuevas, según lo descrito en el manual de instrucciones. No mezcle pilas
nuevas y antiguas.
• Se prohíbe la reproducción del contenido de este manual sin permiso del fabricante.
ESPECIFICACIONES
NOTA Las especificaciones técnicas de este producto y el contenido del manual del usuario se
encuentran sujetos a cambios sin aviso previo.
20170123_WeberOriginal_Digital Thermometer_IM.indd 11 23/01/2017 11.22

12
THERMOMÈTRE À VIANDE NUMÉRIQUE SANS FIL
REMARQUE Veuillez conserver ce manuel à portée de main lors de l’utilisation de votre
nouveau produit. Il contient des instructions pas-à-pas pratiques, ainsi que des spécifications
techniques et avertissements dont vous devriez prendre connaissance.
APERÇU
APERÇU : VUE AVANT DU MONITEUR (ILLUSTRATION 1 PAGE 2)
1. MEAT : Sélection du type de viande
2. MODE : Sélection de l’unité °C ou °F + définition manuelle de la température + arrêt
temporaire de l’alarme
3. TASTE : Sélection du degré de cuisson
4. CLEAR : Réinitialisation de TIMER
5. TIMER : Mise en marche/arrêt du chronomètre et de la minuterie
6. MIN (+) : Sélection des minutes pour la minuterie (+ augmentation de la température cible)
7. SEC (-) : Sélection des secondes pour la minuterie (+ réduction de la température cible)
APERÇU : VUE ARRIERE DU MONITEUR (ILLUSTRATION 2 PAGE 2)
1. POWER / LIGHT : Mise en marche/arrêt de l’appareil + allumage de l’éclairage pendant 5
secondes
2. Clip pour ceinture : permet de porter le moniteur à votre ceinture
3. Compartiment pour piles (les piles ne sont pas fournies)
APERÇU : ÉCRAN LCD (ILLUSTRATION 3 PAGE 2)
1. Type de viande - Affiche le type de viande sélectionné pour la cuisson
2. Indicateur batterie faible pour le moniteur et le transmetteur
3. Niveau de cuisson - Affiche le niveau de cuisson spécifique sélectionné
4. Température cible - Affiche la température de cuisson préprogrammée pour le type de
viande et permet de définir manuellement des températures de cuisson
5. Température actuelle - Affiche la température interne de la viande mesurée par la pointe de
la sonde
6. Durée du chronomètre
APERÇU : TRANSMETTEUR (ILLUSTRATION 4 PAGE 2)
1.
Mise en marche du transmetteur
2. Indicateur LED
3. Boîtier du moniteur
4. Cache de la fiche de la sonde
5. Fiche de la sonde
6. Compartiment pour piles (les piles ne sont pas fournies)
APERÇU : SONDE (ILLUSTRATION 5 PAGE 2)
1. Câble de connexion de la sonde
2. Pointe de la sonde
PREMIERE UTILISATION
INSERTION DES PILES DANS LE MONITEUR (ILLUSTRATION 6 PAGE 3)
1. Faites coulisser, soulevez et retirez le couvercle du compartiment pour piles situé à l’arrière
du moniteur.
2. Insérez deux piles AAA dans le compartiment en respectant les symboles de polarité (+ et
-). (Les piles ne sont pas fournies).
3. Remettez le couvercle en place.
Si
s’affiche sur l’écran LCD, procédez au remplacement des piles du moniteur.
INSERTION DES PILES DANS LE TRANSMETTEUR (ILLUSTRATION 7 PAGE 3)
1. Faites coulisser, soulevez et retirez le couvercle du compartiment pour piles situé au bas du
transmetteur.
2. Insérez deux piles AAA dans le compartiment en respectant les symboles de polarité (+ et
-). (Les piles ne sont pas fournies).
3. Remettez le couvercle en place.
4. L’indicateur LED clignote 3 fois pour vous indiquer que le transmetteur fonctionne.
Si
s’affiche sur l’écran LCD, procédez au remplacement des piles du transmetteur.
SÉLECTION DES UNITÉS °C OU °F
Appuyez sur la touche MODE pour commuter entre les degrés Celsius et Fahrenheit.
CUISSON
ATTENTION La sonde est un objet métallique présentant des arêtes vives et chauffant
fortement pendant la cuisson. Faites attention lorsque vous la manipulez.
REMARQUE N’exposez pas le transmetteur et le moniteur à la lumière directe du soleil, à des
sources de chaleur ou à des flammes, et ne déposez pas la sonde sur la surface de cuisson ou
dans les flammes du barbecue. Cela pourrait endommager le thermistor intégré dans la
sonde.
1. Retirez précautionneusement le cache de la fiche de la sonde du transmetteur, branchez le
connecteur de la sonde dans la prise (ILLUSTRATION 8A PAGE 3) et insérez la sonde dans la
viande. Dans le cas des barbecues au gaz, il faut éviter que le couvercle ne vienne écraser le
20170123_WeberOriginal_Digital Thermometer_IM.indd 12 23/01/2017 11.22

13
WWW.WEBER.COM
THERMOMÈTRE À VIANDE NUMÉRIQUE SANS FIL
câble de la sonde en guidant le câble dans la fente située sur le côté du boîtier de cuisson
(ILLUSTRATION 8B PAGE 3). Pour les barbecues au charbon de bois (ILLUSTRATION 8C PAGE
3), faites passer le câble de la sonde de sorte à l’éloigner de la chaleur directe émise par les
briquettes de charbon.
REMARQUE Si la sonde n’est pas connectée au transmetteur, l’affichage de la température
indiquera « LLL » ou « --.- ».
2. Appuyez et maintenez la touche POWER / LIGHT enfoncée pendant 3 secondes pour allumer
le moniteur.
3. Appuyez et maintenez la touche
de la partie supérieure du transmetteur enfoncée pour
mettre le transmetteur en marche. Lorsque le transmetteur est allumé, la LED rouge du
transmetteur clignote une fois rapidement suivi de 2 à 3 clignotements. La température
actuelle s’affiche sur le moniteur.
4. Appuyez sur la touche MEAT pour sélectionner le type de viande. Le moniteur affiche le type
de viande. Le thermomètre est prêt pour la mesure. Chaque appui permettra de passer en
revue les différents affichages dans l’ordre indiqué dans l’ILLUSTRATION 9 PAGE 3.
5. Pour sélectionner le niveau de cuisson de la viande, appuyez sur la touche TASTE.
Les différents niveaux de cuisson sont : WELL / M WELL / MEDIUM / M RARE / RARE (TRÈS
CUIT / BIEN CUIT / À POINT / SAIGNANT / BLEU)
La température prédéfinie correspondante s’affiche à l’écran en tant que « Target Temp ».
6. Définition manuelle de la température :
Appuyez et maintenez la touche MODE enfoncée pendant 3 secondes. La mention « Target
Temp » se met à clignoter.
Appuyez sur les touches MIN (+) ou SEC (-) pour sélectionner la température souhaitée.
Appuyez sur la touche MODE pour confirmer le réglage.
REMARQUE Une fois la température souhaitée atteinte, le moniteur commence à biper et la
mention « Current Temp » se met à clignoter.
• Pour couper temporairement l’alarme, appuyez sur la touche MODE.
• Pour couper définitivement l’alarme, retirez la sonde de la viande.
REMARQUE La température de service maximale de la sonde est de 380 °C (716 °F). Lorsque
la température de la sonde est supérieure à la valeur d’affichage max. de la température (300
°C/572 °F), l’écran LCD indique « HHH ».
APRÈS LA CUISSON
• Une fois la cuisson terminée, retirez la sonde de la viande. Utilisez des maniques ou des
gants.
• Appuyez et maintenez enfoncées la touche POWER / LIGHT du moniteur et la touche
du
transmetteur pendant 2 secondes pour les arrêter. Le transmetteur clignotera 3 fois de suite.
• Déconnectez la sonde du transmetteur et remettez le cache de la prise en place.
NETTOYAGE
Nettoyez la sonde, le moniteur et le transmetteur en les essuyant à l’aide d’un chiffon humide
et d’un détergent doux.
REMARQUE Ne nettoyez pas la sonde, le moniteur ou le transmetteur au lave-vaisselle et ne
les immergez pas dans de l’eau ou un autre liquide.
UTILISATION DE TIMER
Le chronomètre et la minuterie fonctionnent indépendamment du capteur de température.
Pour activer la fonction chronomètre, appuyez sur la touche TIMER lorsque la mention 00:00
est affichée. Pour couper le chronomètre, appuyez sur la touche TIMER. Pour redémarrer le
chronomètre après un arrêt, appuyez sur la touche TIMER. Pour réinitialiser le chronomètre
sur 00:00, appuyez sur la touche TIMER suivi de la touche CLEAR.
Pour activer la fonction minuterie, réglez d’abord les minutes et les secondes. Appuyez sur la
touche MIN pour régler les minutes et appuyez sur la touche SEC pour régler les secondes.
Appuyez sur la touche TIMER pour lancer le compte à rebours. Pour arrêter le compte à
rebours, appuyez sur TIMER et pour ensuite redémarrer le compte à rebours, appuyez une
nouvelle fois sur TIMER.
Pour réinitialiser la minuterie, appuyez sur la touche TIMER suivi de la touche CLEAR. Une fois
le compte à rebours terminé, le moniteur bipera et l’inscription MIN:SEC clignotera à l’écran.
Appuyez sur n’importe quelle touche pour arrêter l’alarme.
RÉTROÉCLAIRAGE
Appuyez sur la touche POWER/LIGHT pour éclairer l’écran pendant 5 secondes.
REMARQUE Le rétroéclairage s’allumera dès que vous appuyez sur une touche. Cependant les
réglages seront également modifiés.
TRANSMISSION DE DONNÉES VIA LE TRANSMETTEUR
Installez le transmetteur à une distance de max. 60 m (196 pieds) du moniteur.
REMARQUE L’indicateur LED clignote pendant la transmission.
IMPORTANT : Le transmetteur transmet la température toutes les 30 secondes si cette dernière
20170123_WeberOriginal_Digital Thermometer_IM.indd 13 23/01/2017 11.22

14
GARANTIE
Weber-Stephen Products Co., (Weber®) garantit par la présente à l’ACHETEUR D’ORIGINE de ce
thermomètre à viande numérique que ce produit ne présente aucun défaut matériel ou de fabrication
à compter de la date d’achat, selon les termes suivants : 2 ans de garantie, pour autant que l’appareil
ait été monté et utilisé conformément aux instructions du mode d’emploi qui l’accompagne. Weber est
susceptible d’exiger une preuve raisonnable de la date d’achat. DÈS LORS, NOUS VOUS RECOMMANDONS
DE CONSERVER VOTRE TICKET DE CAISSE OU VOTRE FACTURE. La présente garantie limitée portera
uniquement sur la réparation ou le remplacement de pièces qui s’avèrent défectueuses compte tenu
de conditions d’utilisation et de service normales et qui, suite à un examen satisfaisant par Weber, se
révéleront être effectivement défectueuses. Si Weber confirme le défaut et approuve la réclamation, l’en-
treprise décidera de réparer ou de remplacer sans frais les pièces en cause. La présente garantie limitée
ne couvre pas les pannes ni les problèmes de fonctionnement résultant d’un accident, d’une utilisation
abusive, d’une utilisation inadéquate, d’une dégradation, d’une mauvaise application, du vandalisme,
d’une installation incorrecte, d’un entretien ou d’une réparation non effectué dans les règles de l’art ou
de l’incapacité à procéder à un entretien normal et de routine. Les dégradations ou les dégâts résultant
d’intempéries comme la grêle, les ouragans, les tremblements de terre ou les tornades ainsi que la
décoloration provoquée par l’exposition à des produits chimiques, par contact direct ou dans l’air, ne sont
pas couvertes par la présente garantie limitée. Weber ne pourra être tenu responsable, selon la présente
garantie ou toute garantie implicite, pour les dégâts accessoires ou indirects.
Ce symbole indique que le produit ne peut pas être mis
au rebut avec les déchets domestiques. Pour obtenir des
instructions concernant la méthode de mise au rebut
adéquate de ce produit en Europe, visitez le site Web
www.weber.com® et contactez l’importateur répertorié
pour votre pays. Si vous ne disposez pas d’un accès à
Internet, contactez votre revendeur pour obtenir les
coordonnées de l’importateur.
COUNTRIES RITTE APPROVAL
COMPLIED
All EU countries, Swizerland
and Norway
THERMOMÈTRE À VIANDE NUMÉRIQUE SANS FIL
MONITOR
LxWxH 129x65x32mm (5.1x2.6x1.3 in)
Weight 87g (3.1 oz) without battery
Temperature unit °C / °F
Max. operating temperature 50 °C (140 °F)
Temperature resolution 1°C (2°F)
Signal frequency 433 MHz
Power 2xUM - 4 AAA 1.5V batteries
TRANSMITTER
LxWxH 96x69x22mm (3.8x2.7x0.9 in)
Weight 36g (1.3 oz) without battery
Transmission range 60m (197 ft) unobstructed
Power 2xUM - 4 AAA 1.5V batteries
PROBE
Max. operating temperature 380 °C (716 °F)
ne change pas. Lorsque la température change, le transmetteur fait automatiquement la mise à jou
r.
CONSIGNES
Ce produit a été conçu pour vous satisfaire pendant de nombreuses années s’il est utilisé avec soin.
Voici quelques consignes à suivre :
• N’exposez pas l’appareil à une force excessive, à des chocs, à la poussière, à de fortes
températures ou à une humidité extrême car cela pourrait entraîner des problèmes de
fonctionnement, réduire la durée de vie des composants électroniques, endommager les piles
ou détruire certains éléments.
• L’installation de ce produit sur des surfaces en bois dotées de certaines finitions telles qu’un
vernis transparent peut endommager la finition. Consultez les consignes d’entretien du
fabricant du meuble pour connaître les types d’objets qui peuvent être posés en toute sécurité
sur la surface en bois. Weber-Stephen Products Co. ne pourra pas être tenu responsable des
dommages occasionnés aux surfaces en bois suite à un contact avec le présent produit.
• N’immergez pas l’appareil dans l’eau. Si vous renversez du liquide sur l’appareil, essuyez-le
immédiatement avec un chiffon doux non-pelucheux.
• Ne nettoyez pas l’appareil avec des détergents abrasifs ou corrosifs.
• N’utilisez pas le thermomètre dans un four micro-ondes ou un four traditionnel.
• Ne touchez pas aux composants internes de l’appareil. L’ouverture de l’appareil invalide tout
droit à garantie et peut provoquer des dommages inutiles. L’appareil ne contient aucun
élément susceptible d’être réparé par l’utilisateur.
• Utilisez uniquement des piles neuves comme spécifié dans le guide de l’utilisateur. Ne
mélangez pas piles neuves et usagées.
• Le contenu du présent manuel ne peut pas être reproduit sans la permission du fabricant.
CARACTÉRISTIQUES TECHNIQUES
REMARQUE Nous nous réservons le droit de modifier les spécifications techniques du produit
et le contenu du présent guide de l’utilisateur sans notice préalable.
20170123_WeberOriginal_Digital Thermometer_IM.indd 14 23/01/2017 11.22

15
WWW.WEBER.COM
DIGITALES FLEISCHTHERMOMETER, DRAHTLOS
HINWEIS Halten Sie bei der Benutzung Ihres neues Produktes diese Anleitung griffbereit. Sie
enthält eine Schritt-für-Schritt-Anleitung sowie technische Vorgaben und Warnhinweise, die
unbedingt zu beachten sind.
ÜBERSICHT
ÜBERSICHT: VORDERANSICHT DES ANZEIGEGERÄTS (ABBILDUNG 1 SEITE 2)
1. MEAT (FLEISCH): Auswahl der Fleischsorte
2. MODE (MODUS): Auswahl °C oder °F + manuelles Einstellen der Temperatur +
vorübergehendes Ausschalten des Alarms
3. TASTE (GESCHMACK): Auswahl der Garstufe
4. CLEAR (LÖSCHEN): Zurücksetzen des TIMERS
5. TIMER: Ein-/Ausschalten der Stoppuhr und des Timers
6. MIN (+): Einstellen der Minuten für den Timer (+ Steigern der gewünschten Temperatur)
7. SEC (SEK) (-): Einstellen der Sekunden für den Timer (+ Reduzieren der gewünschten
Temperatur)
ÜBERSICHT: RÜCKANSICHT DES ANZEIGEGERÄTS (ABBILDUNG 2 SEITE 2)
1. POWER / LIGHT: Ein-/Ausschalten des Geräts + Einschalten des Lichts für 5 Sekunden
2. Gürtelclip – zum Tragen des Anzeigegeräts am Gürtel
3. Batteriefach (Batterien sind nicht im Lieferumfang enthalten.)
ÜBERSICHT: LCD-DISPLAY (ABBILDUNG 3 SEITE 2)
1. Fleischsorte – Zeigt die für das Garen ausgewählte Fleischsorte an.
2. Anzeige für den Batteriefüllstand, sowohl für das Anzeigegerät als auch für die
Sendestation
3. Garstufe – Zeigt die konkret ausgewählte Garstufe an.
4. Gewünschte Temperatur – Zeigt die für die Fleischsorte voreingestellte Temperatur und die
manuell eingestellten Temperaturen an.
5. Derzeitige Temperatur – Zeigt die Temperatur im Inneren des Fleisches aus der
Messkopfspitze an.
6. Zeit Stoppuhr
ÜBERSICHT: SENDESTATION (ABBILDUNG 4 SEITE 2)
1.
Einschalten der Sendestation
2. LED-Anzeige
3. Gehäuse Anzeigegerät
4. Abdeckung Messkopfbuchse
5. Messkopfbuchse
6. Batteriefach (Batterien sind nicht im Lieferumfang enthalten.)
ÜBERSICHT: MESSKOPF (ABBILDUNG 5 SEITE 2)
1. Anschlusskabel Messkopf
2. Messkopfspitze
ERSTE SCHRITTE
EINLEGEN DER BATTERIEN IN DAS ANZEIGEGERÄT (ABBILDUNG 6 SEITE 3)
1. Schieben Sie den Batteriefachdeckel auf der Rückseite des Anzeigegeräts nach vorne und
heben Sie ihn dann an.
2. Legen Sie zwei AAA-Batterien in das Batteriefach ein und beachten Sie dabei die Symbole
der Polung (+ und -) (Batterien sind nicht im Lieferumfang enthalten.).
3. Setzen Sie den Deckel wieder ein.
Wenn das LCD-Display
anzeigt, tauschen Sie bitte die Batterien des Anzeigegeräts aus.
EINLEGEN DER BATTERIEN IN DIE SENDESTATION (ABBILDUNG 7 SEITE 3)
1. Schieben Sie den Batteriefachdeckel auf der Rückseite der Sendestation nach vorne und
heben Sie diesen dann an.
2. Legen Sie zwei AAA-Batterien in das Batteriefach ein und beachten Sie dabei die Symbole
der Polung (+ und -) (Batterien sind nicht im Lieferumfang enthalten.).
3. Setzen Sie den Deckel wieder ein.
4. Die LED-Anzeige blinkt dreimal, um anzugeben, dass die Sendestation eingeschaltet ist.
Wenn das LCD-Display
anzeigt, ersetzen Sie bitte die Batterien der Sendestation.
AUSWAHL °C ODER °F
Drücken Sie die MODE-Taste, um zwischen Celsius und Fahrenheit zu wechseln.
BETRIEB GAREN
ACHTUNG Der Messkopf ist ein spitzer Metallgegenstand, der während des Garvorgangs heiß
wird. Seien Sie daher vorsichtig, wenn Sie das Gerät benutzen.
HINWEIS Stellen Sie die Sendestation und das Anzeigegerät nicht direkt in die Sonne und
nicht in die Nähe von großer Hitze oder offenem Feuer. Legen Sie den Messkopf nicht auf das
Kochfeld oder auf den Grill. Dies könnte den Temperaturfühler innerhalb des Messkopfes
beschädigen.
1. Ziehen Sie die Abdeckung der Messkopfbuchse vorsichtig aus der Sendestation heraus,
stecken Sie den Messkopfstecker in die Buchse (ABBILDUNG 8A SEITE 3) und den Messkopf in
20170123_WeberOriginal_Digital Thermometer_IM.indd 15 23/01/2017 11.22

16
DIGITALES FLEISCHTHERMOMETER, DRAHTLOS
das Fleisch. Um bei Verwendung eines Gasgrills zu verhindern, dass der Deckel das
Messkopfkabel quetscht, leiten Sie das Kabel durch einen Schlitz an der Seite der
Grillkammer heraus (ABBILDUNG 8B SEITE 3). Achten Sie bei Holzkohlegrills (ABBILDUNG 8C
SEITE 3) darauf, das Kabel nicht direkt durch die Hitze der Holzkohlebriketts zu leiten.
HINWEIS Wenn der Messkopf nicht mit der Sendestation verbunden ist, wird die aktuelle
Temperatur mit „LLL“ oder „--.-“ angezeigt.
2. Drücken und halten Sie für drei Sekunden die POWER / LIGHT-Taste, um das Anzeigegerät
einzuschalten.
3. Drücken und halten Sie die
-Taste oben auf der Sendestation, um sie einzuschalten.
Sobald die Sendestation eingeschaltet ist, blinkt ein rotes LED-Licht oben auf dem Sender
einmal schnell und danach noch zwei bis drei Mal. Die derzeitige Temperatur wird auf dem
Anzeigegerät angezeigt.
4. Drücken Sie die MEAT-Taste, um die Fleischsorte auszuwählen. Das Anzeigegerät zeigt das
Symbol der jeweiligen Fleischsorte an. Das Thermometer ist nun bereit zum Messen. Nach
jedem Tastendruck verändert sich die Anzeige in der Reihenfolge wie abgebildet ABBILDUNG
9 SEITE 3.
5. Drücken Sie die TASTE-Taste, um die Garstufe des Fleisches auszuwählen.
Die unterschiedlichen Garstufen sind: WELL (Durch) / M WELL (Halbdurch) / MEDIUM
(Medium) / M RARE (Rosa) / RARE (Englisch)
Die dazugehörige voreingestellte Temperatur wird auf dem Anzeigegerät als „Target Temp“
dargestellt.
6. Manuelles Einstellen der gewünschten Temperatur:
Drücken und halten Sie für drei Sekunden die MODE-Taste. „Target Temp“ beginnt zu blinken.
Drücken Sie die MIN (+)- oder SEC (-)-Taste, um die gewünschte Temperatur einzustellen.
Drücken Sie die MODE-Taste, um Ihre Einstellung zu bestätigen.
HINWEIS Sobald die gewünschte Temperatur erreicht ist, beginnt das Anzeigegerät zu piepen
und „Current Temp“ blinkt.
• Drücken Sie die MODE-Taste, um den Alarm vorübergehend auszuschalten.
• Entfernen Sie den Messkopf aus dem Fleisch, um den Alarm vollständig auszuschalten.
HINWEIS Die Höchsttemperatur des Messkopfes beträgt 380°C (716°F). Wenn die Temperatur
des Messkopfes die maximal anzeigbare Temperatur (300°C/572°F) übersteigt, zeigt der
LCD-Display „HHH“ an.
NACH DEM GAREN
• Ziehen Sie nach Abschluss des Garvorganges den Messkopf mit einem Grillhandschuh aus
dem Fleisch.
• Drücken und halten Sie für zwei Sekunden die POWER/LIGHT-Taste auf dem Anzeigegerät
und
auf der Sendestation, um sie auszuschalten. Die Sendestation blinkt fortwährend
dreimal.
• Trennen Sie den Messkopf von der Sendestation und setzen Sie die Abdeckung wieder ein.
REINIGUNG
Wischen Sie den Messkopf, das Anzeigegerät und die Sendestation mit einem feuchten Tuch
und mildem Spülmittel ab.
HINWEIS Der Messkopf, das Anzeigegerät und die Sendestation dürfen nicht in der
Geschirrspülmaschine gereinigt werden oder in Wasser oder andere Flüssigkeiten getaucht
werden.
BEDIENUNG TIMER
Der Stoppuhr- bzw. Countdown-Timer funktioniert unabhängig vom Temperaturfühler.
Drücken Sie die TIMER-Taste, sobald 00:00 auf dem Anzeigegerät erscheint, um die Stoppuhr
zu starten. Drücken Sie die TIMER-Taste, um die Stoppuhr auszuschalten. Drücken Sie die
TIMER-Taste, um die Stoppuhr neuzustarten. Drücken Sie zuerst die TIMER-Taste und danach
die CLEAR-Taste, um die Zeit auf Null zurückzusetzen.
Stellen Sie vor dem Starten des Countdowns zuerst die Minuten und Sekunden ein. Drücken
Sie die MIN-Taste, um die Minuten einzustellen und die SEC-Taste, um die Sekunden
einzustellen. Drücken Sie die TIMER-Taste, um den Countdown zu starten. Drücken Sie die
TIMER-Taste, um den Countdown auszuschalten. Das nochmalige Drücken der TIMER-Taste
bewirkt einen Neustart.
Drücken Sie zuerst die TIMER-Taste und danach die CLEAR-Taste, um den Countdown
zurückzusetzen. Sobald der Countdown abgelaufen ist, piept das Anzeigegerät und die
Zeitanzeige blinkt auf dem Bildschirm. Drücken Sie eine beliebige Taste, um den Alarm
auszuschalten.
HINTERGRUNDBELEUCHTUNG
Drücken Sie für fünf Sekunden die POWER/LIGHT-Taste, um den Bildschirm zu beleuchten.
HINWEIS Die Hintergrundbeleuchtung schaltet sich ein, sobald eine Taste gedrückt wird.
Allerdings werden dann auch die Einstellungen geändert.
ÜBERTRAGEN DER DATEN DURCH DIE SENDESTATION
Stellen Sie die Sendestation in einer Entfernung von bis zu 60 m (196 ft) zum Anzeigegerät auf.
20170123_WeberOriginal_Digital Thermometer_IM.indd 16 23/01/2017 11.22

17
WWW.WEBER.COM
GARANTIE
Weber-Stephen Products Co. (Weber®) garantiert dem ERSTKÄUFER dieses digitalen Fleischthe-
rmometers, dass es ab dem Kaufdatum wie folgt frei von Material- und Verarbeitungsmängeln
ist: 2 Jahre, wenn es gemäß der beiliegenden Bedienungsanleitung montiert und betrieben wird.
Weber kann einen angemessenen Beweis für das Kaufdatum verlangen. BEWAHREN SIE DAHER
IHRE QUITTUNG ODER IHRE RECHNUNG AUF. Diese eingeschränkte Garantie beschränkt sich auf
die Reparatur bzw. den Ersatz von Teilen, die sich bei normaler Benutzung und Wartung als defekt
erwiesen haben und die Weber nach entsprechender Überprüfung für defekt hält. Wenn Weber den
Defekt bestätigt und den Anspruch anerkennt, wird das betroffene Teil kostenlos repariert oder ersetzt.
Diese eingeschränkte Garantie gilt nicht für Ausfälle oder Betriebsstörungen aufgrund von Unfall,
Missbrauch, unsachgemäßer Benutzung, Veränderung, Zweckentfremdung, mutwilliger Beschädigung,
unsachgemäßer Installation oder unsachgemäßen Wartungs- und Servicearbeiten oder aufgrund von
Nichtausführung der normalen, routinemäßigen Wartung. Verschleiß und Schäden aufgrund starker
Wetterbedingungen wie Hagel, Wirbelstürme, Erdbeben oder Tornados, Verfärbungen aufgrund des
Aussetzens von Chemikalien entweder direkt oder über die Atmosphäre, sind nicht durch diese einges-
chränkte Garantie abgedeckt. Weber ist weder unter dieser noch unter einer anderen eingeschränkten
Garantie für indirekte oder Folgeschäden haftbar.
Dieses Symbol bedeutet, dass das Produkt nicht zusammen
mit dem normalen Hausmüll entsorgt werden darf. Für
weitere Informationen bezüglich der ordnungsgemäßen
Entsorgung dieses Produkts in Europa besuchen Sie unsere
Website www.weber.com®. Wenden Sie sich an den für Ihr
Land aufgeführten Importeur. Falls Sie über keinen Inter-
netzugang verfügen, fragen Sie Ihren Händler nach Namen,
Adresse und Telefonnummer des Importeurs.
COUNTRIES RITTE APPROVAL
COMPLIED
All EU countries, Swizerland
and Norway
DIGITALES FLEISCHTHERMOMETER, DRAHTLOS
MONITOR
LxWxH 129x65x32mm (5.1x2.6x1.3 in)
Weight 87g (3.1 oz) without battery
Temperature unit °C / °F
Max. operating temperature 50 °C (140 °F)
Temperature resolution 1°C (2°F)
Signal frequency 433 MHz
Power 2xUM - 4 AAA 1.5V batteries
TRANSMITTER
LxWxH 96x69x22mm (3.8x2.7x0.9 in)
Weight 36g (1.3 oz) without battery
Transmission range 60m (197 ft) unobstructed
Power 2xUM - 4 AAA 1.5V batteries
PROBE
Max. operating temperature 380 °C (716 °F)
HINWEIS Während der Übertragung blinkt die LED-Anzeige.
WICHTIG: Solange sich die Temperatur nicht verändert, überträgt die Sendestation alle 30
Sekunden die Temperatur. Sobald sich die Temperatur verändert, aktualisiert die
Sendestation die Temperaturanzeige automatisch.
VORSICHTSMASSNAHMEN
Dieses Produkt ist so gebaut, dass es bei sorgfältiger Behandlung viele Jahre zu Ihrer
Zufriedenheit funktionieren wird.
Beachten Sie bitte die folgenden Vorsichtsmaßnahmen:
• Setzen Sie das Gerät nicht übermäßiger Beanspruchung, Stößen, Staub, hohen
Temperaturen oder Feuchtigkeit aus. Andernfalls können Störungen auftreten, die
elektronische Lebensdauer kann sich verkürzen, Batterien können beschädigt werden oder
der Zustand der Teile könnte sich verschlechtern.
• Das Ablegen des Produktes auf Holzoberflächen mit bestimmter Oberflächenbehandlung,
wie Klarlack, kann zu Schäden an den Oberflächen führen. Welche Gegenstände gefahrlos auf
der Holzoberfläche abgelegt werden können, entnehmen Sie den Pflegehinweisen des
Möbelherstellers. Weber-Stephen Products Co. übernimmt für Schäden an Holzoberflächen,
die aus dem Kontakt mit diesem Produkt resultieren, keine Haftung.
• Tauchen Sie das Gerät nicht ins Wasser. Falls Flüssigkeit auf das Gerät gelaufen ist,
trocknen Sie das Gerät sofort mit einem weichen, fusselfreien Tuch.
• Reinigen Sie das Gerät nicht mit groben oder ätzenden Reinigungsmitteln.
• Verwenden Sie das Thermometer nicht in einer Mikrowelle oder in einem Backofen.
• Nehmen Sie keine Änderungen an den internen Bestandteilen des Gerätes vor. Sollten doch
Änderungen vorgenommen werden, erlischt die Garantie und vermeidbare Schäden können
entstehen. Das Gerät enthält keine durch den Anwender zu wartenden Bestandteile.
• Verwenden Sie ausschließlich neue, in der Bedienungsanleitung vorgegebene Batterien.
Mischen Sie nicht neue mit alten Batterien.
• Die Inhalte dieser Bedienungsanleitung dürfen nur mit Genehmigung des Herstellers
vervielfältigt werden.
VORGABEN
HINWEIS Die technischen Vorgaben dieses Produkts und der Inhalt der Bedienungsanleitung
können ohne Ankündigung geändert werden.
20170123_WeberOriginal_Digital Thermometer_IM.indd 17 23/01/2017 11.22

18
LANGATON DIGITAALINEN LIHALÄMPÖMITTARI
HUOM! Pidä tämä ohje ulottuvillasi, kun otat tuotteen käyttöön. Ohje sisältää vaiheittaiset
käyttöohjeet sekä tarpeelliset tekniset tiedot ja varoitukset.
YLEISKUVA
YLEISKUVA: VASTAANOTIN EDESTÄ (KUVA 1 SIVULLA 2)
1. MEAT: Valitse lihatyyppi
2. MODE: Valitse °C tai °F + aseta lämpötila manuaalisesti + pysäytä hälytys väliaikaisesti
3. TASTE: Valitse kypsyysaste
4. CLEAR: Nollaa ajastin (TIMER)
5. TIMER: Käynnistä/pysäytä sekuntikello ja ajastin
6. MIN (+): Valitse ajastimen minuuttimäärä (+ lisää kohdelämpötilaa)
7. SEC (-) : Valitse ajastimen sekuntimäärä (+ vähennä kohdelämpötilaa)
YLEISKUVA: VASTAANOTIN TAKAA (KUVA 2 SIVULLA 2)
1. POWER / LIGHT: Kytke/katkaise virta + kytke valo 5 sekunnin ajaksi
2. Vyökiinnitin – helppo kiinnittää vyöhön
3. Paristokotelo (ei sisällä paristoja)
YLEISKUVA: LCD-NÄYTTÖ (KUVA 3 SIVULLA 2)
1. Lihatyyppi – Näyttää kypsennettävän lihatyypin
2. Paristotilan ilmaisin sekä vastaanottimelle että lähettimelle
3. Kypsyysaste – Näyttää valitun kypsyysasteen
4. Kohdelämpötila – Näyttää eri lihatyypeille ohjelmoidut lämpötilat sekä manuaalisesti
asetetut lämpötilat
5. Nykyinen lämpötila – Näyttää anturin kärjen mittaaman lihan sisälämpötilan
6. Sekuntikellon aika
YLEISKUVA: LÄHETIN (KUVA 4 SIVULLA 2)
1.
Lähettimen käynnistys
2. LED-merkkivalo
3. Vastaanottimen teline
4. Anturiliitännän suojus
5. Anturiliitäntä
6. Paristokotelo (ei sisällä paristoja)
YLEISKUVA: ANTURI (KUVA 5 SIVULLA 2)
1. Anturin kytkentäjohto
2. Anturin kärki
LÄMPÖMITTARIN KÄYTTÖÖNOTTO
PARISTOJEN ASENTAMINEN VASTAANOTTIMEEN (KUVA 6 SIVULLA 3)
1. Työnnä vastaanottimen takana olevan paristotilan kantta ja nosta se pois paikaltaan.
2. Aseta paristotilaan kaksi AAA-paristoa symbolien (+ ja -) osoittamalla tavalla (paristot eivät
sisälly).
3. Aseta paristotilan kansi paikalleen.
Jos LCD-näytössä näkyy
, vaihda vastaanottimen paristot.
PARISTOJEN ASENTAMINEN LÄHETTIMEEN (KUVA 7 SIVULLA 3)
1. Työnnä lähettimen alla olevan paristotilan kantta ja nosta se pois paikaltaan.
2. Aseta tilaan kaksi AAA-paristoa symbolien (+ ja -) osoittamalla tavalla (paristot eivät
sisälly).
3. Aseta paristotilan kansi paikalleen.
4. LED-valo vilkkuu kolme kertaa ja ilmoittaa, että lähetin on päällä.
Jos LCD-näytössä näkyy
, vaihda lähettimen paristot.
°C- tai °F-asteikon valinta
Vaihda Celsius- ja Fahrenheit-asteikon välillä painamalla MODE-painiketta.
KÄYTTÖ RUOANLAITOSSA
VAROITUS Anturi on terävä metalliesine, joka kuumenee ruoanlaiton aikana. Käsittele sitä
varovasti.
HUOM! Aseta lähetin ja vastaanotin suojaan suoralta auringonvalolta ja liekeiltä. Älä aseta
anturia grillin kuumille pinnoille tai avotulelle, koska sen sisällä oleva termistori voi
vahingoittua.
1. Avaa anturiliitännän suojus varovasti, kiinnitä anturin liitinpää liittimeen (KUVA 8A SIVULLA
3) ja työnnä anturi lihaan. Estä johdon litistyminen kaasugrillin kannen alle viemällä johto ulos
grillin sivussa olevasta aukosta (KUVA 8B SIVULLA 3). Brikettigrillissä (KUVA 8C SIVULLA 3)
estä anturin johtoa joutumasta kosketuksiin kuumien brikettien kanssa.
HUOM Jos anturia ei ole liitetty kunnolla lähettimeen, nykyisen lämpötilan kohdassa näkyy
”LLL” tai ”--.-”.
2. Kytke vastaanotin päälle painamalla POWER / LIGHT -painiketta 3 sekunnin ajan.
3. Kytke lähetin päälle painamalla lähettimen päällä olevaa
-painiketta. Kun lähetin on
20170123_WeberOriginal_Digital Thermometer_IM.indd 18 23/01/2017 11.22

19
WWW.WEBER.COM
LANGATON DIGITAALINEN LIHALÄMPÖMITTARI
päällä, sen punainen LED-valo vilkkuu nopeasti kerran ja sen jälkeen 2–3 kertaa. Anturin
mittaama lämpötila näkyy vastaanottimessa.
4. Valitse lihatyyppi painamalla MEAT-painiketta. Vastaanottimessa näkyy valitun lihatyypin
kuva ja lämpömittari on käyttövalmis. Jokainen painallus vaihtaa näyttöön uuden vaihtoehdon,
järjestys on esitetty KUVASSA 9 SIVULLA 3.
5. Valitse lihalle haluamasi kypsyysaste painamalla TASTE-painiketta.
Kypsyysvaihtoehdot ovat: WELL (täysin kypsä) / M WELL / MEDIUM / M RARE / RARE (raaka)
Vastaava esiasetettu lämpötila näkyy vastaanottimessa ”Target Temp” -kohdassa.
6. Kohdelämpötilan säätö käsin:
Paina MODE-painiketta 3 sekunnin ajan, ”Target Temp” alkaa vilkkua.
Valitse haluamasi lämpötila painamalla MIN (+) tai SEC (-) -painiketta.
Vahvista lämpötila painamalla MODE-painiketta.
HUOM! Kun lämpötila on kohonnut asetettuun lämpötilaan, ”Current Temp” alkaa vilkkua.
• Pysäytä hälytys väliaikaisesti painamalla MODE-painiketta.
• Pysäytä hälytys kokonaan vetämällä anturi lihasta.
HUOM! Anturin maksimilämpötila on 380 °C (716 °F). Kun anturin lämpötila ylittää
maksimilämpötilan (300 °C / 572 °F), LCD-näytössä näkyy ”HHH”.
KYPSENTÄMISEN JÄLKEEN
• Kun liha on valmista, tartu anturiin kintaalla tai patalapulla ja vedä se irti lihasta.
• Kytke vastaanotin ja lähetin pois päältä painamalla vastaanottimen POWER / LIGHT-painiket-
ta ja lähettimen
-painiketta noin 2 sekunnin ajan. Lähetin vilkkuu kolme kertaa peräkkäin.
• Irrota anturi lähettimestä ja aseta liitännän suojus paikalleen.
PUHDISTUS
Puhdista anturi, vastaanotin ja lähetin pyyhkimällä ne mietoon pesuaineliuokseen kostutetulla
liinalla.
HUOM! Älä pese anturia, vastaanotinta tai lähetintä astianpesukoneessa, älä myöskään upota
niitä veteen tai muuhun nesteeseen.
AJASTIMEN KÄYTTÖ
Aikaa eteen- ja taaksepäin mittaava ajastin toimii lämpötila-anturista riippumatta.
Ajan lasku eteenpäin aloitetaan painamalla TIMER-painiketta, kun näytössä näkyy 00:00.
Pysäytä ajastin painamalla TIMER-painiketta. Käynnistä ajastin uudelleen pysäyttämisen
jälkeen painamalla TIMER-painiketta. Palauta ajastin arvoon 00:00 painamalla ensin
TIMER-painiketta ja sen jälkeen CLEAR-painiketta.
Aloita ajan laskeminen taaksepäin asettamalla ensin minuutit ja sekunnit. Aseta minuutit
painamalla MIN-painiketta ja sekunnit painamalla SEC-painiketta. Käynnistä ajastin
painamalla TIMER-painiketta. Voit pysäyttää ajastimen ja käynnistää sen uudelleen painamalla
TIMER-painiketta.
Nollaa ajastin painamalla ensin TIMER-painiketta ja sen jälkeen CLEAR-painiketta. Kun ajastin
on laskenut ajan loppuun, vastaanotin antaa merkkiäänen ja näytössä vilkkuu MIN:SEC. Voit
keskeyttää hälytyksen painamalla mitä tahansa painiketta.
TAUSTAVALO
Voit valaista näytön 5 sekunnin ajaksi painamalla POWER / LIGHTpainiketta.
HUOM! Taustavalo syttyy painettaessa mitä tahansa painiketta, mutta tällöin muuttuvat myös
asetukset.
TIEDONSIIRTO LÄHETTIMESTÄ
Lähetin voi olla korkeintaan 60 metrin etäisyydellä vastaanottimesta.
HUOMAA, että LED-valo vilkkuu tiedonsiirron aikana.
TÄRKEÄÄ: Lähetin lähettää tiedon lämpötilasta joka 30. sekunti niin kauan kuin lämpötila
pysyy samana. Lämpötilan noustessa lähetin päivittää tiedon automaattisesti.
TURVAOHJEET
Tuote on suunniteltu kestämään monivuotista käyttöä, kunhan sitä käsitellään varovasti.
Muutamia turvaohjeita:
• Älä käsittele tuotetta liian kovaotteisesti tai altista sitä tärinälle, pölylle, äärilämpötiloille tai
kosteudelle, koska se voi aiheuttaa tuotteessa toimintahäiriön, pariston käyttöikä voi lyhentyä
tai paristo vaurioitua ja tuotteen osat voivat irrota.
• Tuotteen asettaminen käsitellyille, esim. lakatuille puupinnoille, voi vaurioittaa puun pintaa.
Tiedustele kalusteen valmistajalta hoito-ohjeita sekä sitä, millaisia esineitä puupinnalle
voidaan turvallisesti asettaa. Weber-Stephen Products Co ei vastaa minkäänlaisista tämän
tuotteen puupinnoille aiheuttamista vahingoista.
• Älä upota yksikköä veteen. Jos sen päälle kaatuu nestettä, pyyhi se välittömästi pehmeällä
nukkaantumattomalla liinalla.
• Älä puhdista yksikköä naarmuttavilla tai syövyttävillä aineilla.
• Älä käytä lämpömittaria uunissa tai mikroaaltouunissa.
20170123_WeberOriginal_Digital Thermometer_IM.indd 19 23/01/2017 11.22

20
TAKUU
Weber-Stephen Products Co., (Weber®) antaa tämän digitaalisen lihalämpömittarin ALKU-
PERÄISELLE OSTAJALLE takuun siitä, että tuotteessa ei esiinny materiaali- tai valmistusvikoja ost-
opäivästä lähtien seuraavasti: Takuuaika on 2 vuotta, edellyttäen että tuote on koottu ja sitä käytetään
tuotteen mukana toimitettujen kirjallisten ohjeiden mukaisesti. Weber voi vaatia kelvollisen todisteen
tuotteen ostopäivästä. TÄMÄN TAKIA TUOTTEEN OSTOKUITTI TAI -LASKU KANNATTAA SÄILYTTÄÄ.
Tämä rajoitettu takuu rajoittuu sellaisten osien korjaukseen tai vaihtoon, jotka osoittautuvat tuotetta
normaalisti käytettäessä ja huollettaessa viallisiksi ja jotka tutkimuksissa todetaan viallisiksi Weberin
hyväksymällä tavalla. Jos Weber vahvistaa viallisuuden ja hyväksyy takuuta koskevan vaatimuksen,
Weber valintansa mukaan korjaa tai vaihtaa kyseiset osat veloituksetta. Tämä rajoitettu takuu ei kata
vikoja tai toimintahäiriöitä, jotka aiheutuvat onnettomuudesta, väärinkäytöstä, tuotteen muuttamisesta,
käyttötarkoituksen vastaisesta käytöstä, ilkivallasta, virheellisestä asennuksesta, virheellisestä hoido-
sta tai huollosta tai säännöllisen huollon tai muiden normaalien huoltotoimenpiteiden laiminlyönnistä.
Tämän rajoitetun takuun piiriin eivät myöskään kuulu kuluminen tai muut vauriot, jotka aiheutuvat
ankarista sääolosuhteista, kuten raekuuroista, myrskyistä, maanjäristyksistä tai pyörremyrskyistä,
eivätkä tuotteen värin muutokset, jotka aiheutuvat joko suoraan tai ympäristöstä tulleille kemikaaleille
altistumisesta. Weber ei ole vastuussa tämän tai minkään epäsuoran takuun nojalla oheisvahingoista
tai välillisistä vahingoista.
Tällä symbolilla ilmaistaan tuote, jota ei saa hävittää
kotitalousjätteen mukana. Jos haluat ohjeet tämän
tuotteen asianmukaisesta hävittämisestä Euroopassa,
katso oman maasi maahantuoja sivustosta www.weber.
com® ja ota yhteyttä maahantuojaan. Jos käytössäsi ei
ole Internet-yhteyttä, kysy maahantuojan nimi, osoite ja
puhelinnumero tuotteen jälleenmyyjältä.
COUNTRIES RITTE APPROVAL
COMPLIED
All EU countries, Swizerland
and Norway
LANGATON DIGITAALINEN LIHALÄMPÖMITTARI
MONITOR
LxWxH 129x65x32mm (5.1x2.6x1.3 in)
Weight 87g (3.1 oz) without battery
Temperature unit °C / °F
Max. operating temperature 50 °C (140 °F)
Temperature resolution 1°C (2°F)
Signal frequency 433 MHz
Power 2xUM - 4 AAA 1.5V batteries
TRANSMITTER
LxWxH 96x69x22mm (3.8x2.7x0.9 in)
Weight 36g (1.3 oz) without battery
Transmission range 60m (197 ft) unobstructed
Power 2xUM - 4 AAA 1.5V batteries
PROBE
Max. operating temperature 380 °C (716 °F)
• Älä kajoa yksikön sisäisiin osiin. Niihin kajoaminen aiheuttaa takuun raukeamisen ja yksikkö
voi vaurioitua. Yksikön osia ei voida irrottaa tai huoltaa.
• Käytä vain uusia paristoja käyttöoppaan ohjeiden mukaan. Älä käytä uusia ja vanhoja
paristoja yhtä aikaa.
• Tämän oppaan sisältöä ei saa kopioida ilman valmistajan lupaa.
TEKNISET TIEDOT
HUOM Valmistaja pidättää oikeuden muuttaa tuotteen teknisiä tietoja ja käyttöoppaan sisältöä
siitä etukäteen ilmoittamatta.
20170123_WeberOriginal_Digital Thermometer_IM.indd 20 23/01/2017 11.22
Pagina se încarcă...
Pagina se încarcă...
Pagina se încarcă...
Pagina se încarcă...
Pagina se încarcă...
Pagina se încarcă...
Pagina se încarcă...
Pagina se încarcă...
Pagina se încarcă...
Pagina se încarcă...
Pagina se încarcă...
Pagina se încarcă...
Pagina se încarcă...
Pagina se încarcă...
Pagina se încarcă...
Pagina se încarcă...
Pagina se încarcă...
Pagina se încarcă...
Pagina se încarcă...
Pagina se încarcă...
Pagina se încarcă...
Pagina se încarcă...
Pagina se încarcă...
Pagina se încarcă...
Pagina se încarcă...
Pagina se încarcă...
Pagina se încarcă...
Pagina se încarcă...
Pagina se încarcă...
Pagina se încarcă...
Pagina se încarcă...
Pagina se încarcă...
Pagina se încarcă...
Pagina se încarcă...
Pagina se încarcă...
Pagina se încarcă...
Pagina se încarcă...
Pagina se încarcă...
Pagina se încarcă...
Pagina se încarcă...
Pagina se încarcă...
Pagina se încarcă...
Pagina se încarcă...
Pagina se încarcă...
Pagina se încarcă...
Pagina se încarcă...
Pagina se încarcă...
Pagina se încarcă...
Pagina se încarcă...
Pagina se încarcă...
Pagina se încarcă...
Pagina se încarcă...
Pagina se încarcă...
Pagina se încarcă...
Pagina se încarcă...
Pagina se încarcă...
-
 1
1
-
 2
2
-
 3
3
-
 4
4
-
 5
5
-
 6
6
-
 7
7
-
 8
8
-
 9
9
-
 10
10
-
 11
11
-
 12
12
-
 13
13
-
 14
14
-
 15
15
-
 16
16
-
 17
17
-
 18
18
-
 19
19
-
 20
20
-
 21
21
-
 22
22
-
 23
23
-
 24
24
-
 25
25
-
 26
26
-
 27
27
-
 28
28
-
 29
29
-
 30
30
-
 31
31
-
 32
32
-
 33
33
-
 34
34
-
 35
35
-
 36
36
-
 37
37
-
 38
38
-
 39
39
-
 40
40
-
 41
41
-
 42
42
-
 43
43
-
 44
44
-
 45
45
-
 46
46
-
 47
47
-
 48
48
-
 49
49
-
 50
50
-
 51
51
-
 52
52
-
 53
53
-
 54
54
-
 55
55
-
 56
56
-
 57
57
-
 58
58
-
 59
59
-
 60
60
-
 61
61
-
 62
62
-
 63
63
-
 64
64
-
 65
65
-
 66
66
-
 67
67
-
 68
68
-
 69
69
-
 70
70
-
 71
71
-
 72
72
-
 73
73
-
 74
74
-
 75
75
-
 76
76


Weber 17587 Manual de utilizare
- Categorie
- Termometre digitale pentru corp
- Tip
- Manual de utilizare
în alte limbi
- eesti: Weber 17587 Kasutusjuhend
Lucrări înrudite
-
Weber 7516 Manual de utilizare
-
-
-
-
-
-
-
Weber 72469 Manual de utilizare
Alte documente
-
Xavax Digital Roasting Thermometer Manual de utilizare
-
Blaupunkt FTM501 Manualul proprietarului
-
Xavax Digital Meat Thermometer Manual de utilizare
-
BROWIN 185800 Manualul proprietarului
-
-
Hendi 271308 Manual de utilizare
-
Gorenje OT5518 Manualul proprietarului
-
-
OUTDOORCHEF 14.491.21 Manual de utilizare
-