Tellur TLL331281 Wi-Fi Smoke Sensor Manual de utilizare
- Categorie
- Detectoare de fum
- Tip
- Manual de utilizare
Acest manual este potrivit și pentru

Wi-Fi Smoke Sensor
User Manual
TLL331281
For other languages, please visit smart.tellur.com

Thank you for choosing Tellur!
To ensure an optimum performance and safety, please read this user manual
carefully before using the product. Keep this user manual safe for future
references.
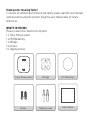
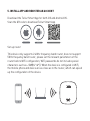
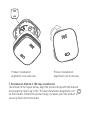
WHAT’S IN THE BOX
Please consult this checklist for all parts.
1 x Tellur Smoke sensor
1 x CR123A battery
1 x 3M tape
2 x Screws
2 x Tapping screws
Tellur Smoke sensor
Screws Tapping screws
3M tape CR 123A battery
User manual

1.PRODUCT OVERVIEW
Increase your sense of security with Tellur's WiFi Smart Smoke Sensor.
Having an intelligent double-checking algorithm, the device senses smoke
and temperature changes and triggers the alarm.
When it detects smoke, the sensor alerts you through an acoustic alarm, a
light indicator and a push notification is sent to your smartphone. You will
also be notified on your smartphone when the batteries are running low or
when someone tries to dismount the device.
The WiFi Smart Smoke Sensor works with a CR123A DC 3V battery
(included) and has a low energy consumption.
The sensor integrates perfectly in the Smart Home ecosystem and allows
you to check its working status and history records by simply accessing the
Tellur Smart app from your smartphone.
2.PRODUCT FEATURES
Detects smoke & temperature change and triggers the alarm.
Multiple types of alarms: light indicator, high-decibel acoustic alarm & push
notification.
Low battery & tamper notifications.
Compatible with Tellur Smart app, perfectly integrated in the Smart Home
ecosystem.
Works with a CR123A DC 3V battery (included) with low energy consumption.
Working in 802.11 b/g/n 2.4GHz wireless network (no hub required).
WiFi network configuration with EZ (Smart Config) and AP (Access Point)
mode.
Share the device with your family.
Mounting with adhesive tape or screw.

Quick guide:
• Make sure the WiFi network is a 802.11 b/g/n 2.4GHz band and internet is
available.
• Download the app from Apple store or Google Play;
• Register an account in the app and login with your email address;
• Setup the device WiFi connection;
• Mount the device on specified location;
• Test and check the device and app working state;
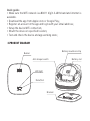
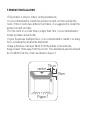
3.PRODUCT DIAGRAM
Buzzer
LED light
Mute/Test
Anti-tamper switch
Battery insulation strip
Battery slot
Bracket

4.PRODUCT SPECIFICATIONS
Power supply: 1 x CR123A DC 3V (included)
Battery life: Up to 3 years
Detection range: Up to 50 m2
Alarm level: 85dB @ 3 meters
Push notifications: Yes
Tamper notifications: Yes
Low battery notifications: Yes
History record: Yes
Self test: Yes
WiFi standard: IEEE 802.11b/g/n
Supported WiFi network: 2.4GHz
Color: White
Housing material: PC + ABS
Installation method: Screws or 3M tape
Operating temperature: -10°C - +55°C
Operating humidity: 5% - 95% RH
Product dimensions: 70 x 70 x 29mm
Product weight: 88 gr

Set up router
This device only supports 2.4GHz frequency band router, does not support
5GHz frequency band router, please set the relevant parameters of the
router before WiFi configuration, WiFi passwords do not include special
characters such as ~!@#$%^&*(). When the device is configured in WiFi,
the mobile phone and device are as close as to the router, which can speed
up the configuration of the device.
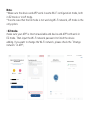
5. INSTALL APP AND REGISTER AN ACCOUNT
Download the Tellur Smart App for both iOS and Android OS.
Scan the QR code to download Tellur Smart App
Android
IOS Download App(IOS&android)

6. ADD AND REMOVE DEVICE IN YOUR APP ACCOUNT
6.1 Open the app and login, Click Add Devices > Security and Sensor >
Smoke Detector (Wi-Fi) to start the device adding.
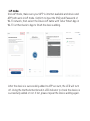
6.2 Press the device button for 5 seconds to enter the Wi-Fi configuration
state (fast blinking in EZ mode or slow blinking in AP mode).
6.3 Input the Wi-Fi SSID and password of the Wi-Fi network that the device
is going to work with, then waiting around 30 seconds for the Wi-Fi
configuration finished until a device is successfully added;
6.4 Change the device name and share it within APP account as you want.
6.5 Click the device just added to launch the device state UI to check the
state, battery level, record history and the APP notification setting.

Note:
*Make sure the device and APP work in same Wi-Fi configuration mode, both
in EZ mode or in AP mode.
*In some case that the EZ mode is not working Wi-Fi network, AP mode is the
only option.
• EZ mode:
make sure your APP is internet available and device and APP both work in
EZ mode. Then input the Wi-Fi network password to finish the device
adding. If you want to change the Wi-Fi network, please check the “Change
network” in APP;

• AP mode:
Click AP Mode, make sure your APP is internet available and device and
APP both work in AP mode. Confirm to input the SSID and Password of
Wi-Fi network, then select the Device AP name with Tellur Smart App in
Wi-Fi list then back to App to finish the device adding.
After the device is successfully added to APP account, the LED will turn
off. Using the methods mentioned in LED indicator to check the device is
successfully added or not. If not, please repeat the Device adding again.

6.6 Remove device
1) Click “Remove Device” to remove this device from your account; click
“Restore manufacturer Defaults” to remove the device from your account
and clear the history record in cloud.
2) After remove device or Restore manufacturer defaults from the APP,
repeating the Device add steps to your account;

7.PRODUCT INSTALLATION
•The product is only for indoor ceiling installation;
•It is recommended to install this product in each corridor outside the
room. If more rooms face different corridors, it is suggested to install the
product in each corridor;
•For the room or corridor that is longer than 12m, it is recommended to
install a product at each end;
•If your house has multiple floors, it is recommended to install it on every
floor, including the loft and the basement.
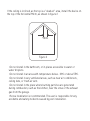
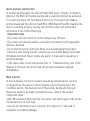
•Keep a distance of at least 50cm from the lamps or decorations;
Keep at least 15cm away from the corner. The installation position should
be 15~30cm from the corner as shown in figure 1;
15cm
15cm
Figure 1
center

If the ceiling is inclined, as the top is a "dead air" area, install the device on
the top of the horizontal 90cm, as shown in figure 2
Figure 2
90cm
•Do not install in the bathroom, or in places accessible to water or
water droplets.
•Do not install in an area with temperature below -100C or above 550C.
•Do not install in very ventilated areas, such as near air conditioners,
ceiling fans, or fresh air vent.
•Do not install in the place where burning particles are generated
during combustion, such as the kitchen, near the stove or the exhaust
gas from the garage.
•Screw installation is recommended. The user is responsible for any
accidents and safety incidents caused by poor installation.

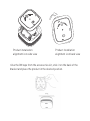
7.1Installation Method I (Screw installation)
•Mark the center point of the two holes in the bracket at the selected
installation place on the ceiling or wall, drill two holes in the mark with the
drill bit and insert the tapping screw to make it flush with the ceiling or wall.
(Note: keep the sensor away from dust when drilling)
•Use the two screws in the accessories kit to install the bracket in position.
Screw hole
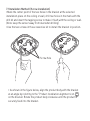
• As shown in the figure below, align the product body with the bracket
at an angle by referring to the "Product installation alignment icon
on the bracket. Rotate the product body clockwise until the product is
securely fixed into the bracket.

Product installation
alignment icon side view
Product installation
alignment icon front view
7.2Installation Method II (3M tape installation)
•As shown in the figure below, align the product body with the bracket
at an angle by referring to the "Product installation alignment icon "
on the bracket. Rotate the product body clockwise until the product is
securely fixed into the bracket.

Product installation
alignment icon side view
Product installation
alignment icon back view
•Use the 3M tape from the accessories kit, stick it on the back of the
bracket and place the product in the desired position.

Alarm and self-test function
In normal working state, the LED will flash RED every 1 minute. If smoke is
detected, the RED LED flashes quickly and a sound prompt will be activated.
For a self-test press the Test/Mute button once. The sensor will make a
prompt sound and the LED will flash RED, GREEN and YELLOW, meaning the
device is working properly. During self-test the sensor will also send a
notification to the Tellur Smart app.
! Important notes
-The sensor will self-check for online status every 10 hours.
-The sensor will send an audible, visual and a notification on the app when
smoke is detected.
-Do not test the sensor with open flame to avoid damaging the product.
-If alarm is sent during the test, it warns you of potential danger and needs
immediate attention. Never ignore any alarm, it may lead to casualties or
property damage.
-If the sensor fails to self-test please refer to “Troubleshooting” part of the
manual. If the fault can not be fixed, the product should be replaced
immediately.
Mute function
In the eventuality of a non-fire alarm caused by a known factor, such as
cooking smoke, the sensor can be muted by one short pressing of the
Test/Mute button. The mute period is 90 seconds, during which proper
measures needs to be made (ventilate the area, remove the smoke).
! Important notes
-After 90 seconds of Mute function, the sensor will alarm again if the smoke
concentration is still too high.
-If you do not know the source of smoke, don’t ignore it. It can lead to
casualties or property damage.

Fault mode
In case of fault alarm (such as low battery, dismantling, sensor failure), press
the Test/Mute button for 3 seconds then release. The sensor will be muted
for 12 hours, during which you can replace the battery, re-mount the device,
self-test the sensor.
Press Test/Mute button again for 3 seconds to re-activate the sensor to
normal working state.
During mute period, if another alarm occurs, the sensor alarm will be
activated.
Replace the battery
Remove the sensor, take out the battery and press the Test/Mute for 5
seconds to release the residual energy stored in the sensor. Insert the new
battery and press Test/Mute button, this will make the device to self-test. If
the self-test is ok, the sensor will switch to normal working state.
Daily maintenance
-Test the sensor at least once a week.
-Keep the sensor clean and without dust. You can clean it with a vacuum
cleaner and a soft fabric material.
-Do not use solvents or cleaning agents to clean the smoke sensor. It can
cause damages to the sensor.
-Don’t paint the sensor, it can affect the normal working of the product.
8.TROUBLESHOOTING
-If the sensor is not reacting, check if the sensor is properly installed on the
bracket.
-Check if the battery has sufficient energy and replace it whenever
necessary.
-In case of anti-dismantling alarm check if the sensor is properly installed on
the bracket.

-Re-position the sensor if there are many false alarms (non-fire alarms)
-Try to clean the sensor if there are many false alarms.
9.WARNING
-Always use indicated battery type, do not replace it with other battery.
-Proper dispose of the battery, do not incinerate, burn, dismantle the
battery.
-Do not leave the product in extreme high temperature environment.
-Do not disassemble the sensor, it will cause the warranty to be lost.
-Keep out of reach of children, especially the battery.

Disposal and recycling information
The crossed-out wheeled-bin symbol on your product, battery, literature or
packaging reminds you that all electronic products and batteries must be
taken to separate waste collection points at the end of their working lives;
they must not be disposed of in the normal waste stream with household
garbage. It is the responsibility of the user to dispose of the equipment
using a designated collection point or service for separate recycling of
waste electrical and electronic equipment (WEEE) and batteries according
to local laws. Proper collection and recycling of your equipment helps
ensure EEE waste is recycled in a manner that conserves valuable
materials and protects human health and the environment, improper
handling, accidental breakage, damage, and/or improper recycling at the
end of its life may be harmful for health and environment.

For other langauges please scan th QR code
Pentru manuale in alte limbi vă rugăm să scanați codul QR
Para otros idiomas, escanee el código QR
Pour les autres langages, veuillez scanner le code QR
Für andere Sprachen scannen Sie bitte den QR-Code
Per altre lingue, eseguire la scansione del codice QR
www.tellur.com/manual-tll331281
-
 1
1
-
 2
2
-
 3
3
-
 4
4
-
 5
5
-
 6
6
-
 7
7
-
 8
8
-
 9
9
-
 10
10
-
 11
11
-
 12
12
-
 13
13
-
 14
14
-
 15
15
-
 16
16
-
 17
17
-
 18
18
-
 19
19
-
 20
20


Tellur TLL331281 Wi-Fi Smoke Sensor Manual de utilizare
- Categorie
- Detectoare de fum
- Tip
- Manual de utilizare
- Acest manual este potrivit și pentru
în alte limbi
Lucrări înrudite
Alte documente
-
LG M160 Manual de utilizare
-
LG LG G6 gold Manualul utilizatorului
-
LG G4 - H818 Manual de utilizare
-
LG LGH815.AVD2BD Manual de utilizare
-
LG LGK580.AEEETS Manual de utilizare
-
LG LGH960A.ATFPBK Manual de utilizare
-
LG G4 Stylus Manual de utilizare
-
LG K500N-black Manual de utilizare
-
LG LGH525N.AHUKKW Manual de utilizare