Tesla WT8H90M Manual de utilizare
- Categorie
- Uscătoare
- Tip
- Manual de utilizare

Product images are for illustrative purposes only and may differ from the actual product.
TUMBLE
DRYER
WT8H90M
HR MK RO SRBENG
BiH/
CG
User Manual


3
ENG
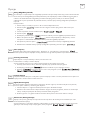
SAFETY INSTRUCTIONS
WARNING!
To prevent any damages to your and others’ life or property, you have to follow the safety notes.
• This product belongs to Category of electrical appliances, and only for drying textiles which have been
washed with water in the household. Please pay attention to the safety of power use during the operation!
• The power source with reliable earthing must be used. Its earth wire must be buried under the ground and
shall not be connected with the public utilities such as city water pipe or gas pipe etc. The earth wire and
null wire shall be distinguished and shall not be connected together.
• The power wire shall be met IEC and must be able to withstand the current above 16A. To ensure your and
your family’s safety, please make improvement immediately if any power use at your home does not meet
the above-mentioned requirements.
• Do not put more load than recommended. Obey the maximum load volume. See the related chapter in
the user manual.
• That the tumble dryer is not to be used if industrial chemicals have been used for cleaning.
• Do not dry unwashed items in the tumble dryer.
• Items that have been soiled with substances such as cooking oil, acetone, alcohol, petrol, kerosene, spot
removers, turpentine, waxes and wax removers should be washed in hot water with an extra amount of
detergent before being dried in the tumble dryer.
• Fabric softeners, or similar products, should be used as specified by the fabric softener instructions.
• Items such as foam rubber (latex foam), shower caps, waterproof textiles, rubber backed articles and
clothes or pillows fitted with foam rubber pads should not be dried in the tumble dryer.
• The final part of a tumble dryer cycle occurs without heat (cool down cycle) to ensure that the items are left
at a temperature that ensures that the items will not be damaged.
• The lint trap has to be cleaned frequently.
• The lint must not to be allowed to accumulate around the tumble dryer.
• Adequate ventilation has to be provided to avoid the back flow of gases into the room from appliance
burning other fuels, including open fires.
• The exhaust air must not be discharged into a flue which is used for exhausting fumes from appliance
burning gas or other fuels.
• The appliance must not be install behind a lockable door, a sliding door or a door with a hinge on the
opposite side to that of the tumble dryer. In such a way that a full opening of the tumble dryer door is
restricted.
• Oil-affected items can ignite spontaneously, especially when exposed to heat sources such as in a tumble
dryer.
• The items become warm, causing an oxidation reaction in the oil. Oxidation creates heat. If the heat cannot
escape, the items can become hot enough to catch fire. Piling, stacking or storing oil-affected items can
prevent heat from escaping and so create a fire hazard.
• If it is unavoidable that fabrics that contain vegetable or cooking oil or have been contaminated by hair
care products be placed in a tumble dryer they should first be washed in hot water with extra detergent-
this will reduce, but not eliminate, the hazard.
• The appliance should not be overturned during normal use or maintenance.
• Remove all objects from pockets such as lighters and matches.
• This appliance can be used by children aged from 8 years and above and persons with reduced physical,
sensory or mental capabilities or lack of experience and knowledge if they have been given supervision or
instruction concerning use of the appliance in a safe way and understand the hazards involved. Children
shall not play with the appliance. Cleaning and user maintenance shall not be made by children without
supervision. (This warning is only for EUROPEAN market)
• The appliance is not intended for use by persons (including children) with reduced physical, sensory or
mental capabilities, or lack of experience and knowledge, unless they have been given supervision or
instruction concerning use of the appliance by a person responsible for their safety.
• Children should be supervised to ensure that they do not play with the appliance.(This warning is not for
EUROPEAN market)
• If the power cable is damaged, it must be replaced by the manufacturer, its service agent or similarly
qualified persons in order to avoid a hazard.
• This appliance is for indoor use only.

4
ENG
• The openings must not be obstructed by a carpet.
• Children of less than 3 years should be kept away unless continuously supervised.
• If the appliance appear high temperature abnormally, please draw the mail plug immediately.
• Warning: The appliance must not be supplied through an external switching device, such as a timer, or
connected to a circuit that is regularly switched on and off by a utility.
• Remove all packages before using the appliance. Otherwise, serious damage may result.
WARNING!
Never stop a tumble dryer before the end of the drying cycle otherwise too much heat
will diffuse and may cause harm.
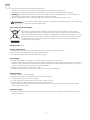
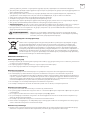
Correct Disposal of this product:
This marking indicates that this product should not be disposed with other household
wastes throughout the EU. To prevent possible harm to the environment or human health
from uncontrolled waste disposal, recycle it responsibly to promote the sustainable reuse of
material resources. To return your used device, please use the return and collection systems
or contact the retailer where the product was purchased. They can take this product for
environmental safe recycling.
Rated capacity: 8kg
Electric shock hazard
• Do not pull the power cord forcefully. Please disconnect the mains plug instead..
• Please do not plug/draw the mains plug with wet hands.
• Do not damage the power cord and the power plug.
Injury danger
• Do not disassemble or install the dryer without any instruction or supervision.
• Do not stack this dryer on washing machine without stacking kits.(if you want to stack this dryer on washing
machine, please purchase the independent parts and it must be installed by the manufacturer, its service
agent or similarly qualified persons to avoid any hazards.)
• Do not lean on the opened door of the dryer.
• Do not put any pyrotoxin on the dryer, such as the candle, electric cooker.
Damage danger
• Do not dry over the rated capacity.
• Do not operate the dryer without the filter door and filter base.
• Do not dry the clothes before being spun.
• Do not expose the dryer directly under the sun, indoor use only.
• Do not install the dryer in humid and drenching environment.
• While cleaning and maintenance, please do remember to pull out the power plug and do not directly
wash the dryer with water.
Explosion danger
• Please do not dry the clothes with any flammable substances such as coal oil or alcohol. Otherwise, there
may be explosion.

5
ENG
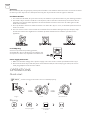
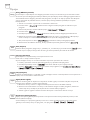
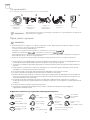
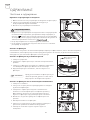
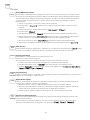
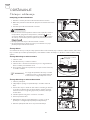
INSTALLATION
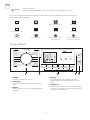
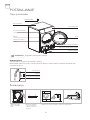
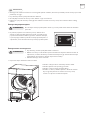
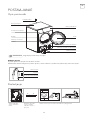
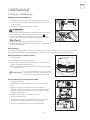
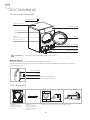
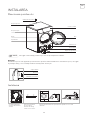
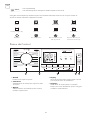
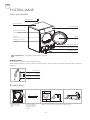
Product Description
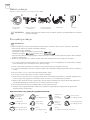
Condensing drain hose
Hose holder
Connector
Remove the drain
hose from the
housing drawer.
Insert the drain hose
and the external
drainage hose into
the connector.
Put the hose holder on the washing basin or any other sink.
Power cord
Top board
Container
Drum
Filter door
Control panel
Air inlet
Filter base
Maintenance cover
Door
NOTE
Please see the products you purchased for reference.
Accessories
The following parts are optional for specific models.
If your dryer has following parts, please wear gloves and install them as per the instruction below.
Installation

6
ENG
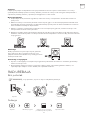
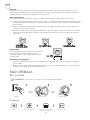
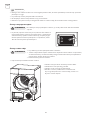
Transport
Move cautiously. Do not grasp any salient parts of machine. The machine door can not be used as the handle
for delivery. If the dryer can’t be transported erectly, the dryer could be slant to right less than 30°.
Installation Position
1. It is recommended that, for your convenience, the machine is positioned close to your washing machine.
2. The tumble dryer must be installed in a clean place, where dirt does not build up. Air must be able to
circulate freely all round the appliance. Do not obstruct the front air inlet or the air intake grilles at the
back of the machine.
3. To keep vibration and noise within minimum level when the dryer is in use, it should be placed on a firm
and level surface.
4. The feet must never be removed. Do not restrict the floor clearance through deep pile carpets, strips
of wood or similar. This might cause heat built-up which would interfere with the operation of the
appliance.
Power Supply Connection
1. Make sure that the voltage of the power supply is the same as the electric specification of the dryer.
2. Do not connect the dryer with the power connection board, the universal plug or socket, do not use
multi-plug adapters and extension cables.
Level Adjusting
Once in its permanent operating position,
check that the dryer is absolutely level with the aid
of a spirit level. If it is not, adjust the feet with a tool.
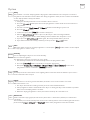
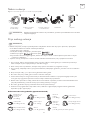
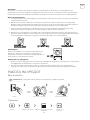
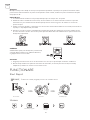
Plug in
On Select program Select function
or default
Start
Load Close the door
Before using, please make sure it’s installed properly.
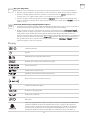
OPERATIONS
Quick start
Drying
NOTE

7
ENG
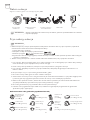
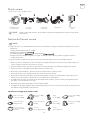
Mixed-fabric clothes
(about 800g)
Jacket
(about 800g cotton)
Jeans
(about 800g)
Towel quilt
(about 900g cotton)
Single bedsheet
(about 600g cotton)
Work clothes
(about 1120g)
Sleepwear
(about 200g)
Long sleeve shirt
(about 300g cotton)
Short sleeve shirt
(about 180g cotton)
Short pants
(about 70g cotton)
Socks
(about 50g mixed-weave)
1. Before drying, thoroughly spin the laundry in washing machine. High spin speed can reduce the drying
time and save energy consumption.
2. For uniform drying result, sort the laundry according to fabric type and drying programme.
3. Before drying, please close zips, hooks and eyelets, button up, tie fabric belts, etc.
4. Do not over dry the clothes, because over dried clothes can easily get creases.
5. Do not dry the articles containing rubber or similar elastic materials.
6. The door can be opened only after the programme of the drying machine finishes to prevent human
skin from being scalded by hot steam or over heated drying machine.
7. Clean the lint filter and empty container after each use to avoid extension of drying time and energy
consumption.
8. Do not dry these clothes after dry-clean process.
9. Please choose the related programme when dealing with wool material clothes, to make the cloth more
fresh and fluffy.
The reference weight of dry clothes (each)
Open the door and
take out laundry
Buzzer beep or “0:00”on display.
Pull out the
container
Pour out
condensate water
Clean the filter Power off
After Drying
Before Each Drying
NOTE
NOTE
If use the socket with a switch, please press the switch to turn off the power directly.
• Leave it to stand for 2 hours after transporting. Before first use, please use the soft fabric to clean the inside
drum.
1. Put some clean rags into the drum.
2. Plug the power, press
3. Select the
Programme, press button.
4. After finishing this programme, please follow the “cleaning and care ” to clean the filter door.
• During drying, the compressor and the water will generate some noise which is entirely normal.

8
ENG
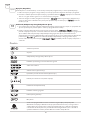
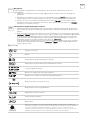
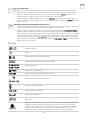
Dry
Line dry / hang to dry
Dry clean
Normal
Drip dry
Do not dry clean
Not tumble dry normal
Dry flat
Dry clean normal cycle
with any solvent
Do not dry
In the shade
Dry clean normal cycle
petroleum solvent only
NOTE
• Never overload.
• Not for textile with dropping water. The dryer could be damaged, even fire.
Please pay attention to use the drying machine if the materials of your clothes can not be dried by it or
contain the symbols as follows:
Jeans
Bed Linen
Sports
Shirts
Warm
Cool
Refresh
Extra
Standard
My Cycle
Iron
Delicate
Mix
Extra
Standard
Wool
SPECIAL COTTON
TIME
SYNTHETICS
Delay Time Intensity Lamp Signal Anti-Crease
Оn/Off
Start/Pause
Press Intensity 3 sec. to set My Cycle
Lamp Signal Anti-Crease
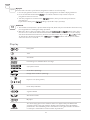
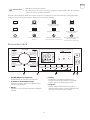
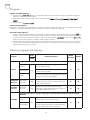
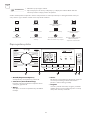
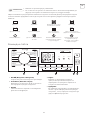
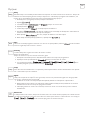
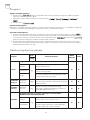
Control Panel
1. On/Off
Product is switched on or off.
2. Start/Pause
Press the button to start or pause the drying
cycle.
3. Option
These buttons are used for setting additional
functions.
4. Display
This display shows the setting, estimated
remaining time and status messages of your
dryer.
5. Programmes
Different Dryer cycle can be selected according
to the user’s needs to ensure the clothes drying
results are more effective.

9
ENG
Option
Delay
This function is used for delaying clothes drying time within 24 hours. The delay time means the
programme will start after x hours. When the delay programme starts, the time starts to countdown
on the display and the delay icon blinks.
Steps in details:
1. Load your laundry and make sure the machine door is closed.
2. Press the
button,then to turn the programme selector knob and select a desired
programme.
3. You can select the
or functions according to your need
4. Press the
button.
5. Continue to press the
to select the delay time.
6. After the
button is pressed, the Dryer is at the running condition.
The drying procedure will be automatically performed when the delay time is over.
7. If you press the
button again, the delay function will be paused.
8. If you want to cancel the “Delay” function, please press the
button.
Intensity
Use for adjusting the dryness level of the laundry.
The level has four grades.
The drying time increases 5 minutes in every grade.
1. The intensity function can be activated only before the programme starts.
2. Press the
button repeatedly to select the drying time.
3. Except the
, all the other
programmes can be set with the function.
Anti-Crease
At the end of the drying cycle,the anti-crease phase time is 30 minutes (default ) or 120 minutes
(selected).
This function prevents the laundry from creases. The laundry can be removed during the anti-crease
phase. Except
, and , all the other programmes have this function.
Time
When the warm or cool or refresh programme is selected, the
button can be used to adjust
the drying time in 10 min. steps.
Lamp
The lamp inside the drum will be on for lighting about 3 minutes when the button is pressed or 1
minute when the door is open.
Signal
Set the buzzer on or off. In general condition, the buzzer is on. Please touch it if needed.
When the buzzer is on:
1. The dryer will make the leading sound if press the extra function buttons.
2. If the programme knob is rotated when the dryer is running,the dryer will remind the operator
that it is an invalid programme selection.
3. When the drying programme is done, the buzzer will beep to remind the user.
Delay
Intensity
Anti-
Crease
Time
Lamp
Signal

10
ENG
My Cycle
Used to define and save your favorite programmes that are used frequently.
1. Use the programme knob to select the required programme and other drying functions.
2. Press and hold the button with
for 3 seconds until the beep and the required
programme has been saved.
3. Turn the programme selector to the
position, then you can start your favorite
programmes.
If you want to change the settings, repeat the steps (1) and (2).
Child Lock
1. This machine incorporates a special child safety lock, which can prevent children from carelessly
pressing buttons or making the faulty operation.
2. When the dryer is at the operation status, press the
and buttons at the same
time for over 3 seconds to start child lock function. When child lock function is set, the display
will show Child lock icon and no key can have an effect on the dryer except button.
To activate the child lock function, the and buttons shall be pressed at the
same time for over 3 seconds.
My Cycle
Child
Lock
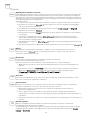
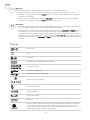
Delay start
Time
Child lock
Remaining Time indicator/Error message
Cycle phase status
Clean filters (warning)
Empty water container (warning)
Dryness level (four grades)
Drum lamp indicator
Signal indicator
Anti-crease mode
My cycle
The wool drying cycle of this machine has been approved by The Woolmark
Company for the drying of machine dryable wool products provided that the
products are dried according to the instructions on the garment label and those
issued by the manufacturer of this tumble dryer. M1716
Display

11
ENG
Program selector
1. Press the button, When the LED display screen brightens up, rotate the programme knob to
select the desired programme.
2. Select the
, , , or functions for additional options.
3. Press the
button.
Program start
The drum will keep rotating after the programme starts. The status light in the display area will flash in
sequence, and the displayed remaining time will change automatically.
Program end
1. The drum will stop running after the programme ends. The display will show
, also the status light of
“End” and related light will illuminate. The dryer will start function if user doesn’t remove the
load in time. Please press key to cut off power and pull the plug out.
2. Deal with the problems accroding to “Malfunction display and solutions , if there is an unexpected stop
during the drying procedure and the dryer shows information.
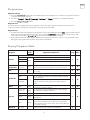
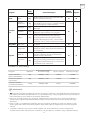
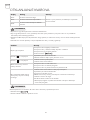
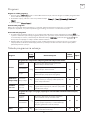
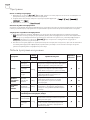
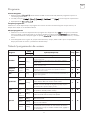
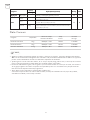
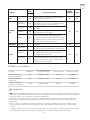
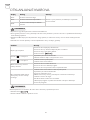
Programmes
Program
Weight
(max)
Application/Properties Delay Time
8.0 kg
Cotton
For cottons and coloureds made of cotton or linen.
Y N
Extra
8.0 kg
To dry cotton pieces of clothing. Drying level: extra dry.
Standard To dry cotton pieces of clothing. Drying level: cupboard dry.
Iron
To dry cotton pieces of clothing. Drying level: applicable to
iron.
Delicate/
Underwear
Delicate/
Underwear
1.0kg
To dry delicate laundry that is suitable for drying or laundry
which is advised to be hand-washed at a lower temperature.
Y N
Mix
Mix 3.5kg
If you can not determine what the clothing’s material is, please
choose Mix.
Y N
Synthetics
For non-iron washing made of synthetic and blended fabrics, cotton.
Extra
3.5 kg
To dry thick or multi-layered synthetic fabrics. Drying
level: extra dry.
Y N
Standard
To dry thin synthetic fabrics which are not ironed,
such as easy care shirts, table linen, baby clothes,
socks.
Wool Wool 1.0kg
For a fluffy and fresh wool clothing
(Can not be used for drying).
Y N
Special
Jeans/ Anti-
bacteria
4.0kg
To dry jeans or leisure clothes that are spun at high
speeds in the washing machine.
Y N
Bed linen 4.0kg To dry sheets or other large sized textiles.
Sports 3.0 kg
To dry sportswear, thin fabrics, polyester,which are
not ironed.
Shirts 1.0 kg
For easy care clothes such shirts and blouses with
anti-crease mechanism for minimum ironing effort.
Place clothes loosely in the dryer. Once dried. Hang it
on a clothes hange.
My Cycle My Cycle — Define and save your favorite programme. Y —
Drying Programs Table

12
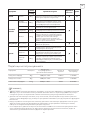
ENG
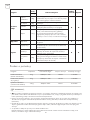
Program
Weight
(max)
Application/Properties Delay Time
8.0 kg
Time
Warm —
To warm clothes from minimum 10 min. to maximum 120 min.
(in 10 min. steps).
Y Y
Cool —
To air clothes without heating from minimum 10 min. to
maximum 30 min. (in 10 min. steps).
Refresh 1.0kg
To refresh the clothes that have been kept at closed
environments for a long time from minimum 20 min. to
maximum 150 min.(in 10 min. steps).
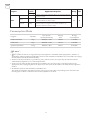
Consumption Data
Program Capacity
Spin Speed /
Residual Humidity
Drying
Time
Energy
Consumption
Cotton Standard 8kg 1000rpm / 60% 170min 1.97kWh
Cotton Iron 8kg 1000rpm / 60% 135min 1.58kWh
Synthetic Standard 3.5kg 800rpm / 40% 60min 0.62kWh
•
This symbol means the energy efficiency test programme “standard cotton programme”, which is in
accordance with Regulation 392/2012/EU, measured in accordance with EN 61121 and suitable for drying
normal cotton load at rated load capacity.
• Thick or multi-layered fabrics,e.g. bedlinen, jeans, jackets etc, are not easy to dry. You’d better choose
Cotton Extra programme or use “Intensity”function.
• As the uneven material, thick and multi-layered clothes are not easy to dry, it is better to choose the
appropriate time drying programme to dry them if some parts of the clothes still damp after programme
finishes.
• All data was measured in accordance with EN 61121.
The actual consumption may differ from the values given in the table, depending on the amount of the
laundry, type of fabric, residual moisture and any functions selected.
NOTE

13
ENG
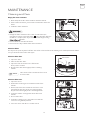
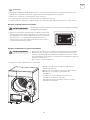
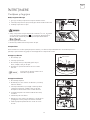
MAINTENANCE
Cleaning and Care
Empty the water container
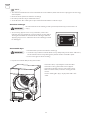
Clean the filters
Clean the filter door
Clean the filter base
1. Hold and pull out the water container with two hands.
2. Tilt the water container, pour out the condensate water into
basin.
3. Install the water container.
WARNING!
• Empty the water container after each use.Otherwise,the
programme will be paused and the ” ” icon will light. After the
container is emptied, the dryer can be restarted by pressing
button.
• Do not drink the condensate water.
• Do not use the dryer without the water container.
This dryer has a primary door fluff filter and a filter in front of the heat exchanger for added protection. Make
sure you clean the filters after each cycle.
1. Open the door.
2. Take out the filter door.
3. Open the filter and remove the fluff on the
filter, clean it in water.
4. Dry the filter door thoroughly before installing
it back.
1. Open the cover.
2. Unlock three locking levers and take out the filter
handle.
3. Remove the filter base and clean it. If there is too
much fluff on the filter, clean it in running water.
Dry the filter thoroughly before installing it back.
4. Clean the rubber sealings both at the filter and
handle.
5. Re-insert the filter.
6. Lock three locking levers and make sure that the
levers are in right lock position.
7. Close the cover until there is a click sound.
NOTE
Take notice of the direction before insert
the filter door.
Filter Door
Filter Base

14
ENG
NOTE
• The fluff accumulated on the filter will block the air circulation, which will increase drying time and energy
consumption.
• Disconnect the power cord before cleaning!
• Do not operate the dryer without the filter!
• Clean the filter after each cycle to prevent fluff accumulation inside the dryer.
• As necessary, approx. once every 2 months, remove the
fluff from the heat exchanger using a vacuum cleaner with a
dusting brush attached. Clean the heat exchanger without
applying any pressure. Otherwise the heat exchanger could
be damaged.
• Disconnect the power cord before cleaning!
• Clean the dryer with a wet cloth which is only damped by clean water. Otherwise,
the chemical cleaners may damage the plastic surfaces and other parts.
• Please wear gloves when cleaning.
• Prepare a wet cloth damped by clean water.
Clean heat exchanger
Clean Tumble dryer
Do not touch the heat exchanger with your hand, which may result in cause an
injury.
WARNING!
WARNING!
• Clean the door, especially the inside window.
• Clean the sealing around the front support.
• Clean the humidity sensor in side of the drum.
• Take out all the filters, clean the sealing and air
tunnel.
Before starting the dryer, dry all parts with a soft
cloth.

15
ENG
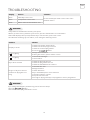
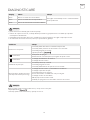
TROUBLESHOOTING
Display Reason Solutions
“E32” Humidity sensor error
Please contact your local service center if the
problem occurs.
“E33” Temperature sensor error
“E64” BLDC motor communication error
WARNING!
WARNING!
• Only authorised technicans can carry out repairs.
• Before you call service, problems yourself or if you have followed the user instructions.
• If the LED displays other prompt and the dryer can not work ,please call service.
• A technician will charge you for advice, even during the warranty period.
If you cannot deal with the problems by yourself and need help:
• Press the
button.
• Pull out the mains plug and call the service.
Problem Solution
Display is not on
• Check if the power supply works.
• Check if the mains plug is inserted.
• Check the selected programme .
• Press the
button.
“
”is lighting
• Empty water container.
• If the light is still on, please call the service.
“
”is lighting
• Clean heat exchanger.
• Clear lint filter.
Dryer does not start
• Check the door has closed.
• Check the programme has set.
• Check the start button has selected.
Degree of dryness was not
reached or drying time too
long
• Clean lint filter and .
• Empty container.
• Check drain hose.
• Dryer installation place is too restricted.
• Clean the moisture sensors.
• Keep the Air inlet clean.
• Use higher drying intensity level programme or time programme.

16
ENG
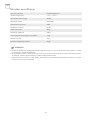
Technical Specifications
Dimension (LxWxH) 640x595x845(mm)
Ambient temperature + 5°C ~ +35°C
Rated input power 850W
Rated voltage 220-240V~
Rated frequency 50Hz
Refrigerant R134a
Weight of product 48kg
Rated capacity 8.0kg
GWP 1430
CO 2 - eq 0.5T
Quantity of refrigerant 350g
• The rated capacity is the maximum capacity, make sure that the dry clothes which are loaded to the
appliance do not exceed the rated capacity each time.
• Do not install the tumble dryer in a room when there is a risk of frost occurring. At temperatures around
freezing point the tumble dryer may not be able to operate properly.
• There is a risk of damage if the condensate water is allowed to freeze in the pump, hoses and / or
condensate water container
NOTE

17
ENG
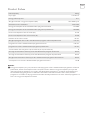
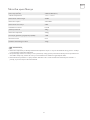
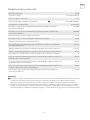
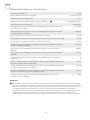
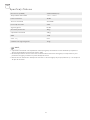
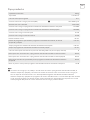
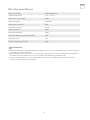
Product Fiches
Rated Capacity 8.0 kg
Dryer Type Condenser
Energy efficiency class A++
Weighted annual energy consumption (AE
C
)
❶
236.0 kWh/year
Automatic or non-automatic Automatic
Energy consumption of the standard cotton program at full load 1.97 kWh
Energy consumption of the standard cotton program at partial load 1.08 kWh
Power consumption of the off-mode (Po) 0.2 W
Power consumption of the left-on mode (PI) 0.8 W
Duration of the left-on mode 10 min
Weighted program time of the standard cotton program at full and partial load 127 min
Program time of the standard cotton program at full load 170 min
Program time of the standard cotton program at partial load 95 min
Condensation efficiency class A (most efficient) to G (least efficient) B
Average condensation efficiency of the standard cotton program at full load 80.5%
Average condensation efficiency of the standard cotton program at partial load 80.5%
Weighted condensation efficiency for the standard cotton program at full and load 80.5%
Sound power level for the standard cotton program at full load 66dB
Remarks
❶
Energy consumption per year, based on 160 drying cycles of the standard cotton programme at full and
partial load, and the consumption of the low-power modes. Actual energy consumption per cycle will
depend on how the appliance is used The ‘standard cotton programme’ used at full and partial load is
the standard drying programme to which the information in the label and the fiche relates, that this
programme is suitable for drying normal wet cotton laundry and that it is the most efficient programme in
terms of energy consumption for cotton.

18
BiH/CG
BEZBJEDNOSNA UPUTSTVA
UPOZORENJE!
Kako biste spriječili svaku pojavu rizika po svoj i život drugih osoba ili štete po svoju i imovinu drugih osoba,
morate se pridržavati napomena o bezbjednosti.
• Ovaj proizvod pripada Kategoriji električnih uređaja i može se koristiti isključivo za sušenje vodom
opranog veša u domaćinstvu. Tokom rada, povedite računa o bezbjednosti prilikom upotrebe električne
energije!
• Mora se koristiti izvor napajanja sa provjerenim uzemljenjem. Vod za uzemljenje mora biti ukopan u zemlju
i nikako ne smije biti povezan na mrežu javnih instalacija, poput gradskih vodovodnih ili gasovodnih cijevi
itd. Zemlja i nula treba da budu jasno označene i ne smiju se povezivati.
• Napojni kabal mora da ispunjava zahtjeve Međunarodne elektrotehničke komisije (IEC, International
Electrotechnical Commission) i mora da izdržava struju jaču od 16 A. Kako biste bili sigurni da ste Vi i Vaša
porodica bezbjedni, odmah ispravite svaki slučaj napajanja koje ne ispunjava gorepomenute zahtjeve, a
koji se javlja u Vašem domu.
• Ne stavljajte u mašinu veću količinu veša od preporučene. Poštujte uputstva o maksimalnoj težini veša.
Pogledajte povezani odjeljak u ovom korisničkom uputstvu.
• Ne koristite mašinu za sušenje veša ukoliko ste veš prethodno čistili industrijskim hemikalijama.
• Veš koji nije prethodno opran nemojte sušiti u mašini za sušenje veša.
• Prije sušenja u mašini, veš koji je zaprljan supstancama poput jestivog ulja, acetona, alkohola, benzina,
kerozina, sredstava za uklanjanje fleka, terpentina, voska i sredstava za skidanje voska, trebalo bi oprati u
vreloj vodi sa više deterdženta.
• Omekšivače za veš i slične proizvode treba upotrebljavati na način naveden u uputstvu na ambalaži.
• Predmete poput spužve (spužva od lateksa), kapa za tuširanje, vodootpornih materijala, gumiranih
predmeta i garderobe ili jastuka koji sadrže spužvaste elemente ne bi trebalo sušiti u mašini.
• Posljednja faza ciklusa sušenja veša se obavlja bez zagrijavanja (ciklus hlađenja), čime se osigurava da je
veš na temperaturama koje ga neće oštetiti.
• Hvatač finih vlakana se mora često čistiti.
• Ne smije se dozvoliti nagomilavanje finih vlakana na mašini za sušenje veša.
• Neophodno je obezbjediti odgovarajuću ventilaciju u prostoriji kako bi se izbjeglo vraćanje gasova koje
proizvode uređaji koji sagorjevaju druge vrste goriva, uključujući i one sa otvorenim plamenom.
• Ispušni vazduh se ne smije ispuštati kroz kanal koji služi za sprovođenje ispušnih gasova iz uređaja koji
sagorjevaju gas ili druge vrste goriva.
• Uređaj se ne smije postavljati iza vrata koja se mogu zaključavati, kliznih vrata ili vrata sa šarkama koje
se nalaze na suprotnoj strani u odnosu na mašinu za sušenje veša, čime bi se onemogućilo potpuno
otvaranje vrata na mašini za sušenje veša.
• Predmeti koji su bili u kontaktu sa uljem se mogu spontano zapaliti, naročito ukoliko su izloženi izvorima
toplote, kao što je to slučaj u mašini za sušenje veša. Veš se zagrijava, što kod ulja izaziva oksidacionu
reakciju. Oksidacija stvara toplotu. Ukoliko je toplotu nemoguće ispustiti van, veš može postići dovoljno
visoku temperaturu da se zapali. Grupisanjem, slaganjem ili gomilanjem veša koji je bio u kontaktu sa
uljem možete sprečiti ispuštanje toplote van i na taj način dovesti do pojave opasnosti od požara.
• Ukoliko tkanine koje su zaprljane biljnim ili jestivim uljem ili proizvodima za održavanje kose morate staviti
u mašinu za sušenje veša, najprije bi ih trebalo oprati u vreloj vodi sa više deterdženta, čime će se opasnost
umanjiti, ali ne i potpuno eliminisati.
• Tokom normalne upotrebe ili održavanja, uređaj se ne smije prevrtati.
• Iz džepova izvadite sve predmete kao što su upaljači i šibice.
• Ovaj uređaj mogu da upotrebljavaju djeca uzrasta od 8 i više godina, kao i osobe sa umanjenim fizičkim,
čulnim ili mentalnim sposobnostima ili osobe bez iskustva i znanja, ukoliko su pod nadzorom ili ukoliko
su dobili uputstva o bezbjednoj upotrebi uređaja i shvataju opasnosti koje upotreba istog nosi. Djeca
ne smiju da se igraju uređajem. Djeca ne smiju da obavljaju čišćenje i korisničko održavanje uređaja bez
nadzora. (Ovo upozorenje se odnosi isključivo na EVROPSKO tržište)
• Nije predviđeno da uređaj upotrebljavaju osobe (uključujući djecu) sa umanjenim fizičkim, čulnim ili
mentalnim sposobnostima ili osobe bez iskustva i znanja, osim ukoliko su pod nadzorom ili ukoliko su
dobile uputstva o upotrebi uređaja od osobe odgovorne za njihovu bezbjednost.
• Djecu je potrebno nadgledati kako bi se spriječilo njihovo igranje uređajem. (Ovo upozorenje se ne
odnosi na EVROPSKO tržište)
• Ukoliko je priključni kabal oštećen, njegovu zamjenu mora da obavi proizvođač, servis koji je proizvođač
angažovao ili lica sa sličnim kvalifikacijama, kako bi se izbjegla opasnost.

19
BiH/CG
• Ovaj uređaj je namjenjen isključivo za upotrebu u zatvorenom prostoru.
• Otvori uređaja ne smiju biti blokirani tepihom.
• Djecu mlađu od 3 godine treba držati dalje od uređaja, osim ukoliko su pod stalnim nadzorom.
• Ukoliko uređaj razvija neuobičajeno visoku temperaturu, odmah izvucite utikač iz utičnice.
• Upozorenje: Uređaj se ne smije napajati preko eksternog prekidača, poput tajmera, i ne smije se
povezivati na kolo koje se redovno uključuje i isključuje putem nekog uređaja.
• Prije nego što počnete da upotrebljavate uređaj, uklonite cjelokupnu ambalažu. U suprotnom, može doći
do ozbiljnog oštećenja.
UPOZORENJE!
Nikada ne zaustavljajte mašinu za sušenje veša prije nego što se ciklus sušenja završi.
U suprotnom, ispustićete preveliku količinu toplote, što može dovesti do povređivanja.
Ispravno odlaganje ovog proizvoda:
Ova oznaka ukazuje da ovaj proizvod u EU ne treba odlagati zajedno sa drugim otpadom
iz domaćinstva. Da biste spriječili potencijalnu štetu po životnu sredinu ili zdravlje ljudi koja
nastaje nekontrolisanim odlaganjem otpada, odgovorno reciklirajte proizvod kako biste
promovisali održivu ponovnu upotrebu materijalnih resursa. Za odlaganje upotrebljenog
uređaja koristite sisteme za vraćanje i sabiranje otpada ili kontaktirajte maloprodajni objekat
u kome ste proizvod kupili. Oni ovaj proizvod mogu reciklirati na način bezbjedan po
životnu okolinu
Nominalni kapacitet: 8kg
Opasnost of strujnog udara
• Nemojte snažno povlačiti priključni kabal, već uređaj isključite tako što ćete utikač izvući iz utičnice.
• Utikač ne priključujte u/isključujte iz utičnice vlažnim rukama.
• Ne oštećujte priključni kabal i utikač.
Opasnost od nastanka povreda
• Ne rasklapajte i ne postavljajte mašinu za sušenje veša bez uputstva ili nadzora.
• Ne postavljajte ovu mašinu za sušenje na mašinu za pranje veša bez opreme za postavljanje jedne mašine
na drugu. (Ukoliko želite da ovu mašinu postavite na mašinu za pranje veša, najprije nabavite potrebne
dijelove koji se zasebno prodaju. Njihovo postavljanje mora da obavi proizvođač, servis koji je proizvođač
angažovao ili lica sa sličnim kvalifikacijama, kako bi se izbjegla pojava opasnosti).
• Ne naslanjajte se na otvorena vrata mašine za sušenje veša.
• Ne stavljajte na mašinu nikakve izvore toplote, poput svijeća, električnih ringli.
Opasnost od oštećenja
• Ne sušite količinu veša koja je veća od nominalne.
• Ne uključujte mašinu za sušenje veša ukoliko nije postavljen filter koji se nalazi u vratima i filter koji se nalazi
na dnu mašine.
• Ne sušite veš koji nije prethodno centrifugiran.
• Ne izlažite mašinu za sušenje veša direktnim zracima sunca i upotrebljavajte je isključivo u zatvorenom
prostoru.
• Ne postavljajte mašinu za sušenje veša u vlažne i mokre prostorije.
• Prilikom čišćenja i održavanja, ne zaboravite da izvučete priključni kabal iz utičnice i nemojte mašinu za
sušenje prati vodom.
Opasnost od eksplozije
• Nemojte sušiti veš koji je prethodno bio u kontaktu sa nekom od zapaljivih supstanci, poput kerozina ili
alkohola. U suprotnom, može doći do eksplozije.

20
BiH/CG
POSTAVLJANJE
Opis proizvoda
Crijevo za odvod kondenzata
Nosač crijeva
Spojnica
Skinite odvodno
crijevo sa kućišta
fioke.
Umetnite odvodno
crijevo i spoljašnje
odvodno crijevo u
spojnicu.
Stavite nosač crijeva na lavabo ili bilo koji drugi slivnik.
Priključni kabal
Gornji poklopac
Posuda za kondenzat
Bubanj
Filter koji se nalazi u
vratima
Komandna tabla
Otvor za dovod vazduha
Filter koji se nalazi na dnu mašine
Zaštitni poklopac
Vrata
Pogledajte proizvod koji ste kupili.
Dodatna oprema
Sljedeći dijelovi su opcioni za određene modele.
Ukoliko Vaša mašina za sušenje veša ima sljedeće dijelove, stavite rukavice i postavite ih prateći dole
navedena uputstva.
Postavljanje
NAPOMENA
Pagina se încarcă ...
Pagina se încarcă ...
Pagina se încarcă ...
Pagina se încarcă ...
Pagina se încarcă ...
Pagina se încarcă ...
Pagina se încarcă ...
Pagina se încarcă ...
Pagina se încarcă ...
Pagina se încarcă ...
Pagina se încarcă ...
Pagina se încarcă ...
Pagina se încarcă ...
Pagina se încarcă ...
Pagina se încarcă ...
Pagina se încarcă ...
Pagina se încarcă ...
Pagina se încarcă ...
Pagina se încarcă ...
Pagina se încarcă ...
Pagina se încarcă ...
Pagina se încarcă ...
Pagina se încarcă ...
Pagina se încarcă ...
Pagina se încarcă ...
Pagina se încarcă ...
Pagina se încarcă ...
Pagina se încarcă ...
Pagina se încarcă ...
Pagina se încarcă ...
Pagina se încarcă ...
Pagina se încarcă ...
Pagina se încarcă ...
Pagina se încarcă ...
Pagina se încarcă ...
Pagina se încarcă ...
Pagina se încarcă ...
Pagina se încarcă ...
Pagina se încarcă ...
Pagina se încarcă ...
Pagina se încarcă ...
Pagina se încarcă ...
Pagina se încarcă ...
Pagina se încarcă ...
Pagina se încarcă ...
Pagina se încarcă ...
Pagina se încarcă ...
Pagina se încarcă ...
Pagina se încarcă ...
Pagina se încarcă ...
Pagina se încarcă ...
Pagina se încarcă ...
Pagina se încarcă ...
Pagina se încarcă ...
Pagina se încarcă ...
Pagina se încarcă ...
Pagina se încarcă ...
Pagina se încarcă ...
Pagina se încarcă ...
Pagina se încarcă ...
Pagina se încarcă ...
Pagina se încarcă ...
Pagina se încarcă ...
Pagina se încarcă ...
Pagina se încarcă ...
Pagina se încarcă ...
Pagina se încarcă ...
Pagina se încarcă ...
Pagina se încarcă ...
Pagina se încarcă ...
Pagina se încarcă ...
Pagina se încarcă ...
Pagina se încarcă ...
Pagina se încarcă ...
-
 1
1
-
 2
2
-
 3
3
-
 4
4
-
 5
5
-
 6
6
-
 7
7
-
 8
8
-
 9
9
-
 10
10
-
 11
11
-
 12
12
-
 13
13
-
 14
14
-
 15
15
-
 16
16
-
 17
17
-
 18
18
-
 19
19
-
 20
20
-
 21
21
-
 22
22
-
 23
23
-
 24
24
-
 25
25
-
 26
26
-
 27
27
-
 28
28
-
 29
29
-
 30
30
-
 31
31
-
 32
32
-
 33
33
-
 34
34
-
 35
35
-
 36
36
-
 37
37
-
 38
38
-
 39
39
-
 40
40
-
 41
41
-
 42
42
-
 43
43
-
 44
44
-
 45
45
-
 46
46
-
 47
47
-
 48
48
-
 49
49
-
 50
50
-
 51
51
-
 52
52
-
 53
53
-
 54
54
-
 55
55
-
 56
56
-
 57
57
-
 58
58
-
 59
59
-
 60
60
-
 61
61
-
 62
62
-
 63
63
-
 64
64
-
 65
65
-
 66
66
-
 67
67
-
 68
68
-
 69
69
-
 70
70
-
 71
71
-
 72
72
-
 73
73
-
 74
74
-
 75
75
-
 76
76
-
 77
77
-
 78
78
-
 79
79
-
 80
80
-
 81
81
-
 82
82
-
 83
83
-
 84
84
-
 85
85
-
 86
86
-
 87
87
-
 88
88
-
 89
89
-
 90
90
-
 91
91
-
 92
92
-
 93
93
-
 94
94


Tesla WT8H90M Manual de utilizare
- Categorie
- Uscătoare
- Tip
- Manual de utilizare
Lucrări conexe
Alte documente
-
Electrolux EDH3897SDW Manual de utilizare
-
Electrolux EDC2086PDW Manual de utilizare
-
Electrolux EDH3498RDE Manual de utilizare
-
LG FH6G1BCH2N Manualul proprietarului
-
LG FH4G1JCH2N Manualul proprietarului
-
Samsung DV90K6000CW Manual de utilizare
-
Samsung DV80K6010CW Manual de utilizare
-
-
Indesit FT M11 82Y EU Daily Reference Guide
-
Samsung DV90M6200CW/LE Manual de utilizare