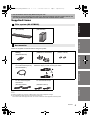
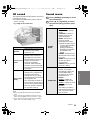
Panasonic SCHTB385EB Manualul proprietarului
- Categorie
- Seturi de difuzoare
- Tip
- Manualul proprietarului
Acest manual este potrivit și pentru

2016/04/22
EG EB
RQT0B25-B
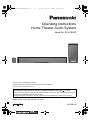
Operating Instructions
Home Theater Audio System
Model No. SC-HTB385
Thank you for purchasing this product.
Please read these instructions carefully before using this product,
and save this manual for future use.
Model number suffix “EB” denotes UK model.
Included Installation Instructions
The installation work should be done by a qualified installation specialist. (> 10 to 15)
Before commencing work, carefully read these installation instructions and the operating instructions
to ensure that installation is performed correctly.
(Please keep these instructions. You may need them when maintaining or moving this system.)
SC-HTB385_EGEB_RQT0B25-B.book 1 ページ 2016年3月29日 火曜日 午前9時33分

2
RQT0B25
Safety precautions
Unit
≥ To reduce the risk of fire, electric shock or
product damage,
jDo not expose this unit to rain, moisture,
dripping or splashing.
jDo not place objects filled with liquids, such as
vases, on this unit.
jUse only the recommended accessories.
jDo not remove covers.
jDo not repair this unit by yourself. Refer
servicing to qualified service personnel.
≥ To prevent injury, this apparatus must be
securely attached to the wall in accordance with
the installation instructions.
AC mains lead
≥ To reduce the risk of fire, electric shock or
product damage,
jEnsure that the power supply voltage
corresponds to the voltage printed on this unit.
j
Insert the mains plug fully into the socket outlet.
jDo not pull, bend, or place heavy items on the
lead.
jDo not handle the plug with wet hands.
jHold onto the mains plug body when
disconnecting the plug.
jDo not use a damaged mains plug or socket
outlet.
≥ The mains plug is the disconnecting device.
Install this unit so that the mains plug can be
unplugged from the socket outlet immediately.
Button-type battery (Lithium battery)
≥ Risk of fire, explosion and burns. Do not
recharge, disassemble, heat above 60
o
C or
incinerate.
≥ Keep the Button-Type battery out of the reach of
children. Never put Button-Type battery in
mouth. If swallowed call your doctor.
Small object
≥ Keep the screws out of reach of children to
prevent swallowing.
≥ Keep the button-type battery out of reach of
children to prevent swallowing.
≥ Keep the optical digital audio cable cap out of
reach of children to prevent swallowing.
Unit
≥ Do not place sources of naked flames, such as
lighted candles, on this unit.
≥ This unit may receive radio interference caused
by mobile telephones during use. If such
interference occurs, please increase separation
between this unit and the mobile telephone.
≥ This unit is intended for use in moderate
climates.
≥ Product Identification Marking is located on the
bottom of the unit.
Placement
≥ Place this unit on an even surface.
≥ To reduce the risk of fire, electric shock or
product damage,
jDo not install or place this unit in a bookcase,
built-in cabinet or in another confined space.
Ensure this unit is well ventilated.
jDo not obstruct this unit’s ventilation openings
with newspapers, tablecloths, curtains, and
similar items.
jDo not expose this unit to direct sunlight, high
temperatures, high humidity, and excessive
vibration.
Button-type battery (Lithium battery)
≥ Danger of explosion if battery is incorrectly
replaced. Replace only with the type
recommended by the manufacturer.
≥ Insert with poles aligned.
≥ Mishandling of batteries can cause electrolyte
leakage and may cause a fire.
jRemove the battery if you do not intend to use
the remote control for a long period of time.
Store in a cool, dark place.
jDo not heat or expose to flame.
jDo not leave the battery(ies) in a car exposed
to direct sunlight for a long period of time with
doors and windows closed.
≥ When disposing of the batteries, please contact
your local authorities or dealer and ask for the
correct method of disposal.
WARNING CAUTION
SC-HTB385_EGEB_RQT0B25-B.book 2 ページ 2016年3月29日 火曜日 午前9時33分

Precautions
RQT0B25
3
Caution for AC Mains Lead
(For the AC mains plug of three pins)
For your safety, please read the following text
carefully.
This appliance is supplied with a moulded three
pin mains plug for your safety and convenience.
A 5-ampere fuse is fitted in this plug.
Should the fuse need to be replaced please
ensure that the replacement fuse has a rating of 5-
ampere and that it is approved by ASTA or BSI to
BS1362.
Check for the ASTA mark Ï or the BSI mark Ì on
the body of the fuse.
If the plug contains a removable fuse cover you
must ensure that it is refitted when the fuse is
replaced.
If you lose the fuse cover the plug must not be
used until a replacement cover is obtained.
A replacement fuse cover can be purchased from
your local dealer.
Before use
Remove the connector cover.
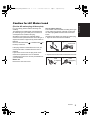
How to replace the fuse
The location of the fuse differ according to the type
of AC mains plug (figures A and B). Confirm the
AC mains plug fitted and follow the instructions
below.
Illustrations may differ from actual AC mains plug.
1. Open the fuse cover with a screwdriver.
2. Replace the fuse and close or attach the fuse cover.
Figure A
Figure B
Fuse cover
Figure A Figure B
Fuse
(5 ampere)
Fuse
(5 ampere)
SC-HTB385_EGEB_RQT0B25-B.book 3 ページ 2016年3月29日 火曜日 午前9時33分

4
RQT0B25
Table of contents
Safety precautions............................................................................................ 2
Caution for AC Mains Lead.............................................................................. 3
Before use
Supplied items .................................................................................................. 5
This system (SC-HTB385) ...................................................................................................5
Accessories .........................................................................................................................5
Control reference guide ................................................................................... 6
This system (Front) ..............................................................................................................6
This system (Rear) ..............................................................................................................7
Remote control ....................................................................................................................8
Getting started
Step 1 Connections ......................................................................................... 9
Connection with the TV .......................................................................................................9
AC mains lead connection ...................................................................................................9
Step 2 Placement ........................................................................................... 10
Safety Precautions ............................................................................................................10
The active subwoofer ........................................................................................................10
Wireless interference .........................................................................................................10
Selecting the placement method .......................................................................................11
When placing the main unit in a rack or on a table ............................................................12
When attaching the main unit to a wall ..............................................................................13
Step 3 Wireless connections ........................................................................ 16
Active subwoofer wireless connection ...............................................................................16
Bluetooth
®
connection .......................................................................................................16
Remote control code ......................................................................................17
Operations
Using this system ...........................................................................................18
3D sound .........................................................................................................19
Sound menu ....................................................................................................19
Audio format ......................................................................................................................20
Setup menu .....................................................................................................21
Reference
Troubleshooting .............................................................................................22
About Bluetooth
®
............................................................................................25
Unit care ..........................................................................................................25
Licenses ..........................................................................................................25
Specifications ................................................................................................. 26
SC-HTB385_EGEB_RQT0B25-B.book 4 ページ 2016年3月29日 火曜日 午前9時33分

Getting started
Operations
Reference
Before use
Precautions
RQT0B25
5
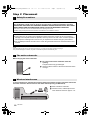
Before use
Supplied items
Check the supplied accessories before using this system.
≥ Product numbers are correct as of March 2016. These may be subject to change.
≥ The supplied AC mains lead is for use with this system only.
Do not use it with other equipment. Also, do not use cords from other equipment with this system.
≥ The illustrations shown may differ from your unit.
≥ Operations in this operating instructions are described mainly with the remote control, but
you can perform the operations on the main unit if the controls are the same.
This system (SC-HTB385)
∏ 1 Main unit (speaker)
(SU-HTB385)
∏ 1 Active subwoofer
(SB-HWA385)
Accessories
∏ 1 Remote control (with a
battery)
(N2QAYC000109)
∏ 2 Wall mount brackets
(RMQ2281A, RMQ2281B)
∏ 2 Screws
(XYN5+J14FJK)
∏
1 Optical digital audio cable
For Continental Europe only
(K7CXJYA00001)
≥ Remove the cap before using the cable.
Attach the cap If you are not using the cable.
∏ 2 AC mains leads
For the United Kingdom
and Ireland
(K2CT2YY00097)
For Continental Europe
(K2CQ2YY00119)
Cap
SC-HTB385_EGEB_RQT0B25-B.book 5 ページ 2016年3月29日 火曜日 午前9時33分

6
RQT0B25
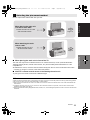
Control reference guide
1 Standby/on switch (Í/I)
Press to switch the unit from on to standby
mode or vice versa. In standby mode, the unit
is still consuming a small amount of power.
2 Adjust the volume of this system (> 18)
3 Select the input source (> 18)
“TV” (-# “BLUETOOTH”
4 Select the Bluetooth
®
device as the source
(> 18)
5 Remote control signal sensor (> 8)
6 Display
7 WIRELESS LINK indicator (> 16)
This system (Front)
6
2134
7
5
Main unit
Active subwoofer
SC-HTB385_EGEB_RQT0B25-B.book 6 ページ 2016年3月29日 火曜日 午前9時33分

Before use
RQT0B25
7
1 OPTICAL DIGITAL AUDIO IN (TV) terminal
(> 9)
2 USB port (for service use only)
3 AC IN terminal (> 9)
4 Active subwoofer on/off button (> 16)
§ The I/D SET button is only used when the main unit is not paired with the active subwoofer. (> 24)
This system (Rear)
4
3
1
2
3
Main unit
Active subwoofer
SC-HTB385_EGEB_RQT0B25-B.book 7 ページ 2016年3月29日 火曜日 午前9時33分

8
RQT0B25
1 Turn the main unit on or off (> 18)
2 Select the input source (> 18)
“TV” (-# “BLUETOOTH”
3 Select the setup menu (> 21)
4 Select the sound menu (> 19)
5 Select the Bluetooth
®
device as the source
(> 18)
6 Adjust the volume of this system (> 18)
7 Mute the sound (> 18)
8 Select and confirm the option
∫ About remote control signal sensor
The remote control signal sensor is located on the main unit.
≥Use the remote control within the correct operation range.
Distance: Within approx. 7 m directly in front
Angle: Approx. 30
o
left and right
B Remote control signal sensor for table top layout
C Remote control signal sensor for wall mounting layout
Remote control
SOUND
MUSIC
1
5
6
7
8
2
INPUT
SETUP
OK
3
4
∫ Before using for the first time
Remove the insulation sheet A.
∫ To replace a button-type battery
Battery type: CR2025 (Lithium battery)
≥ Set the button-type battery with its (i) mark
facing upward.
For table top layout
For wall mounting layout
SC-HTB385_EGEB_RQT0B25-B.book 8 ページ 2016年3月29日 火曜日 午前9時33分

Getting started
Before use
RQT0B25
9
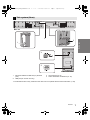
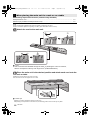
Getting started
Step 1 Connections
≥Turn off all equipment before connection and read the appropriate operating instructions.
Do not connect the AC mains lead until all other connections are completed.
A Optical digital audio cable (supplied for Continental Europe only)
≥ When you use the optical digital audio cable, insert the tip correctly into the terminal.
≥OPTICAL DIGITAL AUDIO IN (TV) terminal is compatible with PCM. Change “DIGITAL AUDIO
OUTPUT” setting to “PCM” on the TV. Read the operating instructions for the TV for details.
≥ Connect only after all other connections are completed.
B To a household mains socket
C AC mains lead (supplied)
≥
This system consumes a small amount of AC power (
>
26) even when it is turned off. In the interest of power
conservation, if you will not be using this system for a long time, unplug it from the household mains socket.
Connection with the TV
AC mains lead connection
OPTICAL
OUT
TV
OPTICAL
DIGITAL
AUDIO IN
A
TV
AC IN
Saving energy
The main unit is designed to conserve its power consumption and save energy.
≥
The main unit will automatically switch to standby mode when no signal is input and no operation is
performed for approx. 20 minutes. Refer to page 21, “AUTO POWER DOWN” to turn this function off.
SC-HTB385_EGEB_RQT0B25-B.book 9 ページ 2016年3月29日 火曜日 午前9時33分

10
RQT0B25
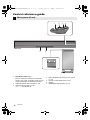
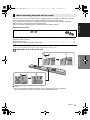
Step 2 Placement
≥ Do not hold the main unit in one hand to avoid injury, you may drop the main unit when carrying it.
≥ To prevent damage or scratches, lay down a soft cloth and perform the assembly on it.
When carrying the active subwoofer
To avoid interference, maintain the following distances between the main unit/active subwoofer
and other electronic devices that use the same radio frequency (2.4 GHz band).
Safety Precautions
Professional installation is required.
The installation should never be done by any other than a qualified installation specialist.
PANASONIC DISCLAIMS ANY PROPERTY DAMAGE AND/OR SERIOUS INJURY, INCLUDING
DEATH RESULTING FROM IMPROPER INSTALLATION OR INCORRECT HANDLING.
≥ Be sure to install the main unit as indicated within this operating instructions.
≥ Attach using techniques suited to the structure and materials of the installation location.
Caution
≥ This system is to be used only as indicated in these instructions. Failure to do so may lead to
damage to the amplifier and/or the speaker, and may result in the risk of fire. Consult a qualified
service person if damage has occurred or if you experience a sudden change in performance.
≥ Do not attempt to attach the main unit to a wall using methods other than those described in this
manual.
The active subwoofer
A Do not hold the active subwoofer from this
opening.
The parts inside may get damaged.
B Always hold the bottom of the active subwoofer when
moving it.
Wireless interference
C Main unit/active subwoofer
D Wireless router, cordless phone and
other electronic devices: approx. 2 m
A
B
D
C
SC-HTB385_EGEB_RQT0B25-B.book 10 ページ 2016年3月29日 火曜日 午前9時33分

Getting started
Precautions
RQT0B25
11
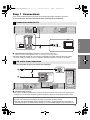
Choose a placement method that suits you best.
∫ When placing the main unit in front of the TV
The main unit may block or interfere with the TV’s various sensors (C.A.T.S. (Contrast Automatic
Tracking System) sensor, remote control sensor, etc.) and the 3D Eyewear transmitters on a 3D
compatible TV.
≥If interference occurs, move the main unit further away from the TV. If the TV still does not function
correctly, try using it in a rack or in the wall mount position.
∫ If the TV’s remote control sensor is blocked by the main unit
Try using the TV’s remote control from a different angle.
≥ Place the active subwoofer within a few meters of the main unit and in a horizontal position with the top panel facing upward.
≥ Do not use the main unit or the active subwoofer in a metal cabinet.
≥ Placing the active subwoofer too close to the walls and corners can result in excessive bass. Cover walls and windows with
thick curtains.
≥ If irregular colouring occurs on your TV, turn the TV off for about 30 minutes. If it persists, move the main unit and active
subwoofer further away from the TV.
≥ Keep magnetised items away. Magnetised cards, watches, etc., can be damaged if placed too close to the main unit and active
subwoofer.
Selecting the placement method
When placing the main unit
in a rack or on a table
≥ Place the main unit on a flat
and horizontal surface.
When attaching the main
unit to a wall
≥ Place the main unit on a
flat and vertical surface.
Page 12
Page 13
SC-HTB385_EGEB_RQT0B25-B.book 11 ページ 2016年3月29日 火曜日 午前9時33分

12
RQT0B25
Additionally required accessories (commercially available)
≥Fall prevention cord ..................................................................................................................... k 2
≥Screw eyes (to attach the fall prevention cord)............................................................................. k 2
≥ Use commercially available screws that are capable of supporting over 26 kg.
≥ Use a cord that is capable of supporting over 26 kg (with a diameter of about 1.5 mm).
Attach the cord to the main unit.
A Cord
§
§ If the cord cannot be threaded through the holes, try bending the cord in 2 locations,
about 5 mm apart from the tip, at an angle of 45
o
(as
illustrated above).
Place the main unit in the desired position and attach each cord onto the
rack or table.
≥ Make sure that the slack of the cord is minimal.
≥ Do not lean the main unit against the TV or wall.
B Screw eye
≥Attach at a position capable of supporting over 26 kg.
≥Depending on the placement of the main unit, the screwing position of the screw eye may differ.
When placing the main unit in a rack or on a table
SC-HTB385_EGEB_RQT0B25-B.book 12 ページ 2016年3月29日 火曜日 午前9時33分

Getting started
Precautions
RQT0B25
13
The main unit can be wall mounted using the supplied wall mount brackets, etc. Make sure that the
screw used and the wall are strong enough to support the weight of at least 26 kg.
The screws and other items are not supplied as the type and size will vary with each installation.
≥Refer to step 3 for details about the required screws.
≥Be sure to attach the fall prevention cord as a secondary safety measure.
Supplied accessories
Additionally required accessories (commercially available)
≥Screws for wall mounting ............................................................................................................. k 2
≥Fall prevention cord...................................................................................................................... k 2
≥Screw eyes (to attach the fall prevention cord) ............................................................................ k 2
≥ Use a cord that is capable of supporting over 26 kg (with a diameter of about 1.5 mm).
Attach the cord to the main unit.
A Cord
§
§ If the cord cannot be threaded through the holes, try bending the cord in 2 locations,
about 5 mm apart from the tip, at an angle of 45
o
(as
illustrated above).
When attaching the main unit to a wall
∏ 2Screws ∏ 2 Wall mount brackets
SC-HTB385_EGEB_RQT0B25-B.book 13 ページ 2016年3月29日 火曜日 午前9時33分

14
RQT0B25
Attach the wall mount brackets to the main unit.
A Wall mount bracket (supplied)
B Screw (supplied)
Drive a screw into the wall.
≥ Use the measurements indicated below to identify the screwing positions on the wall.
≥ Leave at least 100 mm of space above of the main unit to allow enough space for fitting the main unit.
≥ Position the main unit with at least 50 mm of free space to its right. If not, it may not be possible to access the buttons.
≥ Be sure to use a level to ensure that both mounting holes are level to each other.
Front view (semi-transparent image)
C At least 30 mm
D ‰4.0 mm
E ‰7.0 mm to ‰9.4 mm
F Wall or pillar
G 1.6 mm to 2.5 mm
H 400 mm I 275 mm J 275 mm
K 27 mm L 110 mm M Wall mounting hole
SC-HTB385_EGEB_RQT0B25-B.book 14 ページ 2016年3月29日 火曜日 午前9時33分

Getting started
Precautions
RQT0B25
15
Fit the main unit securely onto the screw(s).
Secure the cord to the wall.
≥ Make sure that the slack of the cord is minimal.
A Screw eye
B Cord
DO DO NOT
≥ Move the speaker so
that the screw is in
this position.
≥ In this position, the
speaker will likely fall
if moved to the left or
right.
SC-HTB385_EGEB_RQT0B25-B.book 15 ページ 2016年3月29日 火曜日 午前9時33分

16
RQT0B25
Step 3 Wireless connections
Preparation
≥ Turn on the main unit.
Press [BÍ CI].
Active subwoofer on/off button [B Í C I]
Use this button to turn the active subwoofer on
and off.
C I:
The active subwoofer is on.
B Í:
The active subwoofer is off.
The active subwoofer will still consume a small
amount of power even when it is turned off (
B
,
Í
).
Check that the wireless link is
activated.
WIRELESS LINK indicator
Lights red:
The wireless link is not activated.
Lights green:
The wireless link is activated.
Blinks green:
The active subwoofer is trying to activate the
wireless link with the main unit.
The wireless link will be activated when the main unit and the
active subwoofer are both turned on.
By using the Bluetooth
®
connection, you can listen
to the sound from the Bluetooth
®
audio device
from this system wirelessly.
≥ Refer to the operating instructions of the Bluetooth
®
device
for further instruction on how to connect a Bluetooth
®
device.
Preparation
≥ Turn on the Bluetooth
®
feature of the device and
place the device near the main unit.
Press [ ] to select “BLUETOOTH”.
≥ If “PAIRING” is indicated on the display, go to step 3.
Press and hold [ ] until “PAIRING”
is indicated on the display.
Select “SC-HTB385” from the
Bluetooth
®
device’s Bluetooth
®
menu.
≥
If prompted for the passkey on the Bluetooth
®
device, enter “0000”.
≥ Once the Bluetooth
®
device is connected, the name of the
connected device will be indicated on the display for a few
seconds.
≥ You can register up to 8 devices with this system. If a 9th
device is paired, the device that has not been used for the
longest time will be replaced.
Active subwoofer
wireless connection
Bluetooth
®
connection
Bluetooth
®
pairing
SC-HTB385_EGEB_RQT0B25-B.book 16 ページ 2016年3月29日 火曜日 午前9時33分

Getting started
RQT0B25
17
Press [ ] to enter Bluetooth
®
mode.
“BLUETOOTH READY” is indicated on the display.
Select “SC-HTB385” from the
Bluetooth
®
device’s Bluetooth
®
menu.
∫ Disconnecting a Bluetooth
®
device
Press and hold [ ] until the “BLUETOOTH
READY” is indicated on the display.
≥ When “BLUETOOTH” is selected as the source, this
system will automatically try and connect to the last
connected Bluetooth
®
device.
≥ The Bluetooth
®
device will be disconnected if a different
audio source (e.g. “TV”) is selected.
≥
This system can only be connected to one device at a time.
≥
To change the sound quality, refer to page 21 “LINK MODE”.
Remote control code
When other Panasonic devices respond to this
system’s remote control, change the remote
control code on this system and the remote
control.
Preparation
≥ Turn off all other Panasonic products.
≥ Turn on the main unit.
∫ To set the code to “REMOTE 2”
Press and hold [MUTE] and [OK] for more than
4sec.
“REMOTE 2” is indicated on the display.
∫ To set the code to “REMOTE 1”
Press and hold [MUTE] and [4] for more than
4sec.
“REMOTE 1” is indicated on the display.
Connecting a paired
Bluetooth
®
device
SC-HTB385_EGEB_RQT0B25-B.book 17 ページ 2016年3月29日 火曜日 午前9時33分

18
RQT0B25
Operations
Using this system
Preparation
≥ Turn on the active subwoofer.
≥ Turn on the TV and/or connected device.
Press [Í] to turn on the main unit.
Select the source.
≥ This remote control cannot be used to control the
operations of the connected devices.
∫ When “BLUETOOTH” is selected as
the source
On the Bluetooth
®
device:
Select this system as the output source of the
connected Bluetooth
®
device and start the
playback.
∫ To adjust the volume of this system
Press [i VOL j].
≥ Volume range: 0 to 100
∫ To mute the sound
Press [MUTE].
≥ While muting, “MUTE” is indicated on the display.
≥ To cancel, press the button again or adjust the volume.
≥ Muting is cancelled if the main unit is turned off.
≥ If there is sound coming out of the TV’s speakers, reduce
the volume of the TV to its minimum.
Press To select
[INPUT] “TV” (# “BLUETOOTH”
[] “BLUETOOTH”
SOUND
MUSIC
INPUT
SETUP
OK
If this system does not operate as
expected or sound is unusual, returning
the settings to the factory preset may
solve the problem. (> 22)
SC-HTB385_EGEB_RQT0B25-B.book 18 ページ 2016年3月29日 火曜日 午前9時33分

Operations
RQT0B25
19
3D sound
This system provides a feeling that the sound and
the image are as one.
≥ To change the applied effect, refer to “Sound
menu”. (> right)
≥ Dolby Virtual Speaker effect is ON except “STEREO”
mode.
≥ To turn off Dolby Virtual Speaker and the 3D surround
effects, select “STEREO” as the sound mode. (> right)
≥ To turn off the 3D surround and the Clear-mode dialog
effects, refer to “3D CLR DIALOG”. (> 20)
Sound menu
Press [SOUND] repeatedly to select
the sound effect.
Press [3, 4] repeatedly to select
the desired setting and then press
[OK].
3D sound
Dolby
®
Virtual
Speaker
With this effect you can enjoy
a surround sound effect
similar to 5.1ch.
3D surround
effect
Adding to the Dolby Virtual
Speaker effect, Panasonic
has applied its own sound
field controlling technology to
expand the sound field
forwards, backwards,
upwards, and downwards,
providing a sound with depth
and force that better matches
3D images.
Clear-mode
dialog
Sports commentary and
dialogs from TV dramas are
heard as if the sound is
coming from the TV, giving
the feeling that the sound and
the image are one.
Also, the dialog will stand out
from the other sounds during
normal volume playback and
when the volume is lowered
for night time viewing.
e.g., Image of 3D sound field
SOUND
MODE
STANDARD
: Best suited
for dramas and comedy
shows.
STADIUM: Produces a
realistic sound for live
sports broadcasts.
MUSIC: Enhance the
sound of musical
instruments and songs.
≥ Instead of steps 1 and 2,
you can select "MUSIC"
mode directly by
pressing and holding
[SOUND] until "MUSIC"
is indicated on the
display.
CINEMA: Produces three-
dimensional sound unique
to movies.
NEWS: Enhance the voice
of news and sports
commentaries.
STEREO: Play any source
of sound in stereo.
SUBWOOFER
You can adjust the amount
of bass. This system
automatically selects the
most suitable setting
according to the type of
playback source.
LEVEL 1
LEVEL 2
: Default for
2 channel audio source
LEVEL 3
: Default for multi-
channel audio source
LEVEL 4
The setting you make is
retained and recalled every
time you play the same
type of source.
SC-HTB385_EGEB_RQT0B25-B.book 19 ページ 2016年3月29日 火曜日 午前9時33分

20
RQT0B25
≥ The default setting is underlined. Changed settings will be
kept until it is changed again, unless otherwise indicated.
You can view the current audio format.
Press and hold [OK] for more than 4 sec.
DIALOG
Adjust the dialog level.
LEVEL 1
LEVEL 2
LEVEL 3
LEVEL 4
“DIALOG” is not indicated
on the display when “3D
CLR DIALOG” is set to
“OFF”.
H.BASS
Enhance the harmonic
bass effect.
ON
OFF
3D CLR
DIALOG
The 3D Clear Mode Dialog
feature creates a sound field
similar to the sound coming
from a TV screen and
makes dialogues clearer.
ON: 3D Surround, Clear
Mode Dialog and Dolby
Virtual Speaker effect
OFF: Dolby Virtual
Speaker effect
The setting is set back to
“ON” every time you turn
the main unit on.
DUAL
AUDIO
Sets the preferred audio
channel mode when there
are two audio modes
received by this system.
M1
: Main
M2: Secondary
M1 + M2:
Main + Secondary
This effect only works if the
audio output of the TV or
player is set to “Bitstream”
and “Dolby Dual Mono” is
available in the sound source.
AGC
Auto gain control prevents
sudden loud sound by
reducing the sound level
automatically when the
input is too high.
This function is suitable for
TV broadcast that has
sound level difference.
ON
OFF
If the sound becomes
unnatural, select “OFF”.
LOW VOL
MODE
Enhance the dialog in low
volume condition.
ON
OFF
Select “OFF” to cancel this
effect if the dialog does not
sound natural in low
volume condition.
Audio format
DOLBY
DIGITAL
Dolby Digital is the audio
source.
DTS DTS
®
is the audio source.
PCM
2 channel pulse-code
modulation is the audio
source.
SC-HTB385_EGEB_RQT0B25-B.book 20 ページ 2016年3月29日 火曜日 午前9時33分
Pagina se încarcă ...
Pagina se încarcă ...
Pagina se încarcă ...
Pagina se încarcă ...
Pagina se încarcă ...
Pagina se încarcă ...
Pagina se încarcă ...
Pagina se încarcă ...
Pagina se încarcă ...
Pagina se încarcă ...
Pagina se încarcă ...
Pagina se încarcă ...
-
 1
1
-
 2
2
-
 3
3
-
 4
4
-
 5
5
-
 6
6
-
 7
7
-
 8
8
-
 9
9
-
 10
10
-
 11
11
-
 12
12
-
 13
13
-
 14
14
-
 15
15
-
 16
16
-
 17
17
-
 18
18
-
 19
19
-
 20
20
-
 21
21
-
 22
22
-
 23
23
-
 24
24
-
 25
25
-
 26
26
-
 27
27
-
 28
28
-
 29
29
-
 30
30
-
 31
31
-
 32
32


Panasonic SCHTB385EB Manualul proprietarului
- Categorie
- Seturi de difuzoare
- Tip
- Manualul proprietarului
- Acest manual este potrivit și pentru
în alte limbi
- English: Panasonic SCHTB385EB Owner's manual
Lucrări conexe
-
Panasonic SCHTB527EG Manualul proprietarului
-
Panasonic SCHTB8GN Instrucțiuni de utilizare
-
-
-
-
Panasonic SCALL5CDEB Instrucțiuni de utilizare
-
-
-
-