
Always here to help you
Register your product and get support at
www.philips.com/welcome
AT9XX
AT8X X
AT7XX

1
2
3
4
7
10
5
6
14
13
12
11
9
8
1


4
Introduction
Congratulations on your purchase and welcome to Philips! To fully
benet from the support that Philips offers, register your product
at www.philips.com/welcome.
Please read this user manual, as it contains information about the
wonderful features of this shaver as well as some tips to make shaving
easier and more enjoyable.
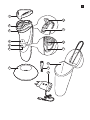
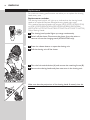
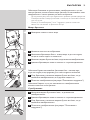
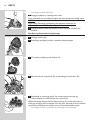
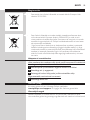
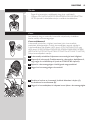
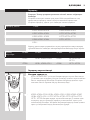
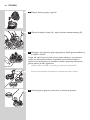
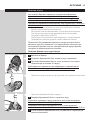
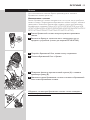
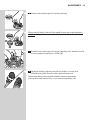
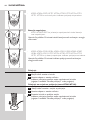
General description (Fig. 1)
1 Protection cap
2 Shaving unit
3 Shaving unit release button
4 Shaver on/off button (AT899/AT896/AT894/AT892/AT891/AT890/
AT811/AT790/AT756/AT753/AT751/AT750 only)
5 Shaving head symbol
6 Charging light (AT899/AT896/AT894/AT892/AT891/AT890/AT811/
AT790/AT756/AT753/AT751/AT750 only)
7 Charging stand (AT941/AT940 only)
8 Adapter
9 Cleaning brush
10 Storage pouch (AT941/AT940/AT897/AT894/AT891/AT890/AT796/
AT790 only)
11 Battery symbol and shaving head symbol (AT941/AT940/AT897 only)
12 Shaver on/off button (AT941/AT940/AT897 only)
13 Trimmer release slide (AT941/AT940/AT918/AT897/AT896/AT894/
AT891/AT890/AT889/AT887/AT886/AT872/AT811/AT797/AT796/
AT790/AT756 only)
14 Trimmer (AT941/AT940/AT918/AT897/AT896/AT894/AT891/AT890/
AT889/AT887/AT886/AT872/AT811/AT797/AT796/AT790/AT756 only)
Note: You can nd the type number on the back of the shaver.
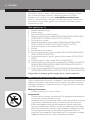
Important safety information
Read this important information carefully before you use the appliance
and its accessories and save it for future reference. The accessories
supplied may vary for different products.
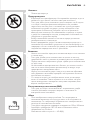
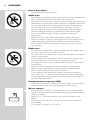
Danger
- Keep the adapter dry.
Warning
- The adapter contains a transformer. Do not cut off the adapter to
replace it with another plug, as this causes a hazardous situation.
- This appliance can be used by children aged from 8 years and above
and persons with reduced physical, sensory or mental capabilities or
lack of experience and knowledge if they have been given supervision
or instruction concerning use of the appliance in a safe way and
understand the hazards involved. Children shall not play with the
appliance. Cleaning and user maintenance shall not be made by
children without supervision.
- Always unplug the shaver before you clean it under the tap.
ENGLISH

- Always check the appliance and its accessories before you use it.
Do not use the appliance or its accessories if it is damaged, as this may
cause injury. Always replace a damaged part with one of the original type.
Caution
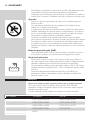
- Never immerse the charging stand in water nor rinse it under the tap.
- Only use this appliance for its intended purpose as shown in the
user manual.
- For hygienic reasons, the appliance should only be used by one person.
- Do not use the adapter in or near wall sockets that contain or have
contained an electric air freshener to prevent irreparable damage to
the adapter.
- Never use compressed air, scouring pads, abrasive cleaning agents
or aggressive liquids such as petrol or acetone to clean the appliance.
- Water may drip from the socket at the bottom of the shaver when
you rinse it. This is normal and not dangerous because all electronics
are enclosed in a sealed power unit inside the shaver.
Electromagnetic elds (EMF)
- This Philips appliance complies with all applicable standards and
regulations regarding exposure to electromagnetic elds.
General
- This shaver is waterproof. It is suitable for use in the bath or shower
and for cleaning under the tap. For safety reasons, the shaver can
therefore only be used without cord.
- The appliance is suitable for mains voltages ranging from 100 to 240 volts.
- The adapter transforms 100-240 volts to a safe low voltage of less
than 24 volts.
- Maximum noise level: Lc = 69dB(A)
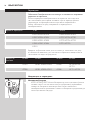
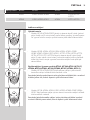
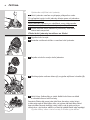
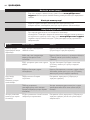
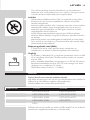
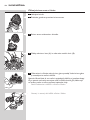
Charging
Note: The shaver cannot be used directly from the mains.
When you charge the shaver for the rst time or after a long period
of disuse, let it charge until the charging light lights up continuously.
See the table below for the charging time of your shaver.
Charging time 1 hour 8 hours
AT941, AT940, AT918 AT899, AT896, AT872
AT897, AT896, AT894 AT797, AT796, AT790
AT892, AT891, AT890 AT770, AT756, AT753
AT889, AT887, AT886 AT751, AT750
AT811
The shaving time may be less than stated below in the table as a result
of your shaving behaviour, your cleanings habits or your beard type.
ENGLISH 5

Shaving
minutes
60 min. 50 min. 45 min. 40 min.
AT941 AT897, AT894, AT892 AT899 AT790, AT756,
AT753
AT940 AT891, AT890, AT811 AT896 AT751, AT750
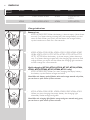
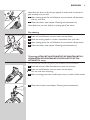
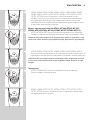
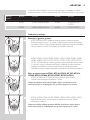
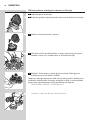
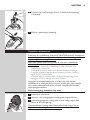
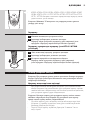
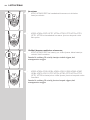
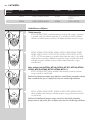
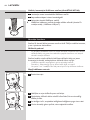
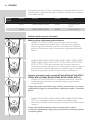
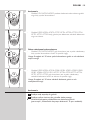
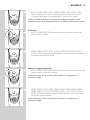
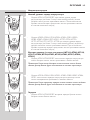
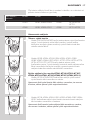
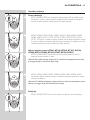
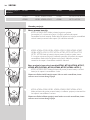
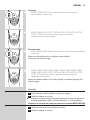
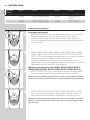
Charge indications
Battery low
- AT941/AT940/AT897: When the battery is almost empty (when there
are only 5 or fewer shaving minutes left), the orange battery symbol
starts to ash. When you switch off the shaver, the orange battery
symbol continues to ash for a few seconds.
- AT899, AT896, AT918, AT896, AT894, AT891, AT890, AT889, AT887,
AT886, AT872, AT811, AT797, AT796, AT790, AT770, AT756,AT753,
AT751, AT750: When the battery is almost empty (when there are
only 5 or fewer shaving minutes left), the charging light starts to ash
orange. When you switch off the shaver, the charging light continues
to ash orange for a few seconds.
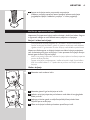
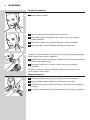
Quick charging (AT941, AT940, AT918, AT 897, AT896, AT894,
AT891, AT890, AT889, AT887, AT886, AT811 only)
- AT941/AT940/AT897: When you start charging the empty battery,
the battery symbol ashes orange and white.
Note: When the battery symbol ashes white and orange towards only white,
you can have a quick shave of three minutes.
- AT918, AT896, AT894, AT891, AT890, AT889, AT887, AT886, AT811:
When you start charging the empty battery, the charging light
alternately ashes orange and green.
Note: When the charging light ashes orange and green towards only green,
you can have a quick shave of three minutes.
ENGLISH6

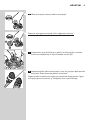
Charging
- AT941/AT940/AT897: When the shaver is charging, the white battery
symbol ashes.
- AT899, AT896, AT872, AT797, AT796, AT790, AT770, AT756,AT753,
AT751, AT750: When the shaver is charging, the charging light
ashes green.
Battery fully charged
- AT941/AT940/AT897: When the battery is fully charged,
the white battery symbol lights up continuously.
Note: After approx. 30 minutes, the battery symbol goes out to save energy.
- AT899, AT896, AT918, AT896, AT894, AT891, AT890, AT889, AT887,
AT886, AT872, AT811, AT797, AT796, AT790, AT770, AT756,AT753,
AT751, AT750:When the battery is fully charged, the charging light
lights up green continuously.
Note: After approx. 30 minutes, the charging light goes out to save energy.
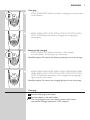
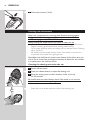
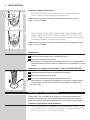
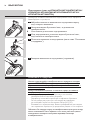
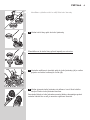
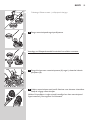
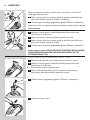
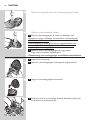
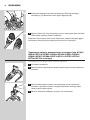
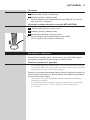
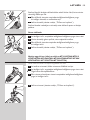
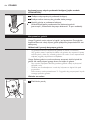
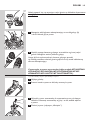
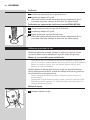
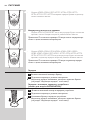
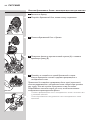
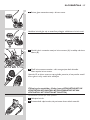
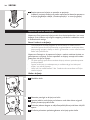
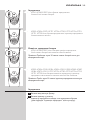
Charging
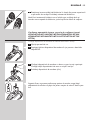
1 Put the small plug in the shaver.
2 Put the adapter in the wall socket.
, The charging light shows the charging status of the shaver
(see section ‘Charge indications’ in this chapter).
ENGLISH 7

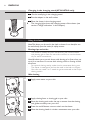
Charging in the charging stand (AT941/AT940 only)
1 Put the small plug in the charging stand.
2 Put the adapter in the wall socket.
3 Place the shaver in the charging stand.
, The charging light shows the charging status of the shaver (see
section ‘Charge indications’ in this chapter).
Using the shaver
Note: This shaver can be used in the bath or shower. It can therefore not
be used directly from the mains for safety reasons.
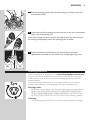
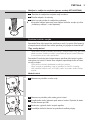
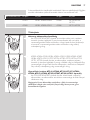
Shaving tips and tricks
- This shaver is suitable for both wet and dry use. Use the shaver
with shaving gel or foam for extra skin comfort, or use the shaver
dry for extra convenience.
Note: We advise you to use the shaver with shaving gel or foam when you
use it for a wet shave. Do not use thick shaving cream or shaving oil with
this shaver.
- For optimal shaving results, make circular movements during use.
- The shaver is waterproof and can be used in the bath or shower.
- Your skin may need 2 or 3 weeks to get accustomed to the Philips
shaving system.
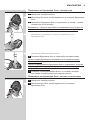
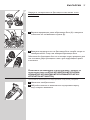
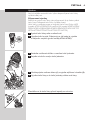
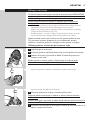
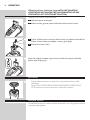
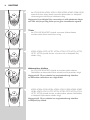
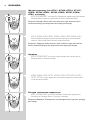
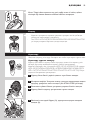
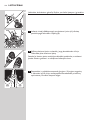
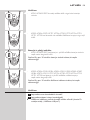
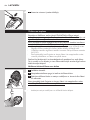
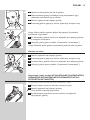
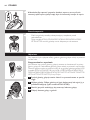
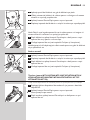
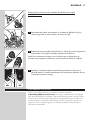
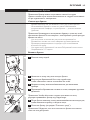
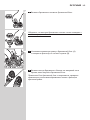
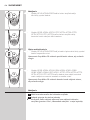
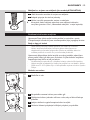
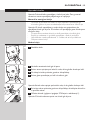
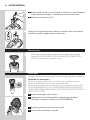
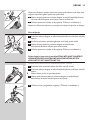
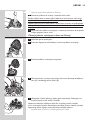
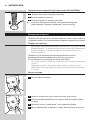
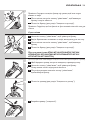
Wet shaving
1 Apply some water to your skin.
2 Apply shaving foam or shaving gel to your skin.
3 Rinse the shaving unit under the tap to ensure that the shaving
unit glides smoothly over your skin.
4 Press the on/off button once to switch on the shaver.
5 Move the shaving heads in circular movements over your skin.
ENGLISH8

Note: Rinse the shaver under the tap regularly to ensure that it continues to
glide smoothly over your skin.
6 After shaving, press the on/off button once to switch off the shaver
and dry your face.
7 Clean the shaver (see chapter ‘Cleaning and maintenance’).
Note: Make sure you rinse all foam or shaving gel off the shaver.
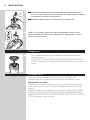
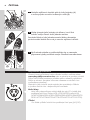
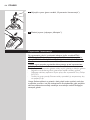
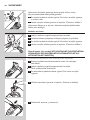
Dry shaving
1 Press the on/off button once to switch on the shaver.
2 Move the shaving heads in circular movements over your skin.
3 After shaving, press the on/off button once to switch off the shaver.
4 Clean the shaver (see chapter ‘Cleaning and maintenance’).
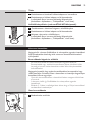
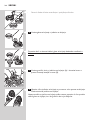
Trimming (AT941/AT940/AT918/AT897/AT896/AT894/AT891/
AT890/AT889/AT887/AT886/AT872/AT811/AT797/AT796/
AT790/AT756 only)
You can use the trimmer to groom your sideburns and moustache.
1 Push the trimmer slide downwards to open the trimmer.
2 Press the on/off button once to switch on the shaver.
, You can now start trimming.
3 After trimming, press the on/off button once to switch off the shaver.
4 Clean the trimmer (see chapter ‘Cleaning and maintenance’).
ENGLISH 9

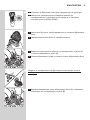
5 Close the trimmer (‘click’).
Cleaning and maintenance
Never use compressed air, scouring pads, abrasive cleaning agents
or aggressive liquids such as petrol or acetone to clean the shaver
and the charging stand (AT941/AT940 only).
Always unplug the shaver before you clean it under the tap.
- Clean the shaver after every shave for optimal shaving performance.
- Regular cleaning guarantees better shaving performance.
- For the best cleaning results, we advise you to use the Philips Cleaning
spray (HQ110).
- Be careful with hot water. Always check if the water is not too hot,
to prevent your hands from getting burnt.
Note: Water may leak from the socket at the bottom of the shaver when you
rinse it. This is normal and not dangerous because all electronics are enclosed
in a sealed power unit inside the shaver.
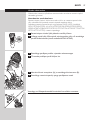
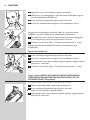
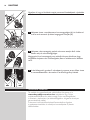
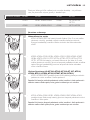
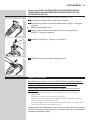
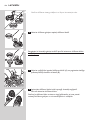
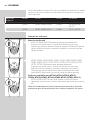
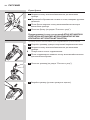
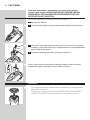
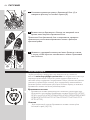
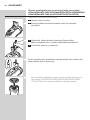
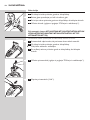
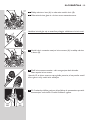
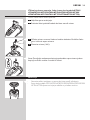
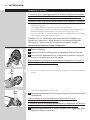
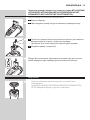
Cleaning the shaving unit under the tap
1 Switch off the shaver.
2 Press the release button to open the shaving unit.
3 Rinse the shaving unit and hair chamber under a hot tap
for 30 seconds.
Be careful with hot water. Always check if the water is not too hot,
to prevent your hands from getting burnt.
- Rinse the hair chamber and the inside of the shaving unit.
ENGLISH10

- Rinse the outside of the shaving unit.
4 Close the shaving unit and shake off excess water.
Be careful not to hit the shaving unit against anything while shaking
off excess water.
Never dry the shaving unit and the hair chamber with a towel or
tissue, as this may damage the shaving unit.
5 Open the shaving unit again and leave it open to let the shaver
dry completely.
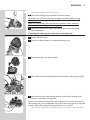
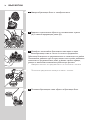
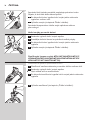
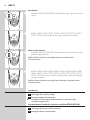
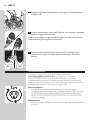
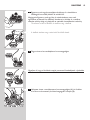
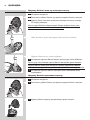
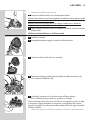
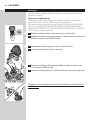
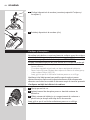
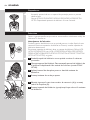
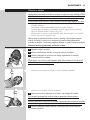
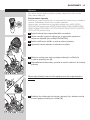
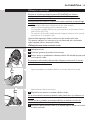
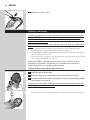
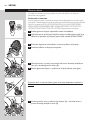
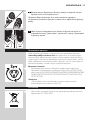
Cleaning the shaving unit with the cleaning brush
1 Switch off the shaver.
2 Press the release button to open the shaving unit.
3 Pull the shaving unit off the shaver.
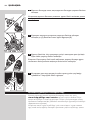
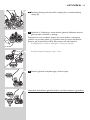
4 Turn the lock anticlockwise (A) and remove the retaining frame (B).
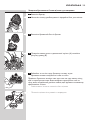
5 Remove and clean one shaving head at a time. Each shaving head
consists of a cutter and a guard.
Note: Do not clean more than one cutter and guard at a time, since they are
all matching sets. If you accidentally mix up the cutters and guards, it may take
several weeks before optimal shaving performance is restored.
- Remove the cutter from the shaving guard and clean it with the brush.
A
B
ENGLISH 11

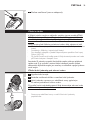
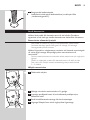
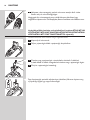
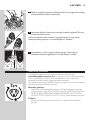
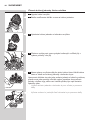
- Clean the inside and outside of the shaving guard with the brush.
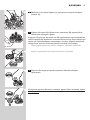
6 Put the shaving heads back into the shaving unit.
Make sure that the projections of the shaving heads t exactly
into the recesses.
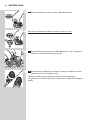
7 Put the retaining frame back into the shaving unit (A) and
turn the lock clockwise (B).
8 Insert the lug of the shaving unit into the slot in the top of the shaver.
Then close the shaving unit.
Note: If the shaving unit does not close smoothly, check if you have inserted
the shaving heads properly and if the retaining frame is locked.
B
A
ENGLISH12

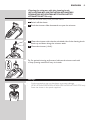
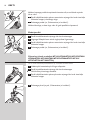
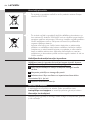
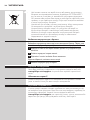
Cleaning the trimmer with the cleaning brush
(AT941/AT940/AT918/AT897/AT896/AT894/AT891/
AT890/AT889/AT887/AT886/AT872/AT811/AT797/
AT796/AT790/AT756 only)
Clean the trimmer every time you have used it.
1 Switch off the shaver.
2 Push the trimmer slide downwards to open the trimmer.
3 Clean the trimmer with the short-bristled side of the cleaning brush.
Brush up and down along the trimmer teeth.
4 Close the trimmer (‘click’).
Tip: For optimal trimming performance, lubricate the trimmer teeth with
a drop of sewing machine oil every six months.
Storage
- Put the protection cap on the shaver to prevent damage.
- AT941/AT940/AT897/AT894/AT892/AT891/AT890/AT796/AT790 only:
Store the shaver in the pouch supplied.
ENGLISH 13

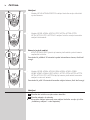
Replacement
For maximum shaving performance, we advise you to replace the shaving
heads every year.
Replacement reminder
The shaving head symbol will light up to indicate that the shaving heads
need to be replaced. Replace damaged shaving heads right away.
Only replace the shaving heads with original HQ9 (AT941/AT940/AT918)
or HQ8 (AT897/AT896/AT894/AT891/AT890/AT889/AT887/AT886/
AT872/AT811/AT797/AT796/AT790/AT770/AT756/AT753/AT751/AT750)
Philips Shaving Heads.
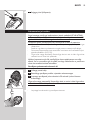
1 The shaving head symbol lights up orange continuously.
2 Switch off the shaver. Disconnect the shaver from the mains or
remove it from the charging stand (AT941/AT940 only).
3 Press the release button to open the shaving unit.
4 Pull the shaving unit off the shaver.
5 Turn the lock anticlockwise (A) and remove the retaining frame (B).
6 Remove the shaving heads and place new ones in the shaving unit.
Make sure that the projections of the shaving heads t exactly into the
recesses.
A
B
ENGLISH14

7 Put the retaining frame back into the shaving unit (A)and turn the
lock clockwise (B).
8 Insert the lug of the shaving unit into the slot in the top of the shaver.
Then close the shaving unit.
Note: If the shaving unit does not close smoothly, check if you have inserted
the shaving heads properly and if the retaining frame is locked.
9 Press and hold the on/off button for 5 seconds to reset the
replacement reminder on the shaver. The orange light will go out.
Ordering accessories
To buy accessories or spare parts, visit www.shop.philips.com/service
or go to your Philips dealer. You can also contact the Philips Consumer
Care Centre in your country (see the worldwide guarantee leaet for
contact details).
To retain the top performance of your shaver, make sure you clean it
regularly and replace its shaving heads at the recommended time.
Shaving heads
- We advise you to replace your shaving heads every two years. Always
replace with HQ9 (AT941/AT940) or HQ8(AT897/AT896/AT894/
AT891/AT890/AT889/AT887/AT886/AT872/AT811/AT797/AT796/
AT790/AT770/AT756/AT753/AT751/AT750) Philips Shaving Heads.
Cleaning
- Use Cleaning spray (HQ110) to clean the shaving heads thoroughly.
B
A
5 sec.
ENGLISH 15

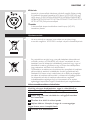
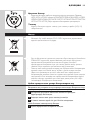
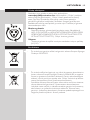
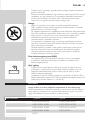
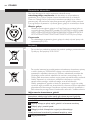
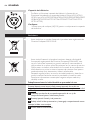
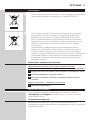
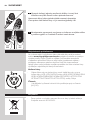
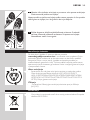
Recycling
- This symbol on a product means that the product is covered by
European Directive 2012/19/EU.
- This symbol means that the product contains a built-in rechargeable
battery covered by European Directive 2006/66/EC which cannot be
disposed of with normal household waste. We strongly advise you to
take your product to an ofcial collection point or a Philips service
centre to have a professional remove the rechargeable battery.
- Inform yourself about the local separate collection system for electrical
and electronic products and rechargeable batteries. Follow local
rules and never dispose of the product and rechargeable batteries
with normal household waste. Correct disposal of old products and
rechargeable batteries helps prevent negative consequences for the
environment and human health.
Removing the rechargeable shaver battery
Only remove the rechargeable battery when you discard the shaver.
Make sure the rechargeable battery is completely empty when you
remove it.
1 Undo the screws in the back of the shaver and in the hair chamber.
2 Remove the front panel and the back panel.
3 Bend the 6 hooks aside and take out the power unit.
Be careful, the hooks are sharp.
4 Remove the rechargeable battery.
Guarantee and support
If you need information or support, please visit www.philips.com/
support or read the separate worldwide guarantee leaet.
Guarantee restrictions
The shaving heads (cutters and guards) are not covered by the terms
of the international guarantee because they are subject to wear.
ENGLISH16

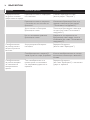
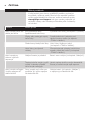
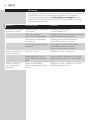
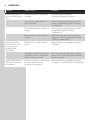
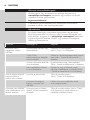
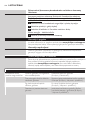
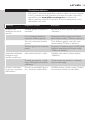
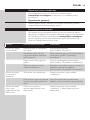
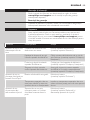
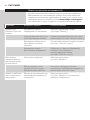
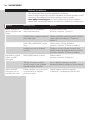
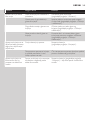
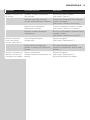
Troubleshooting
This chapter summarises the most common problems you could
encounter with the appliance. If you are unable to solve the problem with
the information below, visit www.philips.com/support for a list of
frequently asked questions or contact the Consumer Care Centre in your
country.
Problem Possible cause Solution
The shaver does not
shave as well as it used
to.
The shaving heads are damaged
or worn.
Replace the shaving heads (see chapter
‘Replacement’).
Foam or gel residues clog up
the shaving heads.
Rinse the shaving unit under a hot tap
(see chapter ‘Cleaning and maintenance’).
Long hairs obstruct the shaving
heads.
Clean the shaving heads one by one
(see chapter ‘Cleaning and maintenance’).
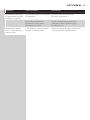
You have not inserted the
shaving heads properly.
Make sure that the projections of the
shaving heads t exactly into the recesses
(see chapter ‘Cleaning and maintenance’).
The shaver does not
work when I press the
on/off button.
The rechargeable battery is
empty.
Recharge the battery (see chapter
‘Charging’).
The temperature of the shaver
is too high. In this case, the
shaver does not work.
As soon as the temperature of the shaver
has dropped sufciently, you can switch on
the shaver again.
The shaver does not
work, although it is
connected to the
mains.
The shaver is not designed to
be used directly from the mains.
Recharge the battery (see chapter
‘Charging’) and disconnect it from the mains.
ENGLISH 17

18
Въведение
Поздравления за вашата покупка и добре дошли във Philips! За
да се възползвате изцяло от предлаганата от Philips поддръжка,
регистрирайте продукта си на адрес www.philips.bg/welcome.
Прочетете внимателно това ръководство за експлоатация, тъй като то
съдържа информация за прекрасните функции на тази самобръсначка,
а също и някои съвети, които ще направят бръсненето ви по-бързо и
по-приятно.
Общо описание (фиг. 1)
1 Предпазна капачка
2 Бръснещ блок
3 Бутон за освобождаване на бръснещия блок
4 Бутон за вкл./изкл. на самобръсначката (само за AT899/AT896/AT894/
AT892/AT891/AT890/AT811/AT790/AT756/AT753/AT751/AT750)
5 Символ на бръснеща глава
6 Индикатор за зареждане (само за AT899/AT896/AT894/AT892/
AT891/AT890/AT811/AT790/AT756/AT753/AT751/AT750)
7 Зарядна поставка (само за AT941/AT940)
8 Адаптер
9 Четка за почистване
10 Калъф за съхранение (само за AT941/AT940/AT897/AT894/AT891/
AT890/AT796/AT790)
11 Символ на батерия и символ на бръснеща глава (само за AT941/
AT940/AT897)
12 Бутон за вкл./изкл. на самобръсначката (само за AT941/AT940/AT897)
13 Плъзгач за освобождаване на машинката за подстригване (само
за AT941/AT940/AT918/AT897/AT896/AT894/AT891/AT890/AT889/
AT887/AT886/AT872/AT811/AT797/AT796/AT790/AT756)
14 Машинка за подстригване (само за AT941/AT940/AT918/AT897/
AT896/AT894/AT891/AT890/AT889/AT887/AT886/AT872/AT811/
AT797/AT796/AT790/AT756)
Забележка: Можете да откриете номера на модела на гърба на
самобръсначката.
Важна информация за безопасност
Прочетете тази важна информация внимателно, преди да използвате
уреда и неговите аксесоари, и я запазете за справка в бъдеще.
Включените в комплекта принадлежности може да са различни за
различните продукти.
БЪЛГАРСКИ

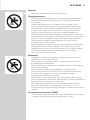
Опасност
- Пазете адаптера сух.
Предупреждение
- В адаптера има трансформатор. Не отрязвайте адаптера, за да го
замените с друг щепсел, тъй като това крие опасности.
- Този уред може да се използва от деца на възраст над 8 години
и от хора с намалени физически възприятия или умствени
недостатъци или без опит и познания, ако са инструктирани
за безопасна употреба на уреда и са под наблюдение с цел
гарантиране на безопасна употреба и ако са им разяснени
евентуалните опасности. Не позволявайте на деца да си играят
с уреда. Не позволявайте на деца да извършват почистване или
поддръжка на уреда без надзор.
- Винаги изключвайте щепсела от контакта, преди да измиете
самобръсначката с течаща вода.
- Винаги проверявайте уреда и неговите аксесоари, преди да го
използвате. Не използвайте уреда, ако той или аксесоарите му са
повредени, тъй като това може да доведе до нараняване. Винаги
подменяйте повредените части с оригинални.
Внимание
- Никога не потапяйте зарядната поставка във вода и не я плакнете
с течаща вода.
- Този уред трябва да се използва само за целите, за които е
предназначен, както е показано в ръководството за потребителя.
- Поради хигиенни съображения уредът трябва да се използва само
от едно лице.
- Не използвайте адаптера във или в близост до контакт, в който
има или е имало електрически ароматизатор за въздух, за да
предотвратите непоправими щети.
- Никога не почиствайте уреда с въздух под налягане, абразивни
гъби, абразивни почистващи препарати или агресивни течности,
като бензин или ацетон.
- От гнездото отдолу на самобръсначката може да тече вода,
когато я изплаквате. Това е нормално и не е опасно, тъй като
цялата електроника е затворена в капсулован захранващ блок
вътре в самобръсначката.
Електромагнитни излъчвания (EMF)
- Този уред на Philips е в съответствие с нормативната уредба
и всички действащи стандарти, свързани с излагането на
електромагнитни излъчвания.
Общи
- Тази самобръсначка е водоустойчива. Тя е подходяща за
използване във ваната или под душа, както и за почистване на
течаща вода. От съображения за безопасност самобръсначката
може да се използва само без кабел.
-
Този уред е подходящ за напрежение на мрежата от 100 до 240 волта.
- Адаптерът преобразува 100-240 волта в безопасно ниско
напрежение под 24 волта.
- Максимално ниво на шума: Lc = 69 dB(A)
БЪЛГАРСКИ 19

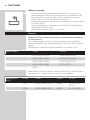
Зареждане
Забележка: Самобръсначката не може да се използва със захранване
директно от мрежата.
Когато зареждате самобръсначката за първи път или след като
не е използвана дълго време, оставете я да се зарежда, докато
индикаторът за зареждане започне да свети непрекъснато.
Вижте таблицата по-долу за времето за зареждане на
самобръсначката.
Време за зареждане 1 час 8 часа
AT941, AT940, AT918 AT899, AT896, AT872
AT897, AT896, AT894 AT797, AT796, AT790
AT892, AT891, AT890 AT770, AT756, AT753
AT889, AT887, AT886 AT751, AT750
AT811
Времето за бръснене може да е по-малко от посоченото по-долу
в таблицата в зависимост от начина ви на бръснене, навиците ви за
почистване или вида на брадата ви.
Минути за
бръснене
60 мин. 50 мин. 45 мин. 40 мин.
AT941 AT897, AT894, AT892 AT899 AT790, AT756,
AT753
AT940 AT891, AT890, AT811 AT896 AT751, AT750
Индикации за зареждане
Изтощена батерия
- AT941/AT940/AT897: Когато батерията е почти изтощена (когато
остават само 5 или по-малко минути за бръснене), оранжевият
символ на батерията започва да мига. Когато изключите
самобръсначката, оранжевият символ на батерията продължава да
мига още няколко секунди.
БЪЛГАРСКИ20
Pagina se încarcă...
Pagina se încarcă...
Pagina se încarcă...
Pagina se încarcă...
Pagina se încarcă...
Pagina se încarcă...
Pagina se încarcă...
Pagina se încarcă...
Pagina se încarcă...
Pagina se încarcă...
Pagina se încarcă...
Pagina se încarcă...
Pagina se încarcă...
Pagina se încarcă...
Pagina se încarcă...
Pagina se încarcă...
Pagina se încarcă...
Pagina se încarcă...
Pagina se încarcă...
Pagina se încarcă...
Pagina se încarcă...
Pagina se încarcă...
Pagina se încarcă...
Pagina se încarcă...
Pagina se încarcă...
Pagina se încarcă...
Pagina se încarcă...
Pagina se încarcă...
Pagina se încarcă...
Pagina se încarcă...
Pagina se încarcă...
Pagina se încarcă...
Pagina se încarcă...
Pagina se încarcă...
Pagina se încarcă...
Pagina se încarcă...
Pagina se încarcă...
Pagina se încarcă...
Pagina se încarcă...
Pagina se încarcă...
Pagina se încarcă...
Pagina se încarcă...
Pagina se încarcă...
Pagina se încarcă...
Pagina se încarcă...
Pagina se încarcă...
Pagina se încarcă...
Pagina se încarcă...
Pagina se încarcă...
Pagina se încarcă...
Pagina se încarcă...
Pagina se încarcă...
Pagina se încarcă...
Pagina se încarcă...
Pagina se încarcă...
Pagina se încarcă...
Pagina se încarcă...
Pagina se încarcă...
Pagina se încarcă...
Pagina se încarcă...
Pagina se încarcă...
Pagina se încarcă...
Pagina se încarcă...
Pagina se încarcă...
Pagina se încarcă...
Pagina se încarcă...
Pagina se încarcă...
Pagina se încarcă...
Pagina se încarcă...
Pagina se încarcă...
Pagina se încarcă...
Pagina se încarcă...
Pagina se încarcă...
Pagina se încarcă...
Pagina se încarcă...
Pagina se încarcă...
Pagina se încarcă...
Pagina se încarcă...
Pagina se încarcă...
Pagina se încarcă...
Pagina se încarcă...
Pagina se încarcă...
Pagina se încarcă...
Pagina se încarcă...
Pagina se încarcă...
Pagina se încarcă...
Pagina se încarcă...
Pagina se încarcă...
Pagina se încarcă...
Pagina se încarcă...
Pagina se încarcă...
Pagina se încarcă...
Pagina se încarcă...
Pagina se încarcă...
Pagina se încarcă...
Pagina se încarcă...
Pagina se încarcă...
Pagina se încarcă...
Pagina se încarcă...
Pagina se încarcă...
Pagina se încarcă...
Pagina se încarcă...
Pagina se încarcă...
Pagina se încarcă...
Pagina se încarcă...
Pagina se încarcă...
Pagina se încarcă...
Pagina se încarcă...
Pagina se încarcă...
Pagina se încarcă...
Pagina se încarcă...
Pagina se încarcă...
Pagina se încarcă...
Pagina se încarcă...
Pagina se încarcă...
Pagina se încarcă...
Pagina se încarcă...
Pagina se încarcă...
Pagina se încarcă...
Pagina se încarcă...
Pagina se încarcă...
Pagina se încarcă...
Pagina se încarcă...
Pagina se încarcă...
Pagina se încarcă...
Pagina se încarcă...
Pagina se încarcă...
Pagina se încarcă...
Pagina se încarcă...
Pagina se încarcă...
Pagina se încarcă...
Pagina se încarcă...
Pagina se încarcă...
Pagina se încarcă...
Pagina se încarcă...
Pagina se încarcă...
Pagina se încarcă...
Pagina se încarcă...
Pagina se încarcă...
Pagina se încarcă...
Pagina se încarcă...
Pagina se încarcă...
Pagina se încarcă...
Pagina se încarcă...
Pagina se încarcă...
Pagina se încarcă...
Pagina se încarcă...
Pagina se încarcă...
Pagina se încarcă...
Pagina se încarcă...
Pagina se încarcă...
Pagina se încarcă...
Pagina se încarcă...
Pagina se încarcă...
Pagina se încarcă...
Pagina se încarcă...
Pagina se încarcă...
Pagina se încarcă...
Pagina se încarcă...
Pagina se încarcă...
Pagina se încarcă...
Pagina se încarcă...
Pagina se încarcă...
Pagina se încarcă...
Pagina se încarcă...
Pagina se încarcă...
Pagina se încarcă...
Pagina se încarcă...
Pagina se încarcă...
Pagina se încarcă...
Pagina se încarcă...
Pagina se încarcă...
Pagina se încarcă...
Pagina se încarcă...
Pagina se încarcă...
Pagina se încarcă...
Pagina se încarcă...
Pagina se încarcă...
Pagina se încarcă...
Pagina se încarcă...
Pagina se încarcă...
Pagina se încarcă...
Pagina se încarcă...
Pagina se încarcă...
Pagina se încarcă...
Pagina se încarcă...
Pagina se încarcă...
Pagina se încarcă...
Pagina se încarcă...
Pagina se încarcă...
Pagina se încarcă...
Pagina se încarcă...
Pagina se încarcă...
Pagina se încarcă...
Pagina se încarcă...
Pagina se încarcă...
Pagina se încarcă...
Pagina se încarcă...
Pagina se încarcă...
Pagina se încarcă...
Pagina se încarcă...
Pagina se încarcă...
Pagina se încarcă...
Pagina se încarcă...
Pagina se încarcă...
Pagina se încarcă...
Pagina se încarcă...
Pagina se încarcă...
Pagina se încarcă...
Pagina se încarcă...
-
 1
1
-
 2
2
-
 3
3
-
 4
4
-
 5
5
-
 6
6
-
 7
7
-
 8
8
-
 9
9
-
 10
10
-
 11
11
-
 12
12
-
 13
13
-
 14
14
-
 15
15
-
 16
16
-
 17
17
-
 18
18
-
 19
19
-
 20
20
-
 21
21
-
 22
22
-
 23
23
-
 24
24
-
 25
25
-
 26
26
-
 27
27
-
 28
28
-
 29
29
-
 30
30
-
 31
31
-
 32
32
-
 33
33
-
 34
34
-
 35
35
-
 36
36
-
 37
37
-
 38
38
-
 39
39
-
 40
40
-
 41
41
-
 42
42
-
 43
43
-
 44
44
-
 45
45
-
 46
46
-
 47
47
-
 48
48
-
 49
49
-
 50
50
-
 51
51
-
 52
52
-
 53
53
-
 54
54
-
 55
55
-
 56
56
-
 57
57
-
 58
58
-
 59
59
-
 60
60
-
 61
61
-
 62
62
-
 63
63
-
 64
64
-
 65
65
-
 66
66
-
 67
67
-
 68
68
-
 69
69
-
 70
70
-
 71
71
-
 72
72
-
 73
73
-
 74
74
-
 75
75
-
 76
76
-
 77
77
-
 78
78
-
 79
79
-
 80
80
-
 81
81
-
 82
82
-
 83
83
-
 84
84
-
 85
85
-
 86
86
-
 87
87
-
 88
88
-
 89
89
-
 90
90
-
 91
91
-
 92
92
-
 93
93
-
 94
94
-
 95
95
-
 96
96
-
 97
97
-
 98
98
-
 99
99
-
 100
100
-
 101
101
-
 102
102
-
 103
103
-
 104
104
-
 105
105
-
 106
106
-
 107
107
-
 108
108
-
 109
109
-
 110
110
-
 111
111
-
 112
112
-
 113
113
-
 114
114
-
 115
115
-
 116
116
-
 117
117
-
 118
118
-
 119
119
-
 120
120
-
 121
121
-
 122
122
-
 123
123
-
 124
124
-
 125
125
-
 126
126
-
 127
127
-
 128
128
-
 129
129
-
 130
130
-
 131
131
-
 132
132
-
 133
133
-
 134
134
-
 135
135
-
 136
136
-
 137
137
-
 138
138
-
 139
139
-
 140
140
-
 141
141
-
 142
142
-
 143
143
-
 144
144
-
 145
145
-
 146
146
-
 147
147
-
 148
148
-
 149
149
-
 150
150
-
 151
151
-
 152
152
-
 153
153
-
 154
154
-
 155
155
-
 156
156
-
 157
157
-
 158
158
-
 159
159
-
 160
160
-
 161
161
-
 162
162
-
 163
163
-
 164
164
-
 165
165
-
 166
166
-
 167
167
-
 168
168
-
 169
169
-
 170
170
-
 171
171
-
 172
172
-
 173
173
-
 174
174
-
 175
175
-
 176
176
-
 177
177
-
 178
178
-
 179
179
-
 180
180
-
 181
181
-
 182
182
-
 183
183
-
 184
184
-
 185
185
-
 186
186
-
 187
187
-
 188
188
-
 189
189
-
 190
190
-
 191
191
-
 192
192
-
 193
193
-
 194
194
-
 195
195
-
 196
196
-
 197
197
-
 198
198
-
 199
199
-
 200
200
-
 201
201
-
 202
202
-
 203
203
-
 204
204
-
 205
205
-
 206
206
-
 207
207
-
 208
208
-
 209
209
-
 210
210
-
 211
211
-
 212
212
-
 213
213
-
 214
214
-
 215
215
-
 216
216
-
 217
217
-
 218
218
-
 219
219
-
 220
220
-
 221
221
-
 222
222
-
 223
223
-
 224
224
-
 225
225
-
 226
226
-
 227
227
-
 228
228
-
 229
229
-
 230
230


Philips AT750/16 Manual de utilizare
- Categorie
- Aparate de bărbierit
- Tip
- Manual de utilizare
în alte limbi
- slovenčina: Philips AT750/16 Používateľská príručka
- eesti: Philips AT750/16 Kasutusjuhend
Lucrări înrudite
-
Philips PT717/16 Manual de utilizare
-
Philips S1100/04 Manual de utilizare
-
Philips S3510/06 Manual de utilizare
-
Philips HQ8255/19 Manual de utilizare
-
Philips HQ8200/17 Manual de utilizare
-
Philips HQ7742/16 Manual de utilizare
-
Philips CRP143/01 Product Datasheet
-
Philips PT730/14 Manual de utilizare
-
Philips CP0479/01 Product Datasheet
-
Philips PT731/16 Manual de utilizare