
GC1830, GC1820, GC1815
GC1720, GC1710, GC1705, GC1703, GC1701

2

3
1

4


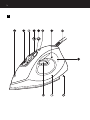
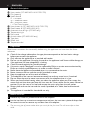
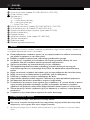
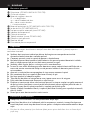
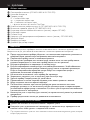
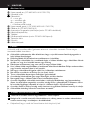
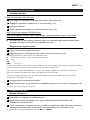
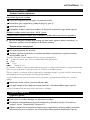
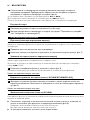
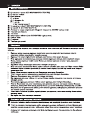
General description
A Spray nozzle (GC1830/1820/1815/1720/1705)
B Filling opening
C Steam control
O = no steam
l = moderate steam
; = maximum steam
x = Calc-Clean function
D Spray button T (GC1830/1820/1815/1720/1705)
E Steam boost 9 (GC1830/1820/1815)
F Automatic shut-off light (GC1830 only)
G Temperature light
H Mains cord
I Anticalc tablet (GC1830/1820 only)
J Type plate
K Water tank
L Temperature dial
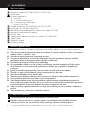
Important
Read these instructions for use carefully before using the appliance and save them for future
reference.
◗ Check if the voltage indicated on the type plate corresponds to the local mains voltage
before you connect the appliance.
◗ Only connect the appliance to an earthed wall socket.
◗ Do not use the appliance if the plug, the cord or the appliance itself shows visible damage, or
if the appliance has been dropped or is leaking.
◗ Check the cord regularly for possible damage.
◗ If the mains cord is damaged, it must be replaced by Philips, a service centre authorised by
Philips or similarly qualified persons in order to avoid a hazard.
◗ Never leave the appliance unattended when it is connected to the mains.
◗ Never immerse the iron and the stand, if provided, in water.
◗ Keep the appliance out of the reach of children.
◗ The soleplate of the iron can become extremely hot and may cause burns if touched.
◗ Do not allow the cord to come into contact with the soleplate when it is hot.
◗ When you have finished ironing, when you clean the appliance, when you fill or empty the
water tank and also when you leave the iron even for a short while: set the steam control to
position O, put the iron on its heel and remove the mains plug from the wall socket.
◗ Always place and use the iron and the stand, if provided, on a stable, level and horizontal
surface.
◗ This appliance is intended for household use only.
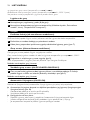
Before first use
1 Remove any sticker or protective foil from the soleplate.
2 Let the iron heat up to maximum temperature and pass the iron over a piece of damp cloth
for several minutes to remove any residues from the soleplate.
B
The iron may give off some smoke when you use it for the first time.This will cease after a short
while.
ENGLISH6

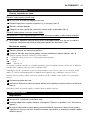
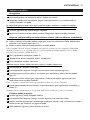
Preparing for use
Filling the water tank
Never immerse the iron in water.
1 Make sure the appliance is unplugged.
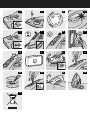
2 Set the steam control to position O (= no steam) (fig. 2).
3 Tilt the iron backwards.
4 Fill the water tank with tap water up to the maximum level (fig. 3).
Do not fill the water tank beyond the MAX indication.
Do not put perfume, vinegar, starch, descaling agents, ironing aids or other chemicals in the water
tank.
◗ If the tap water in your area is very hard, we advise you to mix it with an equal amount of
distilled water or to use distilled water only.
Setting the temperature
1 Put the iron on its heel.
2 Set the required ironing temperature by turning the temperature dial to the appropriate
position (fig. 4).
Check the laundry care label for the required ironing temperature:
1 Synthetic fabrics (e.g. acrylic, viscose, polyamide, polyester)
1 Silk
2 Wool
3 Cotton, linen
If you do not know what kind or kinds of fabric an article is made of, determine the right ironing
temperature by ironing a part that will not be visible when you wear or use the article.
Silk, woollen and synthetic materials; iron the reverse side of the fabric to prevent shiny patches.
Avoid using the spray function to prevent stains.
Start ironing the articles that require the lowest ironing temperature, such as those made of
synthetic fibres.
3 Put the mains plug in an earthed wall socket.
4 When the temperature light has gone out, wait a while before you start ironing (fig. 5).
The temperature light will go on from time to time during ironing.
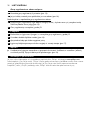
Using the appliance
Steam ironing
1 Make sure that there is enough water in the water tank.
2 Select the recommended ironing temperature (see chapter 'Preparing for use', section
'Setting the temperature').
3 After the temperature light has gone out, set the steam control to the appropriate steam
position. Make sure that the steam setting you select is suitable for the ironing temperature
selected: (fig. 6).
ENGLISH 7

l for moderate steam (temperature settings 2 to 3)
; for maximum steam (temperature settings 3 to MAX)
The iron will start steaming as soon as the set temperature has been reached.
Ironing without steam
1 Set the steam control to position O (= no steam).
2 Select the recommended ironing temperature (see chapter 'Preparing for use', section
'Setting the temperature').
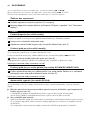
Features
Spray function (specific types only)
You can use the spray function to remove stubborn creases at any temperature.
1 Make sure that there is enough water in the water tank.
2 Press the spray button several times to moisten the article to be ironed (fig. 7).
Steam boost (specific types only)
A powerful shot of steam helps to remove stubborn creases.
The steam boost function can only be used at temperature settings between 3 and MAX.
1 Press and release the steam boost button (fig. 8).
Wait a while before using the button again to avoid spluttering.
Never direct the steam at people.
Vertical steam boost (GC1830/GC1820/GC1815 only)
1 The steam boost function can also be used when you are holding the iron in vertical
position.This is useful for removing creases from hanging clothes, curtains, etc (fig. 9).
Never direct the steam at people.
Automatic shut-off (GC1830 only)
The electronic shut-off function automatically switches the heating element off if the iron has not
been moved for a while.
◗ The auto-off light starts blinking to indicate that the iron has been switched off by the safety
shut-off function (fig. 10).
- In horizontal position, this will happen after 30 seconds.
- In vertical position, this will happen after 8 minutes.
◗ To let the iron heat up again:
- Pick up the iron or move it slightly.The auto-off light goes out.
- If the temperature light goes on, wait for it to go out before you start ironing.
- If the temperature light does not go on, the iron is ready for use.
ENGLISH8

Cleaning and maintenance
After ironing
1 Remove the mains plug from the wall socket and let the iron cool down.
2 Wipe scale and any other deposits off the soleplate with a damp cloth and a non-abrasive
(liquid) cleaner.
To keep the soleplate smooth, you should avoid hard contact with metal objects. Never use a
scouring pad, vinegar or other chemicals to clean the soleplate.
3 Clean the upper part of the appliance with a damp cloth.
4 Regularly rinse the water tank with water. Empty the water tank after cleaning.
Double-Active Calc System (specific types only)
◗ The anti-calc tablet prevents scale from clogging the steam vents.The anti-calc tablet is
constantly active and does not need replacement (fig. 11).
◗ The Calc-Clean function removes the scale particles.
Use the Calc-Clean function once every two weeks. If the water in your area is very hard (i.e. when
flakes come out of the soleplate during ironing), the Calc-Clean function should be used more
frequently.
1 Set the steam control to position O.
2 Set the temperature dial to MAX.
3 Fill the water tank to the maximum level.
Do not pour vinegar or other descaling agents into the water tank.
4 Put the plug in the wall socket.
5 Unplug the iron when the temperature light has gone out.
6 Hold the iron over the sink and set the steam control to the Calc-Clean position x (fig. 12).
7 Pull the steam control slightly upwards and gently shake the iron until all water in the tank
has been used up.
Steam and boiling water will come out of the soleplate. Scale (if any) will be flushed out.
8 After having used the Calc-Clean function, press down the steam control while turning it to
position O.
Repeat the Calc-Clean process if the water coming out of the iron still contains scale particles.
After the Calc-Clean process
1 Connect the iron to the mains to let the soleplate dry.
2 Unplug the iron when the temperature light has gone out.
3 Move the iron gently over a piece of used cloth to remove any water stains that may have
formed on the soleplate.
4 Let the iron cool down before you store it.
ENGLISH 9

Cleaning the steam control needle
1 Pull the steam control out of the appliance (fig. 13).
2 Use vinegar to remove scale, if any, from the needle (fig. 14).
Do not bend or damage the steam control needle.
3 Reinsert the steam control by placing the point of the needle exactly in the centre of the
hole and by fitting the small projection on the side of the needle into the slot (fig. 15).
4 Set the steam control to position O.
Storage
1 Make sure the appliance is unplugged and set the steam control to position O.
2 Empty the water tank (fig. 16).
3 Wind the mains cord round the cord storage facility.
4 Store the iron on its heel in a safe and dry place (fig. 17).
Environment
◗ Do not throw the appliance away with the normal household waste at the end of its life, but
hand it in at an official collection point for recycling. By doing this you will help to preserve
the environment (fig. 18).
Guarantee & service
If you need information or if you have a problem, please visit the Philips website at www.philips.com
or contact the Philips Customer Care Centre in your country (you will find its phone number in the
worldwide guarantee leaflet). If there is no Customer Care Centre in your country, turn to your
local Philips dealer or contact the Service Department of Philips Domestic Appliances and Personal
Care BV.
ENGLISH10

11
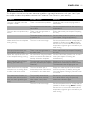
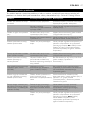
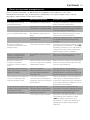
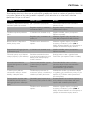
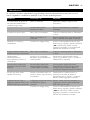
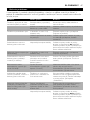
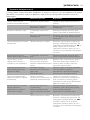
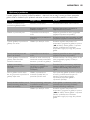
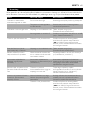
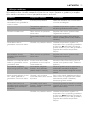
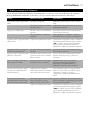
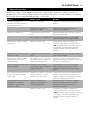
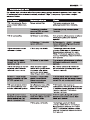
Solution
Check the mains cord, the plug and the
wall socket.
Set the temperature dial to the required
temperature.
Fill the water tank (see chapter 'Preparing
for use').
Set the steam control to position l or ;
(see chapter 'Using the appliance').
Set the temperature dial to a temperature
suitable for steam ironing (2 to MAX).
Put the iron on its heel and wait until the
temperature light has gone out before you
start ironing.
Fill the water tank (see chapter 'Preparing
for use').
Use the Calc-Clean function one or more
times (see chapter 'Cleaning and
maintenance').
Pick the iron up or move it slightly to
deactivate the automatic shut-off function.
The automatic shut-off light goes out.
Empty the water tank and set the steam
control to position O before storing the
iron (see chapter 'Storage'). Store the iron
on its heel.
Put the iron in horizontal position and wait
for a while before using the (vertical)
steam boost function again.
Set the temperature dial to a temperature
suitable for steam ironing (3 to MAX).
Put the iron on its heel and wait until the
temperature light has gone out before you
start ironing.
Possible cause
There is a connection problem.
The temperature dial has been
set to MIN.
There is not enough water in
the water tank.
The steam control has been set
to position O.
The iron is not hot enough.
There is not enough water in
the water tank.
You have been using hard water,
which has caused scale flakes to
develop inside the soleplate.
The automatic shut-off function
has been activated (see chapter
'Features').
The iron has been put in
horizontal position while there
is still water in the water tank.
The (vertical) steam boost
function has been used too
often within a very short
period.
The iron is not hot enough.
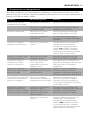
Problem
The iron is plugged in but the
soleplate is cold.
The iron does not produce any
steam.
Water leaks from the soleplate
during ironing.
The spray function does not
work (specific types only)
Flakes and impurities come out
of the soleplate during ironing.
The automatic shut-off light is
blinking (GC1830 only).
Water leaks from the soleplate
while the iron is cooling down
or after it has been stored.
The steam boost function or
vertical steam boost function
does not work (specific types
only).
ENGLISH
Troubleshooting
This chapter summarises the most common problems you could encounter with your iron. If you
are unable to solve the problem, contact the Customer Care Centre in your country.

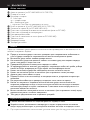
Opis ogólny
A Dysza spryskiwacza (modele GC1830/1820/1815/1720/1705)
B Otwór wlewowy wody
C Regulator pary
O = brak pary
l = umiarkowana ilość pary
; = maksymalna ilość pary
x = funkcja Calc-Clean
D Przycisk spryskiwacza T (modele GC1830/1820/1815/1720/1705)
E Silne uderzenie pary 9 (modele GC1830/1820/1815)
F Wskaźnik automatycznego wyłączania (tylko model GC1830)
G Wskaźnik temperatury
H Przewód sieciowy
I Wkład antywapienny (tylko modele GC1830/1820)
J Tabliczka znamionowa
K Zbiorniczek wody
L Pokrętło regulatora temperatury
Ważne
Przed pierwszym użyciem urządzenia zapoznaj się dokładnie z jego instrukcją obsługi i zachowaj ją
na wypadek konieczności użycia w przyszłości.
◗ Przed podłączeniem urządzenia upewnij się, czy napięcie podane na tabliczce znamionowej
jest zgodne z napięciem w sieci elektrycznej.
◗ Podłączaj urządzenie wyłącznie do uziemionego gniazdka elektrycznego.
◗ Nie korzystaj z urządzenia, jeśli uszkodzona jest wtyczka, przewód sieciowy lub samo
urządzenie, albo jeśli urządzenie zostało upuszczone bądź przecieka.
◗ Regularnie sprawdzaj, czy przewód sieciowy nie jest uszkodzony.
◗ Ze względów bezpieczeństwa oddaj uszkodzony przewód sieciowy do wymiany do
autoryzowanego centrum serwisowego firmy Philips lub odpowiednio wykwalifikowanej
osobie.
◗ Nigdy nie zostawiaj urządzenia bez nadzoru, gdy jest ono podłączone do sieci elektrycznej.
◗ Nigdy nie zanurzaj w wodzie żelazka ani podstawki (jeśli jest dołączona).
◗ Przechowuj urządzenie w miejscu niedostępnym dla dzieci.
◗ Stopa żelazka może być bardzo rozgrzana i dotknięcie jej może spowodować poparzenia.
◗ Nie dopuszczaj do kontaktu przewodu z rozgrzaną stopą żelazka.
◗ Po zakończeniu prasowania ustaw regulator pary w położeniu „0”, postaw żelazko w pionie i
wyjmij wtyczkę przewodu sieciowego z gniazdka w przypadku: czyszczenia urządzenia,
napełniania lub opróżniania zbiorniczka wody, odstawienia żelazka nawet na krótką chwilę.
◗ Zawsze korzystaj z żelazka i podstawki (jeśli jest dołączona) na stabilnej i równej poziomej
powierzchni.
◗ Urządzenie to jest przeznaczone wyłącznie do użytku domowego.
Przed pierwszym użyciem
1 Usuń wszystkie nalepki i folię ochronną ze stopy żelazka.
2 Aby usunąć wszystkie zanieczyszczenia ze stopy żelazka, rozgrzej żelazko do maksymalnej
temperatury i prasuj przez kilka minut wilgotną szmatkę.
B
Podczas pierwszego użycia z żelazka może wydostawać się dym. Zjawisko to ustanie po krótkiej
chwili.
POLSKI12

Przygotowanie do użycia
Napełnianie zbiorniczka na wodę.
Nie zanurzaj żelazka w wodzie.
1 Upewnij się, że urządzenie jest odłączone od sieci elektrycznej.
2 Ustaw regulator pary w położeniu 0 (= brak pary) (rys. 2).
3 Przechyl żelazko do tyłu.
4 Napełnij zbiorniczek wodą z kranu do maksymalnego poziomu (rys. 3).
Nie napełniaj zbiorniczka wody powyżej oznaczenia „MAX”.
Nie wlewaj do zbiorniczka wody perfum, octu, krochmalu, środków do usuwania kamienia,
ułatwiających prasowanie ani żadnych innych środków chemicznych.
◗ Jeśli woda kranowa w Twojej okolicy jest bardzo twarda, zaleca się wymieszanie jej w
równych proporcjach z wodą destylowaną lub stosowanie samej wody destylowanej.
Ustawianie temperatury
1 Postaw żelazko na piętce.
2 Ustaw żądaną temperaturę prasowania, obracając pokrętło regulatora temperatury w
odpowiednie położenie (rys. 4).
Sprawdź zaznaczoną na metce wymaganą temperaturę prasowania.
1 Tkaniny sztuczne (np. akryl, wiskoza, poliamid, poliester)
1 Jedwab
2 Wełna
3 Bawełna, len
Jeśli nie znasz rodzaju tkaniny, z którego wykonany jest prasowany produkt, właściwą temperaturę
prasowania należy ustalić przez wyprasowanie takiej jego części, która będzie niewidoczna podczas
noszenia czy używania.
Jedwab, wełna i tkaniny sztuczne: aby nie dopuścić do powstawania błyszczących plam, prasuj tkaniny
na lewej stronie. Aby uniknąć plam, nie korzystaj z funkcji spryskiwania.
Zacznij od prasowania produktów, wymagających najniższej temperatury prasowania, np.
wykonanych z tkanin sztucznych.
3 Podłącz wtyczkę przewodu sieciowego do uziemionego gniazdka elektrycznego.
4 Gdy zgaśnie wskaźnik temperatury, odczekaj chwilę przed rozpoczęciem prasowania (rys. 5).
Podczas prasowania wskaźnik temperatury będzie zapalał się od czasu do czasu.
Zasady używania
Prasowanie parowe
1 Sprawdź, czy w zbiorniczku jest wystarczająca ilość wody.
2 Wybierz zalecaną temperaturę prasowania (patrz rozdział „Przygotowanie do użycia”, część
„Ustawianie temperatury”).
3 Gdy zgaśnie wskaźnik temperatury, ustaw regulator pary w odpowiednim położeniu. Upewnij
się, że wybrane ustawienie pary jest odpowiednie dla wybranej temperatury prasowania:
(rys. 6).
POLSKI 13

l dla umiarkowanej ilości pary (ustawienia temperatury od 2 do 3)
; dla maksymalnej ilości pary (ustawienia temperatury od 3 do „MAX”)
Z chwilą osiągnięcia zadanej temperatury żelazko zacznie wytwarzać parę.
Prasowanie bez pary
1 Ustaw regulator pary w położeniu 0 (= brak pary).
2 Wybierz zalecaną temperaturę prasowania (patrz rozdział „Przygotowanie do użycia”, część
„Ustawianie temperatury”).
Funkcje
Funkcja spryskiwacza (tylko wybrane modele)
Funkcji spryskiwacza można użyć w celu usunięcia opornych zagnieceń.
1 Sprawdź, czy w zbiorniczku jest wystarczająca ilość wody.
2 Aby zwilżyć prasowaną tkaninę, kilkakrotnie wciśnij przycisk spryskiwacza (rys. 7).
Silne uderzenie pary (tylko wybrane modele)
Silne uderzenie pary pozwala usunąć najbardziej uporczywe zagniecenia.
Funkcji silnego uderzenia pary można używać wyłącznie przy ustawieniach temperatury od 3 do
„MAX”.
1 Wciśnij i zwolnij przycisk silnego uderzenia pary (rys. 8).
Odczekaj chwilę przed ponownym wciśnięciem tego przycisku, aby uniknąć rozpryskiwania.
Nie wolno kierować strumienia pary na ludzi.
Pionowe, silne uderzenie pary (tylko modele GC1830/GC1820/GC1815)
1 Funkcji uderzenia pary można używać również wtedy, gdy żelazko znajduje się w pozycji
pionowej. Jest ona użyteczna w przypadku usuwania zagnieceń na wiszących ubraniach,
zasłonach itd (rys. 9).
Nie wolno kierować strumienia pary na ludzi.
Automatyczne wyłączanie (tylko model GC1830)
Elektroniczny wyłącznik bezpieczeństwa powoduje automatyczne wyłączenie elementu grzejnego
żelazka, gdy nie jest ono używane przez dłuższy czas.
◗ Wskaźnik automatycznego wyłączenia zacznie migać, jeśli żelazko zostało wyłączone przez
wyłącznik bezpieczeństwa (rys. 10).
- Jeśli żelazko znajduje się w pozycji poziomej, nastąpi to po 30 sekundach.
- Jeśli żelazko znajduje się w pozycji pionowej, nastąpi to po 8 minutach.
◗ Aby żelazko rozgrzało się ponownie:
- Podnieś żelazko lub lekko nim porusz.Wskaźnik automatycznego wyłączenia zgaśnie.
- Jeśli zaświeci się wskaźnik temperatury, przed rozpoczęciem prasowania poczekaj, aż zgaśnie.
- Jeśli wskaźnik temperatury nie zaświeci się, oznacza to, że żelazko jest gotowe do użycia.
POLSKI14

Czyszczenie i konserwacja
Po zakończeniu prasowania
1 Wyjmij wtyczkę przewodu sieciowego z gniazdka elektrycznego i poczekaj, aż żelazko
ostygnie.
2 Zetrzyj ze stopy żelazka kamień i inne osady za pomocą wilgotnej szmatki i (płynnego)
środka czyszczącego nie zawierającego środków ściernych.
Aby powierzchnia stopy pozostała niezarysowana, żelazka nie należy stawiać w pobliżu żadnych
metalowych przedmiotów. Do czyszczenia stopy nie wolno używać czyścików, octu ani innych
środków chemicznych.
3 Przetrzyj górną część urządzenia wilgotną szmatką.
4 Wypłucz zbiorniczek wody. Po umyciu opróżnij go.
Podwójny aktywny system antywapienny (tylko wybrane modele)
◗ Wkład antywapienny zapobiega zatykaniu przez kamień otworów wylotu pary.Wkład jest
ciągle aktywny i nie trzeba go wymieniać (rys. 11).
◗ Funkcja Calc-Clean usuwa cząstki kamienia wapiennego.
Tej funkcji należy używać raz na dwa tygodnie. Jeśli woda w danej okolicy jest bardzo twarda (tzn.
gdy podczas prasowania ze stopy żelazka spadają płytki kamienia), z funkcji należy korzystać częściej.
1 Ustaw regulator pary w położeniu „O”.
2 Ustaw pokrętło regulatora temperatury w położeniu „MAX”.
3 Napełnij zbiorniczek wodą do wskaźnika „MAX”.
Nie wlewaj do zbiorniczka wody octu ani innych środków do usuwania kamienia.
4 Włóż wtyczkę do gniazdka elektrycznego.
5 Gdy zgaśnie wskaźnik temperatury, wyjmij wtyczkę z gniazdka elektrycznego.
6 Trzymając żelazko nad zlewem, ustaw regulator pary w położeniu Calc-Cleanx (rys. 12).
7 Pociągnij regulator pary lekko do góry i delikatnie potrząsaj żelazkiem aż do całkowitego
opróżnienia zbiorniczka na wodę.
Ze stopy żelazka będzie wydostawać się para i gorąca woda. Kamień wapienny zostanie wypłukany.
8 Po użyciu funkcji Calc-Clean wciśnij regulator pary, obracając go do pozycji „O”.
Jeśli woda wydostająca się z żelazka nadal zawiera cząstki kamienia wapiennego, ponownie użyj
funkcji Calc-Clean.
Po czyszczeniu przy użyciu funkcji Calc-Clean
1 Aby wysuszyć stopę żelazka, podłącz żelazko do sieci elektrycznej.
2 Gdy zgaśnie wskaźnik temperatury, wyjmij wtyczkę z gniazdka elektrycznego.
3 Aby usunąć zacieki wodne, jakie mogły powstać na stopie żelazka, delikatnie przeciągnij
żelazko po kawałku niepotrzebnej tkaniny.
4 Przed odstawieniem żelazka odczekaj, aż zupełnie ostygnie.
POLSKI 15

Czyszczenie igły regulatora pary
1 Wyjmij regulator pary z urządzenia (rys. 13).
2 Użyj octu do usunięcia kamienia z igły regulatora pary (rys. 14).
Nie zginaj igły regulatora pary i uważaj, aby jej nie uszkodzić.
3 Włóż regulator pary z powrotem do urządzenia, umieszczając igłę dokładnie w środku
otworu i wpasowując mały występ znajdujący się z boku igły w szczelinę (rys. 15).
4 Ustaw regulator pary w położeniu „O”.
Przechowywanie
1 Sprawdź, czy urządzenie jest odłączone od sieci elektrycznej i ustaw regulator pary w
położeniu „O”.
2 Opróżnij zbiorniczek wody (rys. 16).
3 Nawiń przewód zasilający na żelazko.
4 Przechowuj żelazko ustawione na piętce w suchym i bezpiecznym miejscu (rys. 17).
Ochrona środowiska
◗ Zużytego urządzenia nie należy wyrzucać wraz z normalnymi odpadami gospodarstwa
domowego — należy oddać je do punktu zbiórki surowców wtórnych w celu utylizacji.
Stosowanie się do tego zalecenia pomaga w ochronie środowiska (rys. 18).
Gwarancja i serwis
W razie jakichkolwiek pytań lub problemów prosimy odwiedzić naszą stronę internetową
www.philips.com lub skontaktować się z Centrum Obsługi Klienta firmy Philips (numer telefonu
znajduje się w ulotce gwarancyjnej). Jeśli w kraju zamieszkania nie ma takiego Centrum, o pomoc
należy zwrócić się do sprzedawcy produktów firmy Philips lub do Działu Obsługi Klienta firmy Philips
Domestic Appliances and Personal Care BV.
POLSKI16

17
Rozwiązanie
Sprawdź połączenie przewodu sieciowego,
wtyczkę oraz gniazdko elektryczne.
Ustaw pokrętło regulatora temperatury w
żądanej pozycji.
Napełnij zbiorniczek wodą (patrz rozdział
„Przygotowanie do użycia”).
Ustaw regulator pary w położeniu l lub
; (patrz rozdział „Zasady używania”).
Ustaw pokrętło regulatora temperatury w
położeniu odpowiednim do prasowania
parowego (pomiędzy 2 a MAX). Ustaw
żelazko na piętce i przed rozpoczęciem
prasowania poczekaj, aż zgaśnie wskaźnik
temperatury.
Napełnij zbiorniczek wodą (patrz rozdział
„Przygotowanie do użycia”).
Raz lub kilkakrotnie użyj funkcji Calc-Clean
(patrz rozdział „Czyszczenie i
konserwacja”).
Aby wyłączyć funkcję automatycznego
wyłączania, podnieś żelazko lub lekko nim
porusz.Wskaźnik automatycznego
wyłączania zgaśnie.
Przed odstawieniem żelazka opróżnij
zbiorniczek wody i ustaw regulator pary w
położeniu „O” (patrz rozdział
„Przechowywanie”). Przechowuj żelazko
ustawione na piętce.
Ustaw żelazko w pozycji poziomej i
odczekaj chwilę przed ponownym
skorzystaniem z funkcji (pionowego)
silnego uderzenia pary.
Ustaw pokrętło regulatora temperatury w
położeniu odpowiednim do prasowania
parowego (pomiędzy 3 a MAX).
Ustaw żelazko na piętce i przed
rozpoczęciem prasowania poczekaj, aż
zgaśnie wskaźnik temperatury.
Prawdopodobna przyczyna
Problem dotyczy połączenia.
Pokrętło regulatora
temperatury zostało ustawione
w pozycji „MIN”.
W zbiorniczku wody nie ma
wystarczającej ilości wody.
Regulator pary został ustawiony
w położeniu „O”.
Żelazko nie jest wystarczająco
ciepłe.
W zbiorniczku wody nie ma
wystarczającej ilości wody.
Używanie twardej wody
spowodowało osadzenie się
kamienia wapiennego wewnątrz
stopy żelazka.
Włączyła się funkcja
automatycznego wyłączania
(patrz rozdział „Funkcje”).
Żelazko zostało postawione w
pozycji poziomej, gdy w
zbiorniczku wciąż znajdowała się
woda.
Funkcja silnego (pionowego)
uderzenia pary była używana
zbyt często w bardzo krótkim
czasie.
Żelazko nie jest wystarczająco
ciepłe.
Problem
Żelazko jest zasilane, ale stopa
jest zimna.
Żelazko w ogóle nie wytwarza
pary.
Podczas prasowania ze stopy
żelazka wycieka woda.
Funkcja spryskiwacza nie działa
(tylko wybrane modele)
Podczas prasowania ze stopy
żelazka wydostają się
zanieczyszczenia.
Miga wskaźnik automatycznego
wyłączania (tylko model
GC1830).
Podczas stygnięcia żelazka lub
po jego odstawieniu ze stopy
żelazka wycieka woda.
Funkcja silnego uderzenia pary
lub funkcja pionowego, silnego
uderzenia pary nie działa (tylko
wybrane modele).
POLSKI
Rozwiązywanie problemów
Ten rozdział opisuje najczęstsze problemy, z którymi można się zetknąć, korzystając z żelazka. Jeśli
problemu nie można rozwiązać samodzielnie, należy skontaktować się z Centrum Obsługi Klienta.

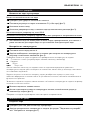
Descriere generală
A Pulverizator (GC1830/1820/1815/1720/1705)
B Orificiu de umplere
C Buton de reglarea a aburului
O = nu degajă abur
l = volum moderat de abur
; = volum maxim de abur
x = funcţie anticalcar
D Buton de pulverizare T (GC1830/1820/1815/1720/1705)
E Jet de abur 9 (GC1830/1820/1815)
F Led pentru oprire automată (numai GC1830)
G Indicator de temperatură
H Cablu de alimentare
I Tabletă anticalcar (numai GC1830/1820)
J Plăcuţă cu tipul aparatului
K Rezervor de apă
L Disc selector pentru temperatură
Important
Citiţi aceste instrucţiuni de utilizare cu atenţie înainte de a folosi aparatul şi păstraţi-le pentru
consultare ulterioară.
◗ Verificaţi dacă tensiunea indicată pe plăcuţa de înregistrare corespunde tensiunii de
alimentare locale înainte de a conecta aparatul.
◗ Conectaţi aparatul numai la o priză de perete cu împământare.
◗ Nu folosiţi aparatul dacă ştecherul, cablul electric sau aparatul prezintă deteriorări vizibile,
dacă aţi scăpat aparatul pe jos sau dacă acesta prezintă scurgeri.
◗ Verificaţi cablul regulat, pentru a vă asigura că nu este deteriorat.
◗ În cazul în care cablul de alimentare este deteriorat, acesta trebuie înlocuit de Philips, de un
centru de service autorizat de Philips sau de personal calificat în domeniu pentru a evita
orice accident.
◗ Aparatul nu trebuie lăsat nesupravegheat în timp ce este conectat la priză.
◗ Nu introduceţi fierul sau suportul (dacă este furnizat) în apă.
◗ Nu lăsaţi aparatul la îndemâna copiilor.
◗ Talpa fierului de călcat se încinge foarte tare şi poate cauza arsuri la atingere.
◗ Feriţi cablul de alimentare de contactul cu talpa încinsă.
◗ După ce aţi terminat de călcat, când curăţaţi aparatul, în timp ce umpleţi sau goliţi rezervorul
de apă sau chiar când faceţi o scurtă pauză: setaţi butonul pentru reglarea jetului de abur la
poziţia O, puneţi fierul în poziţie verticală şi scoateţi aparatul din priză.
◗ Aşezaţi şi folosiţi întotdeauna fierul şi suportul (dacă este furnizat) pe o suprafaţă orizontală,
plană şi stabilă.
◗ Acest aparat este destinat exclusiv uzului casnic.
Înainte de prima utilizare
1 Îndepărtaţi orice autocolant sau folie protectoare de pe talpă.
2 Lăsaţi fierul de călcat să se încălzească până la temperatura maximă şi treceţi fierul peste o
bucată de pânză uscată timp de câteva minute, pentru a îndepărta eventualele reziduuri de pe
talpă.
B
Din fierul de călcat poate ieşi fum când este folosit pentru prima dată.Acest lucru va înceta după
puţin timp.
ROMÂNĂ18

Pregătirea pentru utilizare
Umplerea rezervorului de apă
Nu introduceţi niciodată fierul de călcat în apă.
1 Asiguraţi-vă că aparatul nu este conectat la priză.
2 Poziţionaţi butonul de reglare a aburului pe poziţia O ( = fără abur) (fig. 2).
3 Răsuciţi fierul de călcat spre spate.
4 Umpleţi rezervorul de apă cu apă de la robinet până la nivelul maxim (fig. 3).
Nu umpleţi rezervorul peste gradaţia MAX.
Nu turnaţi parfum, oţet, amidon, agenţi de detartrare, aditivi de călcare sau alte substanţe chimice
în rezervorul de apă.
◗ Dacă apa de la robinet din zona dvs. este foarte dură, vă recomandăm să o amestecaţi cu o
cantitate egală de apă distilată sau să utilizaţi numai apă distilată.
Reglarea temperaturii
1 Puneţi fierul în poziţie verticală.
2 Selectaţi temperatura de călcare adecvată reglând termostatul pe poziţia potrivită (fig. 4).
Verificaţi eticheta articolului călcat pentru a selecta temperatura de călcare adecvată:
1 Materiale sintetice (de ex. fibre acrilice, viscoză, poliamidă, poliester)
1 Mătase
2 Lână
3 Bumbac, in
Dacă nu cunoaşteţi tipul sau tipurile de material din care este confecţionat articolul, încercaţi să
călcaţi o porţiune de material care nu se vede când purtaţi articolul vestimentar respectiv, pentru a
determina temperatura corectă de călcare.
Ţesături sintetice, de mătase şi de lână: călcaţi ţesătura pe dos pentru a nu lăsa pete strălucitoare.
Evitaţi folosirea funcţiei spray pentru a nu produce pete.
Începeţi să călcaţi materialele care necesită temperatura cea mai coborâtă, cum sunt cele din fibre
sintetice.
3 Introduceţi ştecherul în priza de perete cu împământare.
4 După ce indicatorul portocaliu pentru temperatură se stinge, aşteptaţi puţin înainte de a
începe să călcaţi (fig. 5).
Indicatorul portocaliu pentru temperatură se va aprinde periodic în timpul călcatului.
Utilizarea aparatului
Călcarea cu abur
1 Asiguraţi-vă că este suficientă apă în rezervor.
2 Selectaţi temperatura de călcare recomandată (consultaţi capitolul Pregătirea pentru utilizare,
secţiunea Reglarea temperaturii).
3 După ce indicatorul portocaliu pentru temperatură se stinge, setaţi comutatorul pentru abur
la poziţia corespunzătoare.Aveţi grijă ca acesta să se potrivească cu temperatura selectată:
(fig. 6).
ROMÂNĂ 19

l pentru volum moderat de abur (reglaje de temperatură de la 2 la 3)
; pentru abur maxim (reglaje de temperatură 3 până la MAX)
Fierul va sufla abur imediat ce va ajunge la temperatura reglată.
Călcarea fără abur
1 Poziţionaţi butonul de reglare a aburului pe poziţia O ( = fără abur).
2 Selectaţi temperatura de călcare recomandată (consultaţi capitolul Pregătirea pentru utilizare,
secţiunea Reglarea temperaturii).
Caracteristici
Funcţie de pulverizare (numai anumite tipuri)
Puteţi folosi funcţia spray pentru a netezi cutele mai "încăpăţânate" la orice temperatură.
1 Asiguraţi-vă că este suficientă apă în rezervor.
2 Apăsaţi butonul spray de câteva ori pentru a umezi articolul pe care doriţi să-l călcaţi (fig. 7).
Jet de abur (numai anumite tipuri)
Un jet de abur puternic ajută la netezirea cutelor mai dure.
Jetul de abur poate fi folosit doar la temperaturi cuprinse între 3 şi MAX.
1 Apăsaţi şi eliberaţi butonul pentru jet de abur (fig. 8).
Aşteptaţi puţin înainte de a folosi butonul din nou pentru a nu împroşca.
Nu direcţionaţi niciodată aburul înspre oameni.
Jet de abur vertical (numai la modelele GC1830/GC1820/GC1815)
1 Jetul de abur poate fi folosit şi când ţineţi fierul de călcat în poziţie verticală.Astfel, puteţi
netezi cutele hainelor aflate în poziţie verticală, perdelelor etc (fig. 9).
Nu direcţionaţi niciodată aburul înspre oameni.
Oprire automată (numai GC1830)
Funcţia de oprire electronică opreşte automat elementul de încălzire, dacă fierul nu a fost mişcat o
anumită perioadă de timp.
◗ Ledul de oprire automată începe să clipească pentru a indica oprirea fierului prin intermediul
funcţiei de oprire de siguranţă (fig. 10).
- În poziţie orizontală, acest lucru se va întâmpla după 30 de secunde.
- În poziţie verticală, acest lucru se va întâmpla după 8 minute.
◗ Pentru a permite încălzirea fierului din nou:
- Ridicaţi fierul de călcat sau mişcaţi-l puţin. Becul pentru oprire automată se va stinge.
- Dacă indicatorul de temperatură se aprinde, aşteptaţi până se stinge înainte de a continua
călcatul.
- Dacă indicatorul de temperatură nu se aprinde, fierul este gata de utilizare.
ROMÂNĂ20
Pagina se încarcă...
Pagina se încarcă...
Pagina se încarcă...
Pagina se încarcă...
Pagina se încarcă...
Pagina se încarcă...
Pagina se încarcă...
Pagina se încarcă...
Pagina se încarcă...
Pagina se încarcă...
Pagina se încarcă...
Pagina se încarcă...
Pagina se încarcă...
Pagina se încarcă...
Pagina se încarcă...
Pagina se încarcă...
Pagina se încarcă...
Pagina se încarcă...
Pagina se încarcă...
Pagina se încarcă...
Pagina se încarcă...
Pagina se încarcă...
Pagina se încarcă...
Pagina se încarcă...
Pagina se încarcă...
Pagina se încarcă...
Pagina se încarcă...
Pagina se încarcă...
Pagina se încarcă...
Pagina se încarcă...
Pagina se încarcă...
Pagina se încarcă...
Pagina se încarcă...
Pagina se încarcă...
Pagina se încarcă...
Pagina se încarcă...
Pagina se încarcă...
Pagina se încarcă...
Pagina se încarcă...
Pagina se încarcă...
Pagina se încarcă...
Pagina se încarcă...
Pagina se încarcă...
Pagina se încarcă...
Pagina se încarcă...
Pagina se încarcă...
Pagina se încarcă...
Pagina se încarcă...
Pagina se încarcă...
Pagina se încarcă...
Pagina se încarcă...
Pagina se încarcă...
Pagina se încarcă...
Pagina se încarcă...
Pagina se încarcă...
Pagina se încarcă...
Pagina se încarcă...
Pagina se încarcă...
Pagina se încarcă...
Pagina se încarcă...
Pagina se încarcă...
Pagina se încarcă...
Pagina se încarcă...
Pagina se încarcă...
Pagina se încarcă...
Pagina se încarcă...
Pagina se încarcă...
Pagina se încarcă...
Pagina se încarcă...
Pagina se încarcă...
Pagina se încarcă...
Pagina se încarcă...
Pagina se încarcă...
Pagina se încarcă...
Pagina se încarcă...
Pagina se încarcă...
Pagina se încarcă...
Pagina se încarcă...
Pagina se încarcă...
Pagina se încarcă...
Pagina se încarcă...
Pagina se încarcă...
Pagina se încarcă...
Pagina se încarcă...
-
 1
1
-
 2
2
-
 3
3
-
 4
4
-
 5
5
-
 6
6
-
 7
7
-
 8
8
-
 9
9
-
 10
10
-
 11
11
-
 12
12
-
 13
13
-
 14
14
-
 15
15
-
 16
16
-
 17
17
-
 18
18
-
 19
19
-
 20
20
-
 21
21
-
 22
22
-
 23
23
-
 24
24
-
 25
25
-
 26
26
-
 27
27
-
 28
28
-
 29
29
-
 30
30
-
 31
31
-
 32
32
-
 33
33
-
 34
34
-
 35
35
-
 36
36
-
 37
37
-
 38
38
-
 39
39
-
 40
40
-
 41
41
-
 42
42
-
 43
43
-
 44
44
-
 45
45
-
 46
46
-
 47
47
-
 48
48
-
 49
49
-
 50
50
-
 51
51
-
 52
52
-
 53
53
-
 54
54
-
 55
55
-
 56
56
-
 57
57
-
 58
58
-
 59
59
-
 60
60
-
 61
61
-
 62
62
-
 63
63
-
 64
64
-
 65
65
-
 66
66
-
 67
67
-
 68
68
-
 69
69
-
 70
70
-
 71
71
-
 72
72
-
 73
73
-
 74
74
-
 75
75
-
 76
76
-
 77
77
-
 78
78
-
 79
79
-
 80
80
-
 81
81
-
 82
82
-
 83
83
-
 84
84
-
 85
85
-
 86
86
-
 87
87
-
 88
88
-
 89
89
-
 90
90
-
 91
91
-
 92
92
-
 93
93
-
 94
94
-
 95
95
-
 96
96
-
 97
97
-
 98
98
-
 99
99
-
 100
100
-
 101
101
-
 102
102
-
 103
103
-
 104
104


Philips GC1705/01 Manual de utilizare
- Categorie
- Fiare de călcat
- Tip
- Manual de utilizare
în alte limbi
- slovenčina: Philips GC1705/01 Používateľská príručka
Lucrări înrudite
-
Walita GC2650 Manual de utilizare
-
Philips GC1960/02 Manual de utilizare
-
Philips GC4595/40 Manual de utilizare
-
Philips GC4730/02 Manual de utilizare
-
Philips GC4610/02 Manual de utilizare
-
Philips GC4411/02 Manual de utilizare
-
Philips GC1820 Manual de utilizare
-
Philips HI570/02 Manual de utilizare
-
Philips GC4440/02 Manual de utilizare
-
Philips GC3332/02 Manual de utilizare