Lelit Kate PL82T Manual de utilizare
- Categorie
- Aparate de cafea
- Tip
- Manual de utilizare

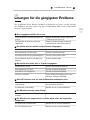
Dimensions:
33.5x27.5x44 cm
Net weight:
12 kg
Power supply:
230V 50Hz/ 120V 60Hz
Power output:
1200 W
Pump pressure:
15 bar
Water Tank Capacity:
2,5 lt
Brass boiler capacity:
300 ml
Vip Line
Kate - PL82T
User Manual
for the following models:
English
EN

VIP Line - Kate - PL82T
2
Write down the serial number of your product
Serial number
Purchased from Date of purchase
Careful design and choice of components are the
secret of the excellent performance
of all of our models.
We develop our products with technology applied
only to the best professional machines.
The materials used meet very high standards of quality
and reliability to provide you with durable, and long-
lasting products.
THANK YOU
FOR CHOOSING US
For more information,
please register your product on care.lelit.com

Lelit Espresso - English
EN
3
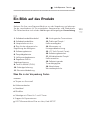
Index
Safety notes 4
Main specications 9
LCC - Lelit Control Center 10
Product overview 11
Instructions for use 12
The art of Espresso coffee 19
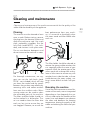
Cleaning and maintenance 23
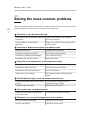
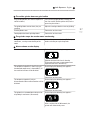
Solving the most common problems 26
Warranty terms 28

VIP Line - Kate - PL82T
4
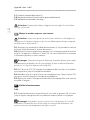
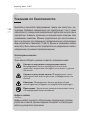
Warnings, please read carefully before use.
This espresso machine is suitable for the preparation of 1 or 2 cups of coffee; it is
equipped with a multi-directional wand for dispensing steam and hot water. The
controls on the front panel have easy understandable symbols. The machine is
designed for domestic use and is not suitable for continuous professional use.
The noise rating of the unit does not exceed 70 dB (A).
The data and images shown are subject to change without notice in order to im-
prove the performance of the machine.
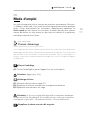
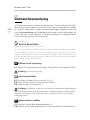
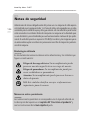
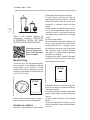
01.
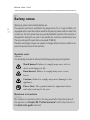
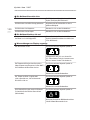
Safety notes
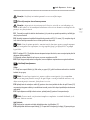
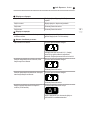
Symbols used
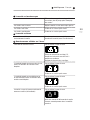
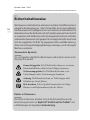
It is absolutely essential to observe the following warnings and symbols:
Shock hazard. Failure to comply may cause electric
shock with danger to life.
Burn hazard. Failure to comply may cause severe
burns.
Caution. Failure to comply may cause damage to the
appliance.
Please Note. is symbol indicates important advice
and infor-mation for the user.
Numbers in brackets
The numbers in brackets refer to the key provided in the description of
the appliance in Chapter 04 “Product overview“ and to the pictures in
the Quick start guide attached.

Lelit Espresso - English
EN
5
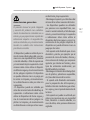
IMPORTANT
SAFEGUARDS
General warnings
This manual is an integral and essen-
tial part of the product. Please read all
these warnings carefully as they pro-
vide important information on safe
installation, use and maintenance.
These instructions should be careful-
ly retained for future reference.
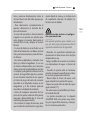
- This appliance can be used by chil-
dren aged from 8 years and above
and persons with reduced physical,
sensory or mental capabilities or
lack of experience and knowledge if
they have been given supervision or
instruction concerning use of the ap-
pliance in a safe way and understand
the hazards involved. Children shall
not play with the appliance. Clean-
ing and user maintenance shall not
be made by children without super-
vision.
- This appliance can be used by chil-
dren aged from 8 years and above
if they have been given supervision
or instruction concerning use of the
appliance in a safe way and if they
understand the hazards involved.
Cleaning and user maintenance
shall not be made by children unless
they are older than 8 and supervised.
Keep the appliance and its cord out
of reach of children aged less than 8
years.
- Appliances can be used by persons
with reduced physical, sensory or
mental capabilities or lack of expe-
rience and knowledge if they have
been given supervision or instruc-
tion concerning use of the appliance
in a safe way and understand the
hazards involved. Children shall not
play with the appliance.
- This appliance is intended to be
used in household and similar ap-
plications such as: staff kitchen areas
in shops, ofces and other working
environments; farm houses; by cli-
ents in hotels, motels and other resi-
dential type environments; bed and
breakfast type environments.
- The appliance is only designed for
making espresso coffee or hot drinks
using the hot water or steam tubes
and for pre-heating cups.

VIP Line - Kate - PL82T
6
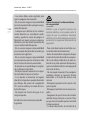
- Any use other than that described
above is improper and could be ha-
zardous; the manufacturer accepts no
liability whatsoever for any damage
arising from improper use of the ap-
pliance.
- This appliance is not intended for
use by persons (including children)
with reduced physical, sensory or
mental capabilities, or lack of expe-
rience and knowledge, unless they
have been given supervision or in-
struction concerning use of the ap-
pliance by a person responsible for
their safety.
- Children must not be allowed to
play with the appliance.
- The appliance must not be left unat-
tended or used outdoors.
- The appliance should not be im-
mersed in water or cleaned by spray-
ing.
- The appliance must not be exposed
to atmospheric agents (rain, sun,
ice).
- If the appliance is stored in rooms
where the temperature can go be-
low freezing, the tank and the water
pipes must be emptied.
- All the packing material (plastic
bags, polystyrene, etc.) should be
kept out of the reach of children.
- No liability is accepted for the use
of unauthorized spares and/or acces-
sories.
- No liability is accepted for repairs
not carried out by authorized service
centres.
- The manufacturer accepts no lia-
bility for tampering with any of the
appliance components.
In all the above cases the warranty
will be void.
Essential
safety warnings
As with all electrical appliances,
the risk of electric shock cannot be
excluded, therefore, the following
safety warnings should be carefully
observed.
- To avoid spilling the connector,
never pull the power cord.
- Always attach plug to appliance

Lelit Espresso - English
EN
7
rst, then plug cord into the wall
outlet.
- To disconnect the appliance, turn
any control to “off”, then remove
plug from wall outlet.
- In the event of any fault or mal-
function, do not attempt to carry out
repairs. Switch the appliance off, re-
move the plug and contact the Ser-
vice Centre.
- In the event of damage to the plug
or the power cord, do not operate the
appliance, these should be replaced
only and exclusively by the Service
Centre.
- Unplug from outlet when not in use.
- Before cleaning the exterior sur-
faces of the appliance, putting on or
taking off parts, switch it off, remove
the plug from the outlet and allow to
cool.
- To reduce the risk of injury do not
drape cord over the counter top or
table top where it can be pulled on
by children or tripped over uninten-
tionally.
- Do not let cord touch hot surfaces.
- Do not let cord hang over edge of
table or counter.
- The use of accessory attachments
not recommended by the appliance
manufacturer may result in re, elec-
tric shock or injury to persons.
- Do not place on or near a hot gas or
electric burner, or in a heated oven.
- Before switching on, ensure that the
power supply voltage corresponds to
that indicated on the plate on the
base of the appliance and that the
power supply is properly earthed.
- Do not tamper with the appliance.
Contact an authorized technician or
the nearest service centre for any
problem.
- Do not touch the appliance if your
hands or feet are wet.
- Do not touch the plug with wet
hands.
- Ensure that the electrical outlet is
always freely accessible so that the
plug can be easily removed when
necessary.
- When removing the plug, always
hold it directly. It should never be re-
moved by pulling on the power cord,
as this can cause damage.

VIP Line - Kate - PL82T
8
- To protect against re, electric shock
and injury to persons do not im-
merse cord, plugs in water or other
liquid.
- Do not use adapters, multiple so-
ckets or extension cords. If their use
is unavoidable, use simple adapters
or multiple sockets and extension
cords that conform to current safety
standards, taking care not to exceed
the current limit marked on the simple
adapter or extension cord, or the ma-
ximum capacity of the multiple socket.
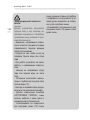
Warning about
burn/scald risks
This appliance produces hot water
and steam; therefore the following
safety warnings should be strictly ob-
served.
- Warning: hot surfaces remain hot
for a certain time also after use.
- Take care to avoid contact with water
spray or jets of steam.
- When the appliance is switched on,
do not touch the cup warming plate
as it is hot.
- Never direct the steam or water
spray towards your body.
- Be careful when touching the steam/
hot water dispensing wand (17).
- Never remove the lter holder (e)
during operation.
- The parts labelled “CAUTION HOT”
are very hot, so approach and ope-
rate them with maximum caution.
- Only place cups and glasses for use
with the coffee machine on the cup
warmer (12). Other objects should
not be placed there.
- Dry the cups thoroughly before pla-
cing them on the cup warmer (12).
SAVE THESE
INSTRUCTIONS

Lelit Espresso - English
EN
9
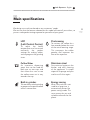
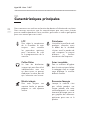
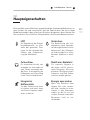
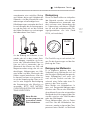
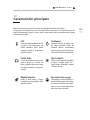
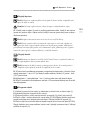
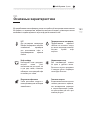
LCC
(Lelit Control Center)
To adjust the boiler
temperature and to control
constantly the perfect
settings for making coffee,
and to program the grinding
times.
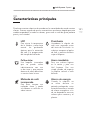
Pre-brewing
To moisten the coffee for a
few seconds before the start
of the actual brewing stage.
This com-pacts the coffee
powder and improves the
ow of the espresso.
Coffee Slider
An innovative dispensing
spout that can be used for
both one or two cups and
that allows the user to see
the coffee cream on its way
towards the cup.
Stainless steel
For maximum hygiene in the
kitchen and easy cleaning
of the appliance. A simple
wipe with a sponge and your
machine will shine again.
Built-in grinder
To have always a fresh grinding
to prepare an espresso coffee
with an intense taste.
Energy saving
When the machine is not
used for a long time, it
automatically enters the
power-saving mode. This
saves money for you and
valuable resources for the
planet.
We design our machines based on our customers’ needs.
We are sure that the features selected for this model will meet all your wishes, so
you can make perfect tasting espresso for yourself and your guests.
02.
Main specications

VIP Line - Kate - PL82T
10
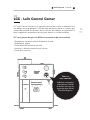
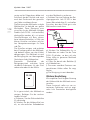
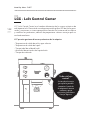
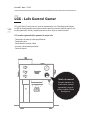
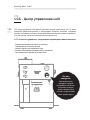
03.
LCC - Lelit Control Center
Everything
under control
e user interface, that
operates the display,
constantly communicates
the machine status and
suggestions to get the best
Espresso.
LCC (Lelit Control Center) is the brain of the new Lelit espresso machines. It has an
elegant, graphic LED display of the latest generation. It controls all the functions
of the machine and allows you to adjust the settings, as well as giving valuable
tips on how to achieve the best results.
LCC lets you manage a number of settings in your machine:
- The temperature of the coffee and hot water dispensed
- The temperature of the steam dispensed
- The ideal time taken to dispense the coffee
- Enabling/disabling of pre-brewing function
- Grinding times

Lelit Espresso - English
EN
11
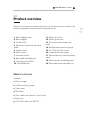
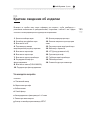
1. Beans hopper cover.
2. Beans hopper.
3. On/off switch
4. Micrometric regulation grinding
wheel.
5. Coffee switch.
6. Steam switch.
7. Hot water switch.
8. Adjustable lterholder pin.
9. Grinding switch (PUSH).
10. Filterholder fork.
11. Water tank cover
12. Wide cup warmer.
13. Steam/hot water dispensing
knob
14. Backlight brew pressure gauge
15. LCC (Lelit Control Center).
16. Coffee distribution group.
17. Multi-directional steam/hot water
wand.
18. Self-cleaning cup-holding grate.
19. Removable water drainage tray.
What’s in the box
a. Plastic tamper
b. Coffee measuring spoon
c. Power cord
d. Blind lter
e. Filter holder with lter for 1 and 2 cups
f. Raises cup
g. LELIT Resin lter, cod. MC747
Take your new espresso coffee machine out of the box and have a look at the
various components and accessories designed for you.
04.
Product overview

VIP Line - Kate - PL82T
12
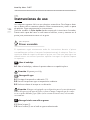
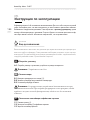
05.
Instructions for use
Lelit coffee machines are not automatic. To make a good cup of coffee, you
must know how to use them properly and will need a bit of practice. Follow the
instructions carefully. You can also refer to the Quick start guide where you will
nd illustrated instructions. You’ll soon be making coffee just like in the cafes,
with the ideal smooth, creamy texture you prefer.
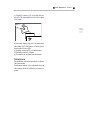
to start
Starting the machine
It is important to carefully follow these instructions the rst time the machine is
started, to ensure that it works properly. These instructions are only for the rst
time the machine is used. The in-structions given in the subsequent chapters are
for all further use. For subsequent uses do not consider this chapter and follow
the chapter Making an Espresso.
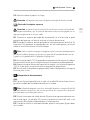
A
Open the packaging
A.1 Open the packaging and place the machine on a at surface.
Be careful. e unit weighs 12 kg.
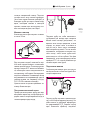
B
Water lling
B.1 Remove the tank from its seating (11).
B.2 Fill the tank with water at room temperature.
B.3 Replace the tank in its seating.
Caution. e tank is tted with a device that automatically detects the presence
of water. When repositioning the tank, check that the tubes are not bent and that the lter
is fully inserted into the end of one of them. In case of lack of water, the LCC will shows a
warning signal. Follow the in-structions in section B to rell the tank.
C
Filling the hopper with coffee beans
C.1 Remove the cover (1).

Lelit Espresso - English
EN
13
C.2 Fill the hopper (2) with the chosen coffee beans.
C.3 Place the cover back in its seat.
Caution. Never use the grinder without the cover on the hopper.
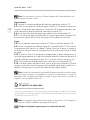
D
Switch on the coffee machine
Caution. Ensure the power supply voltage is the same as that indicated on the infor-
mation plate and that the supply system has an adequate circuit breaker.
D.1 Connect one end of the power cord (c) to the socket in the machine and the
other (plug) into the wall socket.
D.2 Turn on the espresso machine by pressing the main on/off switch (3). The
display (15) will show the Lelit logo, the three switches and the gauge will go
on for a short time.
Note. Only for the rst time that the machine is switched on, the machine will start
to ll the boiler automatically. During this operation, water will ow from the coee distri-
bution group and the Lelit logo will ash on the LCC display.
D.3 .On the LCC display (15) you’ll see the water boiler temperature ashing.
This will grow until the set temperature will be reached.
D.4 Wait until the bar is fully loaded and “Ok” appears on the display. This way
the machine will reach the set temperature.
D.5 After reaching the pre-set temperature, the bar will disappear the machine
will be ready for use.
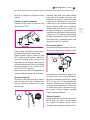
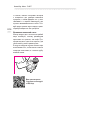
E
Checking that the machine is working properly
Coffee
E.1 Insert the lter holder (e) without coffee rmly onto the coffee distribution
group (16), so as to align the handle with the padlock symbol on it.
Note. With a new machine, in order to reach this position, it is advisable to moisten
the edge of the lter with water. Aer a short period of use, this position will be reached
regularly without excessive eort.
E.2 Press the coffee switch (5) to dispense about half a litre of water. The display
(15) will show the coffee icon and a countdown from the pre-set time for the
coffee dispensing.
E.3 When you’ve taken about half a litre of water, press the switch (5) to stop
dispensing.

VIP Line - Kate - PL82T
14
Note. is procedure helps lling the hydraulic circuit completely and rinsing the
circuit itself.
Hot water
E.4 Place a jug under the steam/hot water wand (17).
E.5 Press the hot water switch (7). The pump starts and the water icon appears
on the display (15), accompanied by the indication to rotate the steam/hot wa-
ter knob (13).
E.6 Turn the steam/hot water knob (13) counter clockwise.
E.7 As soon as water comes out of the wand (17), rotate the knob (13) clockwise
to close it and press the switch (7) again to stop the function.
Steam
E.8 Point the steam/hot water wand (17) onto the cup-holding grate (18)
E.9 Press the steam switch (6). The LCC display (15) will ash, showing the water
temperature in the boiler. Wait until the bar is complete, so that the machine
reaches the operating temperature for steam dispensing.
E.10 When the desired temperature has been reached, the bar will disappear
and the steam icon will appear, accompanied by an indication to turn the ste-
am/hot water knob (13). The machine is now ready for use.
E.11 Turn the steam/hot water knob (13) counter clockwise.
E.12 When steam comes out from the nozzle, turn the knob (13) clockwise to
close it and press the steam (6) again to return the machine to its function of
dispensing coffee and hot water.
Note. If the machine hasn’t been used for 30 minutes or more, the machine will go
in stand-by (energy saving status). e display and the heating element will be switched
o, and the coee switch (5) will ash every 3 seconds to indicate the stand-by status. To
restart the machine, you have to press the coee switch (5).
to start
Making an Espresso
Thanks to the pre-set function settings, the machine is immediately ready to
dispense espresso coffee. To change the settings, please refer to “Changing the
LCC settings” section.
Note. e machine comes with a cup warmer (12). Using warm cups enhances the
organoleptic qualities, the avour and aroma of an Espresso.
F
Preparing the machine for making coffee

Lelit Espresso - English
EN
15
F.1 Turn on the espresso machine by pressing the main on/off switch (3). The
display (15) will show the Lelit logo, the three switches and the gauge will go
on for a short time.
F.2 Insert the lter holder (e) without coffee rmly onto the coffee distribution
group (16), so as to align the handle with the padlock symbol on it.
F.3 On the LCC display (15) you’ll see the water boiler temperature ashing.
This will grow until the set temperature will be reached.
F.4 Wait until the bar is fully loaded and “Ok” appears on the display. This way
the machine will reach the set temperature.
F 5. After reaching the desired temperature, the bar will disappear and the
machine will be ready for use.
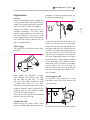
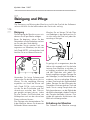
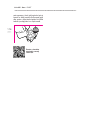
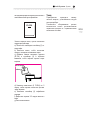
G
Regulate the grinding
Note. e grinder has been set in the factory for a medium size grinding, ideal for
the grinding of most types of coee blends, available in the market.
Caution. Regulate the grinding always and only while the grinder is grinding.
G.1 Rotate the grinding wheel (4) to change the coffee granulometry. Rotate
the wheel anti-clock-wise (towards the small points) to obtain a ner grinding,
clock-wise for a coarser grinding.
Note. Micrometric regulation does not require any blockage.
Note. If the coee ow in your espresso machine is very slow, the coee grinding is
too ne, if it’s quick, the coee grinding is too coarse. Many factors inuence the coee ow
such as: the amount of coee, its pressing, the espresso machine adjustments, how clean the
lters are and also the climatic conditions.
H
Adjust the doses
Note. By using the LCC you can program the grinding time for both doses.
Note. e factory pre-set parameters are 6,0 seconds for 1 dose and 12 seconds for 2
doses. e grinding time can vary from 2 seconds to 20 seconds.
H.1 To enter in the programming mode and change the grinding times, press
the “-” button repeatedly until the display shows the icon and the time (6,0”)
for 1 dose and (12”) for 2 doses.
H.2 Press the “+” button to access, and then press the “-” or “+” button to

VIP Line - Kate - PL82T
16
decrease or increase the grinding time.
H.3 Three seconds after the last press of a button, LCC stores the data and exits
from settings mode.
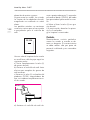
I
Grind and distributing the coffee
I.1 Insert the selected lter into the hot lter holder (e).
I.2 Check that the hopper is lled with beans and that it has the cover (1).
I.3 Position the lter holder, with the correct lter inserted, on the fork (10) to
“hook” it with the pin (8).
I.4 To grind 1 dose, press once the grinding switch (9) (PUSH). The grinder
grinds the dose ac-cording to the set time. Wait until the grinding is over. Re-
move the lter holder from the fork (10).
I.5 To grind 2 doses, press twice the grinding switch (9) (PUSH). The 2 presses
have to be within 2 seconds. The grinder grinds the dose according to the set
time. Wait until the grinding is over. Remove the lterholder from the fork (10).
I.6 Check the grinding and the quantity per dose.
I.7 To grind any quantity of coffee continuously, press the switch (9) (PUSH) and
keep it pressed. Remove the lterholder from the fork (10) once the desired
quantity has been ground.
I.8 Press the coffee with the tamper (a) and remove any coffee residues from the
edge of the lter holder.
Note. We suggest 7 g for one cup and 14 g for two cups.
I.9 Snap the lter holder(e) rmly onto the coffee distribution group (16), so as
to align the handle with the padlock symbol on it.
I.10 Place one or two cups on the cup-holding grate (18), under the lter hol-
der(e).
I.11 Press the coffee switch (5) to start dispensing. The display (15) shows a
countdown in sec-onds.
Note. e countdown display is only to indicate the ideal extraction time and can
be modied as explained in the “Edit LCC settings” section.
I.12 When the countdown is over, the display will show “OK” but not stop the
machine. Once the required amount has been dispensed, press the switch (5)
to stop dispensing coffee.
I.13 Remove the lter holder(e), empty out the coffee grounds and clean tho-
roughly with a damp cloth.
Caution. e lter holder must not be removed before coee brewing is completed.

Lelit Espresso - English
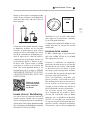
EN
17
Note. To prepare a good espresso, the coee pump pressure gauge (14) must be in the
green zone, while dispensing is in progress.
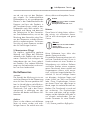
for experts
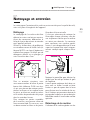
Steam and hot water
The device is equipped with a steam/hot water wand that can foam the milk to
perfection, produc-ing the creamy and compact foam that is the mark of the real
cappuccino.
J
Preparing the coffee machine
J.1 Press the steam (6). The LCC display (15) will ash, showing the water tem-
perature in the boiler. Wait until the bar is complete, so that the machine reaches
the operating temperature for steam dispensing.
J.2 When the desired temperature is reached, the bar will disappear and the
steam icon will ap-pear, accompanied by an indication to turn the steam/hot
water knob (13). The machine is now ready for use.
Caution. Never place your hands or other body parts under the steam/hot water
wand. Risk of scalding
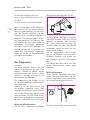
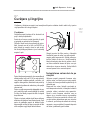
K
Steam distribution
K.1 Open the knob (13) counter clockwise with the steam / hot water wand (13)
pointed at the cup-holding grate (18) and release the initial amount of water.
K.2 When steam comes out, close the knob (13), place a jug with the beverage
to be foamed un-der the steam wand and re-open the steam/hot water knob
(13).
K.3 When the desired result has been achieved, close the steam/hot water knob
(13) turning it clockwise and press the steam switch (6) to turn off the steam
function.
Note. e machine, thanks to its electronic controls, returns to the coee/water
function if the steam function has not been used for a certain period.
Note. See chapter 06 “e art of Espresso coee” for the best way to froth milk.
Caution. Clean the steam/hot water wand (17) aer every use by pointing the ste-
am wand to the cup-holding grate and dispensing some steam. oroughly clean the wand
(17) with a sponge or clean cloth. In the chapter “Cleaning and maintenance”, you will nd
all the necessary advice.

VIP Line - Kate - PL82T
18
L
Hot water distribution
L.1 Press the hot water (7). The pump starts and the water icon appears on the
display (15), ac-companied by the indication to rotate the steam/hot water knob
(13).
L.2 Place a jug under the steam / hot water wand (17) and open the knob (13)
counter-clockwise until you reach the desired amount.
L.3 When the desired amount has been reached, close the knob (13) clockwise
and press the hot water (7) to stop the function.
Note. e machine is equipped with an electronic control that stops the water
function aer a pre-determined time. To withdraw more water, repeat the “Dispense hot
water” operation.
for experts
Adjusting the LCC settings
The LCC - Lelit Control Center (15) has pre-set default settings. Here you can
discover how to ad-just them.
M
Changing the factory settings
M.1 Press the “-” button to enter settings mode, and scroll through the menu.
M.2 Press “+” to change the setting. The setting ashes.
M.3 Change its value and/or state by using the “-” and “+” buttons.
M.4 3 seconds after the last press of a button, LCC stores the data and exits
from settings mode.
Note. Converting the temperature: press “+” and “-” buttons at the same time for
about 3 seconds. When the display shows “C-F”, release both buttons and aerwards press
the button “+” to convert the temperature from Celsius degrees to Fahrenheit degrees.
About 3 sec onds aer the last button has been pressed, the setting will be saved.

Lelit Espresso - English
EN
19
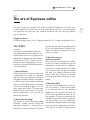
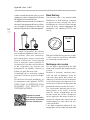
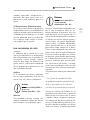
The “5 M’s”
If you want to make perfect Espressos,
you should start by ensuring the ve es-
sential factors which turn a simple cup of
coffee into an Espresso for connoisseurs!
These are the “5 M’s”; in Italian: miscela
(blend), macinatura (grinding), macchina
(machine), manualità (skill) and manutenzi-
one (maintenance).
1- Miscela (Blend)
Good Espressos are always made with
a good blend of coffee. An Espresso
with the right taste requires a blend of
two types of coffee, Arabica and Robus-
ta. The rst gives the coffee its delicate
aroma and the right amount of acidity,
while the second type gives it its full
taste, body and cream. The quantities
depend on your own taste. Try out dif-
ferent combinations until you nd the
blend you like best!
2- Macinatura (Grinding)
The grinder is a must for making good
Espresso. Coffee should always be
ground just before it is used so that it
preserves its taste and aroma. The Lelit
grinders let you adjust the grinding level
to suit the coffee blend in order to es-
tablish the correct extraction time and
amount of cream.
3- Macchina espresso
(Espresso machine)
Lelit machines are designed and built
so that the water temperature can be
adjusted to suit your needs. In addition,
setting this variable correctly will allow
you to extract from the ground coffee,
not only the soluble substances that
give it taste, but also the non-soluble
ones that give body and avour to your
coffee.
4- Manualità (Skill)
Half of the result depends on how you
use the machine. A passionate expert
is an essential part of the Espresso
production chain and can enhance the
result to bring additional value to the
nal product. Passion and practice are,
therefore, the secrets to learning how to
use the machine. You can experiment
with different blends of coffee, grinding,
pressing, water temperature and pres-
sure, not just to make an Espresso, but
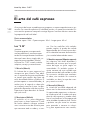
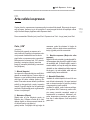
06.
The art of Espresso coffee
Contrary to what you might think, making a perfect Espresso is not that easy.
It takes experience, ability, passion and a little bit of curiosity. In this paragraph
we would like to share with you some of the basic rules for making a perfect
cup of Espresso.
Suggested doses:
Ristretto (Strong) about 20 ml – Espresso about 30 ml – Lungo (Long) about 60 ml.

VIP Line - Kate - PL82T
20
to make the one that is just right for you.
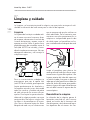
5- Manutenzione (Maintenance)
Daily maintenance, scheduled mainte-
nance and care of the machine will ensure
the quality of the beverage and the dura-
bility of the product you have purchased.
A clean machine says a lot about your
passion for coffee making.
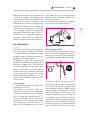
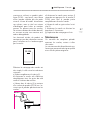
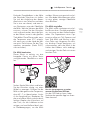
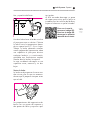
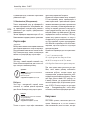
Coffee varieties
The choice of the blend is an essential
factor for making the ideal coffee for
your taste. There are a lot of different
varieties of coffee blends on the market
to choose from. The differences in a-
vour, aroma and texture depend on the
quantities of the two varieties of coffee
that make the blend.
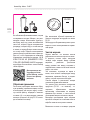
Arabica
This is a sweeter and more delicate va-
riety of coffee, with a rich aroma and
cream that is very thin, dense and com-
pact.
Robusta
It is grown between 200/600 m
Spicy aroma.
Caffeine between 1.8 ~ 4%
Arabica
It is grown between 900/2000 m
Rich aroma.
Caffeine between 0.9 ~ 1.7%
Robusta
This variety is woody, bitter, full-
bodied and spicy, with little aroma.
Its cream is more frothy and grey.
Robusta
It is grown between 200/600 m
Spicy aroma.
Caffeine between 1.8 ~ 4%
Arabica
It is grown between 900/2000 m
Rich aroma.
Caffeine between 0.9 ~ 1.7%
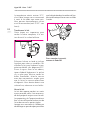
No variety of coffee can make an ideal
Espresso on its own.
The perfect Espresso has a top layer
of cream 2-3 mm thick, a nut brown to
dark brown colour, with reddish tinges
and light streaks, a harmonious avour,
a strong, balanced aroma and a sweet,
long-lasting aftertaste.
It has a strong aroma with notes of o-
wers, fruits, toast and chocolate. These
sensations can last just a moment or can
persist for a few minutes in your mouth.
The taste is round and well structured.
The acid and bitter perceptions are well
balanced whereas there is little or no as-
tringency.
The ideal parameters to obtain this type
of coffee are:
7 ± 0,5 g. of ground coee.
25 seconds to brew 30 ml.
88 / 92°C when brewing and 80°C in the cup.
8 /10 bar pressure during extraction.
Even Arabica blends often contain a
small amount of Robusta, which is ne-
cessary to enhance the cream and add
aroma and body to the espresso.
Blends made for coffee bars usually
contain 20% Robusta but in southern
Italy, where they prefer a stronger taste,
the percentage can reach 40-50%. At
the end of the day, it’s just a matter of
taste…Experiment until you nd the
blend you like best!
Pagina se încarcă...
Pagina se încarcă...
Pagina se încarcă...
Pagina se încarcă...
Pagina se încarcă...
Pagina se încarcă...
Pagina se încarcă...
Pagina se încarcă...
Pagina se încarcă...
Pagina se încarcă...
Pagina se încarcă...
Pagina se încarcă...
Pagina se încarcă...
Pagina se încarcă...
Pagina se încarcă...
Pagina se încarcă...
Pagina se încarcă...
Pagina se încarcă...
Pagina se încarcă...
Pagina se încarcă...
Pagina se încarcă...
Pagina se încarcă...
Pagina se încarcă...
Pagina se încarcă...
Pagina se încarcă...
Pagina se încarcă...
Pagina se încarcă...
Pagina se încarcă...
Pagina se încarcă...
Pagina se încarcă...
Pagina se încarcă...
Pagina se încarcă...
Pagina se încarcă...
Pagina se încarcă...
Pagina se încarcă...
Pagina se încarcă...
Pagina se încarcă...
Pagina se încarcă...
Pagina se încarcă...
Pagina se încarcă...
Pagina se încarcă...
Pagina se încarcă...
Pagina se încarcă...
Pagina se încarcă...
Pagina se încarcă...
Pagina se încarcă...
Pagina se încarcă...
Pagina se încarcă...
Pagina se încarcă...
Pagina se încarcă...
Pagina se încarcă...
Pagina se încarcă...
Pagina se încarcă...
Pagina se încarcă...
Pagina se încarcă...
Pagina se încarcă...
Pagina se încarcă...
Pagina se încarcă...
Pagina se încarcă...
Pagina se încarcă...
Pagina se încarcă...
Pagina se încarcă...
Pagina se încarcă...
Pagina se încarcă...
Pagina se încarcă...
Pagina se încarcă...
Pagina se încarcă...
Pagina se încarcă...
Pagina se încarcă...
Pagina se încarcă...
Pagina se încarcă...
Pagina se încarcă...
Pagina se încarcă...
Pagina se încarcă...
Pagina se încarcă...
Pagina se încarcă...
Pagina se încarcă...
Pagina se încarcă...
Pagina se încarcă...
Pagina se încarcă...
Pagina se încarcă...
Pagina se încarcă...
Pagina se încarcă...
Pagina se încarcă...
Pagina se încarcă...
Pagina se încarcă...
Pagina se încarcă...
Pagina se încarcă...
Pagina se încarcă...
Pagina se încarcă...
Pagina se încarcă...
Pagina se încarcă...
Pagina se încarcă...
Pagina se încarcă...
Pagina se încarcă...
Pagina se încarcă...
Pagina se încarcă...
Pagina se încarcă...
Pagina se încarcă...
Pagina se încarcă...
Pagina se încarcă...
Pagina se încarcă...
Pagina se încarcă...
Pagina se încarcă...
Pagina se încarcă...
Pagina se încarcă...
Pagina se încarcă...
Pagina se încarcă...
Pagina se încarcă...
Pagina se încarcă...
Pagina se încarcă...
Pagina se încarcă...
Pagina se încarcă...
Pagina se încarcă...
Pagina se încarcă...
Pagina se încarcă...
Pagina se încarcă...
Pagina se încarcă...
Pagina se încarcă...
Pagina se încarcă...
Pagina se încarcă...
Pagina se încarcă...
Pagina se încarcă...
Pagina se încarcă...
Pagina se încarcă...
Pagina se încarcă...
Pagina se încarcă...
Pagina se încarcă...
Pagina se încarcă...
Pagina se încarcă...
Pagina se încarcă...
Pagina se încarcă...
Pagina se încarcă...
Pagina se încarcă...
Pagina se încarcă...
Pagina se încarcă...
Pagina se încarcă...
Pagina se încarcă...
Pagina se încarcă...
Pagina se încarcă...
Pagina se încarcă...
Pagina se încarcă...
Pagina se încarcă...
Pagina se încarcă...
Pagina se încarcă...
Pagina se încarcă...
Pagina se încarcă...
Pagina se încarcă...
Pagina se încarcă...
Pagina se încarcă...
Pagina se încarcă...
Pagina se încarcă...
Pagina se încarcă...
Pagina se încarcă...
Pagina se încarcă...
Pagina se încarcă...
Pagina se încarcă...
Pagina se încarcă...
Pagina se încarcă...
Pagina se încarcă...
Pagina se încarcă...
Pagina se încarcă...
Pagina se încarcă...
-
 1
1
-
 2
2
-
 3
3
-
 4
4
-
 5
5
-
 6
6
-
 7
7
-
 8
8
-
 9
9
-
 10
10
-
 11
11
-
 12
12
-
 13
13
-
 14
14
-
 15
15
-
 16
16
-
 17
17
-
 18
18
-
 19
19
-
 20
20
-
 21
21
-
 22
22
-
 23
23
-
 24
24
-
 25
25
-
 26
26
-
 27
27
-
 28
28
-
 29
29
-
 30
30
-
 31
31
-
 32
32
-
 33
33
-
 34
34
-
 35
35
-
 36
36
-
 37
37
-
 38
38
-
 39
39
-
 40
40
-
 41
41
-
 42
42
-
 43
43
-
 44
44
-
 45
45
-
 46
46
-
 47
47
-
 48
48
-
 49
49
-
 50
50
-
 51
51
-
 52
52
-
 53
53
-
 54
54
-
 55
55
-
 56
56
-
 57
57
-
 58
58
-
 59
59
-
 60
60
-
 61
61
-
 62
62
-
 63
63
-
 64
64
-
 65
65
-
 66
66
-
 67
67
-
 68
68
-
 69
69
-
 70
70
-
 71
71
-
 72
72
-
 73
73
-
 74
74
-
 75
75
-
 76
76
-
 77
77
-
 78
78
-
 79
79
-
 80
80
-
 81
81
-
 82
82
-
 83
83
-
 84
84
-
 85
85
-
 86
86
-
 87
87
-
 88
88
-
 89
89
-
 90
90
-
 91
91
-
 92
92
-
 93
93
-
 94
94
-
 95
95
-
 96
96
-
 97
97
-
 98
98
-
 99
99
-
 100
100
-
 101
101
-
 102
102
-
 103
103
-
 104
104
-
 105
105
-
 106
106
-
 107
107
-
 108
108
-
 109
109
-
 110
110
-
 111
111
-
 112
112
-
 113
113
-
 114
114
-
 115
115
-
 116
116
-
 117
117
-
 118
118
-
 119
119
-
 120
120
-
 121
121
-
 122
122
-
 123
123
-
 124
124
-
 125
125
-
 126
126
-
 127
127
-
 128
128
-
 129
129
-
 130
130
-
 131
131
-
 132
132
-
 133
133
-
 134
134
-
 135
135
-
 136
136
-
 137
137
-
 138
138
-
 139
139
-
 140
140
-
 141
141
-
 142
142
-
 143
143
-
 144
144
-
 145
145
-
 146
146
-
 147
147
-
 148
148
-
 149
149
-
 150
150
-
 151
151
-
 152
152
-
 153
153
-
 154
154
-
 155
155
-
 156
156
-
 157
157
-
 158
158
-
 159
159
-
 160
160
-
 161
161
-
 162
162
-
 163
163
-
 164
164
-
 165
165
-
 166
166
-
 167
167
-
 168
168
-
 169
169
-
 170
170
-
 171
171
-
 172
172
-
 173
173
-
 174
174
-
 175
175
-
 176
176
-
 177
177
-
 178
178
-
 179
179
-
 180
180
-
 181
181
-
 182
182
-
 183
183


Lelit Kate PL82T Manual de utilizare
- Categorie
- Aparate de cafea
- Tip
- Manual de utilizare
în alte limbi
- français: Lelit Kate PL82T Manuel utilisateur
- Deutsch: Lelit Kate PL82T Benutzerhandbuch
- español: Lelit Kate PL82T Manual de usuario
Lucrări înrudite
Alte documente
-
Bauknecht KMT 9145 IXL Manualul utilizatorului
-
Camry CR 4410 Instrucțiuni de utilizare
-
Whirlpool ACE 102 IX Manualul utilizatorului
-
Whirlpool ACE 102 IXL Manualul utilizatorului
-
BLACK+DECKER BXCG150E Manualul proprietarului
-
-
Adler AD 4408 Instrucțiuni de utilizare
-
-
-