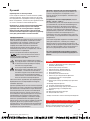
Braun 5090cc, 5070cc, 5050cc, 5040s wet&dry, 5030s, 5020s, Series 5 Manual de utilizare
- Categorie
- Aparate de bărbierit
- Tip
- Manual de utilizare

Series 5
5090cc
5070cc
5050cc
5040s wet&dry
5030s
5020s
Type 5748, 5749
www.braun.com
91153345/VIII-16
91153345_5090cc_CEE_S1.indd 191153345_5090cc_CEE_S1.indd 1 22.08.16 13:0222.08.16 13:02
Stapled booklet, 148 x 210 mm, 84 pages (incl. 8 pages cover), 2/2c = Pantone 485 C + black
CSS APPROVED Effective Date 14Sep2016 GMT - Printed 04Jan2017 Page 1 of 84

English 6
Français 10
Polski 15
Česk 20
Slovensk 25
Magyar 30
Hrvatski 35
Slovenski 40
Türkçe 45
Română (RO/MD) 51
Български 56
Русский 61
Українська 68
81
Braun GmbH
Frankfurter Straße 145
61476 Kronberg/Germany
www.braun.com
UK/FR/PL/CZ/SK/HU/HR/SI/TR/RO/MD/
BG/RU/UA/Arab
Braun Infolines
UK 0800 783 7010
IE 1 800 509 448
FR 0 800 944 802
(service & appel gratuits)
BE 0 800 14 592
PL 801 127 286
801 1 BRAUN
CZ 221 804 335
SK 02/5710 1135
HU (06-1) 451-1256
HR 091 66 01 777
SI 080 2822
TR 0 800 261 63 65
RO 021.224.30.35
RU 8 800 200 20 20
UA 0 800 505 000
HK 2926 2300
(Jebsen Consumer Service Centre)
ZA 0860 112 188
(Sharecall charged at local rates)
www.service.braun.com
91153345_5090cc_CEE_S2.indd 191153345_5090cc_CEE_S2.indd 1 22.08.16 13:0322.08.16 13:03
CSS APPROVED Effective Date 14Sep2016 GMT - Printed 04Jan2017 Page 2 of 84

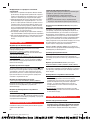
3
S
e
ri
e
s
5
Series 5
S
eries 5
1
2
3
6
8a
8b
9
7
4
509
0cc-
1
5
13
16
15
15a
14
17
12
10
11a
11b
11c
5070cc
5050cc
5040s w&d
5030s
5020s
5070cc
5050cc
5040s w&d
5030s
5020s
5090cc
5070cc
5050cc
5090cc 5090cc
Se
r
i
es 5
91153345_5090cc_CEE_S3.indd 191153345_5090cc_CEE_S3.indd 1 22.08.16 13:0322.08.16 13:03
CSS APPROVED Effective Date 14Sep2016 GMT - Printed 04Jan2017 Page 3 of 84

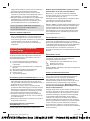
4
90°
20°
20°
10°
10°
0°
0°
10°
10°
20°
10°
0°
10°
20°
Series 5
A
C
B
91153345_5090cc_CEE_S4.indd 191153345_5090cc_CEE_S4.indd 1 22.08.16 13:0422.08.16 13:04
CSS APPROVED Effective Date 14Sep2016 GMT - Printed 04Jan2017 Page 4 of 84

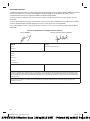
5
2
1
D
E
F
1
2
91153345_5090cc_CEE_S5.indd 191153345_5090cc_CEE_S5.indd 1 22.08.16 13:0422.08.16 13:04
CSS APPROVED Effective Date 14Sep2016 GMT - Printed 04Jan2017 Page 5 of 84

6
English
Our products are designed to meet the highest
standards of quality, functionality and design.
Thank you for your trust in Braun’s quality and we
hope you enjoy your new Braun shaver.
Read these instructions completely, they
contain safety information. Keep them for
future reference.
Warning
Your appliance is provided with a spe-
cial cord set, which has an integrated
Safety Extra Low Voltage power supply.
Do not exchange or tamper with any
part of it, otherwise there is risk of an
electric shock. Only use the special
cord set provided with your appliance.
If the appliance is marked
492, you can use it with any Braun
power supply coded 492-XXXX.
The shaver is suitable for cleaning
under running tap water. Detach
the shaver from the power supply
before cleaning it in water.
Model 5040s w&d only:
This appliance is suitable for
cleaning under running water and
use in a bathtub or shower. For
safety reasons it can only be
operated cordless.
Do not shave with a damaged foil or cord.
This appliance can be used by children
aged from 8 years and above and
persons with reduced physical, sensory
or mental capabilities or lack of experi-
ence and knowledge if they have been
given supervision or instruction con-
cerning the safe use of the appliance
and understand the hazards involved.
Children shall not play with the appli-
ance. Cleaning and user maintenance
shall not be made by children unless
they are older than 8 years and super-
vised.
Oil bottle (not with all models)
Keep out of reach of children. Do not
swallow. Do not apply to eyes. Dispose
of properly when empty.
Clean&Charge Station
(models 5090cc/5070cc/5050cc)
To prevent the cleaning fl uid from leak-
ing, ensure that the Clean&Charge
Station is placed on a fl at surface. When
a cleaning cartridge is installed, do not
tip, move suddenly or transport the sta-
tion in any way as cleaning fl uid might
spill out of the cartridge. Do not place the
station inside a mirror cabinet, nor place
it on a polished or lacquered surface.
The cleaning cartridge contains a highly
fl ammable liquid so keep it away from
sources of ignition. Do not expose to
direct sunlight and cigarette smoking
nor store it over a radiator.
Do not refill the cartridge and use
only original Braun refill cartridges.
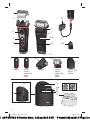
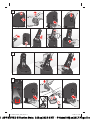
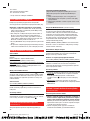
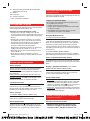
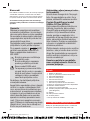
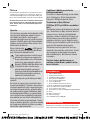
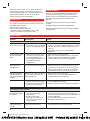
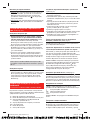
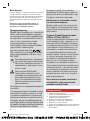
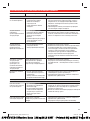
Shaver
1 Foil & Cutter cassette
2 Cassette release button
3 MultiHeadLock switch
4 On/off switch
5 Shaver display
6 Long hair trimmer
7 Shaver-to-station contacts
8a Release button for long hair trimmer
8b Model number of shaver
9 Shaver power socket
10 Special cord set (design can differ)
11a Brush
11b Hard travel case*
11c Protection cap*
* not with all models
First use and Charging
Prior to first use connect the shaver to an electrical
outlet using the special cord set (10).
Charging and basic operating information
• A full charge provides up to 45 minutes of cordless
shaving time. This may vary according to your
beard growth and environmental temperature.
91153345_5090cc_CEE_S6-84.indd 691153345_5090cc_CEE_S6-84.indd 6 23.08.16 10:3323.08.16 10:33
CSS APPROVED Effective Date 14Sep2016 GMT - Printed 04Jan2017 Page 6 of 84

7
• Recommended ambient temperature for charging is
5 °C to 35 °C. The battery may not charge properly
or at all under extreme low or high temperatures.
Recommended ambient temperature for storage
and shaving is 15 °C to 35 °C.
• Do not expose the appliance to temperatures
higher than 50 °C for extended periods of time.
• When the shaver will be connected to an electrical
outlet, it may take some minutes until the display
illuminates.
Shaver display
Charge status
The shaver display (5) shows the charge status of
the battery.
During charging: The battery symbol will blink.
(5090cc: The respective battery segment will blink.)
Fully charged (shaver is connected to an electrical
outlet): The battery symbol will light up for a few
seconds. (5090cc: All battery symbols will light up
for a few seconds.)
Low charge
The low-charge light flashes red when the
battery is running low. You should be able to finish
your shave. With switching off the shaver a beep
sound reminds of the low charge status.
Cleaning status
(models 5090cc/5070cc/5050cc only)
The cleaning indicator lights up, when the shaver
needs to be cleaned in the Clean&Charge Station.
Travel lock
The lock symbol lights up when the shaver has
been locked to avoid unintended starting of the
motor (e.g. for storing it in a suitcase).
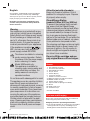
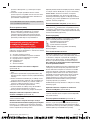
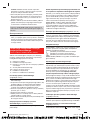
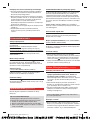
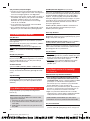
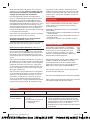
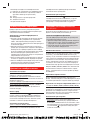
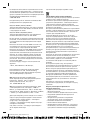
Using the shaver (see fig. A)
Press the on/off switch (4) to operate the shaver.
Tips for a perfect dry shave
For best results, Braun recommends you to follow
3 simple steps:
1. Always shave before washing your face.
2. At all times, hold the shaver at the right angle
(90°) to your skin.
3. Stretch your skin and shave against the direction
of your beard growth.
MultiHeadLock switch (head lock)
To shave hard-to-reach areas (e.g. under the nose)
slide the MultiHeadLock switch (3) down to lock the
shaver head. The shaver head can be locked in five
positions. To change position, move the shaver head
with your thumb and forefinger back or forth. It will
automatically click into the next position.
Models 5090cc/5070cc/5050cc: For automatic
cleaning in the Clean&Charge Station the head lock
should be released.
Long hair trimmer
To trim sideburns, moustache or beard press the
release button (8a) and slide the long hair trimmer
(6) upwards.
Shaving with the cord (models 5090cc/5070cc/
5050cc/5030s/5020s only)
If the shaver has run out of power (discharged), you
may also shave with the shaver connected to an
electrical outlet via the special cord set.
Travel lock
• Activation: By pressing the on/off switch (4) for
3 seconds the shaver is locked. This is confirmed
by a beep sound and the lock symbol in the
display. Afterwards the display turns off.
• Deactivation: By pressing the on/off switch for
3 seconds the shaver is unlocked again.
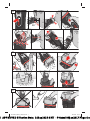
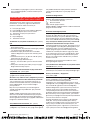
Manual cleaning of the shaver (s. fig. B/C)
Cleaning under running water
•
Switch on the shaver (cordless) and rinse the
shaver head under hot running water until all
residues have been removed. You may use liquid
soap without abrasive substances. Rinse off all
foam and let the shaver run for a few more seconds.
• Next, switch off the shaver, press the release
button (2) to remove the Foil & Cutter cassette (1)
and let it dry.
• If you regularly clean the shaver under water, then
once a week apply a drop of light machine oil on
top of the Foil & Cutter cassette.
Model 5040s w&d only: The shaver should be
cleaned after each foam usage.
Cleaning with a brush
• Switch off the shaver. Remove the Foil & Cutter
cassette (1) and tap it out on a flat surface. Using
the brush, clean the inner area of the pivoting
head. Do not clean the cassette with the brush as
this may damage it!
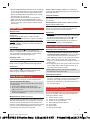
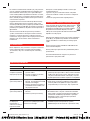
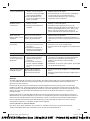
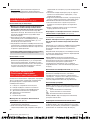
Clean&Charge Station
for models 5090cc/5070cc/5050cc only
The Clean&Charge Station has been developed for
cleaning, charging, lubricating, disinfecting and
storing your Braun shaver.
12 Station power socket
13 Lift button for cartridge exchange
14 Station-to-shaver contacts
15 Clean&Charge Station display
15a Status light
16 Start button
17 Cleaning cartridge
91153345_5090cc_CEE_S6-84.indd 791153345_5090cc_CEE_S6-84.indd 7 23.08.16 10:3323.08.16 10:33
CSS APPROVED Effective Date 14Sep2016 GMT - Printed 04Jan2017 Page 7 of 84

8
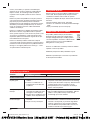
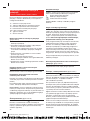
Installing the Clean&Charge Station (see fig. D)
• Remove the protection foil from the Clean&Charge
Station display.
• Using the special cord set (10), connect the
station power socket (12) to an electrical outlet.
• Press the lift button (13) at the rear side of the
Clean&Charge Station to lift up the housing.
• Hold the cleaning cartridge (17) down on a flat,
stable surface (e.g. table).
• Carefully remove the lid from the cartridge.
• Slide the cartridge from the rear side into the base
of the station until it snaps into place.
• Slowly close the housing by pushing it down until
it locks.
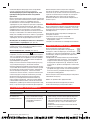
Charging the shaver in the Clean&Charge Station
(see fig. D)
Insert the shaver head down into the cleaning station.
Important: The shaver needs to be dry and free
from any foam or soap residue!
The contacts (7) on the back of the shaver need to
align with the contacts (14) in the station. Push the
shaver in the correct position.
A beep sound confirms that the shaver sits properly
in the station. Charging will start automatically.
Model 5090cc: The Clean&Charge Station analyzes
the hygiene status. The status is shown by the
cleaning program indicators
in the Clean&Charge
Station display (15) more details see chapter
«Cleaning programs» below.
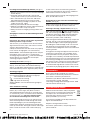
Cleaning the shaver (see fig. D)
When the cleaning indicator lights up in the shaver
display, insert the shaver into the Clean&Charge
Station, upside down and with the front showing (with
released head lock/contact alignment/beep sound).
Cleaning programs
5090cc: The hygiene status will be analyzed and one
of the following program indicators will light up.
short economical cleaning
normal level of cleaning
high intensive cleaning
5070cc/5050cc: One standard cleaning program
included.
Start automatic cleaning
Start the cleaning process by pressing the start
button (16). If status light (15a) does not shine
(Clean&Charge Station switches to stand-by after
ca. 10 minutes), press start button twice. Otherwise
cleaning will not start. For best shaving results,
we recommend cleaning after each shave.
Each cleaning program consists of several cycles,
where cleaning fluid is flushed through the shaver
head. Depending on your Clean&Charge Station
model and/or program selected, the cleaning time
takes up to 3 minutes. During this time the status light
blinks. Leave the shaver in the station for drying.
It takes several hours until remaining moisture
evaporates depending on the climatic conditions.
Afterwards the shaver is ready for use.
After completing the cleaning and charging proce-
dure, all indicators turn off.
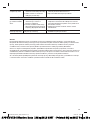
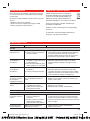
Removing the shaver from the Clean&Charge
Station (see fig. E)
Hold the Clean&Charge Station with one hand and
tilt the shaver slightly to the front to release it.
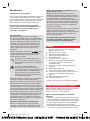
Cleaning Cartridge / Replacement (see fig. F)
When the level indicator
lights up permanently
red, the remaining fluid in the cartridge is sufficient
for about 3 more cycles. When the level indicator
blinks red, the cartridge needs to be replaced -
about every 4 weeks (when used daily).
After having pressed the lift button (13) to open the
housing, wait for a few seconds before removing
the used cartridge to avoid any dripping. Before
discarding the used cartridge, make sure to close
the openings using the lid of the new cartridge,
since the used cartridge will contain contaminated
cleaning solution.
The hygienic cleaning cartridge contains ethanol or
isopropanol (specification see cartridge), which
once opened will naturally evaporate slowly. Each
cartridge, if not used daily, should be replaced after
approximately 8 weeks to ensure optimal disinfection.
The cleaning cartridge also contains lubricants for
the shaving system, which may leave residual marks
on the outer foil frame and the cleaning chamber
of the Clean&Charge Station. These marks can be
removed easily by wiping gently with a damp cloth.
Accessories
Braun recommends changing your shaver’s
Foil & Cutter cassette every 18 months to maintain
your shaver’s maximum performance.
Available at your dealer or Braun Service Centres:
• Foil & Cutter cassette: 52S/52B
• Cleaning cartridge Clean&Charge Station: CCR
• Braun Shaver cleaner spray
Environmental notice
Product contains batteries and/or recyclable
electric waste. For environment protection do
not dispose of in household waste, but for
recycling take to electric waste collection
points provided in your country.
The cleaning cartridge can be disposed of with
regular household waste.
Subject to change without notice.
For electric specifications, see printing on the
special cord set.
91153345_5090cc_CEE_S6-84.indd 891153345_5090cc_CEE_S6-84.indd 8 23.08.16 10:3323.08.16 10:33
CSS APPROVED Effective Date 14Sep2016 GMT - Printed 04Jan2017 Page 8 of 84

9
Trouble-Shooting
Problem Possible reason Remedy
SHAVER
Unpleasant smell
from the shaver head.
1. Shaver head is cleaned with
water.
2. Cleaning cartridge is in use
for more than 8 weeks.
1. When cleaning the shaver head with water only
use hot water and from time to time some liquid
soap (without abrasive substances). Remove
Foil & Cutter cassette to let it dry.
2. Change cleaning cartridge at least every 8 weeks.
Battery performance
dropped significantly.
1. Foil and cutter are worn
which requires more power
for each shave.
2. Shaver head is regularly
cleaned with water but not
lubricated.
1. Renew Foil & Cutter cassette.
2. If the shaver is regularly cleaned with water, apply
a drop of light machine oil on top of the foil once
a week for lubrication.
Shaving performance
dropped significantly.
1. Foil and cutter are worn.
2. Shaving system is clogged.
1. Renew Foil & Cutter cassette.
2. Soak the Foil & Cutter cassette into hot water
with a drop of dish liquid. Afterwards rinse it
properly and tap it out. Once dry apply a drop of
light machine oil on the foil.
Battery segments
in the display
are skipped with
decreasing battery
capacity.
Foil and cutter are worn which
requires more power for each
shave.
– Renew Foil & Cutter cassette.
– Regularly oil the shaving system, especially when
cleaning with water only.
Shaver head is
damp.
1. Drying time after automatic
cleaning was too short.
2. Drain of the Clean&Charge
Station is clogged.
1. Clean directly after shaving to allow enough time
for drying.
2. Clean the drain with a wooden toothpick.
CLEAN&CHARGE STATION
Cleaning does not
start when pressing
the start button.
1. Shaver is not placed properly
in the Clean&Charge Station.
2. Cleaning cartridge contains
not enough cleaning fluid
(display blinks red).
1. Insert shaver into the Clean&Charge Station and
push it to the rear side of the station (contacts
of the shaver need to align with contacts in the
station).
2. Insert new cleaning cartridge. Press start button
again.
Increased
consumption of
cleaning fluid.
Drain of the Clean& Renew
station is clogged.
– Clean the drain with a wooden toothpick.
– Regularly wipe the tub clean.
Guarantee
We grant a 2 year guarantee on the product commencing on the date of purchase. Within the guarantee
period we will eliminate any defects in the appliance resulting from faults in materials or workmanship,
free of charge either by repairing or replacing the complete appliance at our discretion.
This guarantee extends to every country where this appliance is supplied by Braun or its appointed
distributor.
This guarantee does not cover: damage due to improper use, normal wear or use as well as defects that
have a negligible effect on the value or operation of the appliance. The guarantee becomes void if repairs
are undertaken by unauthorised persons and if original Braun parts are not used.
To obtain service within the guarantee period, hand in or send the complete appliance with your sales
receipt to an authorised Braun Customer Service Centre (address information available online at
www.service.braun.com)
For UK only:
This guarantee in no way affects your rights under statutory law.
91153345_5090cc_CEE_S6-84.indd 991153345_5090cc_CEE_S6-84.indd 9 23.08.16 10:3323.08.16 10:33
CSS APPROVED Effective Date 14Sep2016 GMT - Printed 04Jan2017 Page 9 of 84

10
Français
Nos produits sont conçus pour répondre aux normes
les plus élevées en matière de qualité, fonctionnalité
et design. Nous espérons que vous serez pleinement
satisfait de votre nouveau rasoir Braun.
Merci de lire attentivement et intégralement la
notice d’utilisation avant d’utiliser le produit.
Veuillez la conserver pour vous y référer
ultérieurement.
Avertissement
Votre rasoir est livré avec un cordon
d’alimentation spécial qui intègre un
adaptateur sécuritaire de basse tension.
Par conséquent, vous ne devez modifi er
ou manipuler aucun de ses composants,
afi n d’éviter tout risque d’électrocution.
Si l’appareil porte la référence
492, vous pouvez l’utiliser
avec n’importe quel alimentation
marquée 492-XXXX.
Le rasoir peut être nettoyé sous le
robinet d’eau courante. Débran-
chez le rasoir avant de le nettoyer
sous l’eau.
Modèle 5040s w&d uniquement :
Cet appareil peut être nettoyé
sous le robinet d’eau courante et
est utilisable dans le bain ou sous
la douche. Pour des raisons de
sécurité, cet appareil ne peut être
utilisé que sans fil.
Ne pas se raser avec une cassette de
rasage ou un cordon d’alimentation abî-
més.
Cet appareil peut être utilisé par des
enfants de 8 ans et plus et par des per-
sonnes dont les capacités physiques,
sensorielles ou mentales sont réduites,
ou des personnes dénuées d’expé-
rience ou de connaissance, si elles ont
pu bénéfi cier, par l’intermédiaire d’une
personne responsable de leur sécurité,
d’une surveillance ou d’instructions
préalables concernant l’utilisation de
l’appareil en toute sécurité et les dan-
gers encourus. Les enfants ne doivent
pas jouer avec l’appareil. Le nettoyage
et l’entretien ne doivent pas être faits
par des enfants, à moins qu’ils ne
soient âgés de plus de 8 ans et qu’ils
ne soient sous surveillance.
Bouteille d’huile
(non fournie avec tous les modèles)
Ne pas laisser à la portée des enfants.
Ne pas avaler. Ne pas appliquer sur les
yeux. Une fois vide éliminer selon les
réglementations locales en vigueur.
Clean&Charge
(modèles 5090cc/5070cc/5050cc)
Pour éviter tout débordemenr du
liquide de nettoyage, veillez à ce que le
système autonettoyant Clean&Charge
soit posé sur une surface plane. Lors-
qu’une cartouche de liquide nettoyant
est installée, ne basculez pas, ne bou-
gez pas brusquement et ne transportez
pas le système autonettoyant, car le
liquide de nettoyage pourrait se renver-
ser hors de la cartouche. Ne mettez pas
la station dans une armoire à glace, ni
sur une surface cirée ou laquée.
La cartouche de liquide nettoyant
contient des liquides hautement infl am-
mables, gardez-la à l’écart des sources
d’ignition. Ne l’exposez pas directe-
ment à la lumière du soleil et à la fumée
de cigarette et ne la posez pas sur un
radiateur.
Ne remplissez pas la cartouche et
utilisez uniquement les cartouches
de nettoyage d’origine Braun.
Rasoir
1 Cassette de rasage
2 Bouton d’éjection de la cassette de rasage
3 Verrou coulissant de blocage de tête
4 Interrupteur (marche/arrêt)
5 Voyants d’affichage
6 Tondeuse rétractable
7 Plots de contact rasoir / système autonettoyant
8a Bouton de tondeuse
91153345_5090cc_CEE_S6-84.indd 1091153345_5090cc_CEE_S6-84.indd 10 23.08.16 10:3323.08.16 10:33
CSS APPROVED Effective Date 14Sep2016 GMT - Printed 04Jan2017 Page 10 of 84

11
8b Modèle du rasoir
9 Prise du rasoir
10 Cordon d’alimentation (le design peut varier)
11a Brosse de nettoyage
11b Etui de voyage*
11c Capot de protection*
* non fournie avec tous les modèles
Première utilisation et mise en
charge du rasoir
Avant la première utilisation branchez le rasoir à une
prise électrique à l‘aide du cordon d’alimentation (10).
Informations générales et de mise en charge
• Une charge complète permet jusqu’à 45 minutes
de rasage sans le cordon. Cela peut varier selon la
longueur et la densité de votre barbe ainsi que de
la température ambiante.
• La température ambiante idéale pour une mise en
charge doit être comprise entre 5 °C et 35 °C.
La batterie peut ne pas se charger complétement
ou pas du tout avec des températures extrêmes
trop élévées ou trop basses. La température
ambiante recommandée pour le rangement ou
l’utilisation du rasoir doit être comprise entre
15 °C et 35 °C.
• Ne pas exposer le rasoir à des températures
supérieures à 50 °C pendant une période prolongée.
• Quand le rasoir est branché sur une prise électrique,
les voyants peuvent mettre quelques minutes avant
de s’éclairer.
Voyants d’affichage du rasoir
Etat de charge
Les voyants d’affichage du rasoir (5) indiquent le
niveau de charge de la batterie.
Pendant la charge : le voyant batterie clignotera.
(5090cc : le segment indiquant le niveau de charge
de la batterie clignotera).
Lorsque la batterie est complètement chargée
(le rasoir est raccordé sur une prise électrique) :
le voyant batterie s’éclaire ponctuellement pendant
quelques secondes. (5090cc : Tous les segments
s’éclairent ponctuellement quelques secondes.)
Faible charge
Le voyant lumineux de faible charge
clignote
rouge quand la batterie doit être rechargée.
La charge restante est normalement suffisante pour
que vous puissiez terminer votre rasage. Lorsque
vous arrêtez votre rasoir, un bip vous rappelle le
niveau de faible charge de la batterie.
Nettoyage – affichage
(modèles 5090cc/5070cc/5050cc uniquement)
Le symbole s’éclaire quand le rasoir a besoin
d’être nettoyé dans la station Clean&Charge.
Verrou de sécurité pour le voyage
Le symbole s’éclaire quand le rasoir a été bloqué
pour éviter qu’il ne se mette intempestivement en
marche (ex : lors du transport dans un bagage).
Utilisation du rasoir (cf fig. A)
Appuyez sur l’interrupteur marche/arrêt 4 pour
mettre en marche le rasoir.
Conseils pour un rasage parfait
Pour un résultat de rasage optimal, Braun vous
recommande de suivre 3 étapes simples :
1. Rasez-vous toujours avant de vous laver le
visage.
2. Tenez toujours le rasoir à angle droit (90°) par
rapport à la peau.
3. Tendez votre peau et rasez-vous dans le sens
opposé à la pousse du poil.
Verrou coulissant de blocage de tête
Pour raser les zones difficiles à atteindre (ex: sous le
nez) faire coulisser vers le bas le Verrou coulissant
(3) ce qui permet de bloquer en position inclinée la
tête de rasage. La tête de rasage peut être bloquée
dans cinq positions différentes. Pour changer de
position, déplacez la tête de rasage avec vos pouce
et index d’avant en arrière. La tête se bloquera auto-
matiquement dans la nouvelle position.
Modèles 5090cc/5070cc/5050cc : Pour un nettoyage
automatique dans la station Clean&Charge la tête
pivotante doit être libre, le verrou coulissant doit être
positionné vers le haut.
Tondeuse rétractable
Pour tailler les pattes, la moustache et la barbe,
appuyez sur le bouton (8a) et faites coulisser la ton-
deuse (6) vers le haut.
Rasage avec le cordon (modèles 5090cc/5070cc/
5050cc/5030s/5020s uniquement)
Si la batterie est déchargée, vous pouvez vous raser
en branchant le rasoir sur une prise électrique avec
son cordon d’alimentation.
Loquet de sécurité pour le voyage
• Activation : appuyer sur l’interrupteur (marche/
arrêt) (4) pendant 3 secondes, le rasoir est
verrouillé. Confirmation par un bip et l’affichage du
symbole . Puis l’affichage du symbole disparait.
• Désactivation : En appuyant sur l’interrupteur
(marche/arrêt) pendant 3 secondes, le rasoir est
déverrouillé.
Nettoyage manuel du rasoir (cf fig. B/C)
Nettoyage sous l’eau courante
• Allumez le rasoir (sans le cordon) et rincez la
91153345_5090cc_CEE_S6-84.indd 1191153345_5090cc_CEE_S6-84.indd 11 23.08.16 10:3323.08.16 10:33
CSS APPROVED Effective Date 14Sep2016 GMT - Printed 04Jan2017 Page 11 of 84

12
tête du rasoir sous l’eau chaude jusqu’à
retirer tous les résidus. Vous pouvez utiliser
du savoir liquide ne contenant pas de substances
abrasives. Rincez toute la mousse et laissez
fonctionner le rasoir pendant quelques se-
condes.
• Ensuite, arrêtez le rasoir, pressez sur le bouton
d’éjection de la cassette de rasage (2) afin de la
dégrafer et de la retirer pour la laissez sécher.
• Si vous nettoyez régulièrement votre rasoir sous
l’eau, appliquez une fois par semaine une goutte
de l’huile fournie ou d’huile de machine à coudre
sur la tondeuse et sur la cassette de rasage.
Modèle 5040s w&d uniquement : Le rasoir doit
être lavé après chaque utilisation avec de la
mousse de rasage.
Nettoyage avec la brosse
• Arrêtez le rasoir. Retirez la cassette de rasage (1)
et tapotez la sur une surface plane. Avec la brosse,
nettoyez l’intérieure de la tête de rasage. Ne pas
nettoyer la cassette avec la brosse car cela peut
l’endommager.
Nettoyage automatique avec la
centrale de nettoyage
Pour les modèles 5090cc/5070cc/5050cc uniquement
Le système autonettoyant Clean&Charge a été
conçu pour nettoyer, charger et ranger votre rasoir
Braun.
12 Prise électrique
13 Bouton de déverrouillage pour remplacer la
cartouche
14 Plots de contact avec le rasoir
15 Affichage sur le Clean&Charge
15a Affichage des fonctions
16 Bouton de mise en marche
17 Cartouche de nettoyage
Installation de la station Clean&Charge (cf fig. D)
• Retirez le film protégeant la zone d’affichage sur le
Clean&Charge.
• Raccordez l’appareil avec le cordon d’alimentation
(10) branché sur la prise (12) à une prise électrique
secteur.
• Appuyez sur le bouton de déverrouillage (13) à
l’arrière du Clean&Charge pour faire remonter le
boîtier supérieur.
• Mettre en place la cartouche de nettoyage (17) en
gardant l’appareil sur une surface plane et stable
(ex : une table).
• Retirez avec précaution l’opercule de la cartouche.
• Introduire la cartouche dans son logement.
• Refermer lentement l’appareil en abaissant le
boîtier supérieur.
Mise en charge du rasoir dans la station
Clean&Charge (cf fig. D)
Mettre en place le rasoir avec la tête de rasage vers
le bas dans le bac de nettoyage.
Important : le rasoir doit être sec et propre de
tous résidus de mousse ou de savon !
Les plots de contacts (7) au dos du rasoir s’aligne-
ront avec les plots de contact (14) du système auto-
nettoyant. Mettre le rasoir dans la bonne position.
Un bip vous confirme que le rasoir est correctement
positionné dans la station. La charge commencera
automatiquement.
Modèle 5090cc: La station Clean&Charge analyse
le niveau de propreté. Le niveau est indiqué par
les indicateurs du programme de nettoyage
sur
l’affichage du Clean&Charge (15). Pour plus de
détails, voir le chapitre « Programme de nettoyage »
ci-dessous.
Nettoyage (cf fig. D)
Quand l’indicateur de nettoyage s’éclaire sur le
rasoir, mettre le rasoir dans la station Clean&Charge,
la tête libre et vers le bas et face avant du rasoir vers
soi (avec le Verrou coulissant de blocage de tête
vers le bas).
Programme de nettoyage
5090cc : Le niveau de propreté sera analysé et le
voyant du programme sélectionné s’éclairera.
Nettoyage court économique
Nettoyage normal
Nettoyage intensif
5070cc/5050cc : Un programme de nettoyage stan-
dard est inclus.
Démarrer le nettoyage automatique
Démarrez le programme de nettoyage en appuyant
sur le bouton de mise en marche (16). Si aucun
voyant des programmes ne s’allume (Clean&Charge
passe en mode stand-by après environ 10 minutes),
appuyez sur le bouton une seconde fois. Sinon le
nettoyage ne démarrera pas. Pour de meilleurs
résultats de rasage, nous recommandons le
nettoyage du rasoir après chaque rasage.
Chaque programme de nettoyage consiste en plu-
sieurs cycles durant lesquels le liquide de nettoyage
est pompé dans la cartouche et circule vers la tête
de rasage. Selon le modèle de Clean&Charge et/ou
le modèle sélectionné, le temps de démarrage du
nettoyage peut prendre jusqu’à 3 minutes. Pendant
ce temps, le voyant du programme sélectionné
clignote. Laissez le rasoir dans la station pour le
séchage. Cela prend plusieurs heures pour que
l’humidité s’évapore intégralement, selon les
conditions climatiques. Ensuite, le rasoir est prêt à
être utilisé.
91153345_5090cc_CEE_S6-84.indd 1291153345_5090cc_CEE_S6-84.indd 12 23.08.16 10:3323.08.16 10:33
CSS APPROVED Effective Date 14Sep2016 GMT - Printed 04Jan2017 Page 12 of 84

13
Une fois la procédure de nettoyage et de charge-
ment terminée, tous les voyants lumineux
s’éteignent.
Retirer le rasoir de la station Clean&Charge
(cf fig. E)
Maintenir la station Clean&Charge avec une main et
inclinez légerement le rasoir vers l’avant pour le
retirer.
Cartouche de nettoyage/Remplacement (cf fig. F)
Quand l’indicateur du niveau du liquide
s’éclaire
en rouge en permanence c’est que le niveau de
liquide est bas mais suffisant pour 3 cycles de
nettoyage. Quand le voyant clignote en rouge la
cartouche doit être remplacée, après environ
4 semaines (pour un usage quotidien).
Après avoir appuyé sur le bouton de déverrouillage
(13), du système autonettoyant attendez pendant
quelques secondes avant de retirer la cartouche
usagée pour éviter qu’elle ne goutte. Avant de jeter
la cartouche usagée, assurez-vous de reboucher
les ouvertures en utilisant l’opercule de la nouvelle
cartouche ; La cartouche usagée contient de la
solution de nettoyage salie.
La cartouche de nettoyage hygiénique contient de
l’éthanol et de l’isopropanol (selon le pays – pour
plus de précision, cf. cartouche), qui une fois ouverte
va naturellement s’évaporer doucement dans l’air
environnant.
Chaque cartouche, si elle n’est pas
utilisée quotidiennement, doit être remplacée
environ toutes les 8 semaines pour assurer une
désinfection optimale.
La cartouche de nettoyage contient également des
lubrifiants pour le système de rasage, qui peuvent
laisser les traces sur l’extérieur de la cassette de
rasage et dans le bac de nettoyage de la station
Clean&Charge. Ces marques peuvent être retirées
facilement en frottant délicatement avec un tissu
humide.
Accessoires
Braun vous recommande de changer la cassette de
rasage tous les 18 mois pour conserver la perfor-
mance maximum de votre rasoir.
Disponible auprès de votre revendeur ou des
centres service agréés Braun :
• Cassette de rasage : 52S/52B
• Cartouche de liquide nettoyant Clean&Charge :
CCR
• Lotion de nettoyage Braun Shaver
Respect de l’environnement
Ce produit contient des batteries rechar-
geables et/ou des déchets électriques
recyclables. Afin de protéger l’environne-
ment, ne jetez jamais l’appareil dans les
ordures ménagères a la fin de sa durée de vie.
Remettez-le à votre centre service agréé Braun ou
déposez-le dans des sites de récupération appro-
priés conformément aux réglementations locales
ou nationales en vigueur.
Sujet à toute modification sans préavis.
Voir les spécifications électriques mentionnées sur
l’adaptateur basse tension.
Diagnostic de panne
Problème Raison possible Solution
RASOIR
Odeur déplaisante
provenant de la tête
de rasage.
1. La tête de rasage est
nettoyée avec de l’eau.
2. La cartouche de nettoyage
est utilisée depuis plus de
8 semaines.
1. Quand vous nettoyez la tête de rasage avec de
l’eau, utilisez de l’eau chaude exclusivement et
de temps en temps du savon (sans substance
abrasive). Enlevez la cassette pour la laisser
sécher.
2. Changez la cartouche de nettoyage au minimum
toutes les 8 semaines.
La performance
de la batterie a
considérablement
diminué.
1. La cassette de rasage est
usée ce qui utilise davantage
de puissance à chaque
rasage.
2. La tête de rasage est nettoyée
régulièrement avec de l’eau
mais n’est pas lubrifiée.
1. Remplacer la cassette de rasage.
2. Si le rasoir est nettoyé régulierement avec de
l’eau, appliquez une goutte d’huile sur la grille
une fois par semaine pour la lubrifier.
91153345_5090cc_CEE_S6-84.indd 1391153345_5090cc_CEE_S6-84.indd 13 23.08.16 10:3323.08.16 10:33
CSS APPROVED Effective Date 14Sep2016 GMT - Printed 04Jan2017 Page 13 of 84

14
La performance de
rasage a diminué
considérablement.
1. La cassette de rasage est
usée.
2. Le système de rasage est
encrassé.
1. Remplacer la cassette de rasage.
2. Plongez cassette de rasage dans l’eau chaude
avec une goutte de liquide vaisselle. Puis bien la
rincer et la secouer. Une fois secs, appliquez une
goutte d’huile sur la grille.
L’affichage saute des
segments lors de
l’affichage du niveau
de charge batterie.
La cassette de rasage est usée
ce qui utilise davantage de
puissance à chaque rasage.
– Remplacer la cassette de rasage.
– Huilez régulièrement le système de rasage,
particulièrement quand il est nettoyé à l’eau
exclusivement.
La tête du rasoir est
humide.
1. Le temps de séchage après
un nettoyage automatique
était trop court.
2. L’orifice de retour de la
station Clean&Charge est
bouché.
1. Nettoyez le rasoir directement après un rasage
pour permettre un temps de séchage suffisant.
2. Nettoyez l’orifice avec un cure-dent en bois.
CLEAN&CHARGE STATION
Le nettoyage ne
démarre pas quand
vous appuyez sur le
bouton.
1. Le rasoir n’est pas positionné
correctement dans la station
Clean&Charge.
2. La cartouche de nettoyage
ne contient pas assez de
liquide de nettoyage (la LED
clignote rouge).
1. Mettre en place le rasoir dans la station
Clean&Charge et appliquez le contre le fond de la
station (les plots de contact du rasoir doivent être
alignés avec les plots de contact de la station).
2. Introduisez la nouvelle cartouche de nettoyage.
Appuyez de nouveau sur le bouton marche.
Augmentation de la
consommation de
liquide de nettoyage.
L’orifice de retour de la station
Clean&Charge est bouché.
– Nettoyez l’orifice avec un cure-dent en bois.
– Nettoyez régulièrement le bac de nettoyage.
Garantie
Nous accordons une garantie de 2 ans sur ce produit, à partir de la date d’achat.
Pendant la durée de la garantie, Braun prendra gratuitement à sa charge la réparation des vices de
fabrication ou de matière en se réservant le droit de décider si certaines pièces doivent être réparées ou si
l’appareil lui-même doit être échangé.
Cette garantie s’étend à tous les pays où cet appareil est commercialisé par Braun ou son distributeur
exclusif.
Cette garantie ne couvre pas : les dommages occasionnés par une utilisation inadéquate, l’usure normale
(par exemple, grille et bloc-couteaux) ainsi que les défauts d’usures qui ont un effet négligeable sur la
valeur ou l’utilisation de l’appareil. Cette garantie devient caduque si des réparations ont été effectuées par
des personnes non agréées par Braun et si des pièces de rechange ne provenant pas de Braun ont été
utilisées.
Pour toute réclamation intervenant pendant la période de garantie, retournez ou rapportez l’appareil ainsi
que l’attestation de garantie à votre revendeur ou à un Centre Service Agréé Braun.
Veuillez vous référer à www.service.braun.com ou appeler le 0 800 944 802 (service consommateurs –
service & appel gratuits) pour connaître le Centre Service Agréé Braun le plus proche de chez vous.
Clause spéciale pour la France
Outre la garantie contractuelle exposée ci-dessus, nos clients bénéficient de la garantie légale des vices
caches prévue aux articles 1641 et suivants du Code civil.
91153345_5090cc_CEE_S6-84.indd 1491153345_5090cc_CEE_S6-84.indd 14 23.08.16 10:3323.08.16 10:33
CSS APPROVED Effective Date 14Sep2016 GMT - Printed 04Jan2017 Page 14 of 84

15
Polski
Nasze produkty są zaprojektowane tak, aby spełniać
najwyższe standardy jakości, funkcjonalności i wzor-
nictwa. Dziękujemy za zaufanie do jakości Brauna
i mamy nadzieję, że będą Państwo zadowoleni ze
swojej nowej golarki Braun.
Prosimy o przeczytanie poniższej instrukcji
w całości, zawiera ona informacje dotyczące
bezpieczeństwa. Instrukcję należy zachować.
Ostrzeżenie
Urządzenie zostało wyposażone w
specjalny przewód, który zintegrowano
z bezpiecznym zasilaczem bardzo
niskiego napięcia. Nie wolno wymieniać
ani przerabiać jego żadnej części, w
przeciwnym razie istnieje ryzyko pora-
żenia prądem elektrycznym.
Należy używać wyłącznie kabla dostar-
czonego wraz z urządzeniem.
Jeśli urządzenie jest oznakowane
492 można je używać z
kablem oznaczonym symbolem
492-XXXX.
Golarkę można czyścić pod
bieżącą wodą.
Przed rozpoczęciem czyszczenia
w wodzie golarkę należy odłączyć
od zasilania.
Tylko model 5040s w&d:
Urządzenie można czyścić pod
bieżącą wodą i stosować w
wannie lub pod prysznicem. Ze
względów bezpieczeństwa może
być obsługiwane tylko bezprze-
wodowo.
Nie należy się golić w przypadku uszko-
dzenia folii lub przewodu.
To urządzenie może być używane przez
dzieci w wieku od 8 lat i powyżej oraz
przez osoby o ograniczonej zdolności
fi zycznej, czuciowej lub psychicznej lub
nieposiadające doświadczenia i wiedzy,
jeśli znajdują się pod nadzorem lub
zapoznały się z instrukcją bezpiecznego
użytkowania urządzenia i zrozumiały ist-
niejące zagrożenia. Dzieci nie mogą
bawić się urządzeniem. Czyszczenie i
konserwacja urządzenia nie może być
wykonana przez dzieci chyba że są one
starsze niż 8 lat i nadzorowane.
Butelka oleju (dołączana do wybra-
nych modeli)
Trzymać z dala od dzieci. Nie połykać.
Nie stosować do oczu. Zutylizować po
opróżnieniu.
Stacja czyszcząco-ładująca (mode-
le 5090cc/5070cc/5050cc)
Aby zapobiec wyciekowi płynu czysz-
czącego, należy upewnić się, że stacja
czyszcząco-ładująca znajduje się na
płaskiej powierzchni. Gdy wkład czysz-
czący jest zainstalowany, nie należy jej
przechylać, gwałtownie przesuwać lub
przenosić w inne miejsce, ponieważ płyn
czyszczący może wylać się z wkładu.
Nie należy umieszczać stacji w szafce
łazienkowej ani ustawiać na polerowanej
lub lakierowanej powierzchni.
Wkład zawiera wysoce łatwopalną ciecz,
więc należy trzymać ją z dala od źródeł
zapłonu. Nie wystawiać na bezpośrednie
działanie promieni słonecznych i nie
trzymać w pobliżu palących się papie-
rosów ani nie przechowywać nad
kaloryferem.
Nie należy ponownie napełniać
wkładów i należy używać tylko
oryginalnych wkładów firmy Braun.
Golarka
1 Kaseta z folią i ostrzami
2 Przyciski zwalniające kasetę
3 Przełącznik MultiHeadLock
4 Przełącznik wł./wył.
5 Wyświetlacz golarki
6 Trymer do długich włosów
7 Styki golarka-stacja
8a Przycisk zwalniający trymer do długich włosów
8b Numer modelu golarki
9 Gniazdo zasilania golarki
91153345_5090cc_CEE_S6-84.indd 1591153345_5090cc_CEE_S6-84.indd 15 23.08.16 10:3323.08.16 10:33
CSS APPROVED Effective Date 14Sep2016 GMT - Printed 04Jan2017 Page 15 of 84

16
10 Specjalny zestaw przewodów (kształt może
być różny)
11a Szczotka
11b Sztywne etui podróżne*
11c Zatyczka ochronna*
* nie we wszystkich modelach
Pierwsze użycie i ładowanie
Przed pierwszym użyciem należy podłączyć golarkę
do gniazdka elektrycznego za pomocą specjalnego
kabla (10).
Informacje dotyczące ładowania i podstawowej
obsługi
• Całkowite naładowanie zapewnia do 45 minut
bezprzewodowego golenia. Czas ten może się
różnić w zależności od zarostu oraz temperatury
otoczenia.
• Zalecana temperatura otoczenia podczas ładowania
wynosi 5–35 °C. Akumulator może nie naładować
się prawidłowo lub wcale się nie naładować
w skrajnie niskich lub wysokich temperaturach.
Zalecana temperatura przechowywania oraz golenia
wynosi 15–35 °C.
• Nie wolno przez dłuższy czas wystawiać urządzenia
na działanie temperatur wyższych niż 50 °C.
• Od podłączenia golarki do gniazda elektrycznego
do zaświecenia się wyświetlacza może upłynąć
kilka minut.
Wyświetlacz golarki
Stan naładowania
Na wyświetlaczu golarki (5) widoczny jest stan
naładowania akumulatora.
Podczas ładowania: Symbol akumulatora miga.
(5090cc: miga odpowiedni segment akumulatora).
Całkowite naładowanie (golarka jest podłączona do
gniazda elektrycznego): Symbol akumulatora
zaświeci się na kilka sekund. (5090cc: wszystkie
segmenty symbolu akumulatora zaświecą się na
kilka sekund).
Niski stan naładowania
Gdy stan naładowania akumulatora będzie niski,
kontrolka niskiego stanu naładowania zaświeci
się na czerwono. Użytkownik powinien być w stanie
dokończyć golenie. Przy wyłączaniu golarki sygnał
dźwiękowy przypomni o niskim stanie naładowania.
Stan czyszczenia
(tylko modele 5090cc/5070cc/5050cc)
Wskaźnik czyszczenia
świeci się, gdy konieczne
jest wyczyszczenie golarki w stacji czyszcząco-
ładującej.
Blokada podróżna
Symbol blokady świeci się, gdy golarka jest
zablokowana, w celu uniknięcia przypadkowego
uruchomienia silnika (np. podczas przechowywania
w walizce).
Użytkowanie golarki (rys. A)
Aby uruchomić golarkę naciśnij przycisk wł./wył. (4).
Wskazówki dotyczące idealnego golenia
W celu uzyskania najlepszych rezultatów firma
Braun zaleca stosowanie się do trzech prostych
zasad:
1. Gol się zawsze przed umyciem twarzy.
2. Zawsze trzymaj golarkę prostopadle (pod kątem
90°) do skóry.
3. Naciągnij skórę i gol zarost przeciwnie do
kierunku wzrostu.
Przełącznik MultiHeadLock (blokada głowicy)
W celu ogolenia trudno dostępnych miejsc
(np. pod nosem) należy przesunąć przełącznik
MultiHeadLock (3) w dół, aby zablokować głowicę
golarki. Głowicę można zablokować w pięciu
położeniach. Aby zmieniać położenie, należy
przesuwać ją do przodu i do tyłu kciukiem i palcem
wskazującym. Głowica automatycznie przeskoczy
do następnego położenia.
Modele 5090cc/5070cc/5050cc:
w celu przeprowadzenia automatycznego czyszcze-
nia za pomocą stacji czyszcząco-ładującej należy
zwolnić blokadę głowicy.
Trymer do długich włosów
W celu podstrzyżenia baków, wąsów lub brody należy
nacisnąć przycisk zwalniający (8a) i przesunąć
trymer do długich włosów (6) w górę.
Golenie z użyciem przewodu (tylko modele
5090cc/5070cc/5050cc/5030s/5020s)
Jeśli w golarce zabraknie zasilania (urządzenie
rozładuje się), można golić się również po podłącze-
niu jej do gniazda elektrycznego za pomocą spe-
cjalnego zestawu przewodów.
Blokada podróżna
• Aktywacja: golarkę można zablokować, naciskając
przełącznik wł./wył. (4) przez 3 sekundy. Zostanie
to potwierdzone sygnałem dźwiękowym oraz
pojawieniem się symbolu na wyświetlaczu.
Następnie wyświetlacz wyłączy się.
• Dezaktywacja: golarkę można odblokować,
ponownie naciskając przełącznik wł./wył. przez
3 sekundy.
Ręczne czyszczenie golarki (rys. B/C)
Czyszczenie pod bieżącą wodą
• Włączyć golarkę (bezprzewodowo) i płukać
głowicę pod bieżącą ciepłą wodą aż wszystkie
pozostałości zostaną usunięte. Można także
użyć mydła w płynie bez substancji ściernych.
Spłukać pianę i pozwolić golarce popracować
przez kilka sekund.
91153345_5090cc_CEE_S6-84.indd 1691153345_5090cc_CEE_S6-84.indd 16 23.08.16 10:3323.08.16 10:33
CSS APPROVED Effective Date 14Sep2016 GMT - Printed 04Jan2017 Page 16 of 84

17
• Następnie wyłączyć golarkę, nacisnąć przyciski
zwalniające (2), aby wyjąć blok ostrzy (1) i pozosta-
wić do wyschnięcia.
• Jeśli golarka jest regularnie czyszczona pod
bieżącą wodą, raz w tygodniu należy zaaplikować
kroplę lekkiego oleju maszynowego na wierzch
bloku ostrzy.
Tylko model 5040s w&d: Golarkę należy czyścić
każdorazowo po zastosowaniu pianki.
Czyszczenie za pomocą szczoteczki
• Wyłączyć golarkę. Wyjąć blok ostrzy (1) i ostukać
go na płaskiej powierzchni. Za pomocą szczo-
teczki oczyścić wewnętrzną powierzchnię głowicy
obrotowej. Nie czyścić bloku ostrzy szczoteczkę,
ponieważ może to spowodować jego uszkodzenie!
Automatyczna stacja czyszcząco-
ładująca (Clean&Charge)
tylko modele 5090cc/5070cc/5050cc
Stacja czyszcząco-ładująca służy do czyszczenia,
ładowania, smarowania, dezynfekowania i przecho-
wywania golarki Braun.
12 Gniazdo zasilania stacji
13 Przycisk zwalniający do wymiany wkładu
14 Styki stacja-golarka
15 Wyświetlacz stacji czyszcząco-ładującej
15a Kontrolka stanu
16 Przycisk uruchamiania
17 Wkład czyszczący
Instalacja stacji czyszcząco-ładującej (rys. D)
• Zdejmij folię ochronną z wyświetlacza stacji
czyszcząco-ładującej.
• Podłącz specjalny zestaw przewodów (10) do
gniazda zasilania stacji (12) i do gniazda elektrycz-
nego.
• Naciśnij przycisk zwalniający (13) na tylnej stronie
stacji czyszcząco-ładującej, aby unieść obudowę.
• Połóż wkład czyszczący (17) na płaskiej, stabilnej
powierzchni (np. na stole).
• Ostrożnie zdejmij pokrywę z wkładu.
• Wsuń wkład do podstawy stacji od tylnej strony, aż
wskoczy na miejsce.
• Powoli zamknij obudowę, popychając ją w dół aż
do zablokowania.
Ładowanie golarki za pomocą stacji
czyszcząco-ładującej (rys. D)
Włóż golarkę do stacji czyszczącej głowicą w dół.
Ważne: golarka musi być sucha, bez piany i
resztek mydła!
Styki (7) znajdujące się z tyłu golarki muszą zrównać
się ze stykami (14) na stacji. Ustaw golarkę w prawi-
dłowym położeniu.
Prawidłowe umieszczenie golarki w stacji zostanie
potwierdzone sygnałem dźwiękowym. Ładowanie
rozpocznie się automatycznie.
Model 5090cc: stacja czyszcząco-ładująca analizuje
stan higieniczny. Stan jest sygnalizowany za pomocą
wskaźników programu czyszczącego na wyświetlaczu
stacji czyszcząco-ładującej (15). Więcej informacji
można znaleźć poniżej w rozdziale «Programy
czyszczenia».
Czyszczenie golarki (rys. D)
Gdy na wyświetlaczu golarki zaświeci się wskaźnik
czyszczenia, należy włożyć urządzenie do stacji
czyszcząco-ładującej głowicą w dół, tak aby
widoczna była przednia część (zwolniona blokada
głowicy/wyrównane styki/sygnał dźwiękowy).
Programy czyszczenia
5090cc: po przeanalizowaniu stanu higienicznego
zaświeci się jedna z poniższych kontrolek programu.
czyszczenie krótkie ekonomiczne
normalny poziom czyszczenia
czyszczenie intensywne
5070cc/5050cc: dostępny jest jeden standardowy
program czyszczenia.
Uruchamianie czyszczenia automatycznego
Aby rozpocząć proces czyszczenia, naciśnij przycisk
uruchamiania (16). Jeśli kontrolka stanu (15a) nie
świeci się (stacja czyszcząco-ładująca przełącza się
w tryb gotowości po około 10 minutach), naciśnij
przycisk uruchamiania dwukrotnie. W przeciwnym
razie czyszczenie nie rozpocznie się. W celu
uzyskania najlepszych rezultatów golenia
zalecamy czyszczenie po każdym goleniu.
Każdy program czyszczenia składa się z kilku
cykli, w których głowica golarki jest przepłukiwana
płynem czyszczącym. W zależności od modelu stacji
czyszcząco-ładującej i/lub wybranego programu
czyszczenie może potrwać do 3 minut. W tym czasie
kontrolka stanu miga. Należy pozostawić golarkę
w stacji do wyschnięcia. Na wyparowanie pozostałej
wilgoci potrzeba kilku godzin, w zależności od
warunków klimatycznych. Po tym czasie golarka
jest gotowa do użytku.
Po ukończeniu procedury czyszczenia i ładowania
wszystkie kontrolki wyłączą się.
Wyjmowanie golarki ze stacji czyszcząco-
ładującej: (rys. E)
Przytrzymaj stację czyszcząco-ładującą jedną ręką i
lekko przechyl golarkę do przodu, aby ją odłączyć.
Wymiana wkładu czyszczącego (rys. F)
Gdy wskaźnik poziomu
zacznie stale świecić na
czerwono, oznacza to, że ilość płynu pozostała we
wkładzie wystarczy jeszcze na około 3 cykli.
Gdy wskaźnik poziomu miga na czerwono,
91153345_5090cc_CEE_S6-84.indd 1791153345_5090cc_CEE_S6-84.indd 17 23.08.16 10:3323.08.16 10:33
CSS APPROVED Effective Date 14Sep2016 GMT - Printed 04Jan2017 Page 17 of 84

18
konieczna jest wymiana wkładu — co około
4 tygodnie (przy codziennym używaniu).
Po naciśnięciu przycisku zwalniającego (13) w celu
otwarcia obudowy odczekaj kilka sekund przed
wyjęciem zużytego wkładu, aby płyn nie kapał.
Przed wyrzuceniem zużytego wkładu pamiętaj o
zamknięciu jego otworów za pomocą pokrywy
nowego wkładu, ponieważ w zużytym wkładzie
znajduje się skażony płyn czyszczący.
Czysty wkład czyszczący zawiera etanol lub
izopropanol (zob. specyfikacja wkładu), który po
otwarciu będzie w sposób naturalny powoli
odparowywał. Każdy wkład, jeśli nie jest używany
codziennie, należy wymieniać po około 8 tygo-
dniach, aby zapewnić optymalną dezynfekcję.
Wkład czyszczący zawiera również środki smarne
dla systemu golenia, które mogą pozostawiać ślady
na zewnętrznej ramie folii i w komorze czyszczenia
stacji czyszcząco-ładującej. Ślady te można łatwo
usunąć przez delikatne przetarcie wilgotną szmatką.
Dodatki
W celu utrzymania maksymalnej sprawności golarki
firma Braun zaleca wymianę kasety z folią i ostrzami
co 18 miesięcy.
Części są dostępne u dystrybutora lub w punktach
serwisowych firmy Braun:
• Kaseta z folią i ostrzami: 52S/52B
• Wkład czyszczący do stacji czyszcząco-ładującej:
CCR
• Spray czyszczący do golarek Braun
Uwaga dotycząca środowiska
Ten symbol oznacza, że zużytego sprzętu
nie można wyrzucać łącznie z odpadami
socjalnymi. Produkt zawiera akumulatory i/
lub recyklowalne odpady elektryczne. W celu
ochrony środowiska, zużyty produkt należy zostawić
w jednym z punktów zbiórki zużytego sprzętu
elektrycznego i elektronicznego.
Wkład czyszczący można wyrzucić razem z odpa-
dami domowymi.
Może ulec zmianie bez uprzedzenia.
W celu uzyskania specyfikacji elektrycznych, patrz
nadruk na zestawie zasilającym.
Rozwiązywanie problemów
Problem Możliwa przyczyna Rozwiązanie
GOLARKA
Nieprzyjemny zapach
z głowicy golarki.
1. Głowica golarki jest
czyszczona przy użyciu
wody.
2. Wkład czyszczący jest
używany dłużej niż 8 tygodni.
1. W przypadku czyszczenia głowicy golarki samą
wodą używaj gorącej wody, a od czasu do czasu
mydła w płynie (bez substancji ściernych).
Zdemontuj kasetę z folią i ostrzami, aby mogła
wyschnąć.
2. Wymieniaj wkład czyszczący przynajmniej co
8 tygodni.
Wydajność
akumulatora
znacznie spadła.
1. Folia i ostrza są zużyte, co
wiąże się z większym
poborem energii podczas
każdego golenia.
2. Głowica golarki jest
regularnie czyszczona wodą,
ale nie jest smarowana.
1. Wymień kasetę z folią i ostrzami na nową.
2. Jeśli golarka jest często czyszczona wodą,
raz w tygodniu nakładaj kroplę lekkiego oleju
maszynowego na górną część folii, aby ją
nasmarować.
Wydajność golenia
znacznie spadła.
1. Folia i ostrza są zużyte.
2. Mechanizm golarki jest
zapchany.
1. Wymień kasetę z folią i ostrzami na nową.
2. Namocz kasetę z folią i ostrzami w gorącej
wodzie z kroplą płynu do mycia naczyń.
Następnie dokładnie ją wypłucz i wytrząśnij
wodę. Po wysuszeniu nałóż na folię kroplę
lekkiego oleju maszynowego.
Segmenty akumula-
tora na wyświetlaczu
są pomijane, a
pojemność akumula-
tora spada.
Folia i ostrza są zużyte, co
wiąże się z większym poborem
energii podczas każdego
golenia.
– Wymień kasetę z folią i ostrzami na nową.
– Regularnie smaruj mechanizm golarki,
szczególnie wówczas, gdy jest czyszczony
wyłącznie wodą.
91153345_5090cc_CEE_S6-84.indd 1891153345_5090cc_CEE_S6-84.indd 18 23.08.16 10:3323.08.16 10:33
CSS APPROVED Effective Date 14Sep2016 GMT - Printed 04Jan2017 Page 18 of 84

19
Głowica golarki jest
wilgotna.
1. Czas suszenia po automa-
tycznym czyszczeniu był zbyt
krótki.
2. Odpływ stacji czyszcząco-
ładującej jest zablokowany.
1. Czyść golarkę bezpośrednio po goleniu, aby
miała wystarczająco dużo czasu na wyschnięcie.
2. Oczyść odpływ za pomocą drewnianej
wykałaczki.
STACJA CZYSZCZĄCO-ŁADUJĄCA
Czyszczenie nie
rozpoczyna się po
naciśnięciu przycisku
uruchamiania.
1. Golarka nie została prawi-
dłowo umieszczona w stacji
czyszcząco-ładującej.
2. We wkładzie czyszczącym
jest za mało płynu
czyszczącego (wyświetlacz
miga na czerwono).
1. Włóż golarkę do stacji czyszcząco-ładującej i
dociśnij ją do tylnej ścianki stacji (styki golarki
muszą zrównać się ze stykami stacji).
2. Włóż nowy wkład czyszczący. Naciśnij ponownie
przycisk uruchamiania.
Zwiększone zużycie
płynu czyszczącego.
Odpływ stacji czyszcząco-
ładującej jest zablokowany.
– Oczyść odpływ za pomocą drewnianej wykałaczki.
– Regularnie wycieraj zbiornik do czysta.
Warunki gwarancji
1. Procter & Gamble International Operation SA, z
siedzibą w Route de St-Georges 47, 1213 Petit
Lancy 1 w Szwajcarii, gwarantuje sprawne
działanie sprzętu w okresie 24 miesięcy od daty
jego wydania Konsumentowi. Ujawnione w tym
okresie wady będą usuwane bezpłatnie przez
autoryzowany punkt serwisowy, w terminie 14
dni od daty dostarczenia sprzętu do
autoryzowanego punktu serwisowego.
2. Konsument może wysłać sprzęt do naprawy do
najbliżej znajdującego się autoryzowanego
punktu serwisowego lub skorzystać z
pośrednictwa sklepu, w którym dokonał zakupu
sprzętu. W takim wypadku termin naprawy
ulegnie wydłużeniu o czas niezbędny do
dostarczenia i odbioru sprzętu.
3. Konsument powinien dostarczyć sprzęt w
opakowaniu należycie zabezpieczonym przed
uszkodzeniem. Uszkodzenia spowodowane
niedostatecznym zabezpieczeniem sprzętu nie
podlegają naprawom gwarancyjnym. Naprawom
gwarancyjnym nie podlegają także inne
uszkodzenia powstałe w następstwie
okoliczności, za które Gwarant nie ponosi
odpowiedzialności, w szczególności zawinione
przez Pocztę Polską lub firmy kurierskie.
4. Niniejsza gwarancja jest ważna jedynie z
dokumentem zakupu i obowiązuje w każdym
kraju, w którym, to urządzenie jest
rozprowadzane przez jednostkę organizacyjną
firmy Procter & Gamble lub upoważnionego
przez nią dystrybutora.
5. Dokument zakupu musi być opatrzony datą i
numerem oraz określać nazwę i model sprzętu.
6. Okres gwarancji przedłuża się o czas od
zgłoszenia wady lub uszkodzenia do naprawy
sprzętu i zwrotnego postawienia go do
dyspozycji Konsumenta.
7. Naprawa gwarancyjna nie obejmuje czynności
przewidzianych w instrukcji, do wykonania
których, Konsument zobowiązany jest we
własnym zakresie i na własny koszt.
8. Ewentualne oczyszczenie sprzętu dokonywane
jest na koszt Konsumenta według cennika
danego autoryzowanego punktu serwisowego i
nie będzie traktowane jako naprawa
gwarancyjna, chyba, że oczyszczenie jest
niezbędne do usunięcia wady w ramach
świadczeń objętych niniejszą gwarancją i nie
stanowi czynności, o których mowa w p. 7.
9. Gwarancją nie są objęte:
a) mechaniczne uszkodzenia sprzętu
spowodowane w czasie jego użytkowania lub
w czasie dostarczania sprzętu do naprawy;
b) uszkodzenia i wady wynikłe na skutek:
– używania sprzętu do celów innych niż
osobisty użytek;
– niewłaściwego lub niezgodnego z
instrukcją użytkowania, konserwacji,
przechowywania lub instalacji;
– używania niewłaściwych materiałów
eksploatacyjnych;
– napraw dokonywanych przez
nieuprawnione osoby; stwierdzenie faktu
takiej naprawy lub samowolnego otwarcia
sprzętu powoduje utratę gwarancji;
– przeróbek, zmian konstrukcyjnych lub
używania do napraw nieoryginalnych
części zamiennych firmy Braun;
– części szklane, żarówki oświetlenia;
– ostrza i folie do golarek, wymienne
końcówki do szczoteczek elektrycznych i
irygatorów oraz materiały eksploatacyjne.
10. Niniejsza gwarancja na sprzedany towar
konsumpcyjny nie wyłącza, nie ogranicza ani nie
zawiesza uprawnień Kupującego wynikających z
przepisów o rękojmi za wady rzeczy sprzedanej.
91153345_5090cc_CEE_S6-84.indd 1991153345_5090cc_CEE_S6-84.indd 19 23.08.16 10:3323.08.16 10:33
CSS APPROVED Effective Date 14Sep2016 GMT - Printed 04Jan2017 Page 19 of 84

20
Česk
Naše produkty splňují nejvyšší standardy v oblasti
kvality, funkčnosti a designu. Děkujeme, že důvěřu-
jete kvalitě našich produktů, a doufáme, že si nový
holicí strojek Braun oblíbíte.
Tyto pokyny si důkladně prostudujte, jelikož
obsahují bezpečnostní informace. Ponechejte
si je pro potřebu do budoucna.
Varování
Přístroj je dodáván se zvláštním kabe-
lem s integrovaným bezpečnostním
zdrojem napájení, jenž vyžaduje velmi
nízké napětí. Nepokoušejte se žádnou
jeho část vyměnit nebo narušit, jinak
hrozí riziko úrazu elektrickým proudem.
Používejte pouze zvláštní kabel dodaný
s přístrojem.
V případě, že spotřebič je označen
492, můžete jej použít s
libovolným napájecím Braun napájení
kódovaných 492-XXXX.
Holicí strojek je možné čistit
proudem kohoutkové vody.
Před zahájením čištění vodou
odpojte holicí strojek od zdroje
napájení.
Pouze modely 5040s w&d:
Tento přístroj je možné čistit prou-
dem kohoutkové vody a používat
ve vaně nebo ve sprše. Z bezpeč-
nostních důvodů jej lze používat
jen tehdy, když je jeho kabel
odpojen.
Pokud jsou kabel nebo holicí fólie poško-
zené, s přístrojem se neholte.
Tento přístroj mohou používat děti ve
věku od 8 let a osoby se sníženými
fyzickými, smyslovými nebo duševními
schopnostmi nebo bez patřičných zku-
šeností a znalostí, pokud jim byl zajištěn
dohled nebo pokud jim byly poskytnuty
pokyny týkající se bezpečného použí-
vání spotřebiče a pokud chápou souvi-
sející rizika. Děti by si s přístrojem
neměly hrát. Děti by neměly provádět
čištění a uživatelskou údržbu, pokud
nejsou starší 8 let a pokud nemají
zajištěn dohled.
Olejová lahvička (není součástí
každého modelu)
Uchovávejte mimo dosah dětí. Nepoly-
kejte. Zabraňte kontaktu s očima.
Po vyprázdnění řádně zlikvidujte.
Stanice Clean&Charge (modely
5090cc/5070cc/5050cc)
Chcete-li zabránit úniku čisticí kapaliny,
stanici Clean&Charge je nutné umístit
na plochý povrch. Pokud připojíte čisticí
kazetu, stanici žádným způsobem
nenaklánějte, neprovádějte s ní náhlé
pohyby, ani ji nepřenášejte, jinak se
čisticí kapalina může z kazety vylít.
Neumisťujte stanici do zrcadlové
skříňky, ani na leštěný nebo lakovaný
povrch.
Čisticí kazeta obsahuje vysoce hořlavou
kapalinu, takže ji udržujte dále od všeho,
co by ji mohlo zapálit. Nevystavujte ji
přímému slunečnímu světlu nebo ciga-
retovému kouři, ani ji nepokládejte na
nebo nad radiátor.
Kazetu nedoplňujte a používejte
pouze originální náhradní kazety
Braun.
Holicí strojek
1 Kazeta fólie a řezačky
2 Tlačítka uvolnění kazety
3 Přepínač MultiHeadLock
4 Přepínač zapnuto/vypnuto
5 Displej holicího strojku
6 Zastřihovač dlouhých chloupků
7 Kontakty holicího strojku se stanicí
8a Tlačítko uvolnění zastřihovače dlouhých
chloupků
8b Číslo modelu holicího strojku
9 Patice napájení holicího strojku
10 Speciální kabel (provedení se může lišit)
11a Kartáč
11b Pevné cestovní pouzdro*
11c Ochranný kryt*
* ne u všech modelů
91153345_5090cc_CEE_S6-84.indd 2091153345_5090cc_CEE_S6-84.indd 20 23.08.16 10:3323.08.16 10:33
CSS APPROVED Effective Date 14Sep2016 GMT - Printed 04Jan2017 Page 20 of 84
Pagina se încarcă...
Pagina se încarcă...
Pagina se încarcă...
Pagina se încarcă...
Pagina se încarcă...
Pagina se încarcă...
Pagina se încarcă...
Pagina se încarcă...
Pagina se încarcă...
Pagina se încarcă...
Pagina se încarcă...
Pagina se încarcă...
Pagina se încarcă...
Pagina se încarcă...
Pagina se încarcă...
Pagina se încarcă...
Pagina se încarcă...
Pagina se încarcă...
Pagina se încarcă...
Pagina se încarcă...
Pagina se încarcă...
Pagina se încarcă...
Pagina se încarcă...
Pagina se încarcă...
Pagina se încarcă...
Pagina se încarcă...
Pagina se încarcă...
Pagina se încarcă...
Pagina se încarcă...
Pagina se încarcă...
Pagina se încarcă...
Pagina se încarcă...
Pagina se încarcă...
Pagina se încarcă...
Pagina se încarcă...
Pagina se încarcă...
Pagina se încarcă...
Pagina se încarcă...
Pagina se încarcă...
Pagina se încarcă...
Pagina se încarcă...
Pagina se încarcă...
Pagina se încarcă...
Pagina se încarcă...
Pagina se încarcă...
Pagina se încarcă...
Pagina se încarcă...
Pagina se încarcă...
Pagina se încarcă...
Pagina se încarcă...
Pagina se încarcă...
Pagina se încarcă...
Pagina se încarcă...
Pagina se încarcă...
Pagina se încarcă...
Pagina se încarcă...
Pagina se încarcă...
Pagina se încarcă...
Pagina se încarcă...
Pagina se încarcă...
Pagina se încarcă...
-
 1
1
-
 2
2
-
 3
3
-
 4
4
-
 5
5
-
 6
6
-
 7
7
-
 8
8
-
 9
9
-
 10
10
-
 11
11
-
 12
12
-
 13
13
-
 14
14
-
 15
15
-
 16
16
-
 17
17
-
 18
18
-
 19
19
-
 20
20
-
 21
21
-
 22
22
-
 23
23
-
 24
24
-
 25
25
-
 26
26
-
 27
27
-
 28
28
-
 29
29
-
 30
30
-
 31
31
-
 32
32
-
 33
33
-
 34
34
-
 35
35
-
 36
36
-
 37
37
-
 38
38
-
 39
39
-
 40
40
-
 41
41
-
 42
42
-
 43
43
-
 44
44
-
 45
45
-
 46
46
-
 47
47
-
 48
48
-
 49
49
-
 50
50
-
 51
51
-
 52
52
-
 53
53
-
 54
54
-
 55
55
-
 56
56
-
 57
57
-
 58
58
-
 59
59
-
 60
60
-
 61
61
-
 62
62
-
 63
63
-
 64
64
-
 65
65
-
 66
66
-
 67
67
-
 68
68
-
 69
69
-
 70
70
-
 71
71
-
 72
72
-
 73
73
-
 74
74
-
 75
75
-
 76
76
-
 77
77
-
 78
78
-
 79
79
-
 80
80
-
 81
81


Braun 5090cc, 5070cc, 5050cc, 5040s wet&dry, 5030s, 5020s, Series 5 Manual de utilizare
- Categorie
- Aparate de bărbierit
- Tip
- Manual de utilizare
în alte limbi
Lucrări înrudite
-
Braun 9095cc wet&dry, 9090cc, 9075cc, 9070cc, 9050cc, 9040s wet&dry, 9030s, Series 9 Manual de utilizare
-
-
-
-
-
-
Braun MG5050 WET&DRY Manual de utilizare
-
-
-