Avermedia AVerTV Hybrid Volar HX Quick Installation Manual
- Categorie
- Tunere TV pentru computer
- Tip
- Quick Installation Manual
Acest manual este potrivit și pentru

A
A
V
V
e
e
r
r
T
T
V
V
H
H
y
y
b
b
r
r
i
i
d
d
V
V
o
o
l
l
a
a
r
r
H
H
X
X
/
/
A
A
V
V
e
e
r
r
T
T
V
V
V
V
o
o
l
l
a
a
r
r
A
A
X
X
Quick Installation Guide
English
Việt nam
Eesti
Lietuvių
Română
ภาษาไทย

European Community Compliance Statement
Class B (EMC)
This product is herewith confirmed to comply with the requirements set
out in the Council Directives on the Approximation of the laws of the
Member States relating to Electromagnetic Compatibility Directive
2004/108/EC.
DISCLAIMER
No warranty or representation, either expressed or implied, is made with respect to the
contents of this documentation, its quality, performance, merchantability, or fitness for a
particular purpose. Information presented in this documentation has been carefully
checked for reliability; however, no responsibility is assumed for inaccuracies. The
information contained in this documentation is subject to change without notice.
In no event will AVerMedia be liable for direct, indirect, special, incidental, or
consequential damages arising out of the use or inability to use this product or
documentation, even if advised of the possibility of such damages.
TRADEMARKS
AVerMedia is registered trademarks of AVerMedia TECHNOLOGIES, Inc. IBM PC is
a registered trademark of International Business Machines Corporation. Macintosh is a
registered trademark of Apple Computer, Inc. Microsoft is a registered trademark and
Windows is a trademark of Microsoft Corporation. All other products or corporate
names mentioned in this documentation are for identification and explanation purposes
only, and may be trademarks or registered trademarks of their respective owners.
COPYRIGHT
© 2007 by AVerMedia TECHNOLOGIES, Inc. All rights reserved. No part of this
publication may be reproduced, transmitted, transcribed, stored in a retrieval system, or
translated into any language in any form by any means without the written permission of
AVerMedia TECHNOLOGIES, Inc.
THE MARK OF CROSSED-OUT WHEELED BIN INDICATES THAT
THIS PRODUCT MUST NOT BE DISPOSED OF WITH YOUR OTHER
HOUSEHOLD WASTE. INSTEAD, YOU NEED TO DISPOSE OF THE
WASTE EQUIPMENT BY HANDING IT OVER TO A DESIGNATED
COLLECTION POINT FOR THE RECYCLING OF WASTE ELECTRICAL AND
ELECTRONIC EQUIPMENT. FOR MORE INFORMATION ABOUT WHERE TO
DROP OFF YOUR WASTE EQUIPMENT FOR RECYCLING, PLEASE
CONTACT YOUR HOUSEHOLD WASTE DISPOSAL SERVICE OR THE SHOP
WHERE YOU PURCHASED THE PRODUCT.

Quick Installation Guide
ENG-1
English Việt nam Eesti Lietuvių Română ภาษาไทย
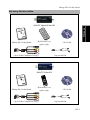
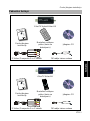
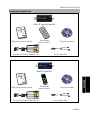
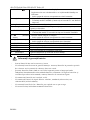
Package Contents
AVerTV Hybrid Volar HX
A
A
V
V
e
e
r
r
T
T
V
V
H
H
y
y
b
b
r
r
i
i
d
d
V
V
o
o
l
l
a
a
r
r
H
H
X
X
A
A
V
V
e
e
r
r
T
T
V
V
V
V
o
o
l
l
a
a
r
r
A
A
X
X
Q
u
i
c
k
I
n
s
t
a
l
l
a
t
i
o
n
G
u
i
d
e
E
n
g
l
i
s
h
D
e
u
t
s
c
h
F
r
a
n
ç
a
i
s
I
t
a
l
i
a
n
o
E
s
p
a
ñ
o
l
P
o
r
t
u
g
u
ê
s
N
e
d
e
r
l
a
n
d
s
Ε
λ
λ
η
ν
ι
κ
ή
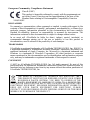
Quick Installation Guide
Remote control
(Batteries included)
Installation CD
S-Video/ Composite 2-in-1 Cable FM Radio Antenna
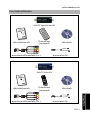
AVerTV Volar AX
A
A
V
V
e
e
r
r
T
T
V
V
H
H
y
y
b
b
r
r
i
i
d
d
V
V
o
o
l
l
a
a
r
r
H
H
X
X
A
A
V
V
e
e
r
r
T
T
V
V
V
V
o
o
l
l
a
a
r
r
A
A
X
X
Q
u
i
c
k
I
n
s
t
a
l
l
a
t
i
o
n
G
u
i
d
e
E
n
g
l
i
s
h
D
e
u
t
s
c
h
F
r
a
n
ç
a
i
s
I
t
a
l
i
a
n
o
E
s
p
a
ñ
o
l
P
o
r
t
u
g
u
ê
s
N
e
d
e
r
l
a
n
d
s
Ε
λ
λ
η
ν
ι
κ
ή
C
H
C
H
D
I
S
P
L
A
Y
C
H
R
T
N
S
N
A
P
S
H
O
T
1
6
C
H
P
R
E
V
▲
▲
▲
▲
F
U
L
L
S
C
R
E
E
N
D
R
A
G
S
O
U
R
C
E
E
N
T
E
R
M
U
T
E
A
U
D
I
O
T
E
L
E
T
E
X
T
L
R
E
P
G
P
I
P
M
E
N
U
V
O
L
V
O
L
▲
▲
▲
▲
▲
▲
▲
▲
▲
▲
R
M
-
J
X
Quick Installation Guide
Remote control
(Batteries included)
Installation CD
S-Video/ Composite 2-in-1 Cable FM Radio Antenna

AVerTV Hybrid Volar HX/AVerTV Volar AX
ENG-2
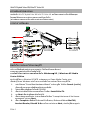
System Requirements
System requirements are described in detail on the package box. Before installing AVerTV
Hybrid Volar HX/AVerTV Volar AX, verify that your PC meets the described requirements.
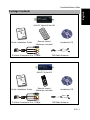
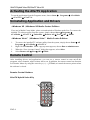
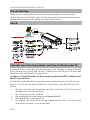
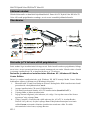
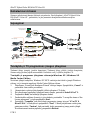
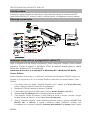
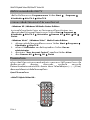
Making the Connections
AUDIO(L)
AUDIO(R)
S-Video/ Composite
2-in-1 Cable
OUT
PC
USB Port
Mini Antenna
TV Antenna(75 )Ω
FM Radio Antenna
S-Video Cable
(not supplied)
Video Cable
(not supplied)
VCR
Camcorder
Example:
Video Game
Audio Cable
(not supplied)
Audio Cable
(not supplied)
Notebook
OR
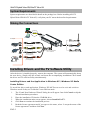
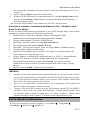
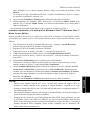
Installing Drivers and the TV Software Utility
After the device is installed properly, turn on the computer. The system will automatically detect
the new device. Simply skip the wizard, and insert the accompanying installation CD to install
the driver and TV software utility simultaneously.
Installing Drivers and the Application in Windows XP / Windows XP Media
Center Edition
To install the driver and application, Windows XP MCE users need to exit and switch to
Windows mode if they are in Media Center Edition mode.
1. The “Found New Hardware Wizard” dialog box will appear. Just click Cancel to skip the
Wizard installation procedures.
2. Place the installation CD into the CD-ROM drive.
3. When the installation main screen appears, choose Install AVerTV.
4. Click Next to continue the installation process.
5. Read the license agreement and if you agree to the terms, select “I accept the terms of the
license agreement” and then click Next.

Quick Installation Guide
ENG-3
English Việt nam Eesti Lietuvių Română ภาษาไทย
6. Choose Complete to install all the necessary softwares, including AVerTV 6, Acrobat
Reader, DirectX 9.0c and Driver. Then click Next. For advanced users, it is
recommended to choose Custom to select the software you want. To choose a different
destination folder, click Browse.
7. In the “InstallShield Wizard” dialog box, if you are instructed to restart your computer,
select Yes.
8. Then click Finish to complete the installation.
9. For Windows XP MCE users, if you want to use the Media Center as the TV application,
start Media Center and follow the on-screen instruction to complete the configuration.
* We recommend to exit the Media Center mode before activating the AVerTV 6.
Installing Drivers and the Application in Windows Vista™/ Windows Vista™
Media Center Edition
To install the driver and application, Windows Vista™ MCE users need to exit and switch
to Windows mode if they are in Media Center Edition mode.
1. The “Found New Hardware Wizard” dialog box will appear. Just click Cancel to skip
the Wizard installation procedures.
2. Place the installation CD into the CD-ROM drive.
3. When the “AutoPlay” dialog box appears, select Run Autorun.exe.
4. When the installation main screen appears, choose Install AVerTV.
5. If the “User Account Control” dialog box appears, select Allow to continue the
process.
6. Click Next to continue the installation process.
7. Read the license agreement and if you agree to the terms, select “I accept the terms of
the license agreement” and then click Next.
8. Choose Complete to install all the necessary softwares, including AVerTV 6,
Acrobat Reader, DirectX 9.0c and Driver. Then click Next. For advanced users, it
is recommended that you choose Custom to select the software you want. To choose
a different destination folder, click Browse.
9. Then click Finish to complete the installation.
NOTE:
1. If DirectX 9.0c or above is not installed in your system, usually the installation CD will
automatically install it during the process of installation. Make sure your system has
DirectX 9.0c or above installed so that the TV software utility can function properly.
2. If your system is not equipped with Acrobat Reader, the installation wizard will
automatically be called up during the process of installation.
3. The product does not come with a software DVD decoder. If users can playback DVD or
MPEG-2 video files on the computer, there is no need to install a DVD decoder. However, if the
Decoded Error message appears on the screen, please install the compatible DVD decoder via
the
Windows
®
XP Media Center Edition Partners site.

AVerTV Hybrid Volar HX/AVerTV Volar AX
ENG-4
Activating the AVerTV Application
To run the application from the Programs menu, choose Start Æ Programs Æ AVerMedia
Æ AVerTV 6 Æ AVerTV 6.
Uninstalling Application and Drivers
--Windows XP / Windows XP Media Center Edition--
If you are in Media Center Mode, please exit and switch to Windows mode first. To remove the
installed TV software utility from the system, simply choose Start Æ Programs Æ
AVerMedia Æ AVerTV 6 Æ Uninstaller Æ Remove All Æ Next Æ OK Æ Finish.
--Windows Vista™ / Windows Vista™ Media Center Edition--
1. To remove the installed TV software utility from the system, simply choose Start Æ All
Programs Æ AVerMedia Æ AVerTV 6.
2. Right Click Uninstaller. When a pop-up menu appears, choose Run as administrator.
3. When the “User Account Control” dialog box appears, select Allow.
4. Select Remove All Æ NextÆ OK Æ Finish.
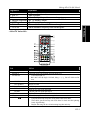
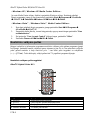
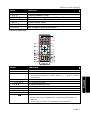
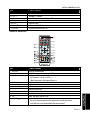
Remote Control
After installing drivers and applications, you can use a remote control to turn on/off the
programs, select channels, adjust volume and so on. In addition, the remote control can function
as a Remote Mouse by using the arrow keys (←↑→↓ÉÊÌË) to control the mouse pointer when
the software is closed.
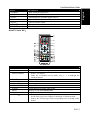
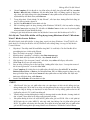
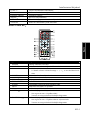
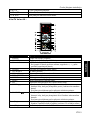
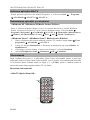
Remote Control Buttons
AVerTV Hybrid Volar HX:
1
2
3
4
5
6
7

Quick Installation Guide
ENG-5
English Việt nam Eesti Lietuvių Română ภาษาไทย
Button Description
1. POWER Turn on/off the application
2. VOL +/- Volume up/down.
3. Source Switch between available signal sources.
4. Numeric Buttons Select a TV channel.
5. MUTE Turn on/off the sound.
6. CH ▲/▼ Go up or down to the next active channel.
7. CH RTN Go to the previously selected channel.
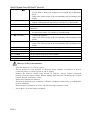
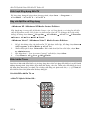
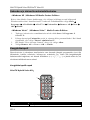
AVerTV Volar AX:
Button Description
1. POWER Turn on/off the application
2. SOURCE Switch between available signal sources.
3. Numeric Buttons - Select a TV channel.
- Under the 16-Channel preview mode, use↑↓← → to highlight the
intended channel.
4. CH RTN Go to the previously selected channel.
5. 16-CH PREV 16-Channel Preview.
6. VOL▲/▼ Volume up/down.
7. FULL SCREEN Display TV in full screen.
8. AUDIO Switch between available audio modes.
9. MENU Display or hide the Control Panel.
10. PIP Display or hide the PIP window.
11. SLEEP - Go to the next file in the playlist.
- Set the time to put your computer in Stand By or Hibernate mode.
- Jump to the Teletext page of the corresponding color according to this
button.

AVerTV Hybrid Volar HX/AVerTV Volar AX
ENG-6
12. WAKE UP - Go to the previous file in the playlist.
- Set the time to bring your computer out of Stand By or Hibernate
mode.
- Jump to the Teletext page of the corresponding color according to this
button.
13. ■ (Stop) - End the Playback or recording.
- End the TimeShift mode and return to real-time TV or Radio mode.
14. ► (Play) Play the last recorded or played file.
15. ● (Record) Switch to DVR mode and record the current program or video into your
hard drive.
16. TIMESHIFT /PAUSE - Freeze the playback.
- Switch from real-time TV or Radio to TimeShift mode.
17. (Forward) - Advance the playback.
- Jump to the Teletext page of the corresponding color according to this
button.
18. (Rewind) - Rewind the playback.
- Jump to the Teletext page of the corresponding color according to this
button.
19. TELETEXT View Teletext/MHEG-5/ Closed Caption information.
20. EPG Launch the Electronic Program Guide. (DVB-T only)
21. MUTE Turn on/off the sound.
22. CH ▲/▼ Go up or down to the next active channel.
23. SNAPSHOT Capture the on-screen image to a bitmap file.
24. DISPLAY Display information.
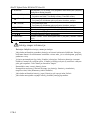
Battery Safety Information:
- Store the batteries in a cool dry place.
- Do not dispose of used batteries in domestic waste. Dispose of batteries at special
collection points or return to point of sale if applies.
- Remove the batteries during long periods of non-use. Always remove exhausted
batteries from the remote control. Battery leakage and corrosion can damage this remote
control, dispose of batteries safely.
- Do not mix old and new batteries.
- Do not mix different types of batteries: alkaline, standard (carbon-zinc) or rechargeable
(nickel-cadmium).
- Do not dispose of batteries in a fire. The batteries may explode or leak.
- Never short circuit the battery terminals.

Hướng dẫn Cài đặt Nhanh
VIT-1
English Việt nam Eesti Lietuvių Română ภาษาไทย
Nội dung Gói sản phẩm
AVerTV Hybrid Volar HX
A
A
V
V
e
e
r
r
T
T
V
V
H
H
y
y
b
b
r
r
i
i
d
d
V
V
o
o
l
l
a
a
r
r
H
H
X
X
A
A
V
V
e
e
r
r
T
T
V
V
V
V
o
o
l
l
a
a
r
r
A
A
X
X
Q
u
i
c
k
I
n
s
t
a
l
l
a
t
i
o
n
G
u
i
d
e
E
n
g
l
i
s
h
D
e
u
t
s
c
h
F
r
a
n
ç
a
i
s
I
t
a
l
i
a
n
o
E
s
p
a
ñ
o
l
P
o
r
t
u
g
u
ê
s
N
e
d
e
r
l
a
n
d
s
Ε
λ
λ
η
ν
ι
κ
ή
Hướng dẫn Cài đặt Nhanh
Điều khiển Từ xa
(gồm cả pin)
CD Cài đặt
Cáp S-Video/Composite 2 trong 1 Ăng-ten đài FM
AVerTV Volar AX
A
A
V
V
e
e
r
r
T
T
V
V
H
H
y
y
b
b
r
r
i
i
d
d
V
V
o
o
l
l
a
a
r
r
H
H
X
X
A
A
V
V
e
e
r
r
T
T
V
V
V
V
o
o
l
l
a
a
r
r
A
A
X
X
Q
u
i
c
k
I
n
s
t
a
l
l
a
t
i
o
n
G
u
i
d
e
E
n
g
l
i
s
h
D
e
u
t
s
c
h
F
r
a
n
ç
a
i
s
I
t
a
l
i
a
n
o
E
s
p
a
ñ
o
l
P
o
r
t
u
g
u
ê
s
N
e
d
e
r
l
a
n
d
s
Ε
λ
λ
η
ν
ι
κ
ή
C
H
C
H
D
I
S
P
L
A
Y
C
H
R
T
N
S
N
A
P
S
H
O
T
1
6
C
H
P
R
E
V
▲
▲
▲
▲
F
U
L
L
S
C
R
E
E
N
D
R
A
G
S
O
U
R
C
E
E
N
T
E
R
M
U
T
E
A
U
D
I
O
T
E
L
E
T
E
X
T
L
R
E
P
G
P
I
P
M
E
N
U
V
O
L
V
O
L
▲
▲
▲
▲
▲
▲
▲
▲
▲
▲
R
M
-
J
X
Hướng dẫn Cài đặt Nhanh
Điều khiển Từ xa
(gồm cả pin)
CD Cài đặt
Cáp S-Video/Composite 2 trong 1 Ăng-ten đài FM

AVerTV Hybrid Volar HX/AVerTV Volar AX
VIT-2
Yêu cầu Hệ thống
Những yêu cầu về hệ thống được mô tả chi tiết trong hộp sản phẩm. Tröôùc khi caøi ñaët
AVerTV Hybrid Volar HX/AVerTV Volar AX, haõy kieåm tra ñeå baûo ñaûm laø maùy tính caù
nhaân cuûa baïn ñaùp öùng ñöôïc nhöõng yeâu caàu nhö ñaõ moâ taû.
Kết nối
Caøi ñaët caùc Trình ñieàu khieån vaø Tieän ích Phaàn meàm TV.
Sau khi thiết bị được cài đặt đúng cách, khởi động máy vi tính. Hệ thống sẽ tự động dò tìm thiết
bị mới. Dễ dàng bỏ qua chương trình “Wizard”, và thiết lập sự cài đặt CD phụ để cài đặt bộ phận
điều khiển và tiện ích phần mềm TV cùng một lúc.
Cài đặt các Trình Điều khiển và Ứng dụng trong Windows
®
XP / Windows XP
Media Center Edition
Để thiết lập bộ phận điều khiển và ứng dụng, người sử dụng Windows XP MCE cần phải
thoát ra và chuyển đổi đến chế độ Windows nếu chúng đang ở trong chế độ Media Center
Edition.
1. Hộp thoại “Tìm thấy trình Wizard Phần cứng Mới” sẽ xuất hiện. Chỉ cần bấm Bỏ để bỏ
qua những thủ tục cài đặt trình Wizard.
2. Đưa CD cài đặt vào trong ổ CD-ROM.
3. Khi màn hình thiết lập chính xuất hiện, chọn Install AVerTV.
4. Nhấn Next để tiếp tục tiến trình cài đặt.
5. Đọc sự đồng ý bản quyền và nếu bạn đồng ý những điều kiện, chọn “ I accept the terms
of the license agreement” và sau đó nhấn Next.

Hướng dẫn Cài đặt Nhanh
VIT-3
English Việt nam Eesti Lietuvių Română ภาษาไทย
6. Chọn Complete để cài đặt tất cả các phần mềm cần thiết, bao gồm AVerTV 6, Acrobat
Reader, DirectX 9.0c và Driver. Sau đó nhấn Next. Đối với những người sử dụng cao
cấp, được giới thiệu bằng cách chọn Custom để chọn phần mềm mà bạn muốn. Để chọn
một danh mục đến khác nhau, nhấn Browse.
7. Trong hộp thoại “Hoàn thành Cài đặt Wizard”, nếu bạn được hướng dẫn khởi động lại
máy vi tính của mình, chọn Có.
8. Sau đó bấm Kết thúc để hoàn thành cài đặt.
9. Đối với những người sử dụng chương trình Windows XP MCE, nếu bạn muốn sử dụng
Media Center như ứng dụng TV, bắt đầu với Media Center và theo sau là sự hướng dẫn
trên màn hình để hoàn thành cấu hình.
* Chúng tôi giới thiệu để thoát ra khỏi chế độ Media Center trước khi kích hoạt AVerTV 6.
Cài đặt các Trình Điều khiển và Ứng dụng trong Windows Vista™/ Windows
Vista™ Media Center Edition
Để thiết lập bộ phận điều khiển và ứng dụng, người sử dụng Windows Vista™ MCE cần
phải thoát ra và chuyển đổi đến chế độ Windows nếu chúng đang ở trong chế độ Media
Center Edition.
1. Hộp thoại “Tìm thấy trình Wizard Phần cứng Mới” sẽ xuất hiện. Chỉ cần bấm Bỏ để bỏ
qua những thủ tục cài đặt trình Wizard.
2. Đưa CD cài đặt vào trong ổ CD-ROM.
3. Khi hộp thoại “AutoPlay” xuất hiện, chọn Run Autorun.exe.
4. Khi màn hình thiết lập chính xuất hiện, chọn In sta ll AVerT V.
5. Nếu hộp thoại “Use Account Control” xuất hiện, chọn Allow để tiếp tục tiến trình.
6. Nhấn Next để tiếp tục tiến trình cài đặt.
7. Đọc sự đồng ý bản quyền và nếu bạn đồng ý những điều kiện, chọn “ I accept the terms of
the license agreement” và sau đó nhấn Next.
8. Chọn Complete để cài đặt tất cả các phần mềm cần thiết, bao gồm AVe rT V 6 , A cro b at
Reader, DirectX 9.0c và Driver. Sau đó nhấn Next. Đối với những người sử dụng cao cấp,
được giới thiệu bằng cách chọn Custom để chọn phần mềm mà bạn muố
n. Để chọn một
danh mục đến khác nhau, nhấn Browse.
9. Sau đó bấm Kết thúc để hoàn thành cài đặt.
CHÚ Ý:
1. Nếu DirectX 9.0c hay các phần mềm trên còn chưa được cài đặt vào hệ thống của bạn,
thông thường thì CD cài đặt sẽ tự động cài đặt phần mềm này trong quá trình cài đặt. Hãy
đảm bảo rằng hệ thống của bạn được cài đặt DirectX 9.0 hay những phần mềm trên để
phần mềm tiện ích TV có thể hoạt động tốt.
2. Nếu hệ thống của bạn không được trang bị chương trình Acrobat Reader, chương trình cài
đặt “wizard” được nhắc lại tự động trong quá trình cài đặt.
3. Sản phẩm không đi kèm với một thiết bị phần mềm giải mã DVD. Nếu có thể phát lại
DVD hoặc tập tin video MPEG-2 trên máy tính, bạn không cần cài phần mềm giải mã
DVD. Tuy nhiên, nếu thông báo Decoder Error hiển thị trên màn hình, hãy cài phần mềm
giải mã DVD tương thích qua trang liên kết của Windows
®
XP Media Center Edition.

AVerTV Hybrid Volar HX/AVerTV Volar AX
VIT-4
Kích hoạt Ứng dụng AVerTV
Để chạy ứng dụng từ bảng chọn chương trình, chọn Start → Programs →
AVerMedia → AVerTV 6 → AVerTV 6.
Hủy cài đặt Đĩa và Ứng dụng
--Windows XP / Windows XP Media Center Edition--
Nếu bạn đang ở trong chế độ Media Center, xin vui lòng thoát ra và chuyển đổi đến
chế độ Windows trước. Để gỡ bỏ các phần mềm tiện ích TV đã được thiết lập từ hệ
thống, dễ dàng chọn Start Programs AVerMedia AVerTV 6 Uninstaller
Remove All Next OK Finish
--Windows Vista™ / Windows Vista™ Media Center Edition--
1. Để gỡ bỏ những tiện ích phần mềm TV đã được thiết lập, dễ dàng chọn Start
All Programs AVerMedia AVerTV 6.
2. Nhấn chuột phải chọn Uninstaller. Khi trình đơn bật lên xuất hiện, chọn Run
as administrator.
3. Khi hộp thoại “ User Account Control” xuất hiện, chọn Allow.
4. Chọn Remove All Next OK Finish.
Điều khiển Từ xa
Sau khi cài đặt trình điều khiển và các ứng dụng bạn có thể sử dụng điều khiển từ xa để bật/tắt
những chương trình, chọn kênh, điều chỉnh âm lượng, vân vân. Thêm nữa, điều khiển từ xa có
thể hoạt động như một Con chuột Từ xa bằng cách dùng các phím mũi tên (←↑→↓ÉÊÌË) để
điều khiển con trỏ khi phần mềm đã được đóng lại.
Các Nút Điều khiển Từ xa
--AVerTV Hybrid Volar HX--
1
2
3
4
5
6
7

Hướng dẫn Cài đặt Nhanh
VIT-5
English Việt nam Eesti Lietuvių Română ภาษาไทย
Düğmeleri Açı klama
1.Power Uygulamayı açın/kapatın
2. VOL +/- Sds aç/kapat.
3. Source Mevcut sinyal kaynakları arasında geçiş yapın.
4. Sayısal düğmeler Bir TV kanalını seçer.
5. MUTE Ses Kapatır/Açar.
6. CH ▲/▼ Bir sonraki/önceki aktif TV kanalına gider
7. CH RTN Daha önceden seçilmiş olan kanala gider.
--AVerTV Volar AX--
Nút Mô tả
1. POWER Baät/Taét öùùng duïng
2. SOURCE Chuyeån giöõa caùc nguoàn tín hieäu hieän coù.
3. Các Nút Số
- Chọn một kênh TV.
- Bên dưới chế độ duyệt 16-kênh, dùng ←↑→↓ làm nổi kênh muốn
xem.
- CH RTN
Quay lại kênh đã chọn trước đó.
- 16-CH PREV
Duyệt 16 kênh.
4. VOL▲/▼
Sds aç/kapat.
- FULL SCREEN
Hiển thị Tivi trên toàn màn hình.
- AUDIO
Chuyển giữa các ngôn ngữ sẵn có.
5. MENU Hieån thò hoaëc aån Pa-nen Ñieàu khieån.
6. PIP Hiển thị hoặc giấu cửa sổ hình trong hình.
7. SLEEP
- Chuyeån ñeán teäp tieáp theo trong danh saùch chôi nhaïc.
- Ñaët thôøi gian ñeå maùy tính cuûa baïn ôû cheá ñoä Döï phoøng
hoaëc Nguû ñoâng.
- Chuyển đến trang tin tức với màu tương ứng theo nút này.

AVerTV Hybrid Volar HX/AVerTV Volar AX
VIT-6
8. WAKE UP
- Chuyeån ñeán teäp tröôùc ñoù trong danh saùch chôi nhaïc.
- Ñaët thôøi gian ñeå ñöa maùy tính cuûa baïn ra khoûi cheá ñoä Döï
phoøng hoaëc Nguû ñoâng.
- Chuyển đến trang tin tức với màu tương ứng theo nút này.
9. ■ (Dừng)
- Ngừng Phát lại hay ghi hình.
- Tắt chế độ Chỉnh Giờ và trở về chế độ Tivi hoặc Radio thực tế.
10. ► (Chạy) Chạy tập tin đã ghi hay đã chạy lần trước.
11. ● (Ghi) Chuyển đến chế độ DVR rồi ghi chương trình hay hình ảnh hiện tại vào ổ
đĩa cứng của bạn.
12. TIMESHIFT /PAUSE
- Tạm ngừng phát.
- Chuyển từ chế độ Tivi hoặc Radio thực tế sang chế độ Chỉnh Giờ.
13. (Về phía trước)
- Thöïc hieän vieäc phaùt laïi
- Chuyển đến trang tin tức với màu tương ứng theo nút này.
14. (Tua lại)
- Tua laïi vieäc phaùt laïi
- Chuyển đến trang tin tức với màu tương ứng theo nút này.
15. TELETEXT Hiển thị Teletext/ MHEG-5/ đóng thông tin phụ đề
16. EPG Khôûi chaïy Höôùng daãn Söû duïng Chöông trình Ñieän töû. (Chỉ dùng
cho hệ thống DVB-T)
17. MUTE Bật/tắt âm thanh.
18. CH ▲/▼ Chuyển lên hoặc xuống tới kênh đang phát kế tiếp.
19. SNAPSHOT Sao laïi hình aûnh treân maøn hình baèng teäp aûnh bitmap.
20. DISPLAY Hiển thị thông tin.
Bảo quản và sử dụng pin an toàn:
- Để pin ở nơi khô và mát.
- Không bỏ pin đã sử dụng vào nơi vứt rác trong nhà. Bỏ pin tại các điểm chuyên thu gom
hay trả lại nơi mua pin nếu có thể.
- Tháo bỏ pin không sử dụng trong thời gian dài. Luôn luôn tháo bỏ pin đã dùng hết khỏi
điều khiển từ xa. Pin rò gỉ có thể làm hỏng điều khiển từ xa, vứt bỏ pin một cách an toàn.
- Không dùng chung pin cũ cùng pin mới.
- Không dùng chung các loại pin khác nhau: pin kiềm, pin tiêu chuẩn (carbon-kẽm) hoặc
pin xạc lại được (nickel-cadmium).
- Không vứt pin vào lửa. Pin có thể nổ hoặc bị rò.
- Không bao giờ làm chập mạch các đầu cuối pin.

Installeerimise lühijuhend
ETI-1
English Việt nam Eesti Lietuvių Română ภาษาไทย
Pakendi sisu
AVerTV Hybrid Volar HX
A
A
V
V
e
e
r
r
T
T
V
V
H
H
y
y
b
b
r
r
i
i
d
d
V
V
o
o
l
l
a
a
r
r
H
H
X
X
A
A
V
V
e
e
r
r
T
T
V
V
V
V
o
o
l
l
a
a
r
r
A
A
X
X
Q
u
i
c
k
I
n
s
t
a
l
l
a
t
i
o
n
G
u
i
d
e
E
n
g
l
i
s
h
D
e
u
t
s
c
h
F
r
a
n
ç
a
i
s
I
t
a
l
i
a
n
o
E
s
p
a
ñ
o
l
P
o
r
t
u
g
u
ê
s
N
e
d
e
r
l
a
n
d
s
Ε
λ
λ
η
ν
ι
κ
ή
Installeerimise lühijuhend
Kaugjuhtimispult
(Koos patareidega)
Installeerimise CD
S-Video/Komposiit kaks ühes kaabel FM raadio antenn
AVerTV Volar AX
A
A
V
V
e
e
r
r
T
T
V
V
H
H
y
y
b
b
r
r
i
i
d
d
V
V
o
o
l
l
a
a
r
r
H
H
X
X
A
A
V
V
e
e
r
r
T
T
V
V
V
V
o
o
l
l
a
a
r
r
A
A
X
X
Q
u
i
c
k
I
n
s
t
a
l
l
a
t
i
o
n
G
u
i
d
e
E
n
g
l
i
s
h
D
e
u
t
s
c
h
F
r
a
n
ç
a
i
s
I
t
a
l
i
a
n
o
E
s
p
a
ñ
o
l
P
o
r
t
u
g
u
ê
s
N
e
d
e
r
l
a
n
d
s
Ε
λ
λ
η
ν
ι
κ
ή
C
H
C
H
D
I
S
P
L
A
Y
C
H
R
T
N
S
N
A
P
S
H
O
T
1
6
C
H
P
R
E
V
▲
▲
▲
▲
F
U
L
L
S
C
R
E
E
N
D
R
A
G
S
O
U
R
C
E
E
N
T
E
R
M
U
T
E
A
U
D
I
O
T
E
L
E
T
E
X
T
L
R
E
P
G
P
I
P
M
E
N
U
V
O
L
V
O
L
▲
▲
▲
▲
▲
▲
▲
▲
▲
▲
R
M
-
J
X
Installeerimise lühijuhend
Kaugjuhtimispult
(Koos patareidega)
Installeerimise CD
S-Video/Komposiit kaks ühes kaabel FM raadio antenn

AVerTV Hybrid Volar HX/AVerTV Volar AX
ETI-2
Süsteemi nõuded
Nõuded süsteemile on detailselt kirjeldatud karbil. Enne AVerT V Hyb rid Vol ar HX /AVerT V
Vola r A X kaardi paigaldamist veenduge, et teie arvuti vastab kirjeldatud nõuetele.
Ühendamine
AUDIO(L)
AUDIO(R)
S-Video/Komposiit
kaks ühes kaabel
OUT
Sülearvuti
USB2.0-port
Mini antenn
Teleantenn (75Ω)
FM raadio antenn
S-Video kaabel
(Ei kuulu paketti)
Videokaabel
(Ei kuulu paketti)
Videomakk
Videokaamera
Näide:
Videomäng
Helikaabel
(Ei kuulu paketti)
Helikaabel
(Ei kuulu paketti)
Arvuti
OR
Draiverite ja TV tarkvara utiliidi paigaldamine
Peale seadme õiget installeerimist käivitaga arvuti. Peale kaardi korrektset paigaldamist, lülitage
arvuti sisse. Arvuti operatsioonisüsteem tunneb automaatselt uut seadet. Lihtsalt eirake viisardit
ja sisestage installatsiooni CD, et installeerida driver ja TV tarkvara.
Draiverite ja rakenduse installeerimine Windows XP / Windows XP Media
Center Edition
Driveri ja seadete installeerimiseks peab Windows XP MCE kasutaja Media Center Edition
keskkonnast väljuma ja lülitama arvuti Windowsi tööreziimi.
1. Ekraanile tuleb “Found New Hardware Wizard” dialoogiboks. Kliki installeerimisviisardi
protseduuride vahelejätkamiseks Cancel.
2. Asetage installeerimise CD arvuti CD-ROM-draivi.
3. Vali installi peaekraani ilmudes AVerTV installeerimine (Install AVerTV).
4. Vajutage Next, et jätkata installeerimist.
5. Lugege litsentsi tingimusi ja kui nõustute, siis valige “I accept the terms of the license
agreement” ning vajutage Next.
6. Valige Complete, et installeerida vajalik tarkvara (k.a. AVerTV 6, Acrobat Reader,
DirectX 9.0c ja driver). Seejärel vajutage Next. Edasijõudnud kasutajatel soovitame
valida Custom, mis annab võimaluse installeeritavat tarkvara valida. Et valida
salvestamiseks erinev kaust, vajutage Browse.

Installeerimise lühijuhend
ETI-3
English Việt nam Eesti Lietuvių Română ภาษาไทย
7. Kui teil palutakse “InstllShield Wizard Complete” aknas uuesti käivitada oma arvuti, siis
valige Yes.
8. Seejärel vajutage Finish, et lõpetada installeerimine.
9. Windows XP MCE kasutajad, kes tahavad kasutada TV rakendust Media Center olekus,
peavad käivitama Media Center keskkonna ja järgima ekraanile ilmuvaid juhiseid, et
lõpetada konfigureerimine.
* Me soovitame väljuda Media Center olekust enne AVerTV 6 aktiviseerimist.
Draiverite ja rakenduse installeerimine Windows Vista™/ Windows Vista™
Media Center Edition
Driveri ja seadete installeerimiseks peab Windows Vista™ MCE kasutaja Media Center Edition
keskkonnast väljuma ja lülitama arvuti Windowsi tööreziimi.
1. Ekraanile tuleb “Found New Hardware Wizard” dialoogiboks. Kliki
installeerimisviisardi protseduuride vahelejätkamiseks Cancel.
2. Asetage installeerimise CD arvuti CD-ROM-draivi.
3. Kui ilmub “AutoPlay” aken, siis valige Run Autorun.exe
4. Vali installi peaekraani ilmudes Install AVerTV.
5. Kui ilmub “ User Account Control” aken, siis valige Allow ,et jätkata protsessi.
6. Vajutage Next, et jätkata installeerimist.
7. Lugege litsentsi tingimusi ja kui nõustute, siis valige “I accept the terms of the
license agreement” ning vajutage Next.
8. Valige Complete, et installeerida vajalik tarkvara (k.a. AVerTV 6, Acrobat Reader,
DirectX 9.0c ja driver). Seejärel vajutage Next. Seejärel vajutage Next.
Edasijõudnud kasutajatel soovitame valida Custom, mis annab võimaluse
installeeritavat tarkvara valida. Et valida salvestamiseks erinev kaust, vajutage
Browse.
9. Seejärel vajutage Finish, et lõpetada installeerimine.
MÄRKUS:
1. Juhul kui arvutisse pole installeeritud programmi DirectX 9.0c või selle uuemat versiooni,
siis tavaliselt installeeritakse see automaatselt install-CD-lt installeerimisprotsessi käigus.
Et TV tarkvarautiliit korralikult töötaks, peab arvutisse olema kindlasti installeeritud
DirectX 9.0c või selle programmi uuem versioon
2. Kui teil ei ole installeeritud Acrobat Readerit, siis installatsiooni viisard pakub teile
protsessi käigus automaatselt võimalust seda teha.
3. Tootega ei ole kaasas DVD decoder tarkvara. Kui kasutajad saavad DVD või MPEG-2
videofaile arvutis esitada, siis vajadus DVD-dekooderi installeerimiseks puudub. Juhul
kui ekraanile ilmub veateade Decoded Error, siis palun installeeri ühilduv DVD
dekooder kasutades selleks
Windows
®
XP Media Center Edition Partnerite saiti.
AVerTV rakenduse aktiveerimine
Et käivitada rakendust Programs menüüst, valige Start Æ Programs Æ
AVerMedia Æ AVerTV 6 Æ AVerTV 6.

AVerTV Hybrid Volar HX/AVerTV Volar AX
ETI-4
Rakenduse ja draiverite mahainstalleerimine
--Windows XP / Windows XP Media Center Edition--
Kui te olete Media Center keskkonnas, siis väljuge ja lülitage arvuti kõigepealt
Windows tööreziimi. Installeeritud TV tarkvara eemaldamiseks valige Start Æ
Programs Æ AVerMedia Æ AVerTV 6 Æ Uninstaller Æ Remove All Æ Next Æ
OK Æ Finish.
--Windows Vista™ / Windows Vista™ Media Center Edition--
1. Tarkvara ja draiverite eemaldamiseks tuleb valida Start Æ Programs Æ
AVerTV 6.
2. Liikuge kursoriga Uninstaller peale ja vajutage hiire paremat klahvi. Kui ilmub
rippmenüü, siis valige ”Run as administrator”.
3. Kui ilmub “User Account Control” aken, siis valige Allow.
4. Valige Remove All -> Next -> OK -> Finish.
Kaugjuhtimispult
Pärast draiverite ja rakenduste installeerimist saate kasutada juhtpulti programmide sisse/välja
lülitamiseks, kanalite valimiseks, helitugevuse seadmiseks jne. Lisaks võib kaugjuhtimispult
funktsioneerida kaughiirena, mis kasutab nooleklahve (←↑→↓ ), et juhtida osutit siis, kui ↖↗↘↙
televisiooni utiliidi tarkvara on suletud.
Kaugjuhtimispuldi nupud
AVerTV Hybrid Volar HX:
1
2
3
4
5
6
7
Nupp Kirjeldus
1. POWER Lülitage rakendus sisse/välja

Installeerimise lühijuhend
ETI-5
English Việt nam Eesti Lietuvių Română ภาษาไทย
2. VOL +/- Valjuse suurendamine/vähendamine.
3. Source Vaheta saadaval olevate signaali allikate vahel
4. Numeric Buttons Telekanali valimine.
5. MUTE Heli sisse/välja lülitamine.
6. CH ▲/▼ Üles või alla järgmise aktiivse kanali juurde liikumine.
7. CH RTN Eelnevalt valitud kanali juurde minemine.
AVerTV Volar AX:
Nupp Kirjeldus
1. POWER Lülitage rakendus sisse/välja
2. SOURCE Vaheta saadaval olevate signaali allikate vahel
3. Numeric Buttons
- Telekanali valimine.
- 16-kanali eelvaate režiimis kasutage ← ↑ → ↓, et soovitud kanal esile
tõsta.
4. CH RTN Eelnevalt valitud kanali juurde minemine.
5. 16-CH PREV 16-kanaliline eelvaade.
6. VOL▲/▼ Valjuse suurendamine/vähendamine.
7. FULL SCREEN Kuva TV täisekraanil.
8. AUDIO Ümberlülitus olemasolevate heliolekute vahel.
9. MENU Juhtpaneeli kuvamine või peitmine.
10. PIP Näita või varja PIP akent.
11. SLEEP
- Loendis järgmise faili juurde minemine.
- Sea aeg arvuti oote- või puhkerežiimi.
- Vastava värvusega teleteksti leheküljele hüppamine.
12. WAKE UP
- Loendis järgmise faili juurde minemine.
- Sea aeg arvuti oote- või puhkerežiimist väljatoomiseks.
- Vastava värvusega teleteksti leheküljele hüppamine.

AVerTV Hybrid Volar HX/AVerTV Volar AX
ETI-6
13. ■ (Stopp)
- Taasesituse või salvestamise lõpetamine.
- Lõpeta TimeShift režiim ja naase reaalajas TV või raadio režiimi.
14. ► (Mäng) Viimati salvestatud või mängitud faili mängimine.
15. ● (Salvestamine) Lülitamine videomaki olekusse ja jooksva saate või video salvestamine
kõvakettale.
16. TIMESHIFT /PAUSE
- Taasesituse kinnistamine.
- Lülita reaalaja TV-lt või raadiolt TimeShift režiimile.
17. (Edasi)
- Taasesituse erivalikud.
- Vastava värvusega teleteksti leheküljele hüppamine.
18. (Tagasikerimine)
- Taasesituse tagasikerimine.
- Vastava värvusega teleteksti leheküljele hüppamine.
19. TELETEXT Vaata teleteksti/MHEG-5/suletud subtiitrite informatsiooni.
20. EPG Käivita Elektrooniline telekava. (Ainult DVB-T)
21. MUTE Heli sisse/välja lülitamine.
22. CH ▲/▼ Üles või alla järgmise aktiivse kanali juurde liikumine.
23. SNAPSHOT Ekraanil oleva pildi hõivamine bittrasteri faili.
24. DISPLAY Info kuva kohta.
Info patarei turvalise kasutamise kohta
- Säilitage patareisid jahedas ja kuivas paigas.
- Ärge visake kasutatud patareisid olmeprügi hulka. Viige need spetsiaalsetesse
kogumispunktidesse või tagastage võimaluse korral müüjale.
- Kui te seadet kaua ei kasuta, eemaldage patareid. Eemaldage alati tühjad patareid
kaugjuhtimispuldist. Patarei lekkimine ja rooste võib pulti kahjustada. Hoidke
patareisid turvalises kohas.
- Ärge hoidke vanu ja uusi patareisid läbisegi.
- Ärge hoidke läbisegi erinevat tüüpi patareisid: leeliselisi, standardseid
(süsinik-tsink) ja akusid (nikkel-kaadmium).
- Ärge visake patareisid tulle. Patareid võivad plahvatada või lekkima hakata.
- Ärge kunagi eemaldage patareide otsakinnitusi.
Pagina se încarcă...
Pagina se încarcă...
Pagina se încarcă...
Pagina se încarcă...
Pagina se încarcă...
Pagina se încarcă...
Pagina se încarcă...
Pagina se încarcă...
Pagina se încarcă...
Pagina se încarcă...
Pagina se încarcă...
Pagina se încarcă...
Pagina se încarcă...
Pagina se încarcă...
Pagina se încarcă...
Pagina se încarcă...
Pagina se încarcă...
Pagina se încarcă...
Pagina se încarcă...
Pagina se încarcă...
-
 1
1
-
 2
2
-
 3
3
-
 4
4
-
 5
5
-
 6
6
-
 7
7
-
 8
8
-
 9
9
-
 10
10
-
 11
11
-
 12
12
-
 13
13
-
 14
14
-
 15
15
-
 16
16
-
 17
17
-
 18
18
-
 19
19
-
 20
20
-
 21
21
-
 22
22
-
 23
23
-
 24
24
-
 25
25
-
 26
26
-
 27
27
-
 28
28
-
 29
29
-
 30
30
-
 31
31
-
 32
32
-
 33
33
-
 34
34
-
 35
35
-
 36
36
-
 37
37
-
 38
38
-
 39
39
-
 40
40


Avermedia AVerTV Hybrid Volar HX Quick Installation Manual
- Categorie
- Tunere TV pentru computer
- Tip
- Quick Installation Manual
- Acest manual este potrivit și pentru
în alte limbi
Lucrări înrudite
-
Avermedia AVerTV BoxW7 Super Manual de utilizare
-
-
-
-
-
-
Alte documente
-
Samsung 933SN Manual de utilizare
-
Samsung SBB-SSN Manual de utilizare
-
Samsung PM55F-BC Manual de utilizare
-
-
Samsung PM55H Manual de utilizare
-
Samsung PM49F Manual de utilizare
-
Samsung PH43F Manual de utilizare
-
-
Samsung PM43H Manual de utilizare
-
HP LaserJet Enterprise MFP M725 series Ghid de instalare