Avermedia DVD EZMaker 7 (C039) Manual de utilizare
- Categorie
- Accesorii mixer / robot de bucătărie
- Tip
- Manual de utilizare

C039
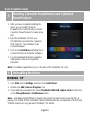
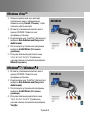
Quick Guide
AVerMedia DVD EZMaker 7
English
Slovenský
Magyar
Slovenščina
Polski
Česky
Български
Pусский
Українська
Türkçe
Hrvatski
繁體中文
Română


European Community Compliance Statement
Class B
This product is herewith confirmed to comply with the requirements set out in the Council Directives on
the Approximation of the laws of the Member States relating to Electromagnetic Compatibility Directive
2004/108/EC.
Responsible manufacturer:
AVerMedia Technologies, Inc.
No. 135, Jian 1st Rd.,Zhonghe Dist., New Taipei City 23585, Taiwan
TEL: +886-2-2226-3630 FAX: +886-2-3234-4842
European Community contact:
AVerMedia Technologies Europe B.V.
Kwartsweg 50, 2665 NN, Bleiswijk, The Netherlands
Technical Support: http://www.avermedia.com/avertv/Support/
FCC NOTICE (Class B)
This device complies with Part 15 of the FCC Rules. Operation is subject to the following two conditions:
(1) this device may not cause harmful interference, and (2) this device must accept any interference
received, including interference that may cause undesired operation.
Federal Communications Commission Statement
NOTE- This equipment has been tested and found to comply with the limits for a Class B digital device, pursuant to Part
15 of the FCC Rules. These limits are designed to provide reasonable protection against harmful interference in a
residential installation. This equipment generates, uses and can radiate radio frequency energy and, if not installed and
used in accordance with the instructions, may cause harmful interference to radio communications. However, there is no
guarantee that interference will not occur in a particular installation. If this equipment does cause harmful interference to
radio or television reception, which can be determined by tuning the equipment off and on, the user is encouraged to try to
correct the interference by one or more of the following measures:
‧ Reorient or relocate the receiving antenna.
‧ Increase the separation between the equipment and receiver.
新增製造商及當地聯絡方式

‧ Connect the equipment into an outlet on a circuit different from that to which the receiver is connected.
‧ Consult the dealer or an experienced radio/television technician for help.
CAUTION ON MODIFICATIONS
To comply with the limits for the Class B digital device, pursuant to Part 15 of the FCC Rules, this device must be installed
in computer equipment certified to comply with the Class B limits. All cables used to connect the computer and peripherals
must be shielded and grounded. Operation with non-certified computers or non-shielded cables may result in interference
to radio or television reception.
Changes and modifications not expressly approved by the manufacturer or registrant of the equipment can void your
authority to operate the equipment under Federal Communications Commission rules.
Responsible manufacturer:
AVerMedia Technologies, Inc.
No. 135, Jian 1st Rd.,Zhonghe Dist., New Taipei City 23585, Taiwan
TEL: +886-2-2226-3630 FAX: +886-2-3234-4842
USA Office contact:
AVerMedia Technologies U.S.A.
47358 Fremont Blvd., Fremont, CA 94538
Technical Support: http://www.avermedia.com/avertv/Support/
ICES-003
CAN ICES-3 (B)/NMB-3(B)
The mark of crossed-out wheeled bin indicates that this product must not be disposed of with your other
household waste. Instead, you need to dispose of the waste equipment by handing it over to a designated
collection point for the recycling of waste electrical and electronic equipment. For more information about
where to drop off your waste equipment for recycling, please contact your household waste disposal service or the
shop where you purchased the product.
新增製造商及當地聯絡方式
新增製造商及當地聯絡方式
Technical Regulations of the Customs Union
TR CU 020/2011
TR CU 004/2011

Disclaimer
All the screen shots in this documentation are only example images. The images may vary depending on the product and
software version. Information presented in this documentation has been carefully checked for reliability; however, no
responsibility is assumed for inaccuracies. The information contained in this documentation is subject to change without
notice.
Copyright
© 2014 by AVerMedia Technologies, Inc. All rights reserved.
No part of this document may be reproduced or transmitted in any form, or by any means (Electronic, mechanical,
photocopy, recording, or otherwise) without prior written permission of AVerMedia Technologies, Inc.
Information in this document is subject to change without notice. AVerMedia Technologies, Inc. reserves the right to
modify, change, improve or enhance its products and to make changes in the content without obligation to notify any
person or organization of such changes. Please visit www.avermedia.com to get the updates of the operation and use of
AVerMedia products.
"AVerMedia" is a trademark and logo of AVerMedia Technologies, Inc. Other trademarks used herein for description
purpose only belong to each of their companies. Made in Taiwan (Expect Accessories).
Picture shown may vary from actual product
公司聲明及版權
©2014 圓剛科技版權所有、轉載必究。
AVerMedia 產品彩盒設計、使用手冊及其內容受到著作權之保護並歸屬於 AVerMedia 所有,非經事先書面同意,嚴格禁
止重製、拍攝、抄寫、翻譯、轉載或以其他紀錄形式(如電磁記錄)儲存本手冊之全部或一部內容。AVerMedia 保留變更或
改善產品規格及設計、零配件 及驅動程式的權利,而無義務知會任何使用者或單位、組織關於此變更或改善。請 至
www.avermedia.com取得本產品相關最新資訊或補充資料。
AVerMedia 是圓剛科技股份有限公司所擁有的商標。其他商標各分屬其他第三方公司所有,且均受商標或著作權等相關法
令保護。彩盒包裝及內附手冊所述產品及配件之示意圖僅供參考,以實際外觀以產品出貨為準。

Quick Installation Guide
English-1
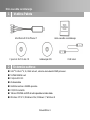
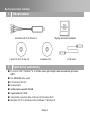
1
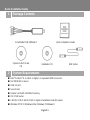
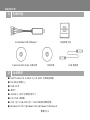
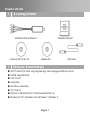
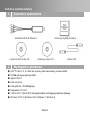
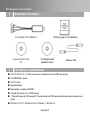
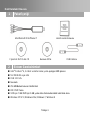
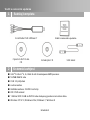
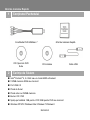
Package Contents
AVerMedia DVD EZMaker 7
Quick Installation Guide
CyberLink DVD Suite
CD
Installation CD
USB Cable
2
System Requirements
Intel
®
Pentium
®
4, 2.4 GHz or higher or equivalent AMD processor.
512 MB RAM or above
USB 2.0 port
Sound card
Graphic card with 256 MB of memory
CD / DVD burner
1 GB for VCD/ 5 GB for DVD or higher of available hard disk space
Windows XP SP2 / Windows Vista / Windows 7/ Windows 8

English-2
423 Dixon Landing Road
Milpitas, CA 95035
Tel: (408)263-3828
Support: (408)942-2121 / (877)774-4543
www.avermedia-usa.com/avertv
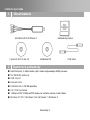
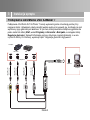
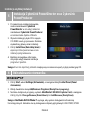
3
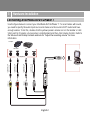
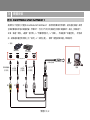
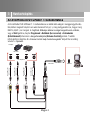
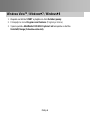
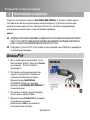
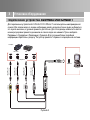
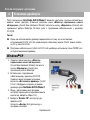
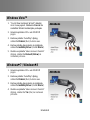
Hardware Installation
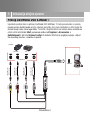
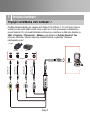
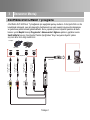
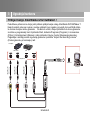
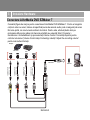
Connecting AVerMedia DVD EZMaker 7
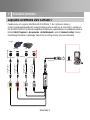
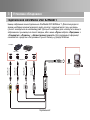
Use the figure below to connect your AVerMedia DVD EZMaker 7. To record video with sound,
you need to specify the audio input source and make sure the sound is NOT muted and have
enough volume. To do this, double-click the yellow speaker volume icon on the taskbar or click
Start, point to Programs > Accessories > Entertainment and then click Volume Control. Refer to
the Volume Control Help Contents and look for “Adjust the recording volume” for more
information.
Example:
Camcorder
VCR
AV Output Port
RCA Cable
(not supplied)
RCA Cable
(not supplied)
RCA Cable
(not supplied)
S-Video Cable
(not supplied)
(Yellow)
(Red)
(White)
USB Cable
USB Port
Computer

Quick Installation Guide
English-3
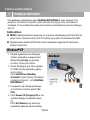
4
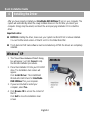
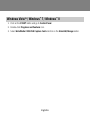
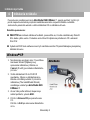
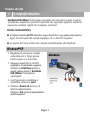
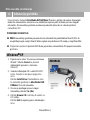
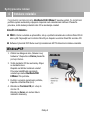
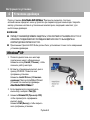
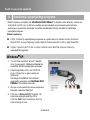
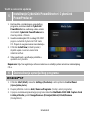
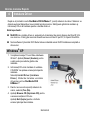
Installing the Driver
After you have properly installed your AVerMedia DVD EZMaker 7, turn on your computer. The
system will automatically detect the newly installed device on the first time you reboot your
computer. Simply skip the wizard, and insert the accompanying installation CD to install the
driver.
Important notice :
BEFORE installing the driver, make sure your system has DirectX 9.0c or above installed.
You can find the latest version of DirectX on CD in the folder DirectX9c.
The CyberLink DVD Suite software must be installed only AFTER the drivers are completely
installed.
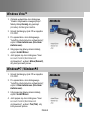
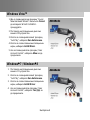
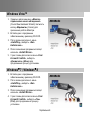
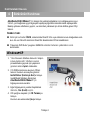
Windows
®
XP
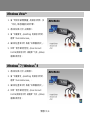
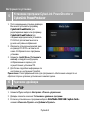
1. The “Found New Hardware Wizard” dialog
box will appear. Just click Cancel to skip
the Wizard installation procedures.
2. Place the Installation CD into your CD-ROM
drive. The installation main screen will
appear.
Click Install Driver. The InstallShield
Wizard will install Drivers for AVerMedia
DVD EZMaker 7 on your computer.
3. If you are instructed to restart your
computer, select Yes.
4. Click Browse CD to access the content of
the CD.
Click Exit to close the installation main
screen.

English-4
423 Dixon Landing Road
Milpitas, CA 95035
Tel: (408)263-3828
Support: (408)942-2121 / (877)774-4543
www.avermedia-usa.com/avertv
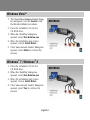
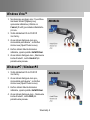
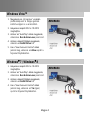
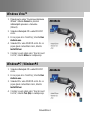
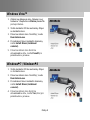
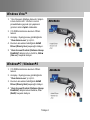
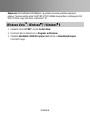
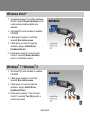
Windows Vista
TM
1. The “Found New Hardware Wizard” dialog
box will appear. Just click Cancel to skip
the Wizard installation procedures.
2. Place the installation CD into the
CD-ROM drive.
3. When the “AutoPlay” dialog box
appears, select Run Autorun.exe.
4. When the installation main screen
appears, choose Install Driver.
5. If the “User Account Control” dialog box
appears, select Allow to continue the
process.
Windows
®
7 / Windows
®
8
1. Place the installation CD into the
CD-ROM drive.
2. When the “AutoPlay” dialog box
appears, select Run Autorun.exe.
3. When the installation main screen
appears, choose Install Driver.
4. If the “User Account Control” dialog box
appears, select Yes to continue the
process.

Quick Installation Guide
English-5
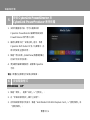
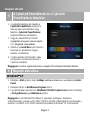
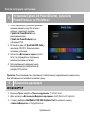
5
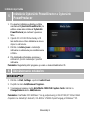
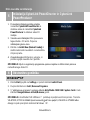
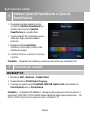
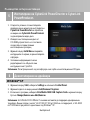
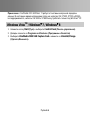
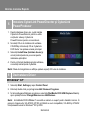
Installing CyberLink PowerDirector and CyberLink
PowerProducer
1. After you have completed installing the
driver, you can install CyberLink
PowerDirector to edit the video or install
CyberLink PowerProducer to make movie
disc.
2. Eject the installation CD from your
CD-ROM drive and insert the CyberLink
DVD Suite CD. The installation main
screen will appear.
3. Click on the Install Now and follow the on
screen instruction to install the softwares.
4. For more detailed information regarding
editing please refer to the Cyberlink
instruction.
Note: The software registration key is on the back of the installation CD cover.
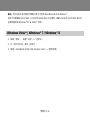
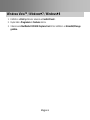
6
Uninstalling the Driver
Windows
®
XP
1. Click Start, point to Settings, and then click Control Panel.
2. Double-click Add / Remove Programs icon.
3. In the add/remove programs list, select AVerMedia C039 USB Capture Card and then click
on the Change/Remove or Add/Remove button.
Note: AVerMedia DVD EZMaker 7 requires the system to support isochronous transfer. At
present, VIA KT400, KT333 and K266A chipset motherboards are not supported; VIA 8235 and
VT6202 chipsets can only operate on Windows
®
XP & 2000.

English-6
423 Dixon Landing Road
Milpitas, CA 95035
Tel: (408)263-3828
Support: (408)942-2121 / (877)774-4543
www.avermedia-usa.com/avertv
Windows Vista
TM
/ Windows
®
7 / Windows
®
8
1. Click on the START button and go to Control Panel.
2. Double-click Programs and Features icon.
3. Select AVerMedia C039 USB Capture Card and click on the Uninstall/Change button.

快速安裝手冊
繁體中文-1
1
包裝內容
AVerMedia DVD EZMaker 7
快速安裝手冊
CyberLink DVD Suite 安裝光碟
安裝光碟
USB 連接線
2
系統需求
Intel
®
Pentium
®
4, 2.4 GHz 以上或 AMD 同等級處理器
512 MB 記憶體以上
USB 2.0 埠
音效卡
256MB 以上顯示記憶體的顯示卡
CD / DVD 燒錄機
VCD 至少 1 GB/ DVD 至少 5 GB 或更多的硬碟空間
Windows XP SP2 / Windows Vista / Windows 7/ Windows 8

繁體中文-2
423 Dixon Landing Road
Milpitas, CA 95035
Tel: (408)263-3828
Support: (408)942-2121 / (877)774-4543
www.avermedia-usa.com/avertv
3
硬體安裝
連接 AVerMedia DVD EZMaker 7
請參照以下連接方式連接 AVerMedia DVD EZMaker 7。欲錄製有聲音的影像時,請先選定該輸入音源
並確認非靜音狀態或音量適當,步驟如下:您的工作列中有個黃色的喇叭音量圖示,請在上面點兩下,
或者,點選「開始」>選擇「程式集」>「附屬應用程式」>「娛樂」,然後選擇「音量控制」。更多資
訊,請點選音量控制視窗上的「說明」>「說明主題」,參閱「調整錄音音量」章節說明。
Example:
Camcorder
VCR
AV Output Port
RCA Cable
(not supplied)
RCA Cable
(not supplied)
RCA Cable
(not supplied)
S-Video Cable
(not supplied)
(Yellow)
(Red)
(White)
USB Cable
USB Port
Computer
範例:
攝錄影機
錄放影機
影像傳輸線
(不提供)
黃
音源線
(不提供)
音源線
(不提供)
S 端子線
(不提供)
紅
白
USB 連接線
USB 埠
電腦

快速安裝手冊
繁體中文-3
4
安裝驅動程式
完成硬體安裝後,重新開機,系統將會偵測到剛才安裝的新硬體。請略過「尋找新增硬體精靈」的
安裝步驟,直接放入安裝光碟片以同時安裝驅動程式。
重要訊息 :
安裝驅動程式之前,請確定您的系統有安裝 DirectX 9.0c 或以上的版本。您可以在安裝光碟
「DirectX9c」資料夾中找到最新版本的 DirectX 程式。
您必須先完成安裝驅動程式之後,方可安裝 CyberLink DVD Suite 應用程式。
Windows
®
XP
1. 當「尋找新增硬體精靈」對話框出現時,按
「取消」略過精靈的安裝步驟。
2. 將安裝光碟片放入光碟機中。當安裝主畫面
出現,點選「安裝驅動程式」。
3. 如果系統指引你重新開機,請選擇「是」。
4. 點選「瀏覽光碟」(Browse CD)可讀取光碟中
的資料。點選「離開」可關閉安裝主畫面。

繁體中文-4
423 Dixon Landing Road
Milpitas, CA 95035
Tel: (408)263-3828
Support: (408)942-2121 / (877)774-4543
www.avermedia-usa.com/avertv
Windows Vista
TM
1. 當「尋找新增硬體精靈」對話框出現時,按
「取消」略過精靈的安裝步驟。
2. 將安裝光碟片放入光碟機中。
3. 當「自動播放」(AutoPlay) 對話框出現時,
選擇「Run Autorun.exe」。
4. 當安裝主畫面出現,點選「安裝驅動程式」。
5. 如果「使用者帳號控制」(User Account
Control)對話框出現,請選擇「允許」(Allow)
繼續安裝流程。
Windows
®
7 / Windows
®
8
1. 將安裝光碟片放入光碟機中。
2. 當「自動播放」(AutoPlay) 對話框出現時,
選擇「Run Autorun.exe」。
3. 當安裝主畫面出現,點選「安裝驅動程式」。
4. 如果「使用者帳號控制」(User Account
Control)對話框出現,請選擇「允許」(Allow)
繼續安裝流程。

快速安裝手冊
繁體中文-5
5
安裝 CyberLink PowerDirector 及
CyberLink PowerProducer 應用軟體
1. 安裝完驅動程式後,您可以選擇安裝
CyberLink PowerDirector 編輯影像或安裝
PowerProducer 製作影片光碟。
2. 請將光碟機中的「安裝光碟」退出,再將
CyberLink DVD Suite CD 放入光碟機中。此
時出現安裝主畫面出現。
3. 點選「現在安裝」(Install Now)再遵循螢幕上
的指示完成所有安裝。
4. 更多關於編輯相關說明,請參閱 Cyberlink
手冊。
備註: 軟體的註冊碼位於安裝光碟背面。
6
安裝驅動程式
Windows
®
XP
1. 點選「開始」,選擇「設定」>「控制台」。
2. 在「新增或移除程式」圖示上按兩下。
3. 在新增或移除程式列表中,點選「AVerMedia C039 USB Capture Card」>「變更/移除」或
「變更/移除」。

繁體中文-6
423 Dixon Landing Road
Milpitas, CA 95035
Tel: (408)263-3828
Support: (408)942-2121 / (877)774-4543
www.avermedia-usa.com/avertv
備註: 您的系統必須支援同步傳輸功能方可使用 AVerMedia DVD EZMaker 7。
目前不支援搭載 VIA KT400、KT333 和 K266A 晶片的主機板;搭載 VIA 8235 和 VT6202 晶片的
主機板僅支援 Windows
®
XP & 2000 下使用。
Windows Vista
TM
/ Windows
®
7 / Windows
®
8
1. 點選「開始」,選擇「設定」>「控制台」。
2. 在「程式和功能」圖示上按兩下。
3. 點選「AVerMedia C039 USB Capture Card」>「移除/變更」。

Inštalačná príručka
Slovenský-1
1
Obsah balenia
AVerMedia DVD EZMaker 7
Inštalačná príručka
CyberLink DVD Suite CD
Inštalačné CD
USB kábel
2
Systémové požiadavky
Intel Pentium 4, 2.4GHz alebo vyšší, alebo zodpovedajúci AMD procesor.
512 MB RAM alebo viac
USB 2.0 port
Zvuková karta
Grafická karta s 256 MB pamäťou
CD / DVD mechanika
1 GB pre VCD/ 5 GB pre DVD alebo viac voľného miesta na hard disku
Windows XP SP2 / Windows Vista / Windows 7 / Windows 8

Slovenský -2
423 Dixon Landing Road
Milpitas, CA 95035
Tel: (408)263-3828
Support: (408)942-2121 / (877)774-4543
www.avermedia-usa.com/avertv
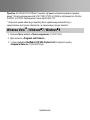
3
Inštalácia hardvéru
Zapojenie AVerMedia DVD EZMaker 7
Použite ikonu pre spojenie AVerMedia DVD EZMaker 7. Na nahrávanie videa so
zvukom potrebujete špecifikovať zvukový zdrojový vstup a uistiť sa, že zvuk NIE JE umlčaný a
má dostatok hlasitosti. Urobte tak dvojklikom na žltú ikonu reproduktorov na ovládacom paneli a
kliknite Start, Programs > Accessories > Entertainment a potom Volume Control, Volume
Control Help Contents a vyhľadajte “Adjust the recording volume” pre viac informácié.
Example:
Camcorder
VCR
AV Output Port
RCA Cable
(not supplied)
RCA Cable
(not supplied)
RCA Cable
(not supplied)
S-Video Cable
(not supplied)
(Yellow)
(Red)
(White)
USB Cable
USB Port
Computer

Inštalačná príručka
Slovenský-3
4
Inštalacia ovládača
Po správnom nainštalovaní karty AVerMedia DVD EZMaker 7 , zapnite počítač. Systém pri
prvom zapnutí automaticky rozpozná nainštalovanú kartu a spustí inštaláciu ovládača.
Jednoducho preskočte wizard a vložte inštalačné CD na inštaláciu drivera.
Doležité upozornenie:
PREDTÝM ako začnete inštalovať ovládač, presvedčite sa, či máte nainštalovaný DirectX
9.0c alebo vyššiu verziu. Poslednú verziu DirectX nájdete na priloženom CD v adresári
DirectX9c
CyberLink DVD Suite software musí byť nainštalované iba PO predchádzajúcej kompletnej
inštalácii driverov.
Windows
XP
1. Na obrazovke sa objaví okno “Found New
Hardware Wizard”(Nájdený nový
sprievodca inštaláciou). Kliknite na
Cancel (Zrušiť) pre začatie inštalačného
procesu.
2. Vložte inštalačné CD do CD-ROM
mechaniky. Objaví sa inštalačné okno.
Kliknite na Inštaluj ovládač. Sprievodca
inštaláciou (The InstallShield Wizard)
nainštaluje ovládač pre AVerMedia DVD
EZMaker 7.
3. Ak sa Vám podľa inštrukcií doporučuje
reštart počítača, vyberte Á NO.
4. Klinite na Browse CD pre pokračovanie
CD.
Kliknite na Exit pre zatvorenie ištalačného
okna.
Pagina se încarcă...
Pagina se încarcă...
Pagina se încarcă...
Pagina se încarcă...
Pagina se încarcă...
Pagina se încarcă...
Pagina se încarcă...
Pagina se încarcă...
Pagina se încarcă...
Pagina se încarcă...
Pagina se încarcă...
Pagina se încarcă...
Pagina se încarcă...
Pagina se încarcă...
Pagina se încarcă...
Pagina se încarcă...
Pagina se încarcă...
Pagina se încarcă...
Pagina se încarcă...
Pagina se încarcă...
Pagina se încarcă...
Pagina se încarcă...
Pagina se încarcă...
Pagina se încarcă...
Pagina se încarcă...
Pagina se încarcă...
Pagina se încarcă...
Pagina se încarcă...
Pagina se încarcă...
Pagina se încarcă...
Pagina se încarcă...
Pagina se încarcă...
Pagina se încarcă...
Pagina se încarcă...
Pagina se încarcă...
Pagina se încarcă...
Pagina se încarcă...
Pagina se încarcă...
Pagina se încarcă...
Pagina se încarcă...
Pagina se încarcă...
Pagina se încarcă...
Pagina se încarcă...
Pagina se încarcă...
Pagina se încarcă...
Pagina se încarcă...
Pagina se încarcă...
Pagina se încarcă...
Pagina se încarcă...
Pagina se încarcă...
Pagina se încarcă...
Pagina se încarcă...
Pagina se încarcă...
Pagina se încarcă...
Pagina se încarcă...
Pagina se încarcă...
Pagina se încarcă...
Pagina se încarcă...
Pagina se încarcă...
Pagina se încarcă...
Pagina se încarcă...
Pagina se încarcă...
Pagina se încarcă...
Pagina se încarcă...
Pagina se încarcă...
Pagina se încarcă...
Pagina se încarcă...
Pagina se încarcă...
-
 1
1
-
 2
2
-
 3
3
-
 4
4
-
 5
5
-
 6
6
-
 7
7
-
 8
8
-
 9
9
-
 10
10
-
 11
11
-
 12
12
-
 13
13
-
 14
14
-
 15
15
-
 16
16
-
 17
17
-
 18
18
-
 19
19
-
 20
20
-
 21
21
-
 22
22
-
 23
23
-
 24
24
-
 25
25
-
 26
26
-
 27
27
-
 28
28
-
 29
29
-
 30
30
-
 31
31
-
 32
32
-
 33
33
-
 34
34
-
 35
35
-
 36
36
-
 37
37
-
 38
38
-
 39
39
-
 40
40
-
 41
41
-
 42
42
-
 43
43
-
 44
44
-
 45
45
-
 46
46
-
 47
47
-
 48
48
-
 49
49
-
 50
50
-
 51
51
-
 52
52
-
 53
53
-
 54
54
-
 55
55
-
 56
56
-
 57
57
-
 58
58
-
 59
59
-
 60
60
-
 61
61
-
 62
62
-
 63
63
-
 64
64
-
 65
65
-
 66
66
-
 67
67
-
 68
68
-
 69
69
-
 70
70
-
 71
71
-
 72
72
-
 73
73
-
 74
74
-
 75
75
-
 76
76
-
 77
77
-
 78
78
-
 79
79
-
 80
80
-
 81
81
-
 82
82
-
 83
83
-
 84
84
-
 85
85
-
 86
86
-
 87
87
-
 88
88


Avermedia DVD EZMaker 7 (C039) Manual de utilizare
- Categorie
- Accesorii mixer / robot de bucătărie
- Tip
- Manual de utilizare
în alte limbi
Lucrări înrudite
-
Avermedia DVD EZMaker 7 C039 Ghid de inițiere rapidă
-
-
-
-
-
-