
EN
TR
NL
ES
BG
ET
LT
PL
LV
BS
CS
HU
HR
RO
SK
SL
SR
UK
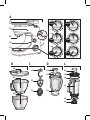
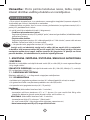
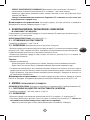
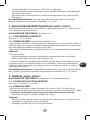
Masterchef Gourmet
Masterchef Gourmet +

7
8
7
8
MAX
7
8
PULSE
STOP
max
max
max
PULSE
STOP
MAX
L6
L5
L4
L3
L2
L1
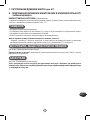
B
A
B2
A5
A7
A4
A3
A6
A2
A1
C1
C2
C3
D3
D2
D1
C D L
B1
B1
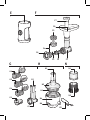
F
F7
F8
F5
E
NH
H1
H5
F4
H3
H2
F6
H4
H6
G
G2
G1
G6
G5
G4
G3
N1
N2
F3 F2 F1

7
8
7
8
MAX
7
8
PULSE
STOP
max
max
max
PULSE
STOP
MAX
L6
L5
L4
L3
L2
L1
B
A
B2
A5
A7
A4
A3
A6
A2
A1
C1
C2
C3
D3
D2
D1
C D L
B1
B1
F
F7
F8
F5
E
NH
H1
H5
F4
H3
H2
F6
H4
H6
G
G2
G1
G6
G5
G4
G3
N1
N2
F3 F2 F1

1.1 1.31.2
1.4 2.22.1
1
2
3
2.3
3.2
1
3
2
4.13.3
4.2
2
1
3
4
3.1
L
5.1
5.4
6.1
10

3
5.1
2
1
5.55.4
5.6
2
1
6.1
D
L1
G3
N2
F3
10
5.2
9
2
1
6.2
5.3

1
EN
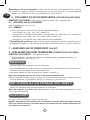
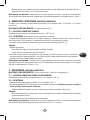
Warning : please read the safety instructions carefully
before initial use.
BEFORE FIRST USE
• Before using for the first time, wash all accessory parts in soapy water
(except for the attachment (E): see § Cleaning) Rinse and dry.
• Place the appliance on a flat, clean and dry surface. Make sure that the selector button (A1) is
in «0» position and plug in your appliance.
• You have several options for starting your appliance: (see diagram A1) :
- Intermittent operation (pulse):
Turn the selector button (A1) to the «pulse» position. Using a succession of pulses can
give you better control when preparing certain foods.
- Continuous operation:
Turn the selector button (A1) to the desired position from «1 to 8/max», depending on the
food you are preparing. You can change it as required during preparation.
• To stop the appliance, turn the button (A1) to «0».
Important: The appliance will start only if the cover (A5) and the head (A3) are locked. The
appliance will stop immediately if you unlock the cover (A5) and/or the head (A3) during
operation. Lock the cover and/or the head, turn the control button (A1) to the «0» position,
and then start the appliance normally by selecting the desired speed.
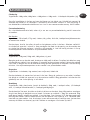
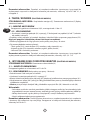
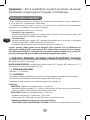
1 - MIXING / KNEADING / BEATING / EMULSIFYING / WHISKING
You can prepare up to 1.8 kg light dough and heavy dough made with up to 500 g flour using the
stainless bowl (B1) and its lid (B2) depending on the food.
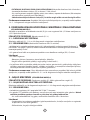
ACCESSORIES USED : Stainless steel bowl (B1), Lid (B2), Kneader (C1) or mixer (C2) or balloon
whisk (C3).
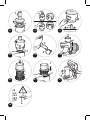
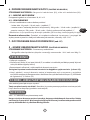
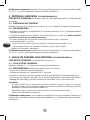
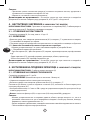
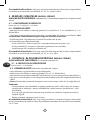
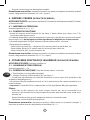
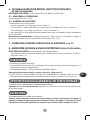
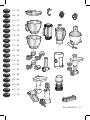
1.1 - ASSEMBLING THE ACCESSORIES
Follow the diagrams from 1.1 to 1.4.
1.2 - USAGE, TIPS AND DISMANTLING
• Start by turning the selector button (A1) to the desired position according to the recipe.
• You can add food through the hole in the lid (B2) during preparation.
• To stop the appliance, turn the button (A1) to «0».
Tips :
KNEADING (Maximum time of use: 13 minutes)
- Use the kneader accessory (C1) at speed «1». You can knead up to 500 g of flour (e.g. white
bread, grain bread, short crust pastry, etc.).
MIXING (Maximum time of use: 13 minutes).
- Use the mixer (C2) at speed «1 to 8/max».
- You can mix up to 1.8 kg of light dough (light cake mixture, sponge cake, biscuit or cookie dough).
-
Never use the mixer (c2) to knead heavy dough
and fresh pasta dough (lasagne, rigatoni,
bigoli, etc.).
- BEATING / EMULSIFYING / WHISKING (Maximum time of use: 10 minutes).
- Use the balloon whisk (c3) at speed «1 to 6/max» or «1 to 8» (depending on model).

2
EN
- You can prepare: mayonnaise, aioli, sauces, whisked egg whites (up to 10 egg whites),
whipped cream (up to 500 ml), meringues etc.
- Never use the balloon whisk (C3) to knead heavy dough or mix light dough.
Dismantling the accessory: Wait for the appliance to come to a complete stop and proceed
in the reverse order of the assembly. diagrams from 1.4 to 1.1.
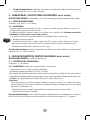
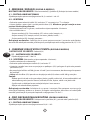
2 - BLENDING / MIXING (DEPENDING ON MODEL)
Depending on the nature of the food, you can use the blender (D) to prepare up to 1.5 L of thick
mixtures and 1.25 L of liquid mixtures.
ACCESSORIES USED : Blender jug (D or L).
2.1 - ASSEMBLING THE ACCESSORIES
Follow the diagrams from 2.1 to 2.3 and 10.
2.2 - USAGE, TIPS AND DISMANTLING (Maximum time of use: 3 minutes).
• Start by turning the selector button (A1) to the desired position (from speed «7 to 8» or «pulse»)
according to the recipe. Use the «Pulse» position for better mixing control and for a better blending
of your preparation.
• You can add food through the hole in the measuring cap (D2, L5) during preparation.
Tips :
• You can prepare :
- finely blended soups, cream soups, stewed fruit, milkshakes and cocktails.
- liquid batter (pancake, fritters, Yorkshire pudding, waffles, clafoutis and custard flans).
• You cannot make crushed ice.
• If ingredients stick to the sides of the bowl when mixing, stop the appliance and wait until the
blades have stopped completely. Remove the blender and push the food down onto the blades
using a spatula, and put your blender back on the appliance to continue processing..
Dismantling the accessory : Wait for the appliance to come to a complete stop before removing
the blender jug and proceed in the reverse order of the assembly, diagrams from 2.3 to 2.1 and 10.
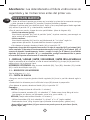
3 - MINCING (DEPENDING ON MODEL)
ACCESSORIES USED : Attachment holder (E), Assembled mincer head (F)
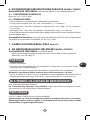
3.1 - FITTING THE MINCER ATTACHMENT
Follow the diagrams 9, 10, and then from 3.1 to 3.3.
3.2 - USAGE, TIPS AND DISMANTLING
• Run the appliance by turning the selector (A1) to speeds «5 to 7».
• Push the meat, piece by piece, down the feed tube, using the pusher (F7). Never push the
ingredients down the feed tube with your fingers or any other utensil.
- You can chop up to 3 kg of meat, Maximum time of use: 10 minutes.
Tips :
- Prepare all of the foodstuffs to be minced (for meat, remove the bones, gristle and tendons
and cut it into pieces of approximately 2 x 2 cm).
- Make sure that frozen meat is thoroughly thawed.

3
EN
Dismantling the accessory : Wait for the appliance to come to a complete stop and proceed
in the reverse order of the assembly diagrams 10, from 3.3 to 3.1 and then 9.
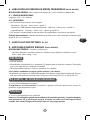
4 - GRATING / SLICING (DEPENDING ON MODEL)
ACCESSORIES USED : Attachment holder (E), Assembled vegetable slicer (G), Drums (depending on model)
4.1 - ASSEMBLING THE ACCESSORIES
Follow the diagrams 10, 9 and then from 4.1 to 4.2.
4.2 - USAGE, TIPS AND DISMANTLING
• Run the appliance by turning the selector (A1) to speed «5» to slice and to speed «7» to grate.
• Place the food in the feed tube on the body and press down with the pusher (G2).
Never push the ingredients with your fingers or any other utensil.
• You can prepare up to 2 kg of food, maximum time of use : 10 min.
• Use the drums to:
- Grate coarsely (G4) / grate finely (G5) : carrots, celery, potatoes, cheese, etc.
- Slice thickly (G3) : potatoes, carrots, cucumbers, apples, beetroot, etc.
- Potato shredder (G6): potatoes, parmesan, etc.
Dismantling the accessory : Wait for the appliance to come to a complete stop and proceed
in the reverse order of the assembly, diagrams 10, 4.2, 4.1 and 9.
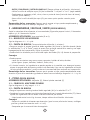
5 - EXTRACTING JUICE FROM FRUIT AND VEGETABLES (DEPENDING ON MODEL)
ACCESSORIES USED : Assembled juice extractor (H)
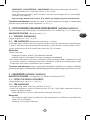
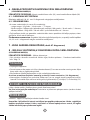
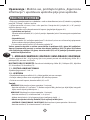
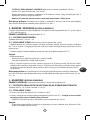
5.1 - ASSEMBLING THE JUICE EXTRACTOR
Follow the diagrams from 5.1 to 5.6.
5.2 - USAGE, TIPS AND DISMANTLING (maximum time of use: 10 minutes.)
• Cut the fruits and/or vegetables into pieces.
• Run the appliance by turning the selector (A1) to speed «5».
• Insert the ingredients down the feed tube in the lid (H2) push them slowly using the pusher (H1).
•
Do not process 500 g of food more than 5 times continuously, without allowing your appliance
to cool down completely
• Important : clean the filter (H3) and the juice collector (H4) after every 300g of ingredients.
Tips :
- You can make juice from: carrots, tomatoes, apples, grapes, raspberries, etc. but it is
not possible to extract juice from certain fruits and vegetables: bananas, avocado pears,
blackberries, some varieties of apples, etc…
- Peel fruits with thick skins; remove stones and the core of pineapples.
- Drink the juices immediately after preparation.
Dismantling the accessory : Wait for the appliance and rotary filter to come to a complete stop
before removing the accessory from the appliance. Proceed in the reverse order of the assembly,
diagrams from 5.6 to 5.1.

4
EN
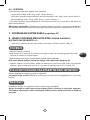
6 - FINELY CHOPPING SMALL QUANTITIES (DEPENDING ON MODEL)
ACCESSORIES USED : Mini chopper lid (N1), Mini chopper bowl (N2)
6.1 - ASSEMBLING THE ACCESSORIES
Follow the diagrams 10, 6.1 and 6.2.
6.2 - USAGE, TIPS AND DISMANTLING
• You can finely chop with the mini chopper :
- fresh herbs : 10g max. / 10secs max. / speed «7»
- dried fruits / Beef (boneless and trimmed meat) : 100g max. / 10secs max. / speed «1»
- vegetable puree : 150g max. / 20secs max. / «pulse» or speed «1»
• This grinder is not designed for hard products like coffee beans, hard spices nor liquids.
Dismantling the accessory : Wait for the appliance to come to a complete stop and proceed
in the reverse order of the assembly, diagrams 10, 6.2 and 6.1.
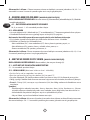
7 - ADJUSTING THE CORD LENGTH (see A7)
8 - ROUGH CHOPPING SMALL QUANTITIES (DEPENDING ON MODEL)
ACCESSORIES USED : Assembled grinder.
-
Chop in a few seconds by pulsing: dried figs, dried apricots, etc. Quantity / max time : 100g / 5s
CLEANING
• Unplug the appliance.
• Do not immerse the motor unit (A) or the attachment (E) in water or under running water. Wipe
them with a dry or slightly damp cloth.
• Disassemble completely and rinse the accessories quickly after use.
Handle the blades with care to prevent injury. (diagram 10).
• Wash, rinse and dry the accessories: they are dishwasher-safe, except for all the metal components
in the mincer head: body (F), the kneader (C1) and the mixer (C2).
WHAT TO DO IF YOUR APPLIANCE DOES NOT WORK
please refer to the chapter «before first use».
Your appliance still does not work? Contact an authorised service centre (see the list in the
service booklet).
AVAILABLE ACCESSORIES
See page 91 and visit the brand website.
Caution: this booklet contains instructions for additional accessories. Please keep safe for
future reference. Please contact the Customer Service for further information on how to
purchase accessories.

5
EN
Cake Batter
Ingredients: 200 g sugar, 200 g butter + 200 g eggs + 200 g flour + 2 tsp baking powder (3 g)
Pour all ingredients into the bowl and set up the mixer and the lid. Operate the appliance for 30
seconds at speed 1 and then for 2 minutes at maximum speed. Pour the batter into a greased and
floured cake tin, then place in a preheated oven at 180°C for 1 hour.
Pancake Batter
If you have the blender accessory, we recommend that you use this accessory to prepare your pancake
batter.
Using the blender:
Ingredients: 750 ml milk, 375 g flour, 4 eggs, 40 g sugar, 100 ml oil, 1 tbsp orange blossom water
or flavoured alcohol
In the blender bowl, place the eggs, oil, sugar, milk and your chosen flavour. Select speed 3 and
operate for 1 minute. Next, pour the flour from the measuring cap’s opening and operate for 1 minute
and 30 seconds. Let the batter rest for at least 1 hour at room temperature before cooking your
pancakes.
Without a blender:
Ingredients: 250 g flour, 500ml milk, 200 g eggs, 6 g salt
In the food processor bowl equipped with a balloon whisk, place the flour, eggs and 100 ml of milk.
Place the lid and mix at speed 1 for 30 seconds and then at maximum speed for 45 seconds. Reduce
the speed to position 6 and then pour the rest of the milk and mix for 45 seconds. Let the batter rest
at least 1 hour at room temperature before cooking your pancakes.
Mayonnaise
Ingredients: 1 egg yolk, 20 g mustard, a pinch of salt, 200 ml oil
Into the bowl, place the egg yolk, mustard and salt. Set up the balloon whisk on your food processor,
place the lid and start the appliance at maximum speed. Gradually add the oil through the lid opening
for 2 minutes.
Bread Dough
Ingredients: 300 ml of cold water (out of the refrigerator), 500 g flour, 1 tbsp sugar, 1.5 tsp salt, 1.5
tbsp sunflower oil, 1.5 tbsp dry yeast
Into the food processor bowl, place the water, salt, sugar and oil. Next, add 350 g of flour and then
the yeast. Set up the dough hook and knead for 5 minutes at speed 1. Add the remaining 150 g of
flour and knead at speed 1 for 3 minutes. Let the dough rise (covered) at 35°C for 1 hour. The dough
must double in volume. Shape your loaf and let it rise again for 1 hour at 35°C. Your loaf must double
in volume. Cook in a preheated oven at 210°C for 10 minutes in a damp environment (place a bowl
of water on the bottom of the oven) and finish cooking at 180°C for 15 minutes.
BASIC RECIPES

6
NL
Waarschuwing :
Gelieve vóór het eerste gebruik het boekje met
de «veiligheidsvoorschriften» en de instructies nauwkeurig
te lezen.
VÓÓR HET EERSTE GEBRUIK
• Was voor het eerste gebruik alle accessoires in water met afwasmiddel (behalve onderdeel (E):
zie § Reinigen.) Afspoelen en afdrogen.
• Zet het apparaat op een vlakke, schone en droge ondergrond. Zorg ervoor dat de
snelheidskeuzeschakelaar (A1) op «0» staat en steek de stekker in het stopcontact.
• Het apparaat kan op verschillende manieren worden opgestart : (zie afbeelding A1)
- Onderbroken werking (impulsen):
zet de snelheidskeuzeschakelaar (A1) op «pulse». Door het gebruik van achtereenvolgende
impulsen hebt u een betere controle bij het bereiden van bepaalde gerechten.
- Continuwerking:
zet de snelheidskeuzeschakelaar (A1) op de gewenste stand, van «1 tot 8/max», afhankelijk
van de voeding die u bereidt. U kunt de stand van de snelheidskeuzeschakelaar tijdens de
bereiding naar wens wijzigen.
• Zet de schakelaar (A1) op «0» om het apparaat stop te zetten.
Belangrijk: Het apparaat start alleen als de kap (A5) en de arm (A3) zijn vergrendeld.
Het apparaat stopt onmiddellijk als u tijdens het gebruik de kap (A5) en/of de arm (A3)
ontgrendelt. Vergrendel de kap en/of de arm, zet de snelheidskeuzeschakelaar (A1) op «0», en
start het apparaat daarna op de gebruikelijke manier door de gewenste snelheid in te stellen.
1 -
MENGEN / KNEDEN / KLOPPEN / EMULGEREN / KLUTSEN
U kunt max. 1,8 kg licht deeg bereiden met de roestvrijstalen mengkom (B1) en het deksel (B 2),
afhankelijk van de voeding.
GEBRUIKTE ACCESSOIRES : Roestvrijstalen mengkom (B1), Deksel (B2), Deeghaak (C1) of
klopper (C2) of garde (C3).
1.1 - MONTEREN VAN DE ACCESSOIRES
Volg de afbeeldingen 1.1 tot en met 1.4.
1.2 - GEBRUIK
• Begin door de snelheidskeuzeschakelaar (A1) in de gewenste stand te zetten, afhankelijk van het recept.
• Tijdens de bereiding kunt u voedsel door het gat in het deksel (B2) toevoegen.
• Zet de schakelaar (A1) op «0» om het apparaat stop te zetten.
Tips :
KNEDEN (De maximumtijd van gebruik: 13 minuten).
- Gebruik de kneedhaak (C1) op snelheid «1». U kunt max. 500 g bloem kneden (bijv.
witbrood, granenbrood, korstdeeg, kruimeldeeg, enz.).
MENGEN (De maximumtijd van gebruik: 13 minuten).
- Gebruik de klopper (C2) op snelheid «1 tot 6/max» of «1 tot 8» (afhankelijk van het model).
- U kunt max. 1,8 kg licht deeg mengen (roombotercake, koekjes, enz.).
- Gebruik de mixer (c2) nooit voor zwaar deeg en vers pastadeeg (lasagne, rigatoni, bigoli enz.).

7
NL
- KLOPPEN / EMULGEREN / KLUTSEN (De maximumtijd van gebruik: 10 minuten).
- Gebruik de garde (C3) op snelheid «1 tot 8/max».
- U kunt het volgende bereiden: mayonaise, aioli, sauzen, opgeklopt eiwit (max. 10 eiwitten),
slagroom (max. 500 ml), enz.
-
Gebruik de garde (C3) nooit voor het kneden van zwaar deeg of het mengen van licht deeg.
Demonteren van de accessoires : Wacht tot het apparaat volledig tot stilstand is gekomen
en ga in de omgekeerde volgorde van de montage te werk (van afbeelding 1.4 tot en met 1.1).
2 - MIXEN / MENGEN (AFHANKELIJK VAN HET MODEL)Depending on the nature
of the food, you can use the blender (D) to prepare up to 1.5 L of thick mixtures and 1.25 L of
liquid mixtures.
GEBRUIKTE ACCESSOIRES : Blender jug (D ou L).
2.1 - MONTEREN VAN DE ACCESSOIRES
Volg de afbeeldingen 2.1 tot en met 2.3 en 10.
2.2 - GEBRUIK (De maximumtijd van gebruik: 3 minuten).
• Begin door de snelheidskeuzeschakelaar (A1) in de gewenste stand te zetten (van snelheid «4 tot
8/Max» of «Pulse»), afhankelijk van het recept. Gebruik de «pulse» stand voor een betere controle
over het mengen en voor een fijner resultaat.
• Tijdens de bereiding kunt u voedsel toevoegen door (D2, L5) het gat in de maatdop.
Tips :
• U kunt het volgende bereiden:
- Fijn gepureerde soepen, veloutés, vruchtenmoes, milkshakes en cocktails.
- Vloeibaar beslag (pannenkoeken, beignets, clafoutis en puddingtaart).
• U kunt geen ijsgruis maken.
•
Als de ingrediënten aan de wand van de mengkom blijven plakken tijdens het mengen. Zet het
apparaat dan stop. Wacht tot het apparaat volledig gestopt is. Verwijder de blender en duw het
voedsel naar beneden met behulp van een spatel. Plaats de blender terug op het apparaat en ga
verder met de bereiding.
Demonteren van de accessoires: Wacht tot het apparaat volledig tot stilstand is gekomen
vooraleer de mengbeker te verwijderen en ga in de omgekeerde volgorde van de montage te werk
(van afbeelding 2.3 tot en met 2.1 en ten slotte 10).
3 - MALEN (AFHANKELIJK VAN HET MODEL)
GEBRUIKTE ACCESSOIRES : Hulpstuk voor het gebruik van diverse accessoires (E), Geassembleerde
kop van de gehaktmolen (F)
3.1 - AANBRENGEN VAN DE GEHAKTMOLEN
Volg de afbeeldingen 9, 10 en vervolgens 3.1 tot en met 3.3.
3.2 - GEBRUIK, TIPS EN DEMONTEREN
• Zet het apparaat aan door de snelheidskeuzeschakelaar (A1) op snelheid «5 tot 7» in te stellen.
• Duw de stukken vlees een voor een in de aanvoerbuis naar beneden met de stamper (F7). Duw de
ingrediënten nooit met uw vingers of enig ander voorwerp naar beneden in de aanvoerbuis.
- U kunt tot 3 kg vlees hakken, De maximumtijd van gebruik: 10 minuten.

8
NL
Tips :
- Bereid alle ingrediënten voor die in de gehaktmolen worden geplaatst (botten, kraakbeen en
zenuwen van het vlees verwijderen en het vlees in stukken snijden van ongeveer 2 x 2 cm).
- Zorg ervoor dat het vlees helemaal is ontdooid.
Demonteren van de accessoires : Wacht tot het apparaat volledig tot stilstand is gekomen
en ga in de omgekeerde volgorde van de montage te werk (eerst afbeelding 10, dan van 3.3 tot
en met 3.1 en ten slotte 9).
4 - RASPEN / SNIJDEN (AFHANKELIJK VAN HET MODEL)
GEBRUIKTE ACCESSOIRES : Hulpstuk voor het gebruik van diverse accessoires (E), Geassembleerde
groentemolen (G), Accessoires (afhankelijk van het model)
4.1 - MONTEREN VAN DE ACCESSOIRES
Volg de afbeeldingen 10, 9 en vervolgens 4.1 tot en met 4.2.
4.2 - GEBRUIK
• Zet het apparaat aan door de snelheidskeuzeschakelaar (A1) op snelheid «5» om plakken te
snijden en op «7» om te raspen.
• Duw het voedsel in de aanvoerbuis naar beneden met de stamper (G2). Duw de ingrediënten
nooit met uw vingers of enig ander voorwerp naar beneden.
• U kunt tot 2 kg voedingsmiddelen voorbereiden, De maximumtijd van gebruik: 10 minuten.
• Gebruik de accessoires voor het volgende :
- Grof raspen (G4) / fijn raspen (G5) : wortels, selderij, aardappel, kaas, enz.
- Dikke plakken snijden (G3) : aardappel, wortel, komkommer, appel, rode biet, enz.
- Reibekuchen (G6): aardappels, Parmezaan, enz.
Demonteren van de accessoires : Wacht tot het apparaat volledig tot stilstand is gekomen
en ga in de omgekeerde volgorde van de montage te werk (eerst afbeelding 10, dan 4.2, 4.1 en
ten slotte 9).
5 - SAP PERSEN UIT VRUCHTEN EN GROENTEN (AFHANKELIJK VAN HET MODEL)
GEBRUIKTE ACCESSOIRES : Geassembleerde sapcentrifuge (H)
5.1 - MONTEREN VAN DE SAPCENTRIFUGE
Volg de afbeeldingen 5.1 tot en met 5.6.
5.2 - GEBRUIK (De maximumtijd van gebruik: 13 minuten)
• Snijd de vruchten en/of groente in stukken.
• Zet het apparaat aan door de snelheidskeuzeschakelaar (A1) op snelheid «5» in te stellen.
• Plaats de vruchten en/of groente in de aanvoerbuis in het deksel (H2) en duw ze langzaam naar
beneden met de stamper (H1).
• Verwerk 500 g voedsel niet meer dan 5 keer continue, zonder het apparaat volledig te laten afkoelen.
• Belangrijk : reinig het filter (H3) en de opvangbeker voor het sap (H4) na elke 300g ingrediënten.
Tips :
- U kunt sap maken van: wortels, tomaten, appels, druiven, frambozen, enz. maar het is niet
mogelijk sap te persen uit bepaalde vruchten en groenten zoals bananen, avocado’s, bramen,
sommige soorten appels, enz.
- Drink het sap direct na de bereiding.

9
NL
Demonteren van de accessoires : Wacht tot het apparaat en de roterende filter volledig
tot stilstand zijn gekomen voordat u het accessoire van het apparaat haalt. Ga in de omgekeerde
volgorde van de montage te werk (van afbeelding 5.6 tot en met 5.1).
6 - FIJN HAKKEN VAN KLEINE HOEVEELHEDEN
(AFHANKELIJK VAN HET MODEL)
GEBRUIKTE ACCESSOIRES : Mini-hak/snij-apparaat: deksel (N1), mengkom (N2).
6.1 - MONTEREN VAN DE ACCESSOIRES
Volg de afbeeldingen 10, 6.1 en 6.2.
6.2 - GEBRUIK
• U kunt met het mini-hak/snij-apparaat het volgende fijnhakken:
- verse kruiden: max. 10g / max. 10s / snelheid
«7»
- gedroogd fruit / rundvlees (zonder bot en schoongemaakt): max. 100g / max. 10s / snelheid «1»
- groentepuree: max. 150g / max. 20s / pulsestand of snelheid «1»
• Deze maler is niet geschikt voor harde producten zoals koffiebonen.
Dismantling the accessory : Wacht tot het apparaat volledig tot stilstand is gekomen en ga in
de omgekeerde volgorde van de montage te werk (eerst afbeelding 10, dan 6.2 en ten slotte 6.1).
7 - AANPASSEN VAN DE SNOERLENGTE (zie A7)
8 - GROF HAKKEN VAN KLEINE HOEVEELHEDEN (AFHANKELIJK VAN HET MODEL)
GEBRUIKTE ACCESSOIRES : Geassembleerde maler.
-
Enkele seconden te hakken met impulsen: gedroogde vijgen, gedroogde abrikozen, enz.
Hoeveelheid/max. duur: 100 g / 5 s
REINIGING
• Haal de stekker van het apparaat uit het stopcontact.
• ompel het motorblok (A) of de accessoire (E) nooit onder in water en houd ze niet onder de kraan.
Droog ze af met een droge of licht bevochtigde doek.
• Demonteer volledig en spoel de accessoires meteen na gebruik af.
Wees voorzichtig met het mes om letsel te voorkomen (afbeelding 10).
•
Wassen, spoelen en drogen van de accessoires: ze zijn vaatwasserbestendig, met uitzondering van de
metalen onderdelen. in de hakmolen: houder (F), deeghaak (C1) en mixer (C2).
WAT TE DOEN ALS UW APPARAAT NIET WERKT?
- Gelieve het hoofdstuk «Vóór het eerste gebruik» te raadplegen
Werkt het apparaat nog steeds niet ? Neem contact op met een erkend servicecentrum (zie de
lijst in het serviceboekje).
ACCESSOIRES
Zie pagina 91 en raadpleeg de website van het merk.
Opgelet: dit boekje bevat instructies voor aanvullende accessoires. Gelieve dit goed te bewaren
voor later. Gelieve contact op te nemen met ons servicecentrum voor verdere informatie over
de aankoop van accessoires.

10
NL
Cakebeslag
Ingrediënten: 200g suiker, 200g boter + 200g eieren + 200g meel + 2 theelepels bakpoeder (3g)
Doe alle ingrediënten in de kom en breng de klopper en het deksel aan. Schakel het apparaat 30
seconden op snelheid 1 en vervolgens 2 minuten op de maximum snelheid in. Giet het beslag in
een beboterde en bebloemde cakevorm en laat 1 uur in een voorverwarmde oven op 180°C bakken.
Pannenkoekenbeslag
Als u het blenderaccessoire hebt, raden wij u aan om uw pannenkoekenbeslag met dit accessoire
te bereiden.
Met blender:
Ingrediënten: 750 ml melk, 375 g meel, 4 eieren, 40 g suiker, 10 cl olie, 1 eetlepel oranjebloesemwater
of aromatische alcohol
Doe de eieren, de olie, de suiker, de melk en het gekozen parfum in de kom. Selecteer snelheid 3
en schakel het apparaat 1 minuut in. Voeg vervolgens het meel via de opening van de maatdop toe
en schakel het apparaat opnieuw 1 minuut en 30 seconden in. Laat het beslag minstens 1 uur op
kamertemperatuur rusten voordat u uw pannenkoeken maakt.
Zonder blender:
Ingrediënten: 250g meel, 500g melk, 200g eieren, 6g zout
Breng de garde aan en doe het meel, de eieren en 100g melk in de kom. Installeer het deksel en meng
30 seconden op snelheid 1 en vervolgens 45 seconden op de maximum snelheid. Verlaag de snelheid
naar stand 6, voeg de rest van de melk toe en meng opnieuw gedurende 45 seconden. Laat het beslag
minstens 1 uur op kamertemperatuur rusten voordat u uw pannenkoeken maakt.
Mayonaise
Ingrediënten: 1 eierdooier, 20g mosterd, een snufje zout, 200ml olie
Doe de eierdooier, de mosterd en het zout in de kom. Breng de garde aan op uw robot, installeer
het deksel en schakel het apparaat in op de maximum snelheid. Voeg gedurende 2 minuten de olie
geleidelijk aan toe via de opening in het deksel.
Brooddeeg
Ingrediënten: 300 g koud water (vanuit de koelkast), 500g meel, 1 eetlepel suiker, 1,5 theelepel
zout, 1,5 eetlepel zonnebloemolie, 1,5 eetlepel gedroogde gist
Doe de vloeistof, het zout, de suiker en de olie in de kom van de robot. Voeg 350g meel en vervolgens
de gist toe. Breng de deeghaak aan en kneed 5 minuten op snelheid 1. Voeg het resterende 150g
meel toe en kneed 3 minuten op snelheid 1. Laat het deeg 1 uur rijzen op 35°C. Het deeg moet twee
keer zo groot worden. Geef uw brood vorm en laat het opnieuw 1 uur rijzen op 35°C. Het brood moet
twee keer zo groot worden. Laat 10 minuten in een voorverwarmde en vochtige oven (zet een kom
water op de bodem van de oven) op 210°C bakken en vervolgens 15 minuten op 180°C.
BASISRECEPTEN

11
ES
Advertencia : Lea detenidamente el folleto «indicaciones de
seguridad» y las instrucciones antes del primer uso.
PUESTA EN MARCHA
• Antes de utilizar el aparato por primera vez, lave todas las piezas de los accesorios con agua
y jabón (excepto el adaptador (E): consulte § limpieza) Aclárelos y séquelos.
• Coloque el aparato sobre una superficie plana, limpia y seca, compruebe que el botón regulador
(A1) esté en la posición “0” y, a continuación, conéctelo.
• Para la puesta en marcha, dispone de varias posibilidades: (véase el diagrama A1):
- Marcha intermitente (pulse):
Gire el botón regulador (A1) hacia la posición “pulse”, impulsos sucesivos, para conseguir un
mejor control de las preparaciones.
- Marcha continua:
Gire el botón regulador (A1) hacia la posición deseada de “1 a 8/max” según las
preparaciones que realice. Se puede modificar durante la preparación.
• Para detener el aparato, devuelva el botón (A1) a la posición “0”.
Importante: el aparato sólo se pondrá en marcha si la tapa de seguridad (A5) y el cabezal (A3)
están acoplados. Si durante el funcionamiento desacopla la tapa (A5) y/o el cabezal (A3), el
aparato se detendrá inmediatamente. Vuelva a acoplar la tapa y/o el cabezal, gire el botón
regulador (A1) hasta la posición “0” y, a continuación, prosiga normalmente con la puesta
en marcha del aparato seleccionando la velocidad deseada.
1 - MEZCLAR / AMASAR / BATIR / EMULSIONAR / BATIR CON LAS VARILLAS
Según la naturaleza de los alimentos, el vaso de acero inoxidable (b1) y la tapa (b2) le permitirán
preparar hasta 1,8 kg de pasta ligera.
ACCESORIOS UTILIZADOS: Vaso de acero inoxidable (B1), Tapa (B2), Amasador (C1), batidor
(C2) o varilla de múltiples aspas (C3).
1.1 - MONTAJE DE LOS ACCESORIO
Siga los diagramas 1.1 - 1.4.
1.2 - PUESTA EN MARCHA
• Ponga en marcha el aparato girando el botón regulador (A1) hasta la posición deseada según la
receta.
• Puede añadir los alimentos por el orificio de la tapa (B2) durante la preparación.
• Para detener el aparato, devuelva el botón (A1) a la posición “0”.
Consejos :
AMASAR (Tiempo máximo de utilización: 13 minutos.)
- Utilice el accesorio amasador (C1) a la velocidad “1”. Puede amasar hasta 500 g de harina
(por ejemplo: pan blanco, pan de cereales, pasta brisa, pasta sablée, …).
MEZCLAR (Tiempo máximo de utilización: 13 minutos.).
- Utilice el mezclador (C2) de la velocidad “1 a 6/max” o “1 a 8” (según modelo).
- Puede mezclar hasta 1,8 kg de pasta ligera (bizcocho de cuatro partes, galletas, etc.).
- Nunca utilice la mezcladora (c2) para amasar masa pesada y masa de pasta fresca (lasaña,
rigatoni, bigoli, etc.).

12
ES
- BATIR / EMULSIONAR / BATIR CON VARILLAS (Tiempo máximo de utilización: 10 minutos.).
- Utilice la varilla de múltiples aspas (C3) de la velocidad “1 a 6/max” o “1 a 8” (según modelo)
- Puede preparar: mayonesa, alioli, salsas, claras a punto de nieve (hasta 10 claras de huevo),
chantillí (hasta 500 ml)...
-
Nunca utilice la varilla de múltiples aspas (C3) para amasar pastas pesadas o mezclar pastas
ligeras.
Desmontaje de los accesorios: Espere a que el aparato se haya parado completamente y
proceda en orden inverso al montaje. Diagramas 1.4 - 1.1.
2 - HOMOGENEIZAR / MEZCLAR / BATIR (SEGÚN MODELO)
Según la naturaleza de los alimentos, el vaso mezclador (D) permite preparar hasta 1,5 l de mezclas
espesas y 1,25 l de mezclas líquidas.
ACCESORIOS UTILIZADOS: Vaso mezclador (D ou L).
2.1 - MONTAJE DE LOS ACCESORIO
Siga los diagramas 2.1 - 2.3 y 10.
2.2 - PUESTA EN MARCHA (Tiempo máximo de utilización: 3 minutos.).
• Ponga en marcha el aparato girando el botón regulador (A1) hasta la posición deseada (desde
la velocidad de “7 a 8” o “Pulse”) según la receta. Para un mejor control de la mezcla y una mejor
homogeneización de la preparación, utilice la posición “Pulse”.
• Puede añadir los alimentos por el orificio del tapón dosificador (D2, L5) durante la preparación.
Consejos:
• Puede preparar:
- sopas con una textura muy suave, cremas, compotas, batidos de leche, cócteles.
- pastas ligeras (crepes, buñuelos, clafoutis, flanes, etc.).
•
Si, durante la mezcla, los ingredientes se quedan pegados en la pared del vaso, detenga el aparato,
esperar al apagado total del aparato y retire el vaso mezclador, haga caer los ingredientes encima de
las hojas usando una espátula, y vuelva a colocar el vaso mezclador para continuar con la preparación.
Desmontaje de los accesorios: Espere a que el aparato se haya parado completamente antes
de retirar la jarra de la mezcladora y proceda en orden inverso al montaje, diagramas 2.3 - 2.1 y 10.
3 - PICAR (SEGÚN MODELO)
ACCESORIOS UTILIZADOS: Adaptador (E), Cabezal picador montado (F)
3.1 - COLOCAR EL ADAPTADOR PICADOR
Siga los diagramas 9, 10 y luego 3.1 - 3.3.
3.2 - PUESTA EN MARCHA
• Ponga el aparato en marcha girando el botón regulador (A1) a la velocidad “5 a 7”.
• Introduzca la carne troceada por el tubo de alimentación con la ayuda del embutidor (F7). Nunca
apriete los ingredientes con los dedos o con otro utensilio por el tubo.
- Usted puede cortar hasta 3 kg de carne, tiempo máximo de utilización: 10 minutos.
Consejos:
- Prepare la cantidad de alimentos que desee picar (para la carne, elimine los huesos, cartílagos
y nervios y córtela en trozos de unos 2 x 2 cm).
- Compruebe que la carne esté bien descongelada.

13
ES
Desmontaje de los accesorios: Espere a que el aparato se pare completamente y luego proceda
en orden inverso a los diagramas de montaje 10, de 3.3 a 3.1 y a continuación 9.
4 - RALLAR / CORTAR (SEGÚN MODELO)
ACCESORIOS UTILIZADOS:
Adaptador (E), Corta-verduras montado (G), Tambores (según modelo)
4.1 - MONTAJE DE LOS ACCESORIO
Siga los diagramas 10, 9 y posteriormente 4.1 - 4.2.
4.2 - PUESTA EN MARCHA
• Ponga el aparato en marcha girando el botón regulador (A1) a la velocidad “5” para cortar y a
la velocidad “4 o 7” para rallar.
• Introduzca los alimentos por el tubo del depósito y guíelos con la ayuda del embutidor (G2).
Nunca apriete los ingredientes con los dedos o con otros utensilios.
• Usted puede preparar hasta 2 kg de alimentos, Tiempo máximo de utilización: 10 minutos
• Puede prepararse con los tambores:
- Rallar ingredientes de forma gruesa (G4) / rallar ingredientes finos (G5): zanahorias, apiorábano,
patatas, queso, etc.
- Cortar ingredientes gruesos (G3): patatas, zanahorias, pepinos, manzanas, remolacha, etc.
- Reibekuchen (G6): patatas, parmesano, etc.
Desmontaje de los accesorios: Espere a que el aparato se pare completamente y proceda luego
en orden inverso al montaje, diagramas 10, 4.2, 4.1 y 9.
5 - CENTRIFUGAR FRUTAS Y VERDURAS
(SEGÚN MODELO)
ACCESORIOS UTILIZADOS: Licuadora montada (H)
5.1 - MONTAJE DE LA LICUADORA
Siga los diagramas 5.1 - 5.6.
5.2 - PUESTA EN MARCHA (Tiempo máximo de utilización: 10 minutos.)
• Trocee las frutas y/o las verduras.
• Ponga el aparato en marcha girando el botón regulador (A1) a la velocidad “5” .
• Introdúzcalas por el tubo de la tapa (H2) y guíelas con la ayuda del embutidor (H1).
•
No procese más de 5 veces seguidas 500 g de alimentos, sin dejar reposar el aparato completamente.
•
Importante : limpie el filtro (H3) y el recogedor de zumo (H4) después de cada 300 g de ingredientes.
Consejos:
- Puedes licuar: zanahorias, tomates, manzanas, uvas, frambuesas, etc. pero no es posible
extraer zumo de ciertas frutas y verduras: plátanos, aguacates, moras, algunas variedades de
manzanas, etc.
- Pele las frutas con piel gruesa, retire los huesos, retire la parte central de las piñas.
- Consuma rápidamente los zumos después de su preparación.
Desmontaje de los accesorios: Espere a que el aparato y el filtro giratorio se hayan detenido
completamente antes de retirar el accesorio del aparato. Proceda en orden inverso al montaje,
diagramas 5.6 - 5.1.

14
ES
6 - PICAR FINAMENTE PEQUEÑAS CANTIDADES (SEGÚN MODELO)
ACCESORIOS UTILIZADOS: Tapa de la minipicadora (N1), cuenco de la minipicadora (N2)
6.1 - MONTAJE DE LOS ACCESORIO
Siga los diagramas 10, 6.1 y 6.2.
6.2 - PUESTA EN MARCHA
• Con la minipicadora puede triturar de manera muy fina:
- hierbas frescas: 10 g máx. / 10 s máx. / velocidad “4 o 7” (según modelo)
- frutos secos / carne de ternera (carne deshuesada y cortada): 100 g máx. / 10 s máx. / velocidad «1»
-
puré de verduras: 150 g máx. / 20 s máx. / «pulse» (impulso) o velocidad «1».
• Este molinillo no se ha diseñado para productos como el café.
Dismantling the accessory : Espere a que el aparato se pare completamente y proceda en orden
inverso al montaje, diagramas 10, 6.2 y 6.1.
7 - ADAPTAR LA LONGITUD DEL CABLE (véase A7)
8 - PICAR PEQUEÑAS CANTIDADES GROSSO MODO (SEGÚN MODELO)
ACCESORIOS UTILIZADOS: Assembled grinder.
-
Picar en pocos segundos por impulsos: higos secos, albaricoques secos, etc. Cantidad / tiempo
máximo: 100 g / 5 seg
• Desconecte el aparato.
• No sumerja el bloque motor (A) ni el adaptador (E) en el agua o debajo de agua corriente.
Límpielos con un trapo seco o un poco húmedo.
• Desmonte completamente y enjuague los accesorios rápidamente después del uso.
Maneje las cuchillas con cuidado para evitar lesiones. (Diagrama 10).
•
Lave, enjuague y seque los accesorios: pueden lavarse en el lavavajillas, salvo todos los componentes
de metal en la cabeza de picadora: cuerpo (F), la amasadora (C1) y la mezcladora (C2).
¿QUÉ HACER SI EL APARATO NO FUNCIONA?
- consulte el capítulo «antes del primer uso»
¿Su aparato sigue sin funcionar? Diríjase a un centro de servicio oficial (consulte la lista del
folleto de servicio).
ACCESORIOS
Consulte la página 91 y visite el sitio web de la marca.
Precaución: este folleto contiene instrucciones para accesorios adicionales. Consérvelo en
un lugar seguro para su consulta futura. Póngase en contacto con el servicio de atención al
cliente para obtener más información sobre cómo comprar accesorios.
LIMPIEZA

15
TR
Uyarı: PLütfen ilk kullanımdan önce "güvenlik talimatları"
kitapçığını dikkatlice okuyun.
İLK KULLANIMDAN ÖNCE
• İlk kez kullanmadan önce tüm aksesuar parçalarını ılık ve sabunlu suyla yıkayın ((E) takma ünitesi
dışında: bkz. Temizleme) durulayın ve kurutun.
• Cihazınızı düz, temiz ve kuru bir yüzeye yerleştirin. Seçme düğmesinin (A1) "0" konumunda
olduğundan emin olun ve cihazınızı şe takın.
• Cihazınızı çalıştırmak için birçok seçeneğe sahipsiniz: (bkz. şema A1) :
- Aralıklı çalıtırma (anlık çalıtırma):
Seçme düğmesini (A1) "pulse" konumuna getirin. Bazı yiyecekleri hazırlarken art arda anlık
çalıştırma daha iyi bir kontrol sağlayabilir.
- Sürekli çalıtırma:
Hazırladığınız yiyeceğe göre seçme düğmesini (A1) "1 konumundan 8/max" konumu arasında
istenilen bir pozisyona getirin. Hazırlama sırasında istediğiniz gibi değiştirebilirsiniz.
• Cihazı durdurmak için düğmeyi (A1) "0" konumuna getirin.
Önemli: Kapağın (A5) ve balığın (A3) kilitlenmesi kouluyla cihaz çalımaya balar.
çalıırken kapağın (A5) ve/veya balığın (A3) kilidini açarsanız cihaz hemen duracaktır.
Balığı ve/veya kapağı kilitleyin, kontrol düğmesini (A1) "0" konumuna getirin ve
istediğiniz hızı seçerek cihazı normal olarak çalıtırın.
1 - KARITIRMA / YOĞURMA / ÇIRPMA / AKICI HALE GETİRME
Yiyeceğin türüne uygun paslanmaz çelik hazneyi (B1) ve kapağını (B2) kullanarak 1,8 kg haf hamur
ve 500 gram sert hamur hazırlayabilirsiniz.
KULLANILAN AKSESUARLAR: Paslanmaz çelik hazne (B1), Kapak (B2), Yoğurucu (C1) mikser
(C2) veya çırpıcı (C3).
1.1 - AKSESUARLARIN MONTE EDİLMESİ
1.1 -1.4 arasındaki şemaları izleyin.
1.2 - KULLANIM
• Tarife göre hız seçme düğmesini (A1) istenilen konuma getirerek başlayın.
•
Cihaz hemen çalışmaya başlar. Hazırlama işlemi boyunca kapaktaki (B2) delikten yiyecek
ekleyebilirsiniz.
• Cihazı durdurmak için düğmeyi (A1) "0" konumuna getirin.
İpuçları:
YOĞURMA (Maksimum kullanım süresi: 13 dakika).
- Yoğurma aksesuarını (C1) "1" hızında kullanın. 500 gr unu yoğurabilirsiniz (örn. beyaz ekmek,
tahıllı ekmek, tart hamuru, turta hamuru, vs.).
KARITIRMA (Maksimum kullanım süresi: 13 dakika).
- Mikser aparatını (C2) "1 konumundan 8/max" konumu arasında kullanın.
- En fazla 1,8 kg ağırlığında yumuşak hamur (kek, kurabiye, vs.) karıştırabilirsiniz.
- Sert hamur yoğurmak için asla mikser aparatını (C2) kullanmayın.
- ÇIRPMA / AKICI HALE GETIRME (Maksimum kullanım süresi: 10 dakika).
Pagina se încarcă...
Pagina se încarcă...
Pagina se încarcă...
Pagina se încarcă...
Pagina se încarcă...
Pagina se încarcă...
Pagina se încarcă...
Pagina se încarcă...
Pagina se încarcă...
Pagina se încarcă...
Pagina se încarcă...
Pagina se încarcă...
Pagina se încarcă...
Pagina se încarcă...
Pagina se încarcă...
Pagina se încarcă...
Pagina se încarcă...
Pagina se încarcă...
Pagina se încarcă...
Pagina se încarcă...
Pagina se încarcă...
Pagina se încarcă...
Pagina se încarcă...
Pagina se încarcă...
Pagina se încarcă...
Pagina se încarcă...
Pagina se încarcă...
Pagina se încarcă...
Pagina se încarcă...
Pagina se încarcă...
Pagina se încarcă...
Pagina se încarcă...
Pagina se încarcă...
Pagina se încarcă...
Pagina se încarcă...
Pagina se încarcă...
Pagina se încarcă...
Pagina se încarcă...
Pagina se încarcă...
Pagina se încarcă...
Pagina se încarcă...
Pagina se încarcă...
Pagina se încarcă...
Pagina se încarcă...
Pagina se încarcă...
Pagina se încarcă...
Pagina se încarcă...
Pagina se încarcă...
Pagina se încarcă...
Pagina se încarcă...
Pagina se încarcă...
Pagina se încarcă...
Pagina se încarcă...
Pagina se încarcă...
Pagina se încarcă...
Pagina se încarcă...
Pagina se încarcă...
Pagina se încarcă...
Pagina se încarcă...
Pagina se încarcă...
Pagina se încarcă...
Pagina se încarcă...
Pagina se încarcă...
Pagina se încarcă...
-
 1
1
-
 2
2
-
 3
3
-
 4
4
-
 5
5
-
 6
6
-
 7
7
-
 8
8
-
 9
9
-
 10
10
-
 11
11
-
 12
12
-
 13
13
-
 14
14
-
 15
15
-
 16
16
-
 17
17
-
 18
18
-
 19
19
-
 20
20
-
 21
21
-
 22
22
-
 23
23
-
 24
24
-
 25
25
-
 26
26
-
 27
27
-
 28
28
-
 29
29
-
 30
30
-
 31
31
-
 32
32
-
 33
33
-
 34
34
-
 35
35
-
 36
36
-
 37
37
-
 38
38
-
 39
39
-
 40
40
-
 41
41
-
 42
42
-
 43
43
-
 44
44
-
 45
45
-
 46
46
-
 47
47
-
 48
48
-
 49
49
-
 50
50
-
 51
51
-
 52
52
-
 53
53
-
 54
54
-
 55
55
-
 56
56
-
 57
57
-
 58
58
-
 59
59
-
 60
60
-
 61
61
-
 62
62
-
 63
63
-
 64
64
-
 65
65
-
 66
66
-
 67
67
-
 68
68
-
 69
69
-
 70
70
-
 71
71
-
 72
72
-
 73
73
-
 74
74
-
 75
75
-
 76
76
-
 77
77
-
 78
78
-
 79
79
-
 80
80
-
 81
81
-
 82
82
-
 83
83
-
 84
84


Tefal QB514G38 Manual de utilizare
- Categorie
- Procesatoare de alimente
- Tip
- Manual de utilizare
în alte limbi
- slovenčina: Tefal QB514G38 Používateľská príručka
- eesti: Tefal QB514G38 Kasutusjuhend
Lucrări înrudite
-
Tefal QB413H38 Manual de utilizare
-
Tefal QB413H38 Manual de utilizare
-
-
-
-
-
-