


3
Basics
Read me first
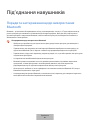
Please read this manual before using the device to ensure safe and proper use.
•
Descriptions are based on the device’s default settings.
•
Some content may differ from your device depending on the region, model
specifications, or device’s software. Images may differ in appearance from the actual
product. Content is subject to change without prior notice. Visit www.samsung.com to
view device information and more.
•
Before using other mobile devices, make sure they are compatible with the headset.
•
Some functions may not work as described in this manual depending on the maker and
model of the mobile device you connect to the device.
•
This product includes certain free/open source software. The licence information of the
open source software used in this product can be found at opensource.samsung.com.
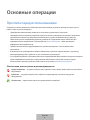
Instructional icons
Warning: situations that could cause injury to yourself or others
Caution: situations that could cause damage to your device or other equipment
Notice: notes, usage tips, or additional information
English (UK)
1

Basics
4
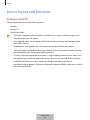
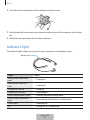
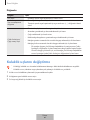
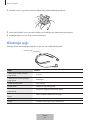
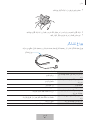
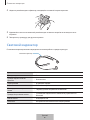
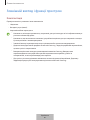
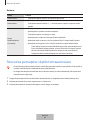
Device layout and functions
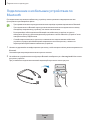
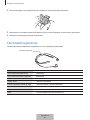
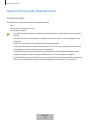
Package contents
Check the product box for the following items:
•
Headset
•
Ear tips (S)
•
Quick start guide
•
The items supplied with the headset, available accessories, and their images may
vary depending on the region.
•
The supplied items are designed only for this headset and may not be compatible
with other devices.
•
Appearances and specifications are subject to change without prior notice.
•
You can purchase additional accessories from the Samsung website. Make sure they
are compatible with the headset before purchase.
•
Use only Samsung-approved accessories. Using unapproved accessories may cause
the performance problems and malfunctions that are not covered by the warranty.
•
Availability of all accessories is subject to change depending entirely on
manufacturing companies. For more information about available accessories, refer to
the Samsung website.
English (UK)
2

Basics
5
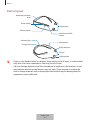
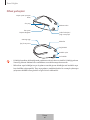
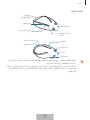
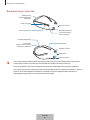
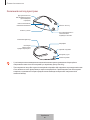
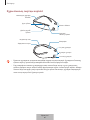
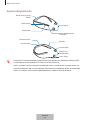
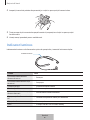
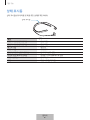
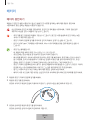
Device layout
Neckband (Vibration
area)
Power button
Volume button
Multifunction/Talk
button
Magnet area
Ear tips
Right earphone
Left earphone
Charger port
Indicator light
Microphone
•
If you use the headset when it is broken, there may be a risk of injury. Use the headset
only after it has been repaired at a Samsung Service Centre.
•
If dust or foreign materials enter the microphone or earphones, the headset’s sound
may become quiet or certain features may not work. If you attempt to remove the
dust or foreign materials with a sharp object, the headset may be damaged and its
appearance may be affected.
English (UK)
3

Basics
6
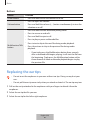
Buttons
Button Function
Power button
•
Press and hold to turn the headset on or off.
Volume button
•
Press to adjust the volume.
•
Press and hold the volume (+, -) button simultaneously to turn the
vibration on or off.
Multifunction/Talk
button
•
Press and hold to enter Bluetooth pairing mode.
•
Press to answer or end calls.
•
Press and hold to reject a call.
•
Press to play or pause multimedia files.
•
Press twice to skip to the next file during media playback.
•
Press three times to skip to the previous file during media
playback.
–
If you triple-press the Multifunction button three seconds
after a multimedia file begins playing, it will start the file from
the beginning. Triple-press the Multifunction button within
three seconds of when multimedia playback begins to play
the previous file.
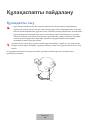
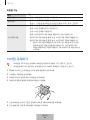
Replacing the ear tips
•
Do not insert the earphones in your ears without ear tips. Doing so may hurt your
ears.
•
Do not pull the ear tip excessively when you attach or detach it. The ear tip may tear.
1 Pull on the ear tip attached to the earphones with your fingers to detach it from the
earphones.
2 Select the ear tip that fits your ear.
3 Select the ear tip for the left or right earphone.
English (UK)
4

Basics
7
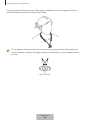
4 Cover the latch at the bottom of the earphone with the ear tip.
5 Hold the partially inserted ear tip in place and cover the rest of the earphone with the ear
tip.
6 Follow the same procedure for the other earphone.
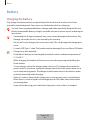
Indicator light
The indicator lights inform you of your headset’s operations and charging status.
Indicator light
Colour Status
Slowly flashes blue three
times
•
Turning on
Slowly flashes red three
times
•
Turning off
Continuously on red
•
Charging
Continuously on blue
•
Fully charged
Flashes red and blue in turn
•
Entering Bluetooth pairing mode
Quickly flashes blue three
times
•
Connected to mobile devices via Bluetooth
Flashes blue
•
Incoming call
Off
•
During use or in sleep mode
English (UK)
5

Basics
8
Battery
Charging the battery
Fully charge the battery before using the headset for the first time or when it has been
unused for extended periods. You cannot use the headset while it is charging.
Use only Samsung-approved battery, charger, and cable specifically designed for your
device. Incompatible battery, charger, and cable can cause serious injuries or damage to
your device.
•
Connecting the charger improperly may cause serious damage to the headset. Any
damage caused by misuse is not covered by the warranty.
•
Do not pull on the charger port cover excessively. This can damage the charger port
cover.
•
Use only USB Type-C cable. The headset may be damaged if you use Micro USB cable.
•
Chargers are sold separately.
•
The headset’s battery can be charged in locations with an ambient temperature of
5 °C to 50 °C.
•
While charging, the headset will not turn on even when pressing and holding the
Power button.
•
To save energy, unplug the charger when not in use. The charger does not have a
power switch, so you must unplug the charger from the electric socket when not in
use to avoid wasting power. The charger should remain close to the electric socket
and easily accessible while charging.
•
If there is sweat or liquid on the charger port, corrosion may occur on the headset.
When there is sweat or liquid on the charger port or USB cable, clean them before
connecting them.
•
If you will not be using your headset for a long time, store it after it is charged.
English (UK)
6

Basics
9
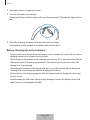
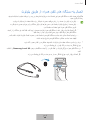
1 Open the headset’s charger port cover.
2 Connect the headset to a charger.
Charging will start and the headset will turn off automatically. The indicator light will turn
red.
3 After fully charging, disconnect the headset from the charger.
If the headset is fully charged, the indicator light will turn blue.
Battery charging tips and precautions
•
Using a power source other than the charger, such as a computer, may result in a slower
charging speed due to a lower electric current.
•
While charging, the headset and the charger may heat up. This is normal and should not
affect the headset’s lifespan or performance. If the battery gets hotter than usual, the
charger may stop charging.
•
If you charge the headset while the charger port is wet, the headset may be damaged.
Thoroughly dry the charger port before charging the headset.
•
If the headset is not charging properly, take the headset and the charger to a Samsung
Service Centre.
•
Avoid bending the USB cable. Doing so may damage or reduce the lifespan of the USB
cable. Never use a damaged USB cable.
English (UK)
7

Basics
10
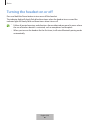
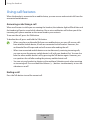
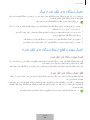
Turning the headset on or off
Press and hold the Power button to turn on or off the headset.
The indicator light will slowly flash blue three times when the headset turns on and the
indicator light will slowly flash red three times when it turns off.
•
Follow all posted warnings and directions from authorised personnel in areas where
the use of wireless devices is restricted, such as aeroplanes and hospitals.
•
When you turn on the headset for the first time, it will enter Bluetooth pairing mode
automatically.
English (UK)
8

11
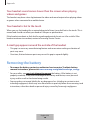
Connecting the headset
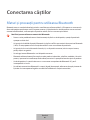
Tips and precautions for using Bluetooth
Bluetooth is a wireless technology standard that uses a 2.4 GHz frequency to connect to
various devices over short distances. It can connect and exchange data with other Bluetooth
enabled devices, such as mobile devices, without connecting via cables.
Notices for using Bluetooth
•
To avoid problems when connecting your headset to another device, place the
devices close to each other.
•
Ensure that your headset and the other Bluetooth device are within the maximum
Bluetooth connection range (10 m). The distance may vary depending on the
environment the devices are used in.
•
Ensure that there are no obstacles between the headset and a connected device,
including human bodies, walls, corners, or fences.
•
Do not touch the Bluetooth antenna of a connected device.
•
Bluetooth uses the same frequency as some industrial, scientific, medical, and low
power products and interference may occur when making connections near these
types of products.
•
Some devices, especially those that are not tested or approved by the Bluetooth SIG,
may be incompatible with the headset.
•
Do not use the Bluetooth feature for illegal purposes (for example, pirating copies of
files or illegally tapping communications for commercial purposes).
English (UK)
9

Connecting the headset
12
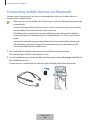
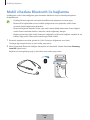
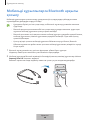
Connecting mobile devices via Bluetooth
You can receive incoming calls or listen to multimedia files with your headset when it is
connected to a mobile device.
•
When you turn on the headset for the first time, it will enter Bluetooth pairing mode
automatically.
•
Once connected via Bluetooth, the headset will try to connect to the most recently
paired mobile device automatically when it turns on.
•
If the Bluetooth connection fails or the mobile device cannot locate the headset,
remove the device’s information from the mobile device’s list. Then, try to connect
again.
•
Connection methods may vary depending on the connected mobile device, and
the Bluetooth connection range and sound quality may vary depending on the
connected mobile device’s performance.
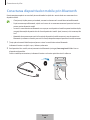
1 Press and hold the Multifunction button to enter Bluetooth pairing mode.
The indicator light will flash red and blue in turn.
2 On your mobile device, activate the Bluetooth feature and select
Samsung Level U2
from
the available devices list.
If a connection is established, the indicator light will quickly flash blue three times.
English (UK)
10

Connecting the headset
13
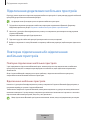
Connecting additional mobile devices
The headset can connect to up to two mobile devices at the same time. In this case, the
second mobile device you connect will be recognised as the primary device.
This feature may not be available on some mobile devices.
1 Connect the headset to the first mobile device via Bluetooth. Refer to Connecting mobile
devices via Bluetooth for more information.
2 Press and hold the headset’s Multifunction button to enter Bluetooth pairing mode again.
The first mobile device will be disconnected.
3 Connect the headset to the second mobile device in the same way as the first mobile
device.
4 Select the headset from the Bluetooth list on the first mobile device to reconnect it.
Reconnecting or disconnecting the mobile
devices
Reconnecting the mobile devices
If the Bluetooth connection ends due to distance issues between the headset and mobile
device, bring them closer together within a certain period of time to reconnect them
automatically.
If the Bluetooth connection ends due to the connected mobile device, use the Bluetooth
menu on the mobile device.
Disconnecting the mobile devices
Press and hold the headset’s Multifunction button. Then, the Bluetooth connection will end
and the headset will enter Bluetooth pairing mode again.
You can also end the Bluetooth connection when turning off the headset by pressing and
holding the Power button. In this case, the headset will be automatically connected with the
most recently paired mobile device when turning on the headset if it is in range.
Noise may occur if the Bluetooth connection is disconnected improperly.
English (UK)
11

14
Using the headset
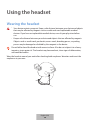
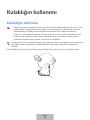
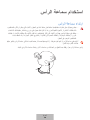
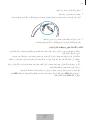
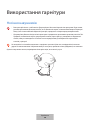
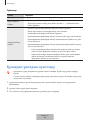
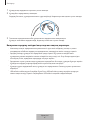
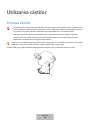
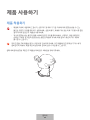
Wearing the headset
•
Your device contains magnets. Keep a safe distance between your device and objects
that may be affected by magnets such as credit cards and implantable medical
devices. If you have an implantable medical device, consult your physician before
use.
•
Keep a safe distance between your device and objects that are affected by magnets.
Objects such as credit cards, passbooks, access cards, boarding passes, or parking
passes may be damaged or disabled by the magnets in the device.
Do not fold or bend the headset with excessive force. Also do not subject it to a heavy
impact or strain against it. The headset may become bent, show signs of deformation,
and could be broken.
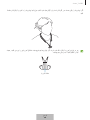
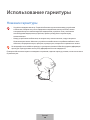
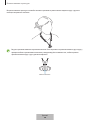
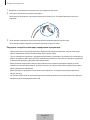
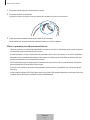
Wear the headset around your neck after checking both earphones’ direction and insert the
earphones in your ears.
English (UK)
12

Using the headset
15
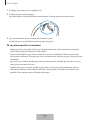
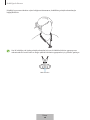
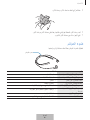
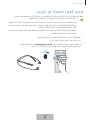
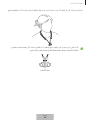
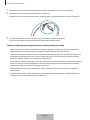
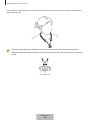
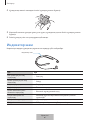
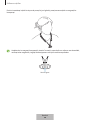
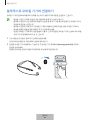
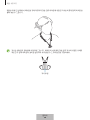
If you do not insert the earphones in your ears while wearing the headset around your neck,
you can connect the earphones with their built-in magnets.
Both earphones have built-in magnets inside them. If the earphones do not stick
together, check the magnet area and adjust their direction to make them stick together
properly.
Magnet area
English (UK)
13

Using the headset
16
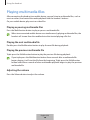
Playing multimedia files
After connecting the headset to a mobile device, you can listen to multimedia files, such as
music or videos, and control the media playback with the headset’s buttons.
On your mobile device, play music or video files.
Playing or pausing multimedia files
Press the Multifunction button to play or pause a multimedia file.
When two connected mobile devices are simultaneously playing multimedia files, the
headset will stream from the mobile device that started playing a file first.
Playing the next multimedia file
Double-press the Multifunction button to play the next file during playback.
Playing the previous multimedia file
Triple-press the Multifunction button to play the previous file during playback.
If you triple-press the Multifunction button three seconds after a multimedia file
begins playing, it will start the file from the beginning. Triple-press the Multifunction
button within three seconds of when multimedia playback begins to play the previous
multimedia file.
Adjusting the volume
Press the Volume button to adjust the volume.
English (UK)
14

Using the headset
17
Using call features
When the headset is connected to a mobile device, you can answer and control calls from the
connected mobile device.
Answering or declining a call
When a call comes in while you are wearing the headset, the indicator light will flash blue and
the headset will emit a sound while vibrating. Also a voice notification will inform you of the
incoming call’s phone number or the name saved in your contacts.
To answer the call, press the Talk button.
To decline the call, press and hold the Talk button.
•
When you play a multimedia file from one mobile device, you can still answer calls
from another mobile device, if both are connected to the headset. However, the
multimedia file will be paused and will resume after ending the call.
•
When two connected mobile devices are simultaneously receiving incoming calls,
you can answer the primary mobile device’s call with your headset first. You can also
take the other mobile device’s call by pressing the Talk button again. However, you
can speak on the call after ending the primary mobile device’s call.
•
You can set your headset to vibrate on the neckband (vibration area) when receiving
an incoming call. Press and hold the Volume (+, -) buttons simultaneously to turn the
vibration on or off.
Ending a call
Press the Talk button to end the current call.
English (UK)
15

18
Appendix
Troubleshooting
Before contacting a Samsung Service Centre, please attempt the following solutions. Some
situations may not apply to your headset.
Your headset does not turn on
•
When the battery is completely discharged, your headset will not turn on. Fully charge
the battery before turning on the headset.
•
While charging, the headset will not turn on even when pressing and holding the Power
button. You can turn the headset on after removing the charger.
Bluetooth device cannot locate your headset
•
Press and hold the headset’s Multifunction button to enter Bluetooth pairing mode.
•
Restart your headset and search for the headset again on the mobile device.
•
Ensure that your headset and the other Bluetooth device are within the maximum
Bluetooth connection range (10 m). The distance may vary depending on the
environment the devices are used in.
If the tips above do not solve the problem, contact a Samsung Service Centre.
A Bluetooth connection is not established or your headset and the
mobile device are disconnected
•
Ensure there are no obstacles, such as walls or electrical equipment, between the devices.
•
Ensure that your headset and the other Bluetooth device are within the maximum
Bluetooth connection range (10 m). The distance may vary depending on the
environment the devices are used in.
English (UK)
16

Appendix
19
The battery does not charge properly (For Samsung-approved
chargers)
•
Ensure that the charger is connected to properly.
•
If the charger port is dirty, the battery may not charge properly. Wipe the charger port
with a dry cloth and try charging the battery again.
If the tips above do not solve the problem, contact a Samsung Service Centre.
The battery depletes faster than when first purchased
•
When you expose the headset or the battery to very cold or very hot temperatures, the
useful charge may be reduced.
•
The battery is consumable and the useful charge will get shorter over time.
You cannot hear others speaking
Adjust the volume on the connected mobile device.
Sound echoes during a call
Adjust the volume on the connected mobile device or move to another area.
Others cannot hear you speaking on a call
•
Ensure that you are not covering the built-in microphone.
•
Ensure that the microphone is close to your mouth.
Audio quality is poor
•
Wireless network services may be disabled due to issues with the service provider’s
network. Ensure to keep the headset away from electromagnetic waves.
•
Ensure that your headset and the other Bluetooth device are within the maximum
Bluetooth range (10 m). The distance may vary depending on the environment the
devices are used in.
•
You may experience drops in volume or noise depending on the connected mobile
device’s volume. To avoid this, appropriately adjust the connected mobile device’s sound.
English (UK)
17

Appendix
20
Your headset sound comes slower than the screen when playing
videos and games
The headset may have a time lag between the video and sound output when playing videos
or games when connected to a mobile device.
Your headset is hot to the touch
When you use the headset for an extended period of time, it may feel hot to the touch. This is
normal and should not affect your headset’s lifespan or performance.
If the headset overheats or feels hot for a prolonged period, do not use it for a while. If the
headset continues to overheat, contact a Samsung Service Centre.
A small gap appears around the outside of the headset
•
This gap is a necessary manufacturing feature and some minor rocking or vibration of
parts may occur.
•
Over time, friction between parts may cause this gap to expand slightly.
Removing the battery
•
To remove the battery, contact an authorised service centre. To obtain battery
removal instructions, please visit www.samsung.com/global/ecodesign_energy.
•
For your safety, you must not attempt to remove the battery. If the battery is not
properly removed, it may lead to damage to the battery and device, cause personal
injury, and/or result in the device being unsafe.
•
Samsung does not accept liability for any damage or loss (whether in contract or tort,
including negligence) which may arise from failure to precisely follow these warnings and
instructions, other than death or personal injury caused by Samsung’s negligence.
English (UK)
18
Pagina se încarcă...
Pagina se încarcă...
Pagina se încarcă...
Pagina se încarcă...
Pagina se încarcă...
Pagina se încarcă...
Pagina se încarcă...
Pagina se încarcă...
Pagina se încarcă...
Pagina se încarcă...
Pagina se încarcă...
Pagina se încarcă...
Pagina se încarcă...
Pagina se încarcă...
Pagina se încarcă...
Pagina se încarcă...
Pagina se încarcă...
Pagina se încarcă...
Pagina se încarcă...
Pagina se încarcă...
Pagina se încarcă...
Pagina se încarcă...
Pagina se încarcă...
Pagina se încarcă...
Pagina se încarcă...
Pagina se încarcă...
Pagina se încarcă...
Pagina se încarcă...
Pagina se încarcă...
Pagina se încarcă...
Pagina se încarcă...
Pagina se încarcă...
Pagina se încarcă...
Pagina se încarcă...
Pagina se încarcă...
Pagina se încarcă...
Pagina se încarcă...
Pagina se încarcă...
Pagina se încarcă...
Pagina se încarcă...
Pagina se încarcă...
Pagina se încarcă...
Pagina se încarcă...
Pagina se încarcă...
Pagina se încarcă...
Pagina se încarcă...
Pagina se încarcă...
Pagina se încarcă...
Pagina se încarcă...
Pagina se încarcă...
Pagina se încarcă...
Pagina se încarcă...
Pagina se încarcă...
Pagina se încarcă...
Pagina se încarcă...
Pagina se încarcă...
Pagina se încarcă...
Pagina se încarcă...
Pagina se încarcă...
Pagina se încarcă...
Pagina se încarcă...
Pagina se încarcă...
Pagina se încarcă...
Pagina se încarcă...
Pagina se încarcă...
Pagina se încarcă...
Pagina se încarcă...
Pagina se încarcă...
Pagina se încarcă...
Pagina se încarcă...
Pagina se încarcă...
Pagina se încarcă...
Pagina se încarcă...
Pagina se încarcă...
Pagina se încarcă...
Pagina se încarcă...
Pagina se încarcă...
Pagina se încarcă...
Pagina se încarcă...
Pagina se încarcă...
Pagina se încarcă...
Pagina se încarcă...
Pagina se încarcă...
Pagina se încarcă...
Pagina se încarcă...
Pagina se încarcă...
Pagina se încarcă...
Pagina se încarcă...
Pagina se încarcă...
Pagina se încarcă...
Pagina se încarcă...
Pagina se încarcă...
Pagina se încarcă...
Pagina se încarcă...
Pagina se încarcă...
Pagina se încarcă...
Pagina se încarcă...
Pagina se încarcă...
Pagina se încarcă...
Pagina se încarcă...
Pagina se încarcă...
Pagina se încarcă...
Pagina se încarcă...
Pagina se încarcă...
Pagina se încarcă...
Pagina se încarcă...
Pagina se încarcă...
Pagina se încarcă...
Pagina se încarcă...
Pagina se încarcă...
Pagina se încarcă...
Pagina se încarcă...
Pagina se încarcă...
Pagina se încarcă...
Pagina se încarcă...
Pagina se încarcă...
Pagina se încarcă...
Pagina se încarcă...
Pagina se încarcă...
Pagina se încarcă...
Pagina se încarcă...
Pagina se încarcă...
Pagina se încarcă...
Pagina se încarcă...
Pagina se încarcă...
Pagina se încarcă...
Pagina se încarcă...
Pagina se încarcă...
Pagina se încarcă...
Pagina se încarcă...
Pagina se încarcă...
Pagina se încarcă...
Pagina se încarcă...
Pagina se încarcă...
Pagina se încarcă...
Pagina se încarcă...
Pagina se încarcă...
Pagina se încarcă...
Pagina se încarcă...
Pagina se încarcă...
Pagina se încarcă...
Pagina se încarcă...
Pagina se încarcă...
Pagina se încarcă...
Pagina se încarcă...
Pagina se încarcă...
Pagina se încarcă...
Pagina se încarcă...
Pagina se încarcă...
Pagina se încarcă...
Pagina se încarcă...
Pagina se încarcă...
Pagina se încarcă...
Pagina se încarcă...
-
 1
1
-
 2
2
-
 3
3
-
 4
4
-
 5
5
-
 6
6
-
 7
7
-
 8
8
-
 9
9
-
 10
10
-
 11
11
-
 12
12
-
 13
13
-
 14
14
-
 15
15
-
 16
16
-
 17
17
-
 18
18
-
 19
19
-
 20
20
-
 21
21
-
 22
22
-
 23
23
-
 24
24
-
 25
25
-
 26
26
-
 27
27
-
 28
28
-
 29
29
-
 30
30
-
 31
31
-
 32
32
-
 33
33
-
 34
34
-
 35
35
-
 36
36
-
 37
37
-
 38
38
-
 39
39
-
 40
40
-
 41
41
-
 42
42
-
 43
43
-
 44
44
-
 45
45
-
 46
46
-
 47
47
-
 48
48
-
 49
49
-
 50
50
-
 51
51
-
 52
52
-
 53
53
-
 54
54
-
 55
55
-
 56
56
-
 57
57
-
 58
58
-
 59
59
-
 60
60
-
 61
61
-
 62
62
-
 63
63
-
 64
64
-
 65
65
-
 66
66
-
 67
67
-
 68
68
-
 69
69
-
 70
70
-
 71
71
-
 72
72
-
 73
73
-
 74
74
-
 75
75
-
 76
76
-
 77
77
-
 78
78
-
 79
79
-
 80
80
-
 81
81
-
 82
82
-
 83
83
-
 84
84
-
 85
85
-
 86
86
-
 87
87
-
 88
88
-
 89
89
-
 90
90
-
 91
91
-
 92
92
-
 93
93
-
 94
94
-
 95
95
-
 96
96
-
 97
97
-
 98
98
-
 99
99
-
 100
100
-
 101
101
-
 102
102
-
 103
103
-
 104
104
-
 105
105
-
 106
106
-
 107
107
-
 108
108
-
 109
109
-
 110
110
-
 111
111
-
 112
112
-
 113
113
-
 114
114
-
 115
115
-
 116
116
-
 117
117
-
 118
118
-
 119
119
-
 120
120
-
 121
121
-
 122
122
-
 123
123
-
 124
124
-
 125
125
-
 126
126
-
 127
127
-
 128
128
-
 129
129
-
 130
130
-
 131
131
-
 132
132
-
 133
133
-
 134
134
-
 135
135
-
 136
136
-
 137
137
-
 138
138
-
 139
139
-
 140
140
-
 141
141
-
 142
142
-
 143
143
-
 144
144
-
 145
145
-
 146
146
-
 147
147
-
 148
148
-
 149
149
-
 150
150
-
 151
151
-
 152
152
-
 153
153
-
 154
154
-
 155
155
-
 156
156
-
 157
157
-
 158
158
-
 159
159
-
 160
160
-
 161
161
-
 162
162
-
 163
163
-
 164
164
-
 165
165
-
 166
166
-
 167
167
-
 168
168
-
 169
169
-
 170
170
-
 171
171
-
 172
172
-
 173
173
-
 174
174


în alte limbi
Lucrări înrudite
-
Samsung HEADSET LEVEL U EO-BG920B Manual de utilizare
-
-
-
-
-
-
-
-
-