
EASY FRY
™
MAX
www.tefal.com
www.moulinex.com
en
tr
es
bg
fr
hu
pt
sl
de
sr
it
pl
nl
bs
el
cs
sk
hr
ru
uk
kk
ro
et
lv
lt
ar
Digital recipe book

en
1
D
E
A
B
C

en
32
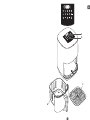
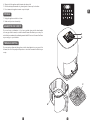
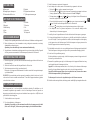
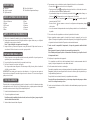
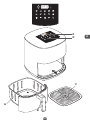
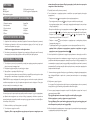
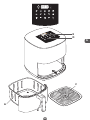
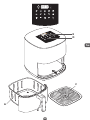
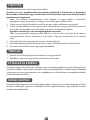
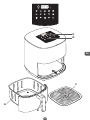
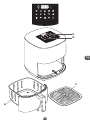
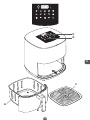
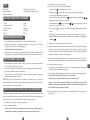
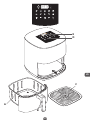
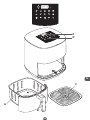
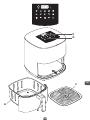
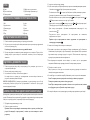
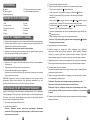
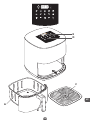
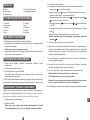
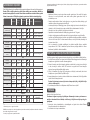
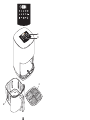
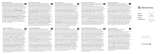
DESCRIPTION
A. Bowl
B. Bowl handle
C. Removable grid
D. Digital touchscreen panel
E. Time/temperature display
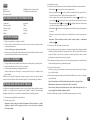
AUTOMATIC COOKING MODES
1. French Fries
2. Nuggets
3. Roasted chicken
4. Bacon / Beef bacon
5. Pizza
6. Steak
7. Fish
8. Vegetables
9. Shrimps
10. Desserts
BEFORE FIRST USE
1. Remove all packaging material and any stickers from the appliance.
2. Thoroughly clean the bowl and the removable grid with hot water, some washing-up liquid
and a non-abrasive sponge.
Note: the bowl and the grid are dishwasher safe.
3. Wipe the inside and outside of the appliance with a damp cloth. The appliance works by
producing hot air. Do not fill the bowl (A) with oil or frying fat.
PREPARING FOR USE
1. Place the appliance on a flat, stable, heat-resistant work surface away from water splashes.
2. Insert the grid at the bottom of the bowl, up to the stop.
3. Do not fill the bowl with oil or any other liquid.
Do not put anything on top of the appliance. This disrupts the airflow and affects the hot
air frying result.
IMPORTANT: To prevent the appliance from overheating, do not place it in a corner or below
a wall cupboard. A gap of at least 15cm should be left around the appliance to allow air to
circulate.
USING THE APPLIANCE
The appliance can cook a large range of recipes. Cooking times for the main foods are given
in the section ‘Cooking Guide’. Enjoy healthy and crispy dishes thanks to our wide variety of
recipes by flashing the QR code in the product sticker.
1. Connect the power supply cord to an electrical socket.
2. Place the food in the bowl.
Note: Never exceed the maximum amount indicated in the table (see section ‘Cooking
Guide’), as this could affect the quality of the end result.
3. Slide the bowl back into the appliance.
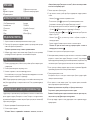
4. To begin cooking, you must select one of the automatic cooking mode:
• Press button to display the cooking mode.
• Then press button on the screen to select the desired cooking mode
(these modes are described in detail in the “Cooking guide” section).
• If needed, adjust the cooking time by pressing the button and adjusting the time with
the and buttons. The timer can be set for between 0 and 60 minutes.
• You can aslo adjust the temperature with the and buttons on the digital screen.
The thermostat varies from 70-200°C.
• Press to begin cooking with the selected temperature and time settings.
• Cooking starts. The selected temperature and remaining cooking time will alternate on
the screen display.
Note : During cooking, you can adjust the cooking time and the temperature by
pressing .
5. Excess oil from the food is collected in the bottom of the bowl.
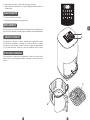
6. Some foods require shaking halfway through the cooking time (see section ‘Cooking Guide’).
To shake the food, pull the bowl out of the appliance by the handle and shake it. Then slide
the bowl back into the appliance, the cooking restarts automatically.
7. When you hear the timer sound, the cooking time set has finished. Pull the bowl out of the
appliance and place it on a heat-resistant surface.
8. Check if the food is ready.
If the food is not ready yet, simply slide the bowl back into the appliance and set the timer
for a few extra minutes.
9. When the food is cooked, take out the bowl. To remove food, use a pair of tongs to lift the
food out of the bowl.
Caution: The bowl should never be turn up side down with the grid.
After hot air frying, the bowl, the grid and the food are very hot.
Caution: Do not touch the bowl during use and for some time after use, as it gets very
hot. Only hold the bowl by the handle.
10.
When a batch of food is ready, the appliance is instantly ready for preparing another batch of food.

en
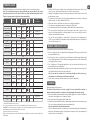
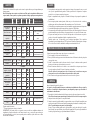
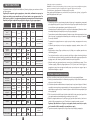
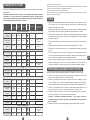
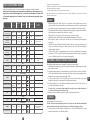
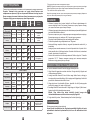
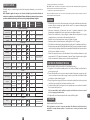
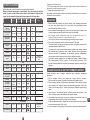
* Shake at least half way through cooking.
Tips: in order to improve the cooking result, do not hesitate to shake 2-3 times when cooking.
IMPORTANT: To avoid damaging your appliance, never exceed the maximum quantities of ingredients and
liquids indicated in the instruction manual and in the recipes.
**place the cake tin/oven dish in the bowl.
When you use mixtures that rise (such as with cake, quiche or muffins) the oven dish should not be filled more
than halfway.
TIPS
• Smaller food will require a slightly shorter cooking time than larger size food. If you are
unsure, you can open the bowl at any point of cooking to check progress.
• Shaking food halfway through the cooking time improves the end result and can help
prevent uneven cooking.
• To make your potatoes extra crispy, try adding a small amount of oil before cooking and
shake to evenly cover. We recommend 14 ml of oil.
• Snacks that can be cooked in an oven can also be cooked in the appliance.
• The optimal recommended quantity for cooking fries is 700 grams.
• Use ready made puff and shortcrust pastry to make filled snacks quickly and easily.
• Place an oven dish in the appliance’s bowl if you want to bake a cake or quiche or if you
want to fry delicate ingredients or filled ingredients. You can use an oven dish in silicon,
stainless steel, aluminium, terracotta.
• You can also use the appliance to reheat food. To reheat food, set the temperature to
160°C for up to 10 minutes. Cooking time could be adjusted depending on food quantity in
order to fully reheat the food.
MAKING HOME-MADE CHIPS
If you want to make home-made chips, follow the steps below.
1. Choose a variety of potato recommended for making chips. Peel the potatoes and cut them
into equal thickness chips.
2. Soak the potato chips in cold water for at least 30 minutes, drain them and dry them with
a clean, highly absorbent tea towel. Then pat with paper kitchen towel. The chips must be
thoroughly dry before cooking.
3. Pour 1 tablespoon of oil (vegetable, sunflower or olive) in a dry bowl, put the chips on top
and mix until they are coated with oil.
4. Remove the chips from the bowl with your fingers or a kitchen utensil so that any excess oil
stays behind in the bowl. Place the chips in the bowl.
Note: Do not tip the container of oil coated chips directly into the bowl in one go,
otherwise excess oil will end up at the bottom of the bowl.
5. Fry the chips according to the instructions in the section Cooking guide.
CLEANING
Clean the appliance after every use.
The bowl and the grid have a non-stick coating. Do not use metal kitchen utensils or
abrasive cleaning materials to clean them, as this may damage the nonstick coating.
1. Remove the mains plug from the wall socket and let the appliance cool down. Note: Remove
the bowl to let the appliance cool down more quickly.
2. Wipe the outside of the appliance with a damp cloth.
3. Clean the bowl and grid with hot water, some washing-up liquid and a non-abrasive sponge.
You can use a degreasing liquid to remove any remaining dirt.
Note: the bowl and the grid are dishwasher safe.
Tip: If food debris/residue is stuck at the bottom of the bowl and the grid, fill them with hot
water and some washing-up liquid. Let the bowl and the grid soak for approximately 10
minutes. Then rinse clean and dry.
54
Quantity
Approx Time
(min)
Temperature
(°C)
Cooking
mode Shake* Extra
information
Potatoes & fries
Frozen chips (10 mm x
10mm standard thickness)
300 - 800 g
20 - 30 min
180°C
Yes
Homemade French
Fries (8 x 8 mm)
300 - 800 g
25 - 35 min
180°C
Yes
Add 1 tbsp of oil
Frozen
potato wedges
300 - 800 g
22 - 30 min
180°C
Yes
Add 1 tbsp of oil
Meat & Poultry
Steak
100 - 500 g
6 - 10 min
180°C
Chicken breast
fillets (boneless)
100 - 500 g
12 - 19 min
180°C
Chicken (whole)
1000 g 60 min
200°C
Bacon / Beef bacon
150 g
(10 slices) 8 min
180°C
Yes Flip at mid-cooking
Fish
Salmon fillet
350 g
15 - 17 min
140°C
Prawns
12 pieces 4 min
170°C
Snacks
Frozen chicken nuggets
100 - 600 g
7 - 15 min
200°C
Yes
Frozen chicken wings
300 g 16 - 20 min
200°C
Yes
Frozen cheese sticks
125 g
(5 pieces)
7 - 9 min
180°C
Frozen onion rings
200 g
(10 pieces) 8 - 10 min
200°C
Yes
Pizza
400g
7 min
190°C
Vegetables
Zucchini
400 - 700 g 15 min
180°C
Baking
Muffins
7 pieces 15 -18 min
180°C Use a baking
tin/oven dish**
Cake 300 g 30 min
160°C
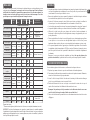
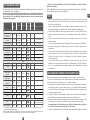
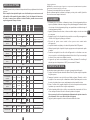
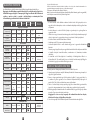
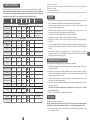
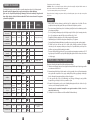
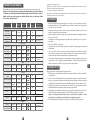
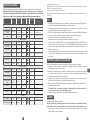
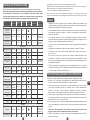
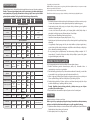
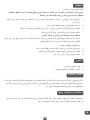
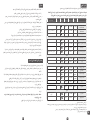
COOKING GUIDE
The table below helps you to select the basic settings for the food you want to prepare.
Note: The cooking times below are only a guide and may vary according to the variety
and batch of potatoes used. For other food the size, shape and brand may affect results.
Therefore, you may need to adjust the cooking time slightly.

7
fr
6
4. Wipe inside of the appliance with hot water and a damp cloth.
5. Clean the heating element with a dry, cleaning brush to remove any food residues.
6. Do not immerse the appliance in water or any other liquid.
STORAGE
1. Unplug the appliance and let it cool down.
2. Make sure all parts are clean and dry.
GUARANTEE AND SERVICE
If you need service or information or if you have a problem, please visit the brand website
(see cover page of this document) or contact the brand Consumer Care Centre in your country. You
can find the phone number in the worldwide guarantee leaflet. If there is no Consumer Care Centre
in your country, go to your local dealer.
TROUBLESHOOTING
If you encounter problems with the appliance, visit the brand website (see cover page of this
document) for a list of frequently asked questions or contact the Consumer Care Centre in your
country.
D
E
A
B
C

98
fr
3. Remettez la cuve dans l’appareil.
4. Pour lancer une cuisson, vous devez sélectionner un mode de cuisson automatique:
• Appuyez sur pour afficher les modes de cuisson
• Appuyez sur jusqu’à choisir le menu automatique souhaité (explication des modes
dans la section «Réglages»).
• Il est possible d’ajuster le temps de cuisson en appuyant sur la touche et en réglant
avec et de l’écran numérique. La minuterie va de 0 à 60 minutes.
• Vous pouvez ajuster la température en appuyant sur les boutons and de l’écran
numérique. Le thermostat varie de 70 à 200°C.
• Appuyez sur le bouton pour lancer la cuisson avec la température et le temps
sélectionnés.
• La cuisson commence. La température sélectionnée et le temps de cuisson restant
paraissent en alternance à l’écran.
5. Le surplus d’huile des ingrédients se dépose au fond de la cuve.
6. Certains ingrédients doivent être remués à mi-cuisson (voir la section « Réglages »). Pour
remuer les ingrédients, retirez la cuve de l’appareil en la tenant par la poignée et secouez.
Ensuite, remettez la cuve en place dans l’appareil. L’appareil se relance automatiquement.
7. Lorsque le temps de cuisson est écoulé, l’appareil sonne et s’arrête. Retirez la cuve de l’appareil
et posez-la sur une surface résistante à la chaleur.
8. Vérifiez si les ingrédients sont prêts.
Si les ingrédients ne sont pas encore prêts, réinsérez simplement la cuve dans l’appareil et
réglez la minuterie à quelques minutes supplémentaires.
9. Lorsque les ingrédients sont prêts, retirez la cuve et utilisez une pince pour retirer les
ingrédients.
Attention: Ne jamais retourner la cuve avec la grille.
Attention : Ne touchez pas la cuve pendant l’utilisation et un certain temps après
l’utilisation, car celle-ci devient très chaude. Tenez toujours la cuve par la poignée.
Après la cuisson à air chaud, la cuve, la grille et les ingrédients sont chauds.
10.
Lorsqu’un lot d’ingrédients est prêt, l’appareil est prêt instantanément pour préparer un autre lot.
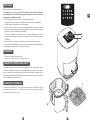
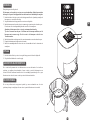
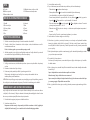
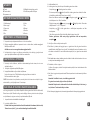
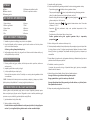
DESCRIPTION
A. Cuve
B. Poignée de la cuve
C. Grille amovible
D. Ecran numérique tactile
E. Affichage temps de cuisson/température
MODES DE CUISSON AUTOMATIQUES
1. Frites
2. Nuggets / croquettes
3. Poulet rôti
4. Bacon
5. Pizza
6. Steak
7. Poisson
8. Légumes
9. Crevettes
10. Desserts
AVANT LA PREMIÈRE UTILISATION
1. Retirez tout le matériel d’emballage et enlevez les autocollants de l’appareil.
2. Nettoyez bien la cuve et la grille amovible à l’eau chaude, avec du détergent à vaisselle et
une éponge non abrasive.
Remarque : ces pièces sont lavables au lave-vaisselle.
3. Essuyez l’intérieur et l’extérieur de l’appareil avec un chiffon humide. L’appareil fonctionne
à l’air chaud. Ne remplissez pas la cuve avec de l’huile ou de la graisse de friture.
PRÉPARATION À L’UTILISATION
1. Placez l’appareil sur une surface stable, horizontale, à l’épreuve de la chaleur et des
éclaboussures d’eau.
2. Insérez la grille au fond du bol, jusqu’à la butée.
3. Ne remplissez pas la cuve avec de l’huile ou tout autre liquide.
Ne posez rien sur l’appareil. Cela perturbe le débit d’air et nuit au résultat de la friture à
air chaud.
IMPORTANT : Pour éviter que l’appareil ne surchauffe, ne le placez pas dans un coin ou sous
un placard. Un espace de 15 cm minimum doit être laissé autour de l’appareil pour permettre
à l’air de circuler.
MODE D’EMPLOI DE L’APPAREIL
L’appareil permet de cuire une vaste gamme de recettes. Les temps de cuisson pour les
principaux ingrédients sont indiqués dans la section « Réglages ». Savourez des plats sains et
croustillants grâce à notre grande variété de recettes en flashant le code QR sur le sticker du
produit.
1. Insérez la fiche secteur sur une prise murale.
2. Retirez délicatement la cuve de l’appareil et mettez-y les ingrédients.
Remarque : Ne dépassez jamais la quantité indiquée dans le tableau (voir la section
« Réglages »), car cela pourrait nuire à la qualité du résultat final.

1110
fr
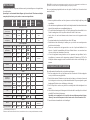
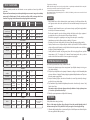
RÉGLAGES
Le tableau ci-dessous vous aide à sélectionner les réglages de base pour les ingrédients que vous
souhaitez préparer. Remarque : les temps de cuisson ne sont fournis qu’à titre de référence
et diffèrent selon la variété et la quantité de pommes de terre. Pour les autres aliments, les
résultats varient en fonction de leur grosseur, de leur forme et de leur marque. Il est donc
possible que vous ayez à modifier légèrement le temps de cuisson.
*Remuez à mi-cuisson
** Placez un moule à gâteau / plat à four dans le bol (silicone, acier inoxydable, aluminium, terre cuite).
IMPORTANT: Pour éviter d’endommager votre appareil, ne jamais dépasser les quantités maximales
d’ingrédients et les liquides indiqués dans le mode d’emploi et dans les recettes. Lorsque vous utilisez des
mélanges qui gonflent pendant la cuisson (comme un gâteau, une quiche ou des muffins), le plat du four
doit ne pas être rempli plus de la moitié.
Quantité
(g)
Temps
(min)
Température
(°C)
Mode de
cuisson
Remuez *
Informations
supplémentaires
Pommes de terre et frites
Frites surgelées fines 300 - 800 g
20 - 30 min
180°C
Oui
Frites maison (8 x 8 mm)
300 - 800 g
25 - 35 min
180°C
Oui
Ajouter une 1 c. à
soupe d’huile
Quartiers de pommes
de terre surgelées
300 - 800 g
22 - 27 min
180°C
Oui
Ajouter une 1 c. à
soupe d’huile
Viandes et volailles
Steaks congelés
100 - 500 g
6 - 10 min
180°C
Poitrines de poulet
(désossées)
100 - 500 g
12 - 19 min
180°C
Poulet (entier)
1000 g 60 min
200°C
Bacon / Lard de boeuf
150 g
(10 tranches)
8 min
180°C
Oui Retourner à mi-cuisson
Poisson
Pavé de saumon 350 g
15 - 17 min
140°C
Crevettes
12 pieces 4 min
170°C
Snacks
Nuggets de poulet
surgelées
100 - 600 g
7 - 15 min
200°C
Oui
Ailes de poulet surgelées
300 g 16 - 20 min
200°C
Oui
Bâtonnets de
fromages surgelés
125 g
(5 pieces)
7 - 9 min
180°C
Rondelles d’oignon surgelées
200 g
(10 pieces) 8 - 10 min
200°C
Oui
Pizza
400 g 7 min
190°C
Légumes
Légumes 300 g
15 - 20 min
200°C
Pâtisserie
Muffins 7 pièces 15 -18 min
180°C Utilisez un plat
allant au four**
Gâteau 300 g 30 min
160°C
CONSEILS
• Les petits ingrédients nécessitent généralement un temps de préparation légèrement plus
court que les ingrédients plus volumineux. Si vous n’êtes pas sûr, vous pouvez ouvrir le bol à
tout moment de la cuisson pour vérifier la cuisson.
• Remuer les ingrédients à mi-cuisson permet d’optimiser le résultat final et peut contribuer
à une meilleure homogénéité de la cuisson des ingrédients
• Ajoutez de l’huile aux pommes de terre fraîches pour obtenir un résultat croustillant et
secouez-les pour les couvrir uniformément. Nous recommandons 14 ml d’huile.
• Les bouchées qui peuvent être cuites au four peuvent également être cuites dans l’appareil.
• La quantité optimale de frites pour obtenir un résultat croustillant est de 700 grammes.
• Utilisez de la pâte toute prête pour préparer des bouchées fourrées rapidement et
facilement. La pâte toute prête nécessite également un temps de préparation plus court
que la pâte maison.
• Placez un plat allant au four dans la cuve de l’appareil si vous souhaitez préparer un gâteau
ou une quiche ou si vous voulez cuire des ingrédients fragiles ou fourrés. Vous pouvez
également utiliser un plat en silicone, en acier inoxydable, en aluminium ou en terre cuite.
• Vous pouvez également utiliser l’appareil pour réchauffer les ingrédients. Pour réchauffer
les ingrédients, réglez la température à 160ºC pour au plus 10 minutes. Le temps de cuisson
peut être ajusté en fonction de la quantité d’aliments afin de réchauffer complètement
les aliments.
Remarque : Lorsque vous utilisez des ingrédients qui lèvent (tels que des gâteaux, des
quiches ou des muffins), le plat allant au four ne doit pas être rempli à plus de la moitié.
CUISSON DE FRITES MAISON
Si vous souhaitez préparer des frites maison, veuillez suivre les étapes ci-dessous.
1. Épluchez les pommes de terre et coupez-les en bâtonnets de la même épaisseur.
2. Faites tremper les bâtonnets de pommes de terre dans un bol pendant au moins 30 minutes,
retirez-les et séchez-les avec du papier absorbant.
3. Versez 1 cuillère à soupe d’huile d’olive dans un bol, mettez-y les bâtonnets et mélangez
jusqu’à ce que les bâtonnets soient recouverts d’huile.
4. Enlevez les bâtonnets du bol avec vos doigts ou un ustensile de cuisine de sorte que le
surplus d’huile reste dans le bol. Mettez les bâtonnets dans la cuve.
Remarque : Ne penchez pas le bol pour mettre tous les bâtonnets dans la cuve en une
seule fois, afin d’éviter que le surplus d’huile reste au fond du bol.
5. Faites cuire les bâtonnets de pommes de terre conformément aux instructions de la section
« Réglages ».

13
de
12
NETTOYAGE
Nettoyez l’appareil après chaque utilisation.
Le revêtement de la cuve et de la grille est anti-adhésif. N’utilisez pas d’ustensiles de
cuisine métalliques ou des produits de nettoyage abrasifs pour les nettoyer, car cela peut
endommager le revêtement anti-adhésif.
1. Retirez la fiche secteur de la prise murale et laissez l’appareil refroidir
Remarque : Retirez la cuve pour laisser la friteuse à air chaud refroidir plus rapidement.
2. Essuyez l’extérieur de l’appareil avec un chiffon humide.
3. Nettoyez la cuve et la grille à l’eau chaude, avec du détergent à vaisselle et une éponge
non abrasive. Vous pouvez utiliser un liquide dégraissant pour enlever tout résidu de saleté.
Remarque: ces pièces sont lavables au lave-vaisselle.
Conseil: Si la saleté adhère au fond de la cuve ou sur la grille, remplissez la cuve avec de
l’eau chaude et du détergent à vaisselle. Laissez tremper la cuve et la grille pendant environ
10 minutes.
4. Nettoyez l’intérieur de l’appareil avec de l’eau chaude et une éponge non abrasive.
5. Nettoyez l’élément chauffant avec une brosse nettoyante pour retirer les résidus d’aliments.
6. N’immergez pas l’appareil dans l’eau ou tout autre liquide.
RANGEMENT
1. Débranchez l’appareil et laissez-le refroidir
2. Assurez-vous que toutes les pièces sont propres et sèches.
GARANTIE ET SERVICE APRÈS-VENTE
Si vous avez besoin d’un service après-vente ou d’informations ou en cas de problème, veuillez
consulter le site Web de la marque (voir page de couverture de cette notice) ou contacter le
service d’assistance à la clientèle de votre pays. Vous trouverez le numéro de téléphone dans le
livret de garantie mondiale. S’il n’y a pas de service clients dans votre pays, veuillez vous rendre
chez votre distributeur local de la marque.
DIAGNOSTIC D’ANOMALIE
Si vous avez des problèmes avec votre appareil, visitez le site web de la marque (voir page
de couverture de cette notice) pour consulter la foire aux questions ou contactez le service
d’assistance à la clientèle de votre pays.
D
E
A
B
C

1514
de
BESCHREIBUNG
A. Schüssel
B. Schüsselgriff
C. Entnehmbares Gitter
D. Trenneinsatz
E. Digitales Touchscreen-Feld
F. Uhrzeit-/Temperatur-Display
AUTOMATISCHE GARMODI
1. Pommes frites
2. Nuggets
3. Hähnchen
4. Speck
5. Pizza
6. Steak
7. Fisch
8. Gemüse
9. Garnelen
10. Dessert
VOR DEM ERSTEN GEBRAUCH
1. Entfernen Sie sämtliches Verpackungsmaterial und Sie alle Etiketten oder Aufkleber von
dem Gerät.
2. Waschen Sie die Schüssel, das entnehmbare Gitter und das Trenneinsatz gründlich mit
heißem Wasser, etwas Geschirrspülmittel und einem nicht scheuernden Schwamm ab.
Anmerkung: Sie können diese Teile auch in der Spülmaschine reinigen.
3. Wischen Sie die Innen- und Außenseite des Gerätes mit einem feuchten Tuch ab. Easy Fry
funktioniert durch die Erzeugung von heißer Luft. Füllen Sie die Schüssel (A) nicht mit Öl
oder Frittierfett.
VORBEREITUNG FÜR DEN GEBRAUCH
1. Stellen Sie das Gerät auf eine ebene, feste und hitzebeständige Arbeitsfläche geschützt vor
Wasserspritzern auf.
2. Setzen Sie den Rost bis zum Anschlag am Boden der Schüssel ein.
3. Füllen Sie die Schüssel nicht mit Öl oder anderen Flüssigkeiten.
Stellen Sie nichts auf das Gerät. Dies würde den Luftstrom unterbrechen und das Ergebnis
des Heißluftfrittierens beeinträchtigen.
WICHTIG: Stellen Sie das Gerät nicht in eine Ecke oder unter einen Wandschrank, um ein
Überhitzen zu vermeiden. Um das Gerät sollte ein Abstand von mindestens 15 cm gelassen
werden, damit die Luft zirkulieren kann.
GEBRAUCH DES GERÄTS
Mit Easy Fry können Sie eine große Palette von Gerichten zubereiten. Die Garzeiten für die
Hauptlebensmittel werden in dem Abschnitt „Leitfaden zum Garen“ angegeben. Genießen Sie
gesunde und knusprige Gerichte mit unserer großen Rezeptvielfalt durch Flashen des QR-Codes
auf dem Produktaufkleber.
1. Verbinden Sie das Netzkabel mit einer Steckdose.
2. Geben Sie die Lebensmittel in die Schüssel.
Hinweis: Füllen überschreiten Sie niemals die in der Tabelle angegebene Höchstmenge
(siehe Abschnitt „Garanleitung“), da andernfalls die Qualität des Garergebnisses
beeinträchtig werden könnte.
3. Setzen Sie die Schüssel wieder in das Gerät.
Vorsicht: Berühren Sie die Schüssel nicht während des Betriebs und für einige Zeit nach
dem Gebrauch, da sie sehr heiß wird. Fassen Sie die Schüssel nur am Griff an.
4. Um mit der Zubereitung der Speisen zu beginnen, müssen Sie einen automatischen Modus
auswählen:
• Drücken Sie die Taste, um den Garmodus anzuzeigen.
• Drücken Sie dann die Taste auf dem Touchscreen, um das gewünschte Garprogramm
(diese Programme werden ausführlich im Abschnitt „Garanleitung“ beschrieben)
auszuwählen.
• Um die Garzeit einzustellen, drücken Sie für die Garzeit die Taste und stellen Sie die
gewünschte Zeit mit den und Tasten ein. Der Timer kann zwischen 0 und 60
Minuten eingestellt werden.
• Sie können die Temperatur mit den und Tasten auf dem digitalen Touchscreen
ein. Der Temperaturregler kann von 70 bis 200°C eingestellt werden.
• Drücken Sie die um den Garvorgang mit der ausgewählten Temperatur und Garzeit
zu starten. Der Garvorgang beginnt nun. Die ausgewählte Temperatur und verbleibende
Garzeit werden abwechselnd auf dem Display angezeigt.
5. Überschüssiges Fett von den Lebensmitteln wird in der Schüssel gesammelt.
6. Manche Speisen müssen nach der Hälfte der Garzeit geschüttelt werden (siehe Abschnitt
„Garanleitung“). Ziehen Sie die Schüssel am Griff aus dem Gerät und schütteln Sie die Speisen.
Setzen Sie die Schüssel dann wieder in das Gerät ein. Das Gerät startet automatisch neu.
7. Wenn die Garzeit abgelaufen ist, erzeugt das Gerät ein akustisches Signal und schaltet sich
aus. Ziehen Sie die Schüssel aus dem Gerät und stellen Sie sie auf eine hitzebeständige
Oberfläche.
8. Prüfen Sie, ob die Speisen gar sind.
Wenn die Speisen nicht gar sind, schieben Sie einfach die Schüssel zurück in das Gerät und
stellen Sie den Timer für einige zusätzliche Minuten ein.
9. Sie die Schüssel heraus, wenn die Speisen gar sind. Nehmen Sie die Speisen mithilfe einer
Zange aus der Schüssel.
Vorsicht: Wenn Sie die Schüssel umdrehen, achten Sie auf überschüssiges Öl, das sich
möglicherweise am Boden der Schüssel angesammelt hat und das auf die Speisen tropfen
könnte, und passen Sie auf, dass das Gitter, nicht herausfällt. Nach dem Frittieren mit
Heißluft sind die Schüssel, das Gitter und die Speisen sehr heiß.
10. Wenn eine Portion fertig gegart ist, kann sofort eine neue Portion in Ihrer das Gerät
zubereitet werden.

1716
de
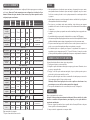
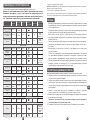
LEITFADEN ZUM GAREN
Die nachfolgende Tabelle hilft Ihnen, die grundlegenden Einstellungen für die Lebensmittel, die
Sie zubereiten möchten, auszuwählen.
Anmerkung: Die unten aufgeführten Garzeiten sind nur eine Orientierungshilfe und können
je nach Sorte und Menge der verwendeten Kartoffeln variieren. Bei anderen Lebensmitteln
können die Größe, Form und Marke das Ergebnis beeinflussen. Sie müssen daher eventuell
die Garzeit leicht anpassen.
Menge (g)
Zeit (min)
Temperatur
(°C)
Entspre-
chender
Frittienvor-
gang
Schütteln* Zusatzinformationen
Kartoffeln und Pommes frites
Tiefgekühlte Pommes
Frites (10 mm x 10 mm
Standarddicke)
300 - 800 g
15 - 25 min
180°C
Ja
Frische Pommes Frites
(8 x 8 mm)
300 - 800 g
22 - 32 min
180°C
Ja
1 EL Öl dazugeben
Tiefgekühlte Kartoffelspalten
300 - 800 g
22 - 27 min
180°C
Ja
1 EL Öl dazugeben
Fleisch und Geflügel
Tiefgekühltes Steak
100 - 500 g
6 - 10 min
180°C
Hühnerbrustfilets
(ohne Knochen)
100 -
500 g
12 - 19 min
180°C
Ganzes Hähnchen
1000 g 60 min
200°C
Speck / Rindfleisch Speck
150 g 8 min
180°C
Ja Nach der Hälfte der Garzeit
wenden
Fisch
Lachssteak
350 g
15 - 17 min
140°C
Garnelen 12 Stücke 4 min
170°C
Snacks
Hähnchennuggets
tiefgekühlt
100 - 600 g
7 - 15 min
200°C
Ja
Tiefgekühlte
Hähnchenflügel
300 g 16 - 20 min
200°C
Ja
Tiefgekühlte
Käsestäbchen
125 g
(5 Stücke)
7 - 9 min
180°C
Tiefgekühlte Onion
Rings
200 g
(10 Stücke)
8 - 10 min
200°C
Ja
Pizza
400 g 7 min
190°C
Gemüse
Gemüse
300 g
Kochen : 10 min
200°C
Backen
Muffins
7 Stücke 15 -18 min
180°C Benutzen Sie eine
Backform/Auflaufform**
Schokoladenkuchen
300 g 30 min
160°C
* Nach der Hälfte der Garzeit schütteln
WICHTIG: Um Beschädigungen an Ihrem Gerät zu vermeiden, überschreiten Sie niemals die Höchstmengen der
in der Bedienungsanleitung und in den Rezepten angegebenen Zutaten und Flüssigkeiten.
**Stellen Sie eine Back-/Auflaufform in die Schüssel (Auflaufform aus Silikon, Edelstahl,
Aluminium, Terrakotta).
Wenn Sie Mischungen benutzen, die aufgehen (wie zum Beispiel Kuchen, Quiche oder Muffins),
sollte die Auflaufform nur bis zur Hälfte gefüllt sein.
TIPPS
• Kleinere Lebensmittel benötigen gewöhnlich eine etwas kürzere Garzeit als größere
Lebensmittel. Wenn Sie sich nicht sicher sind, können Sie die Schüssel jederzeit öffnen, um
den Fortschritt zu überprüfen.
• Wenn Sie Lebensmittel Größe nach der Hälfte der Garzeit schütteln, verbessern Sie das
Endergebnis. Zudem kann so verhindert werden, dass die Speisen ungleichmäßig garen.
• Damit Ihre Kartoffeln besonders knusprig werden, geben Sie vor dem Kochen eine kleine
Menge Öl dazu und schütteln Sie sie, um sie gleichmäßig zu bedecken. Wir empfehlen 14
ml Öl.
• Snacks, die in einem Backofen gebacken werden können, können auch in das Gerät
zubereitet werden.
• Die optimale, empfohlene Menge zur Zubereitung von Pommes frites beträgt 700 Gramm.
• Benutzen Sie Fertigmürbe- und Blätterteig, um schnell und mühelos gefüllte Snacks
zuzubereiten.
• Stellen Sie eine Auflaufform in das Gerät Schüssel, wenn Sie einen Kuchen oder eine Quiche
backen möchten oder wenn Sie zerbrechliche Zutaten oder gefüllte Zutaten frittieren
möchten. Sie können eine Back- oder Auflaufform aus Silikon, Edelstahl, Aluminium,
Terrakotta verwenden.
• Sie können das Gerät auch zum Aufwärmen von Speisen benutzen. Stellen Sie zum
Aufwärmen von Speisen die Temperatur für bis zu 10 Minuten lang auf 160°C. Die Garzeit
kann je nach Lebensmittelmenge angepasst werden, um die Lebensmittel vollständig
aufzuwärmen.
HAUSGEMACHTE POMMES FRITES HERSTELLEN
Wenn Sie hausgemachte Pommes frites zubereiten möchten, folgen Sie diesen Schritten:
1. Wählen Sie eine Kartoffelsorte, die für die Zubereitung von Pommes frites empfohlen wird.
2. Kartoffeln schälen und in Stäbchen von ca. 1 cm Dicke schneiden.
3. Kartoffelstäbchen mindestens 30 Minuten in einer Schüssel mit kaltem Wasser einweichen,
dann abtropfen lassen und mit einem sauberen, sehr saugfähigen Geschirrhandtuch
abtrocknen. Dann mit einem Papiertuch abtupfen. Die Kartoffeln müssen komplett trocken
sein, bevor sie frittiert werden.
4. 1 Esslöffel Öl (Pflanzen-, Sonnenblumen-, Olivenöl usw.) in eine trockene Schüssel geben,
Kartoffelstäbchen darauf legen und umrühren, bis sie mit Öl bedeckt sind.
5. Pommes frites mit den Fingern oder einem Küchenutensil aus der Schüssel nehmen, sodass
überschüssiges Öl in der Schüssel zurückbleibt. Pommes frites in die Schüssel geben.
Anmerkung: Kippen Sie die Behälter mit den ölbedeckten Pommes frites nicht direkt in
die Schüssel, sonst läuft das überschüssige Öl in die Schüssel.
6. Frittieren Sie die Pommes frites nach den Anleitungen in dem Abschnitt Leitfaden zum Garen.

REINIGUNG
Reinigen Sie das Gerät nach jedem Gebrauch.
Die Schüssel und das Gitter sind mit einer Antihaftbeschichtung versehen. Benutzen Sie
keine Küchenutensilien aus Metall oder scheuernde Reinigungsmaterialien zur Reinigung,
da diese die Antihaftbeschichtung beschädigen können.
1. Ziehen Sie den Netzstecker aus der Wandsteckdose und lassen Sie das Gerät abkühlen.
Anmerkung: Entnehmen Sie die Schüssel, damit das Gerät sich schneller abkühlen kann.
2. Wischen Sie die Außenseite des Gerätes mit einem feuchten Tuch ab.
3. Waschen Sie die Schüssel und das Gitter mit heißem Wasser, etwas Geschirrspülmittel und
einem nicht scheuernden Schwamm ab.
Sie können eine Entfettungsflüssigkeit zum Entfernen restlicher Verschmutzungen benutzen.
Anmerkung: Die Schüssel und das Gitter sind geschirrspülmaschinenfest.
Tipp: Falls Schmutz am Boden der Schüssel und dem Gitter haftet, füllen Sie die Schüssel mit
heißem Wasser und etwas Geschirrspülmittel. Lassen Sie die Schüssel und das Gitter etwa
10 Minuten lang einweichen. Dann beide Teile abspülen und abtrocknen.
4. Wischen Sie die Innenseite des Gerätes mit einem in heißem Wasser angefeuchteten Tuch
sauber.
5. Reinigen Sie das Heizelement mit einer trockenen Reinigungsbürste, um Speisereste zu
entfernen.
6. Tauchen Sie das Gerät nicht in Wasser oder eine andere Flüssigkeit.
AUFBEWAHRUNG
1. Ziehen Sie den Stecker des Geräts und lassen Sie das Gerät abkühlen.
2. Achten Sie darauf, dass alle Elemente sauber und trocken sind.
GARANTIE UND KUNDENDIENST
Wenn Sie den Kundendienst oder Informationen benötigen oder wenn Sie ein Problem haben,
besuchen Sie unsere Marke-Website oder kontaktieren Sie den Kundendienst in Ihrem Land. Sie
finden die Telefonnummer in dem Heft mit der weltweiten Garantie. Falls sich kein Consumer
Care Centre in Ihrem Land befindet, wenden Sie sich an Ihren Marke-Händler vor Ort.
FEHLERBEHEBUNG
Falls Probleme mit Ihrem Gerät auftreten, besuchen Sie Marke-Website, wo Sie eine Liste mit
häufig gestellten Fragen finden oder kontaktieren Sie den Kundendienst in Ihrem Land.
19
nl
18
D
E
A
B
C

2120
nl
BESCHRIJVING
A. Binnenpan
B. Handgreep van binnenpan
C. Uitneembaar Grillrooster
D
. Verdeler
E. Digitaal aanraakscherm
F. Tijd/temperatuurweergave
AUTOMATISCHE PROGRAMMA’S
1. Friet
2. Nuggets
3. Gebraden kip
4. Spek
5. Pizza
6. Biefstuk
7. Groenten
8. Vis
9. Garnalen
10. Nagerecht
VOOR INGEBRUIKNAME
1. Verwijder al het verpakkingsmateriaal en haal alle stickers en/of etiketten van het apparaat af.
2. Reinig de binnenpan en het uitneembare rooster grondig met warm water, een beetje
afwasmiddel en een zachte spons.
Opmerking: deze onderdelen zijn tevens vaatwasmachinebestendig.
3. Veeg de binnen- en buitenkant van het apparaat schoon met een vochtige doek. Easy Fry werkt
door het genereren van warme lucht. Vul de binnenpan (A) niet met olie of frituurvet.
VOOBEREIDING VOOR GEBRUIK
1. Plaats het apparaat op een vlak, stabiel en warmtebestendig oppervlak en uit de buurt van
opspattend water.
2. Setzen Sie den Rost bis zum Anschlag am Boden der Schüssel ein.
3. Vul de binnenpan niet met olie of een andere vloeistof.
Plaats niets op het apparaat. Dit belemmert de luchtstroom en heeft een negatieve impact
op het bakresultaat.
BELANGRIJK: Om oververhitting van het apparaat te vermijden, plaats het niet in een hoek of
onder een kast. Er moet een ruimte van ten minste 15 cm rond het apparaat worden vrijgelaten
om lucht te laten circuleren.
HET APPARAAT GEBRUIKEN
Met het apparaat kunt u vele verschillende ingrediënten bereiden. De baktijden voor de
voornaamste ingrediënten zijn vermeld in de sectie «Instellingen». Geniet van gezonde en
knapperige gerechten dankzij onze grote verscheidenheid aan recepten door de QR-code in de
productsticker te laten knipperen.
1. Steek de stekker in een stopcontact.
2. Doe de ingrediënten in de binnenpan.
Opmerking: Overschrijd nooit de maximum hoeveelheid zoals aangegeven in de tabel
(zie de sectie ‘Kookgids’), dit kan een negatieve impact op het bakresultaat hebben.
3. Schuif de binnenpan opnieuw in het apparaat.
4. Om het bakproces te starten, moet u de automatische programma’s selecteren.
• Druk op de knop om de programma’s weer te geven.
• Druk vervolgens op de knop op het scherm om het gewenste programma te selecteren
(deze programma’s worden in detail beschreven in de sectie “Kookgids”).
• De temperatuur pas in met de en knop op het digitaal scherm. De thermostaat
kan worden ingesteld tussen 40 en 220°C.
• U kunt de kooktijd aanpassen door op te drukken en aan te passen met met de en
knop. De timer kan worden ingesteld tussen 0 en 60 minuten.
• Druk op de om het bakproces met de gekozen temperatuur en tijd te starten.
• Het bakproces start. De gekozen temperatuur en de resterende baktijd worden
afwisselend op het scherm weergegeven.
5. Overtollig olie van de ingrediënten wordt in de onderkant van de binnenpan opgevangen.
6. Voor bepaalde ingrediënten is het nodig om ze op de helft van de baktijd te schudden (zie
de sectie “Kookgids”). Om de ingrediënten te schudden, trek de binnenpan via de handgreep
uit het apparaat en schud de binnenpan. Schuif de binnenpan vervolgens opnieuw in das
Gerät Het apparaat start automatisch opnieuw op.
7. Als de baktijd is verstreken, hoort u een geluidssignaal en wordt het apparaat uitgeschakeld.
Trek de binnenpan uit het apparaat en plaats het op een warmtebestendig oppervlak.
8. Controleer of de ingrediënten gaar zijn.
Als de ingrediënten nog niet gaar zijn, schuif de binnenpan opnieuw in het apparaat en stel
de timer nog enkele minuten in.
9. Eenmaal de ingrediënten gaar zijn, haal de binnenpan uit het apparaat. Gebruik een tang
om de ingrediënten uit de binnenpan te halen.
Opgelet: Als u de binnenpan omdraait, kan er olie, die zich op de bodem van de binnenpan
bevindt, op de ingrediënten druppelen en kan het rooster uit het apparaat vallen.
Opgelet: Raak de binnenpan tijdens en kort na gebruik niet aan, deze wordt zeer warm.
Houd de binnenpan alleen bij de handgreep vast.
De binnenpan, het rooster en de ingrediënten zijn na het frituren zeer warm.
10. Na het bereiden van ingrediënten, kan het apparaat onmiddellijk opnieuw gebruikt worden.

* Schud halverwege het bakproces.
**Plaats een cakevorm/ovenschaal in de kom (ovenschaal van siliconen, roestvrij staal, aluminium, terracotta).
BELANGRIJK: Om schade aan uw apparaat te vermijden, overschrijd nooit de maximum hoeveelheden aan
ingrediënten en vloeistoffen die in de gebruiksaanwijzing en recepten zijn vermeld.
Als u een rijzend mengsel gebruikt (zoals een cake, quiche of muffins), vul de ovenschaal niet
meer dan de helft.
TIPS
• Kleinere ingrediënten hebben over het algemeen een kortere baktijd nodig dan grotere
ingrediënten.
• Het schudden van ingrediënten aan de helft van de baktijd verbetert het eindresultaat en kan
helpen bij het vermijden van een ongelijkmatig bakproces.
• Voor extra krokante aardappelen voegt u vóór de bereiding een kleine hoeveelheid olie toe.
Schud de aardappelen om de olie goed te verdelen. We raden 14 ml olie aan.
• Snacks die in de oven bereid kunnen worden, kunnen tevens in het apparaat worden
gebakken.
• De optimale aanbevolen hoeveelheid te frituren friet is 700 gram.
• Gebruik kant-en-klare bladerdeeg of zanddeeg om op een snelle en eenvoudige manier
gevulde snacks te bereiden.
• Plaats een ovenschaal in de het apparaat als u een cake of quiche wilt bakken of als u
delicate of gevulde levensmiddelen wilt frituren. Gebruik hiervoor een ovenschaal van
siliconen, roestvrij staal, aluminium of terracotta.
• U kunt het apparaat tevens gebruiken voor het opwarmen van ingrediënten. Om de
ingrediënten op te warmen, stel de temperatuur gedurende 10 minuten op 160°C in. De
kooktijd kan worden aangepast aan de hoeveelheid voedsel om het voedsel volledig op te
warmen.
ZELFGEMAAKTE FRIET BEREIDEN
Als u zelfgemaakte friet wilt bereiden, volg onderstaande stappen.
1. Kies een aardappelsoort die voor het maken van friet is aanbevolen. Schil de aardappelen
en snij ze in frieten van een gelijke dikte.
2. Week de friet minstens 30 minuten in een kom met koud water, voer het water af en maak
de friet droog met een schone en goed absorberende theedoek. Dep ze vervolgens droog met
keukenpapier. De friet moet voor het frituren goed droog zijn.
3. Giet 1 eetlepel olie in een kom, voeg de friet toe en meng totdat de friet volledig met olie is
bedekt.
4. Haal de friet met uw vingers of keukengerei uit de schaal zodat de overtollige olie in de schaal
achterblijft. Doe de friet in de binnenpan.
Opmerking: om te vermijden dar er olie op de bodem van de binnenpan komt te liggen,
raden wij u aan om de binnenpan niet om te draaien om de friet in de mand te doen.
5. Frituur de friet zoals vermeld in de sectie “instellingen”.
2322
nl
INSTELLINGEN
Onderstaande tabel zal u helpen met het kiezen van de juiste instellingen voor de ingrediënten
die u wilt bereiden.
Opmerking: de onderstaande bakinstellingen zijn louter indicatief. Deze kunnen afwijken
naargelang de herkomst, grootte, merk en vorm van uw ingrediënten.
Hoeveelheid
(g)
Tijd (mins)
Temperatuur
(°C)
Overe-
enkomstig
programma
Schud
halverwege
de baktijd*
Extra
informatie
Aardappelen en friet
Bevroren dunne friet
(10 mm x 10mm)
300 - 800 g
15 - 25 min
180°C
ja
Zelfgemaakte friet
(8 x 8 mm)
300 - 800 g
22 - 32 min
180°C
ja
Voeg een 1 eetlepel
olie toe
Bevroren
aardappelpartjes
300 - 800 g
22 - 27 min
180°C
ja
Voeg een 1 eetlepel
olie toe
Viees en gevogelte
Bevroren gehakt
100 - 500 g
6 - 10 min
180°C
Diepgevroren
gehaktballen
100 - 500 g
12 - 19 min
180°C
Kipfilet (zonder bot)
1000 g 60 min
200°C
Spek / Rundvlees spek
150 g 8 min
180°C
ja
Halverwege het koken
omdraaien
Vis
Zalmfilet
350 g
15 - 17 min
140°C
Garnaal 12 stuks 4 min
170°C
Snacks
Diepgevroren kipnuggets
100 - 600 g
7 - 15 min
200°C
ja
Diepgevroren
kippenvleugels
300 g 16 - 20 min
200°C
ja
Diepgevroren kaassticks
125 g
(5 stuks)
7 - 9 min
180°C
Diepgevroren uienringen
200 g
(10 stuks) 8 - 10 min
200°C
ja
Pizza
400 g 7 min
190°C
Groenten
Groenten
300 g
Bereiden : 10 min
200°C
Bakken
Muffins 7 stuks 15 -18 min
180°C Gebruik een bakvorm/
ovenschaal**
Chocolade taarten 300 g 30 min
160°C

25
es
24
REINIGING
Reinig het apparaat na elk gebruik.
De binnenpan en de mand zijn voorzien van een anti-aanbaklaag. Gebruik geen metalen
keukengerei of agressief reinigingsmiddel om schade aan de anti-aanbaklaag te vermijden.
1. Haak de stekker uit het stopcontact en laat het apparaat afkoelen. Opmerking: verwijder de
binnenpan voor een snellere afkoeling.
2. Veeg de buitenkant van het apparaat schoon met een vochtige doek.
3. Maak de binnenpan en de mand schoon in een warm sopje en met een niet-schurende spons.
U kunt tevens een ontvettingsmiddel gebruiken om alle vuil te verwijderen.
Opmerking: de binnenpan en het rooster zijn vaatwasmachinebestendig.
Tip: als er etensresten aan de pan of de bodem van de binnenpan vastkleven, vul de
binnenpan met een warm sopje. Doe het rooster in de binnenpan en laat dit circa
10 minuten weken.
4. Maak de binnenkant van het apparaat schoon met warm water en een niet-schurende spons.
5. Dompel de behuizing van het apparaat nooit in water.
6. Maak het verwarmingselement schoon met een schoonmaakborstel om de etensresten te
verwijderen.
OPSLAG
1. Haal de stekker uit het stopcontact en zorg dat het apparaat voldoende is afgekoeld.
2. Zorg dat alle onderdelen schoon en droog zijn.
GARANTIE EN KLANTENSERVICE
Als u contact wilt opnemen met onze klantenservice voor meer informatie of er treedt een
probleem op, raadpleeg de merk-website of neem contact op met de klantenservice van
uw land. Het telefoonnummer bevindt zich in het wereldwijde garantieboekje. Als er geen
klantenservice in uw land is, neem contact op met uw lokale merk winkelier.
FOUTOPSPORING
Als er een probleem met uw apparaat optreedt, ga naar merk-website om de sectie
probleemoplossing te raadplegen of neem contact op met de klantenservice in uw land.
D
E
A
B
C

DESCRIPCIÓN
A. Canasta
B. Asa de la canasta
C. Rejilla extraíble
D. Panel táctil digital
E. Pantalla de temperatura/tiempo
MODOS AUTOMÁTICOS DE COCCIÓN
1. Papas a la francesa
2. Pepitas
3. Pollo asado
4. Tocino
5. Pizza
6. Carne
7. Pescado
8. Verduras
9. Camarón
10. Postres
ANTES DE USAR POR PRIMERA VEZ
1. Retire todo el material de embalaje y las calcomanías del aparato.
2. Limpie minuciosamente la sartén y la rejilla extraíble con agua caliente, un poco de líquido
lavavajillas y una esponja no abrasiva.
Nota : Se puede limpiar estas partas en el lavavajillas.
3. Limpie el interior y el exterior del aparato con un paño húmedo. El dispositivo funciona con
aire caliente. No llene la canasta con aceite o grasa para freír.
PREPARACIÓN PARA EL USO
1. Ubique el aparato en una superficie nivelada, horizontal y estable. No coloque el aparato en
superficies que no sean resistentes al calor.
2. Inserte la rejilla en la parte inferior de la canasta, hasta el tope.
3. No llene la canasta con aceite ni otro líquido.
No coloque nada encima del aparato. Esto interrumpe el flujo de aire y afecta el resultado
de freído con aire caliente.
IMPORTANTE: Para evitar que el aparato se sobrecaliente, no lo coloques en una esquina ni
bajo una alacena de pared. Es necesario dejar un hueco de al menos 15 cm en torno al aparato
para que circule el aire.
USO DEL APARATO
El aparato puede cocinar una amplia gama de recetas. Los tiempos de cocción de los alimentos principales
se encuentran en la sección “Guía de cocción”. Disfruta de platos sanos y crujientes gracias a nuestra amplia
variedad de recetas mostrando el código QR en la etiqueta del producto.
1. Enchufe el cable de alimentación en el tomacorriente.
2. Coloque los ingredientes en la canasta.
Nota: Nunca exceda la cantidad indicada en el cuadro (vea la sección «Ajustes»), ya que esto podría
afectar la calidad del resultado final.
3. Vuelva a deslizar la canasta dentro del aparato.
4. Para comenzar a cocinar, se debe seleccionar la configuración del modo de cocción automático.
• Presione el botón para ver el modo de cocción en pantalla.
• Después, presione el botón en pantalla para seleccionar el modo de cocción deseado (estos modos
se describen en detalle en la sección “Guía de cocción”).
• Se puede cambiar el tiempo de cocción deseado presionando el botón y ajustando el tiempo con
los botones y . El temporizador se puede configurar entre 0 y 60 minutos.
•
Si se necessita, ajuste la temperatura con los botones y en la pantalla digital. El
termostato varía de 70-200°C.
• Presione el botón
para comenzar a cocinar con las configuraciones de temperatura y tiempo
seleccionadas.
• La cocción comenzará. La temperatura seleccionada y el tiempo restante de cocción se alternarán en
la pantalla.
5. El exceso de aceite de los ingredientes se recolecta en la parte inferior de la sartén
6. Algunos ingredientes requieren agitado a la mitad de su tiempo de preparación (vea la sección
«Ajustes»). Para agitar los ingredientes, retire la sartén del aparato por la asa y agítela. Después, deslice
el recipiente hacia dentro del artefacto. El aparato se reinicia automáticamente.
7. Cuando escuche la campanilla del temporizador, el tiempo de preparación establecido habrá
finalizado.
Retire la canasta del aparato y colóquela sobre una superficie resistente al calor.
Nota: También puede apagar el aparato de forma manual. Para hacerlo, gire la perilla de control
del temporizador hasta 0.
8. Verifique que los ingredientes estén preparados.
Si los ingredientes no están listos todavía, simplemente deslice la canasta nuevamente dentro del
aparato y configure el temporizador con unos minutos adicionales.
9. Vacíe la canasta dentro de un tazón o una bandeja.
Para retirar los ingredientes, use un par de pinzas para levantar los ingredientes y retirarlos de la canasta.
Precaución: Cuando gire la canasta, preste atención al exceso de aceite recogido en la parte inferior y a
la rejilla extraíble que puede caerse.
Después de freír con aire caliente, la canasta y los ingredientes están calientes.
Precaución: No toque la canasta durante el uso y cierto tiempo después de usarla ya que se calienta
mucho. Solo sostenga la canasta por el asa.
10. Cuando una tanda de alimentos esté lista, el artefacto está inmediatamente preparado para cocinar
la siguiente tanda.
2726
es

AJUSTES
Este cuadro a continuación le ayuda a seleccionar los ajustes básicos para los ingredientes que
desea preparar.
Nota: Recuerde que estos ajustes son indicaciones. Dado que los ingredientes difieren en su
origen, tamaño, forma y marca, no podemos garantizar el mejor ajuste para sus ingredientes.
2928
es
Cantidad
(g)
Tiempo
(min)
Temperatura
(°C)
Modo de
cocción
Agitar *
Información adicional
Papas y papas fritas
Papas fritas finas
congeladas
300 - 800 g
15 - 25 min
180°C
Sí
Papas fritas caseras
300 - 800 g
22 - 32 min
180°C
Sí
Agregar une cucharada de
aceite
Rodajas de papa
congeladas
300 - 800 g
22 - 27 min
180°C
Sí
Agregar une cucharada de
aceite
Carne de res y carne de ave
Bistec
100 - 500 g
6 - 10 min
180°C
Pechuga de pollo
100 - 500 g
12 - 19 min
180°C
Pollo (entero)
1000 g 60 min
200°C
Beicon de cerdo/
ternera
150 g 8 min
180°C
Sí Dar la vuelta a media cocción
Pescado
Filete de salmón
350 g
15 - 17 min
140°C
Gambas 12 piezas 4 min
170°C
Bocadillos
Trocitos de pollo
empanizados congelados
100 - 600 g
7 - 15 min
200°C
Sí
Alitas de pollo
congeladas
300 g 16 - 20 min
200°C
Sí
Palitos de queso
empanizados congelados
125 g
(5 piezas)
7 - 9 min
180°C
Aros de cebolla
congelados
200 g
(10 piezas) 8 - 10 min
200°C
Sí
Pizza
400 g 7 min
190°C
Verduras
Verduras
300 g
Cocción : 10 min
200°C
Horneado
Panqués
7 piezas 15 -18 min
180°C
Use fuente para horno
Torta
300 g 30 min
160°C
*Agitar a mitad de camino.
** Coloque la fuente para horno en la sartén.
IMPORTANTE: Para evitar daños a su aparato, nunca exceda las cantidades máximas de
ingredientes y líquidos indicados en las Instrucciones de uso y recetas. Al usar mezclas que
se hinchan durante la cocción (como un pastel, quiche o muffins), el plato del horno no debe
llenarse más de la mitad.
SUGERE
• Los ingredientes más pequeños suelen requerir un tiempo de preparación un poco más
corto que los ingredientes más grandes. Si duda, puede abrir el recipiente en cualquier
punto de la cocción para comprobar el progreso.
• Agitar los ingredientes más pequeños a la mitad del tiempo de preparación optimiza el
resultado final.
• Para conseguir patatas extracrujientes, añade un poco de aceite antes de cocinarlas y
agítalas para cubrirlas uniformemente. Recomendamos usar 14 ml de aceite.
• Los bocadillos que se pueden preparar en un horno también se pueden preparar en el dispositivo.
• La cantidad óptima para preparar papas fritas crujientes es 700 gramos.
• Use una masa prehecha para preparar bocadillos rellenos de forma rápida y fácil. La masa
prehecha también requiere un tiempo de preparación más corto que el de la masa casera.
• Coloque una fuente para horno en la cesta del dispositivo si desea hornear un pastel o
quiche o si desea freír ingredientes frágiles o ingredientes rellenos.
• También puede usar el dispositivo. para recalentar ingredientes. Para recalentar
ingredientes, ajuste la temperatura a 160°C por hasta 10 minutos. Deberá ajustar el tiempo
de cocción en función de la cantidad de comida para recalentarla del todo.
PREPARACIÓN DE PAPAS FRITAS CASERAS
Si desea hacer papas fritas caseras, siga los pasos a continuación.
1. Pele las papas y córtelas en forma de bastones.
2. Remoje los bastones de papa en un tazón durante al menos 30 minutos, retírelas y séquelas
con papel de cocina.
3. Vierta 1 cucharada de aceite de oliva en un tazón, coloque los bastones arriba y mezcle
hasta que los bastones estén recubiertos con aceite.
4. Retire los bastones del tazón con los dedos o con un utensilio de cocina para que el exceso
de aceite quede en el tazón. Coloque los bastones en la sartén
Nota: No incline el tazón para poner todos los bastones en la cesta de una vez, para
evitar que el exceso de aceite termine en la parte inferior de la sartén.
5. Fría los bastones de papas según las instrucciones en la sección «Ajustes».
LIMPIEZA
Limpie el aparato después de cada uso.
La canasta y la rejilla extraíble tienen un recubrimiento antiadherente. No use utensilios
metálicos o materiales de limpieza abrasivos para limpiarlas porque se podría dañar el
recubrimiento antiadherente.
1. Desenchufe el cable de alimentación del tomacorriente y deje que el aparato se enfríe.
Nota: Retire la canasta para permitir que la freidora de aire se enfríe con mayor rapidez.
2. Limpie el exterior del aparato con un paño húmedo.
3. Limpie la canasta y la rejilla extraíble con agua caliente, un poco de líquido lavavajillas y una
esponja no abrasiva. Puede usar un líquido desengrasante para retirar la suciedad que reste.
Nota : Se puede limpiar estas partes en el lavavajillas.
Consejo: Si hay suciedad pegada en la rejilla extraíble o en la parte inferior de la sartén,
llene la sartén con agua caliente y algo de líquido lavavajillas. Coloque la rejilla extraíble en
la sartén y déjela en remojo por aproximadamente 10 minutos.

31
pt
30
4. Limpie el interior del aparato con agua caliente y una esponja no abrasiva.
5. Limpie el elemento de calentamiento con un cepillo de limpieza para retirar los residuos de
comida que haya.
ALMACENAMIENTO
1. Desenchufe el aparato y déjelo enfriar.
2. Asegúrese de que todas las partes estén limpias y secas.
MEDIO AMBIENTE
No arroje el aparato con la basura normal del hogar cuando termine su vida útil, entréguelo en un
punto de recolección oficial para su reciclado. Al hacer esto ayudará a conservar el medio ambiente.
GARANTÍA Y SERVICIO
Si necesita servicio o información o si tiene un problema, visite la página web de la marca
(ver la portada de este manual) o comuníquese con el Centro de atención al consumidor
de la marca en su país. Encontrará el número de teléfono en el folleto de garantía mundial.
Si no hay Centro de atención al cliente en su país, vaya al distribuidor local de la marca.
DETECCIÓN DE PROBLEMAS
Si tiene problemas con el aparato, visite la página web de la marca (ver la portada de este
manual). Para ver una lista de preguntas frecuentes o comuníquese con el Centro de atención
al cliente.
D
E
A
B
C

3332
pt
DESCRIÇÃO
A. Cuba
B. Alça da cuba
C. Grade removível
D. Painel digital touch screen
E. Visor de tempo/temperatura
F. Saída de ar
MODOS DE COZIMENTO AUTOMÁTICO
1. Fritas
2. Nuggets frango
3. Frango assado
4. Bacon
5. Pizza
6. Bife
7. Peixe
8. Legumes
9. Camarão
10. Sobremesa
ANTES DO PRIMEIRO USO
1. Remova todos os objetos da embalagem o qualquer adesivo do equipamento.
2. Limpe bem a cuba e a grade removível com água quente, um pouco de detergente líquido
e uma esponja não abrasiva.
Observação: Você também pode limpar estas peças na máquina de lavar louça.
3. Limpe o interior e exterior do equipamento com um pano molhado. O aparelho funciona
produzindo ar quente. Não preencha cuba com óleo ou gordura para fritura.
PREPARANDO PARA USO
1. Coloque o equipamento em uma superfície estável, horizontal e nivelada. Não coloque o
aparelho sobre uma superfície não resistente ao calor.
2. Insira a grade no fundo da cuba, até o batente.
3. Não preencha cuba com óleo ou qualquer outro líquido.
Não coloque nada em cima do equipamento. Isso interrompe o fluxo de ar e afeta o
resultado da fritura em ar quente.
IMPORTANTE: para evitar o sobreaquecimento do aparelho, não o coloque num canto ou
encostado a um armário de parede. Deve deixar uma distância de, pelo menos, 15 cm à volta
do aparelho para permitir a circulação de ar.
USANDO O EQUIPAMENTO
O equipamento pode preparar um amplo leque de receitas. O tempo de preparo para os
principais alimentos é indicado na seção ‘Guia de cozinha’. Desfrute de pratos saudáveis e
crocantes graças à nossa grande variedade de receitas, exibindo o código QR na etiqueta do
produto.
1. Insira o plugue em uma tomada de acordo com a voltagem do produto.
2. Coloque os ingredientes na cuba.
Observação: Nunca exceda a quantidade indicada na tabela (consulte a seção
‘Configurações’), pois isso pode afetar a qualidade do resultado final.
3. Coloque a cuba de volta ao aparelho.
4. Para começar a cozinhar, você deve selecionar um modo de cozimento automático:
• Pressione o botão para exibir o modo de cozimento.
• Pressione em seguida o botão na tela para escolher o modo de cozimento desejado
(esses modos são descritos em detalhe na seção “Guia de cozimento”).
• Você pode alterar o tempo de cozimento, pressionando o botão e ajustando o tempo
com os botões e . O timer pode ser definido para de 0 a 60 minutos.
• Ajuste a temperatura com os botões e na tela digital. O termostato varia de
70 a 200°C.
• Pressione o botão Start para iniciar o cozimento com os dados escolhidos de temperatura
e tempo.
• Inicia-se o cozimento. A temperatura escolhida e o tempo de cozimento restante vão
alternar-se na tela do visor.
5. O excesso de óleo dos ingredientes é coletado no fundo da cuba.
6. Alguns alimentos precisam ser agitados na metade do tempo de cozimento (ver seção
“Guia de Cozimento”). Para mexer os alimentos, puxe o cesto para fora do aparelho pela
pega e agite-o.
Em seguida, deslize o copo de volta no aparelho. O aparelho reinicia automaticamente.
7. Quando ouvir o apito do timer, o tempo de preparação definido se esgotou. Retire a cuba
do aparelho e coloque-a sobre uma superfície resistente ao calor.
8. Verifique se a comida está pronta.
Se a comida ainda não estiver pronta, basta colocar a cuba de volta no aparelho e ajustar
o timer para alguns minutos extras.
9. Quando a comida estiver cozida, retire a cuba. Para remover o alimento, use um par de
pinças para retirá-la da cuba.
Cuidado: Ao virar a cuba, tome cuidado com qualquer excesso de óleo coletado na parte
inferior da cuba que pode vazar na comida e que pode fazer a grade cair.
Cuidado: Não toque na panela durante e algum tempo após o uso, pois ela fica muito
quente. Só segure a panela pela alça.
Depois de fritar em ar quente, a cuba, a grelha e a comida ficam muito quentes.
10. Assim que o alimento estiver pronto, o aparelho fica pronto de imediato para preparar
outra receita.

3534
pt
A tabela abaixo ajuda você a selecionar as configurações básicas para preparar a comida que
você deseja. Observação: Tenha em mente que essas configurações são indicações. Como
alimentos diferem em origem, tamanho, forma e marca, não podemos garantir a melhor
configuração para seus alimentos.
GUIA DE COZIMENTO
Quantidade
min-máx (g)
Tempo
aproximado
(min)
Temperatura
(°C)
Modo de
cozimento Agitar* Informação adicional
Batatas e fritas
Batata frita
congelada
(espessura 10 mm
x 10 mm)
300 - 800 g
15 - 25 min
180°C
Sim
Batata frita in
natura (8 x 8 mm)
300 - 800 g
22 - 32 min
180°C
Sim Adicione 1 colher de
sopa de óleo
Batata rústica
congelada
300 - 800 g
22 - 27 min
180°C
Sim Adicione 1 colher de
sopa de óleo
Carne e aves
Bife congelado
100 - 500 g
6 - 10 min
180°C
Filés de peito de
frango (sem osso)
100 - 500 g
12 - 19 min
180°C
Frango (inteiro)
1000 g 60 min
200°C
Bacon/bacon
de vaca
150 g 8 min
180°C
Sim Virar a meio da cozedura
Peixe e frutos do mar
Filé de salmão
350 g
15 - 17 min
140°C
Camarões médios
12 pedaços 4 min
170°C
Snacks
Nuggets de frango
congelados
100 - 600 g
7 - 15 min
200°C
Sim
Asas de frango
congeladas
300 g 16 - 20 min
200°C
Sim
Palitos de queijo
congelados
125 g
(5 pedaços)
7 - 9 min
180°C
Anéis de cebola
congelados
200 g
(10 pedaços) 8 - 10 min
200°C
Sim
Vegetals
Vegetais
300 g
Cozimento : 10 min
200°C
Cozimento
Muffins 7 pedaços 15 -18 min
180°C Use um tabuleiro/
forma de forno **
Bolo 300 g 30 min
160°C
DICAS
• Uma quantidade maior de alimento requer um tempo de preparação um pouco maior,
uma quantidade menor de alimento requer um tempo de preparação um pouco menor.
Se não tiver a certeza, pode abrir o cesto a qualquer momento da cozedura para verificar
o progresso.
• Agitar alimentos menores no meio da preparação otimiza o resultado final e pode ajudar a
evitar ingredientes fritados de forma desigual.
• Para tornar as suas batatas ainda mais estaladiças, tente adicionar uma pequena
quantidade de óleo antes de cozinhar e agite para cobrir uniformemente. Recomendamos
14 ml de óleo.
• Os alimentos que podem ser preparados em um forno também podem ser preparados nao
aparelho.
• A quantidade ideal para a preparação de batatas fritas crocantes é de 700 gramas.
• Use uma massa pré-fabricada para preparar lanches com recheio de forma rápida e fácil. A massa
pré-fabricada também requer um tempo de preparação mais curto do que a massa caseira.
• Coloque em uma forma que pode ser levada ao forno na cuba se quiser assar um bolo ou
quiche, ou caso queira fritar ingredientes frágeis ou ingredientes com recheio.
• Você também pode usar a aparelho para reaquecer os ingredientes. Para reaquecer os
ingredientes, ajuste a temperatura para 160 ° C por até 10 minutos. O tempo de cozedura
pode ser ajustado dependendo da quantidade para reaquecer completamente os alimentos.
FAZENDO BATATA FRITA IN NATURA
Se deseja fazer batatas fritas in natura, siga as etapas abaixo.
1. Descasque as batatas e corte-as em palitos.
2. Mergulhe os palitos de batata em uma tigela com agua por pelo menos 30 minutos, tire-os
e seque-os com papel toalha.
3. Despeje 1 colher de sopa de azeite em uma tigela, coloque os palitos na parte superior e
misture até os palitos serem revestidos com óleo.
4. Remova os palitos da tigela com os dedos ou um utensílio de cozinha para que o excesso de
óleo permaneça na tigela. Coloque os palitos na cuba.
Observação: Não incline a tigela para colocar todos os palitos na cuba de uma só vez,
para evitar que o excesso de óleo acabe na parte inferior da panela.
5. Frite os palitos de batata de acordo com as instruções na seção 'Configurações'.
LIMPEZA
Limpe o equipamento após cada uso.
A panela e a cuba possuem um revestimento antiaderente. Não use utensílios de cozinha
metálicos ou materiais de limpeza abrasivos para limpá-los, pois isso pode danificar o
revestimento antiaderente.
1. Remova o plugue da tomada e deixe o aparelho esfriar. Observação: Retire a cuba para
deixar a aparelho esfriar mais rapidamente.
2. Limpe o exterior do equipamento com um pano úmido.
*Agite na metade do cozimento.
**coloque a forma de bolo/forno na cuba

36
3. Limpe a panela e a cuba com água quente, um pouco de detergente líquido e uma esponja
não abrasiva.
Você pode usar um líquido tira gordura para remover a sujeira restante.
Observação: A cuba e grade são laváveis na máquina de lavar louça.
Dica: Se a sujeira estiver grudada no fundo da cuba e na grade, encha-as com água quente
e um pouco de detergente. Deixe a cuba e a grade de molho por aproximadamente 10
minutos. Em seguida, enxague e seque.
4. Limpe o interior do equipamento com água quente e uma esponja não abrasiva.
5. Limpe o elemento de aquecimento com uma escova de limpeza para remover quaisquer
resíduos de alimentos.
6. Não mergulhe o aparelho em água ou qualquer outro líquido.
ARMAZENAMENTO
1. Desconecte o aparelho e deixe esfriar.
2. Verifique se todas as peças estão limpas e secas.
AMBIENTE
Não jogue o equipamento fora com lixo doméstico normal no final de sua vida útil, descarte-o
em um ponto de coleta oficial para reciclagem. Ao fazer isso, você ajuda a preservar o meio
ambiente
GARANTIA E SERVIÇO
Se precisar de serviços ou informações ou caso tenha um problema, visite o site da marca (veja
a capa destas instruções de uso) ou entre em contato com o Centro de atendimento ao cliente
da Arno em seu país. Você encontra seu número de telefone no folheto de garantia mundial.
RESOLUÇÃO DE PROBLEMAS
Se encontrar problemas no aparelho, visite o site da marca para obter uma lista de perguntas
frequentes ou entre em contato com o Centro de atendimento ao cliente em seu país
Pagina se încarcă...
Pagina se încarcă...
Pagina se încarcă...
Pagina se încarcă...
Pagina se încarcă...
Pagina se încarcă...
Pagina se încarcă...
Pagina se încarcă...
Pagina se încarcă...
Pagina se încarcă...
Pagina se încarcă...
Pagina se încarcă...
Pagina se încarcă...
Pagina se încarcă...
Pagina se încarcă...
Pagina se încarcă...
Pagina se încarcă...
Pagina se încarcă...
Pagina se încarcă...
Pagina se încarcă...
Pagina se încarcă...
Pagina se încarcă...
Pagina se încarcă...
Pagina se încarcă...
Pagina se încarcă...
Pagina se încarcă...
Pagina se încarcă...
Pagina se încarcă...
Pagina se încarcă...
Pagina se încarcă...
Pagina se încarcă...
Pagina se încarcă...
Pagina se încarcă...
Pagina se încarcă...
Pagina se încarcă...
Pagina se încarcă...
Pagina se încarcă...
Pagina se încarcă...
Pagina se încarcă...
Pagina se încarcă...
Pagina se încarcă...
Pagina se încarcă...
Pagina se încarcă...
Pagina se încarcă...
Pagina se încarcă...
Pagina se încarcă...
Pagina se încarcă...
Pagina se încarcă...
Pagina se încarcă...
Pagina se încarcă...
Pagina se încarcă...
Pagina se încarcă...
Pagina se încarcă...
Pagina se încarcă...
Pagina se încarcă...
Pagina se încarcă...
Pagina se încarcă...
Pagina se încarcă...
Pagina se încarcă...
Pagina se încarcă...
Pagina se încarcă...
Pagina se încarcă...
Pagina se încarcă...
Pagina se încarcă...
Pagina se încarcă...
Pagina se încarcă...
Pagina se încarcă...
Pagina se încarcă...
Pagina se încarcă...
Pagina se încarcă...
Pagina se încarcă...
Pagina se încarcă...
Pagina se încarcă...
Pagina se încarcă...
Pagina se încarcă...
Pagina se încarcă...
Pagina se încarcă...
Pagina se încarcă...
Pagina se încarcă...
Pagina se încarcă...
Pagina se încarcă...
-
 1
1
-
 2
2
-
 3
3
-
 4
4
-
 5
5
-
 6
6
-
 7
7
-
 8
8
-
 9
9
-
 10
10
-
 11
11
-
 12
12
-
 13
13
-
 14
14
-
 15
15
-
 16
16
-
 17
17
-
 18
18
-
 19
19
-
 20
20
-
 21
21
-
 22
22
-
 23
23
-
 24
24
-
 25
25
-
 26
26
-
 27
27
-
 28
28
-
 29
29
-
 30
30
-
 31
31
-
 32
32
-
 33
33
-
 34
34
-
 35
35
-
 36
36
-
 37
37
-
 38
38
-
 39
39
-
 40
40
-
 41
41
-
 42
42
-
 43
43
-
 44
44
-
 45
45
-
 46
46
-
 47
47
-
 48
48
-
 49
49
-
 50
50
-
 51
51
-
 52
52
-
 53
53
-
 54
54
-
 55
55
-
 56
56
-
 57
57
-
 58
58
-
 59
59
-
 60
60
-
 61
61
-
 62
62
-
 63
63
-
 64
64
-
 65
65
-
 66
66
-
 67
67
-
 68
68
-
 69
69
-
 70
70
-
 71
71
-
 72
72
-
 73
73
-
 74
74
-
 75
75
-
 76
76
-
 77
77
-
 78
78
-
 79
79
-
 80
80
-
 81
81
-
 82
82
-
 83
83
-
 84
84
-
 85
85
-
 86
86
-
 87
87
-
 88
88
-
 89
89
-
 90
90
-
 91
91
-
 92
92
-
 93
93
-
 94
94
-
 95
95
-
 96
96
-
 97
97
-
 98
98
-
 99
99
-
 100
100
-
 101
101


în alte limbi
- Türkçe: Tefal EY2453CH Kullanım kılavuzu
Lucrări înrudite
Alte documente
-
 Russell Hobbs 21840-56 Manual de utilizare
-
Redmond RMC-M90E Manualul proprietarului
-
Redmond M92S-E Manualul proprietarului
-
Redmond RMC-M95E Manualul proprietarului
-
 Russell Hobbs 20810-56 Manual de utilizare
-
Teesa TSA8053 Digital Air Fryer Manualul proprietarului
-
-
BABYMOOV A001115_UK Manual de utilizare
-
Tesla AirCook Q40 Manual de utilizare
-
 KikkaBoo Snack bowl Manual de utilizare


