Parkside PEH 30 A1 ELECTRIC PLANER Operation and Safety Notes
- Tip
- Operation and Safety Notes

IAN 93528
ELECTRIC PLANER PEH 30 A1
ELEKTROHOBEL
Bedienungs- und Sicherheitshinweise
Originalbetriebsanleitung
ELEKTRIČNA BLANJALICA
Upute za posluživanje i za Vašu sigurnost
Prijevod originalnih uputa za uporabu
ЕЛЕКТРИЧЕСКО РЕНДЕ
Инструкции за обслужване и безопасност
Превод на оригиналното ръководство за експлоатация
ΗΛΕΚΤΡΙΚΗ ΠΛΑΝΗ
Υποδείξει χειρισού και ασφαλεία
Μετάφραση των αυθεντικών οδηγιών λειτουργίας
ELECTRIC PLANER
Operation and Safety Notes
Translation of original operation manual
RINdEA ELECTRICă
Instrucţiuni de utilizare şi de siguranţă
Traducerea instrucţiunilor de utilizare originale

GB Operation and Safety Notes Page 5
HR Upute za posluživanje i za Vašu sigurnost Stranica 15
RO Instrucţiuni de utilizare şi de siguranţă Pagina 25
BG Инструкции за обслужване и безопасност Страница 35
GR Υποδείξει χειρισού και ασφαλεία Σελίδα 45
DE / AT / CH Bedienungs- und Sicherheitshinweise Seite 55
Before reading, unfold both pages containing illustrations and familiarise yourself with all functions of the
device.
Rasklopite prije čitanja obije stranice sa slikama i nakon toga se upoznajte sa svim funkcijama uređaja.
Înainte de a citi instrucţiunile, priviţi ambele pagini cu imagini şi familiarizaţi-vă cu toate funcţiile aparatului.
Преди да прочетете отворете двете страници с фигурите и след това се запознайте с всички
функции на уреда.
Πριν ξεκινήσετε την ανάγνωση, ανοίξτε τι δυο σελίδε ε τι εικόνε και εξοικειωθείτε ε όλε τι
λειτουργίε τη συσκευή.
Klappen Sie vor dem Lesen die beiden Seiten mit den Abbildungen aus und machen Sie sich anschließend
mit allen Funktionen des Gerätes vertraut.

111 12 313 14 2 3
5
7
89
B
9 16
4
A
15
10
5 5
6
5

C
H
J
6
D
9
26
17
E
9
221817 21
19
I
G
2324 25
F
5423
4 5°
20
5

5 GB
Table of contents
Introduction
Proper use ............................................................................................................................................Page 6
Features and equipment .....................................................................................................................Page 6
Included items .....................................................................................................................................Page 6
Technical data ..................................................................................................................................... Page 6
General safety advice for electrical power tools
1. Workplace safety ...........................................................................................................................Page 7
2. Electrical safety ............................................................................................................................... Page 7
3. Personal safety ................................................................................................................................Page 8
4. Careful handling and use of electrical power tools .....................................................................Page 8
5. Service .............................................................................................................................................Page 9
Safety advice relating specifically to power planers ........................................................................ Page 9
Safety instructions for planers.............................................................................................................Page 9
Original accessories / attachments ....................................................................................................Page 10
Preparing for use
Switching On / Off .............................................................................................................................. Page 10
Setting the cutting depth .....................................................................................................................Page 10
Vacuum extraction of dust / debris.....................................................................................................Page 10
Parking shoe ........................................................................................................................................ Page 10
The planing process ............................................................................................................................ Page 11
Chamfering edges...............................................................................................................................Page 11
Using the guide fence ......................................................................................................................... Page 11
Using the rebate depth stop ............................................................................................................... Page 11
Removing and installing a planer blade ............................................................................................Page 11
Replacing a drive belt .........................................................................................................................Page 12
Maintenance and cleaning ............................................................................................... Page 12
Service centre ..............................................................................................................................Page 12
Warranty .........................................................................................................................................Page 12
Disposal ............................................................................................................................................Page 13
Declaration of Conformity / Manufacturer..........................................................Page 13

6 GB
Introduction
Introduction / General safety advice for electrical power tools
Electric planer PEH 30 A1
Q
Introduction
We congratulate you on the purchase of your new
device. You have chosen a high quality product. The
instructions for use are part of the product. They
contain important information concerning safety,
use and disposal. Before using the product, please
familiarise yourself with all of the safety information
and instructions for use. Only use the unit as de
scribed
and for the specified applications. If you pass the
product on to anyone else, please ensure that you
also pass on all the documentation with it.
Q
Proper use
The device is suitable for planing wood in the form
of beams or boards or the like if the workpiece is
held securely in a fixed position. The device is also
suitable for chamfering edges and for rebating.
Any other use or modification to the device shall be
considered as improper use and could give rise to
considerable risk of accident. The manufacturer will
not accept liability for loss or damage arising from
improper use. Not suitable for commercial use.
Q
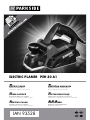
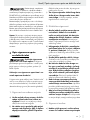
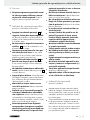
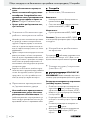
Features and equipment
1
Safety lock-out
2
ON / OFF switch
3
Planing debris removal port (right / left selectable)
4
Belt cover
5
Belt cover screws
6
Guide fence
7
Guide fence fixing screws
8
Fixing nut for setting rebate width
9
Sole
10
V-groove
11
Rebate depth stop fixing screw
12
Rebate depth stop
13
Rotary control for setting planing depth
14
Cutting depth scale
15
Reducer piece
16
Parking shoe
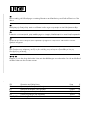
17
Blade shaft
18
Cutting element
19
Plane blade fixing screws
20
Plane blade
21
Side blade shaft guard
22
Allen key
23
Drive belt
24
Large belt wheel
25
Small belt wheel
26
Open spanner
Q
Included items
1 Electric planer PEH 30 A1
1 Guide fence
1 Rebate depth stop
1 Allen key
1 Open spanner
1 Reducer piece
1 Operating instructions
Q
Technical data
Rated voltage: 230–240 V∼ 50 Hz
Rated power: 750 W
Design no-load speed: n
0
13000 rpm
Planing depth: 0–3.0 mm
Planing width: 82 mm
Protection class: II /
Noise and vibration data:
Measured values for noise are determined in accor-
dance with EN 60745. The A-weighted noise level
of the electrical power tool are typically:
Sound pressure level: 89 dB(A)
Sound power level: 100 dB(A)
Uncertainty K: 3 dB
Wear ear protection!
Evaluated acceleration, typical:
Hand / arm vibration a
h
= 5.644 m / s
2
Uncertainty K = 1.5 m / s
2

7 GB
Introduction
Introduction / General safety advice for electrical power tools
The vibration level specified in
these instructions was measured in accordance with
an EN 60745 standardised measurement process
and can be used to compare equipment. The vibra-
tion emission value specified can also serve as a
preliminary assessment of the exposure.
The vibration level will change according to the ap-
plication of the electrical tool an in some cases may
exceed the value specified in these instructions. Re-
gularly using the electric tool in such a way may make
it easy to underestimate the vibration.
Note: If you wish to make an accurate assessment
of the vibration loads experienced during a particular
period of working, you should also take into account
the intervening periods of time when the device is
switched off or is running but is not actually in use.
This can result in a much lower vibration load over
the whole of the period of working.
General safety advice for
electrical power tools
Read all the safety advice
and instructions! Failure to observe the safety
advice and instructions may result in electric shock,
fire and / or serious injury.
Keep all the safety advice and instructions
in a safe place for future reference!
The term “electrical tool” used in the safety advice
refers to electrical tools powered by mains electrici-
ty (by means of a mains lead) and electrical tools
powered by rechargeable batteries (without a
mains lead).
1. Workplace safety
a) Keep your working area clean and
well lit. Untidy or poorly lit working areas can
lead to accidents.
b) Do not work with the device in poten-
tially explosive environments in which
there are inflammable liquids, gases
or dusts. Electrical power tools create sparks,
which can ignite dusts or fumes.
c) Keep children and other people away
while you are operating the electrical
tool. Distractions can cause you to lose control
of the device.
2. Electrical safety
a)
The mains plug on the device must match
the mains socket. The plug must not be
modified in any way. Do not use an
adapter plug with devices fitted with
a protective earth. Unmodified plugs and
matching sockets reduce the risk of electric shock.
b) Avoid touching earthed surfaces such
as pipes, radiators, ovens and refrig-
erators with any part of your body.
There is an increased risk of electric shock if
your body is earthed.
c) Keep the device away from rain or
moisture. Water entering an electrical device
increases the risk of electric shock.
d) Do not use the mains lead for any pur-
pose for which it was not intended,
e.g.
to carry the device, to hang up the de-
vice or to pull the mains plug out of
the mains socket. Keep the mains lead
away from heat, oil, sharp edges or
moving parts of the device. Damaged
or tangled mains leads increase the risk of
electric shock.
e) When working outdoors with an
electrical power tool always use ex-
tension cables that are also approved
for use outdoors. The use of an extension
cable suitable for outdoor use reduces the risk
of electric shock.
f) Use a residual current device (RCD)
for protection if operating the electri-
cal power tool in a moist environment
is unavoidable. The use of an RCD reduces
the risk of electric shock.

8 GB
General safety advice for electrical power tools
General safety advice for electrical power tools
3. Personal safety
a) Remain alert at all times, watch what
you are doing and always proceed
with caution. Do not use the device if
you are tired or under the influence of
drugs, alcohol or medication. One mo
ment
of carelessness when using the device can lead
to serious injury.
b) Wear personal protective equipment
and always wear safety glasses. The
wearing of personal protective equipment such
as dust masks, non-slip safety shoes, safety hel-
mets or ear protectors, appropriate to the type
of electrical power tool used and work under-
taken, reduces the risk of injury.
c) Avoid unintentional operation of the
device. Check that the electrical power
tool is switched off before you connect
it to the mains, pick it up or carry it.
Accidents can happen if you carry the device
with your finger on the ON / OFF switch or with
the device switched on.
d) Remove any setting tools or spanners
before you switch the device on. A tool
or spanner left attached to a rotating part of a
device can lead to injury.
e) Avoid placing your body in an unnat-
ural position. Keep proper footing and
balance at all times. By doing this you will
be in a better position to control the device in
unforeseen circumstances.
f) Wear suitable clothing. Do not wear
loose clothing or jewellery. Keep your
hair, clothing and gloves clear of mov-
ing parts. Loose clothing, jewellery or long
hair can become trapped in moving parts.
g) If vacuum dust extraction and collection
devices are fitted do not forget to
check
that they are properly connected and
correctly used. The use of these devices
reduces the hazard presented by dust.
4. Careful handling and use
of electrical power tools
a) Do not overload the device. Always
use an electrical power tool that is
intended for the task you are under-
taking. By using the right electrical power
tool for the job you will work more safely and
achieve a better result.
b) Do not use an electrical power tool if
its switch is defective. An electrical power
tool that can no longer be switched on and off
is dangerous and must be repaired.
c) Pull the mains plug from the socket
before you make any adjustments to
the device, change accessories or when
the device is put away. This precaution is
intended to prevent you from unintentionally
starting the device.
d) When not in use always ensure that
electrical power tools are kept out of
reach of children. Do not let anyone use
the device if he or she is not familiar
with it or has not read the instructions
and advice. Electrical power tools are dan-
gerous when they are used by inexperienced
people.
e) Look after the device carefully. Check
that moving parts are working prop-
erly and move freely. Check for any
parts that are broken or damaged
enough to detrimentally affect the
functioning of the device. Have dam-
aged parts repaired before you use
the device. Many accidents have their origins
in poorly maintained electrical power tools.
f) Keep cutting tools clean and sharp.
Carefully maintained cutting tools with sharp
cutting edges are less likely to jam and are
easier to control.
g) Use the electrical power tool, accesso-
ries, inserted tools etc. in accordance
with these instructions and advice, and
the stipulations drawn up for this par-
ticular type of device. In doing this, take
into account the working conditions
and the task in hand. The use of electrical

9 GB
General safety advice for electrical power tools
General safety advice for electrical power tools
power tools for purposes other than those in-
tended can lead to dangerous situations.
5. Service
a) Have your device repaired at the ser-
vice centre or by qualified specialist
personnel using original manufacturer
parts only. This will ensure that your device
remains safe to use.
Q
Safety advice relating specifi-
cally to power planers
Wait until the blade shaft
17
has com-
pletely stopped moving before you
put the device down. An exposed blade
shaft may catch on the surface and lead to loss
of control or serious injury.
Do not place your fingers in the planer
debris removal port
3
. Danger of injury
from rotating parts.
Always switch on the device before
placing it against the workpiece. Oth-
erwise the device could kick back if the planer
blade gets snagged in the workpiece.
When working always keep the sole
9
flat against the workpiece. Otherwise
you could be injured if the plane tilts.
Never plane over metal objects. Other-
wise the planer blade / blade shaft
17
could
be damaged.
Secure the workpiece. Use clamps or a
vice to grip the workpiece firmly. This is much
safer than holding it with your hand.
Do not plane materials containing
asbestos. Asbestos is a known carcinogen.
The dust generated while planing
could be hazardous to health, inflam-
mable or explosive. Wear a dust mask and
use a suitable dust / debris vacuum extraction
device. Some dusts are known carcinogens.
When planing wood for long periods
and in particular when working on
materials that give rise to dusts that
are hazardous to health, the planer
must be connected to a suitable exter-
nal dust extraction device.
Do not use the power planer if its
mains lead is damaged. Damaged mains
leads increase the risk of electric shock.
Never support yourself by placing
your hands near or in front of the
device or on the workpiece surface.
If you slip you could be injured.
If a dangerous situation arises, pull
the mains plug immediately out of the
mains socket.
When taking a break from your
work, before carrying out any tasks
on the device itself (e.g. changing the
plane blade) or when you are not us-
ing the device, always pull the mains
plug out of the mains socket.
Always work with the mains lead lead-
ing away from the rear of the device.
Use sharp planer blades only.
Do not soak the materials or the sur-
face you are about to work on with
liquids containing solvents.
Avoid contact with rotating parts.
Never use the device for a purpose
for which it was not intended or with
non-original parts / accessories.
Hold the device securely when work-
ing. Ensure that you are standing in a stable,
well-balanced position.
Always keep the device clean, dry and
free from oil or grease.
Safety instructions for planers
Wait for the cutter spindle to stop completely
before setting down the power tool. An ex-
posed rotating cutter spindle can catch on the
surface, resulting in loss of control and serious
injuries.
Only hold the power tool by the insulated handle
areas as the cutter spindle may touch the tool‘s
mains cable. Contact with a live wire could
cause metal parts of the device to become live
and lead to electric shock.

10 GB
Preparing for use
General safety advice for electrical power tools / Preparing for use
Fix and secure the work piece to a stable sur-
face using clamps or other means. When only
securing the work piece by hand or against
your body it will remain unstable, which could
lead to loss of control.
Q
O
riginal accessories / attachments
Use only the accessories and attach-
ments detailed in the operating instruc-
tions. The use of attachments or accessories
other than those recommended here could lead
to you suffering an injury.
Q
Preparing for use
Q
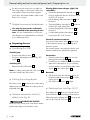
Switching On / Off
Switching on:
First press the safety lock-out
1
.
Then press and keep pressed the ON / OFF
switch
2
.
Switching off:
Release the ON / OFF switch
2
.
Note: For safety reasons the ON / OFF switch
2
cannot be locked in the ON position.
Q
Setting the cutting depth
The rotary control
13
can be used to set the cutting
depth in steps from 0–3.0 mm according to the cut-
ting depth scale
14
.
Q
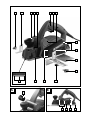
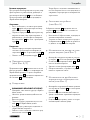
Vacuum extraction of dust /
debris (see Fig. A)
DANGER OF INJURY!
Before you carry out any work on the device always
pull the mains plug out of the mains socket.
Planing debris removal port (right / left
selectable):
Release the planing debris removal port
3
by
turning it against the direction of the arrow (out
of the “Lock” position).
Pull the planing debris removal port
3
out of
the device.
The planing debris removal port
3
can be set
to face left or right in the planer.
Push the planing debris removal port
3
into
the device.
Lock the planing debris removal port
3
by
turning it into the “Lock” position.
External vacuum extraction:
If necessary fit the reducer piece
15
when using
a dust extraction system, e.g. a workshop dust
extraction system.
The vacuum cleaner / dust extraction device used
must be suitable for the material being planed.
Connection:
Place the reducer piece
15
firmly on to the
planing debris removal port
3
.
Push the hose of a suitable dust extraction device
approved for that purpose (e.g. a workshop
vacuum cleaner) on to the planing debris remov-
al port
3
or the reducer piece
15
.
Removal:
Pull the hose of the dust extraction device off
the planing debris removal port
3
or off the
reducer piece
15
.
Pull off the reducer piece
15
, if fitted.
Q
Parking shoe (see Figs. B / C)
The parking shoe
16
allows you to lay the device
down without the risk of damaging the workpiece.
When planing, the parking shoe
16
swings up and
exposes the rear part of the sole
9
.

11 GB
Preparing for use
General safety advice for electrical power tools / Preparing for use
Q
The planing process
CAUTION! DANGER OF KICKBACK!
Always switch on the device before placing it
against the workpiece.
Set the required cutting depth.
Switch on the device.
Always place the front part of the sole
9
down
first on to the workpiece.
Guide the device with even forward movement
over the surface being planed.
Move the device forward at a slow rate and
ensure that the contact pressure acts evenly on
the sole
9
. Moving forward at too great a rate
results in a poorer surface quality and can lead
to blocking of the planing debris removal port.
Q
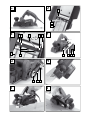
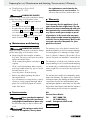
Chamfering edges (see Fig. H)
The V-grooves
10
in the front sole
9
allow the de
vice
to be used for simple chamfering of workpiece edges.
Use the V-groove most appropriate to your
desired chamfer width.
Place the planer with the V-groove
10
on the
work-
piece edge and guide the planer along the edge.
Q
Using the guide fence (see Fig. I)
Attach the guide fence
6
to the device with
the fixing screw
7
.
Release the fixing nut
8
and set the guide at
the desired distance.
Retighten the fixing nut
8
.
Exert some slight sideways pressure when guid-
ing the planer with the guide fence.
Q
Using the rebate depth stop
(see Fig. J)
Attach the rebate depth stop
12
to the device
with the fixing screw
11
.
Set the desired rebate depth with the rebate
depth stop
12
.
Make the required number of passes with the
planer until desired rebate depth is achieved.
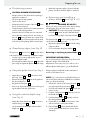
Q
Removing and installing a
planer blade
20
(see Fig. D + E)
DANGER OF INJURY!
Before you carry out any work on the device always
pull the mains plug out of the mains socket.
CAUTION! The sharp cutting edges of the plan-
er blade
20
present an injury hazard! Never
touch the cutting edges of the planer blade
20
.
The planer blade
20
has two cutting edges and it
can be fitted either way around.
Replace the planer blade
20
when both cutting
edges are blunt.
Do not resharpen the planer blades
20
.
Reversing or replacing a planer blade
20
IMPORTANT INFORMATION:
Do not release the two Allen keys. They are used to
adjust the height of the blade shaft.
Adjustment is necessary only if you wish to use a
different planer blade type e.g. a profiled blade.
Always replace both blades at the same time to
avoid out of balance forces.
NOTE: If you only release one blade first then you
can use the factory-fitted second blade for orientation
when you fit the new blade.
1. Release the 3 bolts of the cutting element
18
using the supplied open spanner
26
.
Press the removable side guard
21
into the slot
in the housing.
2. Push the cutting element
18
sideways out from
the blade shaft
17
.
3. Push the planer blade
20
sideways out from
the cutting element
18
.
4. Reassembly is carried out in the reverse order
with a reversed or new planer blade.
5. Planer blades
20
can be obtained from the
service address indicated (see section about
warranty).

12 GB
Disposal / Declaration of Conformity / Manufacturer
Preparing for use / Maintenance and cleaning / Service centre / Warranty
Q
Replacing a drive belt
(see Figs. F + G)
DANGER OF INJURY!
Before you carry out any work on the device always
pull the mains plug out of the mains socket.
Release the screws
5
and remove the belt
cover
4
.
Remove the worn drive belt
23
.
First place the new drive belt
23
on to the small
belt wheel
25
and then pull the drive belt
23
on to the large belt wheel
24
by rotating it.
Put the belt cover
4
back into position and
fasten it into place with the screws
5
.
Q
Maintenance and cleaning
DANGER OF INJURY!
Before you carry out any work on the device always
pull the mains plug out of the mains socket.
Always keep the device and the ventilation
slots clean. This way you will work more safely
and produce better results.
Clean out the planing debris removal port
3
regularly.
Clean out a blocked planing debris removal
port using suitable means (e.g. piece of wood,
air under pressure, etc.).
Use a dry cloth to clean the housing.
Remove any adhering planing dust with a
narrow paint brush.
In no circumstances use sharp objects, or petrol,
solvents or cleaning agents that might attack
plastic. Do not allow any liquids to enter the
inside of the device.
Q
Service centre
Have your device repaire
d
only by qualified specialist personnel
using original manufacturer parts only.
This will ensure that your device remains safe
to use.
If the plug or mains lead
needs to be replaced, always have
the replacement carried out by the
manufacturer or its service centre. This
will ensure that your device remains safe to use.
Q
Warranty
The warranty for this appliance is for 3
years from the date of purchase. The ap-
pliance has been manufactured with care
and meticulously examined before deliv-
ery. Please retain your receipt as proof
of purchase. In the event of a warranty
claim, please make contact by telephone
with our Service Department. Only in this
way can a post-free despatch for your
goods be assured.
The warranty covers only claims for material and
maufacturing defects, but not for transport damage,
for wearing parts or for damage to fragile compo-
nents, e.g. buttons or batteries. This product is for pri-
vate use only and is not intended for commercial use.
The warranty is void in the case of abusive and im-
proper handling, use of force and internal tampering
not carried out by our authorized service branch. Your
statutory rights are not restricted in any way by this
warranty.
The warranty period will not be extended by repairs
made unter warranty. This applies also to replaced
and repaired parts. Any damage and defects extant
on purchase must be reported immediately after
unpacking the appliance, at the latest, two days after
the purchase date. Repairs made after the expiration
of the warranty period are subject to payment.
GB
Service Great Britain
Tel.: 0871 5000 720
(0,10 GBP/Min.)
e-mail: kom[email protected]
IAN 93528

13 GB
Disposal / Declaration of Conformity / Manufacturer
Preparing for use / Maintenance and cleaning / Service centre / Warranty
Q
Disposal
The packaging is wholly composed of
environmentally-friendly materials that can
be disposed of at a local recycling centre.
Do not dispose of electrical power
tools with the household rubbish!
In
accordance with European Directive 2002 / 96 / E
C
(covering waste electrical and electronic equipment)
and its transposition into national legislation, worn
out electrical power tools must be collected sepa
rately
and taken for environmentally compatible recycling.
Contact your local refuse disposal authority for
more details of how to dispose of your worn out
electrical devices.
Q
Declaration of Conformity /
Manufacturer
We, KOMPERNASS HANDELS GMBH, the person
responsible for documents: Mr Semi Uguzlu, BURG-
STRASSE 21, 44867 BOCHUM, GERMANY, hereby
declare that this product complies with the following
standards, normative documents and EU directives:
Machinery Directive
(2006 / 42 / EC)
EU Low Voltage Directive
(2006 / 95 / EC)
Electromagnetic Compatibility
(2004 / 108 / EC)
RoHS Directive
(2011 / 65 / EU)
Applicable harmonized standards
EN 60745-1/A11:2010
EN 60745-2-14/A2:2010
EN 55014-1/A2:2011
EN 55014-2/A2:2008
EN 61000-3-2/A2:2009
EN 61000-3-3:2008
Type / Device description:
Electric planer PEH 30 A1
Date of manufacture (DOM): 09–2013
Serial number: IAN 93528
Bochum, 30.09.2013
Semi Uguzlu
- Quality Manager -
We reserve the right to make technical modifica-
tions in the course of further development.

14

15 HR
Popis sadržaja
Uvod
Namjenska uporaba ..................................................................................................................... Stranica 16
Oprema ......................................................................................................................................... Stranica 16
Opseg pošiljke .............................................................................................................................. Stranica 16
Tehnički podatci ............................................................................................................................ Stranica 16
Opće sigurnosne upute za električni alat
1. Sigurnost na radnom mjestu .................................................................................................... Stranica 17
2. Električna sigurnost ................................................................................................................... Stranica 17
3. Sigurnost osoba ........................................................................................................................ Stranica 17
4. Pažljivo postupanje s električnim uređajima i njihovo korištenje ........................................... Stranica 18
5. Servis ......................................................................................................................................... Stranica 18
Karakteristične sigurnosne upute za električne blanjalice .......................................................... Stranica 19
Sigurnosne upute za strugalicu .................................................................................................... Stranica 19
Originalni pribor / originalni dodatni uređaji .............................................................................. Stranica 19
Stavljanje u pogon
Uključivanje / Isključivanje ............................................................................................................ Stranica 20
Namještanje dubine strugotine .................................................................................................... Stranica 20
Usisavanje prašine / strugotina .................................................................................................... Stranica 20
Postolje za odlaganje blanjalice .................................................................................................. Stranica 20
Blanjanje ........................................................................................................................................ Stranica 20
Sječenje rubova ............................................................................................................................ Stranica 21
Uporaba paralelnog udara ......................................................................................................... Stranica 21
Uporaba dubine udara žlijeba .................................................................................................... Stranica 21
Vađenje / ugrađivanje noža blanjalice ....................................................................................... Stranica 21
Zamijena pogonskog remena ...................................................................................................... Stranica 21
Redovito održavanje i čišćenje ............................................................................... Stranica 22
Servis ............................................................................................................................................ Stranica 22
Jamstveni list.......................................................................................................................... Stranica 22
Zbrinjavanje ........................................................................................................................... Stranica 22
Objašnjenje konformnosti / Proizvođač ......................................................... Stranica 23

16 HR
Uvod
Električna blanjalica PEH 30 A1
Q
Uvod
Čestitamo Vam na kupnji novog uređaja. Ovom
kupnjom odlučili ste se za visokokvalitetan proizvod.
Uputa za uporabu je sastavni dio ovog proizvoda.
Ona sadrži važne upute o sigurnosti, uporabi i
uklanjanju otpada. Prije upotrebe proizvoda upoz-
najte se sa svim njegovim uputama za korištenje i
sigurnosnim uputama. Koristite ovaj proizvod u
skladu s navedenim uputama te u navedene svrhe.
Ukoliko proizvod dajete nekoj drugoj osobi, pre-
dajte toj osobi također i sve upute.
Q
Namjenska uporaba
Uređaj je namijenjen za blanjanje drvenih materija-
la, kao npr. greda ili dasaka, s tim da je potrebno
čvrsto postaviti izradak. Nadalje, uređaj je namije-
njen za koso rezanje rubova i za izradu ureza.
Svako drugo korištenje ili izmjena na uređaju tretira
se kao nepropisano i krije znatne opasnosti od
nesreća. Za oštećenja nastala zbog nepropisane
upotrebe, proizvođač ne preuzima nikakvu odgovor-
nost. Nije namijenjeno za korištenje u obrtne svrhe.
Q
Oprema
1
uklopni zapor
2
sklopka za UKLJUČIVANJE / ISKLJUČIVANJE
3
izbačaj strugotina (prema izboru desno / lijevo)
4
poklopac remena
5
vijci za poklopac remena
6
paralelni udar
7
vijak za pričvršćivanje paralelnog udara
8
sigurnosna matica za namještanje širine žlijeba
9
dno blanjalice
10
v-utori
11
pričvrsni vijak za dubinu udara žlijeba
12
dubina udara žlijeba
13
zakretni regulator za namještanje dubine
strugotine
14
ljestvica dubine strugotine
15
redukcijski komad
16
postolje za odlaganje blanjalice
17
rotirajući pojas noža
18
zatezni dio
19
pričvrsni vijci za nož blanjalice
20
nož blanjalice
21
bočna zaštita rotirajućeg pojasa noža
22
unutarnji šesterobridni ključ
23
pogonski remen
24
veliki kotač remena
25
mali kotač remena
26
čeljusni ključ
Q
Opseg pošiljke
1 električna blanjalica PEH 30 A1
1 paralelni udar
1 dubina udara žlijeba
1 unutarnji šesterobridni ključ
1 čeljusni ključ
1 redukcijski komad
1 upute za uporabu
Q
Tehnički podatci
Nazivni napon: 230–240 V∼ 50 Hz
Nazivna snaga: 750 W
Broj okretaja dimenzioniranja
u praznom hodu: n
0
13000 min
-1
Dubina blanjalice: 0–3,0 mm
Širina blanjalice: 82 mm
Klasa zaštite: II /
Informacija o buci i vibraciji:
Mjerna vrijednost za buku utvrđena sukladno
EN 60745. A-ocjenjena razina buke električnog
alata iznosi tipično:
Razina zvučnog tlaka: 89 dB(A)
Razina snage zvuka: 100 dB(A)
Nesigurnost K: 3 dB
Potrebno je nositi štitnike za uši!
Ocjenjeno ubrzavanje, karakteristično:
Vibracija ruke a
h
= 5,644 m / s
2
Nesigurnost K = 1,5 m / s
2

17 HR
Uvod
Razina titranja, navedena u
ovim uputama, je istražena i određena sukladno
normiranom postupku mjerenja, koji je naveden u
EN 60745 i koji je prikladan za uspoređivanje stro
ja.
Navedena vrijednost emisije titranja se može koristiti
i za uvodnu procjenu izloženosti.
Razina titranja je promijenljiva, ovisno o korištenju
električnog alata, te može u pojedinim slučajevima
ležati iznad vrijednosti, navedene u ovim uputama.
Razina opterećenja titranja može biti podcjenjena,
ako se električni alat redovito koristi na takav način.
Uputa: Za precizno ocjenjivanje titrajnog otpere-
ćenja tijekom određenog radnog vremena, potrebno
je također uzeti u obzir vremena kad je stroj isključen,
ili je uključen ali se zapravo ne rabi. To može znatno
smanjiti titrajno opterećenje, tijekom cijelog radnog
vremena.
Opće sigurnosne upute
za električni alat
Pročitajte sigurnosne
upute kao i sve ostale upute! U slučaju ne
pridržavanja sigurnosnih uputa kao i ostalih uputa,
prijeti opasnost od strujnog udara, požara i / ili
teških ozljeda.
Sačuvajte sve sigurnosne upute kao i sve
ostale upute za ubuduće!
U sigurnosnim uputa rabljeni izraz “električni alat“
odnosi se na električne uređaje sa mrežnim pogo-
nom (sa mrežnim kabelom) i na električni alat sa
akumulatorskim pogonom (bez mrežnog kabela).
1. Sigurnost na radnom mjestu
a) Vodite uvijek računa o tome, da Vaše
radno mjesto bude čisto i dobro os-
vjetljeno. Nered i ne osvjetljeno područje
rada, može uzrokovati nezgode.
b) Ne rabite stroj u području gdje prijeti
opasnost od eksplozije, gdje se nalaze
zapaljive tekućine, plinovi ili prašine.
Električni alati proizvode iskre, koje mogu za-
paliti prašinu ili pare.
c) Za
vrijeme uporabe elek
trič
nog alata,
držite djecu i druge osobe izvan doh-
vata istoga. U slučaju nepažnje, možete
izgubiti kontrolu nad strojem.
2. Električna sigurnost
a) Mrežni utikač uređaja mora odgova-
rati utičnici. Utikač se ni na kakav
način ne smije mijenjati. Ne koristite
adapterske utičnice zajedno s zaštitno
uzemljenim uređajima. Neizmijenjeni
utikači i odgovarajuće utičnice smanjuju rizik
električnog udara.
b) Izbjegavajte dodir tijela s uzemljenim
površinama kao što su cijevi, radijato-
ri, pećnice i hladnjaci. Postoji povećana
opasnost od električnog udara ukoliko je vaše
tijelo uzemljeno.
c) Uređaj držite podalje od kiše i vlage.
Prodiranje vode u unutrašnjost uređaja pove-
ćava opasnost električnog udara.
d) Ne koristite kabel u neke druge svr-
he, npr. za nošenje uređaja, vješanje
uređaja ili za izvlačenje utikača iz utič-
nice. Kabel držite podalje od topline,
ulja, oštrih rubova i pokretnih dijelo-
va uređaja. Oštećeni ili spetljani kabel ili
utikač povećava rizik električnog udara.
e) Kod rada na otvorenome koristite
samo produžni kabel koji je dozvoljen
za korištenje na otvorenome. Upotreba
produžnog kabla namijenjenog za korištenje
na otvorenome smanjuje rizik električnog udara.
f) Ako je korištenje električnog alata u
vlažnim prostorima neizbježno, rabite
zaštitnu strujnu sklopku. Korištenje zaštit-
ne strujne sklopke, smanjuje rizik strujnog udara.
3. Sigurnost osoba
a) Budite uvijek pozorni, vodite računa
o tome što radite i razumno pristupite
Uvod / Opće sigurnosne upute za električni alat

18 HR
radu s električnim alatom. Ne rabite
stroj, ako ste umorni ili pod utjecajem
droga, alkohola ili lijekova. Jedan trenu
tak
nepažnje za vrijeme korištenja stroja, može
uzrokovati teške ozljede.
b) Nosite osobnu zaštitnu opremu i uvi-
jek zaštitne očale. Korištenje osobne zaštitne
opreme, kao maske za prašinu, protuklizne
zaštitne cipele, zaštitnu kacigu ili štitnik za uši,
ovisno o vrsti i uporabi električnog alata,
smanjuje rizik od ozljeda.
c) Spriječite slučajno uključenje. Uvjerite
se u to, da je električni alat isključen,
prije uključenja na struju, podizanja
ili nošenja. Ako pri nošenju uređaja držite
prst na sklopki za UKLJUČENJE / ISKLJUČENJE
ili ako je uređaj uključen, prijeti opasnost od
nezgode.
d) Prije uključenja stroja, uklonite alat
za podešavanje ili vijčani ključ. Alat ili
ključ, koji se nalazi u rotirajućem dijelu stroja,
može prouzročiti ozljede.
e) Izbjegavajte nenaravan polažaj tijela.
Vodite računa o tome da sigurno
stojite na tlu i održavate vlastitu rav-
notežu. Na taj način bolje možete kontrolira-
ti uređaj, posebno u neočekivanim situacijama.
f) Nosite prikladnu odjeću. Ne nosite
široku odjeću ili nakit. Držite kosu,
odjeću i rukavice dalje od pomičnih
dijelova. Opuštena odjeća, nakit ili duga kosa
mogu biti zahvaćeni od pomičnih dijelova.
g) Ako se montira uređaje za usisavanje i
prihvaćanje prašine, uvjerite se u to da
su priključeni i da se pravilno koriste.
Uporaba tih uređaja, smanjuje ugrožavanje
od prašine.
4. Pažljivo postupanje s
električnim uređajima i
njihovo korištenje
a) Nemojte uređaj preopterećivati.
Koristite onaj električni uređaj koji
odgovara za Vaš rad. S odgovarajućim
električnim uređajem bolje i sigurnije ćete raditi
u navedenom području rada.
b) Ne koristite električni uređaj s neisprav-
nim prekidačem. Električni uređaj koji se više
ne može uključiti i isključiti opasan je i treba
ga dati popraviti.
c) Izvucite utikač iz utičnice, prije namje-
štanja uređaja, zamjene dijelova
opreme ili odlaganja uređaja. Ova
sigurnosna mjera spriječava slučajno
pokretanje električnog alata. Ova mje-
ra opreza spriječava nenamjerno pokretanje
uređaja.
d) Čuvajte ne korišteni električni uređaj
tako da nije na dohvatu djeci. Ne
dopustite da uređaj koriste osobe
koje s njim nisu upoznate ili koje nisu
pročitale upute. Električni alati su opasni
kada ih korite osobe bez iskustva.
e) Pažljivo održavajte uređaj. Kontroli-
rajte da li pokretni dijelovi uređaja
besprijekorno funkcioniraju i da ne
zapinju, da dijelovi nisu slomljeni ili
tako oštećeni da je funkcija uređaja
upitna. Molimo da oštećene dijelove
dadete popraviti prije korištenja ure-
đaja. Brojne nesreće imaju uzrok zbog loše
održavanih električnih alata.
f) Alat za rezanje treba biti oštar i čist.
Brižljivo njegovani alat za rezanje sa oštrim
reznim rubovima, manje zaglavi i jednostavniji
je za rukovanje.
g) Rabite električni alat, opremu i ugrad-
ni alat, itd. sukladno ovim uputama i
na način kako je propisano za ovaj
posebni tip uređaja. Pri tome uzmite
u obzir radne uvjete i rad koji se izvodi.
Uporaba električnog alata za drugu osim
predviđene primjene, može uzrokovati opasne
situacije.
5. Servis
a) Električne naprave smiju popravljati
samo ovlašteni serviseri ili električari.
Time ćete zadržati sigurnost vaših uređaja.
Opće sigurnosne upute za električni alat
Opće sigurnosne upute za električni alat

19 HR
Opće sigurnosne upute za električni alat
Karakteristične sigurnosne
upute za električne blanjalice
Prije odlaganja uređaja, pričekajte
zastoj rotirajućeg pojasa noža
17
.
Nezaštićeni pojas noža može se zakvačiti za
površinu i prouzročiti gubitak kontrole kao i
teške ozljede.
Ne zahvaćajte prstima u izbačaj stru-
gotina
3
. Opasnost od ozljeda na rotirajuć
im
dijelovima.
Vodite uređaj isključivo u uključenom
stanju prema izradku. Inače prijeti opa-
snost od protuudarca, ako se nož blanjalice
zakvači za izradak.
Dno blanjalice
9
treba plosnato prili-
jegati na izradak tijekom rada. Inače
prijeti opasnost od ozljeda ako se blanjalica
zakači.
Ne blanjajte nikad preko metalnih
predmeta. Nož blanjalice / rotirajući pojas
noža
17
bi se inače mogao oštetiti.
Osigurajte izradak. Rabite zatezne napra
ve /
škripac kako bi učvrstili izradak. Izradak je na
taj način bolje učvršćen nego rukom.
Zabranjena je obrada materijala koji
sadrži azbest. Azbest se smatra kancerogenim.
Prašine koje nastaju tijekom rada,
mogu biti štetne za zdravlje, zapaljive
ili eksplozivne. Stoga nosite zaštitnu masku
protiv prašine i rabite prikladan usis prašine /
strugotina, jer poneke prašine smatra se kance-
rogenim.
Tijekom duljeg obrađivanja drva i
posebno materijala od kojih nastaju
prašine škodljive zdravlju, potrebno
je uređaj priključiti na vanjsku napra-
vu za usis prašine.
Ne rabite električnu blanjalicu ako je
oštećen kabel. Oštećeni kablovi povećava-
ju rizik od strujnog udara.
Ne naslanjajte ruke ni u kojem slučaju
pored ili ispred uređaja i površine
koju obrađujete. Inače prijeti opasnost od
iskliznuća što bi moglo prouzročiti ozljede.
U slučaju opasnosti smjesta izvucite
utikač iz utičnice.
U slučaju opasnosti, za vrijeme radnih
stanki, prije izvođenja bilo kakvih ra-
dova na uređaju (npr. zamijena noža
blanjalice), uvijek prethodno izvucite
utikač iz utičnice.
Mrežni kabel treba uvijek biti iza
uređaja.
Rabite isključivo oštre noževe blanjalice
.
Ne natapajte materijale ili površine
koje ćete obrađivati sa tekućinama
koje sadrže otapala.
Izbjegavajte dodir s rotirajućim dijelo-
vima.
Ne rabite uređaj nikad protunamjenski
i isključivo sa originalnim dijelovima /
originalnom opremom.
Pridržavajte uređaj tijekom rada.
Vodite računa da sigurno stojite na tlu.
Uređaj treba uvijek biti čist, suh i oslo-
bođen od ulja ili maziva.
Sigurnosne upute za strugalicu
Pričekajte da se vratilo noža potpuno zaustavi,
prije nego što odložite električni alat. Rotirajuće
vratilo noža, koje slobodno leži se može za-
kvačiti s površinom, te može doći do gubljenja
kontrole i do teških ozljeda.
Držite električni alat samo za izolirane površine
ručke, budući da vratilo noža može zahvatiti
vlastiti mrežni kabel. Dodir voda pod naponom,
može također metalne dijelove uređaja staviti
pod napon i time prouzročiti strujni udar.
Pričvrstite i osigurajte komad koji obrađujete na
stabilnu podlogu pomoću stegače ili na drugi
način. Ako komad kojeg obrađujete držite samo
rukom ili uz tijelo, ostaje labilan, što može do-
vesti do gubitka kontrole.
Q
Originalni pribor / originalni
dodatni uređaji
Rabite isključivo pribor i dodatne ure-
đaje, koji nisu navedeni u uputama
za uporabu. Korištenje drugih osim ovdje
Opće sigurnosne upute za električni alat

20 HR
navedenih dijelova ili drugog pribora može
prouzročiti opasnost od ozljeda.
Q
Stavljanje u pogon
Q
Uključivanje/ Isključivanje
Uključivanje:
Prvo pritisnite uklopni zapor
1
.
Nakon toga pritisnite sklopku za UKLJUČIVANJE/
ISKLJUČIVANJE
2
.
Isključivanje:
Otpustite sklopku za UKLJUČVANJE/ISKLJUČI-
VANJE
2
.
Uputa: Iz sigurnosnih razloga, nije moguće areti-
rati sklopku za UKLJUČIVANJE/ISKLJUČIVANJE
2
.
Q
Namještanje dubine strugotine
Pomoću zakretnog regulatora
13
može se od
0–3,0 mm pomoću ljestvica dubine strugotina
14
stupnasto namjestiti dubinu strugotine.
Q
Usisavanje prašine / strugotina
(prikaz A)
OPASNOST OD OZLJE-
DA! Prije izvođenja bilo kakvih radova na uređaju,
uvijek prethodno izvucite utikač iz utičnice.
Izbačaj strugotina (prema izboru desno /
lijevo):
Deblokirajte izbačaj strugotina
3
, tako da ga
vrtite u suprotnom smjeru strijelice (iz pozicije
„LOCK“).
Izvucite izbačaj strugotina
3
iz uređaja.
Izbačaj strugotina
3
može se umetnuti desno
ili lijevo u blanjalicu.
Gurnite izbačaj strugotina
3
u uređaj.
Aretirajte izbačaj strugotina
3
pomoću vrtnje
na poziciju „LOCK“.
Odsis pomoću vanjskih uređaja:
U slučaju korištenja sustava za usis prašine, npr.
radionički usisavač, potrebno je rabiti redukcijski
komad
15
.
Usisavač treba biti prikladan za materijal koji se
obrađuje.
Priključivanje:
Nataknite redukcijski komad
15
čvrsto na izba-
čaj strugotina
3
.
Gurnite cijev dozvoljene usisne naprave, npr.
radioničkog usisavača, na izbačaj strugotine
3
,
ili na redukcijski komad
15
.
Izvlačenje:
Odvucite cijev usisne naprave sa izbačaja stru-
gotine
3
ili sa redukcijskog komada
15
.
Odvucite redukcijski komad
15
.
Q
Postolje za odlaganje blanjalice
(vidite prikaz B / C)
Postolje za odlaganje blanjalice
16
omogućuje
odlaganje uređaja bez opasnosti od oštećenja
izradka. Tijekom radnog postupka zaokrene se
postolje za odlaganje blanjalice
16
prema gore i
oslobodi se stražnji dio dna blanjalice
9
.
Q
Blanjanje
OPREZ! OPASNOST OD PROTUUDARCA
!
Vodite uređaj isključivo u uključenom stanju
prema izradku.
Namjestite željenu dubinu strugotine.
Uključite uređaj.
Postavite uređaj sa prednjim dijelom dna bla-
njalice
9
na izradak.
Vodite uređaj sa ravnomjernim pomakom preko
površine koju obrađujete.
Radite samo sa neznatnim pomakom i vršite
pritisak samo u sredini na dno blanjalice
9
.
Prebrzi pomak umanjuje kakvoću površine i
može prouzročiti začepljenje izbačaja strugotina.
Opće sigurnosne upute za električni alat / Stavljanje u pogon
Stavljanje u pogon
Pagina se încarcă...
Pagina se încarcă...
Pagina se încarcă...
Pagina se încarcă...
Pagina se încarcă...
Pagina se încarcă...
Pagina se încarcă...
Pagina se încarcă...
Pagina se încarcă...
Pagina se încarcă...
Pagina se încarcă...
Pagina se încarcă...
Pagina se încarcă...
Pagina se încarcă...
Pagina se încarcă...
Pagina se încarcă...
Pagina se încarcă...
Pagina se încarcă...
Pagina se încarcă...
Pagina se încarcă...
Pagina se încarcă...
Pagina se încarcă...
Pagina se încarcă...
Pagina se încarcă...
Pagina se încarcă...
Pagina se încarcă...
Pagina se încarcă...
Pagina se încarcă...
Pagina se încarcă...
Pagina se încarcă...
Pagina se încarcă...
Pagina se încarcă...
Pagina se încarcă...
Pagina se încarcă...
Pagina se încarcă...
Pagina se încarcă...
Pagina se încarcă...
Pagina se încarcă...
Pagina se încarcă...
Pagina se încarcă...
Pagina se încarcă...
Pagina se încarcă...
Pagina se încarcă...
Pagina se încarcă...
Pagina se încarcă...
-
 1
1
-
 2
2
-
 3
3
-
 4
4
-
 5
5
-
 6
6
-
 7
7
-
 8
8
-
 9
9
-
 10
10
-
 11
11
-
 12
12
-
 13
13
-
 14
14
-
 15
15
-
 16
16
-
 17
17
-
 18
18
-
 19
19
-
 20
20
-
 21
21
-
 22
22
-
 23
23
-
 24
24
-
 25
25
-
 26
26
-
 27
27
-
 28
28
-
 29
29
-
 30
30
-
 31
31
-
 32
32
-
 33
33
-
 34
34
-
 35
35
-
 36
36
-
 37
37
-
 38
38
-
 39
39
-
 40
40
-
 41
41
-
 42
42
-
 43
43
-
 44
44
-
 45
45
-
 46
46
-
 47
47
-
 48
48
-
 49
49
-
 50
50
-
 51
51
-
 52
52
-
 53
53
-
 54
54
-
 55
55
-
 56
56
-
 57
57
-
 58
58
-
 59
59
-
 60
60
-
 61
61
-
 62
62
-
 63
63
-
 64
64
-
 65
65


Parkside PEH 30 A1 ELECTRIC PLANER Operation and Safety Notes
- Tip
- Operation and Safety Notes
în alte limbi
- Deutsch: Parkside PEH 30 A1 ELECTRIC PLANER
Lucrări înrudite
Alte documente
-
Bosch GHO 16-82 Manual de utilizare
-
Bosch GHO 15-82 Specificație
-
-
Hitachi P 20ST Instrucțiuni de utilizare
-
Bosch GHO 12V-20 Manual de utilizare
-
Bosch GHO 40-82 C Professional Specificație
-
Pattfield PPL900B Manualul proprietarului
-
 Raider Industrial RDI-EP14 Manual de utilizare
-
 Raider Power Tools RD-EP16 Manual de utilizare
-
Bosch 26-82 D Manual de utilizare

