PegPerego Gran Pagoda Cradle Manual de utilizare
- Tip
- Manual de utilizare

culla gran pagoda
IT Istruzioni d’uso
EN Instructions for use
FR Notice d’emploi
DE Gebrauchsanleitung
ES Instrucciones de uso
PT Instruções de uso
NL Gebruiksaanwijzing
DK Brugsanvisning
FI Käyttöohjeet
CZ Návod na použití
SK Návod na použitie
HU Használati útmutató
SL Navodila za uporabo
RU Инструкции по пользованию
TR Kullanim kilavuzu
HR/SRB/MNE/BiH Upute za uporabu
PL Instrukcja obsługi
UA Інструкція з використання
EL Οδηγίε χρήσεω
RO Instruciuni de utilizare
BG Инструкции за употреба

click
13
2
1 2
3 4
PUSH 1
2

5 6
7
PUSH
1
2
3
8

9
11
10
12
12
3

15
14
13
123
123
16

1
2
1
2
18
20
19
17

23 24
21 22
1
1 1
2
3
4

25 26
27 28

9
Grazie per aver scelto un prodotto
PegPerego.
AVVERTENZE
• IMPORTANTE: leggere
attentamente le istruzioni prima
dell'uso e conservarle per futuro
riferimento. La sicurezza del
bambino potrebbe essere messa a
rischio se non si eseguono queste
istruzioni.
• ATTENZIONE: questo prodotto
è adatto per un bambino che
non è in grado di stare seduto
autonomamente.
•
ATTENZIONE: Questo prodotto è
adatto per bambini che non si possono
mettere da soli in posizione seduta,
girarsi e fare leva su mani e ginocchia.
Peso massimo del bambino: 9 Kg.
• ATTENZIONE: usare soltanto su una
superficie stabile, orizzontale, piana
e asciutta.
• ATTENZIONE: Non lasciare che altri
bambini giochino senza sorveglianza
vicino alla cazzozzina.
• ATTENZIONE: non usare se una
IT_Italiano parte di Culla Grand Pagoda è rotta,
strappata o mancante.
• Utilizzare unicamente le parti di
ricambio fornite o consigliate dal
produttore/distributore.
• Non utilizzare l’articolo in vicinanza di
scale o gradini, non utilizzare vicino
fonti di calore, fiamme libere o oggetti
pericolosi che sono alla portata del
bambino.
•
Assemblaggio e preparazione del
prodotto devono essere effettuati da
adulti.
• ATTENZIONE: Prima di sollevare la
carrozzina e durante il trasporto a
mano, schienale e poggiagambe
devono essere completamente
abbassati.
• ATTENZIONE: prima di sollevare la
carrozzina per il trasporto, verificare
che il maniglione sia correttamente
agganciato in posizione verticale.
• ATTENZIONE: prima dell’ uso
assicurarsi che tutti i meccanismi
di aggancio siano fissati
correttamente.
• Non inserire le dita nei meccanismi.
• Non utilizzare accessori non approvati

10
dal costruttore.
• Questo prodotto è progettato per i
bambini dalla nascita fino a un peso di
9 kg.
• ATTENZIONE: Per evitare lesioni o
ferimenti assicurarsi che il bambino sia
a debita distanza durante le operazioni
di apertura e chiusura del prodotto.
•
ATTENZIONE: Quando sdraiato,
assicurarsi che la testa del bambino non
sia mai al di sotto rispetto al suo corpo.
• Prima dell'uso, ispezionare le maniglie
di trasporto e il fondo della cazzozzina
per verificare la presenza di segni di
danneggiamento e usura.
• Assicurarsi che il maniglione sia nella
corretta posizione di impiego, prima
di effettuare il sollevamento della Culla
Grand Pagoda.
•
Il presente prodotto è progettato
per contenere il neonato quando
dorme. Una volta addormentato, è
consigliabile abbassare completamente
lo schienalino della navetta.
• Prima di sganciare e sollevare la
cazzozzina dal telaio, regolare lo
schienale nella posizione piu bassa
• Non aggiungere o utilizzare
materassini diversi da quello originale.
• Questo prodotto è compatibile con i
prodotti originali PegPerego.
• Per informazioni sulla compatibilità di
questo prodotto con accessori/telai
PegPerego consultare il sito:
www.pegperego.com
IN ABBINAMENTO AL TELAIO:
• ATTENZIONE Controllare che i
dispositivi di aggancio di Culla Grand
Pagoda siano correttamente fissati
prima dell'uso.
• ATTENZIONE: Non lasciare mai il
bambino incustodito.
Le immagini riferite ai dettagli tessili potrebbero
differire dalla collezione acquistata.
Per maggiori informazioni consultare il nostro sito
internet: www.pegperego.com
ISTRUZIONI D’USO
Utilizzo della carrozzina
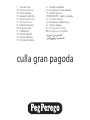
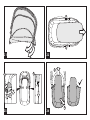
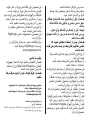
1 CAPOTTINA: Sollevare la capottina fino al click.
Abbottonare i 6 bottoni presenti sul profilo inferiore.
2 Per abbassare la capottina premere sulla maniglia e
contemporaneamente abbassarla.
3 COPERTINA: Calzare la copertina e abbottonarla
lateralmente.
4 Grazie alle calamite è possibile agganciare la copertina alla
capottina garantendo al bambino maggior protezione.
Basta sollevare il bavero della copertina come illustrato.
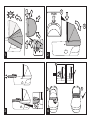
5 PAGODA HOOD con VISIERA : La Culla Gran Pagoda è
dotata di una capottina estendibile.

11
La Pagoda hood può essere estesa in avanti per maggior
protezione dai raggi solari nei periodi più caldi o in caso di
giornate ventose .
Per estendere la Pagoda hood : aprire la cerniera posta sulla
capotta (1) premere il maniglione (2) e tirare la capotta in
avanti fino al click (3).
Per richiudere la Pagoda hood : riportare il maniglione in
posizione di trasporto e richiudere la cerniera
IMPORTANTE : il maniglione ritorna automaticamente
in posizione di trasporto nel momento in cui si solleva la
carrozzina.
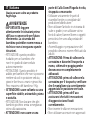
6 Pagoda hood è dotata di visiera che può essere aperta per
fornire ulteriore copertura dai raggi solari.
La visiera è posta all' interno della capottina e viene aperta
tirandola semplicemente verso l'esterno.
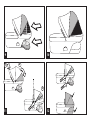
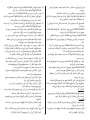
7 VISTA GRAN PANORAMA: La carrozzina è dotata di
due finestre , utilizzabili assieme o separatamente, che
permettono di dare più areazione ed avere sempre sotto
controllo il bambino quando dorme:
Apertura A .
La finestra panorama della Pagoda Hood può essere aperta
risvoltando dal basso verso l' alto il tessuto sulla parte
superiore della capottina.
8 Apertura B
Al di sotto della capottina aprendo le cerniere, si apre
un'altra finestra in corrispondenza della testa del bambino.
9 Quando le due finestre sono aperte contemporaneamente,
offrono una maggiore areazione e visibiltà del bambino.
10 La finestra panorama della Pagoda Hood può essere aperta
anche quando la Pagoda Hood è estesa in avanti.
11 IMPORTANTE : prima di chiudere la cerniera della Pagoda
Hood è necessario chiudere la finestra panorama della
capottina tenendo estesa con una mano la Pagoda Hood e
con l' altra richiudere la finestra panorama.
12 Le finestre panorama della carrozzina possono essere
aperte o chiuse tramite le cerniere. Culla Gran Pagoda con
entrambe cerniere chiuse.
IMPORTANTE : Quando la carrozzina è in movimento si
consiglia di chiudere la finestra panorama posta dietro
la testa del bambino.
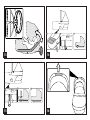
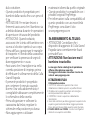
13 REGOLAZIONE SCHIENALE: tirare la manopola verso
l'esterno e ruotarla in senso orario per alzare lo schienale o
in senso antiorario, per abbassarlo.
14 REGOLAZIONE DEL POGGIAGAMBE: in caso di necessità è
possibile sollevare l’area di sostegno delle gambe del bambino :
tirare il cinghietto che sporge lateralmente dal fondo della
carrozzina (Fig.1).
Raggiunta l’altezza desiderata, agganciarlo al velcro sul
fondo della carrozzina (Fig.2). Poggiagambe sollevato (Fig.3).
15 Per ritornare alla posizione distesa :
Sganciare il cinghietto dal fondo della carrozzina (Fig.1),
premere sul materassino (Fig.2) fino a quando torna
completamente in posizione distesa (Fig.3).Il cinturino
rientra automaticamente.
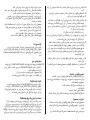
16 MANIGLIA DI TRASPORTO: il maniglione è dotato della
maniglia di trasporto.
_ Prima di sollevare la cazzozzina assicurarsi che il maniglione
integrato sia correttamente agganciato.
_ Prima di sollevare la cazzozzina assicurarsi che la capottina
sia nella posizione corretta per il trasporto.
_ Prima di sganciare e sollevare la cazzozzina dal telaio,
regolare lo schienale nella posizione piu bassa.
17 Per agganciare la carrozzina, posizionarla sul telaio e
premere con entrambi le mani fino al click.
Azionare sempre il freno del telaio prima di agganciare e
sganciare la carrozzina.
IMPORTANTE: Verificare che la carrozzina sia
correttamente agganciata.
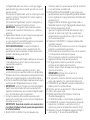
18 Per sganciare la carrozzina, sollevare le due leve laterali
poste sullo snodo (Fig.1) e sganciarla dal telaio (Fig.2).
19 SFODERABILITÁ: per sfoderare la capottina sbottonare i 6
bottoni presenti sul profilo inferiore.
20 Premere i pulsanti sui due attacchi e sfilare la capottina.
21 Sfilare i due supporti rigidi.
22 RIMOZIONE MATERASSINO: Togliere il materassino
sfilandolo dal poggiatesta.
ATTENZIONE quando si riveste calzarlo al poggiatesta.
23 SFODERABILITA': Sganciare il tessuto interno slacciando
lateralmente i tre bottoni, su entrambi i lati (Fig.1).
Aprire la zip presente sul bordo della carrozzina (Fig.2).
24 Rimuovere il tessuto sfilandolo dal poggiatesta (Fig.3) e
sollervalo (Fig. 4). Tessuto sfilato correttamente .

12
25 Per rivestire la carrozzina procedere in senso contrario.
Prestare attenzione, durante la vestizione della capottina,
al corretto inserimento dei supporti rigidi. Infilare il tubo,
dotato di maniglia di trasporto, nella sede anteriore della
capottina prestando attenzione a centrare la maniglia.
26 infine infilare il secondo sostegno metallico nella sede più
interna della capottina.
27 Agganciare la capottina negli appositi supporti ed
abbottonare i 6 bottoni.
Manutenzione dell'imbottitura
Spazzolare le parti in tessuto per allontanare la polvere;
• Per il lavaggio attenersi all'etichetta cucita sulla sacca del
prodotto.
• non candeggiare al cloro;
• non stirare;
• non lavare a secco;
• non smacchiare con solventi e non asciugare a mezzo di
asciugabiancheria a tamburo rotativo.
Pulizia del prodotto
• Il vostro prodotto necessita un minimo di manutenzione.
Le operazioni di pulizia e manutenzione devono essere
effettuate solo da adulti.
• Si raccomanda di tenere pulite tutte le parti in movimento
e se occorre, lubrificarle con olio leggero.
• Periodicamente pulire le parti in plastica con un panno
umido, non usare solventi o altri prodotti simili.
• Spazzolare le parti in tessuto per allontanare la polvere.
• Non pulire il dispositivo di assorbimento d’urto in
polistirolo con solventi o altri prodotti simili.
• Proteggere il prodotto da agenti atmosferici, acqua,
pioggia o neve; l’esposizione continua e prolungata al sole
potrebbe causare cambiamenti di colore in molti materiali.
• Conservare il prodotto in un posto asciutto.
• Ricordarsi di arieggiare periodicamente l'interno della Culla.
The Original Accessory PegPerego
Gli accessori PegPerego sono stati concepiti come utile e
pratico supporto per semplificare la vita dei genitori. Scopri
tutti gli accessori dedicati al tuo prodotto PegPerego su
www.pegperego.com
Numeri di serie
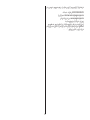
28 Culla Grand Pagoda riporta internamente e sul lato della scocca,
informazioni relative alla data di produzione della stessa.
E' necessario aprire il tessuto della Culla Grand Pagoda.
Nome del prodotto, data di produzione e numerazione
seriale dello stesso.
Queste informazioni sono indispensabili in caso di reclamo.
PegPerego S.p.A.
PegPerego SpA è un azienda con sistema di gestione
qualità certificato da TÜV Italia Srl, in accordo alla norma
ISO 9001. PegPerego potrà apportare in qualunque
momento modifiche ai modelli descritti in questa
pubblicazione, per ragioni di natura tecnica o commerciale.
Servizio assistenza PegPerego
Se fortuitamente parti del modello vengono perse o
danneggiate, usare solo pezzi di ricambio originali PegPerego.
Per eventuali riparazioni, sostituzioni, informazioni sui
prodotti, vendita di ricambi originali e accessori, contatta il
Servizio Assistenza PegPerego indicando il numero seriale
del prodotto.
tel. 0039/039/60.88.213
numero verde: 800/147.414
e-mail customer.service@pegperego.com
sito internet www.pegperego.com
Tutti i diritti di proprietà intellettuale relativi ai contenuti di
questo manuale d’istruzione appartengono a PegPerego
S.p.A. e sono tutelati dalle leggi vigenti.

13
Thank you for choosing a PegPerego
product.
WARNING
• IMPORTANT: read the instructions
carefully before use and keep
for future reference. Your child's
safety could be at risk if you do
not follow these instructions.
•
WARNING:
This product is only
suitable for a child who cannot sit up
unaided.
•
WARNING: this product is suitable
for children who cannot sit unaided,
cannot roll and are unable to raise
themselves on their hands and knees.
Maximum weight of child: 9 Kg.
• WARNING: only use on a firm,
horizontal level and dry surface.
• WARNING: Do not let other children
play unattended near the carry cot.
• WARNING: do not use if any part
of the Culla Grand Pagoda is
broken, torn or missing.
• Only replacement parts supplied or
recommended by the manufacturer/
distributor shall be used.
EN_English • Do not use the item near stairs or
steps, near heat sources, open flames
or dangerous objects that are within
reach of the child.
• Assembly and preparation of the
product must be carried out by
adults.
• WARNING: Before lifting the pram
body and when carrying by hand,
the backrest and the footrest
must be completely flat.
• WARNING: before lifting the
pram body to carry it, ensure the
handle bar is fastened correctly in
the vertical position.
• WARNING: before use make
sure that all of the attachment
mechanisms are connected
properly.
• Do not insert fingers into the
mechanisms.
• Do not use accessories which are not
approved by the manufacturer.
• This product is designed for children
from birth up to the weight of 9 kg.
• WARNING: To avoid injury ensure
that the child is kept away when
unfolding and folding this product.

14
• WARNING: When lying, ensure that
the baby's head is not below the
body.
• Before use, inspect handles and the
bottom of the carry cot for checking
presence of signs of damage and wear.
• Make sure the handle bar is in the
correct position for use before lifting
the Culla Grand Pagoda.
• This product is designed to hold
a sleeping baby. Once the baby is
asleep, the bassinet’s backrest should
be lowered completely.
• Before unfastening and lifting the
bassinet from the frame, adjust the
backrest to its lowest position
• Do not add or use mattresses
different from the original one.
• This product is compatible with
original PegPerego products.
• For information on the product's
compatibility with PegPerego
accessories/frames, visit:
www.pegperego.com
COMBINED WITH CHASSIS:
• WARNING: make sure that all the
attachment devices of the Culla
Grand Pagoda are correctly fixed
before using.
• WARNING: never leave the child
unattended.
The images referring to the textile details may differ
from the collection purchased.
For more information, consult our website:
www.pegperego.com
INSTRUCTIONS FOR USE
Using the pram
1 HOOD: Lift the hood until it clicks. Fasten the 6 buttons on
the lower profile.
2 To lower the hood, press on the handle bar while lowering it.
3 FOOT MUFF: Fit the foot muff and button it to the side.
4 The magnets can be used to fasten the foot muff to the
hood, granting the child even more protection.
Just lift the foot muff flap as shown.
5 PAGODA HOOD with VISOR: Culla Gran Pagoda comes
with an extendible hood.
The Pagoda hood can be extended forwards for more
protection against the wind or against the sun during the
summer months.
To extend the Pagoda hood: open the zip on the hood (1),
push on the handle bar (2) and pull the hood forward until it
clicks (3).
To close the Pagoda hood: bring the handle bar to the
carrying position and close the zip.
IMPORTANT: the handle bar returns automatically to the
carrying position when you lift the pram body.
6 The Pagoda hood comes with a visor which can be opened
for greater protection against the sun.
The visor is stored inside the hood and is opened simply by
pulling it outwards.
7 VISTA GRAN PANORAMA: The pram body has two
windows, which can be used together or separately for
greater ventilation and to check on baby while asleep:
Window A
The Pagoda Hood panorama window is opened by pulling
the protective fabric upwards.

15
8 Window B
The zips below the hood open another window level with
baby’s head.
9 When both opened, the two windows ensure greater
ventilation and visibility.
10 The Pagoda Hood panorama window can also be opened
when the Pagoda Hood is pulled forwards.
11 IMPORTANT: close the panorama window before closing
the Pagoda Hood zip; this is done by keeping the Pagoda
Hood taut with one hand and closing the window with the
other.
12 The pram body’s panorama windows can be opened and
closed via zips. Culla Gran Pagoda with both zips closed.
IMPORTANT: When the pram is moving, we recommend
closing the panorama window level with baby’s head.
13 BACKREST ADJUSTMENT: pull the handle outwards and
rotate it clockwise to raise the backrest or anticlockwise to
lower it.
14 ADJUSTING THE FOOTREST: If necessary, the area
supporting the child’s legs can be raised:
Pull the strap on the side under the pram body (Fig.1)
When the desired height has been reached, fasten it to the
bottom of the pram body (Fig.2). Raised footrest (Fig.3).
15 To return to the flat position:
Unfasten the strap from under the pram body (Fig.1),
press on the mattress (Fig.2) until it returns fully to the flat
position (Fig.3). The strap will withdraw automatically.
16 CARRY HANDLE: the handle bar is fitted with a carry
handle.
_ Before lifting the bassinet, ensure the built-in hood is
correctly fastened.
_ Before lifting the bassinet, make sure the hood is in the
correct position for transport.
_ Before unfastening and lifting the bassinet from the frame,
adjust the backrest to its lowest position.
17 To fasten the bassinet, position it on the frame and press
down with both hands until it clicks into place.
Always enable the brake on the frame before fastening and
unfastening the bassinet.
IMPORTANT: Ensure the bassinet is properly fastened.
18 To unfasten the bassinet, lift the two side levers on the
joints (Fig.1) and release it from the frame (Fig.2).
19 REMOVING THE HOOD: To remove the hood, unbutton the
6 buttons on the lower edge.
20 Press the buttons on the two attachments and remove the
hood.
21 Remove the two rigid supports.
22 REMOVING THE MATTRESS: Remove the mattress by pulling
it out from the headrest.
WARNING: reposition the mattress by slipping it in through
the headrest.
23 REMOVING THE LINING: Unfasten the internal fabric by
undoing the three side buttons on both sides (Fig.1).
Open the zip on the edge of the pram body (Fig.2).
24 Remove the fabric by pulling it from the headrest (Fig.3) and
then lifting it (Fig.4). Fabric removed correctly.
25 Do the opposite to reposition the lining.
When fastening the hood, ensure you insert the rigid
supports correctly. Insert the tube bearing the carry handle
into the hood’s front slot, ensuring the handle is centred
correctly.
26 Finally, slip the second metal support into the hood’s inner slot.
27 Fasten the hood to the appropriate supports and fasten
the 6 buttons.
Padding cleaning instructions
Brush the fabric parts to remove dust.
• When washing, closely follow the instructions stated on
the label sewn into the cover.
• Do not use chlorine bleach.
• Do not iron.
• Do not dry clean.
• Do not remove stains with solvents and do not tumble dry.
Product cleaning
• This product requires a small amount of maintenance.
Cleaning and maintenance must only be carried out by adults.
• Keep all moving parts clean and if necessary lubricate
them with light oil.
• Clean the plastic parts periodically with a damp cloth. Do
not use solvents or similar substances.
• Brush the fabric parts to remove dust.
• Do not clean the polystyrene shock absorbing device with
solvents or other similar products.

16
Merci d’avoir choisi un produit
PegPerego.
AVERTISSEMENTS
• IMPORTANT : llire les instructions
suivantes attentivement avant
utilisation et les conserver pour les
besoins ultérieurs de référence. La
sécurité de l’enfant pourrait être
menacée si ces instructions ne sont
pas suivies.
• AVERTISSEMENT : Cet article convient
pour un enfant qui ne sait pas
s’asseoir seul.
• AVERTISSEMENT : Ce produit est
adapté pour les enfants qui ne
peuvent pas s’asseoir, se tourner et
s’appuyer sur les mains et les genoux
seuls. Poids maximal de l’enfant : 9 kg.
• AVERTISSEMENT : ne poser que
sur une surface plane, horizontale,
ferme et sèche.
• AVERTISSEMENT : Ne pas laisser
d'autres enfants jouer sans
surveillance à proximité de la nacelle.
• AVERTISSEMENT : ne pas utiliser si
FR_Français
• Protect the product from atmospheric agents: humidity,
rain or snow. Extended exposure to sunshine can cause
colour changes in many materials.
• Store the product in a dry environment.
• Remember to regularly ventilate the interior of the carrycot.
The Original Accessory PegPerego
PegPerego accessories are designed as a useful, practical
means of simplifying the lives of parents. Discover all your
product’s accessories on www.pegperego.com.
Serial numbers
28 Information about the production date of Culla Grand
Pagoda can be found internally and on the side of the
body by pulling back the Culla Grand Pagoda lining.
Product name, production date and serial number.
This information is required for any complaints.
PegPerego S.p.A.
PegPerego SpA adopts a quality management system
certified by TÜV Italia Srl in accordance with the ISO 9001
standard. PegPerego can make changes at any time to
the models described in this publication for technical or
commercial reasons.
PegPerego after-sales service
If any parts of the item get lost or damaged, only
use genuine PegPerego spare parts. For any repairs,
replacements, information on the products and sales
of genuine spare parts and accessories, contact the
PegPerego Assistance Service and state the serial number
of the product.
tel. 0039/039/60.88.213
e-mail customer.service@pegperego.com
website www.pegperego.com
All intellectual property rights on the contents of this
manual are property of PegPerego S.p.A. and are protected
by the laws in force.

17
l'un des éléments du Culla Grand
Pagoda est cassé, déchiré ou
manquant.
• N’utiliser que les pièces de rechange
fournies ou conseillées par le
fabricant/distributeur.
•
Ne pas utiliser l’article à proximité
d’escaliers ou de marches ; ne pas l’utiliser
à proximité de sources de chaleur, de
flammes nues ou d’objets dangereux se
trouvant à la portée de l’enfant.
•
Le montage et la préparation du produit
doivent être effectués par des adultes.
• AVERTISSEMENT : avant de
soulever le landau et pendant
le transport à la main, le dossier
et le repose-pied doivent être
complètement baissés.
• AVERTISSEMENT: avant de
soulever le landau pour le
transporter, vérifier que l’anse soit
correctement fixée à la verticale.
• AVERTISSEMENT: Avant d’utiliser
Culla Grand Pagoda, vérifier si tous
les mécanismes de fixation sont
correctement enclenchés.
• Ne pas mettre les doigts dans les
mécanismes.
• Ne pas utiliser d'accessoires non
approuvés par le fabricant.
• Ce produit est conçu pour les enfants de
la naissance jusqu'à un poids de 9 kg.
•
AVERTISSEMENT : Pour éviter toute
blessure, maintenir l’enfant à l’écart lors
du dépliage et du pliage du produit.
• AVERTISSEMENT : Quand l'enfant est
couché, s'assurer que sa tête ne soit
jamais plus basse que son corps.
• Avant d'utiliser le produit, contrôler
les poignées de transport et le fond
du berceau pour vérifier la présence
de dommages et d'usure.
• S'assurer que l'anse est dans la
bonne position d'utilisation, avant de
soulever Culla Grand Pagoda.
• Ce produit est conçu pour contenir
le nouveau-né quand il dort. Quand
il est endormi, il est conseillé de
baisser complètement le dossier de
la nacelle.
• Avant de décrocher et de soulever la
nacelle du châssis, régler le dossier
dans la position la plus basse
• Ne pas ajouter ou utiliser des matelas
différents que l'original.
• Ce produit est compatible avec les

18
produits originaux PegPerego.
• Pour plus d’informations sur la
compatibilité de ce produit avec
des accessoires/châssis PegPerego,
veuillez consulter le site
www.pegperego.com
ASSOCIÉ AU CHÂSSIS :
• AVERTISSEMENT: Contrôler que les
dispositifs d’accrochage du Culla
Grand Pagoda soient correctement
fixés avant utilisation.
• AVERTISSEMENT : Ne jamais laisser
un enfant sans surveillance.
Les images relatives aux détails textiles pourraient
différer de la collection achetée.
Pour plus d'informations, consulter notre site
internet: www.pegperego.com
MODE D’EMPLOI
Utilisation du landau
1 CAPOTE: soulever la capote jusqu’au déclic. Boutonner les 6
boutons présents sur le profil inférieur.
2 Pour baisser la capote, appuyer sur la poignée et la baisser
simultanément.
3 TABLIER: enfiler le tablier et le boutonner sur les côtés.
4 Grâce aux aimants, il est possible d’accrocher le tablier à la
capote, ce qui garantit une meilleure protection de l’enfant.
Il suffit de soulever le pan du tablier comme cela est
montré.
5 PAGODA HOOD avec VISIÈRE : La Culla Gran Pagoda est
munie d’une capote extensible.
La Pagoda Hood peut être déployée vers l’avant pour
mieux protéger des rayons du soleil lors des journées les
plus chaudes ou en cas de vent.
Pour déployer la Pagoda Hood: ouvrir la fermeture éclair
située sur la capote (1), appuyer sur l’anse (2) et tirer la
capote vers l’avant jusqu’à ce qu’on entende un déclic (3).
Pour refermer la Pagoda Hood: ramener l’anse dans la
position de transport et refermer la fermeture éclair.
IMPORTANT: l’anse revient automatiquement dans la
position de transport lorsqu’on soulève le landau.
6 La Pagoda Hood est munie d’une visière qu’il est possible
d’ouvrir afin de protéger encore davantage des rayons du
soleil.
La visière est située à l’intérieur de la capote et s’ouvre en la
tirant simplement vers l’extérieur.
7 VUE GRAND PANORAMA: Le landau est muni de
deux fenêtres, utilisables ensemble ou séparément,
qui permettent d’aérer davantage et de surveiller
constamment l’enfant lorsqu’il dort:
Ouverture A
La fenêtre panoramique de la Pagoda Hood peut être
ouverte en relevant le tissu sur la partie supérieure de la
capote.
8 Ouverture B
Sous la capote, en ouvrant les fermetures éclair, on ouvre
une autre fenêtre au niveau de la tête de l’enfant.
9 Lorsque les deux fenêtres sont ouvertes simultanément,
elles offrent une plus grande ventilation et permettent de
mieux voir l’enfant.
10 La fenêtre panoramique de la Pagoda Hood peut
également être ouverte lorsque la Pagoda Hood est
déployée vers l’avant.
11 IMPORTANT: avant de fermer la fermeture éclair de la
Pagoda Hood, il faut fermer la fenêtre panoramique de la
capote en tenant d’une main la Pagoda Hood déployée
tandis que l’on ferme la fenêtre panoramique avec l’autre
main.
12 Les fenêtres panoramiques du landau peuvent être
ouvertes ou fermées au moyen des fermetures éclair. Culla
Gran Pagoda avec les deux fermetures éclair fermées.
IMPORTANT: lorsque le landau est en mouvement, il
est conseillé de fermer la fenêtre panoramique située

19
derrière la tête de l’enfant.
13 RÉGLAGE DU DOSSIER : tirer la manette vers l’extérieur et la
faire tourner dans le sens des aiguilles d’une montre pour
relever le dossier, dans le sens contraire des aiguilles d’une
montre pour l’abaisser.
14 RÉGLAGE DU REPOSE-PIED : En cas de besoin, il est possible
de soulever la zone qui soutient les jambes de l’enfant:
Tirer sur la sangle qui dépasse sur le côté du fond du
landau (Fig.1).
Une fois que la hauteur souhaitée est atteinte, l’accrocher
au velcro au fond du landau (Fig.2). Repose-pied soulevé
(Fig.3).
15 Décrocher la sangle du fond du landau (Fig.1), appuyer sur
le matelas (Fig.2) jusqu’à ce qu’il revienne complètement à
la position allongée (Fig.3). La sangle rentre automatique.
16 POIGNÉE DE TRANSPORT: l’anse est munie d'une poignée
de transport.
_ Avant de soulever la nacelle, vérifier que l'anse intégrée soit
correctement accrochée.
_ Avant de soulever la nacelle, vérifier que la capote soit dans
la position correcte pour le transport.
_ Avant de décrocher et de soulever la nacelle du châssis,
régler le dossier dans la position la plus basse.
17 Pour fixer la nacelle, la placer sur le châssis et appuyer des
deux mains jusqu'au déclic.
Toujours enclencher le frein du châssis avant de mettre et
d’enlever la nacelle.
IMPORTANT: vérifier que la nacelle est bien fixée.
18 Pour décrocher la nacelle, soulever les deux leviers latéraux
situés sur l’articulation (Fig.1) et la décrocher du châssis
(Fig.2).
19 ENLEVER LA HOUSSE: pour déhousser la capote
déboutonner les 6 boutons présents sur le profil inférieur.
20 Appuyer sur les boutons sur les deux fixations et enlever la
capote.
21 Retirer les deux supports rigides.
22 RETRAIT DU MATELAS: ôter le matelas en le sortant par
l’appuie-tête.
AVERTISSEMENT pour le remettre, l’enfiler par l’appuie-tête.
23 DÉHOUSSAGE : décrocher le tissu à l’intérieur en détachant
latéralement les trois boutons des deux côtés (Fig.1).
Ouvrir la fermeture éclair située sur le bord du landau
(Fig.2).
24 Enlever le tissu en le sortant par l’appuie-tête (Fig.3), puis le
soulever (Fig.4). Tissu déhoussé correctement.
25 Pour remettre la housse de la nacelle, effectuer les
opérations dans l’ordre inverse.
Veiller à insérer correctement les supports rigides au
moment de remettre la housse de la capote. Enfiler le tube,
muni de la poignée de transport, dans le logement avant
de la capote en veillant à centrer la poignée.
26 Pour finir, enfiler le second support métallique dans le
logement situé le plus à l’intérieur de la capote.
27 Accrocher la capote dans les supports prévus à cet effet et
boutonner les 6 boutons.
Entretien des parties en tissu
Brosser les éléments en tissu pour éliminer la poussière.
• Pour le lavage, suivre les instructions figurant sur l’étiquette
cousue sur la sacoche du produit.
• ne pas utiliser de chlore;
• ne pas repasser;
• ne pas laver à sec;
• ne pas détacher à l’aide de solvants et ne pas sécher dans
un sèche-linge à tambour rotatif.
Nettoyage du produit
• Ce produit requiert un entretien minimum. Les opérations
de nettoyage et d’entretien doivent être effectuées
uniquement par des adultes.
• Il est recommandé de nettoyer régulièrement les parties
mobiles et, si nécessaire, de les lubrifier avec de l’huile légère.
• Nettoyer périodiquement les parties en plastique avec un linge
humide ; ne pas utiliser de solvants ou tout produit similaire.
• Épousseter les éléments en tissu pour chasser la poussière.
• Ne pas nettoyer le dispositif d’absorption des chocs en
polystyrène avec des solvants ou autres produits similaires.
• Protéger le produit des agents atmosphériques (eau, pluie
ou neige) ; une exposition continue et prolongée au soleil
peut provoquer la décoloration de nombreux matériaux.
• Conserver le produit dans un endroit sec.

20
Vielen Dank, dass Sie sich für ein
Produkt PegPerego entschieden
haben.
WARNUNG
• WICHTIG: Anleitungen für spätere
Rückfragen aufbewahren. Die
Sicherheit des Kindes könnte
gefährdet werden, sollten diese
Anweisungen ni cht beachtet
werden.
• WARNUNG: Dieses Produkt ist nur
für ein Kind geeignet, das sich noch
nicht selbst aufsetzen kann.
• WARNUNG: Dieses Produkt ist nur
Kinder geeignet, die sich noch nicht
selbst aufsetzen, umdrehen und auf
Hände und Knie stützen können.
Höchstgewicht des Kindes: 9 kg.
• WARNUNG: Nur auf einem
festen, waagerechten, trockenem
Untergrund verwenden.
• WARNUNG: Lassen Sie andere Kinder
nicht unbeaufsichtigt in der Nähe
der Tragetasche spielen.
• WARNUNG: Nicht verwenden,
wenn ein Teil der Culla Grand
DE_Deutsch
• Ne pas oublier d’aérer régulièrement l’intérieur de la nacelle.
The Original Accessory PegPerego
Les accessoires PegPerego ont été conçus en tant que
support utile et pratique pour simplifier la vie des parents.
Découvrez tous les accessoires consacrés à votre produit
PegPerego sur le site www.pegperego.com
Numéros de série
28 Les informations relatives à la date de production de Culla
Grand Pagoda figurent à l’intérieur de celle-ci et sur le
côté de la coque. Il est nécessaire d’ouvrir le tissus de Culla
Grand Pagoda.
Nom du produit, date de production et numéro de série.
Ces informations sont indispensables en cas de réclamation.
PegPerego S.p.A.
PegPerego SpA adopte un système de gestion de la qualité
certifié par TÜV Italia Srl conformément à la norme ISO
9001. PegPerego se réserve le droit de procéder à tout
moment à des modifications sur les modèles décrits dans
cet ouvrage, pour des raisons de nature technique ou
commerciale.
Service d’assistance PegPerego
En cas de perte de pièces ou de rupture de l'une d'elles,
utiliser exclusivement des pièces de rechange originales
PegPerego. Pour toute réparation, remplacement,
informations sur les produits, vente de pièces détachées
d’origine et accessoires, contactez le service après-vente
PegPerego en indiquant le numéro de série du produit.
tél. 0039/039/60.88.213
Numéro vert pour le SAV en France 0800910994
e-mail customer.service@pegperego.com
site Internet www.pegperego.com
Tous les droits de propriété intellectuelle relatifs au
contenu de ce manuel appartiennent à PegPerego SpA et
sont protégés par la loi.
Pagina se încarcă...
Pagina se încarcă...
Pagina se încarcă...
Pagina se încarcă...
Pagina se încarcă...
Pagina se încarcă...
Pagina se încarcă...
Pagina se încarcă...
Pagina se încarcă...
Pagina se încarcă...
Pagina se încarcă...
Pagina se încarcă...
Pagina se încarcă...
Pagina se încarcă...
Pagina se încarcă...
Pagina se încarcă...
Pagina se încarcă...
Pagina se încarcă...
Pagina se încarcă...
Pagina se încarcă...
Pagina se încarcă...
Pagina se încarcă...
Pagina se încarcă...
Pagina se încarcă...
Pagina se încarcă...
Pagina se încarcă...
Pagina se încarcă...
Pagina se încarcă...
Pagina se încarcă...
Pagina se încarcă...
Pagina se încarcă...
Pagina se încarcă...
Pagina se încarcă...
Pagina se încarcă...
Pagina se încarcă...
Pagina se încarcă...
Pagina se încarcă...
Pagina se încarcă...
Pagina se încarcă...
Pagina se încarcă...
Pagina se încarcă...
Pagina se încarcă...
Pagina se încarcă...
Pagina se încarcă...
Pagina se încarcă...
Pagina se încarcă...
Pagina se încarcă...
Pagina se încarcă...
Pagina se încarcă...
Pagina se încarcă...
Pagina se încarcă...
Pagina se încarcă...
Pagina se încarcă...
Pagina se încarcă...
Pagina se încarcă...
Pagina se încarcă...
Pagina se încarcă...
Pagina se încarcă...
Pagina se încarcă...
Pagina se încarcă...
Pagina se încarcă...
Pagina se încarcă...
Pagina se încarcă...
Pagina se încarcă...
Pagina se încarcă...
Pagina se încarcă...
Pagina se încarcă...
Pagina se încarcă...
Pagina se încarcă...
Pagina se încarcă...
Pagina se încarcă...
Pagina se încarcă...
Pagina se încarcă...
Pagina se încarcă...
Pagina se încarcă...
Pagina se încarcă...
Pagina se încarcă...
Pagina se încarcă...
Pagina se încarcă...
Pagina se încarcă...
Pagina se încarcă...
Pagina se încarcă...
Pagina se încarcă...
Pagina se încarcă...
-
 1
1
-
 2
2
-
 3
3
-
 4
4
-
 5
5
-
 6
6
-
 7
7
-
 8
8
-
 9
9
-
 10
10
-
 11
11
-
 12
12
-
 13
13
-
 14
14
-
 15
15
-
 16
16
-
 17
17
-
 18
18
-
 19
19
-
 20
20
-
 21
21
-
 22
22
-
 23
23
-
 24
24
-
 25
25
-
 26
26
-
 27
27
-
 28
28
-
 29
29
-
 30
30
-
 31
31
-
 32
32
-
 33
33
-
 34
34
-
 35
35
-
 36
36
-
 37
37
-
 38
38
-
 39
39
-
 40
40
-
 41
41
-
 42
42
-
 43
43
-
 44
44
-
 45
45
-
 46
46
-
 47
47
-
 48
48
-
 49
49
-
 50
50
-
 51
51
-
 52
52
-
 53
53
-
 54
54
-
 55
55
-
 56
56
-
 57
57
-
 58
58
-
 59
59
-
 60
60
-
 61
61
-
 62
62
-
 63
63
-
 64
64
-
 65
65
-
 66
66
-
 67
67
-
 68
68
-
 69
69
-
 70
70
-
 71
71
-
 72
72
-
 73
73
-
 74
74
-
 75
75
-
 76
76
-
 77
77
-
 78
78
-
 79
79
-
 80
80
-
 81
81
-
 82
82
-
 83
83
-
 84
84
-
 85
85
-
 86
86
-
 87
87
-
 88
88
-
 89
89
-
 90
90
-
 91
91
-
 92
92
-
 93
93
-
 94
94
-
 95
95
-
 96
96
-
 97
97
-
 98
98
-
 99
99
-
 100
100
-
 101
101
-
 102
102
-
 103
103
-
 104
104


PegPerego Gran Pagoda Cradle Manual de utilizare
- Tip
- Manual de utilizare
în alte limbi
Lucrări înrudite
-
PegPerego Stroller Veloce Instrucțiuni de utilizare
-
 PegPerego Culla Elite Smart Manual de utilizare
-
PegPerego 10017139 Manual de utilizare
-
 PegPerego BSEXXX-112589 Manual de utilizare
-
 PegPerego 35829550 Instrucțiuni de utilizare
-
 PegPerego Rialto Manual de utilizare
-
PegPerego Lounge Modular Manual de utilizare
-
PegPerego Ypsi Instrucțiuni de utilizare


