Indesit PWDE 7125 S (EU) Manual de utilizare
- Categorie
- Mașini de spălat
- Tip
- Manual de utilizare
Acest manual este potrivit și pentru

1
GB
English,1
GB
WASHER-DRYER
Contents
Installation, 2-3
Unpacking and levelling
Connecting the electricity and water supplies
The first wash cycle
Technical data
Description of the washer-dryer, 4-5
Control panel
Display
How to run a wash cycle or a drying cycle, 6
Wash cycles and options, 7
Table of programmes and wash cycles
Wash options
Detergents and laundry, 8
Detergent dispenser drawer
Preparing the laundry
Special wash cycles
Precautions and advice, 9
General safety
Disposal
Opening the porthole door manually
Care and maintenance, 10
Cutting off the water and electricity supplies
Cleaning the washer-dryer
Cleaning the detergent dispenser drawer
Cleaning the pump
Checking the water inlet hose
Troubleshooting, 11
Service, 12
PWDE 7125 S
Instructions for use
Ðóññêèé,13
CSI
Românã,25
RO

2
GB
Installation
This instruction manual should be kept in a safe place
for future reference. If the washer-dryer is sold,
transferred or moved, make sure that the instruction
manual remains with the machine so that the new
owner is able to familiarise himself/herself with its
operation and features.
Read these instructions carefully: they contain vital
information relating to the safe installation and operation
of the appliance.
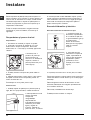
Unpacking and levelling
Unpacking
1. Remove the washer-dryer from its packaging.
2. Make sure that the washer-dryer has not been
damaged during the transportation process. If it has
been damaged, contact the retailer and do not proceed
any further with the installation process.
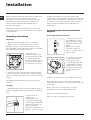
3. Remove the 4
protective screws (used
during transportation) and
the rubber washer with
the corresponding spacer,
located on the rear part of
the appliance (see figure).
4. Close off the holes using the plastic plugs provided.
5. Keep all the parts in a safe place: you will need them
again if the washer-dryer needs to be moved to another
location.
Packaging materials should not be used as toys for
children.
Levelling
1. Install the washer-dryer on a flat sturdy floor, without
resting it up against walls, furniture cabinets or anything
else.
2. If the floor is not
perfectly level,
compensate for any
unevenness by tightening
or loosening the adjustable
front feet (see figure); the
angle of inclination,
measured in relation to the
worktop, must not exceed
2°.
Levelling the machine correctly will provide it with
stability, help to avoid vibrations and excessive noise and
prevent it from shifting while it is operating. If it is placed
on carpet or a rug, adjust the feet in such a way as to
allow a sufficient ventilation space underneath the
washer-dryer.
Connecting the electricity and water
supplies
Connecting the water inlet hose
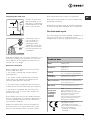
1. Connect the inlet hose
by screwing it to a cold
water tab using a 3/4 gas
threaded connection (see
figure).
Before performing the
connection, allow the
water to run freely until it is
perfectly clear.
2. Connect the inlet hose
to the washer-dryer by
screwing it onto the
corresponding water inlet
of the appliance, which is
situated on the top right-
hand side of the rear part
of the appliance (see
figure).
3. Make sure that the hose is not folded over or bent.
The water pressure at the tap must fall within the
range of values indicated in the Technical data table (see
next page).
If the inlet hose is not long enough, contact a
specialised shop or an authorised technician.
Never use second-hand hoses.
Use the ones supplied with the machine.

3
GB
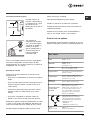
Connecting the drain hose
Connect the drain hose,
without bending it, to a
drain duct or a wall drain
situated between 65 and
100 cm from the floor;
alternatively, place it
over the edge of a
basin, sink or tub,
fastening the duct
supplied to the tap (see
figure). The free end of
the hose should not be
underwater.
We advise against the use of hose extensions; if it is
absolutely necessary, the extension must have the
same diameter as the original hose and must not
exceed 150 cm in length.
Electrical connections
Before plugging the appliance into the electricity
socket, make sure that:
the socket is earthed and complies with all
applicable laws;
the socket is able to withstand the maximum
power load of the appliance as indicated in the
Technical data table (see opposite);
the power supply voltage falls within the values
indicated in the Technical data table (see opposite);
the socket is compatible with the plug of the
washer-dryer. If this is not the case, replace the
socket or the plug.
The washer-dryer must not be installed outdoors,
even in covered areas. It is extremely dangerous to
leave the appliance exposed to rain, storms and
other weather conditions.
When the washer-dryer has been installed, the
electricity socket must remain within easy reach.
Do not use extension cords or multiple sockets.
65 - 100 cm
The cable should not be bent or compressed.
The power supply cable must only be replaced by
authorised technicians.
Warning! The company shall not be held responsible
in the event that these standards are not observed.
The first wash cycle
Once the appliance has been installed, and before you
use it for the first time, run a wash cycle with
detergent and no laundry, using wash cycle number 2.
Technical data
Model
PWDE 7125 S
Dimensions
width 59,5 cm
height 85 cm
depth 55 cm
Capacity
from 1to 7 kg for wash programme
from 1 to 5 kg for the drying programme
Electrical
connections
please refer to the technical data
plate fixed to the machine
Water connections
maximum pressure 1 MPa (10 bar)
minimum pressure 0.05 MPa (0.5 bar)
drum capacity 52 litres
Spin speed
up to 1200 rotations per minute
Energy rated
programmes
according to
regulation
EN 50229
Wash: programme 2; temperature
60°C; using a load of 7 kg.
Drying: first drying cycle performed
with a 2 kg load, by selecting the
drying level "A1" (IRON);
Second drying cycle performed with a
5 kg load, selecting the maximum
drying level "A4" (EXTRA).
This appliance conforms to the
following EC Directives:
- 89/336/EEC dated 03/05/89
(Electromagnetic Compatibility) and
subsequent modifications
- 2006/95/EC (Low Voltage)
- 2002/96/EC

4
GB
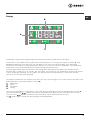
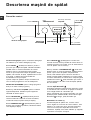
Description of the washer-dryer
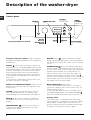
Control panel
TEMPERATURE
button
WASH
CYCLE
SELECTOR
KNOB
Detergent dispenser drawer
ON/OFF
button
SPIN
button
START/PAUSE
button and indicator
light
DISPLAY
DRYING
button
OPTION
buttons and
indicator lights
DOOR
LOCKED
indicator light
Detergent dispenser drawer: used to dispense
detergents and washing additives ( see Detergents
and laundry).
ON/OFF
button: press this briefly to switch the
machine on or off. The START/PAUSE indicator light
which flashes slowly in a blue colour shows that the
machine is switched on. To switch off the washer-
dryer during the wash cycle, press and hold the
button for approximately 3 seconds; if the button is
pressed briefly or accidentally the machine will not
switch off.
If the machine is switched off during a wash cycle,
this wash cycle will be cancelled.
WASH CYCLE SELECTOR KNOB: used to set the
desired wash cycle (see Table of programmes and
wash cycles).
OPTION buttons and indicator lights: press to
select the available options. The indicator light
corresponding to the selected option will remain lit.
SPIN
button: press to reduce or completely
exclude the spin cycle; the value appears on the
display.
TEMPERATURE
button: press to reduce or
completely exclude the temperature; the value
appears on the display.
DRYING button
: press to decrease or exclude
drying; the selected drying level or time will appear on
the display (see "How to run a wash cycle or a drying
cycle").
START/PAUSE
button and indicator light: when
the blue indicator light flashes slowly, press the button
to start a wash cycle. Once the cycle has begun the
indicator light will remain lit in a fixed manner. To
pause the wash cycle, press the button again; the
indicator light will flash in an amber colour. If the
symbol is not illuminated, the door may be opened. To
start the wash cycle from the point at which it was
interrupted, press the button again.
DOOR LOCKED
indicator light:
The lit symbol indicates that the door is locked. To
prevent any damage, wait until the symbol turns off
before opening the door.
To open the door while a cycle is in progress, press
the START/PAUSE button; if the DOOR LOCKED
symbol is switched off the door may be opened.
Standby mode
This washer-dryer, in compliance with new energy
saving regulations, is fitted with an automatic standby
system which is enabled after a few minutes if no
activity is detected. Press the ON-OFF button briefly
and wait for the machine to start up again.

5
GB
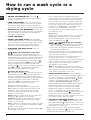
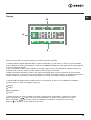
The display is useful when programming the machine and provides a great deal of information.
The duration of the available wash cycles and the remaining time of a running cycle appear in section A; if the
DELAYED START option has been set, the countdown to the start of the selected wash cycle will appear.
Furthermore, pressing the corresponding button allows you to view the maximum temperature, spin speed and
drying level or time values attained by the machine during the selected cycle.
The hour-glass flashes while the machine is processing data, depending on the wash cycle and Smart level
selected. After a maximum of 10 minutes, the hour-glass icon remains lit in a fixed manner and the final amount
of time remaining is displayed. The hour-glass icon will then switch off approximately 1 minute after the final
amount of time remaining has appeared.
The phases scheduled for the selected cycle and, once the cycle has begun, the current phase of the wash cycle
(and drying cycle, if applicable) appear in section B:
Main wash
Rinse
Spin/Drain
Drying
The icons corresponding to temperature, spin and Drying (working from the left) are displayed in section C.
The temperature bars
indicate the maximum temperature level which may be selected for the set cycle.
The spin bars
indicate the maximum spin level which may be selected for the set cycle.
The
symbol lights up while the drying settings are being adjusted.
Display
B
C
A

6
GB
How to run a wash cycle or a
drying cycle
1. SWITCH THE MACHINE ON. Press the
button; the START/PAUSE indicator light will flash
slowly in a blue colour.
2. LOAD THE LAUNDRY. Open the porthole door.
Load the laundry, making sure you do not exceed
the maximum load value indicated in the table of
programmes and wash cycles on the following page.
3. MEASURE OUT THE DETERGENT. Pull out the
detergent dispenser drawer and pour the detergent
into the relevant compartments as described in
Detergents and laundry.
4. CLOSE THE DOOR.
5. SELECT THE WASH CYCLE. Use the WASH
CYCLE SELECTOR knob to select the desired wash
cycle. A temperature and spin speed is set for each
wash cycle; these values may be adjusted. The
duration of the cycle will appear on the display.
6. CUSTOMISE THE WASH CYCLE. Use the
relevant buttons:
Modify the temperature and/or spin
speed. The machine automatically displays the
maximum temperature and spin speed values set for
the selected cycle, or the most recently-used settings
if they are compatible with the selected cycle. The
temperature can be decreased by pressing the
button, until the cold wash OFF setting is reached.
The spin speed may be progressively reduced by
pressing the
button, until it is completely excluded
(the OFF setting). If these buttons are pressed
again, the maximum values are restored.
Setting the drying cycle
The first time the button
is pressed, the machine
will automatically select the maximum drying cycle
which is compatible with the selected wash cycle.
Subsequent presses will decrease the drying level and
then the drying time, until the cycle is excluded
completely ("OFF"). If these buttons are pressed
again, the maximum values are restored.
Drying may be set as follows:
A- Based on the desired laundry dryness level:
Iron: suitable for clothes which will need ironing
afterwards. the remaining dampness softens
creases, making them easier to remove. "A1"
appears on the display.
Hanger: ideal for clothes which do not need to be
dried fully. "A2" appears on the display.
Cupboard: suitable for laundry which can be put
back in a cupboard without being ironed. "A3"
appears on the display.
Extra: suitable for garments which need to be dried
completely, such as sponges and bathrobes. "A4"
appears on the display.
B - Based on a set time period: between 30 and 180
minutes (Max. load 4 kg).
If your laundry load to be washed and dried is
much greater than the maximum stated load (see
adjacent table of programmes), perform the wash
cycle, and when the cycle is complete, divide the
garments into groups and put some of them back
in the drum. At this point, follow the instructions
provided for a "Drying only" cycle. Repeat this
procedure for the remainder of the load.
A cooling-down period is always added to the end
of each drying cycle.
Drying only
Use the cycle selector knob to select a drying cycle
(11-12-13) in accordance with the type of fabric.
The desired drying level or time may also be set
using the DRYING button
.
Modify the cycle settings.
Press the button to enable the option; the indicator
light corresponding to the button will switch on.
Press the button again to disable the option; the
indicator light will switch off.
If the selected option is not compatible with the
set wash cycle, the indicator light will flash and the
option will not be activated.
If the selected option is not compatible with a
previously selected one, the indicator light
corresponding to the first function selected will flash
and only the second option will be activated; the
indicator light for the option which has been
activated will be illuminated.
Note: if the SMART option has been selected,
none of the incompatible options may be activated.
The options may affect the recommended load
value and/or the duration of the cycle.
7. START THE WASH CYCLE. Press the START/
PAUSE button. The corresponding indicator light will
turn blue, remaining lit in a fixed manner, and the
door will be locked (the DOOR LOCKED
symbol
will be lit). To change a wash cycle while it is in
progress, pause the washer-dryer using the
START/PAUSE button (the START/PAUSE indicator
light will flash slowly in an amber colour); then
select the desired cycle and press the START/
PAUSE button again. To open the door while a
cycle is in progress, press the START/PAUSE
button; if the DOOR LOCKED
symbol is switched
off the door may be opened. Press the START/
PAUSE button again to restart the wash cycle from
the point at which it was interrupted.
8. THE END OF THE WASH CYCLE. This will be
indicated by the text END on the display; when
the DOOR LOCKED
symbol switches off the door
may be opened. Open the door, unload the laundry
and switch off the machine.
If you wish to cancel a cycle which has already
begun, press and hold the
button. The cycle will be
stopped and the machine will switch off.

7
GB
Wash cycles and
options
Wash options
The option optimises washing to suit the quantity of
laundry loaded into the machine, thereby reducing the overall
wash cycle duration while minimising water and energy
consumption. Press the
button to select the type of
wash cycle desired:
Intensive: vigorous wash cycle for garments with a heavy soil level.
4 You: standard wash cycle for garments with a normal soil level.
Fast: quick wash cycle for garments with a light soil level.
This may only be used in conjunction with wash cycles 1, 2, 3, 4, 5
(all three levels) and 6, 7 (4 You and Fast levels).
Easy iron
By selecting this function, the wash and spin cycles will be modified
in order to reduce the formation of creases. At the end of the cycle
the washer-dryer will perform slow rotations of the drum, while the
EASY IRON and START/PAUSE indicator lights will flash (blue and
orange respectively). To end the cycle, press the START/PAUSE
button or the EASY IRON button. For wash cycles number 9-10,
the machine will end the cycle while the laundry is soaking; the EASY
IRON and START/PAUSE indicator lights will flash. To drain the
water so that the laundry may be removed, press the START/
PAUSE button or the EASY IRON button.
It cannot be used in conjunction with wash cycles 8, 11, 12, 13,
, .
Note: If you also want to run the drying cycle, this option is
enabled only if combined with level A1 (Iron dry).
Stain removal
This function is particularly useful
for the removal of stubborn
stains. Insert extra
compartment 4 (supplied with
the appliance) into compartment
1. When pouring in the bleach,
be careful not to exceed the
max level marked on the
central pivot (see figure). To
bleach laundry with no other
washing action, pour the bleach
into extra compartment 4, select the Rinse cycle
and
activate the Stain removal option . To bleach during a wash
cycle, pour in the detergent and any fabric softener you wish to
use, select the desired wash cycle and enable the Stain
removal option. The use of extra compartment 4 excludes
the pre-wash function.
It cannot be used in conjunction with wash cycles 1, 6, 8, 9, 10,
11, 12, 13,
, .
Delayed start
To set a delayed start for the selected cycle, press the
corresponding button repeatedly until the required delay
period has been reached. When this option is enabled, the
corresponding indicator light will remain lit. To remove the
delayed start setting, press the button until the text "OFF"
appears on the display.
This option can be used in conjunction with all cycles.
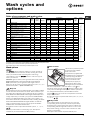
For all Test Institutes:
1) Test wash cycle in compliance with regulation EN 50229: select wash cycle 2 with a temperature of 60°C.
2) Long wash cycle for cottons: select wash cycle 2 with a temperature of 40.
3) Short wash cycle for cottons: select wash cycle 4 with a temperature of 40.
Table of programmes and wash cycles
4
2
3
1
4
2
1
3
Detergents
Description of the wash cycle
Max.
temp.
(°C)
Max.
speed
(rpm)
Drying
Pre-
wash
Main wash
Bleach
Fabric
softener
Max.
load
(kg)
Cycle
duration
Smart cycles
.
1
Cottons with Pre-wash
: extremely
soiled whites.
90°
1200
•
•
•
-
•
7
2
White Cottons
: extremely soiled
whites.
90°
1200
•
-
•
•
•
7
2
White Cottons (1)
: heavily soiled
whites and resistant colours.
60°
1200
•
-
•
•
•
7
2
White Cottons (2)
: heavily soiled
whites and delicate colours.
40°
1200
•
-
•
•
•
7
3
Cottons
: heavily soiled whites and
resistant colours.
60°
1200
•
-
•
•
•
7
4
Coloured Cottons(3)
: lightly soiled
whites and delicate colours.
40°
1200
•
-
•
•
•
7
5
Synthetics
: heavily soiled resistant
colours.
60°
800
•
-
•
•
•
3
6 Jeans
40°
800
•
-
•
-
•
3,5
7 Shirts
40°
600
•
-
•
•
•
2
Special cycles
8 Wool
: for wool, cashmere, etc.
40°
800
•
-
•
-
•
1,5
9
Silk/Curtains
: for garments in silk
and viscose, lingerie.
30°
0 - -
•
-
•
1
10 Outwear
30°
400 - -
•
- - 2
Partial cycles
11 Drying Cottons
- -
•
- - - - 5
12 Drying Synthetics
- -
•
- - - - 3
13 Drying Wool
- -
•
- - - - 1,5
Partial cycles
Rinse
- 1200
•
- -
•
•
7
Spin
- 1200
•
- - - - 7
Drain
- 0 - - - - - 7
Wash
cycles
The duration of the wash cycles can be checked on the display.

8
GB
Detergents and laundry
Detergent dispenser drawer
Successful washing results also depend on the correct
dose of detergent: adding too much detergent will not
necessarily result in a more efficient wash, and may in
fact cause build up on the inside of your appliance and
contribute to environmental pollution.
Do not use hand washing detergents; they create too
much foam.
Open the detergent
dispenser drawer and pour
in the detergent or washing
additive, as follows.
Compartment 1: Pre-wash detergent (powder)
Before pouring in the detergent, make sure that extra
compartment 4 has been removed.
Compartment 2: Washing detergent (powder or
liquid)
Liquid detergent should only be poured in immediately
prior to the start of the wash cycle.
Compartment 3: Additives (fabric softeners,
etc.)
The fabric softener should not overflow the grid.
extra compartment 4: Bleach
extra compartment 5: we recommend this
compartment is used for liquid detergent.
Preparing the laundry
Divide the laundry according to:
- the type of fabric/the symbol on the label
- the colours: separate coloured garments from
whites.
Empty all garment pockets and check the buttons.
Do not exceed the listed values, which refer to the
weight of the laundry when dry:
Durable fabrics: max. 7 kg
Synthetic fabrics: max. 3 kg
Delicate fabrics: max. 2 kg
Wool: max. 1,5 kg
Silk: max. 1 kg
How much does your laundry weigh?
1 sheet 400-500 g
1 pillow case 150-200 g
1 tablecloth 400-500 g
1 bathrobe 900-1,200 g
1 towel 150-250 g
Special wash cycles
Jeans: turn the garments inside out before washing
and use liquid detergent. Use wash cycle 6.
1
2
3
5
4
Shirts: use special wash cycle 7 to wash shirts in
various fabrics and colours.
It guarantees maximum care is taken of the garments
and minimises the formation of creases.
Wool: wash cycle 8 can be used to wash all woollen
garments in the machine, even those carrying the hand
wash only
label. To achieve the best results, use a
special detergent and do not exceed the maximum load
of 1,5 kg.
Silk: use special wash cycle 9 to wash all silk
garments. We recommend the use of special detergent
which has been designed to wash delicate clothes.
Curtains: we recommend you fold the curtains and
place them in a pillow case or mesh bag. Use wash
cycle 9.
Outwear(
wash cycle
10): is studied for washing water-
repellent fabrics and winter jackets (e.g. Gore-Tex,
polyester, nylon); for best results, use a liquid detergent
and dosage suitable for a half-load; pre-treat necks,
cuffs and stains if necessary; do not use softeners or
detergents containing softeners. Stuffed duvets cannot
be washed with this programme.
Load balancing system
Before every spin cycle, to avoid excessive vibrations
before every spin and to distribute the load in a
uniform manner, the drum rotates continuously at a
speed which is slightly greater than the washing
rotation speed. If, after several attempts, the load is
not balanced correctly, the machine spins at a
reduced spin speed. If the load is excessively
unbalanced, the washer-dryer performs the
distribution process instead of spinning. To encourage
improved load distribution and balance, we
recommend small and large garments are mixed in
the load.

9
GB
Precautions and tips
Opening the porthole door manually
In the event that it is not possible to open the porthole
door due to a powercut, and if you wish to remove
the laundry, proceed as follows:
1. Remove the plug from
the electrical socket..
2. Make sure the water
level inside the machine is
lower than the door
opening; if it is not, remove
excess water using the
drain hose, collecting it in a
bucket as indicated in the
figure.
3. Remove the cover panel on the lower front part of
the washer-dryer (see overleaf).
4. Pull outwards using the tab as indicated in the
figure, until the plastic tie-rod is freed from its stop
position; pull downwards and open the door at the
same time.
5. Reposition the panel, making sure the hooks are
securely in place before you push it onto the
appliance.
This washer-dryer was designed and constructed in
accordance with international safety regulations. The
following information is provided for safety reasons and
must therefore be read carefully.
General safety
This appliance was designed for domestic use only.
The washer-dryer must only be used by adults, in
accordance with the instructions provided in this manual.
Do not touch the machine when barefoot or with wet
or damp hands or feet.
Do not pull on the power supply cable when
unplugging the appliance from the electricity socket.
Hold the plug and pull.
Do not open the detergent dispenser drawer while the
machine is in operation.
Do not touch the drained water as it may reach
extremely high temperatures.
Never force the porthole door. This could damage the
safety lock mechanism designed to prevent accidental
opening.
If the appliance breaks down, do not under any
circumstances access the internal mechanisms in an
attempt to repair it yourself.
Always keep children well away from the appliance
while it is operating.
The door can become quite hot during the wash cycle.
If the appliance has to be moved, work in a group of
two or three people and handle it with the utmost
care. Never try to do this alone, because the
appliance is very heavy.
Before loading laundry into the washer-dryer, make
sure the drum is empty.
During the drying phase, the door tends to get
quite hot.
Do not use the appliance to dry clothes that have
been washed with flammable solvents (e.g.
trichlorethylene).
Do not use the appliance to dry foam rubber or
similar elastomers.
Make sure that the water tap is turned on during
the drying cycles.
Disposal
Disposing of the packaging materials:
observe local regulations so that the packaging may
be re-used.
The European Directive 2002/96/EC relating to Waste
Electrical and Electronic Equipment (WEEE) states
that household appliances should not be disposed of
using the normal solid urban waste cycle. Exhausted
appliances should be collected separately in order to
optimise the cost of re-using and recycling the
materials inside the machine, while preventing
potential damage to the atmosphere and to public
health. The crossed-out dustbin is marked on all
products to remind the owner of their obligations
regarding separated waste collection.
For more information relating to the correct disposal of
household appliances, owners should contact their
local authorities or appliance dealer.

10
GB
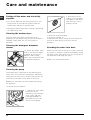
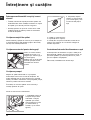
Care and maintenance
Cutting off the water and electricity
supplies
Turn off the water tap after every wash cycle. This
will limit wear on the hydraulic system inside the
washer-dryer and help to prevent leaks.
Unplug the washer-dryer when cleaning it and during
all maintenance work.
Cleaning the washer-dryer
The outer parts and rubber components of the
appliance can be cleaned using a soft cloth soaked in
lukewarm soapy water. Do not use solvents or
abrasives.
Cleaning the detergent dispenser
drawer
To remove the drawer, press
lever (1) and pull the drawer
outwards (2) (see figure).
Wash it under running
water; this procedure should
be repeated frequently.
Cleaning the pump
The washer-dryer is fitted with a self-cleaning pump
which does not require any maintenance. Sometimes,
small items (such as coins or buttons) may fall into the
protective pre-chamber at the base of the pump.
Make sure the wash cycle has finished and unplug
the appliance.
To access the pre-chamber:
1. Take off the cover panel
on the front of the
machine by first pressing it
in the centre and then
pushing downwards on
both sides until you can
remove it (see figures).
2
1
1
2
3
2. Unscrew the lid by
rotating it anti-clockwise
(see figure): a little water
may trickle out. This is
perfectly normal.
3. Clean the inside thoroughly.
4. Screw the lid back on.
5. Reposition the panel, making sure the hooks are
securely in place before you push it onto the
appliance.
Checking the water inlet hose
Check the inlet hose at least once a year. If there are
any cracks, it should be replaced immediately: during
the wash cycles, water pressure is very strong and a
cracked hose could easily split open.
Never use second-hand hoses.

11
GB
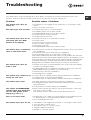
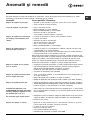
Troubleshooting
Your washer-dryer could occasionally fail to work. Before contacting the Technical Assistance Service (see
Service), make sure that the problem cannot be not solved easily using the following list.
Problem:
The washer-dryer does not
switch on.
The wash cycle does not start.
The washer-dryer does not fill
with water (the text H2O
flashes on the display).
The washer-dryer continuously
takes in and drains water.
The washer-dryer does not
drain or spin.
The washer-dryer vibrates a lot
during the spin cycle.
The washer-dryer leaks.
The option and START/PAUSE
indicator lights flash rapidly and
an error code appears on the
display (e.g.: F-01, F-..).
There is too much foam.
The washer-dryer does not dry.
Possible causes / Solutions:
The appliance is not plugged into the socket fully, or not enough to make
contact.
There is no power in the house.
The washer-dryer door is not closed properly.
The ON/OFF button has not been pressed.
The START/PAUSE button has not been pressed.
The water tap has not been opened.
A delayed start has been set.
The water inlet hose is not connected to the tap.
The hose is bent.
The water tap has not been opened.
There is no water supply in the house.
The pressure is too low.
The START/PAUSE button has not been pressed.
The drain hose is not fitted at a height between 65 and 100 cm from the floor
(see Installation).
The free end of the hose is under water (see Installation).
The wall drainage system is not fitted with a breather pipe.
If the problem persists even after these checks, turn off the water tap, switch the
appliance off and contact the Technical Assistance Service. If the dwelling is on one
of the upper floors of a building, there may be problems relating to water drainage,
causing the washer-dryer to fill with water and drain continuously. Special anti-
draining valves are available in shops and help to prevent this inconvenience.
The wash cycle does not include draining: some cycles require the draining
process to be enabled manually.
The EASY IRON option is enabled: To complete the wash cycle, press the
START/PAUSE button (see Wash cycles and options).
The drain hose is bent (see Installation).
The drainage duct is clogged.
The drum was not unlocked correctly during installation (see Installation).
The washer-dryer is not level (see Installation).
The washer-dryer is trapped between cabinets and walls (see Installation).
The water inlet hose is not screwed on properly (see Installation).
The detergent dispenser drawer is blocked (for cleaning instructions, see Care
and maintenance).
The drain hose is not fixed properly (see Installation).
Switch off the machine and unplug it, wait for approximately 1 minute and
then switch it back on again.
If the problem persists, contact the Technical Assistance Service.
The detergent is not suitable for machine washing (it should display the text
for washer-dryers or hand and machine wash, or the like).
Too much detergent was used.
The appliance is not plugged into the socket, or not enough to make contact.
There has been a power failure.
The appliance door is not shut properly.
A DELAY TIMER has been set.
DRYING is in the OFF position.

12
GB
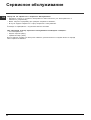
Service
Before contacting the Technical Assistance Service:
Check whether you can solve the problem alone (see Troubleshooting).
Restart the wash cycle to check whether the problem has been solved.
If this is not the case, contact an authorised Technical Assistance Centre.
Always request the assistance of authorised technicians.
Have the following information to hand:
the type of problem;
the appliance model (Mod.);
the serial number (S/N).
This information can be found on the data plate applied to the rear of the washer-dryer, and can also be found on
the front of the appliance by opening the door.

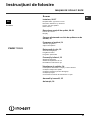
13
CIS
Ðóññêèé
CIS
ÑÒÈÐÀËÜÍÀß ÌÀØÈÍÀ
Ñîäåðæàíèå
Ìîíòàæ, 14-15
Ðàñïàêîâêà è âûðàâíèâàíèå
Âîäîïðîâîäíîå è ýëåêòðè÷åñêîå ïîäñîåäèíåíèå
Ïåðâûé öèêë ñòèðêè
Òåõíè÷åñêèå äàííûå
Îïèñàíèå ñòèðàëüíîé ìàøèíû, 16-17
Êîíñîëü óïðàâëåíèÿ
Äèñïëåé
Ïîðÿäîê âûïîëíåíèÿ öèêëà ñòèðêè è ñóøêè, 18
Ïðîãðàììû è äîïîëíèòåëüíûå ôóíêöèè, 19
Òàáëèöà ïðîãðàìì
Äîïîëíèòåëüíûå ôóíêöèè ìîéêè
Ñòèðàëüíûå ïîðîøêè è áåëüå, 20
ß÷åéêà äëÿ ñòèðàëüíîãî ïîðîøêà
Ïîäãîòîâêà áåëüÿ
Ñïåöèàëüíûå ïðîãðàììû
Ïðåäîñòîðîæíîñòè è ðåêîìåíäàöèè, 21
Îáùèå òðåáîâàíèÿ ïî áåçîïàñíîñòè
Óòèëèçàöèÿ
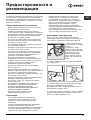
Îòêðûâàíèå ëþêà âðó÷íóþ
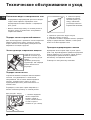
Òåõíè÷åñêîå îáñëóæèâàíèå è óõîä, 22
Îòêëþ÷åíèå âîäû è ýëåêòðè÷åñêîãî òîêà
Ïîðÿäîê ÷èñòêè ñòèðàëüíîé ìàøèíû
×èñòêà ÿ÷åéêè äëÿ ñòèðàëüíîãî ïîðîøêà
Ïîðÿäîê ÷èñòêè íàñîñà
Ïðîâåðêà øëàíãà ïîäà÷è âîäû
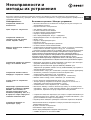
Íåèñïðàâíîñòè è ìåòîäû èõ óñòðàíåíèÿ, 23
Ñåðâèñíîå îáñëóæèâàíèå, 24
PWDE 7125 S
Ðóêîâîäñòâî ïî ýêñïëóàòàöèè

14
CIS
Óñòàíîâêà
Âàæíî ñîõðàíèòü äàííîå ðóêîâîäñòâî äëÿ åãî
ïîñëåäóþùèõ êîíñóëüòàöèé.  ñëó÷àå ïðîäàæè,
ïåðåäà÷è èëè ïåðååçäà íà íîâóþ êâàðòèðó
íåîáõîäèìî ïðîâåðèòü, ÷òîáû ðóêîâîäñòâî
îñòàâàëîñü âìåñòå ñî ñòèðàëüíîé ìàøèíîé, ÷òîáû
åå íîâûé âëàäåëåö ìîã îçíàêîìèòüñÿ ñ ïîðÿäêîì åå
ôóíêöèîíèðîâàíèÿ è ñîîòâåòñòâóþùèìè
ïðåäóïðåæäåíèÿìè.
Âíèìàòåëüíî ïðî÷èòàéòå èíñòðóêöèè: â íèõ
ñîäåðæàòñÿ âàæíûå ñâåäåíèÿ î ìîíòàæå èçäåëèÿ,
åãî ýêñïëóàòàöèè è áåçîïàñíîñòè.
Ðàñïàêîâêà è âûðàâíèâàíèå
Ñíÿòèå óïàêîâêè
1. Ðàñïàêîâàòü ñòèðàëüíóþ ìàøèíó.
2. Ïðîâåðèòü, ÷òîáû ñòèðàëüíàÿ ìàøèíà íå áûëà
ïîâðåæäåíà â ïðîöåññå ïåðåâîçêè. Ïðè
îáíàðóæåíèè ïîâðåæäåíèé íå âûïîëíÿòü åå
ïîäñîåäèíåíèé, à îáðàòèòüñÿ ê ïðîäàâöó.
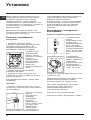
3. Ñíèìèòå 4 âèíòà,
ïðåäîõðàíÿþùèå
ìàøèíó â ïðîöåññå
ïåðåâîçêè, è ðåçèíîâóþ
çàãëóøêó ñ
ñîîòâåòñòâóþùåé
ðàñïîðíîé øàéáîé,
ðàñïîëîæåííûå â
çàäíåé ÷àñòè
ñòèðàëüíîé ìàøèíû (ñì.
ñõåìó).
4. Çàêðîéòå îòâåðñòèÿ ïðèëàãàþùèìèñÿ
ðåçèíîâûìè çàãëóøêàìè.
5. Ñîõðàíèòå âñå äåòàëè: îíè äîëæíû áûòü
óñòàíîâëåíû íà ñòèðàëüíóþ ìàøèíó â ñëó÷àå åå
ïîâòîðíî é ïåðåâîçêè.
Íå ðàçðåøàéòå äåòÿì èãðàòü ñ óïàêîâî÷íûìè
ìàòåðèàëàìè.
Íèâåëèðîâêà
1. Óñòàíîâèòå ñòèðàëüíóþ ìàøèíó íà ïëîñêîì è
ïðî÷íîì ïîëó, íå ïðèñëîíÿÿ åå ê ñòåíàì, ìåáåëè è
ïðî÷èì ïðåäìåòàì.
2. Åñëè ïîë íå ÿâëÿåòñÿ
èäåàëüíî
ãîðèçîíòàëüíûì,
íåîáõîäèìî
êîìïåíñèðîâàòü
íåðîâíîñòü,
îòðåãóëèðîâàâ ïî
âûñîòå ïåðåäíèå íîæêè
(ñì. ñõåìó). Óêëîí,
èçìåðåííûé ïðè
ïîìîùè óðîâíÿ,
óñòàíîâëåííîãî íà
ïîâåðõíîñòü ìàøèíû, íå äîëæåí ïðåâûøàòü 2°.
Òî÷íîå âûðàâíèâàíèå îáåñïå÷èâàåò ñòàáèëüíîñòü
ñòèðàëüíîé ìàøèíû, ïîìîãàåò èçáåæàòü åå
âèáðàöèé è ñìåùåíèé â ïðîöåññå
ôóíêöèîíèðîâàíèÿ.  ñëó÷àå óñòàíîâêè ìàøèíû
íà êîâåð èëè êîâðîâîå ïîêðûòèå îòðåãóëèðîâàòü
íîæêè òàêèì îáðàçîì, ÷òîáû ïîä ñòèðàëüíîé
ìàøèíîé îñòàâàëñÿ äîñòàòî÷íûé çàçîð äëÿ
âåíòèëÿöèè.
Âîäîïðîâîäíîå è ýëåêòðè÷åñêîå
ïîäñîåäèíåíèå
Ïîðÿäîê ïîäñîåäèíåíèÿ âîäîïðîâîäíîãî øëàíãà
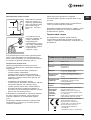
1. Ïðèêðóòèòå øëàíã
ïîäà÷è ê
âîäîïðîâîäíîìó êðàíó
õîëîäíîé âîäû ñ
ðåçüáîâûì îòâåðñòèåì
3/4 ãàç, (ñì. ñõåìó).
Ïåðåä ïîäñîåäèíåíèåì
îòêðîéòå âîäîïðîâîäíûé
êðàí äî òåõ ïîð, ïîêà èç
íåãî íå ïîòå÷åò ÷èñòàÿ
âîäà.
2. Ïîäñîåäèíèòå
âîäîïðîâîäíûé øëàíã ê
ìàøèíå, ïðèâèíòèâ åãî ê
ñïåöèàëüíîìó
âîäîïðîâîäíîìó êðàíó,
ðàñïîëîæåííîìó â
çàäíåé âåðõíåé ÷àñòè
ñïðàâà (ñì. ñõåìó).
3. Ïðîâåðüòå, ÷òîáû âîäîïðîâîäíûé øëàíã íå áûë
çàëîìëåí èëè ñæàò.
Âîäîïðîâîäíîå äàâëåíèå â êðàíå äîëæíî áûòü â
ïðåäåëàõ çíà÷åíèé, óêàçàííûõ â òàáëèöå
Òåõíè÷åñêèå äàííûå (ñì. ñòðàíèöó ðÿäîì).
Åñëè äëèíà âîäîïðîâîäíîãî øëàíãà áóäåò
íåäîñòàòî÷íîé, ñëåäóåò îáðàòèòüñÿ â
ñïåöèàëèçèðîâàííûé ìàãàçèí èëè ê
óïîëíîìî÷åííîìó ñàíòåõíèêó.
Íèêîãäà íå ïîëüçóéòåñü á/ó øëàíãàìè.
Èñïîëüçóéòå øëàíãè, ïðèëàãàþùèåñÿ ê ìàøèíå.

15
CIS
Ïðèñîåäèíåíèå ñëèâíîãî øëàíãà
Ïîäñîåäèíèòå ñëèâíîé
øëàíã, íå ñãèáàÿ åãî, ê
ñëèâíîìó òðóáîïðîâîäó
èëè ê íàñòåííîìó ñëèâó,
ðàñïîëîæåííîìó íà
âûñîòå 65 100 ñì îò
ïîëà.
èëè ïîìåñòèòå êîíåö
øëàíãà â ðàêîâèíó èëè
â âàííó, ïðèêðåïèâ
ïðèëàãàþùóþñÿ
íàïðàâëÿþùóþ ê êðàíó
(ñì. ñõåìó). Ñâîáîäíûé
êîíåö ñëèâíîãî øëàíãà
íå äîëæåí áûòü
ïîãðóæåí â âîäó.
Íå ðåêîìåíäóåòñÿ èñïîëüçîâàòü óäëèíèòåëüíûå
øëàíãè. Ïðè íåîáõîäèìîñòè óäëèíåíèå äîëæíî
èìåòü òàêîé æå äèàìåòð, ÷òî è îðèãèíàëüíûé øëàíã,
è åãî äëèíà íå äîëæíà ïðåâûøàòü 150 ñì.
Ýëåêòðè÷åñêîå ïîäêëþ÷åíèå
Ïåðåä ïîäñîåäèíåíèåì øòåïñåëüíîé âèëêè
èçäåëèÿ ê ñåòåâîé ðîçåòêå íåîáõîäèìî ïðîâåðèòü
ñëåäóþùåå:
ñåòåâàÿ ðîçåòêà äîëæíà áûòü çàçåìëåíà è
ñîîòâåòñòâîâàòü íîðìàòèâàì;
ñåòåâàÿ ðîçåòêà äîëæíà áûòü ðàñ÷èòàíà íà
ìàêñèìàëüíóþ ìîùíîñòü ñòèðàëüíîé ìàøèíû,
óêàçàííóþ â òàáëèöå Òåõíè÷åñêèå äàííûå (ñì.
òàáëèöó ñáîêó);
íàïðÿæåíèå ýëåêòðîïèòàíèÿ äîëæíî
ñîîòâåòñòâîâàòü çíà÷åíèÿì, óêàçàííûì â òàáëèöå
Òåõíè÷åñêèå äàííûå (ñì. òàáëèöó ñáîêó);
ñåòåâàÿ ðîçåòêà äîëæíà áûòü ñîâìåñòèìîé ñî
øòåïñåëüíîé âèëêîé ñòèðàëüíîé ìàøèíû. Â
ïðîòèâíîì ñëó÷àå íåîáõîäèìî çàìåíèòü ñåòåâóþ
ðîçåòêó èëè øòåïñåëüíóþ âèëêó.
Çàïðåùàåòñÿ óñòàíàâëèâàòü ñòèðàëüíóþ ìàøèíó
íà óëèöå, äàæå ïîä íàâåñîì, òàê êàê ÿâëÿåòñÿ
îïàñíûì ïîäâåðãàòü åå âîçäåéñòâèþ äîæäÿ è
ãðîçû.
Ñòèðàëüíàÿ ìàøèíà äîëæíà áûòü ðàñïîëîæåíà
òàêèì îáðàçîì, ÷òîáû äîñòóï ê ñåòåâîé ðîçåòêå
îñòàâàëñÿ ñâîáîäíûì.
65 - 100 cm
Íå èñïîëüçóéòå óäëèíèòåëè è òðîéíèêè.
Ñåòåâîé êàáåëü èçäåëèÿ íå äîëæåí áûòü ñîãíóò
èëè ñæàò.
Çàìåíà ñåòåâîãî êàáåëÿ ìîæåò îñóùåñòâëÿòüñÿ
òîëüêî óïîëíîìî÷åííûìè òåõíèêàìè.
Âíèìàíèå! Êîìïàíèÿ-ïðîèçâîäèòåëü ñíèìàåò ñ ñåáÿ
âñÿêóþ îòâåòñòâåííîñòü â ñëó÷àå íåñîáëþäåíèÿ
âûøåîïèñàííûõ ïðàâèë.
Ïåðâûé öèêë ñòèðêè
Ïî çàâåðøåíèè óñòàíîâêè, ïåðåä íà÷àëîì
ýêñïëóàòàöèè íåîáõîäèìî ïðîèçâåñòè îäèí öèêë
ñòèðêè ñî ñòèðàëüíûì âåùåñòâîì, íî áåç áåëüÿ, ïî
ïðîãðàììå .
Òåõíè÷åñêèå õàðàêòåðèñòèêè
Ìîäåëü
PWDE 7125 S
Ðàçìåðû
øèð è í à 59 ,5 ñ ì
âûñîòà 85 ñì
ãëóáèíà 55 ñì
Çàãðóçêà
îò 1 äî 7 êã íà öèêë ñòèðêè;
îò 1 äî 5 êã íà öèêë ñóøêè;
Ýëåêòðè÷åñêèå
ïàðàìåòðû
cìîòðèòå ïàñïîðòíóþ òàáëè÷êó ñ
òåõíè÷åñêèìè õàðàêòåðèñòèêàìè íà
ìàøèíå
Ãèäðàâëè÷åñêèå
ïàðàìåòðû
max äàâëåíèå 1 Ìïà (10 áàð)
min äàâëåíèå 0,05 Ìïà (0,5 áàð)
îáúåì áàðàáàíà 52 ë
Ñêîðîñòü
îòæèìà
äî 1200 îá/ìèí
Kîíòðîëüíûå
ïðîãðàììû
ñîãëàñíî
íîðìàòèâó
EN 50229
ñòèðêè:
ïðîãðàììà 2; òåìïåðàòóðà
60°Ñ; ïðè çàãðóçêå äî 7 êã.
ñóøêà:
ïåðâàÿ ñóøêà ñ çàãðóçêîé
2 êã áåëüÿ ïðè âûáîðå ðåæèìà ñóøêè
"A1" (Ïîä óòþã);
âòîðàÿ ñóøêà ñ çàãðóçêîé 5 êã áåëüÿ ïðè
âûáîðå ðåæèìà ñóøêè "A4" (Ýêñòðà).
Ìàøèíà ñîîòâåòñòâóåò ñëåäóþùèì
Äèðåêòèâàì Åâðîïåéñêîãî
Ýêîíîìè÷åñêîãî ñîîáùåñòâà:
- 89/336 /ÅÅÑ îò 03.05.89 (ýëåêòðî-
ìàãíèòíîé ñîâìåñòèìîñòè) è
ïîñëåäóþùèå ìîäèôèêàöèè
- 2 00 2 / 96/ C E
- 2006/95/CE (íèçêîãî íàïðÿæåíèÿ)

16
CIS
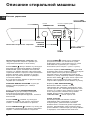
Îïèñàíèå ñòèðàëüíîé ìàøèíû
Êîíñîëü óïðàâëåíèÿ
Êíîïêà
ÒÅÌÏÅÐÀÒÓÐÀ
ÐÓÊÎßÒÊÀ
ÂÛÁÎÐÀ
ÏÐÎÃÐÀÌÌ
ß÷åéêà äëÿ ñòèðàëüíîãî âåùåñòâà
Êíîïêà
ON/OFF
Êíîïêà ÎÒÆÈÌ
Êíîïêà ñ èíäèêàòîðîì
START/PAUSE
ÄÈÑÏËÅÉ
Êíîïêè ñ èíäèêàòîðàìè
ÔÓÍÊÖÈÈ
Èíäèêàòîð ËÞÊ
ÇÀÁËÎÊÈÐÎÂÀÍ
ß÷åéêè äëÿ ñòèðàëüíîãî âåùåñòâà: äëÿ
çàãðóçêè ñòèðàëüíûõ âåùåñòâ è äîáàâîê (ñì.
Ñòèðàëüíûå âåùåñòâà è òèïû áåëüÿ).
Êíîïêà ON/OFF
: áûñòðî íàæìèòå ýòó êíîïêó äëÿ
âêëþ÷åíèÿ èëè âûêëþ÷åíèÿ ìàøèíû. Èíäèêàòîð
START/PAUSE, ðåäêî ìèãàþùèé ñèíèì öâåòîì,
îçíà÷àåò, ÷òî ìàøèíà âêëþ÷åíà. Äëÿ âûêëþ÷åíèÿ
ñòèðàëüíîé ìàøèíû â ïðîöåññå ñòèðêè íåîáõîäèìî
äåðæàòü íàæàòîé êíîïêó, ïðèìåðíî 3 ñåêóíäû.
Êîðîòêîå èëè ñëó÷àéíîå íàæàòèå íå ïðèâåäåò ê
îòêëþ÷åíèþ ìàøèíû.
 ñëó÷àå âûêëþ÷åíèÿ ìàøèíû â ïðîöåññå ñòèðêè
òåêóùèé öèêë îòìåíÿåòñÿ.
ÐÓÊÎßÒÊÀ ÂÛÁÎÐÀ ÏÐÎÃÐÀÌÌ: ñëóæàò äëÿ
âûáîðà íóæíîé ïðîãðàììû (ñì. Òàáëèöà
ïðîãðàìì).
Êíîïêè è èíäèêàòîðû ÄÎÏÎËÍÈÒÅËÜÍÛÅ
ÔÓÍÊÖÈÈ: ñëóæàò äëÿ âûáîðà èìåþùèõñÿ
äîïîëíèòåëüíûõ ôóíêöèé. Èíäèêàòîð,
ñîîòâåòñòâóþùèé âûáðàííîé ôóíêöèè , îñòàíåòñÿ
âêëþ÷åííûì.
Êíîïêà ÎÒÆÈÌ
: íàæìèòå ýòó êíîïêó äëÿ
ñîêðàùåíèÿ ñêîðîñòè èëè ïîëíîãî èñêëþ÷åíèÿ
îòæèìà çíà÷åíèå ïîêàçûâàåòñÿ íà äèñïëåå.
Êíîïêà ÒÅÌÏÅÐÀÒÓÐÀ
: íàæìèòå ýòó êíîïêó äëÿ
ñîêðàùåíèÿ òåìïåðàòóðû èëè ïîëíîãî èñêëþ÷åíèÿ
íàãðåâà çíà÷åíèå ïîêàçûâàåòñÿ íà äèñïëåå.
Êíîïêà ÑÓØÊÀ
: íàæìèòå äëÿ ñîêðàùåíèÿ
ïðîäîëæèòåëüíîñòè èëè èñêëþ÷åíèÿ ñóøêè;
âûáðàííûé ðåæèì è ïðîäîëæèòåëüíîñòü ñóøêè
ïîêàçûâàþòñÿ íà äèñïëåå (ñì. «Ïîðÿäîê
âûïîëíåíèÿ öèêëà ñòèðêè è ñóøêè è ñóøêè»).
Êíîïêà è èíäèêàòîð START/PAUSE
: êîãäà ñèíèé
èíäèêàòîð ðåäêî ìèãàåò, íàæìèòå êíîïêó äëÿ çàïóñêà
öèêëà ñòèðêè. Ïîñëå ïóñêà öèêëà èíäèêàòîð
ïåðåñòàåò ìèãàòü. Äëÿ ïðåðûâàíèÿ ñòèðêè âíîâü
íàæìèòå ýòó êíîïêó; èíäèêàòîð çàìèãàåò îðàíæåâûì
öâåòîì. Åñëè ñèìâîë
íå ãîðèò, ìîæíî îòêðûòü ëþê
ìàøèíû. Äëÿ âîçîáíîâëåíèÿ ñòèðêè ñ ìîìåíòà,
êîãäà îíà áûëà ïðåðâàíà, âíîâü íàæìèòå ýòó êíîïêó.
Èíäèêàòîð ËÞÊ ÇÀÁËÎÊÈÐÎÂÀÍ
Âêëþ÷åííûé ñèìâîë îçíà÷àåò, ÷òî ëþê
çàáëîêèðîâàí. Âî èçáåæàíèå ïîâðåæäåíèé, ïåðåä
òåì êàê îòêðûòü ëþê, íåîáõîäèìî äîæäàòüñÿ, ïîêà
ïîãàñíåò ýòîò ñèìâîë. Åñëè òðåáóåòñÿ îòêðûòü ëþê
ïîñëå çàïóñêà öèêëà, íàæìèòå êíîïêó START/
PAUSE. Êîãäà ïîãàñíåò èíäèêàòîð ËÞÊ
ÇÀÁËÎÊÈÐÎÂÀÍ
, ìîæíî îòêðûòü ëþê.
Ðåæèì îæèäàíèÿ
Íàñòîÿùàÿ ñòèðàëüíàÿ ìàøèíà îòâå÷àåò
òðåáîâàíèÿì íîâûõ íîðìàòèâîâ ïî ýêîíîìèè
ýëåêòðîýíåðãèè, óêîìïëåêòîâàíà ñèñòåìîé
àâòîìàòè÷åñêîãî îòêëþ÷åíèÿ (ðåæèì ñîõðàíåíèÿ
ýíåðãèè), âêëþ÷àþùåéñÿ ÷åðåç íåñêîëüêî ìèíóò
ïðîñòîÿ ìàøèíû. Íàæìèòå îäèí ðàç êíîïêó ON/OFF
è ïîäîæäèòå, ïîêà ìàøèíà âíîâü âêëþ÷èòñÿ.
Êíîïêà
ÑÓØÊÀ

17
CIS
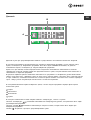
Äèñïëåé
B
C
A
Äèñïëåé ñëóæèò äëÿ ïðîãðàììèðîâàíèÿ ìàøèíû è ïðåäîñòàâëÿåò ïîëüçîâàòåëþ ìíîæåñòâî ñâåäåíèé.
 ñåêòîðå A ïîêàçûâàåòñÿ ïðîäîëæèòåëüíîñòü ðàçëè÷íûõ èìåþùèõñÿ ïðîãðàìì è, ïîñëå çàïóñêà öèêëà,
âðåìÿ, îñòàþùååñÿ äî çàâåðøåíèÿ ïðîãðàììû. Åñëè áûë çàäàí ÒÀÉÌÅÐ ÎÒÑÐÎ×ÊÈ, íà äèñïëåå
ïîêàçûâàåòñÿ âðåìÿ, îñòàþùååñÿ äî çàïóñêà âûáðàííîé ïðîãðàììû.
Êðîìå òîãî ïðè ïîìîùè ñîîòâåòñòâóþùåé êíîïêè íà äèñïëåå ïîêàçûâàþòñÿ ìàêñèìàëüíûå çíà÷åíèÿ
òåìïåðàòóðû, ñêîðîñòè îòæèìà, ðåæèì èëè ïðîäîëæèòåëüíîñòü ñóøêè, êîòîðûå ìàøèíà ìîæåò âûïîëíèòü â
çàâèñèìîñòè îò çàäàííîé ïðîãðàììû.
 ïðîöåññå îáðàáîòêè äàííûõ ìàøèíîé â çàâèñèìîñòè îò ïðîãðàììû è îò âûáðàííîãî óðîâíÿ Smart ìèãàåò
ñèìâîë ïåñî÷íûå ÷àñû. Ìàêñèìóì ÷åðåç 10 ìèíóò ïîñëå çàïóñêà ñèìâîë ïåñî÷íûå ÷àñû ïåðåñòàåò ìèãàòü
è ãîðèò ñòàáèëüíî, ïîêàçûâàÿ îêîí÷àòåëüíîå îñòàòî÷íîå âðåìÿ. Ñèìâîë ïåñî÷íûå ÷àñû ïîãàñíåò ïðèìåðíî
÷åðåç 1 ìèíóòó ïîñëå âèçóàëèçàöèè îêîí÷àòåëüíîãî îñòàòî÷íîãî âðåìåíèÿ.
 ñåêòîðå  ïîêàçûâàþòñÿ ôàçû âûáðàííîãî öèêëà, è ïîñëå çàïóñêà ïðîãðàììû òåêóùàÿ ôàçà ñòèðêè è
âîçìîæíîé ñóøêè.
Ñòèðêà
Ïîëîñêàíèå
Îòæèì/Ñëèâ
Cóøêà
 ñåêòîðå C ïîêàçûâàþòñÿ ñëåâà íàïðàâî ñèìâîëû òåìïåðàòóðà, îòæèì è Cóøêà.
Ïîëîñêè òåìïåðàòóðû
ïîêàçûâàþò ìàêñèìàëüíûé òåìïåðàòóðíûé óðîâåíü, êîòîðûé ìîæåò áûòü çàäàí
äëÿ âûáðàííîé ïðîãðàììû.
Ïîëîñêè îòæèìà
ïîêàçûâàþò ìàêñèìàëüíóþ ñêîðîñòü îòæèìà, êîòîðàÿ ìîæåò áûòü çàäàíà äëÿ
âûáðàííîé ïðîãðàììû.
Ñèìâîë
çàãîðàåòñÿ â ïðîöåññå ïðîãðàììèðîâàíèÿ ñóøêè.

18
CIS
Ïîðÿäîê âûïîëíåíèÿ öèêëà ñòèðêè
è ñóøêè
1. ÏÎÐßÄÎÊ ÂÊËÞ×ÅÍÈß ÌÀØÈÍÛ. Íàæìèòå
êíîïêó
; èíäèêàòîð START/PAUSE ðåäêî ìèãàåò
ñèíèì öâåòîì.
2. ÇÀÃÐÓÇÊÀ ÁÅËÜß. Îòêðîéòå ëþê ìàøèíû.
Çàãðóçèòå â áàðàáàí áåëüå, íå ïðåâûøàÿ
ìàêñèìàëüíûé äîïóñòèìûé âåñ, óêàçàííûé â
òàáëèöå ïðîãðàìì íà ñëåäóþùåé ñòðàíèöå.
3. ÄÎÇÈÐÎÂÊÀ ÑÒÈÐÀËÜÍÎÃÎ ÂÅÙÅÑÒÂÀ Âûíüòå
äîçàòîð è ïîìåñòèòå ñòèðàëüíîå âåùåñòâî â
ñïåöèàëüíûå ÿ÷åéêè, êàê îïèñàíî â ðàçäåëå
Ñòèðàëüíûå âåùåñòâà è òèïû áåëüÿ.
4. ÇÀÊÐÎÉÒÅ ËÞÊ.
5. ÂÛÁÎÐ ÏÐÎÃÐÀÌÌÛ. Ïðè ïîìîùè ðóêîÿòêè
âûáîðà ÏÐÎÃÐÀÌÌ âûáåðèòå íóæíóþ
ïðîãðàììó; â äàííîé ïðîãðàììå çàäàíà
òåìïåðàòóðà è ñêîðîñòü îòæèìà, êîòîðûå ìîæíî
èçìåíèòü. Íà äèñïëåå ïîêàçûâàåòñÿ
ïðîäîëæèòåëüíîñòü äàííîãî öèêëà.
6. ÏÅÐÑÎÍÀËÈÇÈÐÎÂÀÍÍÛÅ ÖÈÊËÛ ÑÒÈÐÊÈ.
Íàæìèòå ñîîòâåòñòâóþùèå êíîïêè:
Èçìåíèòå òåìïåðàòóðó è/èëè ñêîðîñòü
îòæèìà. Ìàøèíà àâòîìàòè÷åñêè ïîêàçûâàåò íà
äèñïëåå ìàêñèìàëüíûå òåìïåðàòóðó è ñêîðîñòü
îòæèìà, ïðåäóñìîòðåííûå äëÿ âûáðàííîé ïðîãðàììû,
èëè ïîñëåäíèå âûáðàííûå çíà÷åíèÿ, åñëè îíè
ñîâìåñòèìû ñ âûáðàííîé ïðîãðàììîé. Ïðè ïîìîùè
êíîïêè
ìîæíî ïîñòåïåííî óìåíüøèòü òåìïåðàòóðó
âïëîòü äî ñòèðêè â õîëîäíîé âîäå OFF. Ïðè ïîìîùè
êíîïêè
ìîæíî ïîñòåïåííî óìåíüøèòü ñêîðîñòü
îòæèìà âïëîòü äî åãî èñêëþ÷åíèÿ OFF. Ïðè åùå
îäíîì íàæàòèè ýòèõ êíîïîê âåðíóòñÿ ìàêñèìàëüíûå
äîïóñòèìûå çíà÷åíèÿ.
Ïðîãðàììèðîâàíèå ñóøêè
Ïðè ïåðâîì íàæàòèè êíîïêè
ìàøèíà
àâòîìàòè÷åñêè âûáèðàåò ìàêñèìàëüíûé ðåæèì
ñóøêè, ñîâìåñòèìûé ñ âûáðàííîé ïðîãðàììîé. Ïðè
ïîñëåäóþùèõ íàæàòèÿõ êíîïêè ðåæèì óìåíüøàåòñÿ
è, ñëåäîâàòåëüíî, ñîêðàùàåòñÿ ïðîäîëæèòåëüíîñòü
ñóøêè âïëîòü äî åå èñêëþ÷åíèÿ OFF. Ïðè åùå
îäíîì íàæàòèè ýòèõ êíîïîê âåðíóòñÿ ìàêñèìàëüíûå
äîïóñòèìûå çíà÷åíèÿ.
Ìîæíî âûáðàòü ñëåäóþùèå ðåæèìû ñóøêè:
A - ïî òðåáóåìîìó óðîâíþ ñóøêè áåëüÿ:
Ïîä óòþã: ðåêîìåíäóåòñÿ äëÿ áåëüÿ, êîòîðîå
çàòåì òðåáóåòñÿ ãëàäèòü. Ñòåïåíü îñòàòî÷íîé
âëàæíîñòè ñìÿã÷àåò ñêëàäêè è äåëàåò ãëàæêó
áîëåå ëåãêîé. Íà äèñïëåå ïîêàçûâàåòñÿ «À1».
Íà âåøàëêó: èäåàëüíî ïîäõîäèò äëÿ âåùåé,
íå íóæäàþùèõñÿ â ïîëíîé ñóøêå.
Íà äèñïëåå
ïîêàçûâàåòñÿ «À2».
 øêàô: ïîäõîäèò äëÿ áåëüÿ, ñðàçó ñêëàäûâàåìîãî
â øêàô áåç ãëàæêè.
Íà äèñïëåå ïîêàçûâàåòñÿ «À3».
Ýêñòðà: ïîäõîäèò äëÿ áåëüÿ, íóæäàþùåãîñÿ â
ïîëíîé ñóøêå, òàêîãî êàê ìàõðîâûå ïîëîòåíöà
è õàëàòû.
Íà äèñïëåå ïîêàçûâàåòñÿ «À4».
B - Ïî ïðîäîëæèòåëüíîñòè: îò 30 äî 180 ìèíóò
(Ìàêñ. çàãðóçêà 4 êã).
 ñëó÷àå, åñëè âåñ áåëüÿ, ïðåäíàçíà÷åííîãî
äëÿ ñòèðêè è ñóøêè, ïðåâûøàåò ìàêñèìàëüíóþ
äîïóñòèìóþ çàãðóçêó (ñìîòðèòå òàáëèöó
ñáîêó), âûïîëíèòå öèêë ñòèðêè, è ïî åãî
çàâåðøåíèè, ðàçäåëèòå áåëüå íà ÷àñòè è
ïðîèçâîäèòå åãî ñóøêó ÷àñòÿìè. Çàòåì
ñëåäóéòå èíñòðóêöèÿì, îïèñûâàþùèì ôóíêöèþ
«Òîëüêî ñóøêà». Ïîâòîðèòå òå æå îïåðàöèè
äëÿ ñóøêè îñòàâøåãîñÿ áåëüÿ.
ÏÐÈÌÅ×ÀÍÈÅ: ïî çàâåðøåíèè ñóøêè âñåãäà
ïðîèçâîäèòñÿ öèêë îõëàæäåíèÿ áåëüÿ.
Òîëüêî ñóøêà
Ïðè ïîìîùè ðóêîÿòêè âûáîðà ïðîãðàìì
âûáåðèòå ðåæèì ñóøêè (11-12-13) â
çàâèñèìîñòè îò òèïà áåëüÿ. Ìîæíî òàêæå
âûáðàòü íóæíûé ðåæèì èëè ïðîäîëæèòåëüíîñòü
ñóøêè ïðè ïîìîùè êíîïêè ÑÓØÊÀ
Èçìåíèòå ïàðàìåòðû öèêëà.
Íàæìèòå êíîïêó äëÿ àêòèâàöèè
äîïîëíèòåëüíîé ôóíêöèè; èíäèêàòîð
ñîîòâåòñòâóþùåé êíîïêè çàãîðèòñÿ.
Âíîâü íàæìèòå êíîïêó äëÿ îòêëþ÷åíèÿ
äîïîëíèòåëüíîé ôóíêöèè, èíäèêàòîð ïîãàñíåò.
Åñëè âûáðàííàÿ äîïîëíèòåëüíàÿ ôóíêöèÿ
ÿâëÿåòñÿ íåñîâìåñòèìîé ñ çàäàííîé ïðîãðàììîé,
èíäèêàòîð áóäåò ìèãàòü, è òàêàÿ ôóíêöèÿ íå
áóäåò àêòèâèðîâàíà.
Åñëè âûáðàíàÿ äîïîëíèòåëüíàÿ ôóíêöèÿ
íåñîâìåñòèìà ñ ðàíåå àêòèâèðîâàííîé ôóíêöèåé,
èíäèêàòîð ñîîòâåòñòâóþùèé ïåðâîé
àêòèâèðîâàííîé ôóíêöèè ôóíêöèè çàìèãàåò, è
áóäåò àêòèâèðîâàíà òîëüêî âòîðàÿ ôóíêöèÿ,
èíäèêàòîð àêòèâèðîâàííîéôóíêöèèçàãîðèòñÿ .
Ïðèìå÷àíèå: åñëè àêòèâèðîâàíà äîïîëíèòåëüíàÿ
ôóíêöèÿ SMART, íèêàêàÿ äðóãàÿ äîïîëíèòåëüíàÿ
ôóíêöèÿ íå ìîæåò áûòü àêòèâèðîâàíà.
Äîïîëíèòåëüíûå ôóíêöèè ìîãóò èçìåíèòü
ðåêîìåíäóåìóþ çàãðóçêó ìàøèíû è/èëè
ïðîäîëæèòåëüíîñòü öèêëà.
7. ÇÀÏÓÑÊ ÏÐÎÃÐÀÌÌÛ Íàæìèòå êíîïêó START/
PAUSE. Ñîîòâåòñòâóþùèé èíäèêàòîð çàãîðèòñÿ
ñèíèì ñâåòîì, è ëþê çàáëîêèðóåòñÿ (ñèìâîë ËÞÊ
ÇÀÁËÎÊÈÐÎÂÀÍ
çàãîðèòñÿ). Äëÿ èçìåíåíèÿ
ïðîãðàììû â ïðîöåññå âûïîëíåíèÿ öèêëà
ïåðåêëþ÷èòå ìàøèíó â ðåæèì ïàóçû ïðè ïîìîùè
êíîïêè START/PAUSE (èíäèêàòîð START/PAUSE
ðåäêî ìèãàåò îðàíæåâûì öâåòîì). Çàòåì âûáåðèòå
íîâûé öèêë è âíîâü íàæìèòå êíîïêó START/
PAUSE. Åñëè òðåáóåòñÿ îòêðûòü ëþê ïîñëå ïóñêà
öèêëà, íàæìèòå êíîïêó START/PAUSE. Êîãäà
ïîãàñíåò èíäèêàòîð ËÞÊ ÇÀÁËÎÊÈÐÎÂÀÍ
,
ìîæíî îòêðûòü ëþê. Âíîâü íàæìèòå êíîïêó START/
PAUSE äëÿ âîçîáíîâëåíèÿ ïðîãðàììû ñ ìîìåíòà,
â êîòîðûé îíà áûëà ïðåðâàíà.
8. ÇÀÂÅÐØÅÍÈÅ ÏÐÎÃÐÀÌÌÛ. Ïîêàçûâàåòñÿ
ñîîáùåíèåì íà äèñïëåå END. Ïîñëå òîãî, êàê
ïîãàñíåò ñèìâîë ËÞÊ ÇÀÁËÎÊÈÐÎÂÀÍ
,
ìîæíî áóäåò îòêðûòü ëþê. Îòêðîéòå ëþê,
âûãðóçèòå áåëüå è âûêëþ÷èòå ìàøèíó.
Åñëè òðåáóåòñÿ îòìåíèòü òåêóùèé öèêë ñòèðêè,
äåðæèòå íàæàòîé êíîïêó
íåñêîëüêî ñåêóíä. Öèêë
ïðåðâåòñÿ, è ìàøèíà âûêëþ÷èòñÿ.

19
CIS
Ïðîãðàììû è
äîïîëíèòåëüíûå ôóíêöèè
Äîïîëíèòåëüíûå ôóíêöèè ñòèðêè
Äîïîëíèòåëüíàÿ ôóíêöèÿ ïîçâîëÿåò îïòèìèçèðîâàòü
ðåçóëüòàò ñòèðêè â çàâèñèìîñòè îò îáúåìà áåëüÿ, çàãðóæåííîãî
â ìàøèíó, ñîêðàùàÿ ïðîäîëæèòåëüíîñòü ñòèðêè, à òàêæå
ðàñõîä âîäû è ýëåêòðîýíåðãèè. Êðîìå òîãî ïðè ïîìîùè êíîïêè
ìîæíî âûáðàòü íóæíûé Âàì ðåæèì ñòèðêè.
Intensive: èíòåíñèâíûé ðåæèì ñòèðêè äëÿ áåëüÿ ñ ñèëüíûì
çàãðÿçíåíèåì.
4 You: ñòàíäàðòíûé ðåæèì ñòèðêè äëÿ áåëüÿ ñ îáû÷íûì
çàãðÿçíåíèåì.
Fast: êîðîòêèé ðåæèì ñòèðêè äëÿ áåëüÿ ñ íåçíà÷èòåëüíûì
çàãðÿçíåíèåì.
Ýòà ôóíêöèÿ ìîæåò áûòü àêòèâèðîâàíà òîëüêî äëÿ
ïðîãðàìì 1, 2, 3, 4, 5 (äëÿ âñåõ òðåõ óðîâíåé) è 6, 7 (óðîâíè
4 You è Fast).
Ëåãêàÿ ãëàæêà
Ïðè âûáîðå ýòîé ôóíêöèè öèêëû ñòèðêè è îòæèìà
èçìåíÿþòñÿ òàêèì îáðàçîì, ÷òîáû ñîêðàòèòü ñìèíàåìîñòü
áåëüÿ. Ïî çàâåðøåíèè öèêëà ìàøèíà ïðîèçâîäèò ìåäëåííîå
âðàùåíèå áàðàáàíà. Èíäèêàòîð ôóíêöèè Ëåãêàÿ ãëàæêà è
èíäèêàòîð START/PAUSE ìèãàþò (ïåðâûé ñèíèì, âòîðîé
îðàíæåâûì öâåòîì). Äëÿ çàâåðøåíèÿ öèêëà íàæìèòå êíîïêó
START/PAUSE èëè êíîïêó Ëåãêàÿ ãëàæêà. Ïðè âûáîðå
ïðîãðàììû 9-10 ìàøèíà çàâåðøàåò öèêë áåç ñëèâà âîäû, è
èíäèêàòîð ôóêöèè Ëåãêàÿ ãëàæêà è èíäèêàòîð START/PAUSE
ìèãàþò. Äëÿ ñëèâà âîäû è âûãðóçêè áåëüÿ íåîáõîäèìî íàæàòü
êíîïêó START/PAUSE èëè êíîïêó Ëåãêàÿ ãëàæêà.
Íå ìîæåò áûòü àêòèâèðîâàíà â ïðîãðàììàõ 8, 11, 12, 13
, .
Ïðèìå÷àíèå: Åñëè âû òàêæå õîòèòå çàïóñòèòü öèêë
ñóøêè, ýòàôóíêöèÿ ìîæåò áûòü èñïîëüçîâàíà òîëüêî
ñîâìåñòíî ñ óðîâíåì ñóøêè A1 (Ïîä óòþã).
Ôóíêöèÿ ïÿòíîâûâåäåíèÿ
Ýòà ôóíêöèÿ ñëóæèò äëÿ
óäàëåíèÿ íàèáîëåå òðóäíûõ
ïÿòåí. Âñòàâüòå
äîïîëíèòåëüíûé
ïðèëàãàþùèéñÿ äîçàòîð 4 â
äîçàòîð 1. Ïðè çàëèâå
îòáåëèâàòåëÿ íå ïðåâûøàéòå
ìàêñ. óðîâåíü, óêàçàííûé
íà ñòåðæíå â öåíòðå (ñì.
ñõåìó). Äëÿ âûïîëíåíèÿ
òîëüêî îòáåëèâàíèÿ çàëåéòå
îòáåëèâàòåëü â äîïîëíèòåëüíûé äîçàòîð 4, âûáåðèòå
ïðîãðàììó Îïîëàñêèâàíèå
è âêëþ÷èòå äîïîëíèòåëüíóþ
ôóíêöèþ Ïÿòíîâûâåäåíèå
. Äëÿ îòáåëèâàíèÿ â ïðîöåññå
ñòèðêè ïîìåñòèòå ñòèðàëüíîå âåùåñòâî è äîáàâêè, âûáåðèòå
íóæíóþ ïðîãðàììó è àêòèâèðóéòå äîïîëíèòåëüíóþ ôóíêöèþ
Ïÿòíîâûâåäåíèå
. Åñëè èñïîëüçóåòñÿ äîïîëíèòåëüíûé
äîçàòîð 4, ôóíêöèÿ ïðåäâàðèòåëüíàÿ ñòèðêà èñêëþ÷àåòñÿ.
Íå ìîæåò áûòü àêòèâèðîâàíà â ïðîãðàììàõ 1, 6, 8, 9, 10, 11,
12, 13,
, .
Ïóñê ñ çàäåðæêîé
Äëÿ ïðîãðàììèðîâàíèÿ ïóñêà âûáðàííîé ïðîãðàììû ñ
çàäåðæêîé íàæìèòå ñîîòâåòñòâóþùóþ êíîïêó âïëîòü äî
ïîëó÷åíèÿ íóæíîãî âðåìåíè çàäåðæêè. Êîãäà âêëþ÷åíà
ýòà ôóíêöèÿ, ñîîòâåòñòâóþùèé èíäèêàòîð ãîðèò. Äëÿ
îòìåíû çàïóñêà ñ çàäåðæêîé íàæìèòå êíîïêó íåñêîëüêî
ðàç äî òåõ ïîð, ïîêà íà äèñïëåå íå ïîÿâèòñÿ OFF.
Ýòà ôóíêöèÿ ñîâìåñòèìà ñ ëþáîé ïðîãðàììîé.
Äëÿ âñåõ èíñòèòóòîâ òåñòèðîâàíèÿ:
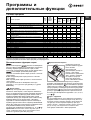
1) Ïðîãðàììû óïðàâëåíèÿ â ñîîòâåòñòâèè ñ Äèðåêòèâîé EN 50229: çàäàéòå ïðîãðàììó 2 ñ òåìïåðàòóðîé 60°C.
2) Äëèííàÿ ïðîãðàììà äëÿ õ/á áåëüÿ: çàäàéòå ïðîãðàììó 2 ñ òåìïåðàòóðîé 40°C.
3) Êîðîòêàÿ ïðîãðàììà äëÿ õ/á áåëüÿ: çàäàéòå ïðîãðàììó 4 ñ òåìïåðàòóðîé 40°C.
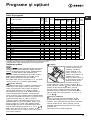
Òàáëèöà ïðîãðàìì
4
2
3
1
4
2
1
3
Ñòèðàëüíûå âåùåñòâà è äîáàâêè
Îïèñàíèå ïðîãðàììû
Ìàêñ.
òåìï.
(°C)
Ìàêñ.
ñêîðîñòü
(îáîðîòîâ
â ìèíóòó
Ñóøêà
Ïðåäâà
ðèòåëüí
àÿ
ìîéêà
Ñòèðêà
Îòáå
ëèâà
òåëü
Îïîëàñê
èâàòåëü
Ìàêñ.
çàãðó
çêà
(êã)
Ïðîä
îëæè
ò-òü
öèêëà
Smart
1
Õ/á èçäåëèÿ ñ ïðåäâàðèòåëüíîé ñòèðêîé:
Î÷åíü
ãðÿçíîå
áåëîå
áåëüå
.
90° 1200 • • • - • 7
2 Áåëîå õ/á áåëüå:
Î÷åíü
ãðÿçíîå
áåëîå
áåëüå
.
90° 1200 • - • • • 7
2
Áåëîå õ/á áåëüå (1):
î÷åíü
ãðÿçíîå
áåëîå
è
ïðî÷íîå
öâåòíîå
áåëüå
.
60° 1200 • - • • • 7
2
Áåëîå õ/á áåëüå (2):
Î÷åíü
ãðÿçíîå
áåëîå
è
äåëèêàòíîå
öâåòíîå
áåëüå
.
40° 1200 • - • • • 7
3 Õëîïîê:
î÷åíü
ãðÿçíîå
áåëîå
è
ïðî÷íîå
öâåòíîå
áåëüå
.
60° 1200 • - • • • 7
4
ÖÂÅÒÍÎÉ ÕËÎÏÎÊ (3):
Ìàëî
çàãðÿçíåííîå
áåëîå
è
öâåòíîå
äåëèêàòíîå
áåëüå
.
40° 1200 • - • • • 7
5
Ñèíòåòè÷åñêèå òêàíè:
Ïðî÷íîå
öâåòíîå
áåëüå
ñ
íå çíà÷ èò åë üí ûì
çà ãð ÿ çíåíèå ì
.
60° 800 • - • • • 3
6 Äæèíñû
40° 800 • - • - • 3,5
7 Ðóáàøêè
40° 600 • - • • • 2
Ñïåöèàëüíûå ïðîãðàììû
8 Øåðñòü:
øåðñòü
,
êàøåìèð
è
ò
.
ä
.
40° 800 • - • - • 1,5
9 ØÅËÊ/ÇÀÍÀÂÅÑÊÈ:
èçäåëèÿ
èç
øåëêà
,
âèñêîçû
è
íèæíåå
áåëüå
.
30° 0 - - • - • 1
10
Âåðõíÿÿ îäåæäà
30° 400 - - • - - 2
Ïðîãðàììû ñóøêè
11
Ñóøêà
ÕËÎÏÎK
- - • - - - - 5
12
Ñóøêà
ÑÈÍÒÅÒÈKÀ
- - • - - - - 3
13
Ñóøêà
Øeðcòü
- - • - - - - 1,5
×àñòè÷íûå ïðîãðàììû
Ïîëîñêàíèå
- 1200 • - - • • 7
Îòæèì
- 1200 • - - - - 7
Ñëèâ
- 0 - - - - - 7
Ïðîãðàììû
Ïðîäîëæèòåëüíîñòü ïðîãðàìì ñòèðêè ìîæíî
ïðîâåðÿòü ïî äèñïëåþ.

20
CIS
Ñòèðàëüíûå âåùåñòâà è
òèïû áåëüÿ
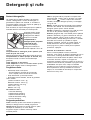
ß÷åéêà äëÿ ñòèðàëüíîãî âåùåñòâà
Õîðîøèé ðåçóëüòàò ñòèðêè çàâèñèò òàêæå îò
ïðàâèëüíîé äîçèðîâêè ñòèðàëüíîãî âåùåñòâà:
èçáûòîê ñòèðàëüíîãî âåùåñòâà íå ãàðàíòèðóåò
áîëåå ýôôåêòèâíóþ ñòèðêó, íàïðîòèâ, ñïîñîáñòâóåò
îáðàçîâàíèþ íàëåòîâ âíóòðè ñòèðàëüíîé ìàøèíû è
çàãðÿçíåíèþ îêðóæàþùåé ñðåäû.
Íå èñïîëüçóéòå ñòèðàëüíûå âåùåñòâà äëÿ ðó÷íîé
ñòèðêè, òàê êàê îíè îáðàçóþò ñëèøêîì ìíîãî ïåíû.
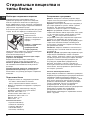
Âûíüòå ÿ÷åéêó è
ïîìåñòèòå â íåå
ñòèðàëüíîå âåùåñòâî èëè
äîáàâêó â ñëåäóþùåì
ïîðÿäêå.
ß÷åéêà 1: Ñòèðàëüíîå
ââåùåñòâî äëÿ
ïðåäâàðèòåëüíîé
ñòèðêè (ïîðîøîê)
Ïåðåä çàñûïêîé ñòèðàëüíîãî ïîðîøêà íåîáõîäèìî
ïðîâåðèòü, ÷òîáû íå áûë óñòàíîâëåí
äîïîëíèòåëüíûé äîçàòîð 4.
ß÷åéêà 2: Ñòèðàëüíîå âåùåñòâî äëÿ ñòèðêè
(ïîðîøîê èëè æèäêèé)
Æèäêîå ñðåäñòâî äëÿ ñòèðêè çàëèâàåòñÿ
íåïîñðåäñòâåííî ïåðåä çàïóñêîì ìàøèíû.
ß÷åéêà 3: Äîáàâêè (îïîëàñêèâàòåëü è ò.ä.)
Íå íàëèâàéòå îïîëàñêèâàòåëü âûøå ðåøåòêè
äîçàòîðà.
äîïîëíèòåëüíûé äîçàòîð 4: Îòáåëèâàòåëü
äîïîëíèòåëüíûé äîçàòîð 5: ðåêîìåíäóåòñÿ
èñïîëüçîâàòü ýòîò äîçàòîð äëÿ æèäêîãî ñòèðàëüíîãî
âåùåñòâà.
Ïîäãîòîâêà áåëüÿ
Ðàçäåëèòå áåëüå ïî ñëåäóþùèì ïðèçíàêàì:
- òèï òêàíè / îáîçíà÷åíèÿ íà ýòèêåòêå
- öâåòó: îòäåëèòå öâåòíîå áåëüå îò áåëîãî.
Âûíüòå èç êàðìàíîâ âñå ïðåäìåòû è ïðîâåðüòå
ïóãîâèöû.
Íå ïðåâûøàéòå ìàêñèìàëüíóþ çàãðóçêó
áàðàáàíà, óêàçàííóþ äëÿ ñóõîãî áåëüÿ:
Ïðî÷íûå òêàíè: ìàêñ. 7 êã
Ñèíòåòè÷åñêèå òêàíè: ìàêñ. 3 êã
Äåëèêàòíûå òêàíè: ìàêñ. 2 êã
Øåðñòü: ìàêñ. 1,5 êã
Øåëê: ìàêñ. 1 êã
Ñêîëüêî âåñèò áåëüå?
1 ïðîñòûíÿ 400-500 ãð.
1 íàâîëî÷êà 150-200 ãð.
1 ñêàòåðòü 400-500 ãð.
1 õàëàò 900-1200 ãð.
1 ïîëîòåíöå 150-250 ãð.
1
2
3
5
4
Ñïåöèàëüíûå ïðîãðàììû
Äæèíñû: âûâåðíèòå íàèçíàíêó èçäåëèÿ ïåðåä
ñòèðêîé è èñïîëüçóéòå æèäêîå ìîþùåå ñðåäñòâî.
Èñïîëüçóéòå ïðîãðàììó 6.
Ðóáàøêè: èñïîëüçóéòå ñïåöèàëüíóþ ïðîãðàììó 7
äëÿ ñòèðêè ðóáàøåê èç ðàçíûõ òêàíåé è ðàçíûõ
ðàñöâåòîê. Ýòî îáåñïå÷èò ìàêñèìàëüíóþ
ñîõðàííîñòü âåùåé è ñîêðàòèò èõ ñìèíàåìîñòü.
Øåðñòü: ïðîãðàììà 8 ïîçâîëÿåò ñòèðàòü â
ñòèðàëüíîé ìàøèíå ëþáûå øåðñòÿíûå âåùè, äàæå
òå, íà ýòèêåòêàõ êîòîðûõ óêàçàí ñèìâîë ðó÷íàÿ
ñòèðêà
. Äëÿ ïîëó÷åíèÿ îïòèìàëüíîãî
ðåçóëüòàòà èñïîëüçóéòå ñïåöèàëüíûé ñòèðàëüíûé
ïîðîøîê è íå ïðåâûøàòü âåñ çàãðóçêè 1,5 êã.
Øåëê: èñïîëüçóéòå ñïåöèàëüíóþ ïðîãðàììó 9 äëÿ
ñòèðêè âñåõ øåëêîâûõ âåùåé. Ðåêîìåíäóåòñÿ
èñïîëüçîâàòü ñïåöèàëüíîå ñòèðàëüíîå âåùåñòâî
äëÿ äåëèêàòíûõ òêàíåé.
Çàíàâåñêè: ñâåðíèòå çàíàâåñêè è ïîëîæèòå èõ â
íàâîëî÷êó èëè â ñåò÷àòûé ìåøî÷åê. Èñïîëüçóéòå
ïðîãðàììó 9.
Âåðõíÿÿ îäåæäà (ïðîãðàììà 10) ðàçðàáîòàíà äëÿ
ñòèðêè âîäîîòòàëêèâàþùèõ òêàíåé è âåòðîâîê
(íàïð., goretex, ïîëèýñòåð, íåéëîí); äëÿ äîñòèæåíèÿ
ëó÷øèõ ðåçóëüòàòîâ èñïîëüçóéòå æèäêèå ìîþùèå
ñðåäñòâà â ñîîòâåòñòâóþùåé äîçèðîâêå äëÿ
ïîëóçàãðóçêè; îáðàáîòàéòå ïðåäâàðèòåëüíî
ìàíæåòû, âîðîòíèêè è ó÷àñòêè ñ ïÿòíàìè; íå
èñïîëüçóéòå ñìÿã÷èòåëü èëè ìîþùèå ñðåäñòâà ñî
ñìÿã÷èòåëåì. Ýòà ïðîãðàììà íå ïðåäíàçíà÷åíà
äëÿ ñòèðêè ïóõîâèêîâ.
Ñèñòåìà áàëàíñèðîâêè áåëüÿ
Ïåðåä êàæäûì îòæèìîì âî èçáåæàíèå ÷ðåçìåðíûõ
âèáðàöèé è äëÿ ðàâíîìåðíîãî ðàñïðåäåëåíèÿ áåëüÿ
â áàðàáàíå ìàøèíà ïðîèçâîäèò âðàùåíèÿ ñî
ñêîðîñòüþ, ñëåãêà ïðåâûøàþùåé ñêîðîñòü ñòèðêè.
Åñëè ïîñëå íåñêîëüêèõ ïîïûòîê áåëüå íå áóäåò
ïðàâèëüíî ñáàëàíñèðîâàíî, ìàøèíà ïðîèçâåäåò
îòæèì íà ìåíüøåé ñêîðîñòè ïî ñðàâíåíèþ ñ
ïðåäóñìîòðåííîé.  ñëó÷àå ÷ðåçìåðíîé
ðàçáàëàíñèðîâêè ìàøèíà âûïîëíèò ðàñïðåäåëåíèå
áåëüÿ âìåñòî îòæèìà. Äëÿ îïòèìèçàöèè
ðàñïðåäåëåíèÿ áåëüÿ è åãî ïðàâèëüíîé
áàëàíñèðîâêè ðåêîìåíäóåòñÿ ïåðåìåøàòü ìåëêîå
áåëüå ñ êðóïíûì.
Pagina se încarcă...
Pagina se încarcă...
Pagina se încarcă...
Pagina se încarcă...
Pagina se încarcă...
Pagina se încarcă...
Pagina se încarcă...
Pagina se încarcă...
Pagina se încarcă...
Pagina se încarcă...
Pagina se încarcă...
Pagina se încarcă...
Pagina se încarcă...
Pagina se încarcă...
Pagina se încarcă...
Pagina se încarcă...
-
 1
1
-
 2
2
-
 3
3
-
 4
4
-
 5
5
-
 6
6
-
 7
7
-
 8
8
-
 9
9
-
 10
10
-
 11
11
-
 12
12
-
 13
13
-
 14
14
-
 15
15
-
 16
16
-
 17
17
-
 18
18
-
 19
19
-
 20
20
-
 21
21
-
 22
22
-
 23
23
-
 24
24
-
 25
25
-
 26
26
-
 27
27
-
 28
28
-
 29
29
-
 30
30
-
 31
31
-
 32
32
-
 33
33
-
 34
34
-
 35
35
-
 36
36


Indesit PWDE 7125 S (EU) Manual de utilizare
- Categorie
- Mașini de spălat
- Tip
- Manual de utilizare
- Acest manual este potrivit și pentru
în alte limbi
- English: Indesit PWDE 7125 S (EU) User manual
- italiano: Indesit PWDE 7125 S (EU) Manuale utente
Lucrări înrudite
-
Indesit XWDE 861480X WSSS EU Manualul utilizatorului
-
-
-
Indesit XWDE 961480X Manual de utilizare
-
-
-
-
-
-
Alte documente
-
Whirlpool AQSD 29 U (EU) /B Manualul utilizatorului
-
HOTPOINT/ARISTON AQD1171D 69ID EU/B Manualul utilizatorului
-
-
-
-
-
Ariston AQXD 129 Manual de utilizare
-
-
-