
English .............................................................. 11
Deutsch .............................................................. 18
Nederlands ........................................................ 26
Polski ................................................................. 33
Français ............................................................. 41
Italiano ............................................................... 48
Română .............................................................. 56
Ελληνικά ............................................................. 64
Hrvatski .............................................................. 72
Čeština .............................................................. 79
Magyar ............................................................... 86
Український ....................................................... 93
Eesti keel ........................................................... 101
Latviski ............................................................... 108
Lietuvių .............................................................. 115
Português .......................................................... 122
Español .............................................................. 129
Slovenský ........................................................... 137
Dansk ................................................................. 144
Suomalainen ...................................................... 151
Norsk ................................................................. 158
Slovenščina ........................................................ 165
Svenska .............................................................. 172
български ......................................................... 179
Русский .............................................................. 187
210000, 210017, 210031, 210048, 210086, 970294
SLICER
GB
DE
NL
PL
FR
IT
RO
HR
CZ
HU
UA
LV
LT
FI
NO
BG
SI
SE
SK
DK
ES
PT
EE
GR
RU
SLICER
AUFSCHNITTMASCHINE
SNIJMACHINE
KRAJALNICA
TRANCHEUSE
AFFETTATRICE
FELIATOR
ΜΗΧΑΝΗ ΚΟΠΗΣ
ΑΛΛΑΝΤΙΚΏΝ
REZAČ
NÁŘEZOVÝ STROJ
SZELETELŐGÉP
СЛАЙСЕР
VIILUTAJA
SLAISERIS
PJAUSTYKLĖ
FIAMBREIRA
CORTAFIAMBRES
KRÁJAČ
SLICER
LEIKKURIN
KUTTER
REZANJE
SKIVARE
СЛАЙСЪР
СЛАЙСЕР
GB: User manual
DE: Benutzerhandbuch
NL: Gebruikershandleiding
PL: Instrukcja obsługi
FR: Manuel de l’utilisateur
IT: Manuale utente
RO: Manual de utilizare
GR: Εγχειρίδιο χρήστη
HR: Korisnički priručnik
CZ: Uživatelská příručka
HU: Felhasználói kézikönyv
UA: Посібник користувача
EE: Kasutusjuhend
LV: Lietotāja rokasgrāmata
LT: Naudojimo instrukcija
PT: Manual do utilizador
ES: Manual del usuario
SK: Používateľská príručka
DK: Brugervejledning
FI: Käyttöopas
NO: Brukerhåndbok
SI: Navodila za uporabo
SE: Användarhandbok
BG: Ръководство за потребителя
RU: Руководство пользователя

2
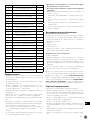
GB: Read user manual and keep this with the appliance.
DE: Lesen Sie das Benutzerhandbuch und bewahren Sie es
zusammen mit dem Gerät auf.
NL: Lees de gebruikershandleiding en bewaar deze bij het
apparaat.
PL: Należy przeczytać instrukcję obsługi i zachować ją wraz
z urządzeniem.
FR: Lisez le manuel d’utilisation et conservez-le avec
l’appareil.
IT: Leggere il manuale dell’utente e conservarlo con l’appa-
recchiatura.
RO: Citiți manualul de utilizare și păstrați-l împreună cu
aparatul.
GR: Διαβάστε το εγχειρίδιο χρήστη και φυλάξτε το μαζί με τη
συσκευή.
HR: Pročitajte upute za uporabu i sačuvajte ovo uz uređaj.
CZ: Přečtěte si uživatelskou příručku a uschovejte ji u
spotřebiče.
HU: Olvassa el a használati útmutatót, és tartsa azt a kés-
zülék közelében.
UA: Прочитайте посібник користувача та тримайте його
разом із приладом.
EE: Lugege kasutusjuhendit ja hoidke seda koos seadmega.
LV: Izlasiet lietošanas pamācību un saglabājiet to kopā ar
ierīci.
LT: Perskaitykite naudojimo instrukciją ir palikite ją su
prietaisu.
PT: Leia o manual do utilizador e guarde-o juntamente com
o aparelho.
ES: Lea el manual del usuario y consérvelo con el aparato.
SK: Prečítajte si návod na použitie a uschovajte ho spolu so
spotrebičom.
DK: Læs brugervejledningen, og opbevar den sammen med
apparatet.
FI: Lue käyttöohje ja säilytä se laitteen mukana.
NO: Les bruksanvisningen og ta vare på den.
SI: Preberite navodila za uporabo in jih shranite skupaj z
napravo.
SE: Läs bruksanvisningen och förvara den tillsammans med
produkten.
BG: Прочетете ръководството за потребителя и го запазете
заедно с уреда.
RU: Прочтите руководство пользователя и сохраните его
вместе с прибором.
GB: For indoor use only.
DE: Nur zur Verwendung im Innenbereich.
NL: Alleen voor gebruik binnenshuis.
PL: Do użytku wewnątrz pomieszczeń.
FR: Pour l’usage à l’intérieur seulement.
IT: Destinato solo all’uso domestico.
RO: Doar pentru uz la interior.
GR: Για χρήση μόνο σε εσωτερικό χώρο.
HR: Samo za unutarnju upotrebu.
CZ: Pouze pro vnitřní použití.
HU: Csak beltéri használatra.
UA: Використовувати тільки всередині приміщень.
EE: Ainult sisetingimustes kasutamiseks.
LV: Tikai lietošanai telpās.
LT: Naudoti tik patalpoje.
PT: Apenas para uso interno.
ES: Sólo para uso en interiores.
SK: Iba na vnútorné použitie.
DK: Kun til indendørs brug.
FI: Vain sisäkäyttöön.
NO: Kun til innendørs bruk.
SI: Samo za uporabo v zaprtih prostorih.
SE: Endast för inomhusbruk.
BG: Да се използва само на закрито.
RU: Использовать только в помещениях.
INDOOR
READ MANUAL
HEAVY
GB: For item 210017 only.
DE: Nur für Artikel 210017.
NL: Alleen voor item 210017.
PL: Dotyczy tylko pozycji 210017.
FR: Uniquement pour l’article 210017.
IT: Solo per la voce 210017.
RO: Doar pentru articolul 210017.
GR: Μόνο για το στοιχείο 210017.
HR: Samo za stavku 210017.
CZ: Pouze pro položku 210017.
HU: Csak a 210017-os tételhez.
UA: Тільки для пункту 210017.
EE: Ainult punkti 210017 puhul.
LV: Tikai 210017. punktam.
LT: Tik 210017 punktui.
PT: Apenas para o item 210017.
ES: Solo para el artículo 210017.
SK: Len pre položku 210017.
DK: Kun for punkt 210017.
FI: Vain tuotteelle 210017.
NO: Kun for punkt 210017.
SI: Samo za točko 210017.
SE: Endast för artikel 210017.
BG: Само за точка 210017.
RU: Только для позиции 210017.

3
GB: NOTE: This manual is translated from original English manual using AI and machine translations.
DE: HINWEIS: Dieses Handbuch wurde aus dem englischen Originalhandbuch mit KI und maschinellen Übersetzungen übersetzt.
NL: OPMERKING: Deze handleiding is vertaald vanuit de originele Engelse handleiding met behulp van AI en machinevertalingen.
PL: UWAGA: Niniejszy podręcznik został przetłumaczony z oryginalnego podręcznika w języku angielskim przy użyciu AI i tłumaczeń maszynowych.
FR: REMARQUE : Ce manuel est traduit à partir du manuel original en anglais à l’aide de l’IA et de traductions automatiques.
IT: NOTE: Questo manuale è tradotto dal manuale originale in inglese utilizzando l’intelligenza artificiale e le traduzioni automatiche.
RO: NOTĂ: Acest manual este tradus din manualul original în limba engleză folosind AI și traduceri automate.
GR: ΣΗΜΕΊΏΣΗ: Αυτό το εγχειρίδιο μεταφράζεται από το πρωτότυπο αγγλικό εγχειρίδιο χρησιμοποιώντας AI και αυτόματες μεταφράσεις.
HR: NAPOMENA: Ovaj priručnik je preveden iz izvornog engleskog priručnika s AI i strojnim prijevodima.
CZ: POZNÁMKA: Tato příručka je přeložena z původní anglické příručky pomocí umělé inteligence a strojových překladů.
HU: MEGJEGYZÉS: Ez a kézikönyv az eredeti angol kézikönyvből származik, mesterséges intelligencia és gépi fordítások segítségével.
UA: ПРИМІТКА: Цей посібник перекладається з оригінального англійського посібника з використанням штучного інтелекту та машинного
перекладу.
EE: MÄRKUS: Käesolev kasutusjuhend on tõlgitud originaal inglise keeles, kasutades AI ja masinate tõlkeid.
LV: PIEZĪME: Šī rokasgrāmata tiek tulkota no oriģinālās angļu valodas rokasgrāmatas, izmantojot mākslīgā intelekta un veļas mašīnas tulkojumus.
LT: PASTABA: Šis vadovas išverstas iš originalaus anglų kalbos vadovo naudojant dirbtinį intelektą ir mašininį vertimą.
PT: NOTA: Este manual é traduzido do manual original em inglês utilizando IA e traduções de máquinas.
ES: NOTA: Este manual está traducido del manual original en inglés utilizando IA y traducciones automáticas.
SK: POZNÁMKA: Táto príručka je preložená z pôvodnej anglickej príručky pomocou umelej inteligencie a strojového prekladu.
DK: BEMÆRK: Denne vejledning er oversat fra den originale engelske vejledning ved hjælp af AI og maskinoversættelser.
FI: HUOMAUTUS: Tämä opas on käännetty alkuperäisestä englanninkielisestä oppaasta käyttäen tekoälyä ja konekäännöksiä.
NO: MERK: Denne håndboken oversettes fra den originale engelske håndboken ved hjelp av AI og maskinoversettelser.
SI: OPOMBA: Ta priročnik je preveden iz izvirnega angleškega priročnika z uporabo umetne inteligence in strojnih prevodov.
SE: NOTERA: Denna handbok är översatt från den engelska originalmanualen med AI och maskinöversättningar.
BG: ЗАБЕЛЕЖКА: Това ръководство е преведено от оригиналното английско ръководство с помощта на AI и машинни преводи.
RU: ПРИМЕЧАНИЕ: Это руководство переведено из оригинального руководства на английском языке с использованием ИИ и машинных
переводов.

4
1
8
7
61
954
2
3
2
F
E
DKC
H I
KM
J
K
K
B
GG
D
C
A

5
3
210000,
210031,
210048,
210086,
970294
4
210017

6
5
6
7
8

7
910
11 12
10
1
13 14
11
11
12

8
15 16
13
5
14
17 18
15
c
16

9
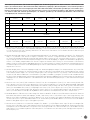
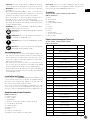
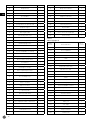
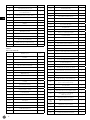
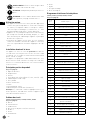
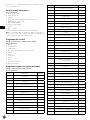
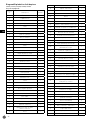
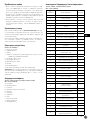
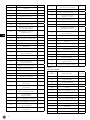
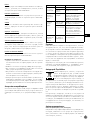
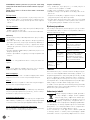
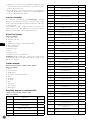
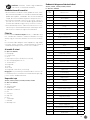
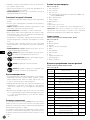
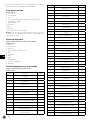
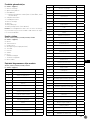
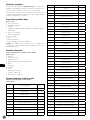
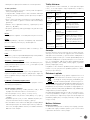
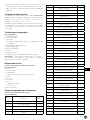
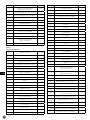
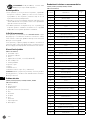
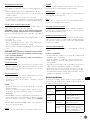
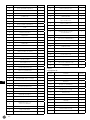
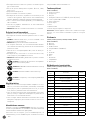
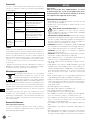
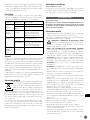
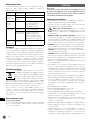
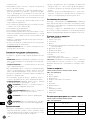
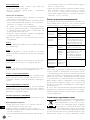
GB: Technical specifications / DE: Technische Angaben / NL: Technische gegevens / PL: Dane techniczne / FR: Données tech-
niques / IT: Parametri di base / RO: Parametrii de bază / GR: Βασικές παράμετροι / HR: Tehnički podaci / CZ: Technická specifikace
/ HU: Műszaki adatok / UA: Технічні характеристики / EE: Tehnilised andmed / LV: Tehniskās specifikācijas / LT: Techninės speci-
fikacijos / PT: Especificações técnicas / ES: Especificaciones técnicas / SK: Technické špecifikácie / DK: Tekniske specifikationer
/ FI: Tekniset tiedot / NO: Tekniske spesifikasjoner / SI: Tehnične specifikacije / SE: Tekniska specifikationer / BG: Технически
спецификации / RU: Технические данные
A 210031 210048 210000 210017 210086 970294
B 220 - 240V ~ 50Hz / 220 - 240В ~ 50Гц
C 200W / Вт 280W / Вт 320W / Вт 420W / Вт 320W / Вт 280W / Вт
D I
E 195 mm / мм 220 mm / мм 250 mm / мм 300 mm / мм 250 mm / мм 220 mm / мм
F 12 mm / мм 14 mm / мм 12 mm / мм
G <70 dB (A)
H IP33
I400x400x(H)330
mm / мм 440x420x(H)350
mm / мм 485x420x(H)395
mm / мм 600x480x(H)450
mm / мм 485x420x(H)395
mm / мм 440x420x(H)350
mm / мм
J 13,5kg / кг 14kg / кг 16kg / кг 26kg / кг 16kg / кг 14kg / кг
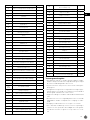
A: GB: Item no. / DE: Art.-Nr. / NL: Artikelnr. / PL: Nr pozycji / FR: N° d’article / IT: N. articolo / RO: Nr. articolului/ GR: Αρ. είδους /
HR: Broj stavke / CZ: Položka č. / HU: Cikkszám / UA: Номер елемента / EE: Artikli nr / LV: Vienums Nr. / LT: Prekės Nr. / PT: Item
n.o / ES: N.o de artículo / SK: Č. položky / DK: Varenr. / FI: Kohteen nro / NO: Varenr. / SI: Št. izdelka / SE: Art.nr / BG: Номер на
елемент / RU: Номер позиции
B: GB: Rated voltage and frequency / DE: Nennspannung und Frequenz / NL: Nominale spanning en frequentie / PL: Znamionowe
napięcie i częstotliwość / FR: Tension et fréquence nominales / IT: Tensione e frequenza nominali / RO: Tensiune nominală și
frecvență / GR: Ονομαστική τάση και συχνότητα / HR: Nazivni napon i frekvencija / CZ: Jmenovité napětí a frekvence / HU: Név-
leges feszültség és frekvencia / UA: Номінальна напруга та частота / EE: Nimipinge ja -sagedus / LV: Nominālais spriegums un
frekvence / LT: Vardinė įtampa ir dažnis / PT: Tensão e frequência nominais / ES: Tensión y frecuencia nominales / SK: Menovité
napätie a frekvencia / DK: Nominel spænding og frekvens / FI: Nimellisjännite ja -taajuus / NO: Nominell spenning og frekvens /
SI: Nazivna napetost in frekvenca / SE: Märkspänning och frekvens / BG: Номинално напрежение и честота / RU: Номинальное
напряжение и частота
C: GB: Rated input power / DE: Nenneingangsleistung / NL: Nominaal ingangsvermogen / PL: Znamionowa moc wejściowa / FR:
Puissance d’entrée nominale / IT: Potenza nominale in ingresso / RO: Putere nominală de intrare / GR: Ονομαστική ισχύς εισόδου
/ HR: Nazivna ulazna snaga / CZ: Jmenovitý vstupní výkon / HU: Névleges bemeneti teljesítmény / UA: Номінальна вхідна
потужність / EE: Nimisisendvõimsus / LV: Nominālā ieejas jauda / LT: Vardinė įėjimo galia / PT: Potência de entrada nominal /
ES: Potencia de entrada nominal / SK: Menovitý vstupný výkon / DK: Nominel indgangseffekt / FI: Nimellistuloteho / NO: Nominell
inngangseffekt / SI: Nazivna vhodna moč / SE: Märkineffekt / BG: Номинална входяща мощност / RU: Номинальная входная
мощность
D: GB: Protection class (Class) / DE: Schutzklasse (Klasse) / NL: Beschermingsklasse (klasse) / PL: Klasa ochrony (klasa) / FR:
Classe de protection (classe) / IT: Classe di protezione (classe) / RO: Clasă de protecție (clasă) / GR: Κλάση προστασίας (κατηγορία)
/ HR: Klasa zaštite (klasa) / CZ: Třída ochrany (třída) / HU: Védelmi osztály (osztály) / UA: Клас захисту (клас) / EE: Kaitseklass
(klass) / LV: Aizsardzības klase (klase) / LT: Apsaugos klasė (klasė) / PT: Classe de proteção (classe) / ES: Clase de protección
(clase) / SK: Trieda ochrany (trieda) / DK: Beskyttelsesklasse (klasse) / FI: Suojausluokka (luokka) / NO: Beskyttelsesklasse
(klasse) / SI: Razred zaščite (razred) / SE: Skyddsklass (klass) / BG: Клас на защита (Клас) / RU: Класс защиты (класс)
E: GB: Blade diameter / DE: Durchmesser der Klinge / NL: Diameter blad / PL: Średnica ostrza / FR: Diamètre de lame/ IT: Diametro
della lama / RO: Diametru lamă / GR: Διάμετρος λεπίδας / HR: Promjer oštrice / CZ: Průměr čepele / HU: Penge átmérője / UA:
Діаметр леза / EE: Tera läbimõõt / LV: Asmens diametrs / LT: Peilio skersmuo / PT: Diâmetro da lâmina / ES: Diámetro de la
cuchilla / SK: Priemer čepele / DK: Bladets diameter / FI: Terän halkaisija / NO: Bladets diameter / SI: Premer rezila / SE: Bladets
diameter / BG: Диаметър на острието / RU: Диаметр лезвия
F: GB: Cut thickness / DE: Dicke schneiden / NL: Snijdikte / PL: Grubość cięcia / FR: Épaisseur de coupe / IT: Spessore di taglio / RO:
Grosime tăiere / GR: Πάχος κοπής / HR: Debljina rezanja / CZ: Tloušťka řezu / HU: Vágott vastagság / UA: Товщина різання / EE:
Lõika paksus / LV: Griezuma biezums / LT: Pjovimo storis / PT: Espessura do corte / ES: Grosor del corte / SK: Hrúbka rezu / DK:
Skær tykkelse / FI: Leikkauksen paksuus / NO: Kutt tykkelse / SI: Debelina reza / SE: Skär tjocklek / BG: Дебелина на рязане /
RU: Толщина среза

10
G: GB:Noise level (dB(A)) / DE:Rauschpegel (dB(A)) / NL:Geluidsniveau (dB(A)) / PL:Poziom hałasu (dB(A)) / FR: Niveau sonore
(dB(A)) / IT:Livello di rumore (dB(A)) / RO:Nivel zgomot (dB(A)) / GR:Επίπεδο θορύβου (dB(A)) / HR:Razina šuma (dB(A)) / CZ:Hluk-
ová hladina (dB(A)) / HU:Zajszint (dB(A)) / UA:рівень шуму (дБ(A)) / EE:Müratase (dB(A)) / LV:trokšņa līmenis (dB(A)) / LT:triukšmo
lygis (dB(A)) / PT:Nível de ruído (dB(A)) / ES:Nivel de ruido (dB(A)) / SK:Hladina hluku (dB(A)) / DK:Støjniveau (dB(A)) / FI:melutaso
(dB(A))/ NO:Støynivå (dB(A)) / SI: Raven hrupa (dB(A)) / SE:Ljudnivå (dB(A)) / BG: Ниво на шума (dB(A)) / RU:Уровень шума (об./
мин.)
H: GB:Waterproof protection rating / DE:Wasserdichtigkeitsschutzklasse / NL:Beschermingsgraad tegen water / PL:Klasa wo-
doodporności / FR:Indice de protection étanche / IT:Grado di protezione impermeabile / RO:Clasificare protecție impermea-
bilă / GR:Βαθμός αδιάβροχης προστασίας / HR:Vodootporna zaštita / CZ:Odolnost proti vodě / HU:Vízálló védelmi besorolás /
UA:Рейтинг водонепроникності / EE:Veekindluse kaitseaste / LV:Ūdensnecaurlaidības klase / LT:Apsaugos nuo vandens klasė
/ PT:Classificação de proteção à prova de água / ES:Grado de impermeabilidad / SK:Stupeň ochrany proti vode / DK:Vandtæt
beskyttelsesklassificering / FI:Vedenpitävä suojausluokitus / NO:Vanntett beskyttelsesklassifisering / SI:Stopnja zaščite pred
vdorom vode / SE:Vattentät skyddsklassning / BG:Клас на водоустойчивост / RU:Рейтинг водонепроницаемости
I: GB: Dimensions / DE: Abmessungen / NL: Afmetingen / PL: Wymiary / FR: Dimensions / IT: Dimensioni / RO: Dimensiuni / GR:
Διαστάσεις / HR: Dimenzije / CZ: Rozměry / HU: Méretek / UA: Розміри / EE: Mõõtmed / LV: Izmēri / LT: Matmenys / PT: Di-
mensões / ES: Dimensiones / SK: Rozmery / DK: Mål / FI: Mitat / NO: Mål / SI: Mere / SE: Mått / BG: Размери / RU: Размеры
J: GB: Net weight / DE: Nettogewicht / NL: Nettogewicht / PL: Waga netto / FR: Poids net / IT: Peso netto / RO: Greutate netă / GR:
Καθαρό βάρος / HR: Neto težina / CZ: Čistá hmotnost / HU: Nettó tömeg / UA: Вага нетто / EE: Netokaal / LV: Neto svars / LT:
Grynasis svoris / PT: Peso líquido / ES: Peso neto / SK: Čistá hmotnosť / DK: Nettovægt / FI: Nettopaino / NO: Nettovekt / SI: Neto
teža / SE: Nettovikt / BG: Нетно тегло / RU: Вес нетто
GB: Remark: Technical specification is subjected to change without prior notification.
DE: Anmerkung: Die technische Spezifikation kann ohne vorherige Ankündigung geändert werden.
NL: Opmerking: De technische specificatie zijn onderworpen aan wijzigingen zonder voorafgaande kennisgeving.
PL: Uwaga: Specyfikacja techniczna może zostać zmieniona bez powiadomienia.
FR: Remarque: La spécification technique peut être modifiée sans notification préalable.
IT: Osservazione: Le specifiche tecniche sono soggette a modifiche senza preavviso.
RO: Observație: Specificația tehnică se poate modifica fără notificare prealabilă.
GR: Σημείωση: Οι τεχνικές προδιαγραφές μπορούν να αλλάξουν χωρίς προειδοποίηση.
HR: Napomena: Tehničke specifikacije podložne su promjenama bez prethodne obavijesti.
CZ: Poznámka: Technická specifikace se může změnit bez předchozího upozornění.
HU: Megjegyzés: A műszaki adatok előzetes értesítés nélkül változhatnak.
UA: Зауваження: Технічні характеристики можуть змінюватися без попереднього повідомлення.
EE: Märkus: Tehnilisi andmeid võidakse muuta ilma eelneva teavitamiseta.
LV: Piezīme: Tehniskās specifikācijas var tikt mainītas bez iepriekšēja brīdinājuma.
LT: Pastaba: Techninė specifikacija gali būti keičiama be išankstinio įspėjimo.
PT: Observação: As especificações técnicas estão sujeitas a alterações sem notificação prévia.
ES: Observación: Las especificaciones técnicas están sujetas a cambios sin previo aviso.
SK: Poznámka: Technické špecifikácie podliehajú zmenám bez predchádzajúceho oznámenia.
DK: Bemærkning: Tekniske specifikationer kan ændres uden forudgående varsel.
FI: Huomautus: Teknisiä tietoja voidaan muuttaa ilman ennakkoilmoitusta.
NO: Merknad: Teknisk spesifikasjon kan endres uten forhåndsvarsel.
SI: Opomba: Tehnične specifikacije se lahko spremenijo brez predhodnega obvestila.
SE: Anmärkning: Tekniska specifikationer kan ändras utan föregående meddelande.
BG: Забележка: Техническите спецификации подлежат на промяна без предварително уведомление.
RU: Примечание. Технические характеристики могут быть изменены без предварительного уведомления.

11
GB
ENGLISH
Dear Customer,
Thank you for purchasing this HENDI appliance. Read this
user manual carefully, paying particular attention to the safe-
ty regulations outlined below, before installing and using this
appliance for the first time.
Safety instructions
• Only use the appliance for the intended purpose it was de-
signed for, as described in this manual.
• The manufacturer is not liable for any damage caused by in-
correct operation and improper use.
• DANGER! RISK OF ELECTRIC SHOCK! Do not attempt
to repair the appliance by yourself. Do not immerse
the electrical parts of the appliance in water or other liquids.
Never hold the appliance under running water.
• NEVER USE A DAMAGED APPLIANCE! Check the electrical
connections and cord regularly for any damage. When dam-
aged, disconnect the appliance from the power supply. Any
repairs should only be carried out by a supplier or qualified
person to avoid danger or injury.
• WARNING! When positioning the appliance, route the power
cable safely if necessary to avoid unintentional pulling, being
damaged, coming into contact with the heating surface, or
causing a tripping hazard.
• WARNING! As long as the plug is in the socket the appliance
is connected to the power supply.
• WARNING! ALWAYS switch off the appliance before discon-
necting from the power supply, cleaning, maintenance or
storage.
• Only connect the appliance to an electrical outlet with the
voltage and frequency mentioned on the appliance label.
• Do not touch the plug/electrical connections with wet or
damp hands.
• Keep the appliance and electrical plug/connections away
from water and other liquids. If the appliance falls into wa-
ter, remove the power supply connections immediately. Do
not use the appliance until it has been checked by a certified
technician. Failure to follow these instructions will cause life
threatening risks.
• Connect the power supply into an easily accessible electrical
outlet so you can disconnect the appliance immediately in
case of emergency.
• Make sure the cord does not come in contact with sharp or
hot objects and keep it away from open fire. Never pull the
power cord to unplug it from the socket, always pull the plug
instead.
• Never carry the appliance by its cord.
• Never try to open the housing of the appliance yourself.
• Do not insert objects into the housing of the appliance.
• Never leave the appliance unattended during use.
• This appliance should be operated by trained personnel in
kitchen of the restaurant, canteens or bar staff, etc.
• This appliance should not be operated by persons with re-
duced physical, sensory or mental capabilities, or persons
that have a lack of experience and knowledge.
• This appliance should, under any circumstances, not be used
by children.
• Keep the appliance and its electrical connections out of reach
of children.
• Never use accessories or any extra devices other than those
supplied with the appliance or recommended by the manu-
facturer. Failure to do so could pose a safety risk to the user
and could damage the appliance. Only use original parts and
accessories.
• Do not operate this appliance by means of an external timer
or remote-control system.
• Do not place the appliance on a heating object (gasoline, elec-
tric, charcoal cooker, etc.).
• Do not cover the appliance in operation.
• Do not place any objects on top of the appliance.
• Do not use the appliance near any open flames, explosive or
flammable materials. Always operate the appliance on a hori-
zontal, stable, clean, heat-resistant and dry surface.
• The appliance is not suitable for installation in an area where
a water jet could be used.
• Leave a space of at least 20 cm around the appliance for ven-
tilation during use.
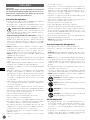
• WARNING! Keep all ventilation openings on the appliance
free from obstruction.
Special safety instructions
• This appliance is not intended for household use.
• Do not operate the appliance without load to prevent over-
heating.
• CAUTION! ALWAYS switch the machine off and disconnect the
power supply before touching any motoring parts.
• WARNING! Do not attempt to by-pass any safety interlock.
• If the supply cord is damaged, it must be replaced by the
manufacturer, its service agent or similarly qualified persons
in order to avoid a hazard.
• This appliance should not be used for cutting frozen food,
bone-in meat or fish, etc.
• Do not use the appliance before it is properly assembled with
the blade, blade guard and the food holder.
• WARNING! ALWAYS keep hands, long hair and clothing away
from the moving parts.
• CAUTION! Unplug before cleaning, maintenance or
repair!
• WARNING! Keep hands away from moving part and
cutting blade.
• CAUTION! Two-person handling required!
• CAUTION! Read instruction manual before opera-
tion, cleaning or maintenance!
Intended use
• This appliance is intended to be used for commercial appli-
cations, for example in kitchens of restaurants, canteens,
hospitals and in commercial enterprises such as bakeries,
butcheries, etc., but not for continuous mass production of
food.
• The appliance is designed only for slicing foodstuff, e.g.
meats, cheese, breads, etc. Any other use may lead to dam-
age of the appliance or personal injury.
• Operating the appliance for any other purpose shall be
deemed a misuse of the device. The user shall be solely liable
for improper use of the device.

12
GB
Grounding installation
This appliance is classified as protection class I and must be
connected to a protective ground. Grounding reduces the risk
of electric shock by providing an escape wire for the electric
current.
This appliance is fitted with a power cord with grounding plug
or electrical connections with grounding wire. The connections
must be properly installed and grounded.
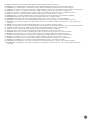
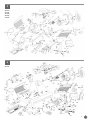
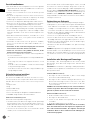
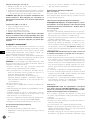
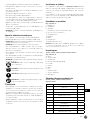
Main parts of the product
(Fig.1 on page 4)
1. Blade sharpener
2. Stop plate
3. Carriage
4. On/off switch [White (I): ON; Black (O): OFF]
5. Slice thickness dial
6. Product clamp
7. Blade guard
8. Blade
9. Carriage lock
10. Blade guard bolt (not displayed)
Remark: The content of this manual applies for all listed items
unless specified otherwise. The appearance may vary from the
shown illustrations.
Circuit diagram
210000, 210017, 210031, 210048, 210086, 970294
(Fig.2 on page 4)
A. Motor
B. Transformer
C. Capacitor
D. Protective earthing (Grounding)
E. Live
F. Neutral
G. Switch
H. Relay
I. Indicator lamp
J. Thermal cut-out
K. Micro switch
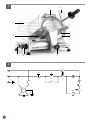
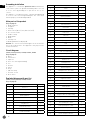
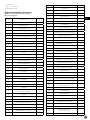
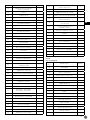
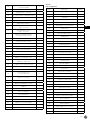
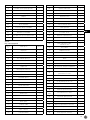
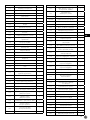
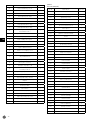
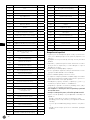
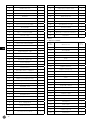
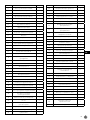
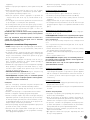
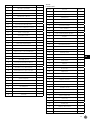
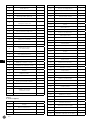
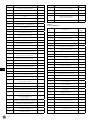
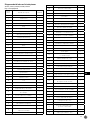
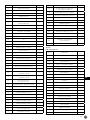
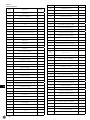
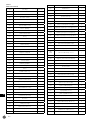
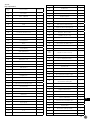
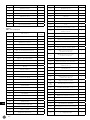
Exploded diagram with part list
210000, 210031, 210048, 210086, 970294
(Fig.3 on page 5)
Part no. Part name Quantity
1 Encloser 1
2 Active clapboard 1
3 Food salver 1
4 Blade guard disc 1
5 Blade 1
6 Blade guarding ring 1
7 Tray bracket 1
8 Food and fixed-arm 1
9 Fixed-arm bushing 1
10 Fixed-arm handle 1
11 Plastic granule 1
12 Motor 1
13 Motor briquetting 1
14 Fixed-arm pin Ø12×185 1
15 Blade guard bolts 1
16 Ball bearing 6202 2
17 Blade belt wheel Ø66 1
18 Pin of belt wheel 1
19 BeltSV.330 2
20 Slide mulch 1
21 Power line 1
22 Slide axle 1
23 Knob with scale 1
24 Spring gasket 1
25 Cam 1
26 Cam osculant staff 1
27 Slider 1
28 Slide axle briquetting 2
29 Spring of towing bracket axle 2
30 Towing bracket axle 1
31 Quadrate axis 1
32 Towing bracket 1
33 M8×35Hexagonal screw 1
34 Ball bearing 607 1
35 Towing bracket cover knob 1
36 Relay 1
37 Capacitor 1
38 Capacitor retainer 1
39 Button mulch 1
40 Button switch 1
41 Motherboard 1
42 Meatscraper 1
43 Sharpener mulch 1
44 Sharpener base of subassembly 1
45 Sharpener base of assembled 1
46 Button of sharpener 2
47 Fine grinding wheel Ø45 1
48 Crude grinding wheel Ø45 1
49 Pin of rubbing stone 2
50 Spring 2
51 Pin of sharpener bracket 1

13
GB
52 Sharpener tighten knob 1
53 Active clapboard mandril 1
54 Rubber foot 4
55 Pin of blade guarding ring 2
56 Meat blocking board 1
57 Slide axle bracket 2
58 Small belt wheel of motor 1
59 Slide driver 1
60 Belt wheel setting 1
61 Sharpener setting 1
62 Ø15 Spring gasket for bearing 1
63 Ø15 Spring gasket for bearing 1
64 Blade guard disc square-head nut 1
65 Fixed-arm handle bolt 1
66 Finger baffle bolt 2
67 Finger baffle nut 2
68 Bracket knob bolt 1
69 Undee spring gascket 1
70 Motor impacted bolt 1
71 Meat scraping shim 2
72 Meat scraper bolt 2
73 Capacitor fixation clamp bolt 1
74 Tray bearing cover A 1
75 Meat board bracket 1
76 Tray bearing cover B 1
77 Cross recessed counter-
sunk head M6×12 2
78 Slide axle briquetting bolt 4
79 Quadrate axis locking screw 2
80 Slider adjust bolt 1
81 Magnet 1
82 Magnet switch 1
83 Aluminium block 1
84 Microswitch 1
85 Stainless steel lock 1
86 Limited block 1
87 Stainless steel bar 1
88 Set screw for tray bracket 1
89 Oil seal 1
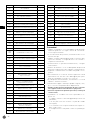
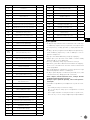
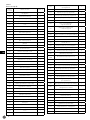
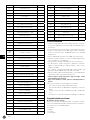
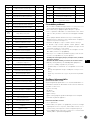
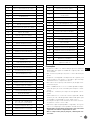
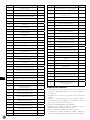
210017
(Fig.4 on page 5)
Part no. Part name Quantity
101 Encloser 1
102 Active clapboard 1
103 Food salver 1
104 Guarding blade disc 1
105 blade 1
106 Blade guarding ring 1
107 Tray bracket 1
108 Food fixed-arm 1
109 Fixed-arm bushing 1
110 Handle 1
111 Plastic granule 1
112 Motor 1
113 Motor briquetting 1
114 Power line 1
115 Blade guard bolts 1
116 Ball bearing6204 2
117 Belt wheel 1
118 Pin of belt wheel 1
119 Belt SV.400 2
120 Supportng base 1
121 Cable jacket 1
122 Mearscraper 1
123 Button mulch 1
124 Button switch 1
125 Capacitor 1
126 Capacitor retainer 1
127 Screw of oriented staff 1
128 Knob with scale 1
129 Spring gasket 1
130 Cam 300 1
131 Motherboard 1
132 Cam osculant pin 1
133 Sliding axle 1
134 Slider 1
135 Rubber foot 4
136 Sliding axle briquetting 2
137 Relay 1
138 Spring of sliding axle 2

14
GB
139 Towing bracket sliding axle 1
140 Quadrate axis 1
141 Towing bracket 1
142 Button of towing bracket 1
143 Sharpener mulch 1
144 Button 2
145 Fine grinding wheel Ø 45 1
146 Pin of burr cleaning wheel 2
147 Spring of burr cleaning wheel 2
148 Crude grinding wheel Ø 45 2
149 Sharpener tighten knob 1
150 Supporting base of outer ring 1
151 Ø 4.751 Wheel 1
152 Pin of rubbing stone 1
153 Sharpener base of subassembly 1
154 pin of blade guading ring 2
155 Pin of food tray 1
156/
156A Meat blocking board 1
157 Bracket of sliding axle 1
158 Small belt wheel of motor 1
159 Slide transmitting wheel 1
160 Towing bracket handle 1
161 Sliding axle608 1
162 Belt wheel setting 1
163 Sharpener setting 1
164 Ø 20 Spring gasket for bearing 1
165 Ø 47 Spring gasket for hole 1
166 Blade guard disc square-head nut 1
167 Fixed-arm handle bolt 1
168 Finger baffle bolt 2
169 Finger baffle nut 2
170 Bracket knob bolt 1
171 Bracket knob nut 1
172 Bracket bottom bolt 1
173 Quadrate axis locking screw 2
174 Slide axle briquetting bolt 4
175 Slide axle bolt 1
176 Ø 12 Under spring gasket 1
177 Meat scraping shim 2
178 Meat scraper bolt 1
179 Fulcrum bearing shim 2
180 Fulcrum bearing bolt 2
181 Stainless steel lock 1
182 Magnet 1
183 Magnet switch 1
184 Limited block 1
185 Microswitch 1
186 Tray bearing cover A 1
187 Tray bearing cover B 1
188 Fulcrum bearing shim 1
189 Oil seal 1
190 Stainless steel bar 1
191 Set screw for tray bracket 1
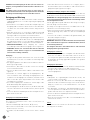
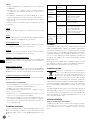
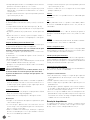
Precautions
• The appliance should only be handled by highly qualified peo-
ple who follow the safety measures described in this manual.
• In case of rotation of personnel, training should be provided
in advance.
• The appliance is equipped with safety devices at dangerous
points. However, it is recommended not to touch the blade
and moving components.
• Before starting maintenance operations, disconnect the pow-
er supply.
• Carefully assess residual risks when protective devices are
removed for cleaning and maintenance.
• Cleaning and maintenance require great concentration.
• Is absolutely necessary a regular control of the power supply
cord. A frayed or damaged cord can expose users to great risk
of electric shock.
• If the device shows anomalies, do not use it or try to repair it:
please contact the supplier.
• Do not use the appliance for frozen products, meat, fish with
bones or any products other than food.
• When dealing with a small portion of meat, do not use the
appliance without using the meat pusher.
• Do not stand in a dangerous position, the blade can cause
injury.
• The manufacturer and/or the seller are not responsible in the
following cases:
- if the appliance has been handled by unauthorised person-
nel;
- if some parts have been replaced with non-original spare
parts;
- if the instructions included in this manual are not followed
precisely;
- if the cutter has not been cleaned and oiled with the right
products.
Safety system installed
Mechanical safety system
The mechanical safety system of the appliance described in this
manual complies with 2006/42 EC directives and EN 1974 reg-
ulations. The safety system includes:

15
GB
• blade guard
• ring
• blade cover
• meat pusher
• meat pusher knob with ring nut and spacer
• hand cover on the food tray
Electrical safety system
The appliance is equipped with:
• a micro-switch which stops the appliance in case the tie rod
for blade guard is removed; the micro-switch prevents from
restarting the appliance if the guard has not been set in the
switch-off position.
• a relay in the control box which requires the restart of the
appliance when a power cut occurs.
Even though CE version appliance are provided with electrical
and mechanical protections (when the appliance is operating
and for maintenance and cleaning operations), there are still
RESIDUAL RISKS that cannot be eliminated completely; these
risks are specified in this manual under “WARNING! / DAN-
GER! / CAUTION!”. The blade and other parts of the machine
can cause cuts and injuries.
Preparation before use
• Remove all protective packaging and wrapping.
• Check that the device is in good condition and with all ac-
cessories. In case of incomplete or damaged delivery, please
contact the supplier immediately. In this case, do not use the
device.
• Clean the accessories and the appliance before use (See ==>
Cleaning & Maintenance).
• Make sure the appliance is completely dry.
• Place the appliance on a horizontal, stable and heat resistant
surface that is safe against water splashes.
• Keep the packaging if you intend to store your appliance in
the future.
• Keep the user manual for future reference.
NOTE! Due to manufacturing residues, the appliance may emit
a light odor during the first few uses. This is normal and does
not indicate any defect or hazard. Make sure the appliance is
well ventilated.
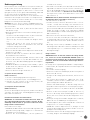
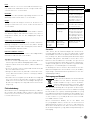
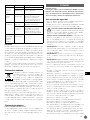
Installation or Assembly & Disassembly
The assembly or disassembly operations of the appliance are
performed with the appliance stopped and disconnected from
the power supply.
ATTENTION! Any installation, maintenance and repair work
should be performed by qualified and authorized technician
only.
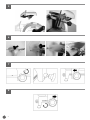
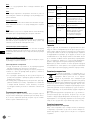
Sharpener (Fig.5 on page 6)
1. Attach the sharpening module in such as way that the blade
does not move between the wheels.
2. Secure the sharpening device to the machine by tightening
the holder. Check to make sure that the sharpening device
is well secured before using the machine.
NOTE! The sharpening device is equipped with a safety switch.
If the sharpening device is not properly attached, you will not
be able to use the appliance.
Hand guard (Fig.6 on page 6)
1. Place both screws in the carriage.
2. Attach the hand guard.
3. Place the two washers over the white bolts.
4. Screw on the two dome nuts.
NOTE! You are advised not to use the appliance if the hand
guard is not attached as instructed! These are safety features
that will prevent possible injury. If you do not attach these fea-
tures, there will be a risk of injury.
Operating instructions
The appliance must be installed upon a working table suita-
ble for it’s overall dimensions shown in “Technical specifica-
tions”; therefore, it must be adequately large, well leveled, dry,
smooth, resistant, stable and placed at a height of 80 cm from
the ground.
Moreover, the machine must be installed in a room with max.
humidity of 75% at the temperature between 5°C and 35°C, that
is in the environment which does not contribute to the appli-
ance failure.
IMPORTANT! All parts(meat pusher, hand cover, blade sharp-
ener) must be installed, assembled and secured before op-
eration.
• Position the appliance so that the on/off switch is facing the
user.
• If the blade sharpener has not been installed, proceed as
follows:
- Position the blade sharpener in its support so that the blade
does not extend between the gears.
- Tighten the safety screw on the blade sharpener.
- Note! The appliance is equipped with a safety switch and will
turn off automatically if the sharpening device is removed)
• Push the plug in the wall socket.
• Turn the dial with the graduated scale to the desired slice
thickness.
• Switch ON the appliance by pressing the “WHITE (I)” button
of the ON/OFF switch.
• Put the food product on the carriage and adjust the clamp
to hold the product firmly in place. Make sure the product is
positioned against the stop plate.
• Once the product has been sliced, switch OFF the appliance
by pressing the “BLACK (O)” button of the ON/OFF switch.
• Turn the thickness dial back to “0”.
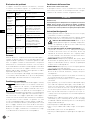
How to lock the slicer
(Fig 7 on page 6)
1. Turn the knob in anti-clockwise direction.
2. Continue to turn the knob until it is loosen completely.
3. Move the carriage to the proper position, the slicer will be
locked automatically.
How to unlock the slicer
(Fig 8 on page 6)
Turn the knob in clockwise direction to unlock the slicer. The
knob should be turned completely to tighten the carriage.

16
GB
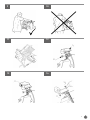
Loading and slicing of foodstuffs
WARNING! Products to be cut must be loaded on the food tray
only when the thickness dial knob is set to the “0” position.
Pay attention to the blade and the sharp edges.
The procedure is as follows:
• once the product has been loaded onto the food tray and
placed against the plate, stop it with the arm provided with
gripping points;
• adjust the thickness dial knob so as to obtain the desired cut-
ting thickness;
• to avoid accidents, the operator has to face the machine and
adopt a correct position: put the ring hand on the meat push-
er, and then the left one beside the deflector (do not touch
the blade);the body must be perpendicular to the working
surface (see Fig.9 on page 7).
WARNING! Pay maximum attention: no part of your body
should contact the blade (see Fig.10 on page 7);
• push the switch-on button “I”;
• smoothly push the carriage (food tray + meat pusher + stem)
towards the blade without exerting pressure on foodstuffs
with the meat pusher since they have their own force of grav-
ity which exerts pressure on the thickness gauge. The blade
will easily cut foodstuffs and appliance will be guided by the
deflector onto the collecting plate (see Fig.11 on page 7);
• do not operate the appliance without foodstuffs;
• once foodstuffs have been cut, set the thickness dial knob in
the “0” position and switch OFF the appliance by pressing the
“0” button of ON/OFF switch;
• resharpen the blade as soon as slices show a rough or frayed
surface and the cutting becomes difficult (See ==> “Sharpen-
ing the blade” under “Operating instructions”).
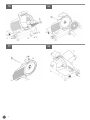
Sharpening the blade
WARNING! Before proceeding with blade sharpening, remain
alert to the RESIDUAL RISKS (See ==> Safety system installed)
that refer to the hazard of injury if the instructions below are
not followed.
The blade must be sharpened periodically and as soon as it be-
comes blunt; the detailed instructions below are to be followed:
• disconnect the power supply;
• place the thickness dial knob adjusting the thickness plate
in the “0”position;
• Clean the blade accurately with alcohol to remove grease;
• Unscrew the sharpener locking knob (10, Fig.12 on page 7),
lift (a) the sharpener (1, Fig.12 on page 7) up to the locking
position and rotate it 180°.
Then let it move to the end so that the blade is positioned
between the two sharpeners. Lock the knob;
• Switch-on the slicer by pushing the button “I” (ON);
• Push the small button (13, Fig.11 on page 7), let the blade
rotate against the sharpener for 30/40 sec. to produce a sharp
burr on the blade edge;
• Push buttons simultaneously for 3/4 seconds (11 and 12,
Fig.14 on page 7) and then leave them simultaneously;
• It is recommended to clean the sharpeners upon the end of
sharpening (See ==> Sharpener cleaning);
• Once sharpening has been completed, return the slice to its
original setting with the reverse procedure.
• After sharpening, the blade should be cleaned (See ==>
Blade, blade guard and ring cleaning)
NOTE: Do not prolong the burring operation beyond 3/4 sec.
in order to prevent the dangerous twisting of the blade cutting
edge.
The blade should be replaced when it cannot be sharpened
any further or when the gap between edge of the blade and
the blade guard exceeds 6 mm.
Cleaning & maintenance
• ATTENTION! Always disconnect the appliance from the pow-
er supply and cool down before storage, cleaning & mainte-
nance.
• Do not use water jet or steam cleaner for cleaning and do not
push the appliance under the water as the parts will get wet
and electric shock might be resulted.
• If the appliance is not kept in a good state of cleanliness, this
can adversely affect the life of the appliance and result in a
dangerous situation.
• Food residues should be regularly cleaned and removed from
the appliance. If the appliance is not cleaned properly, it will
reduce its lifespan and may result in a dangerous condition
during use.
• DANGER OF INJURY! Care should be taken when handling
the sharp cutting blades during cleaning.
• WARNING! Pay attention to residual risks due to cutting
and/or sharp edges. Wear protective gloves (not supplied).
Cleaning
• Clean the cooled exterior surface with a cloth or sponge
slightly dampened with a mild soap solution.
• For reasons of hygiene, the appliance should be cleaned be-
fore and after use.
• Avoid water contacting the electrical components.
• Never immerse the appliance in water or other liquids.
• Never use aggressive cleaning agents, abrasive sponges, or
cleaning agents containing chlorine. Do not use steel wool,
metallic utensils, or any sharp or pointed objects for clean-
ing. Do not use petrol or solvents!
• The appliance cleaning must be carried out at least once a
day or more frequently, if necessary.
• Cleaning must be extremely accurate for those parts of the
appliance which are directly or indirectly in contact with food-
stuffs.
• Place the thickness dial knob adjusting the thickness plate
in the “0”position.
Food tray cleaning
(Fig.15 on page 8)
The carriage (food tray + arm + stem) is easily removable:
• set the thickness dial knob in the “0” position (5);
• set the carriage (13) at the end of its run (a) near the controls;
• unscrew the screw (14), slide the carriage upwards (b);
• after having removed the carriage, it is possible to clean ac-
curately the food tray with hot water and neutral detergent
(pH 7).
Blade, blade guard and ring cleaning
Remove the blade guard cover by unscrewing the pin at the
back of the appliance (Fig.16 on page 8).
WARNING! The blade cleaning must be carried out with a wet
cloth and protective gloves (not supplied) on.
To clean the opposite surface of the blade it is necessary to
remove the blade.

17
GB
The blade is to be removed as follows (see Fig.17 on page 8):
• disassemble the blade guard;
• remove the sharpener (a) and move the blade out of blade
ring guard by turning the thickness dial knob;
• loosen the 3 or 4 screws (15) (according to the model) that
fix the blade;
• Take out the blade directly.
WARNING! Pay attention to residual risks due to cutting and/
or sharp edges. Wear protective gloves (not supplied).
The blade guard must be cleaned with hot water and neutral
detergent.
Sharpener cleaning
• The sharpener cleaning operation is carried out by rubbing
the grinding moles with a brush. The moles must be placed
in the safety position which means that they must be turned
towards the side opposite to the blade.
Deflector cleaning
• To remove the deflector, unscrew the two screws (16) of the
deflector (see Fig.18 on page 8).
• Clean the deflector with hot water and neutral detergent.
Maintenance
• Check the operation of the appliance regularly to prevent se-
rious accidents.
• If you see that the appliance is not working properly or that
there is a problem, stop using it, switch it off and contact the
supplier.
• All maintenance, installation and repair work must be car-
ried out by specialised and authorised technicians, or recom-
mended by the manufacturer.
• Place the thickness dial knob adjusting the thickness plate
in the “0”position.
• Please call the manufacturer or its services agent for any
replacement.
Belt
The belt is not to be adjusted. It must be replaced after 3 or
4 years.
Feet
Feet may deteriorate and lose elasticity, thus reducing the sta-
bility of the appliance. In this case they must be replaced.
Power supply cord
Periodically check the power supply cord for any symptoms of
worn-out. In this case it must be replaced.
Blade
Check that the blade does not lose more than 10mm of its orig-
inal diameter. In this case it must be replaced.
Sharpener - grinding moles
Check that the grinding moles retain their abrasive property
during sharpening operations. If not, it must be replaced to
prevent the blade damage.
Lubrication of sliding guides
From time to time pour some oil drops onto the round sliding
guide along which the carriage moves back and forth. This op-
eration can be performed through the opening (OIL) next to the
thickness dial knob.
Label of the ON/OFF switch
If the labels of the ON/OFF switch have been damaged, in this
case it must be replaced.
Transportation and Storage
• Before storage, always make sure that the appliance has
been disconnected from the power supply and completely
cooled down.
• Store the appliance in a cool, clean and dry place.
• Never place heavy objects on the appliance as this could
damage it.
• Do not move the appliance while it is under operation. Dis-
connect the appliance from power supply when moving and
hold it at the bottom.
• Special care must be taken when moving or transporting the
machine due to its heavy weight. With at least 2 persons or
using a cart. Move the machine slowly, carefully, and never
incline more than 45°.
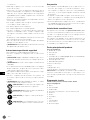
Troubleshooting
If the appliance does not function properly, please check the
below table for the solution. If you are still unable to solve the
problem, please contact the supplier/service provider.
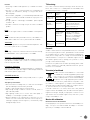
Problem Possible cause Possible solution
Appliance
does not
slice evenly
Blunt blade Sharpen blade
Dirty appliance Clean the appliance
Appliance
stops slicing Overheated
motor Let the machine cool off
for an extended period. The
motor’s safety thermostat will
reset itself automatically.
Carriage
does not
slide
Dirty slide bar Clean the slide bar and
lubricate with Vaseline
Some food stick
to the blade. Switch off the appliance
& unplug it. Let it come to
a complete stop. Remove
any blockage. Wipe the
blade with a damp cloth.
Blade
stops when
product is
being cut
v-belt worn
out or dirty Contact the supplier.
Warranty
Any defect affecting the functionality of the appliance which
becomes apparent within one year after purchase will be re-
paired by free repair or replacement provided the appliance has
been used and maintained in accordance with the instructions
and has not been abused or misused in any way. Your statutory
rights are not affected. If the appliance is claimed under war-
ranty, state where and when it was purchased and include proof
of purchase (e.g. receipt).
In line with our policy of continuous product development we
reserve the right to change the product, packaging and docu-
mentation specifications without notice.

18
DE
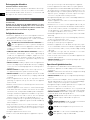
Discarding & Environment
When decommissioning the appliance, the prod-
uct must not be disposed of with other household
waste. Instead, it is your responsibility to dispose
to your waste equipment by handing it over to a
designated collection point. Failure to follow this
rule may be penalized in accordance with applicable regula-
tions on waste disposal. The separate collection and recycling
of your waste equipment at the time of disposal will help con-
serve natural resources and ensure that it is recycled in a man-
ner that protects human health and the environment.
For more information about where you can drop off your waste
for recycling, please contact your local waste collection compa-
ny. The manufacturers and importers do not take responsibility
for recycling, treatment and ecological disposal, either directly
or through a public system.
Machine disposal
Putting the machine out of service
If for some reason there is a necessity to put the machine out
of service, make sure nobody can use it: disconnect it from the
mains and eliminate any the electrical connections.
DEUTSCH
Sehr geehrter Kunde,
Vielen Dank, dass Sie dieses HENDI Gerät gekauft haben. Le-
sen Sie dieses Benutzerhandbuch sorgfältig durch und achten
Sie dabei besonders auf die unten aufgeführten Sicherheits-
vorschriften, bevor Sie dieses Gerät zum ersten Mal installie-
ren und verwenden.
Sicherheitshinweise
• Verwenden Sie das Gerät nur für den vorgesehenen Zweck,
wie in diesem Handbuch beschrieben.
• Der Hersteller haftet nicht für Schäden, die durch unsach-
gemäßen Betrieb und unsachgemäßen Gebrauch verursacht
werden.
• GEFAHR! STROMSCHLAGGEFAHR! Versuchen Sie
nicht, das Gerät selbst zu reparieren. Tauchen Sie die
elektrischen Teile des Geräts nicht in Wasser oder andere
Flüssigkeiten. Halten Sie das Gerät niemals unter fließendem
Wasser.
• VERWENDEN SIE NIEMALS EIN BESCHÄDIGTES GERÄT!
Überprüfen Sie die elektrischen Anschlüsse und das Kabel
regelmäßig auf Schäden. Wenn das Gerät beschädigt ist,
trennen Sie es von der Stromversorgung. Alle Reparaturen
sollten nur von einem Lieferanten oder einer qualifizierten
Person durchgeführt werden, um Gefahren oder Verletzun-
gen zu vermeiden.
• WARNUNG! Verlegen Sie das Netzkabel bei der Positionie-
rung des Geräts bei Bedarf sicher, um unbeabsichtigtes Zie-
hen, Beschädigungen, Kontakt mit der Heizfläche oder Stol-
pergefahr zu vermeiden.
• WARNUNG! Solange sich der Stecker in der Steckdose be-
findet, ist das Gerät an die Stromversorgung angeschlossen.
• WARNUNG! Schalten Sie das Gerät STETS aus, bevor Sie es
von der Stromversorgung trennen, reinigen, warten oder la-
gern.
• Schließen Sie das Gerät nur mit der auf dem Geräteetikett
angegebenen Spannung und Frequenz an eine Steckdose an.
• Die Stecker-/Elektroanschlüsse nicht mit nassen oder feuch-
ten Händen berühren.
• Halten Sie das Gerät und die elektrischen Stecker/Anschlüs-
se von Wasser und anderen Flüssigkeiten fern. Wenn das Ge-
rät in Wasser fällt, entfernen Sie sofort die Netzanschlüsse.
Verwenden Sie das Gerät erst, wenn es von einem zertifizier-
ten Techniker überprüft wurde. Die Nichtbeachtung dieser
Anweisungen führt zu lebensbedrohlichen Risiken.
• Schließen Sie das Netzteil an eine leicht zugängliche Steck-
dose an, damit Sie das Gerät im Notfall sofort trennen kön-
nen.
• Stellen Sie sicher, dass das Kabel nicht mit scharfen oder
heißen Gegenständen in Kontakt kommt und halten Sie es
von offenen Bränden fern. Ziehen Sie niemals das Netzkabel,
um es aus der Steckdose zu ziehen, sondern ziehen Sie im-
mer den Stecker.
• Tragen Sie das Gerät niemals am Kabel.
• Versuchen Sie niemals, das Gehäuse des Geräts selbst zu
öffnen.
• Führen Sie keine Gegenstände in das Gehäuse des Geräts ein.
• Lassen Sie das Gerät während des Betriebs niemals unbe-
aufsichtigt.
• Dieses Gerät sollte von geschultem Personal in der Küche
des Restaurants, Kantinen oder Barpersonal usw. bedient
werden.
• Dieses Gerät darf nicht von Personen mit eingeschränkten
physischen, sensorischen oder geistigen Fähigkeiten oder
Personen mit mangelnder Erfahrung und Kenntnis betrieben
werden.
• Dieses Gerät darf unter keinen Umständen von Kindern ver-
wendet werden.
• Bewahren Sie das Gerät und seine elektrischen Anschlüsse
für Kinder unzugänglich auf.
• Verwenden Sie niemals anderes Zubehör oder andere Geräte
als das mit dem Gerät gelieferte oder vom Hersteller emp-
fohlene. Andernfalls könnte ein Sicherheitsrisiko für den
Benutzer bestehen und das Gerät beschädigt werden. Ver-
wenden Sie nur Originalteile und Zubehör.
• Betreiben Sie dieses Gerät nicht mit einem externen Timer
oder einer Fernbedienung.
• Stellen Sie das Gerät nicht auf ein Heizobjekt (Benzin, Elektro,
Holzkohle usw.).
• Decken Sie das Gerät nicht im Betrieb ab.
• Stellen Sie keine Gegenstände auf das Gerät.
• Verwenden Sie das Gerät nicht in der Nähe von offenen Flam-
men, explosiven oder brennbaren Materialien. Betreiben Sie
das Gerät immer auf einer horizontalen, stabilen, sauberen,
hitzebeständigen und trockenen Oberfläche.
• Das Gerät ist nicht für die Installation in einem Bereich ge-
eignet, in dem ein Wasserstrahl verwendet werden könnte.
• Lassen Sie während des Gebrauchs mindestens 20 cm um
das Gerät herum Platz für die Belüftung.
• WARNUNG! Halten Sie alle Lüftungsöffnungen am Gerät frei
von Hindernissen.
Besondere Sicherheitshinweise
• Dieses Gerät ist nicht für den Gebrauch im Haushalt vorge-
sehen.
• Betreiben Sie das Gerät nicht ohne Last, um eine Überhit-
zung zu vermeiden.

19
DE
• VORSICHT! Schalten Sie die Maschine IMMER aus und tren-
nen Sie die Stromversorgung, bevor Sie Motorteile berühren.
• WARNUNG! Versuchen Sie nicht, Sicherheitsverriegelungen
zu umgehen.
• Wenn das Netzkabel beschädigt ist, muss es vom Hersteller,
seinem Kundendienst oder ähnlich qualifizierten Personen
ausgetauscht werden, um eine Gefahr zu vermeiden.
• Dieses Gerät darf nicht zum Schneiden von gefrorenen Le-
bensmitteln, Fleisch, Fisch usw. verwendet werden.
• Verwenden Sie das Gerät erst, wenn es ordnungsgemäß mit
der Klinge, dem Klingenschutz und dem Lebensmittelhalter
zusammengebaut wurde.
• WARNUNG! Halten Sie STETS Hände, lange Haare und Klei-
dung von den beweglichen Teilen fern.
• VORSICHT! Vor Reinigung, Wartung oder Reparatur
ausstecken!
• WARNUNG! Halten Sie die Hände vom beweglichen
Teil und der Schneidklinge fern.
• VORSICHT! Zwei-Personen-Handhabung erforder-
lich!
• VORSICHT! Lesen Sie vor Betrieb, Reinigung oder
Wartung die Bedienungsanleitung!
Verwendungszweck
• Dieses Gerät ist für kommerzielle Anwendungen vorgesehen,
z. B. in Küchen von Restaurants, Kantinen, Krankenhäusern
und in kommerziellen Unternehmen wie Bäckereien, Metz-
gereien usw., jedoch nicht für die kontinuierliche Massenpro-
duktion von Lebensmitteln.
• Das Gerät ist nur zum Schneiden von Lebensmitteln wie
Fleisch, Käse, Brot usw. bestimmt. Jede andere Verwendung
kann zu Schäden am Gerät oder zu Verletzungen führen.
• Der Betrieb des Geräts für andere Zwecke gilt als Missbrauch
des Geräts. Der Benutzer haftet allein für die unsachgemäße
Verwendung des Geräts.
Installation der Erdung
Dieses Gerät ist als Schutzklasse I klassifiziert und muss an
eine Schutzerde angeschlossen werden. Die Erdung reduziert
das Risiko eines Stromschlags, indem ein Escape-Kabel für
den elektrischen Strom bereitgestellt wird.
Dieses Gerät ist mit einem Netzkabel mit Erdungsstecker oder
elektrischen Anschlüssen mit Erdungsdraht ausgestattet. Die
Anschlüsse müssen ordnungsgemäß installiert und geerdet sein.
Hauptbestandteile des Produkts
(Abb. 1 auf Seite 4 )
4. Klingenschärfer
5. Platte stoppen
6. Beförderung
7. Ein/Aus-Schalter [Weiß (I): EIN; Schwarz (O): AUS]
8. Scheibendicke-Zifferblatt
9. Produkt-Klemme
10. Klingenschutz
11. Klinge
12. Schlitten-Verriegelung
13. Klingenschutzschraube (nicht angezeigt)
Bemerkung: Sofern nicht anders angegeben, gilt der Inhalt
dieses Handbuchs für alle aufgeführten Artikel. Das Aussehen
kann von den gezeigten Abbildungen abweichen.
Schaltplan
210000, 210017, 210031, 210048, 210086, 970294
(Abb. 2 auf Seite 4)
A. Motor
B. Transformator
C. Kondensator
D. Schutzerdung (Erdung)
E. Live
F. Neutral
G. Schalter
H. Relais
I. Kontrolllampe
J. Thermischer Ausschnitt
K. Mikroschalter
Explosionszeichnung mit Teileliste
210000, 210031, 210048, 210086, 970294
(Abb. 3 auf Seite 5)
Teile-Nr. Name des Teils Menge
1 Umschließer 1
2 Aktives Klappenbrett 1
3 Lebensmittel-Salver 1
4 Blattschutzscheibe 1
5 Klinge 1
6 Klinge Schutzring 1
7 Tray-Halterung 1
8 Lebensmittel und fester Arm 1
9 Buchse mit festem Arm 1
10 Griff mit festem Arm 1
11 Kunststoff-Granulat 1
12 Motor 1
13 Motor-Brikettierung 1
14 Festarmstift Ø12×185 1
15 Schrauben des Klingenschutzes 1
16 Kugellager 6202 2
17 Blattriemenrad Ø66 1
18 Stift des Bandrades 1
19 RiemenSV.330 2
20 Mulch schieben 1
21 Stromleitung 1
22 Achse schieben 1
23 Knopf mit Skala 1
24 Federdichtung 1
25 Nocken 1

20
DE
26 Cam-oskulantes Personal 1
27 Schieberegler 1
28 Schiebeachsen-Brikettierung 2
29 Feder der Abschlepphalterungsachse 2
30 Achse der Abschlepphalterung 1
31 Quadratische Achse 1
32 Zughalterung 1
33 M8×35Hexagonale Schraube 1
34 Kugellager 607 1
35 Deckelknopf der Abschlepphalterung 1
36 Relais 1
37 Kondensator 1
38 Kondensator-Halterung 1
39 Knopf-Mulch 1
40 Taster 1
41 Hauptplatine 1
42 Fleischkratzer 1
43 Schärfer-Mulch 1
44 Schärferbasis der Unterbaugruppe 1
45 Schärferbasis montiert 1
46 Taste des Schärfers 2
47 Feinschleifscheibe Ø45 1
48 Rohschleifscheibe Ø45 1
49 Stift aus Reibstein 2
50 Frühling 2
51 Stift der Schärferhalterung 1
52 Schärfer Knopf festziehen 1
53 Aktives Klappmandril 1
54 Gummifuß 4
55 Stift des Klingenschutzrings 2
56 Fleisch-Blocking-Board 1
57 Schiebeachsenhalterung 2
58 Kleines Riemenrad des Motors 1
59 Objektträger-Treiber 1
60 Einstellung des Riemenrads 1
61 Einstellung des Schärfers 1
62 Ø15 Federdichtung für Lager 1
63 Ø15 Federdichtung für Lager 1
64 Blattschutzscheibe, Vierkantmutter 1
65 Griffschraube mit festem Arm 1
66 Finger-Schwenkbolzen 2
67 Finger-Scheibenmutter 2
68 Schraube des Halterungsknopfes 1
69 Undichte Federdichtung 1
70 Motor-Schraube impaktiert 1
71 Fleisch-Scraping-Unterlegscheibe 2
72 Fleischschaber-Schraube 2
73 Schraube für Kondensatorfixation 1
74 Tellerlagerabdeckung A 1
75 Fleischbrett-Halterung 1
76 Tray Lagerdeckel B 1
77 Quervertiefter Senkkopf M6×12 2
78 Schiebeachsen-Brikettschraube 4
79 Verriegelungsschraube
der Quadratachse 2
80 Einstellschraube des Schiebers 1
81 Magnet 1
82 Magnetschalter 1
83 Aluminium-Block 1
84 Mikroschalter 1
85 Edelstahl-Schloss 1
86 Begrenzter Block 1
87 Edelstahl-Stange 1
88 Stellschraube für Trayhalterung 1
89 Öldichtung 1
210017
(Abb. 4 auf Seite 5)
Teile-Nr. Name des Teils Menge
101 Umschließer 1
102 Aktives Klappenbrett 1
103 Lebensmittel-Salver 1
104 Schutzklingenscheibe 1
105 Klinge 1
106 Klinge Schutzring 1
107 Tray-Halterung 1
108 Festarm für Lebensmittel 1
109 Buchse mit festem Arm 1
110 Griff 1
111 Kunststoff-Granulat 1
112 Motor 1
113 Motor-Brikettierung 1
114 Stromleitung 1
Pagina se încarcă...
Pagina se încarcă...
Pagina se încarcă...
Pagina se încarcă...
Pagina se încarcă...
Pagina se încarcă...
Pagina se încarcă...
Pagina se încarcă...
Pagina se încarcă...
Pagina se încarcă...
Pagina se încarcă...
Pagina se încarcă...
Pagina se încarcă...
Pagina se încarcă...
Pagina se încarcă...
Pagina se încarcă...
Pagina se încarcă...
Pagina se încarcă...
Pagina se încarcă...
Pagina se încarcă...
Pagina se încarcă...
Pagina se încarcă...
Pagina se încarcă...
Pagina se încarcă...
Pagina se încarcă...
Pagina se încarcă...
Pagina se încarcă...
Pagina se încarcă...
Pagina se încarcă...
Pagina se încarcă...
Pagina se încarcă...
Pagina se încarcă...
Pagina se încarcă...
Pagina se încarcă...
Pagina se încarcă...
Pagina se încarcă...
Pagina se încarcă...
Pagina se încarcă...
Pagina se încarcă...
Pagina se încarcă...
Pagina se încarcă...
Pagina se încarcă...
Pagina se încarcă...
Pagina se încarcă...
Pagina se încarcă...
Pagina se încarcă...
Pagina se încarcă...
Pagina se încarcă...
Pagina se încarcă...
Pagina se încarcă...
Pagina se încarcă...
Pagina se încarcă...
Pagina se încarcă...
Pagina se încarcă...
Pagina se încarcă...
Pagina se încarcă...
Pagina se încarcă...
Pagina se încarcă...
Pagina se încarcă...
Pagina se încarcă...
Pagina se încarcă...
Pagina se încarcă...
Pagina se încarcă...
Pagina se încarcă...
Pagina se încarcă...
Pagina se încarcă...
Pagina se încarcă...
Pagina se încarcă...
Pagina se încarcă...
Pagina se încarcă...
Pagina se încarcă...
Pagina se încarcă...
Pagina se încarcă...
Pagina se încarcă...
Pagina se încarcă...
Pagina se încarcă...
Pagina se încarcă...
Pagina se încarcă...
Pagina se încarcă...
Pagina se încarcă...
Pagina se încarcă...
Pagina se încarcă...
Pagina se încarcă...
Pagina se încarcă...
Pagina se încarcă...
Pagina se încarcă...
Pagina se încarcă...
Pagina se încarcă...
Pagina se încarcă...
Pagina se încarcă...
Pagina se încarcă...
Pagina se încarcă...
Pagina se încarcă...
Pagina se încarcă...
Pagina se încarcă...
Pagina se încarcă...
Pagina se încarcă...
Pagina se încarcă...
Pagina se încarcă...
Pagina se încarcă...
Pagina se încarcă...
Pagina se încarcă...
Pagina se încarcă...
Pagina se încarcă...
Pagina se încarcă...
Pagina se încarcă...
Pagina se încarcă...
Pagina se încarcă...
Pagina se încarcă...
Pagina se încarcă...
Pagina se încarcă...
Pagina se încarcă...
Pagina se încarcă...
Pagina se încarcă...
Pagina se încarcă...
Pagina se încarcă...
Pagina se încarcă...
Pagina se încarcă...
Pagina se încarcă...
Pagina se încarcă...
Pagina se încarcă...
Pagina se încarcă...
Pagina se încarcă...
Pagina se încarcă...
Pagina se încarcă...
Pagina se încarcă...
Pagina se încarcă...
Pagina se încarcă...
Pagina se încarcă...
Pagina se încarcă...
Pagina se încarcă...
Pagina se încarcă...
Pagina se încarcă...
Pagina se încarcă...
Pagina se încarcă...
Pagina se încarcă...
Pagina se încarcă...
Pagina se încarcă...
Pagina se încarcă...
Pagina se încarcă...
Pagina se încarcă...
Pagina se încarcă...
Pagina se încarcă...
Pagina se încarcă...
Pagina se încarcă...
Pagina se încarcă...
Pagina se încarcă...
Pagina se încarcă...
Pagina se încarcă...
Pagina se încarcă...
Pagina se încarcă...
Pagina se încarcă...
Pagina se încarcă...
Pagina se încarcă...
Pagina se încarcă...
Pagina se încarcă...
Pagina se încarcă...
Pagina se încarcă...
Pagina se încarcă...
Pagina se încarcă...
Pagina se încarcă...
Pagina se încarcă...
Pagina se încarcă...
Pagina se încarcă...
Pagina se încarcă...
Pagina se încarcă...
Pagina se încarcă...
Pagina se încarcă...
Pagina se încarcă...
Pagina se încarcă...
Pagina se încarcă...
Pagina se încarcă...
Pagina se încarcă...
Pagina se încarcă...
Pagina se încarcă...
Pagina se încarcă...
-
 1
1
-
 2
2
-
 3
3
-
 4
4
-
 5
5
-
 6
6
-
 7
7
-
 8
8
-
 9
9
-
 10
10
-
 11
11
-
 12
12
-
 13
13
-
 14
14
-
 15
15
-
 16
16
-
 17
17
-
 18
18
-
 19
19
-
 20
20
-
 21
21
-
 22
22
-
 23
23
-
 24
24
-
 25
25
-
 26
26
-
 27
27
-
 28
28
-
 29
29
-
 30
30
-
 31
31
-
 32
32
-
 33
33
-
 34
34
-
 35
35
-
 36
36
-
 37
37
-
 38
38
-
 39
39
-
 40
40
-
 41
41
-
 42
42
-
 43
43
-
 44
44
-
 45
45
-
 46
46
-
 47
47
-
 48
48
-
 49
49
-
 50
50
-
 51
51
-
 52
52
-
 53
53
-
 54
54
-
 55
55
-
 56
56
-
 57
57
-
 58
58
-
 59
59
-
 60
60
-
 61
61
-
 62
62
-
 63
63
-
 64
64
-
 65
65
-
 66
66
-
 67
67
-
 68
68
-
 69
69
-
 70
70
-
 71
71
-
 72
72
-
 73
73
-
 74
74
-
 75
75
-
 76
76
-
 77
77
-
 78
78
-
 79
79
-
 80
80
-
 81
81
-
 82
82
-
 83
83
-
 84
84
-
 85
85
-
 86
86
-
 87
87
-
 88
88
-
 89
89
-
 90
90
-
 91
91
-
 92
92
-
 93
93
-
 94
94
-
 95
95
-
 96
96
-
 97
97
-
 98
98
-
 99
99
-
 100
100
-
 101
101
-
 102
102
-
 103
103
-
 104
104
-
 105
105
-
 106
106
-
 107
107
-
 108
108
-
 109
109
-
 110
110
-
 111
111
-
 112
112
-
 113
113
-
 114
114
-
 115
115
-
 116
116
-
 117
117
-
 118
118
-
 119
119
-
 120
120
-
 121
121
-
 122
122
-
 123
123
-
 124
124
-
 125
125
-
 126
126
-
 127
127
-
 128
128
-
 129
129
-
 130
130
-
 131
131
-
 132
132
-
 133
133
-
 134
134
-
 135
135
-
 136
136
-
 137
137
-
 138
138
-
 139
139
-
 140
140
-
 141
141
-
 142
142
-
 143
143
-
 144
144
-
 145
145
-
 146
146
-
 147
147
-
 148
148
-
 149
149
-
 150
150
-
 151
151
-
 152
152
-
 153
153
-
 154
154
-
 155
155
-
 156
156
-
 157
157
-
 158
158
-
 159
159
-
 160
160
-
 161
161
-
 162
162
-
 163
163
-
 164
164
-
 165
165
-
 166
166
-
 167
167
-
 168
168
-
 169
169
-
 170
170
-
 171
171
-
 172
172
-
 173
173
-
 174
174
-
 175
175
-
 176
176
-
 177
177
-
 178
178
-
 179
179
-
 180
180
-
 181
181
-
 182
182
-
 183
183
-
 184
184
-
 185
185
-
 186
186
-
 187
187
-
 188
188
-
 189
189
-
 190
190
-
 191
191
-
 192
192
-
 193
193
-
 194
194
-
 195
195
-
 196
196


Hendi 210086 Manual de utilizare
- Tip
- Manual de utilizare
în alte limbi
- eesti: Hendi 210086 Kasutusjuhend