

IAN 373086_2204 8
EDI Light GmbH
Heiligkreuz 22
6136 Pill
AUSTRIA
Status of the information · Stato delle infor-
mazioni · Statut de l’information · Estado de
la información · Status van de informatie ·
Status for oplysningerne · Stav informací ·
Stanje informacij · Stav informácií · Az in-
formáció állapota · Status informacji · Stanje
informacija · Starea informațiilor · Status
informacije · Starea informațiilor · Статус
на информацията · Κατάσταση των
πληροφοριών · Stand der Informationen:
05/2022
Ident.-No.: 55875052022-8
RECYCLED
Packaging
FSC® C115297

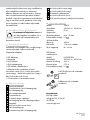
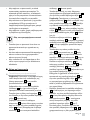
IAN 373086_2204
LED CURVE LIGHT
OS
GB IE NI
LED CURVE LIGHT
Assembly, operating and safety instructions
IT MT
LUCE AD ARCO A LED
Istruzioni di montaggio, funzionamento e sicurezza
FR BE
LAMPE À ARC LED
Instructions de montage, d’utilisation et de sécurité
ES
LUZ DE ARCO LED
Instrucciones de montaje, funcionamiento y seguridad
NL BE
LED WAPENLICHT
Montage-, bedienings- en veiligheidsvoorschriften
DK
BUET LED-GULVLAMPE
Monterings-, betjenings- og sikkerhedsanvisninger
RO
A CONDUS LUMINATORUL CU ARC
Instrucțiuni de asamblare, exploatare și siguranță
GR
ΟΔΉΓΗΣΕ ΦΩΤΙΣΤΙΚΌ ΤΌΞΟΥ
Οδηγίες συναρμολόγησης, λειτουργίας και ασφάλειας
CZ
LED OBLOUKOVÉ SVĚTLO
Montážní, provozní a bezpečnostní pokyny
SI
LED ARC LIGHT
Navodila za montažo, uporabo in varnost
SK
LED OBLÚKOVÉ SVETLO
Montážne, prevádzkové a bezpečnostné pokyny
HU
LED ARC FÉNY
Összeszerelési, üzemeltetési és biztonsági utasítások
PL
LED ARC LIGHT
Instrukcje montażu, obsługi i bezpieczeństwa
HR
LED LUČNO SVJETLO
Upute za montažu, rad i sigurnost
BG
LED ОСВЕТИТЕЛ ЗА ДЪГА
Инструкции за монтаж, експлоатация и безопасност
DE AT CH
LED BOGENLEUCHTE
Montage-, Bedienungs- und Sicherheitshinweise

GB IE NI
Before reading, unfold the two pages with the illustrations and then familiarise yourself with all the functions of the unit.
IT MT
Prima di leggere aprire le due pagine con le immagini e prendere confidenza con le diverse funzioni dell’apparecchio.
FR BE
Avant de lire le mode d‘emploi, ouvrez les deux pages contenant les illustrations et familiarisez-vous ensuite avec toutes les fonctions de l‘appareil.
ES
Antes de leer, despliegue las dos páginas con las ilustraciones y luego familiarícese con todas las funciones del aparato.
familiarícese con todas las funciones del aparato.
NL BE
Vouw vóór het lezen de beide pagina‘s met de afbeeldingen open en maak u vertrouwd met alle functies van het apparaat.
DK
Før du læser, vend begge sidene med billeder frem og bliv bekendt med alle apparatets funktioner.
CZ
Před čtením si odklopte obě dvě strany s obrázky a potom se seznamte se všemi funkcemi přístroje.
SI
Pred branjem odprite dve strani z ilustracijami in se nato seznanite z vsemi funkcijami naprave.
SK
Pred čítaním si odklopte obidve strany s obrázkami a potom sa oboznámte so všetkými funkciami prístroja.
HU
Olvasás előtt hajtsa ki az ábrákat tartalmazó két oldalt, majd ismerkedjen meg a készülék összes funkciójával.
PL
Przed przeczytaniem proszę rozłożyć obie strony z ilustracjami, a następnie proszę zapoznać się z wszystkimi funkcjami urządzenia.
HR
Prije čitanja rasklopite dvije stranice s ilustracijama i zatim se upoznajte sa svim funkcijama uređaja.
RO
Înainte de a citi, desfășurați cele două pagini cu ilustrații și apoi familiarizați-vă cu toate funcțiile aparatului.
BG
Преди да започнете да четете, разгърнете двете страници с илюстрациите и след това се запознайте с всички функции на
устройството.
GR
Πριν διαβάσετε, διπλώστε τις δύο σελίδες με τις εικόνες και στη συνέχεια εξοικειωθείτε με όλες τις λειτουργίες της συσκευής.
DE AT CH
Klappen Sie vor dem Lesen die beiden Seiten mit den Abbildungen aus und machen Sie sich anschließend mit allen Funktionen des Gerätes vertraut.
GB/IT/NI Assembly, operating and safety instructions Page 5
IT/MT Istruzioni di montaggio, funzionamento e sicurezza Pagina 13
FR/BE Instructions de montage, d‘utilisation et de sécurité Page 21
ES Instrucciones de montaje, funcionamiento y seguridad Página 29
NL/BE Montage-, bedienings- en veiligheidsvoorschriften Pagina 37
DK Monterings-, betjenings- og sikkerhedsanvisninger Side 45
CZ Montážní, provozní a bezpečnostní pokyny Strana 53
SI Navodila za montažo, uporabo in varnost Stran 61
SK Montážne, prevádzkové a bezpečnostné pokyny Strana 69
HU Összeszerelési, üzemeltetési és biztonsági utasítások Oldal 77
PL Instrukcja montażu, obsługi i bezpieczeństwa Strona 87
HR Upute za montažu, rad i sigurnost Strana 95
RO Instrucțiuni de asamblare, operare și siguranță Pagina 103
BG Инструкции за монтаж, експлоатация и безопасност Страница 111
GR Οδηγίες συναρμολόγησης, λειτουργίας και ασφάλειας Σελίδα 119
DE / AT / CH Montage-, Bedienungs- und Sicherheitshinweise Seite 127

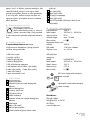
55875


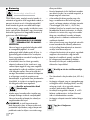
A B
1
C
6
1
2
3
8
2
6
3
8
14
7
1
3
11
4
5
2
13
910
4
1
56
12
4 a4 b

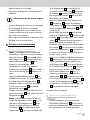
List of pictograms used ..................................................................................... Page 6
Introduction ........................................................................................................ Page 6
Intended use ....................................................................................................... Page 7
Scope of delivery ................................................................................................ Page 7
Parts description ................................................................................................. Page 7
Technical data .................................................................................................... Page 7
Safety .................................................................................................................. Page 7
Safety instructions ............................................................................................... Page 7
Commissioning .................................................................................................. Page 8
Mounting the light ............................................................................................... Page 8
Switching the luminaire on / off ........................................................................... Page 9
Dimming the light ................................................................................................ Page 9
Maintenance and cleaning .............................................................................. Page 9
Disposal .............................................................................................................. Page 10
Declaration of conformity ............................................................................... Page 10
Information / Warranty .................................................................................. Page 10
Warranty ........................................................................................................... Page 10
Service address .................................................................................................. Page 11
Warranty card .................................................................................................... Page 12
5GB/IE/NI

6 GB/IE/NI
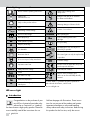
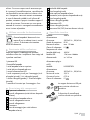
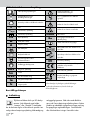
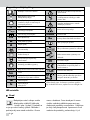
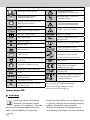
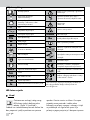
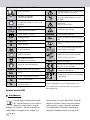
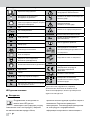
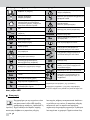
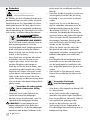
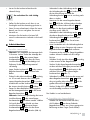
List of pictograms used
Please read the operating instructions!
Safety notes
Instructions for use
Only use the product indoors.
VVolt
Alternating current/voltage
Direct current/voltage
Hz Hertz (frequency)
WWatts (effective power)
AAmpere (electricity)
not dimmable
Protection class II
Short-circuit proof safety transformer
Separate control unit
SELV Safety extra-low voltage
lm Lumen
IP20 For indoor use only
ta Ambient temperature
tc Maximum housing temperature at
stated point
Observe the warnings and
safety notes!
Danger to life and risk of accidents
for infants and children!
Warning! Danger of electric shock!
Caution - hot surfaces!
25000h LED operating life
Ra Colour rendering index of the
LED light
For your safety
LED LED
The LED light source can only be re-
placed by a specialist.
LED
230V
The control gear can only be replaced by
a specialist.
CV Constant Voltage
Product meets the applicable European
product-specific directives.
TÜV SÜD/GS certified
b
a
Dispose of the packaging and
device in an environmentally friendly
manner!
* Further details, e.g. additional symbol explanations
and technical information, can be found
at www.edi-light.com
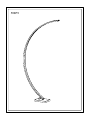
LED curve light
Introduction
Congratulations on the purchase of your
new LED arc luminaire (hereinafter also
referred to as “luminaire” or “product”).
You have chosen a high quality product. Please be
sure to carefully read all the instructions for use.
Fold out the page with illustrations. These instruc-
tions for use are part of the product and contain
important information on setup and handling.
Always observe all safety instructions. Before using
this product for the first time, verify the correct

7GB/IE/NI
voltage and that all parts are properly installed. If
you have any questions or are unsure about
operating the product, please contact your
distributor or the service centre. Please keep these
instructions for use in a safe place and include them
when passing this product on to others.
Intended use
This light is only suitable for indoor use
in dry and enclosed spaces. This product
is intended for private household use
only.
Scope of delivery
Immediately after unpacking, always check that the
scope of delivery is complete and that the product
is in perfect condition.
1 LED curve light
1 Lamp base
1 Upper gooseneck lamp unit
1 Lower gooseneck lamp unit
1 LED plug-in mains adapter
1 Small parts for assembly (4 socket head screws
(small), 2 socket head screws (large), 1 hex key
(large), 1 hex key (small))
1 Set of assembly instructions and instructions
for use
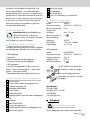
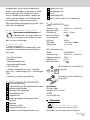
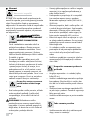
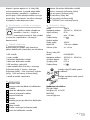
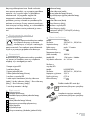
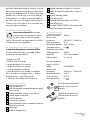
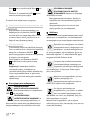
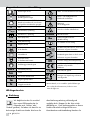
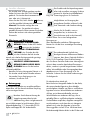
Parts description
1 Aluminium baffle
2 Connection socket (lower gooseneck lamp unit)
3 Lower gooseneck lamp unit
4 Internal power cord
4a Connection socket
4b Connecting plug
5 Assembly bracket (for lower gooseneck lamp
unit)
6 Lamp base
7 Socket head screw (small)
8 Upper gooseneck lamp unit
9 Connecting plug (upper gooseneck lamp unit)
10 Socket head screw (large)
11 Hex key (large)
12 LED plug-in mains adapter
13 Hex key (small)
14 ON/OFF switch (including dimmer function)
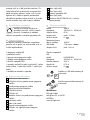
Technical data
Model: 55875
Power supply: 220-240 V~, 50/60 Hz
Protection level: IP 20
Power input: max. 19 Watts
Protection class: II /
Colour temperature
(Light colour): 3000 K
LED Modul: 17W, max. 1900lm
Total height: ca. 165 cm
Model: HS2250750V
Operating voltage: 200-240 V~, 50/60 Hz
Output voltage: 22,5 V
Output current: 0,75 A
Protection class: II /
LED LED
The LED light source can only be
replaced by a specialist.
LED
230V
The control gear can only be
replaced by a specialist.
Distributor:
EDI Light GmbH
Heiligkreuz 22, 6136 Pill
AUSTRIA
www.edi-light.com
Safety
Safety instructions
Damage due to failure to comply with these instruc-
tions for use will invalidate the warranty!
LED plug-in mains adapter:

8 GB/IE/NI
We assume no liability for consequential damages!
We assume no liability for property damage or
personal injury due to improper handling or failure
to comply with the safety instructions!
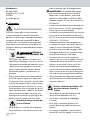
■WARNING! DANGER TO
LIFE AND RISK OF ACCIDENT
FOR INFANTS AND CHIL-
DREN!
Never leave children unsupervised with the
packaging material. The packaging material
poses a suffocation hazard. Children frequently
underestimate the dangers. Please keep the
product out of the reach of children at all times.
This product is not a toy.
■This device may be used by children aged
8 years and up, as well as by persons with
reduced physical, sensory or mental capacities,
or lacking experience and/or knowledge, so
long as they are supervised or instructed in the
safe use of the device and understand the asso-
ciated risks. Do not allow children to play with
the device. Cleaning and user maintenance
should not be performed by children without
supervision.
■Avoid the risk of fatal injury
from electric shock
■Check the lamp for possible damage before
every use. Never use the light if it shows any
signs of damage.
CAUTION! A damaged light means danger
of death from electric shock. In the event of
damage, repairs or other problems with the
light please contact the service centre or a
qualified electrician.
■The external flexible cord on this lamp is not
replaceable; if the cord is damaged, the lamp
must be disposed of.
■Before use, verify the available mains voltage
matches the required operating voltage of the
light (220–240 V∼, 50/60 Hz).
■Never allow the lamp to come into contact with
water or other liquids. Always unplug the LED
plug-in mains adapter from the mains socket
prior to assembly, disassembly, cleaning or if
the lamp will not be used for extended periods.
■Never open any of the components of the
electrical equipment or insert any objects into
the same components. This will pose a risk of
fatal injury from electric shock.
■The LED light source and control gear in this
light must be replaced by the manufacturer
or by an authorised service technician or a
similarly qualified person.
■This light is not suitable for external dimmers
(house installation) or electronic switches.
Prevent fire and
injury hazards
■Do not look directly into the light source (light
bulb, LED etc.).
■Do not leave the light or packaging lie about
carelessly. Plastic film or bags, plastic parts etc.
can turn into dangerous toys for children.
■Never cover the lamp or the LED plug-in mains
adapter with objects. Excessive heat build-up
can result in fire.
■Do not operate the lamp unattended.
Safe working
■Mount the light so that it is protected from
moisture and dirt.
■Always be attentive! Always pay attention to
what you are doing and proceed with caution
at all times.
■Never assemble the lamp whilst unfocused or
feeling unwell.
Commissioning
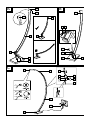
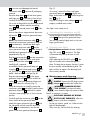
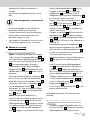
Mounting the light
Note: We recommend assembling this light
with 2 persons. When assembling the lamp
base
6 and the lower gooseneck lamp unit

9GB/IE/NI
3 , be sure not to damage the internal
connection cable 4 . Remove all packaging
material.
□Place the lamp base 6 with the lower goose-
neck lamp unit 3 on the floor in front of you.
□Carefully lift the aluminium baffle 1 approx.
30 cm out of the guide for the lower gooseneck
lamp unit 3 . 4 holes and the connecting
plug 4b of the internal power cord 4 will be
visible.
□Position these bores congruent over the assem-
bly bracket 5 for the lower gooseneck lamp
unit 3 .
Note: The internal connection cable 4 must
be pushed into the lower gooseneck lamp unit
3 simultaneously. Choose the ideal angle
between the connection cable 4 and the
lower gooseneck lamp unit 3 when doing so.
Hold the lower gooseneck lamp unit 3
perpendicular (Fig. A).
□Plug the connecting plug 4b into the connection
socket 4a and clasp the power cord under-
neath the connection socket 2 in order to
carefully pull it upwards.
□Assemble the lower gooseneck lamp unit 3
using the 4 small socket head screws 7 and
the small hex key 13 and push the aluminium
baffle 1 back as far as it will go (Fig. B).
□Plug the connecting plug 9 for the upper
gooseneck lamp unit 8 into the connection
socket 2 for the lower gooseneck lamp unit
3 . Ensure that it fits securely (Fig. C).
□It may be necessary to carefully remove the
connection socket 2 with pliers from the lower
gooseneck lamp unit 3 and hold it in place
with pliers when plugging it in. Ensure correct
position.
□Carefully push the connection cable 4 into the
lower section of the gooseneck lamp.
□Attach the upper gooseneck light unit 8 with
the side guide correctly onto the aluminium
baffle 1 and simultaneously into the side
guides in the lower gooseneck lamp unit 3
(Fig. C).
□On reverse, connect the lower and upper
gooseneck lamp unit 3 , 8 using the two
large socket head screws 10 and the large hex
key 11 (Fig. C).
□Plug the LED plug-in mains adapter 12 into a
properly installed mains socket.
Your light is now ready to use.
Switching the luminaire on/off
□Switch the light on and off with the ON/OFF
switch 14 at the top of the gooseneck lamp.
You will only need to lightly touch it with your
finger (push button).
Dimming the light
□The light features a variable dimmer. Hold the
ON/OFF switch 14 to activate it. The light
will automatically dim to the max. or min.
brightness.
□After releasing the ON/OFF switch 14 , the
light will remain at the selected brightness.
Note: The lamp has a memory function. It saves
the most recently selected dimming level. The
light switches on again in the dimming level
most recently selected.
Maintenance and cleaning
WARNING! DANGER OF ELECTRIC
SHOCK! Remove the LED plug-in mains
adapter 12 from the mains socket first.
WARNING! DANGER OF ELEC-
TRIC SHOCK! For electrical safety,
never clean the light with water or other
liquids, or immerse it in water.
CAUTION! DANGER OF BURNS
DUE TO HOT SURFACES! Allow the
lamp to cool down completely.
□Do not use solvents, petrol, etc. Otherwise the
light will be damaged.
□Only use a dry, lint-free cloth for cleaning.

10 GB/IE/NI
Disposal
The packaging is made entirely of recyclable mate-
rials, which you may dispose of at local recycling
facilities.
b
a
Observe the marking of the packaging
materials for waste separation, which
are marked with abbreviations (a) and
numbers (b) with following meaning: 1–7:
plastics/20–22: paper and fibreboard/ 80–98:
composite materials.
The product and packaging materials
are recyclable, dispose of it separately
for better waste treatment. The Triman
logo is valid in France only.
Contact your local refuse disposal
authority for more details of how to
dispose of your worn-out product.
To help protect the environment, please
dispose of the product properly when it
has reached the end of its useful life and
not in the household waste. Information on
collection points and their opening hours can be
obtained from your local authority.
The adjacent symbol of a crossed-out
wheeled bin indicates that this appliance
is subject to Directive 2012/19/EU. This
directive states that you may not dispose of this
appliance with normal household waste at the end
of its service life, but must take it to specially set up
collection points, recycling centres or waste
disposal companies. This disposal is free of charge
for you. Protect the environment and dispose of it
properly.
Declaration of conformity
This product fulfils the requirements of
the applicable European and national
directives. The relevant declarations and
documents are held by the manufacturer. This
product meets the requirements of the German
Equipment and Product Safety Act.
We reserve the right to make technical and visual
changes to the product in the interest of product
improvement. Typographical and printing errors
excepted.
This product contains light sources of energy
efficiency class F.
Information/Warranty
Warranty
We provide a 3 year warranty from the date of
purchase. Our products are manufactured using
modern production methods and are subject to
precise quality control. We guarantee this product
is of good quality. During the warranty period any
defects in material or manufacture will be replaced
free of charge In the event of an unexpected defect,
please return the carefully packaged product to
the service address specified. The warranty does
not extend to damage due to improper handling
as well as wear items and consumables. These can
be ordered from the telephone number listed for a
charge. Repairs not covered by the warranty (e.g.
light bulb) may also be requested at cost from the
service address listed. The product will be repaired
at the specified service location. Timely processing
and return can only be ensured by sending the
product directly to this address. For additional
product information, to order accessories or have a
question about the service process, please contact
our Customer Service Department at the telephone
number specified. Please include the item number
(see “Technical data”) when inquiring about the
product.

11GB/IE/NI
IAN 373086_2204
Please have your receipt and item number (z. B.
IAN 123456_7890) ready as your proof of
purchase when enquiring about the product.
Service address
Great Britain/Ireland
EGLO UK LTD.
Unit 12 Cirrus Park, Lower Farm Road, Moulton
Park
Industrial Estate, NORTHAMPTON NN3 6UR
T: +44 1604 790 986

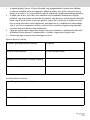
Warranty card
Return address:
Name / First name:
Country / Postal code / City / Street address:
Phone number:
Item number / Description:
Purchase date / Point of purchase:
Description of the defect:
Date / Signature:
Non-warranty cases:
Please return the un-repaired item, carriage paid.
Please inform me of the costs. Repair the product for a fee.
12 GB/IE/NI

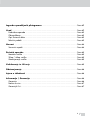
Legenda dei pittogrammi utilizzati ............................................................. Pagina 14
Introduzione ................................................................................................... Pagina 14
Utilizzo secondo la destinazione d’uso ............................................................. Pagina 15
Contenuto della confezione .............................................................................. Pagina 15
Descrizione dei componenti ............................................................................. Pagina 15
Specifiche tecniche .......................................................................................... Pagina 15
Sicurezza ........................................................................................................ Pagina 16
Avvertenze per la sicurezza ............................................................................. Pagina 16
Messa in servizio .......................................................................................... Pagina 17
Montaggio della lampada ............................................................................... Pagina 17
Accensione / Spegnimento della lampada ........................................................ Pagina 17
Funzione dimmer ............................................................................................ Pagina 18
Manutenzione e pulizia ............................................................................... Pagina 18
Smaltimento ................................................................................................... Pagina 18
Dichiarazione di conformità ....................................................................... Pagina 18
Informazioni / Garanzia ............................................................................. Pagina 19
Garanzia ....................................................................................................... Pagina 19
Indirizzo assistenza clienti ............................................................................... Pagina 19
Carta garanzia ............................................................................................... Pagina 20
13IT/MT

14 IT/MT
Legenda dei pittogrammi utilizzati
Leggere le istruzioni per l’uso!
Indicazioni di sicurezza
Istruzioni per l’uso
Utilizzare il prodotto soltanto in
ambienti interni.
VVolt
Tensione/corrente alternata
Tensione/corrente continua
Hz Hertz (frequenza)
WWatt (potenza attiva)
AAmpere (corrente)
non dimmerabile
Classe di isolamento II
Trasformatore di sicurezza anti-corto-
circuito
Dispositivo a funzionamento indipendente
SELV Bassissima tensione di sicurezza
lm Lumen
IP20 Solo per ambienti interni
ta Temperatura ambiente
tc Massima temperatura alloggiamento
nel punto indicato
Rispettare le avvertenze e le
indicazioni di sicurezza!
Pericolo di morte e di incidente
per neonati e bambini!
Avvertenza! Pericolo di folgorazione!
Attenzione alle superfici calde!
25000h Durata utile del LED
Ra Indice di resa del colore
dell’illuminazione LED
Questa è la procedura corretta
LED LED
La sorgente luminosa a LED può essere
sostituita solo da uno specialista.
LED
230V
Il dispositivo di controllo può essere
sostituito solo da uno specialista.
CV Tensione costante
Il prodotto è conforme alle direttive
europee vigenti per questa tipologia
di prodotti.
Omologato TÜV SÜD/GS
b
a
Smaltire l’imballaggio e l’apparecchio
in modo ecocompatibile!
* Per ulteriori dettagli, ad esempio le spiegazioni
dei simboli e le informazioni tecniche, consultare
il sito www.edi-light.com
Piantana LED
Introduzione
Congratulazioni per l’acquisto del vostro
nuovo apparecchio ad arco LED (di
seguito denominato anche “apparec-
chio” o “prodotto”). Con questo acquisto
avete scelto un prodotto di alta qualità. Si prega di
leggere interamente e attentamente questo
manuale d‘istruzioni per l‘uso. Aprire la pagina
con le illustrazioni. Questo manuale di istruzi-
oni è parte integrante del prodotto e contiene
importanti indicazioni circa la sua attivazione e

15IT/MT
utilizzo. Osservare sempre tutte le avvertenze per
la sicurezza. Prima dell‘attivazione, controllare che
sia disponibile la tensione elettrica richiesta e che
tutti i componenti siano stati montati correttamente.
In caso di domande o dubbi circa l‘utilizzo del
prodotto, contattare il proprio rivenditore oppure il
centro di assistenza. Conservare con cura questo
manuale di istruzioni e consegnarlo eventualmente
a terzi insieme al prodotto.
Utilizzo secondo la destinazione
d’uso
Questa lampada è idonea esclusiva-
mente all’uso in ambienti interni, asciutti
e chiusi. È destinata esclusivamente
all‘utilizzo domestico.
Contenuto della confezione
Dopo aver aperto l‘imballaggio del prodotto,
controllare subito che i componenti siano integri ed
in perfette condizioni.
1 piantana LED
1 base della lampada
1 unità lampada ad arco superiore
1 unità inferiore lampada ad arco
1 cavo di alimentazione LED
1 set di componenti piccoli per il montaggio (4 viti
a brugola (piccole), 2 viti a brugola (grandi),
1 chiave a brugola (grande), 1 chiave a brugola
(piccola))
1 manuale di istruzioni per il montaggio e l‘uso
Descrizione dei componenti
1 Copertura in alluminio
2 Porta di collegamento (unità inferiore lampada
ad arco)
3 Unità inferiore lampada ad arco
4 Cavo di collegamento interno
4a Porta di collegamento
4b Connettore
5 Presa di montaggio (per unità inferiore
lampada ad arco)
6 Piedistallo della lampada
7 Vite a brugola (piccola)
8 Unità superiore lampada ad arco
9 Connettore (unità superiore lampada ad arco)
10 Vite a brugola (grande)
11 Chiave a brugola (grande)
12 Alimentatore LED
13 Chiave a brugola (piccola)
14 Interruttore ON/OFF (funzione dimmer inclusa)
Specifiche tecniche
Modello: 55875
Alimentazione
di corrente: 220-240 V~, 50/60 Hz
Grado di protezione: IP 20
Potenza assorbita: max. 19 Watt
Classe di isolamento: II /
Temperatura di colore
(tonalità della luce): 3000 K
Modulo LED: 17W, max. 1900lm
Altezza totale: ca. 165 cm
Alimentatore plug-in
a LED:
Modello: HS2250750V
Alimentazione
di corrente: 200-240 V~, 50/60 Hz
Tensione di uscita: 22,5 V
Corrente di uscita: 0,75 A
Classe di isolamento: II /
LED LED
La sorgente luminosa a LED può
essere sostituita solo da uno
specialista.
LED
230V
Il dispositivo di controllo può
essere sostituito solo da uno specialista.

16 IT/MT
Distributore:
EDI Light GmbH
Heiligkreuz 22, 6136 Pill
AUSTRIA
www.edi-light.com
Sicurezza
Avvertenze per la sicurezza
Il mancato rispetto delle istruzioni contenute
in questo manuale d‘uso annulla il diritto alla
garanzia! Si declina ogni responsabilità per danni
conseguenti al mancato rispetto delle suddette
istruzioni! Non ci assumiamo alcuna responsabil-
ità per danni a cose e persone causati da un uso
improprio o dall’inosservanza delle avvertenze per
la sicurezza!
■ATTENZIONE! PERICOLO
DI MORTE E DI INCIDENTE PER
BAMBINI!
Non lasciare mai i bambini incustoditi con il
materiale per imballaggio. Sussiste il rischio di
soffocamento causato da tale materiale. Spesso
i bambini non sono in grado di riconoscere i
pericoli. Tenere i bambini sempre a dovuta
distanza dal prodotto. Il prodotto non è un
giocattolo.
■Questo attrezzo può essere utilizzato da bam-
bini di età superiore agli 8 anni, da persone
con capacità fisiche, sensoriali o mentali ridotte
o da persone inesperte solo se supervisionate o
preventivamente istruite sull’utilizzo in sicurez-
za del prodotto e solo se informate dei pericoli
legati al prodotto stesso. I bambini non devono
giocare con questo prodotto. La pulizia e la
manutenzione non devono essere eseguite da
bambini senza la supervisione di un adulto.
■Pericolo di morte causato da
scossa elettrica
■Prima di ogni uso, verificare che la lampada
non presenti danni. Non utilizzare mai la lam-
pada se presenta segni di danneggiamento.
AVERTENZA! Una lampada danneggiata
può causare pericolo di morte a seguito di
folgorazione. In caso di danni, necessità di
riparazioni o altri problemi nell’utilizzo della
lampada, rivolgersi al Centro di Assistenza o a
un elettricista.
■Il cavo esterno flessibile di questa lampada non
può essere sostituito; se il cavo è danneggiato,
è necessario sostituire la lampada.
■Prima dell‘uso non dimenticare di verificare che
la tensione di rete disponibile coincida con la
tensione di esercizio necessaria per la lampada
(220–240 V∼, 50/60 Hz).
■Evitare assolutamente che la lampada entri
in contatto con acqua o altri liquidi. Staccare
sempre il cavo di alimentazione LED dalla
presa di corrente prima del montaggio, dello
smontaggio, della pulizia o quando la lampa-
da resta inutilizzata per molto tempo.
■Non aprire mai nessuno dei componenti
elettrici e non inserirvi alcun oggetto. Interventi
di questo tipo possono provocare una scossa
elettrica e essere quindi rischiosi per la vita.
■La fonte luminosa di questa lampada può
essere sostituita esclusivamente dal produttore,
da un suo tecnico del servizio assistenza incari-
cato o da una persona ugualmente qualificata.
■Questa lampada non è idonea per regolatori
di luminosità esterni (installazione domestica) e
interruttori elettronici.
Evitare situazioni pericolose che
possono causare incendi o
lesioni
■Non rivolgere lo sguardo direttamente alla
fonte luminosa (lampadina, LED ecc.).
■Non lasciare la lampada o l‘imballaggio
incustoditi.
■Buste, fogli e componenti di plastica ecc.
possono diventare giocattoli pericolosi per i
bambini.
■Non coprire la lampada o il cavo di alimen-
tazione LED con alcun oggetto. Un‘eccessiva
Pagina se încarcă...
Pagina se încarcă...
Pagina se încarcă...
Pagina se încarcă...
Pagina se încarcă...
Pagina se încarcă...
Pagina se încarcă...
Pagina se încarcă...
Pagina se încarcă...
Pagina se încarcă...
Pagina se încarcă...
Pagina se încarcă...
Pagina se încarcă...
Pagina se încarcă...
Pagina se încarcă...
Pagina se încarcă...
Pagina se încarcă...
Pagina se încarcă...
Pagina se încarcă...
Pagina se încarcă...
Pagina se încarcă...
Pagina se încarcă...
Pagina se încarcă...
Pagina se încarcă...
Pagina se încarcă...
Pagina se încarcă...
Pagina se încarcă...
Pagina se încarcă...
Pagina se încarcă...
Pagina se încarcă...
Pagina se încarcă...
Pagina se încarcă...
Pagina se încarcă...
Pagina se încarcă...
Pagina se încarcă...
Pagina se încarcă...
Pagina se încarcă...
Pagina se încarcă...
Pagina se încarcă...
Pagina se încarcă...
Pagina se încarcă...
Pagina se încarcă...
Pagina se încarcă...
Pagina se încarcă...
Pagina se încarcă...
Pagina se încarcă...
Pagina se încarcă...
Pagina se încarcă...
Pagina se încarcă...
Pagina se încarcă...
Pagina se încarcă...
Pagina se încarcă...
Pagina se încarcă...
Pagina se încarcă...
Pagina se încarcă...
Pagina se încarcă...
Pagina se încarcă...
Pagina se încarcă...
Pagina se încarcă...
Pagina se încarcă...
Pagina se încarcă...
Pagina se încarcă...
Pagina se încarcă...
Pagina se încarcă...
Pagina se încarcă...
Pagina se încarcă...
Pagina se încarcă...
Pagina se încarcă...
Pagina se încarcă...
Pagina se încarcă...
Pagina se încarcă...
Pagina se încarcă...
Pagina se încarcă...
Pagina se încarcă...
Pagina se încarcă...
Pagina se încarcă...
Pagina se încarcă...
Pagina se încarcă...
Pagina se încarcă...
Pagina se încarcă...
Pagina se încarcă...
Pagina se încarcă...
Pagina se încarcă...
Pagina se încarcă...
Pagina se încarcă...
Pagina se încarcă...
Pagina se încarcă...
Pagina se încarcă...
Pagina se încarcă...
Pagina se încarcă...
Pagina se încarcă...
Pagina se încarcă...
Pagina se încarcă...
Pagina se încarcă...
Pagina se încarcă...
Pagina se încarcă...
Pagina se încarcă...
Pagina se încarcă...
Pagina se încarcă...
Pagina se încarcă...
Pagina se încarcă...
Pagina se încarcă...
Pagina se încarcă...
Pagina se încarcă...
Pagina se încarcă...
Pagina se încarcă...
Pagina se încarcă...
Pagina se încarcă...
Pagina se încarcă...
Pagina se încarcă...
Pagina se încarcă...
Pagina se încarcă...
Pagina se încarcă...
Pagina se încarcă...
Pagina se încarcă...
Pagina se încarcă...
Pagina se încarcă...
Pagina se încarcă...
Pagina se încarcă...
Pagina se încarcă...
-
 1
1
-
 2
2
-
 3
3
-
 4
4
-
 5
5
-
 6
6
-
 7
7
-
 8
8
-
 9
9
-
 10
10
-
 11
11
-
 12
12
-
 13
13
-
 14
14
-
 15
15
-
 16
16
-
 17
17
-
 18
18
-
 19
19
-
 20
20
-
 21
21
-
 22
22
-
 23
23
-
 24
24
-
 25
25
-
 26
26
-
 27
27
-
 28
28
-
 29
29
-
 30
30
-
 31
31
-
 32
32
-
 33
33
-
 34
34
-
 35
35
-
 36
36
-
 37
37
-
 38
38
-
 39
39
-
 40
40
-
 41
41
-
 42
42
-
 43
43
-
 44
44
-
 45
45
-
 46
46
-
 47
47
-
 48
48
-
 49
49
-
 50
50
-
 51
51
-
 52
52
-
 53
53
-
 54
54
-
 55
55
-
 56
56
-
 57
57
-
 58
58
-
 59
59
-
 60
60
-
 61
61
-
 62
62
-
 63
63
-
 64
64
-
 65
65
-
 66
66
-
 67
67
-
 68
68
-
 69
69
-
 70
70
-
 71
71
-
 72
72
-
 73
73
-
 74
74
-
 75
75
-
 76
76
-
 77
77
-
 78
78
-
 79
79
-
 80
80
-
 81
81
-
 82
82
-
 83
83
-
 84
84
-
 85
85
-
 86
86
-
 87
87
-
 88
88
-
 89
89
-
 90
90
-
 91
91
-
 92
92
-
 93
93
-
 94
94
-
 95
95
-
 96
96
-
 97
97
-
 98
98
-
 99
99
-
 100
100
-
 101
101
-
 102
102
-
 103
103
-
 104
104
-
 105
105
-
 106
106
-
 107
107
-
 108
108
-
 109
109
-
 110
110
-
 111
111
-
 112
112
-
 113
113
-
 114
114
-
 115
115
-
 116
116
-
 117
117
-
 118
118
-
 119
119
-
 120
120
-
 121
121
-
 122
122
-
 123
123
-
 124
124
-
 125
125
-
 126
126
-
 127
127
-
 128
128
-
 129
129
-
 130
130
-
 131
131
-
 132
132
-
 133
133
-
 134
134
-
 135
135
-
 136
136
-
 137
137
-
 138
138
-
 139
139
-
 140
140


în alte limbi
- français: LIVARNO 373086 Le manuel du propriétaire
- slovenčina: LIVARNO 373086 Návod na obsluhu
Lucrări înrudite
-
LIVARNO 418275 Manualul proprietarului
-
-
-
-
-
-
-
-
-
Alte documente
-
Yamaha PM5000 Manualul proprietarului
-
-
-
-
-
Promate LumiFlex-2 Manualul utilizatorului
-
-
-
Xavax Stick Manual de utilizare