
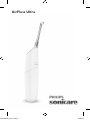
AirFloss Ultra
4 _DFU-Booklet_A6_v1.indd 1
30/0
5/17
11:26


2
3
4
5
6
8
9
1
7
1


English
Introduction
Congratulations on your purchase and welcome to Philips! To fully
benefit from the support that Philips offers, register your product at
www.philips.com/welcome.
Use AirFloss with your favorite mouthwash as part of your oral care
routine. In addition to brushing, AirFloss helps reduce the plaque in
between teeth in order to improve your gum health.
Important safety information
Read this important information carefully before you use the
appliance and save it for future reference.
Danger
-
Keep the charger away from water. Do not
place or store it over or near water
contained in a bathtub, washbasin, sink etc.
Do not immerse the charger in water or any
other liquid. After cleaning, make sure the
charger is completely dry before you
connect it to the mains.
Warning
-
The mains cord cannot be replaced. If the
mains cord is damaged, discard the charger.
-
Always have the charger replaced with one
of the original type in order to avoid a
hazard.
6
English

-
Use only charger type HX6100 provided
with the AirFloss Ultra to recharge the
battery.
-
If the appliance is damaged in any way
(AirFloss Ultra nozzle, handle and/or
charger), stop using it.
-
This appliance contains no serviceable
parts. If the appliance is damaged, contact
the Consumer Care Centre in your country
(see chapter ‘Warranty and support').
-
Do not use the charger outdoors or near
heated surfaces.
-
This appliance is not intended for use by
persons (including children) with reduced
physical, sensory or mental capabilities, or
lack of experience and knowledge, unless
they have been given supervision or
instruction concerning use of the appliance
by a person responsible for their safety.
-
Children should be supervised to ensure
that they do not play with the appliance.
7
English

Caution
-
Consult your dentist before you use this
appliance if you have had recent oral or
gum surgery, suffer from an ongoing dental
condition, had extensive dental work in the
previous 2 months, or have suspected issues
with your dental work (filings, crowns, etc.).
-
Consult your dentist if excessive bleeding
occurs after using this appliance or if
bleeding continues to occur after 4 weeks of
use.
-
If you have medical concerns, consult your
doctor before you use this appliance.
-
This Philips appliance complies with the
safety standards for electromagnetic
devices. If you have a pacemaker or other
implanted device, contact your physician or
the appliance manufacturer of the
implanted appliance prior to use.
-
Do not use attachments other than the ones
recommended by the manufacturer.
-
Do not exert excessive pressure on the
nozzle tip of the nozzle.
8
English

-
To avoid physical injury, do not fill the
reservoir with hot water. Do not put foreign
objects in the reservoir.
-
Only use the AirFloss Ultra for its intended
purpose as described in this user manual.
-
To avoid physical injury, do not direct the
spray under the tongue or into the ear, nose,
eye or other sensitive area.
-
Do not clean the AirFloss Ultra nozzle, the
handle, the charger, the water reservoir and
its cover in the dishwasher or a microwave.
-
To avoid an ingestion hazard, do not put
isopropyl alcohol or other cleaning fluids in
the reservoir.
-
The AirFloss Ultra is a personal care
appliance and is not intended for use on
multiple patients in a dental practice or
institution.
Electromagnetic fields (EMF)
This Philips appliance complies with all applicable standards and
regulations regarding exposure to electromagnetic fields.
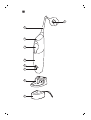
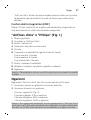
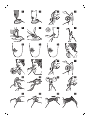
Your Philips AirFloss Ultra (Fig. 1)
1 Nozzle tip
2 AirFloss Ultra nozzle
9
English

3 Activation button
4 Reservoir and reservoir door
5 Handle
6 Charge & burst mode indicators
- Single burst: 1 LED
- Double burst: 2 LEDs
- Triple burst: 3 LEDs
7 Power/mode button
8 Removable nozzle holder (select models)
9 Charger
Note: The contents of the box may very based on the model
purchased.
Charging
Charge the AirFloss Ultra for 24 hours before first use.
1 Put the plug of the charger in the electrical outlet.
2 Place the handle on the charger.
Charging process: (Fig. 3)
- 1 green LED: 33% charged.
- 2 green LEDs: 66% charged.
- 3 green LEDs: 100% charged.
Note: When it is fully charged, AirFloss Ultra has an operating time of
up to 11 days when it is used in triple burst mode, and up to 33 days
when it is used in single burst mode.
Note: When the charge indicators flash yellow, the battery is low and
needs to be recharged (fewer than 3 uses left).
Preparing for use
1 Align the nozzle and press the nozzle down onto the handle
(‘click’) (Fig. 4).
Note: We advise you to place the tip facing the front of the handle
as the illustration shows, but the nozzle can be placed in the
handle either way without affecting the function. You can try both
options and use what works best for you in your oral care routine.
10
English

Note: Replace the nozzle (HX8032, HX8033) every 6 months for
optimal results. Also replace the nozzle if it becomes loose or no
longer ‘clicks’ onto the handle.
Note: The AirFloss Ultra only supports AirFloss Ultra nozzles. Do
not attempt to use non-AirFloss Ultra nozzles on the AirFloss Ultra
handle.
2 Open the cover of the reservoir (‘click’) (Fig. 5).
3 Fill the reservoir with mouthwash or water. (Fig. 6)
Tip: For the best result and a fresher experience, we advise you to
use mouthwash with your AirFloss Ultra.
Note: Do not use mouthwash that contains isopropyl myristate
(e.g. Dentyl Active) or high concentrations of essential oils, as it
may damage the appliance. This includes all mouthwash sold in
glass and ceramic packaging.
4 Close the cover of the reservoir by pressing (‘click’) (Fig. 7).
5 Press the power/mode button to switch on the appliance. (Fig. 8)
The LEDs illuminate.
6 Press and hold the activation button until spray comes out of the
tip of the nozzle. (Fig. 9)
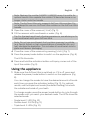
Using the appliance
1 Make sure the AirFloss Ultra is switched on. If it is off, press and
release the power/mode button to switch on the appliance. (Fig.
8)
You can change the modes to have the desired amounts of bursts
each time you press the activation button (Fig. 9). For optimal
results, use the triple burst mode (the default setting) from both
the outside and inside of your teeth.
To change modes, press the power/mode button to cycle through
the modes until you reach your desired mode. The LEDs show the
selected mode:
- Single burst: 1 LED (Fig. 10)
- Double burst: 2 LEDs (Fig. 11)
- Triple burst: 3 LEDs (Fig. 12)
11
English

Note: The AirFloss Ultra remembers what mode was selected last
and it is ready for the next use. If your AirFloss Ultra becomes fully
drained of power, it will go back to the triple burst default mode
once it has been recharged.
2 Place the nozzle tip between two teeth at your gum line. Slightly
close your lips over the nozzle when it is in place, to avoid
splashing. (Fig. 13)
3 Press the activation button to deliver 1-3 bursts (depending on the
selected mode) of air and micro-droplets of mouthwash or water
between the teeth. (Fig. 14)
4 Slide the nozzle tip along the gum line until you feel it settle
between the next two teeth.
5 Continue this procedure for all spaces between your teeth,
including behind your back teeth. (Fig. 15)
Note: Refill the reservoir as needed.
Auto-burst function
Hold the activation button to deliver bursts continuously,
approximately one second between set of bursts.
Automatic shut-off function
The AirFloss automatically turns off if it has not been used for one
minute.
Cleaning
If the AirFloss Ultra becomes clogged, or to clean the inside of the
AirFloss, fill the reservoir with warm water and press the activation
button until the reservoir is empty.
Do not clean the nozzle, handle or charger in the dishwasher.
Do not use cleaning agents to clean the appliance. The formulation
or strength of some agents may damage the appliance.
Handle and nozzle
1 Remove the AirFloss Ultra nozzle from the handle. Rinse the
nozzle after each use to eliminate the residue left in it. (Fig. 16)
12
English

2 Open the reservoir and rinse it under a faucet to eliminate residue.
(Fig. 17)
Tip: You can also use a cotton swab to wipe the reservoir and
remove the remaining residue.
Note: Do not immerse the handle in water.
Note: Failure to remove residue from the nozzle or reservoir may
result in an unhygienic condition.
3 Wipe the entire surface of the handle with a damp cloth. (Fig. 18)
Charger
1 Unplug the charger before you clean it.
2 Wipe the surface of the charger with a damp cloth.
Storage
If you are not going to use AirFloss Ultra for an extended period of
time, follow the steps below.
1 Open the cover of the reservoir and empty it.
2 Press the activation button until no more spray comes out of the
nozzle.
3 Unplug the charger.
4 Clean AirFloss Ultra nozzle, handle and charger. Refer to chapter
‘Cleaning’.
5 Store AirFloss Ultra in a cool, dry place away from direct sunlight.
Recycling
- This symbol means that this product shall not be disposed of with
normal household waste (2012/19/EU) (Fig. 28).
- This symbol means that this product contains a built-in
rechargeable battery which shall not be disposed of with normal
household waste (Fig. 29) (2006/66/EC). We strongly advise you
to take your product to an official collection point or a Philips
service center to have a professional remove the rechargeable
battery.
13
English

- Follow your country’s rules for the separate collection of electrical
and electronic products and rechargeable batteries. Correct
disposal helps prevent negative consequences for the
environment and human health.
Removing the rechargeable battery
Please note that this process is not reversible.
1 To deplete the battery, repeatedly press the activation button until
the AirFloss no longer produces any bursts of air. (Fig. 20)
2 Remove the AirFloss nozzle from the handle. (Fig. 21)
3 Firmly grab the handle with one hand at the top and one hand on
the bottom. (Fig. 22)
4 Snap the handle into two parts. (Fig. 23)
Note: This step requires a good amount of physical force. The top
and bottom half of the handle should be separated once you snap
the handle.
5 Remove the bottom half of the handle. (Fig. 24)
6 Cut all 6 wires on the internal component with scissors. (Fig. 25)
7 Completely pull apart the internal component from the top part of
the handle. (Fig. 26)
8 The battery is located inside the top half of the handle. Remove
the battery and dispose of it properly (not in household waste).
(Fig. 27)
Warranty and support
If you need information or support, please visit
www.philips.com/support or read the international warranty leaflet.
Warranty restrictions
The terms of the international warranty do not cover the following:
- AirFloss Ultra nozzle
- Damage caused by use of unauthorized replacement parts.
- Damage caused by misuse, abuse, neglect, alterations or
unauthorized repair.
14
English

- Normal wear and tear, including chips, scratches, abrasions,
discoloration or fading.
15
English

Čeština
Úvod
Společnost Philips Vám gratuluje ke koupi a vítá Vás! Chcete-li
využívat všech výhod podpory nabízené společností Philips,
zaregistrujte svůj výrobek na stránkách www.philips.com/welcome.
Používejte přístroj AirFloss se svou oblíbenou ústní vodou jako
součást běžné péče o ústa. Nejen že čistí zuby, ale pomáhá také
redukovat mezizubní plak a tím zlepšovat zdraví vašich dásní.
Důležité bezpečnostní informace
Před použitím přístroje si pečlivě přečtěte tuto příručku s důležitými
informacemi a uschovejte ji pro budoucí použití.
Nebezpečí
-
Chraňte nabíječku před kontaktem s vodou.
Nepokládejte a neuskladňujte nabíječku
v blízkosti vody, například u vany
s napuštěnou vodou, umyvadla, dřezu
apod. Neponořujte nabíječku do vody ani
jiné kapaliny. Před připojením nabíječky
k napájení se ujistěte, že je po čištění zcela
suchá.
Varování
-
Napájecí kabel nelze vyměnit. Pokud je
napájecí kabel poškozen, je nutné vyřadit
nabíječku z provozu.
-
Nabíječku nechte vždy vyměnit za originální
typ, aby nevzniklo žádné riziko.
16
Čeština

-
K nabíjení baterie používejte pouze
nabíječku typu HX6100 dodávanou
s přístrojem AirFloss Ultra.
-
Pokud dojde k jakémukoli poškození
přístroje (tryska přístroje AirFloss Ultra,
rukojeť nebo nabíječka), přestaňte jej
používat.
-
Tento přístroj neobsahuje žádné opravitelné
součásti. Pokud dojde k poškození přístroje,
obraťte se na středisko péče o zákazníky
ve vaší zemi (viz kapitolu „Záruka
a podpora“).
-
Nepoužívejte nabíječku venku ani blízko
horkých povrchů.
-
Osoby (včetně dětí) s omezenými fyzickými,
smyslovými nebo duševními schopnostmi
nebo nedostatkem zkušeností a znalostí by
neměly s přístrojem manipulovat, pokud
nebyly o používání přístroje předem
poučeny nebo nejsou pod dohledem osoby
zodpovědné za jejich bezpečnost.
-
Dohlédněte na to, aby si s přístrojem
nehrály děti.
17
Čeština

Upozornění
-
Pokud jste v nedávné době podstoupili
operaci zubů či dásní, trpěli dlouhodobými
potížemi se zuby nebo v posledních
dvou měsících podstoupili extenzivní
zákroky, případně pokud máte podezření na
problémy zubního charakteru (plomby,
korunky atd.), poraďte se před použitím
přístroje se svým zubním lékařem.
-
Pokud po použití přístroje dochází
k výraznému krvácení nebo pokud krvácení
neustává po čtyřech týdnech používání,
obraťte se na svého zubního lékaře.
-
Máte-li zdravotní pochybnosti, obraťte se
před použitím přístroje na svého lékaře.
-
Tento přístroj Philips splňuje bezpečnostní
standardy pro elektromagnetická zařízení.
Pokud máte kardiostimulátor nebo jiné
implantované zařízení, před použitím se
poraďte s lékařem nebo s výrobcem
implantovaného přístroje.
-
Nepoužívejte jiné nástavce než ty, které jsou
doporučeny výrobcem.
18
Čeština

-
Na konec trysky příliš netlačte.
-
Neplňte nádržku horkou vodou, mohlo by
dojít ke zranění. Do nádržky nevkládejte cizí
předměty.
-
Přístroj AirFloss Ultra používejte pouze
k účelu uvedeném v uživatelské příručce.
-
Tryskou nemiřte pod jazyk, do ucha, nosu,
očí nebo dalších citlivých oblastí, mohlo by
dojít ke zranění.
-
Nečistěte trysku, rukojeť, nabíječku, nádržku
na vodu nebo kryt přístroje AirFloss Ultra
v myčce nebo mikrovlnné troubě.
-
Nevkládejte izopropylalkohol či jiné čisticí
přípravky do nádržky, mohlo by dojít
k popáleninám.
-
Přístroj AirFloss Ultra je určený pro osobní
péči, nikoli pro použití u více pacientů ve
stomatologické ordinaci nebo instituci.
Elektromagnetická pole (EMP)
Tento přístroj Philips odpovídá všem platným normám a předpisům
týkajícím se elektromagnetických polí.
Váš Philips AirFloss Ultra (obr. 1)
1 Konec trysky
2 Tryska AirFloss Ultra
19
Čeština

3 Aktivační tlačítko
4 Nádržka a její kryt
5 Rukojeť
6 Kontrolky režimů nabíjení a dávkového režimu
- Jedna dávka: 1 LED
- Dvojitá dávka: 2 LED diody
- Trojitá dávka: 3 LED diody
7 Tlačítko napájení/režimu
8 Odnímatelný držák trysky (pouze vybrané modely)
9 Nabíječka
Poznámka: Obsah balení se může lišit v závislosti na zakoupeném
modelu.
Nabíjení
Před první použitím nabíjejte přístroj AirFloss Ultra 24 hodin.
1 Zapojte zástrčku nabíječky do elektrické zásuvky.
2 Postavte rukojeť na nabíječku.
Nabíjení: (obr. 3)
- 1 zelená LED dioda: 33% nabití
- 2 zelené LED diody: 66% nabití
- 3 zelené LED diody: 100% nabití
Poznámka: Jakmile bude přístroj AirFloss Ultra zcela nabitý, vydrží
v provozu až 11 dní (při použití režimu trojité dávky) a až 33 dní (při
použití v režimu jedné dávky).
Poznámka: Když kontrolka nabíjení bliká žlutě, je baterie vybitá
a potřebuje nabít (zbývají méně než 3 použití).
Příprava k použití
1 Srovnejte trysku a přitlačte ji na rukojeť (ozve se zaklapnutí) (obr.
4).
Poznámka: Doporučujeme, aby špička byla otočena směrem
k přední části rukojeti, podle obrázku. Trysku lze nasadit
i obráceně, aniž by to mělo vliv na funkci. Můžete zkusit obě
20
Čeština
Pagina se încarcă...
Pagina se încarcă...
Pagina se încarcă...
Pagina se încarcă...
Pagina se încarcă...
Pagina se încarcă...
Pagina se încarcă...
Pagina se încarcă...
Pagina se încarcă...
Pagina se încarcă...
Pagina se încarcă...
Pagina se încarcă...
Pagina se încarcă...
Pagina se încarcă...
Pagina se încarcă...
Pagina se încarcă...
Pagina se încarcă...
Pagina se încarcă...
Pagina se încarcă...
Pagina se încarcă...
Pagina se încarcă...
Pagina se încarcă...
Pagina se încarcă...
Pagina se încarcă...
Pagina se încarcă...
Pagina se încarcă...
Pagina se încarcă...
Pagina se încarcă...
Pagina se încarcă...
Pagina se încarcă...
Pagina se încarcă...
Pagina se încarcă...
Pagina se încarcă...
Pagina se încarcă...
Pagina se încarcă...
Pagina se încarcă...
Pagina se încarcă...
Pagina se încarcă...
Pagina se încarcă...
Pagina se încarcă...
Pagina se încarcă...
Pagina se încarcă...
Pagina se încarcă...
Pagina se încarcă...
Pagina se încarcă...
Pagina se încarcă...
Pagina se încarcă...
Pagina se încarcă...
Pagina se încarcă...
Pagina se încarcă...
Pagina se încarcă...
Pagina se încarcă...
Pagina se încarcă...
Pagina se încarcă...
Pagina se încarcă...
Pagina se încarcă...
Pagina se încarcă...
Pagina se încarcă...
Pagina se încarcă...
Pagina se încarcă...
Pagina se încarcă...
Pagina se încarcă...
Pagina se încarcă...
Pagina se încarcă...
Pagina se încarcă...
Pagina se încarcă...
Pagina se încarcă...
Pagina se încarcă...
Pagina se încarcă...
Pagina se încarcă...
Pagina se încarcă...
Pagina se încarcă...
Pagina se încarcă...
Pagina se încarcă...
Pagina se încarcă...
Pagina se încarcă...
Pagina se încarcă...
Pagina se încarcă...
Pagina se încarcă...
Pagina se încarcă...
Pagina se încarcă...
Pagina se încarcă...
Pagina se încarcă...
Pagina se încarcă...
Pagina se încarcă...
Pagina se încarcă...
Pagina se încarcă...
Pagina se încarcă...
Pagina se încarcă...
Pagina se încarcă...
Pagina se încarcă...
Pagina se încarcă...
Pagina se încarcă...
Pagina se încarcă...
Pagina se încarcă...
Pagina se încarcă...
Pagina se încarcă...
Pagina se încarcă...
Pagina se încarcă...
Pagina se încarcă...
Pagina se încarcă...
Pagina se încarcă...
Pagina se încarcă...
Pagina se încarcă...
Pagina se încarcă...
Pagina se încarcă...
Pagina se încarcă...
Pagina se încarcă...
Pagina se încarcă...
Pagina se încarcă...
Pagina se încarcă...
Pagina se încarcă...
Pagina se încarcă...
Pagina se încarcă...
Pagina se încarcă...
Pagina se încarcă...
Pagina se încarcă...
Pagina se încarcă...
Pagina se încarcă...
Pagina se încarcă...
Pagina se încarcă...
Pagina se încarcă...
Pagina se încarcă...
Pagina se încarcă...
Pagina se încarcă...
Pagina se încarcă...
Pagina se încarcă...
Pagina se încarcă...
Pagina se încarcă...
Pagina se încarcă...
Pagina se încarcă...
Pagina se încarcă...
Pagina se încarcă...
Pagina se încarcă...
Pagina se încarcă...
Pagina se încarcă...
Pagina se încarcă...
Pagina se încarcă...
Pagina se încarcă...
Pagina se încarcă...
-
 1
1
-
 2
2
-
 3
3
-
 4
4
-
 5
5
-
 6
6
-
 7
7
-
 8
8
-
 9
9
-
 10
10
-
 11
11
-
 12
12
-
 13
13
-
 14
14
-
 15
15
-
 16
16
-
 17
17
-
 18
18
-
 19
19
-
 20
20
-
 21
21
-
 22
22
-
 23
23
-
 24
24
-
 25
25
-
 26
26
-
 27
27
-
 28
28
-
 29
29
-
 30
30
-
 31
31
-
 32
32
-
 33
33
-
 34
34
-
 35
35
-
 36
36
-
 37
37
-
 38
38
-
 39
39
-
 40
40
-
 41
41
-
 42
42
-
 43
43
-
 44
44
-
 45
45
-
 46
46
-
 47
47
-
 48
48
-
 49
49
-
 50
50
-
 51
51
-
 52
52
-
 53
53
-
 54
54
-
 55
55
-
 56
56
-
 57
57
-
 58
58
-
 59
59
-
 60
60
-
 61
61
-
 62
62
-
 63
63
-
 64
64
-
 65
65
-
 66
66
-
 67
67
-
 68
68
-
 69
69
-
 70
70
-
 71
71
-
 72
72
-
 73
73
-
 74
74
-
 75
75
-
 76
76
-
 77
77
-
 78
78
-
 79
79
-
 80
80
-
 81
81
-
 82
82
-
 83
83
-
 84
84
-
 85
85
-
 86
86
-
 87
87
-
 88
88
-
 89
89
-
 90
90
-
 91
91
-
 92
92
-
 93
93
-
 94
94
-
 95
95
-
 96
96
-
 97
97
-
 98
98
-
 99
99
-
 100
100
-
 101
101
-
 102
102
-
 103
103
-
 104
104
-
 105
105
-
 106
106
-
 107
107
-
 108
108
-
 109
109
-
 110
110
-
 111
111
-
 112
112
-
 113
113
-
 114
114
-
 115
115
-
 116
116
-
 117
117
-
 118
118
-
 119
119
-
 120
120
-
 121
121
-
 122
122
-
 123
123
-
 124
124
-
 125
125
-
 126
126
-
 127
127
-
 128
128
-
 129
129
-
 130
130
-
 131
131
-
 132
132
-
 133
133
-
 134
134
-
 135
135
-
 136
136
-
 137
137
-
 138
138
-
 139
139
-
 140
140
-
 141
141
-
 142
142
-
 143
143
-
 144
144
-
 145
145
-
 146
146
-
 147
147
-
 148
148
-
 149
149
-
 150
150
-
 151
151
-
 152
152
-
 153
153
-
 154
154
-
 155
155
-
 156
156
-
 157
157
-
 158
158
-
 159
159
-
 160
160


Sonicare HX8432/03 Manual de utilizare
- Categorie
- Flossers electrice
- Tip
- Manual de utilizare
în alte limbi
- slovenčina: Sonicare HX8432/03 Používateľská príručka
- eesti: Sonicare HX8432/03 Kasutusjuhend
Lucrări înrudite
-
Sonicare HX8494/01 Manual de utilizare
-
Sonicare HX8392/47 Manual de utilizare
-
Sonicare HX8261/01 Manual de utilizare
-
Sonicare HX8211/02 Manual de utilizare
-
-
Sonicare CRP122/01 Product Datasheet
-
-
-
Sonicare HX8341/01 Product Datasheet
-
Sonicare HX8438/01 Product Datasheet