Whirlpool AKR 802 IX Program Chart
- Categorie
- Hote pentru aragaz
- Tip
- Program Chart

5019 318 33225
KARTA INSTALACYJNA
Minimalna odległość od palników: 50 cm (od palników elektrycznych), 65 cm
(od palników gazowych, olejowych lub węglowych). Podczas montażu należy
przestrzegać kolejności numeracji (1Ö2Ö3Ö.....).
Jeżeli w instrukcjach instalacji kuchenki gazowej przewidziana została większa
odległość w stosunku do odległości tutaj wskazanej, należy ją zastosować. Nie
podłączać urządzenia do zasilania, zanim nie zostanie zakończony całkowicie jego
montaż. Uwaga! Rura odprowadzająca dym i parę oraz kolanka nie są dostarczane i
należy je zakupić oddzielnie.
Urządzenie jest ciężkie. Przenoszenie i instalacja okapu powinny być wykonywane
przez co najmniej dwie osoby.
POPIS INSTALACE
Minimální vzdálenost od sporáků: 50 cm (elektrické sporáky), 65 cm (sporáky na plyn,
naftu nebo uhlí). Při montáži sledujte číslování (1 Ö2 Ö3 Ö.....).
Jestliže je v pokynech k instalaci plynového spotřebiče určena větší vzdálenost, než
je uvedená vzdálenost, je nutné ji dodržet. Spotřebič připojte k elektrické síti až po
úplném dokončení instalace. Upozornění! Odtahová trubka a pásky k upevnění nejsou
součástí vybavení, je nutné je zakoupit.
Vzhledem k tomu, že je digestoř velmi těžká, jsou ke stěhování a instalaci spotřebiče
nutné minimálně dvě osoby.
INŠTALAČNÁ SCHÉMA
Minimálna vzdialenost' od sporáka: 50 cm (elektrické sporáky), 65 cm (plynové sporáky,
sporáky na naftu alebo uhlie). Pri montáži postupujte podľa číslic (1Ö2Ö3Ö.....).
Ak pokyny na inštaláciu plynovej varnej dosky určujú väčšiu vzdialenost' ako je
špecifikovaná, dodržiavajte ich. Spotrebič nezapájajte do siete, kým nie je inštalácia
úplne ukončená. Upozornenie! Rúra na odvádzanie dymov a upevňovacie svorky sa
nedodávajú, musíte ich kúpit' samostatne.
Výrobok má nadmernú hmotnost', preto je nevyhnutné, aby ho prenášali a inštalovali
aspoň dve alebo viac osôb.
ÜZEMBE HELYEZÉSI ÚTMUTATÓ
A tűzhelytől való minimális távolság: 50 cm (elektromos tűzhely), 65 cm (gáz-, olaj-
vagy széntüzelésű tűzhely). A felszereléshez kövesse a számozást (1Ö2Ö3Ö.....).
Ha a gáztűzhely üzembehelyezési utasításai a jelzettnél nagyobb távolságot írnak elő,
akkor ezt kell betartani. A készüléket csak akkor szabad áram alá helyezni, ha a
beüzemelés már megtörtént. Figyelem! Az elvezető cső és a rögzítőpántok nem
tartozékok, így azokat külön meg kell vásárolni.
Nagy súlya miatt a készülék mozgatását és üzembe helyezését legalább két vagy több
személynek kell végeznie.
PL
CZ
SK
H

5019 318 33225
СХЕМА УСТАНОВКИ
Минимальное расстояние до конфорок: 50 см (электрические конфорки),
65 см (газовые, керосиновые или угольные конфорки). Последовательность
действий при монтаже должна соответствовать нумерации (1
Ö
2
Ö
3
Ö
.....).
Если инструкциями по установке газового прибора предусмотрено большее
расстояние, то данное указание должно быть соблюдено. Не подключайте
прибор к сети до тех пор, пока его установка не будет полностью закончена.
Предупреждение! Вытяжная труба и крепления не входят в комплект
поставки и приобретаются отдельно.
Устройство отличается большим весом; для его переноски и установки
требуется не менее двух человек.
КАРТА ЗА ИНСТАЛИРАНЕ
Минимално разстояние от печки: 50 см (електрически печки), 65 см (печки с
газ, нафта или въглища). За монтаж следвайте номерацията (1
Ö
2
Ö
3
Ö
.....).
Ако в инструкциите на устройството за готвене на газ е указано по?голямо
разстояние за тази спецификация, трябва да се изпълнява това разстояние.
Не включвайте захранването на уреда, докато инсталирането не е
завършено докрай. Внимание! Тръбата за отвеждане не е предоставена и
трябва да се закупи отделно.
Уред с много голямо тегло ? преместването и инсталирането на аспиратора
трябва да се извършва от най?малко двама души.
FIȘA DE INSTALARE
Distanţa minimă de la arzătoare: 50 cm (arzătoare electrice), 65 cm (arzătoare pe bază
de gaze, petrol sau cărbune). Pentru montaj urmaţi numerotarea (1Ö2Ö3Ö.....).
Dacă instrucţiunile de instalare ale mașinii de gătit cu gaz specifică o distanţă mai
mare decât cea indicată, trebuie să ţineţi cont de ea. Nu branșaţi aparatul la curent
până când nu terminaţi definitiv operaţia de instalare. Atenţie! Tubul de evacuare și
manșoanele de fixare nu fac parte din dotare și trebuie să fie cumpărate separat.
Produs cu greutate mare, deplasarea și instalarea hotei trebuie efectuate de cel puţin
două sau mai multe persoane.
INSTALLATION DATA SHEET
Minimum height above cooker: 50 cm (electric cookers), 65 cm (gas, gas oil or coal cookers). To
install, follow steps (
Ö
2
Ö
3
Ö
.....).
If the installation instructions for a gas cooker specify a greater distance, then this distance
must be observed. Do not connect the hood to the electrical power supply until installation
is completed. Warning! The exhaust pipe and clamps are not supplied and must be bought
separately.
Excessively heavy product; hood handling and installation must be carried out by two or
more persons.
RUS
BG
RO
GB

5019 318 33225

5019 318 33225
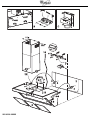
Assembly - Fig. 1-A-B-C
_
In order to facilitate installation of the hood and flue support, trace a centre line on the wall between the hob and ceiling (
1
).
_
Position the template against the wall (
2
), then mark and drill the holes where indicated.
Insert two wall plugs with hooks (
3
).
_
Hang the hood (
4
) and adjust the position by turning the adjustment screws on the hooks.
_
Remove the grease filters (
5
) and mark the holes for secure fixing (
6 – see also Fig. A)
.
_
Remove the hood and drill the holes (4 x Ø 8 mm). Insert 4 wall plugs.
_
Fix the bracket to the wall
(Fig. B)
.
_
Fix the flue support (
7
) as close as possible to the ceiling with two screws and wall plugs.
Important!
Check that the support is perfectly aligned with the hood: mark “a” on the support should align with the
centre line drawn on the wall.
_
Rehang the hood on the wall (
8
).
_
Fix the hood with 4 screws (
8
).
_
Fix the collar to the hood exhaust outlet with two screws (
9
).
Installing the exhaust pipe (Extractor version)
Warning!
The exhaust pipe and clamps are not supplied and must be bought separately.
_
Connect one end of the exhaust pipe to the collar on the hood with the other end directed to the outside.
Installing the deflector (Filter version)
_
Fix the deflector (
F
) to the flue support with 4 screws
(see Fig. C)
.
_
Connect the deflector to the hood with an exhaust pipe.
Warning!
The exhaust pipe and clamps are not supplied and must be bought separately.
Telescopic flue installation
_
Connect the hood to the power supply (
10
).
_
Fix the telescopic flue (
11a
) to the support (
11b
) with two screws and let it slide down to its specific seat on the top of the
hood (
12
).
_
Fix the bottom section of the flue with two screws from the inside of the hood (
13
).
INSTALLATION - ASSEMBLY INSTRUCTIONS
PL SK H RUS
CZ
BG RO GB

5019 318 33225
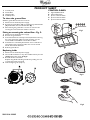
1.
Control panel.
2.
Grease filter.
3.
Halogen bulbs.
4.
Telescopic flue.
To clean the grease filter
Wash the grease filter at least once a month.
1.
Disconnect the electrical power supply.
2.
Remove the grease filters -
Fig. 1
: pull the spring release handle
(f1)
downwards, then remove the filter
(f2)
.
3.
After cleaning the grease filter, remount in reverse order
ensuring the entire extraction surface is covered.
Fitting or renewing the carbon filter - Fig. 2:
1.
Disconnect the electrical power supply.
2.
Remove the grease filters.
3.
If the carbon filters are already mounted (two filters covering
the motor protection grille) and need renewing, turn the
central handle anticlockwise until the filters release.
4.
If the filters are not already fitted locate one on each side to
cover both motor protection grilles, then turn the central
handle of the filters clockwise.
5.
Refit the grease filters.
Replacing bulbs
1.
Disconnect the electrical power supply.
2.
Use a small screwdriver or any other suitable tool to prise off
(m-Fig. 3)
the lamp cover
(p-Fig.3)
.
3.
Remove the burnt-out bulb.
Replace using 20 W max halogen bulbs only, making sure not
to touch them with your hands.
4.
Close the lighting unit (snap-on).
CONTROL PANEL
a.
Light ON/OFF switch.
b.
Motor OFF switch.
c.
Speed 1 selector switch.
d.
Speed 2 selector switch.
e.
Speed 3 selector switch.
4
1
3
2
f1
f2
abcde
Fig.1
Fig.2
Fig.3
PRODUCT SHEET
PL SK H RUS
CZ
BG RO GB

5019 318 33225
SAFEGUARDING THE ENVIRONMENT
1. Packaging
Packaging materials are 100% recyclable and are marked with the
recycling symbol .Dispose of the appliance in conformity with
local environmental regulations. Packaging materials (plastic bags,
polystyrene, etc.) can be dangerous for children and should be kept
well out of their reach.
2. Product
This appliance is marked in compliance with European Directive
2002/96/EC on Waste Electrical and Electronic Equipment (WEEE).
By ensuring that this appliance is scrapped suitably, you can help
prevent potentially damaging consequences for the environment and
health.
The symbol on the appliance or accompanying documentation
indicates that this product should not be disposed of as unsorted
municipal waste but must be taken to a collection point for the
treatment of WEEE.
Disposal must be carried out in accordance with local environmental
regulations for waste disposal.
For further information on the treatment, recovery and recycling of this
appliance, contact your competent local authority, the collection service
for household waste or the shop where you purchased the appliance.
PRECAUTIONS AND GENERAL
RECOMMENDATIONS
WARNING!
• The appliance is not intended for use by young children or
persons with restricted physical, sensory or mental
abilities or without experience and knowledge of the
appliance, unless they are under the supervision or
instruction of a person responsible for their safety.
• Make sure children do not play with the appliance.
1. Do not connect the appliance to the mains power supply until
installation has been fully completed. Always disconnect the hood
before cleaning or carrying out maintenance by unplugging it or
switching off the power supply.
2. Do not “flambé” food under the hood. Naked flames could cause a
fire.
3. Do not leave pans unattended when frying. Cooking oil can catch
fire.
4. Regular cleaning and maintenance is essential to correct functioning
and good performance. Regularly remove dirt deposits. Regularly
clean or replace filters. Never use flammable materials as hoses for
extracted air.
5. If the hood is used together with other appliances powered by gas
or other fuels, ambient negative pressure must not exceed
4Pa (4 x 10⁻⁵ bar). For this reason, make sure the room is
adequately ventilated.
6. Exhaust air must not be conveyed through the same flue used by
the heating system or other appliances powered by gas or other
fuels.
7. The room must be adequately ventilated when the hood is used
together with appliances powered by gas or other fuels.
8. When replacing the bulbs, first ensure that they are cold.
9. The discharge air must not be ducted to a flue used for removing
fumes produced by appliances using gas or other fuels, but must
have a separate outlet. All national regulations on air discharge
must be observed.
10. The hood is not a shelf. It must not be overloaded or used to
carry objects
Note:
always wear work gloves for all installation and maintenance
operations.
Electrical connections
The mains power supply must correspond to the voltage indicated
on the appliance rating plate located inside the hood. If it is fitted
with a plug, connect the hood to a power socket that complys with
applicable standards and is in an easily accessible location. If it is not
fitted with a plug (direct connection to the power supply) or if the
socket is not in an easily accessible location, fit a two-pole switch in
compliance with regulations, to ensure complete disconnection from
the mains voltage in conditions of category III overvoltage, according
to the rules for proper installation.
WARNING: Before reconnecting the hood circuit to the
mains power supply and checking correct operation, make
sure the power cable is correctly fitted and that it was NOT
crushed in the housing during installation.
Cleaning the hood
Warning!
Failure to remove oil and grease (at least once a month) could
lead to fire.
Use a soft cloth with a neutral detergent. Never use abrasive
substances or alcohol.
Before using the hood
Please read these instructions carefully and keep them for future
reference, in order to ensure best use of your hood.
Packaging materials (plastic bags, polystyrene, etc.) can be dangerous
for children and should be kept well out of their reach.
Make sure the hood has not been damaged during transport.
Declaration of conformity
This product has been designed, manufactured and sold in
conformity to the following standards:
- safety objectives of “Low Voltage” Directive 73/23/EEC
- protection requirements of “EMC” Directive 89/336/EEC
amended by Directive 93/68/EEC.
Troubleshooting guide
The hood does not work:
• Is the plug properly inserted in the power socket?
• Is there a power failure?
The hood is not extracting efficiently:
• Is the right speed selected?
• Do the filters need cleaning or replacing?
• Are the air outlets blocked?
The light does not work:
• Does the bulb need replacing?
• Is the bulb correctly fitted?
AFTER-SALES SERVICE
Before calling the After-sales Service
1. Check if you can fix the problem yourself
(see “Troubleshooting guide”).
2. Switch the hood off and then on again to check if the problem
has gone.
3. If the problem persists, contact the After-sales Service.
Specify:
•the nature of the problem,
• the model of hood, stated on the data plate inside the hood,
accessible by removing the grease filters.
• your full address,
• your telephone number and area code.
• the service code (the number appearing below the word
SERVICE on the data plate inside the hood behind the grease
filter).
If any repairs are needed, contact an authorised Service Centre (to
ensure that only original spare parts are used and that repairs are
made correctly).
Failure to comply with these instructions may compromise the safety
and quality of the product.
PL SK H RUS
CZ
BG RO GB
-
 1
1
-
 2
2
-
 3
3
-
 4
4
-
 5
5
-
 6
6


Whirlpool AKR 802 IX Program Chart
- Categorie
- Hote pentru aragaz
- Tip
- Program Chart
în alte limbi
- English: Whirlpool AKR 802 IX
- slovenčina: Whirlpool AKR 802 IX
- polski: Whirlpool AKR 802 IX
Lucrări înrudite
-
Whirlpool AKR 767 IX Manualul utilizatorului
-
Whirlpool AKR 759 IX Manualul utilizatorului
-
Whirlpool AKR 951 IX WP Program Chart
-
Whirlpool AKR 950 IX WP Program Chart
-
-
Whirlpool AKR 995 IX Program Chart
-
-
Whirlpool AKR 970 NB Program Chart
-
-
KIC AKR 903 IX-1 Program Chart