Whirlpool AWSE 7100 Manualul utilizatorului
- Categorie
- Mașini de spălat
- Tip
- Manualul utilizatorului

DWG NO. DWG REV
W10444804 A
Note: RoHS Conformity.
= CONTROL CHARACTERISTIC
THIS DRAWING IS THE PROPERTY OF WHIRLPOOL CORP. IT CONTAINS CONFIDENTIAL
INFORMATION BELONGING TO AND/OR ENTRUSTED TO WHIRLPOOL. IT IS DISCLOSED IN
CONFIDENCE AND SHALL NOT BE HELD, REPRODUCED, DISCLOSED OR USED EXCEPT IN A
MANNER AND FOR A PURPOSE EXPRESSLY PERMITTED BY WHIRLPOOL IN WRITING.
VENDORS SHALL NOT REVISE ANY PHYSICAL, DIMENSIONAL, OR PERFORMANCE
CHARACTERISTICS UNLESS AUTHORIZED IN WRITING BY WHIRLPOOL ENGINEERING GROUP.
WHIRLPOOL TEST SPECIFICATIONS, IF ANY, ARE NOT INTENDED TO ASSUME ANY
RESPONSIBILITY FOR SUBSEQUENT PROBLEMS WITH OR CAUSED BY THE PART, COMPONENT,
OR ASSEMBLY PROVIDED BY THE SUPPLIER, AND DO NOT RELIEVE THE SUPPLIER OF ITS
OBLIGATIONS INCLUDING, BUT NOT LIMITED TO, THE NEED TO PERFORM ITS OWN TESTING,
INSPECTION AND ONGOING QUALITY CONTROL, AND ASSURING FITNESS FOR USE. ANY
WHIRLPOOL RECOMMENDED TEST AND ITS OUTCOME DO NOT IN ANYWAY LIMIT OR CHANGE
THE WARRANTY CONTAINED IN WHIRLPOOL'S PURCHASE ORDER OR SUPPLY AGREEMENT.
BY
ELIN CHEN
DATE
2011-9-7
DESCRIPTION
IFU, UKRAINE
DRAWING NUMBER SHEET
W10444804
1 OF 1
Whirlpool Corporation
Benton Harbor, MI
USA
REV
DESCRIPTION OF CHANGE BY E.N. DATE.
A
DRAWING RELEASE
ELIN 663291
2011-9-7
16-Sep-2011 03:28:56 EDT | RELEASED
In some European factories the letter "W" of the part code mentioned herein will be automatically
replaced by the number "4000" (e.g. "W12345678" becomes "400012345678")

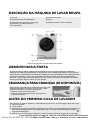
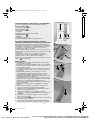
INSTRUCTIONS FOR USE
DEFINITION OF USE
SAFETY AND GENERAL RECOMMENDATIONS
BEFORE USING THE WASHING MACHINE
DESCRIPTION OF THE WASHING MACHINE
OPENING/CLOSING DOOR
CHILD SAFETY (IF AVAILABLE)
BEFORE THE FIRST WASH CYCLE
PREPARATION OF THE WASHING
DETERGENTS AND ADDITIVES
CLEANING THE FILTER/DRAINING
RESIDUAL WATER
CARE AND MAINTENANCE
TROUBLESHOOTING GUIDE
AFTER-SALES SERVICE
TRANSPORT/HANDLING
IFU Ares W10426884A GB.fm Page 1 Wednesday, August 10, 2011 11:09 AM
Black process 45,0° 130,0 LPI
16-Sep-2011 03:28:56 EDT | RELEASED
In some European factories the letter "W" of the part code mentioned herein will be automatically
replaced by the number "4000" (e.g. "W12345678" becomes "400012345678")

NOTE
The manufactur
er reserves the right for any modifications on the product which
might be deemed necessary or useful without informing about it in this IFU.
Thank you for choosing a Whirlpool washing machine.
Before operating your new washing machine, please read this instruction
carefully, and keep it for future reference.
Please make sure the socket is grounded securely, the water source connection
is reliable. The manufacturer declines all liability and warranty for damage to
property or injury to persons or animals due to non-compliance with the
directions given in this instruction.
IFU Ares W10426884A GB.fm Page 2 Wednesday, August 10, 2011 11:09 AM
Black process 45,0° 130,0 LPI
reduced physical, sensory or mental capabilities, or lack of experience and
knowledge, unless they have been given supervision or instruction concerning
use of the appliance by a person responsible for their safety.
This appliance is not intended for use by persons (including children) with
16-Sep-2011 03:28:56 EDT | RELEASED
In some European factories the letter "W" of the part code mentioned herein will be automatically
replaced by the number "4000" (e.g. "W12345678" becomes "400012345678")

GB 3
DEFINITION OF USE
This washing machine is exclusively destined to
wash and spin machine washable laundry in
quantities which are usual for private households.
• Observe the instructions given in these
Instructions for Use, the Installation Guide and
the Programme Chart when using the washing
machine.
• Keep these Instructions for Use, the Programme
Chart and the Installation Guide; if you pass on
the washing machine to another person, also give
him/her Instructions for Use, Programme Chart
and Installation Guide.
SAFETY AND GENERAL RECOMMENDATIONS
1.Packaging
• The packaging material is entirely recyclable, and
marked with the recycling symbol . Adhere
to current local regulations when disposing of
packaging material.
2.Disposing of packaging and scrapping
old washing machines
• The washing machine is built from reusable
materials. It must be disposed of in compliance
with current local waste disposal regulations.
• Before scrapping, remove all detergent residues,
break the door hook, and cut off the power cable
so that the washing machine is made unusable.
• This appliance is marked according to the
European directive 2002/96/EC on Waste
Electrical and Electronic Equipment (WEEE).
By ensuring this product is disposed of correctly,
• you will help prevent potential negative
consequences for the environment and human
health, which could otherwise be caused by
inappropriate waste handling of this product.
The symbol on the product, or on the
documents accompanying the product, indicates
that this appliance may not be treated as
household waste. Instead it shall be handed over
to the applicable collection point for the recycling
of electrical and electronic equipment.
Disposal must be carried out in accordance with
local environmental regulations for waste
disposal.
For more detailed information about treatment,
recovery and recycling of this product, please
contact your local city office, your household
waste disposal service or the shop where you
purchased the product.
3.Location and surroundings
• The washing machine is appropriate for indoor
use only. Installation in bathroom or other places
where air is humid is not recommended.
4.Safety
• Do not store flammable fluids near the appliance.
• Do not leave the appliance plugged in when not
in use. Never plug or unplug the power if your
hands are wet.
• Turn off the tap when not in use.
• Before any cleaning and maintenance switch off
the machine or disconnect it from the mains.
• Clean the outside of the machine with a damp
cloth. Do not use abrasive detergents or general
purpose/window cleaners etc.
• Never open the door forcibly or use it as step.
• Children must not be allowed to play with the
washing machine or to climb into the drum (see
also the following page chapter “Child Safety”).
• If necessary, the power cable may be replaced
with an identical one obtained from our After-
Sales Service. The power cable must only be
replaced by a qualified technician.
• Do not operate the washing machine at
temperatures below 5°C.
• Do not place a dryer on the worktop of your
washing machine.
5.Frost
Do not place the washing machine in a room prone
to frost. If you must, make sure that the washing
machine is completely drained after each wash:
• Remove inlet hose(s) from water tap and let the
water flow out completely.
• Remove drain hose from siphon or handwash
basin and let the water flow out completely.
• Empty residual water inside the machine by
following the instructions in the chapter
“CLEANING THE FILTER/DRAINING
RESIDUAL WATER”; tilt the appliance forward
with two persons to let the rest water flow out
completely.
6.EC Declaration of Conformity
• The appliance conforms to the following
European Standards:
2006/95/EC Low Voltage Directive
2004/108/EC Electromagnetic Compatibility
Directive
The Manufacturer is not liable for any damage to
laundry resulting from inadequate of incorrect
fabric care instructions which have been provided
with the garment or article.
IFU Ares W10426884A GB.fm Page 3 Wednesday, August 10, 2011 11:09 AM
Black process 45,0° 130,0 LPI
16-Sep-2011 03:28:56 EDT | RELEASED
In some European factories the letter "W" of the part code mentioned herein will be automatically
replaced by the number "4000" (e.g. "W12345678" becomes "400012345678")

GB 4
BEFORE USING THE WASHING MACHINE
1.Removing the packaging and inspection
• After unpacking, make sure that the washing
machine is undamaged. If in doubt, do not use the
washing machine. Contact After-Sales Service or
your local retailer.
• Keep the packaging materials (plastic bags,
polystyrene parts, etc.) out of reach of children,
as they are potentially dangerous.
• If the appliance was exposed to the cold prior to
delivery, keep it at room temperature for a few
hours before operating.
2.Remove the transport bolts
• The washing machine is fitted with transport
bolts to avoid any possible damage to the interior
during transport. Before using the machine, it is
imperative that the transport bolts are removed.
• After their removal, cover the openings with the
4 enclosed plastic caps.
3.Install the washing machine
• Move the appliance without lifting it by the
worktop.
• Install the appliance on a solid and level floor
surface, preferably in a corner of the room.
• Make sure that all four feet are stable and resting
on the floor and then check that the washing
machine is perfectly level (use a spirit level).
• In case of wooden or so-called “floating floors”
(for instance certain parquet or laminate floors),
place the appliance on a 60 x 60 cm sheet of
plywood at least 3 cm in thickness which is
secured to the floor.
• Make sure that the ventilation openings in the
base of your washing machine (if available on
your model) are not obstructed by a carpet or
other material.
4.Water inlet
• Connect the water supply inlet hose in
accordance with the regulations of your local
water company.
• Water inlet: Cold water only
(if no other information on
your programme chart)
• Water tap: 3/4” threaded hose
connector
• Water pressure
(flow pressure): 100-1000 kPa (1-10 bar).
• Only use a new inlet hoses for connecting the
washing machine to the water supply.
Used hoses must not be employed anymore.
5.Drain
• Connect the drain hose to the siphon or hook it
over the edge of a sink by means of the “U” bend
supplied and secure it against falling down.
• If the washing machine is connected to an
integrated drainage system, ensure the latter is
equipped with a vent to avoid simultaneous
loading and draining of water (siphoning effect).
6.Electrical connection
• Electrical connections must be carried out by a
qualified technician in compliance with the
manufacturer’s instructions and current standard
safety regulations.
• Data regarding voltage, power consumption and
protection requirements is given on the inside of
the door.
• The appliance must be connected to the mains by
means of a socket with an earth connection in
accordance with current regulations. The
washing machine must be earthed by law. The
manufacturer declines all liability for damage to
property or injury to persons or animals due to
non-compliance with the directions given above.
• Do not use extension leads or multiple sockets.
• After installation, access to the mains plug or
disconnection from the mains by a double-pole
switch must be ensured at all times.
• Do not operate the washing machine if it has
been damaged during transport. Inform the
After-Sales Service.
• Mains cable replacement is only to be carried out
by After-Sales Service or a qualified electrical
technician.
• The appliance must only be used in the
household for the prescribed uses.
Minimum housing dimensions:
Width: 600 mm
Height: 850 mm
Depth: refer to programme chart
IFU Ares W10426884A GB.fm Page 4 Wednesday, August 10, 2011 11:09 AM
Black process 45,0° 130,0 LPI
16-Sep-2011 03:28:56 EDT | RELEASED
In some European factories the letter "W" of the part code mentioned herein will be automatically
replaced by the number "4000" (e.g. "W12345678" becomes "400012345678")

GB 5
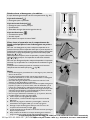
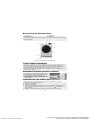
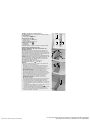
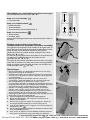
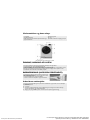
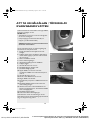
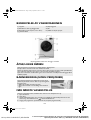
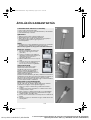
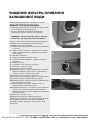
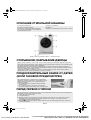
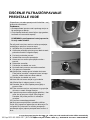
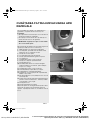
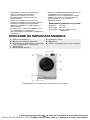
DESCRIPTION OF THE WASHING MACHINE
OPENING/CLOSING DOOR
CHILD SAFETY (IF AVAILABLE)
BEFORE THE FIRST WASH CYCLE
1.) Worktop
3.) Detergent dispenser
5.) Child safety device (if provided, inside the door)
7.) Adjustable feet
2.) Control Panel
4.) Door
6.) Plinth covering pump access
The layout of control panel depends on the model
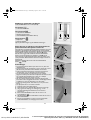
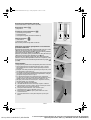
Only when the door lock light goes off in the display window, the door can be opened.
Never open the door forcibly during operation, otherwise you would damage the door lock.
If you must open the door during operation, first, turn off the power or press Reset for at least 3 seconds,
then must wait at least 2 minutes to let the door lock released.
To open the door, hold the door handle and pull the door. Close the door by pressing it without
excessive force until it clicks shut.
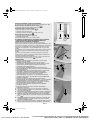
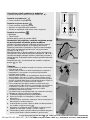
To protect the appliance against improper use, turn the
plastic screw on the interior of the door. To do this, use a
coin or similar objects.
• Slot vertical: the door will not lock.
• Slot horizontal-normal position: the door can be locked
again.
To remove any residues from manufacturing, we recommend that you carry out a short wash cycle
without laundry.
1. Open the tap.
2. Close the door.
3. Add a small amount of detergent (maximum 1/3 of quantity the detergent manufacturer recommends
for lightly soiled laundry) to main wash chamber of the detergent dispenser.
4. Select and start programme “Synthetics” at 60°C (see separate programme chart).
IFU Ares W10426884A GB.fm Page 5 Wednesday, August 10, 2011 11:09 AM
Black process 45,0° 130,0 LPI
16-Sep-2011 03:28:56 EDT | RELEASED
In some European factories the letter "W" of the part code mentioned herein will be automatically
replaced by the number "4000" (e.g. "W12345678" becomes "400012345678")

GB 6
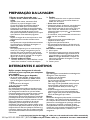
PREPARATION OF THE WASHING
1.Sort the laundry according to...
• Type of fabric / care label symbol
Cottons, mixed fibres, easy care/synthetics,
wool, handwash items.
The wool wash cycle of this machine has been
tested and approved by The Woolmark
Company for the washing of Woolmark
garments labelled as “machine wash” provided
that the garments are washed according to the
instructions on the garment label and those
issued by the manufacturer of this washing
machine.
• Colour
Separate coloured and white items. Wash new
coloured articles separately.
•Loading
Wash items of different sizes in the same load to
improve washing efficiency and distribution in the
drum.
• Delicates
Wash small items (e.g. nylon stockings, belts etc.)
and items with hooks (e.g. bras) in a cloth bag or
pillow case with zip. Always remove curtain rings
or wash curtains with the rings inside a cotton
bag.
2.
Empty all pockets
Coins, safety pins etc. can damage your laundry
as well as the appliance drum and tub.
3.
Fasteners
Close zips and fasten buttons or hooks; loose
belts or ribbons should be tied together.
•Stain removal
• Blood, milk, eggs etc. are generally removed by
the automatic enzyme phase of the programme.
• To remove red wine, coffee, tea, grass and fruit
stains etc. add a stain remover to the main wash
chamber of the detergent dispenser.
• Pre-treat heavily-soiled areas with stain remover
if necessary.
Dyeing
• Only use dyes that are suitable for washing
machines.
• Follow the Manufacturer’s instructions.
• Plastic and rubber parts of the washing machine
can be stained by dyes.
Loading the laundry
1. Open the door.
2. Load the articles one at a time loosely into the
drum, without overfilling. Observe the load
sizes given in the quick reference guide.
Note: overloading the machine will result in
unsatisfactory washing results and creased
laundry.
3. Close the door.
DETERGENTS AND ADDITIVES
Always use high efficiency, low foam
detergent for tumble machine.
The choice of detergent depends on:
• type of fabric (cottons, easy care/synthetics,
delicate items, wool). Note: Use only specific
detergents for washing wool
• colour
• the wash temperature
• degree and type of soiling
Remarks:
Any whitish residues on dark fabrics are caused by
insoluble compounds used in modern phosphate-
free powder detergents. If this occurs, shake or
brush out the fabric or use liquid detergents. Use
only detergents and additives specifically produced
for domestic washing machines. When using
descaling agents, dyes or bleaches for the pre-wash,
make sure that they are suitable for use in domestic
washing machines. Descalers could contain
products which could damage your washing
machine. Do not use any solvents (e.g. turpentine,
benzine). Do not machine wash fabrics that have
been treated with solvents or flammable liquids.
Dosage
Follow the dosage recommendations on the
detergent pack. They depend on:
• degree and type of soiling
• size of wash
follow the detergent manufacturer’s instructions
for a full load;
half load: 3/4 the amount used for a full load;
Minimum load (about 1 kg);
1/2 the amount used for a full load
• water hardness in your area (ask for information
from your water company). Soft water requires
less detergent than hard water.
Notes:
Too much detergent can result in excess foam
formation, which reduces washing efficiency.
If the washing machine detects too much foam, it
may prevent spinning, or prolong the programme
duration and increase the water consumption.
Insufficient detergent may result in grey laundry and
also calcifies the heating system, drum and hoses.
IFU Ares W10426884A GB.fm Page 6 Wednesday, August 10, 2011 11:09 AM
Black process 45,0° 130,0 LPI
16-Sep-2011 03:28:56 EDT | RELEASED
In some European factories the letter "W" of the part code mentioned herein will be automatically
replaced by the number "4000" (e.g. "W12345678" becomes "400012345678")

GB 7
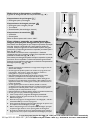
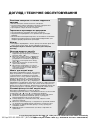
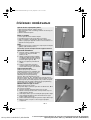
Where to put detergent and additives
The detergent drawer has three chambers (fig. “A”).
Prewash Chamber
• Detergent for the prewash
Mainwash Chamber
• Detergent for the main wash
• Stain remover
• Water softener (water hardness class 4)
Softener Chamber
• Fabric softener
• Liquid starch
Pour additives only up to the “MAX” mark.
How to position the separator in the main wash
chamber for powder or liquid detergent
For use with powder detergent: place the separator in the higher
position. Lift the separator until its top can be reclined. Place its
hooks on the upper end of the back guide rails and slightly push the
separator down to fix it (fig. “B” and “C”).
A gap should remain between the separator and the bottom of the
main wash chamber. If the separator has been correctly installed
(fig. “B” and “C”).
For use with liquid detergent: place the separator in the lower
position. Secure the separator in the chamber using the front guide
rails.
Position the separator so that it touches the bottom of the main
wash chamber (fig. “D”).
Notes:
• Keep detergents and additives in a safe, dry place out of the reach of
children.
• Liquid detergents can be used for programmes with prewash.
However, in this case a powder detergent must be used for the main
wash.
• Do not use liquid detergent when activating the “Start Delay” function
(if available on your washing machine)
• To prevent dispensing problems when using highly concentrated
powder and liquid detergents, use the special detergent ball or bag
supplied with the detergent and place it directly inside the drum.
• When using descaling agents, bleaches or dyes, make sure that they
are suitable for washing machine. Descalers could contain
components that can damage parts of your washing machine.
• Do not use any solvents in the washing machine (e.g turpentine,
benzine).
• If you use starch powder, proceed as follows:
1. Wash your laundry using the desired wash programme.
2. Prepare the starch solution according to the starch manufacturer’s
instructions.
3. Select the “Rinse and Spin” programme, reduce the speed to 800
rpm and start the programme.
4. Pull out the detergent drawer until you can see about 3 cm of the
main wash chamber
.
5. Pour the starch solution into the main wash chamber while the
water is running into the detergent drawer,
6. If there are starch residues in the detergent drawer when the
programme has finished, clean the main wash chamber.
A
()
Separator
Hooks
Separator
Guide
Rails
}
B
1
2
3
C
D
IFU Ares W10426884A GB.fm Page 7 Wednesday, August 10, 2011 11:09 AM
Black process 45,0° 130,0 LPI
16-Sep-2011 03:28:56 EDT | RELEASED
In some European factories the letter "W" of the part code mentioned herein will be automatically
replaced by the number "4000" (e.g. "W12345678" becomes "400012345678")

GB 8
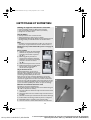
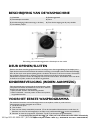
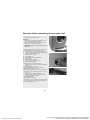
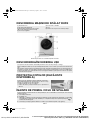
CLEANING THE FILTER/DRAINING RESIDUAL
WATER
We recommend that you check and clean the filter
regularly, at least two or three times a year.
Especially:
• If the appliance is not draining properly or if it fails to
perform spin cycles.
• If the pump is blocked by a foreign body (e.g. buttons,
coins or safety pins).
IMPORTANT: make sure the water has cooled
before draining the appliance.
If your washing machine has no emergency hose, proceed
as described at the end of this page.
1. Stop the appliance and unplug it.
2. Remove the plinth by holding it tight on both sides,
pushing it downward and tilting it to the front.
3. Place a container beneath it.
4. Pull out the emergency hose.
5. Hold the emergency hose’s end into the container.
6. Remove the stopper.
7. Wait until all the water has drained.
8. Refix the stopper at the hose’s end.
9. Put the hose back.
10. Open the filter but do not remove it completely.
Slowly turn the filter counterclockwise until the water
begins to drain out.
11. Wait until all the water has drained.
12. Now unscrew the filter completely and remove it.
13. Clean the filter and the filter chamber.
14. Check that the pump rotor in the filter chamber moves
freely.
15. Re-insert the filter and screw it in clockwise as far as it
will go.
16. Pour about 1 litre of water into the detergent drawer
to reactivate the “Eco system”. Check that the filter is
inserted properly and securely.
17. Re-install the plinth.
18. Plug in the appliance again.
The washing machine is now ready for operation again. If
your washing machine has no emergency hose: - follow the
steps above but neglect step 4 to 9.
A
B
C
IFU Ares W10426884A GB.fm Page 8 Wednesday, August 10, 2011 11:09 AM
Black process 45,0° 130,0 LPI
16-Sep-2011 03:28:56 EDT | RELEASED
In some European factories the letter "W" of the part code mentioned herein will be automatically
replaced by the number "4000" (e.g. "W12345678" becomes "400012345678")

GB 9
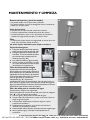
CARE AND MAINTENANCE
Appliance exterior and control panel
• Can be washed down with a soft, damp cloth.
• A little neutral detergent (non abrasive) can also be used.
• Dry with a soft cloth.
Door seal
• Clean with a damp cloth when necessary.
• Check the condition of the door seal periodically.
• When possible, in-between uses please leave the door of your
front loader open top prevent mould built up.
Filter
• Check and clean the filter regularly, at least two or three times a
year (see “Removing the filter).
Do not use flammable fluids for cleaning the appliance.
Detergent dispenser
1. Press the lever in the main wash
compartment downward and remove
the drawer (fig. “A”).
2. Remove the cover grid from the fabric
softener compartment. Remove the
separator from the main wash
compartment by pulling it upward
(fig. “B”).
3. Wash all the parts under running water.
4. Refit the separator and the grid in the
detergent drawer and fit the drawer
back inside its housing.
Water supply hose
Check the supply hose regularly for
brittleness and cracks and replace it if
necessary using a new hose of the same
type (available from After-Sales Service or
specialist dealer). If your supply hose has a
transparent hose coating (fig. “C”), periodically check the colour of
the transparent coating. If the coating begins to turn red, this is an
indication that the hose may have a leek and should be replaced.
Contact our After-Sales Service team or specialist dealer to obtain a
replacement hose.
Mesh filter for water connection
Check and clean regularly.
For washing machine with an inlet hose as shown on pictures “A”,
“B” or “C” (depending on the model):
1. Close the tap and loosen the inlet hose on the tap.
2. Clean the internal mesh filter and screw the water inlet hose
back onto the tap.
3. Now unscrew the inlet hose on the rear of the washing machine.
4. Pull off the mesh filter from the washing machine connection
with universal pliers and clean it.
5. Refit the mesh filter and screw the inlet hose on again
6. Turn on the tap and ensure that the connections are completely
water-tight.
B
Safety valve
inspection
window
C
A
IFU Ares W10426884A GB.fm Page 9 Wednesday, August 10, 2011 11:09 AM
Black process 45,0° 130,0 LPI
16-Sep-2011 03:28:56 EDT | RELEASED
In some European factories the letter "W" of the part code mentioned herein will be automatically
replaced by the number "4000" (e.g. "W12345678" becomes "400012345678")

GB 10
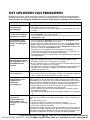
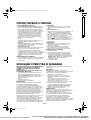
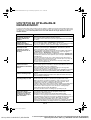
TROUBLESHOOTING GUIDE
Depending on the model, your washing machine is equipped with various automatic safety functions. This
enables faults to be detected in good time and the safety system can react appropriately. These faults are
frequently so minor that they can be removed within few minutes.
Problem Causes, Solutions, Tips
The washing machine will
not start, no indicator
lamps are on
Check whether:
• The mains plug is inserted in socket.
• The wall socket is functionally correctly (use a table lamp or similar appliance
to test it).
The washing machine will
not start...and the “Start/
Pause” indicator lamp
flashes
• The door is not properly closed (“Child safety”).
• The “Start/Pause” button has been pressed.
• The “Water tap closed” indication lights up. Open the water tap and press the
“Start/Pause” button.
The washing machine stops
during the programme
(varies depending on
model)
• The “Rinse hold” indicator lamp lights up: press the “Start/Pause” button to
start the “Spin” programme.
• Another programme has been selected and the “Start/Pause” indicator lamp
is flashing. Reselect the desired programme and press the “Start/Pause”
button.
• The door has been opened and the “Start/Pause” indicator lamp is flashing.
Close the door and press the “Start/Pause” button again.
• Check if there is much foam inside, machine enters kill-foam routine.The
machine will run again automatically after a period.
• The washing machine’s safety system has been activated (see “Fault
description table”).
Residues from detergent
and additives left in the
detergent drawer at end of
wash
• The cover grid of the softener chamber and the separator of the main wash
chamber are correctly installed in the detergent dispenser and all parts are
clean (see “Care and Maintenance”).
• Sufficient water is entering. The mesh filters of the water supply could be
blocked (see “Care and Maintenance”).
• The position of the separator in the main wash chamber is adapted to the use
of powder or liquid detergent (see “Detergent and Additives”).
Machine vibrates during
spin cycle
• The washing machine is level and standing firmly on all four feet.
• The transport bolts have been removed. Before using the machine, it is
imperative that the transport bolts are removed.
Final spin results are poor The washing machine has an imbalance detection and correction system. If
individual heavy items are loaded (e.g bathrobes), this system may reduce the
spin speed automatically or even interrupt the spin completely if it detects to
great an imbalance even after several spin starts, in order to protect the washing
machine.
• If the laundry is still
too wet at the end of the cycle, add smaller articles of
laundry and repeat the spin cycle.
• Excessive foam formation may prevent spinning. Use the correct amount of
detergent.
• Check that the spin speed selector has not been set to “0”.
If your washing machine
has a time display: the
programme time initially
displayed is lengthened /
shortened by a period of
time
This is a normal capacity of the washing machine to adapt to factors that can
have an effect on the wash programme time, e.g;.
• Excess foam formation.
• Load imbalance due to heavy items of laundry.
• Prolonged heating time due to reduced inlet water temperature.
Because of influence like these, the time remaining in the programme run is
recalculated, and updated if necessary. In addition, during the filling phase, the
washing machine determines the load and if necessary adjust the initial
programme time displayed accordingly. During such update periods, an
animation appears on the time display.
IFU Ares W10426884A GB.fm Page 10 Wednesday, August 10, 2011 11:09 AM
Black process 45,0° 130,0 LPI
16-Sep-2011 03:28:56 EDT | RELEASED
In some European factories the letter "W" of the part code mentioned herein will be automatically
replaced by the number "4000" (e.g. "W12345678" becomes "400012345678")

GB 11
Red indication lights is on
or Indication on display
(if fitted on your
machine)
Description, Causes, Solutions
Water tap closed
or
Appliance has no or insufficient water supply. The “Start/Pause” light blinks.
Check whether:
• The water tap is fully open and there is sufficient water supply pressure.
• Kinks are present in water hose.
• The mesh filters of the water supply are blocked (see “Care And
Maintenance”).
• The water hose is frozen up.
After the problem has been removed, restart the programme by pressing
“Start/Pause”
again. If the fault occurs again, contact After-Sales Service
(see “After-Sales Service”).
Clean pump
or
Waste water cannot be pumped out. The washing machine stops in the
appropriate programme step. Unplug the appliance.
Check whether:
• Kinks are present in the drain hose.
• The pump or the filter is blocked (see” Removing The Filter”).
IMPORTANT: make sure that the water has cooled before draining
the appliance.
• The drain hose is frozen up.
Plug in the appliance again.
Before you select a programme, please select “Reset” button at least 3
seconds, then select other programme.
If the fault occurs again please contact After-Sales Service (see “After-Sales
Service”).
From “F02” to “F35”
or
“FA” or “Fod”
The appliance stops during the programme.
For the model with a remaining time display, a failure code between “F02”
and “F35”, “FA” or “Fod” appears on that display.
For the model without display, the programme sequence indicator will show
the failure code by the combination of LED light.
• If service lights up and a failure code between “F02” and “F35” appears on the
display:
please select “Reset” button at least 3 seconds, then select and start the
desired programme again.
If the fault persist, unplug the appliance and contact After-Sales Service (see
“After-Sales Service”).
• If a failure code “FA” appears on the display:
Switch the appliance off, pull out the mains plug and turn the water tap off.
Tilt the appliance forward carefully to allow the collected water to flow out
from the bottom of the appliance, then:
1. Connect the appliance to the electrical supply.
2. Turn the water tap on (if water immediately flows into the appliance again,
without the appliance being started, there is a failure. Turn off the tap and
notify After-Sales Service).
3. Select and start the desired programme again. If the failure occurs again,
unplug the appliance and contact our After-Sales Service (see “After-Sales
Service”).
• If a failure code “Fod” appears on the display:
Too much foam interrupted the washing programme. Avoid excessive
detergent dosing.
1. Select and start the “Rinse & Spin” programme.
2. Afterwards, select and start the desired programme again, using less
detergent. If the fault persist, unplug the appliance and contact After-Sales
Service.
IFU Ares W10426884A GB.fm Page 12 Wednesday, August 10, 2011 11:09 AM
Black process 45,0° 130,0 LPI
16-Sep-2011 03:28:56 EDT | RELEASED
In some European factories the letter "W" of the part code mentioned herein will be automatically
replaced by the number "4000" (e.g. "W12345678" becomes "400012345678")

W10444804A
GB 12
AFTER-SALES SERVICE
Before contacting After-Sales Service:
1. Try to remedy the problem yourself (see “TROUBLESHOOTING GUIDE”).
2. Restart the programme to check whether the problem has solved itself.
3. If the washing machine continues to function incorrectly, call After-Sales Service.
Specify:
• The nature of the problem.
• The washing machine model.
• The service code (number after the word SERVICE).
The After-Sales Service sticker can be found inside the door.
• Your full address.
• Your telephone number and area code.
After-Sales Service phone numbers and addresses are given on the guarantee card.
Alternatively, consult the dealer where you purchased the appliance.
TRANSPORT/HANDLING
Never lift the appliance by the worktop when transporting:
1. Pull out the main plug.
2. Turn off the tap
3. Disconnect the inlet and drain hoses.
4. Eliminate all water from hoses and from the appliance (see “Removing the Filter”, “Draining Residual
Water”).
5. Fit the transport bolts (obligatory).
6. The machine is 75 kg in weight, two persons are needed to move it.
IFU Ares W10426884A GB.fm Page 13 Wednesday, August 10, 2011 11:09 AM
Black process 45,0° 130,0 LPI
16-Sep-2011 03:28:56 EDT | RELEASED
In some European factories the letter "W" of the part code mentioned herein will be automatically
replaced by the number "4000" (e.g. "W12345678" becomes "400012345678")

NOTICE D’UTILISATION
USAGE PRÉVU
PRÉCAUTIONS ET RECOMMANDATIONS
GÉNÉRALES
AVANT D’UTILISER LE LAVE-LINGE
DESCRIPTION DU LAVE-LINGE
OUVERTURE/FERMETURE DU HUBLOT
SÉCURITÉ ENFANTS (SI DISPONIBLE)
AVANT D’EFFECTUER LE PREMIER CYCLE DE
LAVAGE
PRÉPARATION DU CYCLE DE LAVAGE
DÉTERGENTS ET PRODUITS ADDITIFS
NETTOYAGE DU FILTRE/VIDANGE DE L’EAU
RÉSIDUELLE
NETTOYAGE ET ENTRETIEN
DIAGNOSTIC RAPIDE
SERVICE APRÈS-VENTE
TRANSPORT/DÉPLACEMENT
IFU Ares W10426884A F.fm Page 1 Friday, September 2, 2011 3:23 PM
Black process 45,0° 130,0 LPI
16-Sep-2011 03:28:56 EDT | RELEASED
In some European factories the letter "W" of the part code mentioned herein will be automatically
replaced by the number "4000" (e.g. "W12345678" becomes "400012345678")

REMARQUE
Le fabricant se réserve le droit d’apporter des modifications au produit qu’il juge
utiles ou nécessaires à tout moment et sans préavis.
Nous vous remercions d’avoir choisi ce lave-linge Whirlpool.
Avant d’utiliser votre nouveau lave-linge, lisez attentivement cette notice et
conservez-la en lieu sûr pour toute consultation ultérieure.
Veillez à ce que l’appareil soit branché au réseau électrique au moyen d’une prise
de terre et à ce que son tuyau d’arrivée d’eau, soit raccordé conformément aux
prescriptions des Compagnies locales de distribution d’eau. Le fabricant décline
toute responsabilité en cas de dommages matériels ou de blessures corporelles
aux personnes ou aux animaux résultant directement ou indirectement du non-
respect des instructions mentionnées dans la présente notice d’utilisation.
Les personnes (y compris les enfants) qui, en raison de leurs capacités physiques,
sensorielles ou mentales, de leur inexpérience ou de leur méconnaissance, ne
sont pas en mesure d’utiliser l’appareil en toute sécurité, doivent se servir de
celui-ci uniquement sous la surveillance ou avec les instructions d’une personne
responsable.
IFU Ares W10426884A F.fm Page 2 Friday, September 2, 2011 3:23 PM
Black process 45,0° 130,0 LPI
16-Sep-2011 03:28:56 EDT | RELEASED
In some European factories the letter "W" of the part code mentioned herein will be automatically
replaced by the number "4000" (e.g. "W12345678" becomes "400012345678")

F 3
USAGE PRÉVU
Ce lave-linge est exclusivement destiné au lavage et
à l’essorage de quantités de linge habituelles pour
un ménage.
• Respectez les instructions fournies dans la
présente notice d’utilisation, le manuel
d’installation et le tableau des programmes
lorsque vous utilisez ce lave-linge.
• Conservez la présente notice d’utilisation, le
tableau des programmes et le guide d’installation.
En cas de cession du lave-linge à un tiers, veillez
à lui fournir la notice d’utilisation, le tableau des
programmes et le guide d’installation.
PRÉCAUTIONS ET RECOMMANDATIONS
GÉNÉRALES
1.Emballage
• Les matériaux d’emballage sont entièrement
recyclables, comme l’indique le symbole du
recyclage . Mettez-les au rebut conformément
aux réglementations locales en vigueur.
2.Mise au rebut des emballages et des
appareils usagés
• Le lave-linge est fabriqué à partir de matériaux
recyclables. Sa mise au rebut doit être réalisée en
conformité avec les réglementations locales en
vigueur.
• Avant de mettre votre appareil au rebut,
nettoyez toute trace de détergent, cassez le
crochet de la porte et rendez-le inutilisable en
coupant le câble d’alimentation.
• Cet appareil porte le symbole du recyclage
conformément à la directive européenne
2002/96/CE sur les déchets d’équipements
électriques et électroniques (DEEE ou WEEE).
En procédant correctement à la mise au rebut de
cet appareil, vous contribuerez à empêcher des
conséquences potentiellement nuisibles pour
l’environnement et la santé de l’homme.
Le symbole présent sur l’appareil ou sur la
documentation qui l’accompagne indique que ce
produit ne peut en aucun cas être traité comme
un déchet ménager. Il doit être remis à un centre
de collecte des déchets chargé du recyclage des
équipements électriques et électroniques.
La mise au rebut doit être réalisée conformément
aux réglementations locales en vigueur.
Pour obtenir de plus amples informations sur le
traitement, la récupération et le recyclage de ce
produit, contactez le service municipal ou la
déchetterie de votre ville, voire le revendeur du
produit.
3.Emplacement et environnement
• Le lave-linge doit être installé dans une pièce,
jamais à l’extérieur. L’installation dans une salle de
bain ou un autre endroit humide est déconseillée.
4.Sécurité
• Ne rangez pas de produits inflammables à
proximité du lave-linge.
• Ne laissez jamais l’appareil branché lorsqu’il n’est
pas utilisé. Évitez de brancher ou de débrancher
l’appareil avec les mains mouillées.
• Fermez le robinet lorsque l’appareil n’est pas
utilisé.
• Avant de procéder au nettoyage ou à l’entretien,
débranchez l’appareil.
• Nettoyez l’extérieur de l’appareil avec un chiffon
humide. N’utilisez ni produits corrosifs ou
détergents abrasifs ni produits pour vitre,
nettoyants universels, etc.
• Ne forcez pas l’ouverture du hublot, et ne
montez pas dessus.
• Veillez à ce que les enfants ne jouent pas avec le
lave-linge ou à l’intérieur (reportez-vous
également au chapitre “Sécurité des enfants”).
• Si nécessaire, remplacez le câble d’alimentation
par un câble d’alimentation d’origine, disponible
auprès du service après-vente. Le câble
d’alimentation doit être exclusivement remplacé
par un technicien qualifié.
• N’utilisez pas le lave-linge par température
inférieure à 5 °C.
• N’installez pas un sèche-linge sur le plan de
travail de votre lave-linge.
5.Gel
N’installez pas le lave-linge dans une pièce exposée
au gel. Le cas échéant, assurez-vous que le lave-
linge est correctement vidangé après chaque
utilisation :
• Débranchez le(s) tuyau(x) d’arrivée d’eau du
robinet d’eau et laissez l’eau s’écouler
complètement.
• Retirez le tuyau de vidange du siphon ou du
lavabo, et laissez l’eau s’écouler complètement.
• Videz l’eau résiduelle qui se trouve à l’intérieur
de l’appareil en suivant les instructions du
chapitre “NETTOYAGE DU FILTRE/VIDANGE
DE L’EAU RÉSIDUELLE” ; inclinez l’appareil vers
l’avant avec deux autres personnes pour laisser
l’eau résiduelle s’écouler complètement.
6.Déclaration de conformité CE
• Cet appareil est conforme aux normes
européennes suivantes :
Directive 2006/95/CE relative à la basse tension
Directive 2004/108/CE relative à la compatibilité
électromagnétique
Le fabricant décline toute responsabilité en cas
d’endommagement du linge résultant d’instructions
d’entretien incorrectes ou inadéquates fournies
avec le vêtement ou l’article.
IFU Ares W10426884A F.fm Page 3 Friday, September 2, 2011 3:23 PM
Black process 45,0° 130,0 LPI
16-Sep-2011 03:28:56 EDT | RELEASED
In some European factories the letter "W" of the part code mentioned herein will be automatically
replaced by the number "4000" (e.g. "W12345678" becomes "400012345678")

F 4
AVANT D’UTILISER LE LAVE-LINGE
1.Retrait de l’emballage et vérification
• Après avoir sorti le lave-linge de son emballage,
vérifiez qu’il n’a pas été endommagé pendant le
transport. En cas de doute, n’utilisez pas le lave-
linge. Contactez le Service Après-vente ou votre
revendeur local.
• Les matériaux d’emballage (sachets en plastique,
éléments en polystyrène, etc.) doivent être tenus
hors de portée des enfants, car ils constituent
une source potentielle de danger.
• Si l’appareil a été exposé au froid avant sa
livraison, maintenez-le à température ambiante
pendant quelques heures avant de le mettre en
service.
2.Retrait du bridage de transport
• Le lave-linge est doté d’un bridage de transport
destiné à éviter son endommagement pendant le
transport. Avant de mettre l’appareil en service,
il faut OBLIGATOIREMENT retirer le bridage de
transport.
• Une fois cette opération terminée, fermez les
ouvertures à l’aide des 4 bouchons en plastique
fournis.
3.Installation du lave-linge
• Ne déplacez jamais l’appareil en le tenant par le
plan de travail.
• Placez l’appareil sur une surface plane et stable, si
possible dans un coin de la pièce.
• Assurez-vous que les quatre pieds reposent
correctement sur le sol et que l’appareil est bien
horizontal (utilisez un niveau à bulle).
• Si l’appareil est installé sur un plancher en bois ou
sur ce qu’on appelle un “plancher flottant”
(certains parquets ou planchers lamellés, par
exemple), placez-la sur un panneau en contre-
plaqué de 60 x 60 cm et de 3 cm d’épaisseur
minimum, préalablement fixé au sol.
• Assurez-vous que les bouches de ventilation à la
base de votre lave-linge (selon modèle) ne sont
pas obstruées par de la moquette ou tout autre
matériau.
4.Arrivée d’eau
• Raccordez le tuyau d’arrivée d’eau
conformément aux prescriptions des
Compagnies locales de distribution d’eau.
• Arrivée d’eau : Eau froide seulement
(si aucune autre
information sur votre
tableau des programmes)
• Robinet d’eau : Raccord tuyau fileté de 3/4”
• Pression de l’eau
(pression du débit) : 100 - 1 000 kPa (1-10 bar).
• Utilisez exclusivement des tuyaux neufs pour
raccorder votre lave-linge à l’arrivée d’eau.
Les tuyaux usagés ne doivent plus être utilisés.
5.Vidange
• Connectez le tuyau de vidange au siphon ou
accrochez-le au rebord d’un évier avec la crosse
de vidange fournie, de manière à l’empêcher de
tomber.
• Si le lave-linge est connecté à un système de
vidange intégré, assurez-vous que ce dernier est
équipé d’un évent pour empêcher le remplissage
et la vidange d’eau simultanés (effet de siphon).
6.Branchement électrique
• Les branchements électriques doivent être
réalisés par un technicien qualifié, en conformité
avec les instructions du fabricant et les normes de
sécurité locales en vigueur.
• Les données techniques (tension, puissance et
fusible) figurent sur la plaque signalétique située à
l’intérieur du hublot.
• L’appareil doit être branché au réseau au moyen
d’une prise de terre, conformément aux
réglementations en vigueur. La mise à la terre de
l’appareil est obligatoire aux termes de la loi. Le
fabricant décline toute responsabilité en cas de
blessures corporelles ou de dommages matériels
résultant directement ou indirectement du non-
respect des instructions ci-dessus.
• N’utilisez ni rallonge, ni multiprise.
• L’accès à la prise secteur ou la déconnexion du
secteur via un interrupteur bipolaire doivent être
possibles à tout moment après l’installation.
• N’utilisez en aucun cas le lave-linge s’il a été
endommagé pendant le transport. Informez-en
le service après-vente.
• Le remplacement du câble d’alimentation doit
être exclusivement réalisé par le service après-
vente ou un électricien qualifié.
• L’appareil ne doit être utilisé qu’à des fins
domestiques.
Encombrement minimum :
Largeur : 600 mm
Hauteur : 850 mm
Profondeur : consultez le tableau des
programmes
IFU Ares W10426884A F.fm Page 4 Friday, September 2, 2011 3:23 PM
Black process 45,0° 130,0 LPI
16-Sep-2011 03:28:56 EDT | RELEASED
In some European factories the letter "W" of the part code mentioned herein will be automatically
replaced by the number "4000" (e.g. "W12345678" becomes "400012345678")

F 5
DESCRIPTION DU LAVE-LINGE
OUVERTURE/FERMETURE DU HUBLOT
SÉCURITÉ ENFANTS (SI DISPONIBLE)
AVANT D’EFFECTUER LE PREMIER CYCLE DE
LAVAGE
1.) Plan de travail
3.) Bac à produits
5.) Sécurité enfants (si disponible, à l’intérieur du hublot)
7.) Pieds réglables
2.) Bandeau de commandes
4.) Hublot
6.) Accès au filtre situé derrière la plinthe
La disposition du bandeau de commandes dépend du modèle
Le hublot ne peut être ouvert que lorsque le voyant de verrouillage de la porte s’éteint.
Ne forcez pas l’ouverture du hublot en cours de fonctionnement, pour ne pas endommager le
verrouillage de la porte.
Si vous devez ouvrir le hublot pendant le fonctionnement, coupez d’abord l’alimentation ou appuyez sur
la touche Annulation pendant au moins 3 secondes, puis attendez 2 minutes afin de permettre la
désactivation du verrouillage de la porte.
Pour ouvrir le hublot, appuyez sur la poignée intérieure et tirez vers vous. Fermez le hublot sans forcer.
Il est verrouillé lorsque vous entendez un déclic.
Pour éviter toute utilisation inappropriée de l’appareil,
tournez la vis en plastique à l’intérieur du hublot, en vous
servant d’une pièce de monnaie ou d’un objet similaire.
• Fente verticale : la fermeture du hublot est impossible.
• Fente horizontale - position normale : la fermeture du
hublot est à nouveau possible.
Pour éliminer tous les éventuels résidus de fabrication, nous vous recommandons de lancer un cycle de
lavage court sans charger le tambour.
1. Ouvrez le robinet.
2. Fermez le hublot de l’appareil.
3. Versez une petite quantité de détergent (maximum 1/3 de la quantité de détergent recommandée par
le fabricant pour du linge peu sale) dans le compartiment de lavage principal du bac à produits.
4. Sélectionnez et démarrez le programme “Synthétique” à 60 °C (reportez-vous au Tableau des
programmes séparé).
IFU Ares W10426884A F.fm Page 5 Friday, September 2, 2011 3:23 PM
Black process 45,0° 130,0 LPI
16-Sep-2011 03:28:56 EDT | RELEASED
In some European factories the letter "W" of the part code mentioned herein will be automatically
replaced by the number "4000" (e.g. "W12345678" becomes "400012345678")

F 6
PRÉPARATION DU CYCLE DE LAVAGE
1.Triez le linge selon ...
• Le type de tissu/le symbole de l’étiquette
d’entretien
Coton, tissus mixtes, synthétiques, lainage, linge
délicat.
Le cycle de lavage “Laine” a été testé et approuvé par
la société Woolmark Company pour le lavage en
machine des articles portant l’étiquette Woolmark
“lavable en machine”, à condition de laver les
vêtements conformément aux consignes figurant sur
l’étiquette du vêtement et dans le tableau des
programmes du lave-linge.
• Les couleurs
Séparez le linge de couleur du linge blanc. Lavez
séparément le linge de couleur neuf.
• La charge
Lavez ensemble des pièces de dimension
différente, afin d’améliorer l’efficacité du lavage
et de mieux répartir le linge dans le tambour.
•Linge délicat
Lavez les petits textiles (bas en nylon, ceintures,
par exemple) et le linge avec agrafes (soutiens-
gorge, par exemple) dans un sac à linge ou dans
une taie d’oreiller avec fermeture à glissière.
Retirez tous les crochets de rideaux ou placez les
rideaux avec leurs crochets dans un sac à linge.
2. Videz les poches
Les pièces de monnaie, épingles de sûreté, etc.,
risquent d’endommager le linge, le tambour et
la cuve.
3. Fermetures
Fermez les fermetures à glissière, les boutons
et les agrafes ; attachez les ceintures et les
rubans.
• Traitement des taches
• Les taches de sang, de lait, d’œuf, etc., sont
éliminées lors de la phase enzymatique
automatique du programme.
• Pour les taches de vin rouge, de café, de thé,
d’herbe, de fruits, etc., ajoutez un détachant dans
le compartiment principal du bac à produits.
• Traitez les taches au moyen d’un détachant aussi
rapidement que possible.
Teinture
• Utilisez exclusivement des teintures
recommandées pour les lave-linge.
• Respectez les instructions du fabricant.
• Les composants en plastique et en caoutchouc à
l’intérieur de l’appareil peuvent changer de
couleur au contact des produits de teinture.
Chargement du linge
1. Ouvrez le hublot.
2. Introduisez le linge, pièce par pièce, dans le
tambour, sans surcharger l’appareil. Respectez
les poids de chargement indiqués dans le Guide
d’utilisation rapide.
Remarque : la surcharge de l’appareil donne
un résultat moins satisfaisant et provoque le
froissement des vêtements.
3. Fermez le hublot de l’appareil.
DÉTERGENTS ET PRODUITS ADDITIFS
Utiliser uniquement des détergents
haute efficacité à mousse contrôlée pour
lave-linge.
Le choix du détergent dépend :
• du type de tissu (coton, synthétiques, linge délicat,
lainage). Remarque : utilisez uniquement des
détergents spécifiques pour le lavage de la laine
• de la couleur
• de la température de lavage
• du type et du degré de salissure
Remarques :
Les traces blanches sur les tissus noirs sont
provoquées par les composants insolubles des
détergents en poudre sans phosphate. Le cas échéant,
secouez ou brossez le linge, ou utilisez un détergent
liquide. N’utilisez que du détergent et des produits
additifs destinés à une utilisation dans des lave-linge
domestiques. Si vous utilisez des anticalcaires, des
produits de teinture ou de blanchiment pendant la
phase de prélavage, assurez-vous qu’ils conviennent
pour les lave-linge. Un détartrant peut contenir des
composants susceptibles d’attaquer certaines pièces
de votre lave-linge. N’utilisez pas de solvants (de
l’essence térébenthine, par exemple). Ne lavez en
aucun cas des tissus traités avec des solvants ou des
liquides inflammables dans le lave-linge.
Dosage
Respectez les doses recommandées et spécifiées
sur l’emballage des détergents. Elles dépendent :
• du type et du degré de salissure
• de la charge de linge
respectez scrupuleusement les indications du
fabricant pour une charge complète ;
demi-charge : 3/4 de la quantité utilisée pour une
charge complète ; charge minimale (environ 1
kg) ;
1/2 de la quantité utilisée pour une charge
complète
• de la dureté de l’eau (renseignez-vous auprès de
votre compagnie de distribution d’eau). L’eau
douce nécessite moins de détergent que l’eau
calcaire.
Remarques :
Tout surdosage entraîne une formation excessive
de mousse et réduit l’efficacité du lavage.
Si le lave-linge détecte une quantité trop
importante de mousse, il peut bloquer l’essorage,
ou augmenter la durée du programme et la
consommation d’eau.
Un dosage de détergent insuffisant peut rendre le
linge gris, et provoquer des dépôts de calcaire sur la
résistance, le tambour et les tuyaux.
IFU Ares W10426884A F.fm Page 6 Friday, September 2, 2011 3:23 PM
Black process 45,0° 130,0 LPI
16-Sep-2011 03:28:56 EDT | RELEASED
In some European factories the letter "W" of the part code mentioned herein will be automatically
replaced by the number "4000" (e.g. "W12345678" becomes "400012345678")

F 7
Où verser le détergent et les produits additifs
Le bac à produits est divisé en trois compartiments (fig. “A”).
Compartiment de prélavage
• Détergent pour le prélavage
Compartiment de lavage principal
• Détergent pour le lavage principal
• Détachant
• Adoucisseur d’eau (catégorie 4 de dureté de l’eau)
Compartiment assouplissant
• Assouplissant
• Amidon liquide
Versez les produits additifs jusqu’au repère “MAX”, sans le dépasser.
Comment positionner le séparateur dans le compartiment
de lavage principal pour le détergent en poudre ou liquide
Si vous utilisez un détergent en poudre : installez le séparateur dans
la position plus élevée. Soulevez le séparateur jusqu’à ce que la
partie supérieure puisse être inclinée. Placez les crochets sur
l’extrémité supérieure des rails de guidage arrière et poussez
légèrement le séparateur vers le bas pour le fixer (fig. “B” et “C”).
Si le séparateur a été installé correctement, il doit rester un espace
entre le séparateur et la partie inférieure du compartiment de lavage
principal. (fig. “B” et “C”).
Si vous utilisez un détergent liquide : installez le séparateur dans la
position basse. Immobilisez le séparateur dans le compartiment à
l’aide des rails de guidage avant.
Positionnez le séparateur de façon qu’il soit en contact avec la partie
inférieure du compartiment de lavage principal (fig. “D”).
Remarques :
• Conservez le détergent et les produits additifs dans un endroit sec et
sûr, hors de portée des enfants.
• Les détergents liquides peuvent être utilisés pour les programmes
avec prélavage. Toutefois, dans ce cas, vous devez utiliser un
détergent en poudre pour le lavage principal.
• N’utilisez pas de détergents liquides si vous avez activé la fonction
“Départ différé” (si celle-ci est disponible sur votre lave-linge)
• Pour éviter les problèmes de distribution lors de l’utilisation de
détergents en poudre et liquides hautement concentrés, utilisez le sac
ou la balle spécial(e) fourni(e) avec le détergent et placez-le/la
directement dans le tambour.
• Si vous utilisez des anticalcaires, des produits de teinture ou de
blanchiment, assurez-vous qu’ils conviennent pour les lave-linge. Les
détartrants anticalcaires peuvent contenir des substances susceptibles
d’endommager des composants du lave-linge.
• N’utilisez pas de solvants dans le lave-linge (essence, térébenthine,
par exemple).
• Si vous utilisez de l’amidon, procédez comme suit :
1. Lavez votre linge avec le programme de lavage souhaité.
2. Mélangez l’amidon conformément aux instructions du fabricant.
3. Sélectionnez le programme “Rinçage et Essorage”, réduisez la vitesse
d’essorage jusqu’à 800 tr/min maximum puis démarrez le programme.
4. Ouvrez le bac à produits de façon à faire apparaître environ 3 cm du
compartiment de lavage principal .
5. Versez le mélange d’amidon dans le compartiment de lavage
principal lorsque l’eau s’écoule dans le bac à produits.
6. S’il reste des résidus d’amidon dans le bac à produits à la fin du
programme, nettoyez le compartiment de lavage principal.
A
()
Séparateur
Crochets
Sépara-
teur
Rails de
guidage
}
B
1
2
3
C
D
IFU Ares W10426884A F.fm Page 7 Friday, September 2, 2011 3:23 PM
Black process 45,0° 130,0 LPI
16-Sep-2011 03:28:56 EDT | RELEASED
In some European factories the letter "W" of the part code mentioned herein will be automatically
replaced by the number "4000" (e.g. "W12345678" becomes "400012345678")
Pagina se încarcă...
Pagina se încarcă...
Pagina se încarcă...
Pagina se încarcă...
Pagina se încarcă...
Pagina se încarcă...
Pagina se încarcă...
Pagina se încarcă...
Pagina se încarcă...
Pagina se încarcă...
Pagina se încarcă...
Pagina se încarcă...
Pagina se încarcă...
Pagina se încarcă...
Pagina se încarcă...
Pagina se încarcă...
Pagina se încarcă...
Pagina se încarcă...
Pagina se încarcă...
Pagina se încarcă...
Pagina se încarcă...
Pagina se încarcă...
Pagina se încarcă...
Pagina se încarcă...
Pagina se încarcă...
Pagina se încarcă...
Pagina se încarcă...
Pagina se încarcă...
Pagina se încarcă...
Pagina se încarcă...
Pagina se încarcă...
Pagina se încarcă...
Pagina se încarcă...
Pagina se încarcă...
Pagina se încarcă...
Pagina se încarcă...
Pagina se încarcă...
Pagina se încarcă...
Pagina se încarcă...
Pagina se încarcă...
Pagina se încarcă...
Pagina se încarcă...
Pagina se încarcă...
Pagina se încarcă...
Pagina se încarcă...
Pagina se încarcă...
Pagina se încarcă...
Pagina se încarcă...
Pagina se încarcă...
Pagina se încarcă...
Pagina se încarcă...
Pagina se încarcă...
Pagina se încarcă...
Pagina se încarcă...
Pagina se încarcă...
Pagina se încarcă...
Pagina se încarcă...
Pagina se încarcă...
Pagina se încarcă...
Pagina se încarcă...
Pagina se încarcă...
Pagina se încarcă...
Pagina se încarcă...
Pagina se încarcă...
Pagina se încarcă...
Pagina se încarcă...
Pagina se încarcă...
Pagina se încarcă...
Pagina se încarcă...
Pagina se încarcă...
Pagina se încarcă...
Pagina se încarcă...
Pagina se încarcă...
Pagina se încarcă...
Pagina se încarcă...
Pagina se încarcă...
Pagina se încarcă...
Pagina se încarcă...
Pagina se încarcă...
Pagina se încarcă...
Pagina se încarcă...
Pagina se încarcă...
Pagina se încarcă...
Pagina se încarcă...
Pagina se încarcă...
Pagina se încarcă...
Pagina se încarcă...
Pagina se încarcă...
Pagina se încarcă...
Pagina se încarcă...
Pagina se încarcă...
Pagina se încarcă...
Pagina se încarcă...
Pagina se încarcă...
Pagina se încarcă...
Pagina se încarcă...
Pagina se încarcă...
Pagina se încarcă...
Pagina se încarcă...
Pagina se încarcă...
Pagina se încarcă...
Pagina se încarcă...
Pagina se încarcă...
Pagina se încarcă...
Pagina se încarcă...
Pagina se încarcă...
Pagina se încarcă...
Pagina se încarcă...
Pagina se încarcă...
Pagina se încarcă...
Pagina se încarcă...
Pagina se încarcă...
Pagina se încarcă...
Pagina se încarcă...
Pagina se încarcă...
Pagina se încarcă...
Pagina se încarcă...
Pagina se încarcă...
Pagina se încarcă...
Pagina se încarcă...
Pagina se încarcă...
Pagina se încarcă...
Pagina se încarcă...
Pagina se încarcă...
Pagina se încarcă...
Pagina se încarcă...
Pagina se încarcă...
Pagina se încarcă...
Pagina se încarcă...
Pagina se încarcă...
Pagina se încarcă...
Pagina se încarcă...
Pagina se încarcă...
Pagina se încarcă...
Pagina se încarcă...
Pagina se încarcă...
Pagina se încarcă...
Pagina se încarcă...
Pagina se încarcă...
Pagina se încarcă...
Pagina se încarcă...
Pagina se încarcă...
Pagina se încarcă...
Pagina se încarcă...
Pagina se încarcă...
Pagina se încarcă...
Pagina se încarcă...
Pagina se încarcă...
Pagina se încarcă...
Pagina se încarcă...
Pagina se încarcă...
Pagina se încarcă...
Pagina se încarcă...
Pagina se încarcă...
Pagina se încarcă...
Pagina se încarcă...
Pagina se încarcă...
Pagina se încarcă...
Pagina se încarcă...
Pagina se încarcă...
Pagina se încarcă...
Pagina se încarcă...
Pagina se încarcă...
Pagina se încarcă...
Pagina se încarcă...
Pagina se încarcă...
Pagina se încarcă...
Pagina se încarcă...
Pagina se încarcă...
Pagina se încarcă...
Pagina se încarcă...
Pagina se încarcă...
Pagina se încarcă...
Pagina se încarcă...
Pagina se încarcă...
Pagina se încarcă...
Pagina se încarcă...
Pagina se încarcă...
Pagina se încarcă...
Pagina se încarcă...
Pagina se încarcă...
Pagina se încarcă...
Pagina se încarcă...
Pagina se încarcă...
Pagina se încarcă...
Pagina se încarcă...
Pagina se încarcă...
Pagina se încarcă...
Pagina se încarcă...
Pagina se încarcă...
Pagina se încarcă...
Pagina se încarcă...
Pagina se încarcă...
Pagina se încarcă...
Pagina se încarcă...
Pagina se încarcă...
Pagina se încarcă...
Pagina se încarcă...
Pagina se încarcă...
Pagina se încarcă...
Pagina se încarcă...
Pagina se încarcă...
Pagina se încarcă...
Pagina se încarcă...
Pagina se încarcă...
Pagina se încarcă...
Pagina se încarcă...
Pagina se încarcă...
Pagina se încarcă...
Pagina se încarcă...
Pagina se încarcă...
Pagina se încarcă...
Pagina se încarcă...
Pagina se încarcă...
Pagina se încarcă...
Pagina se încarcă...
Pagina se încarcă...
Pagina se încarcă...
Pagina se încarcă...
Pagina se încarcă...
Pagina se încarcă...
-
 1
1
-
 2
2
-
 3
3
-
 4
4
-
 5
5
-
 6
6
-
 7
7
-
 8
8
-
 9
9
-
 10
10
-
 11
11
-
 12
12
-
 13
13
-
 14
14
-
 15
15
-
 16
16
-
 17
17
-
 18
18
-
 19
19
-
 20
20
-
 21
21
-
 22
22
-
 23
23
-
 24
24
-
 25
25
-
 26
26
-
 27
27
-
 28
28
-
 29
29
-
 30
30
-
 31
31
-
 32
32
-
 33
33
-
 34
34
-
 35
35
-
 36
36
-
 37
37
-
 38
38
-
 39
39
-
 40
40
-
 41
41
-
 42
42
-
 43
43
-
 44
44
-
 45
45
-
 46
46
-
 47
47
-
 48
48
-
 49
49
-
 50
50
-
 51
51
-
 52
52
-
 53
53
-
 54
54
-
 55
55
-
 56
56
-
 57
57
-
 58
58
-
 59
59
-
 60
60
-
 61
61
-
 62
62
-
 63
63
-
 64
64
-
 65
65
-
 66
66
-
 67
67
-
 68
68
-
 69
69
-
 70
70
-
 71
71
-
 72
72
-
 73
73
-
 74
74
-
 75
75
-
 76
76
-
 77
77
-
 78
78
-
 79
79
-
 80
80
-
 81
81
-
 82
82
-
 83
83
-
 84
84
-
 85
85
-
 86
86
-
 87
87
-
 88
88
-
 89
89
-
 90
90
-
 91
91
-
 92
92
-
 93
93
-
 94
94
-
 95
95
-
 96
96
-
 97
97
-
 98
98
-
 99
99
-
 100
100
-
 101
101
-
 102
102
-
 103
103
-
 104
104
-
 105
105
-
 106
106
-
 107
107
-
 108
108
-
 109
109
-
 110
110
-
 111
111
-
 112
112
-
 113
113
-
 114
114
-
 115
115
-
 116
116
-
 117
117
-
 118
118
-
 119
119
-
 120
120
-
 121
121
-
 122
122
-
 123
123
-
 124
124
-
 125
125
-
 126
126
-
 127
127
-
 128
128
-
 129
129
-
 130
130
-
 131
131
-
 132
132
-
 133
133
-
 134
134
-
 135
135
-
 136
136
-
 137
137
-
 138
138
-
 139
139
-
 140
140
-
 141
141
-
 142
142
-
 143
143
-
 144
144
-
 145
145
-
 146
146
-
 147
147
-
 148
148
-
 149
149
-
 150
150
-
 151
151
-
 152
152
-
 153
153
-
 154
154
-
 155
155
-
 156
156
-
 157
157
-
 158
158
-
 159
159
-
 160
160
-
 161
161
-
 162
162
-
 163
163
-
 164
164
-
 165
165
-
 166
166
-
 167
167
-
 168
168
-
 169
169
-
 170
170
-
 171
171
-
 172
172
-
 173
173
-
 174
174
-
 175
175
-
 176
176
-
 177
177
-
 178
178
-
 179
179
-
 180
180
-
 181
181
-
 182
182
-
 183
183
-
 184
184
-
 185
185
-
 186
186
-
 187
187
-
 188
188
-
 189
189
-
 190
190
-
 191
191
-
 192
192
-
 193
193
-
 194
194
-
 195
195
-
 196
196
-
 197
197
-
 198
198
-
 199
199
-
 200
200
-
 201
201
-
 202
202
-
 203
203
-
 204
204
-
 205
205
-
 206
206
-
 207
207
-
 208
208
-
 209
209
-
 210
210
-
 211
211
-
 212
212
-
 213
213
-
 214
214
-
 215
215
-
 216
216
-
 217
217
-
 218
218
-
 219
219
-
 220
220
-
 221
221
-
 222
222
-
 223
223
-
 224
224
-
 225
225
-
 226
226
-
 227
227
-
 228
228
-
 229
229
-
 230
230
-
 231
231
-
 232
232
-
 233
233
-
 234
234
-
 235
235
-
 236
236
-
 237
237
-
 238
238
-
 239
239
-
 240
240
-
 241
241


Whirlpool AWSE 7100 Manualul utilizatorului
- Categorie
- Mașini de spălat
- Tip
- Manualul utilizatorului
în alte limbi
- slovenčina: Whirlpool AWSE 7100 Užívateľská príručka
- dansk: Whirlpool AWSE 7100 Brugervejledning
- Nederlands: Whirlpool AWSE 7100 Gebruikershandleiding
Lucrări înrudite
-
Sibir MHC 8460 WS Manualul proprietarului
-
Whirlpool SILVERLINE+ AWH 912S/PRO VASKEMASKIN Ghid de instalare
-
Amana AKR 925 IX Manualul proprietarului
-
Bauknecht WAB 1211 SW Manualul utilizatorului
-
-
Whirlpool AWM 8100/PRO Ghid de instalare
-
ESLABON DE LUJO WTB 935 M8 Manualul utilizatorului
-
Bauknecht AWO/D 6100 Ghid de instalare
-
Whirlpool AWG 910 E W Manualul utilizatorului
-
Alte documente
-
Beko 7170243500 Manual de utilizare
-
-
Candy Grand'O Evo User Instructions
-
Hoover DYN 9124DG/L-37 Manual de utilizare
-
-
Indesit ECO6D 1291 Manualul utilizatorului
-
Xavax Intermediate Frame (open front) for Washing Machine and Dryer Manual de utilizare
-
HQ WB1 Specificație
-
Gorenje SD14ST Manualul proprietarului
-