Daikin EHYHBX08AA Ghid de instalare
- Tip
- Ghid de instalare


3P3531761B
CE DECLARATIONOFCONFORMITY CE DECLARACIONDECONFORMIDAD CE DECLARAÇÃODECONFORMIDADE CE ERKLÆRING OMSAMSVAR CE IZJAVAOUSKLAĐENOSTI CE IZJAVA O SKLADNOSTI CE ATITIKTIESDEKLARACIJA
CE KONFORMITÄTSERKLÄRUNG CE DICHIARAZIONEDICONFORMITA CE ЗАЯВЛЕНИЕОСООТВЕТСТВИИ CE ILMOITUSYHDENMUKAISUUDESTA CE MEGFELELŐSÉGINYILATKOZAT CE VASTAVUSDEKLARATSIOON CE ATBILSTĪBASDEKLARĀCIJA
CE DECLARATIONDECONFORMITE CE ΔHΛΩΣΗ ΣΥΜΜΟΡΦΩΣΗΣ CE OVERENSSTEMMELSESERKLÆRING CE PROHLÁŠENÍOSHODĚ CE DEKLARACJAZGODNOŚCI CE ДЕКЛАРАЦИЯЗАСЪОТВЕТСТВИЕ CE VYHLÁSENIEZHODY
CE CONFORMITEITSVERKLARING CE FÖRSÄKRANOMÖVERENSTÄMMELSE CE DECLARAŢIEDECONFORMITATE CE UYGUNLUKBEYANI
DaikinEuropeN.V.
01
02
03
04
05
06
07
08
declaresunderitssoleresponsibilitythattheequipmenttowhichthisdeclarationrelates:
erklärtaufseinealleinigeVerantwortungdaßdieAusrüstungfürdiedieseErklärungbestimmtist:
déclaresoussaseuleresponsabilitéquel'équipementviséparlaprésentedéclaration:
verklaarthierbijopeigenexclusieveverantwoordelijkheiddatdeapparatuurwaaropdezeverklaringbetrekkingheeft:
declarabajosuúnicaresponsabilidadqueelequipoalquehacereferencialadeclaración:
dichiarasottolapropriaresponsabilitàchegliapparecchiacuièriferitaquestadichiarazione:
δηλώνειμεαποκλειστικήτηςευθύνηότιοεξοπλισμόςστονοποίοαναφέρεταιηπαρούσαδήλωση:
declarasobsuaexclusivaresponsabilidadequeosequipamentosaqueestadeclaraçãoserefere:
09
10
11
12
13
14
15
16
заявляет,исключительноподсвоюответственность,чтооборудование,ккоторомуотноситсянастоящеезаявление:
erklærerundereneansvarlig,atudstyret,someromfattetafdenneerklæring:
deklarerariegenskapavhuvudansvarig,attutrustningensomberörsavdennadeklarationinnebäratt:
erklæreretfullstendigansvarforatdetutstyrsomberøresavdennedeklarasjoninnebærerat:
ilmoittaayksinomaanomallavastuullaan,ettätämänilmoituksentarkoittamatlaitteet:
prohlašujevesvéplnéodpovědnosti,žezařízení,kněmužsetotoprohlášenívztahuje:
izjavljujepodisključivovlastitomodgovornošćudaopremanakojuseovaizjavaodnosi:
teljesfelelősségetudatábankijelenti,hogyaberendezések,melyekreenyilatkozatvonatkozik:
17
18
19
20
21
22
23
24
25
deklarujenawłasnąiwyłącznąodpowiedzialność,żeurządzenia,którychtadeklaracjadotyczy:
declarăpeproprierăspunderecăechipamentelelacaresereferăaceastădeclaraţie:
zvsoodgovornostjoizjavlja,dajeopremanaprav,nakateroseizjavananaša:
kinnitabomatäielikulvastutusel,etkäesolevadeklaratsiooniallakuuluvvarustus:
деклариранасвояотговорност,чеоборудването,закоeтосеотнасятазидекларация:
visiškasavoatsakomybeskelbia,kadįranga,kuriaitaikomašideklaracija:
arpilnuatbildībuapliecina,katālākaprakstītāsiekārtas,uzkurāmattiecasšīdeklarācija:
vyhlasujenavlastnúzodpovednosť,žezariadenie,naktorésavzťahujetotovyhlásenie:
tamamenkendisorumlulu*undaolmaküzerebubildirininilgilioldu*udonanımınınaşa*ıdakigibioldu*unubeyaneder:
EHYHBH05AAV3,EHYHBH08AAV3,EHYHBX08AAV3,
01
02
03
04
05
06
07
areinconformitywiththefollowingstandard(s)orothernormativedocument(s),providedthattheseareusedinaccordancewithour
instructions:
der/denfolgendenNorm(en)odereinemanderenNormdokumentoderdokumentenentspricht/entsprechen,unterderVoraussetzung,
daßsiegemäßunserenAnweisungeneingesetztwerden:
sontconformesàla/auxnorme(s)ouautre(s)document(s)normatif(s),pourautantqu'ilssoientutilisésconformémentànosinstructions:
conformdevolgendenorm(en)oféénofmeeranderebindendedocumentenzijn,opvoorwaardedatzewordengebruiktovereenkomstig
onzeinstructies:
estánenconformidadconla(s)siguiente(s)norma(s)uotro(s)documento(s)normativo(s),siemprequeseanutilizadosdeacuerdocon
nuestrasinstrucciones:
sonoconformial(i)seguente(i)standard(s)oaltro(i)documento(i)acaratterenormativo,apattochevenganousatiinconformitàallenostre
istruzioni:
είναισύμφωναμετο(α)ακόλουθο(α)πρότυπο(α)ήάλλοέγγραφο(α)κανονισμών,υπότηνπροϋπόθεσηότιχρησιμοποιούνται
σύμφωναμετιςοδηγίεςμας:
08
09
10
11
12
13
14
15
estãoemconformidadecoma(s)seguinte(s)norma(s)ououtro(s)documento(s)normativo(s),desdequeestessejamutilizadosde
acordocomasnossasinstruções:
соответствуютследующимстандартамилидругимнормативнымдокументам,приусловииихиспользованиясогласнонашим
инструкциям:
overholderfølgendestandard(er)ellerandet/andreretningsgivendedokument(er),forudsatatdisseanvendesihenholdtilvoreinstrukser:
respektiveutrustningärutfördiöverensstämmelsemedochföljerföljandestandard(er)ellerandranormgivandedokument,under
förutsättningattanvändningskeriöverensstämmelsemedvårainstruktioner:
respektiveutstyrerioverensstemmelsemedfølgendestandard(er)ellerandrenormgivendedokument(er),underforutssetningavatdisse
brukesihenholdtilvåreinstrukser:
vastaavatseuraavienstandardienjamuidenohjeellistendokumenttienvaatimuksiaedellyttäen,ettäniitäkäytetäänohjeidemme
mukaisesti:
zapředpokladu,žejsouvyužíványvsouladusnašimipokyny,odpovídajínásledujícímnormámnebonormativnímdokumentům:
uskladusaslijedećimstandardom(ima)ilidrugimnormativnimdokumentom(ima),uzuvjetdaseonikoristeuskladusnašimuputama:
16
17
18
19
20
21
22
23
24
25
megfelelnekazalábbiszabvány(ok)nakvagyegyébirányadódokumentum(ok)nak,haazokatelőírásszerinthasználják:
spełniająwymoginastępującychnormiinnychdokumentównormalizacyjnych,podwarunkiemżeużywanesązgodnieznaszymi
instrukcjami:
suntînconformitatecuurmătorul(următoarele)standard(e)saualt(e)document(e)normativ(e),cucondiţiacaacesteasăfieutilizateîn
conformitatecuinstrucţiunilenoastre:
skladniznaslednjimistandardiindrugiminormativi,podpogojem,daseuporabljajovskladuznašiminavodili:
onvastavusesjärgmis(t)estandardi(te)gavõiteistenormatiivsetedokumentidega,kuineidkasutataksevastavaltmeiejuhenditele:
съответстватнаследнитестандартиилидругинормативнидокументи,приусловие,чесеизползватсъгласнонашите
инструкции:
atitinkažemiaunurodytusstandartusir(arba)kitusnorminiusdokumentussusąlyga,kadyranaudojamipagalmūsųnurodymus:
tad,jalietotiatbilstoširažotājanorādījumiem,atbilstsekojošiemstandartiemuncitiemnormatīviemdokumentiem:
súvzhodesnasledovnou(ými)normou(ami)aleboiným(i)normatívnym(i)dokumentom(ami),zapredpokladu,žesapoužívajúvsúlade
snašimnávodom:
ürünün,talimatlarımızagörekullanılmasıkoşuluylaaşağıdakistandartlarvenormbelirtenbelgelerleuyumludur:
EN60335240,
01
02
03
04
05
06
07
08
09
followingtheprovisionsof:
gemäßdenVorschriftender:
conformémentauxstipulationsdes:
overeenkomstigdebepalingenvan:
siguiendolasdisposicionesde:
secondoleprescrizioniper:
μετήρησητωνδιατάξεωντων:
deacordocomoprevistoem:
всоответствиисположениями:
10
11
12
13
14
15
16
17
underiagttagelseafbestemmelsernei:
enligtvillkoreni:
gittihenholdtilbestemmelsenei:
noudattaenmääräyksiä:
zadodrženíustanovenípředpisu:
premaodredbama:
követia(z):
zgodniezpostanowieniamiDyrektyw:
18
19
20
21
22
23
24
25
înurmaprevederilor:
obupoštevanjudoločb:
vastavaltnõuetele:
следвайкиклаузитена:
laikantisnuostatų,pateikiamų:
ievērojotprasības,kasnoteiktas:
održiavajúcustanovenia:
bununkoşullarınauygunolarak:
LowVoltage2006/95/EC
ElectromagneticCompatibility2004/108/EC *
01
02
03
04
05
06
07
08
09
Directives,asamended.
Direktiven,gemäßÄnderung.
Directives,tellesquemodifiées.
Richtlijnen,zoalsgeamendeerd.
Directivas,segúnloenmendado.
Direttive,comedamodifica.
Οδηγιών,όπωςέχουντροποποιηθεί.
Directivas,conformealteraçãoem.
Директивсовсемипоправками.
10
11
12
13
14
15
16
17
Direktiver,medsenereændringer.
Direktiv,medföretagnaändringar.
Direktiver,medforetatteendringer.
Direktiivejä,sellaisinakuinneovat
muutettuina.
vplatnémznění.
Smjernice,kakojeizmijenjeno.
irányelv(ek)ésmódosításaikrendelkezéseit.
zpóźniejszymipoprawkami.
18
19
20
21
22
23
24
25
Directivelor,cuamendamentelerespective.
Direktivezvsemispremembami.
Direktiividkoosmuudatustega.
Директиви,стехнитеизменения.
Direktyvosesupapildymais.
Direktīvāsuntopapildinājumos.
Smernice,vplatnomznení.
DeğiştirilmişhalleriyleYönetmelikler.
01Note*
02Hinweis*
03Remarque*
04Bemerk*
05Nota*
assetoutin<A>andjudgedpositivelyby<B>
accordingtotheCertificate<C>.
wiein<A>aufgeführtundvon<B>positiv
beurteiltgemäßZertifikat<C>.
telquedéfinidans<A>etévaluépositivementpar
<B>conformémentauCertificat<C>.
zoalsvermeldin<A>enpositiefbeoordeelddoor
<B>overeenkomstigCertificaat<C>.
comoseestableceen<A>yesvalorado
positivamentepor<B>deacuerdoconel
Certificado<C>.
06Nota*
07Σημείωση*
08Nota*
09Примечание*
10Bemærk*
delineatonel<A>egiudicatopositivamenteda<B>
secondoilCertificato<C>.
όπωςκαθορίζεταιστο<A>καικρίνεταιθετικά
απότο<B>σύμφωναμετοΠιστοποιητικό<C>.
talcomoestabelecidoem<A>ecomoparecer
positivode<B>deacordocomoCertificado<C>.
какуказанов<A>ивсоответствии
сположительнымрешением<B>согласно
Свидетельству<C>.
somanførti<A>ogpositivtvurderetaf<B>ihenhold
tilCertifikat<C>.
11Information*
12Merk*
13Huom*
14Poznámka*
15Napomena*
enligt<A>ochgodkäntsav<B>enligt
Certifikatet<C>.
somdetfremkommeri<A>oggjennompositiv
bedømmelseav<B>ifølgeSertifikat<C>.
jotkaonesitettyasiakirjassa<A>jajotka<B>
onhyväksynytSertifikaatin<C>mukaisesti.
jakbylouvedenov<A>apozitivnězjištěno
<B>vsouladusosvědčením<C>.
kakojeizloženou<A>ipozitivnoocijenjeno
odstrane<B>premaCertifikatu<C>.
16Megjegyzés*
17Uwaga*
18Notă*
19Opomba*
20Märkus*
a(z)<A>alapján,a(z)<B>igazoltaamegfelelést,
a(z)<C>tanúsítványszerint.
zgodniezdokumentacją<A>,pozytywną
opinią<B>iŚwiadectwem<C>.
aşacumestestabilitîn<A>şiapreciatpozitivde
<B>înconformitatecuCertificatul<C>.
kotjedoločenov<A>inodobrenosstrani<B>
vskladuscertifikatom<C>.
naguonnäidatuddokumendis<A>jaheaks
kiidetud<B>järgivastavaltsertifikaadile<C>.
21Забележка*
22Pastaba*
23Piezīmes*
24Poznámka*
25Not*
кактоеизложенов<A>иоцененоположително
от<B>съгласноСертификата<C>.
kaipnustatyta<A>irkaipteigiamainuspręsta<B>
pagalSertifikatą<C>.
kānorādīts<A>unatbilstoši<B>pozitīvajam
vērtējumamsaskaņāarsertifikātu<C>.
akobolouvedenév<A>apozitívnezistené<B>
vsúladesosvedčením<C>.
<A>’dabelirtildiğigibive<C>Sertifikasınagöre<B>
tarafındanolumluolarakdeğerlendirildiğigibi.
<A>
<B>
<C>
DEKRA(NB0344)
2082543.0551QUA/EMC
DAIKIN.TCF.025E15/052013
JeanPierreBeuselinck
Director
Ostend,4thofNovember2013

Tableofcontents
Installationmanual
3
EHYHBH05AAV3+EHYHBH/X08AAV3
DaikinAlthermahybridheatpump–heatpumpmodule
4P3495871C–2013.10
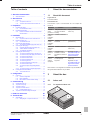
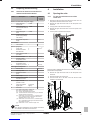
Tableofcontents
1 Aboutthedocumentation 3
1.1 Aboutthisdocument.................................................................. 3
2 Aboutthebox 3
2.1 Indoorunit.................................................................................. 3
2.1.1 Tounpacktheindoorunit ........................................... 3
2.1.2 Toremovetheaccessoriesfromtheindoorunit......... 4
3 Preparation 4
3.1 Preparingwaterpiping............................................................... 4
3.1.1 Tocheckthewatervolume ......................................... 4
3.2 Preparingelectricalwiring ......................................................... 5
3.2.1 Overviewofelectricalconnectionsforexternaland
internalactuators ........................................................ 5
4 Installation 5
4.1 Openingtheunits ...................................................................... 5
4.1.1 Toopentheswitchboxcoveroftheindoorunit ......... 5
4.2 Mountingtheindoorunit ............................................................ 6
4.2.1 Toinstalltheindoorunit.............................................. 6
4.3 Connectingtherefrigerantpiping .............................................. 6
4.3.1 Toconnecttherefrigerantpipingtotheindoorunit .... 6
4.4 Connectingthewaterpiping ...................................................... 7
4.4.1 Connectingthewaterpipingoftheindoorunit............ 7
4.4.2 Tofillthedomestichotwatertank .............................. 7
4.4.3 Toinsulatethewaterpiping ........................................ 7
4.5 Connectingtheelectricalwiring................................................. 7
4.5.1 Toconnecttheelectricalwiringontheindoorunit...... 7
4.5.2 Toconnectthemainpowersupplyoftheindoorunit . 8
4.5.3 Toconnecttheuserinterface ..................................... 9
4.5.4 Toconnecttheshutoffvalve...................................... 9
4.5.5 Toconnecttheelectricalmeter................................... 9
4.5.6 Toconnectthegasmeter ........................................... 10
4.5.7 Toconnectthedomestichotwaterpump ................... 10
4.5.8 Toconnectthealarmoutput ....................................... 10
4.5.9 Toconnectthespacecooling/heatingON/OFF
output .......................................................................... 10
4.5.10 Toconnectthepowerconsumptiondigitalinputs ....... 11
4.6 Finishingtheindoorunitinstallation .......................................... 11
4.6.1 Toclosetheindoorunit............................................... 11
5 Configuration 11
5.1 Indoorunit.................................................................................. 11
5.1.1 Overview:Configuration.............................................. 11
5.1.2 Basicconfiguration...................................................... 13
5.1.3 Menustructure:Overviewinstallersettings ................ 17
6 Commissioning 19
6.1 Checklistbeforetestrun............................................................ 19
6.2 Toperformanairpurge............................................................. 19
6.3 Toperformatestrun ................................................................. 19
6.4 Toperformanactuatortestrun ................................................. 19
6.4.1 Possibleactuatortestruns.......................................... 19
6.5 Toperformanunderfloorheatingscreeddryout ....................... 20
7 Handovertotheuser 20
8 Technicaldata 21
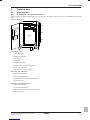
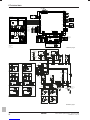
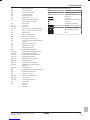
8.1 Wiringdiagram .......................................................................... 21
8.1.1 Wiringdiagram–components:Indoorunit ................. 21
1 Aboutthedocumentation
1.1 Aboutthisdocument
Targetaudience
Authorisedinstallers
Documentationset
This document is part of a documentation set. The complete set
consistsof:
Document Contains… Format
General
safety
precautions
Safetyinstructionsthat
youmustreadbefore
installing
Paper(intheboxofthe
indoorunit)
Heatpump
module
installation
manual
Installationinstructions
Gasboiler
module
installation
manual
Installationandoperation
instructions
Paper(intheboxofthe
gasboilerunit)
Outdoorunit
installation
manual
Installationinstructions Paper(intheboxofthe
outdoorunit)
Installer
reference
guide
Preparationofthe
installation,technical
specifications,reference
data,…
Digitalfilesonhttp://
www.daikineurope.com/
supportandmanuals/
productinformation/.
Addendum
bookfor
optional
equipment
Additionalinfoabouthow
toinstalloptional
equipment
Paper(intheboxofthe
indoorunit)
Digitalfilesonhttp://
www.daikineurope.com/
supportandmanuals/
productinformation/.
Latestrevisionsofthesupplieddocumentationmaybeavailableon
theregionalDaikinwebsiteorviayourdealer.
2 Aboutthebox
2.1 Indoorunit
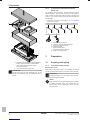
2.1.1 Tounpacktheindoorunit

3Preparation
Installationmanual
4
EHYHBH05AAV3+EHYHBH/X08AAV3
DaikinAlthermahybridheatpump–heatpumpmodule
4P3495871C–2013.10
a
b
aInstallationmanual,operationmanual,addendum
bookforoptionalequipment,quickinstallation
guide,generalsafetyprecautions,boiler
communicationcable
bConnectionpiecesforthegasboiler
INFORMATION
Do NOT throw away the upper cardboard cover. On the
outside of the cardboard cover, the installation pattern is
printed.
2.1.2 Toremovetheaccessoriesfromthe
indoorunit
The installation manual, operation manual, addendum book for
optional equipment, general safety precautions, quick installation
guide,andboilercommunicationcablearelocatedintheupperpart
ofthebox.Theconnectionpiecesforthegasboilerareattachedto
thewaterpiping.
1Removethe accessories asdescribedin "2.1.1Tounpack the
indoorunit"onpage3.
a b c d e
f g
aGeneralsafetyprecautions
bAddendumbookforoptionalequipment
cIndoorunitinstallationmanual
dOperationmanual
eQuickinstallationguide
fConnectionpiecesforgasboiler
gBoilercommunicationcable
3 Preparation
3.1 Preparingwaterpiping
3.1.1 Tocheckthewatervolume
Minimumwatervolume
Check that the total water volume in the installation is minimum
13.5liter,theinternalwatervolumeoftheindoorunitNOTincluded.
INFORMATION
In critical processes, or in rooms with a high heat load,
extrawatermightberequired.
NOTICE
When circulation in each space heating loop is controlled
by remotely controlled valves, it is important that the
minimum water volume is guaranteed, even if all of the
valvesareclosed.

4Installation
Installationmanual
5
EHYHBH05AAV3+EHYHBH/X08AAV3
DaikinAlthermahybridheatpump–heatpumpmodule
4P3495871C–2013.10
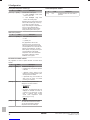
3.2 Preparingelectricalwiring
3.2.1 Overviewofelectricalconnectionsfor
externalandinternalactuators
Item Description Wires Maximum
running
current
Outdoorunitandindoorunitpowersupply
1 Powersupplyfor
outdoorunit
2+GND (a)
2 Powersupplyand
interconnectioncableto
indoorunit
3+GND (g)
3 Powersupplygas
boiler
2+GND (c)
4 PreferentialkWhrate
powersupply(voltage
freecontact)
2(e)
5 NormalkWhratepower
supply
2 6.3A
Userinterface
6 Userinterface 2 (f)
Optionalequipment
7 3wayvalve 3 100mA(b)
8 Domestichotwater
tankthermistor
2(d)
9 Powersupplyfordrain
panheater
2(b)
10 Roomthermostat 3or4 100mA(b)
11 Outdoorambient
temperaturesensor
2(b)
12 Indoorambient
temperaturesensor
2(b)
13 Heatpumpconvector 4 100mA(b)
Fieldsuppliedcomponents
14 Shutoffvalve 2 100mA(b)
15 Electricitymeter 2 (b)
16 Domestichotwater
pump
2(b)
17 Alarmoutput 2 (b)
18 Changeovertoexternal
heatsourcecontrol
2(b)
19 Spacecool/heat
operationcontrol
2(b)
20 Powerconsumption
digitalinputs
2(perinput
signal)
(b)
21 Gasmeter 2 (b)
(a) Refertonameplateonoutdoorunit.
(b) Minimumcablesection0.75mm².
(c) Usethecablesuppliedwiththeboiler.
(d) Thethermistorandconnectionwire(12m)aredelivered
withthedomestichotwatertank.
(e) Cablesection0.75mm²till1.25mm²;maximumlength:
50m.Voltagefreecontactshallensuretheminimum
applicableloadof15VDC,10mA.
(f) Cablesection0.75mm²till1.25mm²;maximumlength:
500m.Applicableforbothsingleuserinterfaceanddual
useinterfaceconnection.
(g) Cablesection1.5mm2;maximumlength:50m.
NOTICE
More technical specifications of the different connections
areindicatedontheinsideoftheindoorunit.
4 Installation
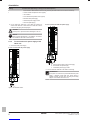
4.1 Openingtheunits
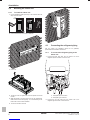
4.1.1 Toopentheswitchboxcoverofthe
indoorunit
1Removethesidepanelattherightsideoftheindoorunit.The
sidepanelisfixedatthebottomwith1screw.
2Remove the upper and lower screw on the side panel of the
switchbox.
3Therightpaneloftheswitchboxwillopen.
4Remove the upper and lower screw on the front panel of the
switchbox.
5Thefrontpaneloftheswitchboxwillopen.
2x
2x
2
4
5
3
Whentheboilerisinstalledandaccesstotheswitchboxisrequired,
pleasefollowthestepsbelow.
6Remove the upper and lower screw on the side panel of the
switchbox.
7Removetheswitchboxfromtheunit.
8Hook the switch box to the side of the unit with the hooks
foreseenontheswitchbox.
6
6
7
8

4Installation
Installationmanual
6
EHYHBH05AAV3+EHYHBH/X08AAV3
DaikinAlthermahybridheatpump–heatpumpmodule
4P3495871C–2013.10
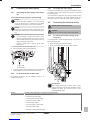
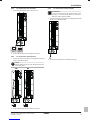
4.2 Mountingtheindoorunit
4.2.1 Toinstalltheindoorunit
1Puttheinstallationpattern(seebox)onthewallandfollowthe
stepsasshownbelow.
21 3
2Fixthewallbrackettothewallwith2M8bolts.
2x
3Lifttheunit.
30kg
4Tiltthetopoftheunitagainstthewallatthepositionofthewall
bracket.
5Slidethebracketontheback oftheunitoverthewallbracket.
Makesuretheunitisfixedproperly.Youcanadditionallyfixthe
bottomsideoftheunitwith2M8bolts.
6Theunitismountedtothewall.
4.3 Connectingtherefrigerantpiping
See the outdoor unit installation manual for all guidelines,
specificationsandinstallationinstructions.
4.3.1 Toconnecttherefrigerantpipingtothe
indoorunit
1Connect the liquid stop valve from the outdoor unit to the
refrigerantliquidconnectionoftheindoorunit.
b
a
aRefrigerantliquidconnection
bRefrigerantgasconnection
2Connect the gas stop valve from the outdoor unit to the
refrigerantgasconnectionoftheindoorunit.

4Installation
Installationmanual
7
EHYHBH05AAV3+EHYHBH/X08AAV3
DaikinAlthermahybridheatpump–heatpumpmodule
4P3495871C–2013.10
4.4 Connectingthewaterpiping
4.4.1 Connectingthewaterpipingoftheindoor
unit
Toconnectthewaterpipingforspaceheating
NOTICE
In case of old heating installations, it is recommended to
use a dirt separator. Dirt or sediment from the heating
installationcandamagetheunitandreduceitslifetime.
NOTICE
DoNOT useexcessiveforce when connectingthepiping.
Deformationofthepipingcancausemalfunctioningofthe
unit.
NOTICE
▪ It is recommended to install shutoff valves to space
heatinginandspaceheatingoutconnections.Shutoff
valvesarefieldsupplied.Theyallowservicetotheunit
withoutdrainingthewholesystem.
▪ Foresee a drain/fill point to drain or fill the space
heatingcircuit
1Connectthewaterinletconnection(Ø22mm).
2Connectthewateroutletconnection(Ø22mm).
a
b
aWaterinlet
bWateroutlet
3Incaseofconnectionwiththeoptionaldomestichotwatertank,
seetheinstallationmanualofthedomestichotwatertank.
4.4.2 Tofillthedomestichotwatertank
For installation instructions, see the installation manual of the
domestichotwatertank.
4.4.3 Toinsulatethewaterpiping
Thepipinginthecompletewatercircuitmustbeinsulatedtoprevent
condensationduringcoolingoperationand reduction of the heating
andcoolingcapacity.
If the temperature is higher than 30°C and the humidity is higher
than RH 80%, the thickness of the sealing materials should be at
least20mmtopreventcondensationonthesurfaceofthesealing.
4.5 Connectingtheelectricalwiring
DANGER:RISKOFELECTROCUTION
WARNING
ALWAYSusemulticorecableforpowersupplycables.
4.5.1 Toconnecttheelectricalwiringonthe
indoorunit
It is recommended to install all electrical wiring to the hydro box
beforeinstallingtheboiler.
1Wiringshouldentertheunitfromthebottom.
2Routingofthewiringinsidetheunitshouldbeasfollows:
b
a
c
a
b
c
INFORMATION
When installing field supply or option cables, foresee
sufficientcablelength.Thiswillmakeitpossibletoremove/
reposition the switch box and gain acces to other
componentsduringservice.
Routing Possiblecables(dependingonunittypeandinstalledoptions)
a ▪ Interconnectioncablebetweenindoorandoutdoorunit
▪ NormalkWhratepowersupply
▪ PreferentialkWhratepowersupply
▪ Heatpumpconvector(option)
▪ Roomthermostat(option)
▪ 3wayvalve(optionincaseoftank)
▪ Shutoffvalve(fieldsupply)
▪ Domestichotwaterpump(fieldsupply)

4Installation
Installationmanual
8
EHYHBH05AAV3+EHYHBH/X08AAV3
DaikinAlthermahybridheatpump–heatpumpmodule
4P3495871C–2013.10
Routing Possiblecables(dependingonunittypeandinstalledoptions)
b ▪ Interconnectioncablebetweenindoorunitandgasboiler(seeboilermanualforconnectioninstructions)
c ▪ Outdoorambienttemperaturesensor(option)
▪ Userinterface
▪ Indoorambienttemperaturesensor(option)
▪ Electricalmeter(fieldsupply)
▪ Preferentialpowersupplycontact
▪ Gasmeter(fieldsupply)
3Fix the cable with cable ties to the cable tie mountings to
ensurestrainreliefandtomakesurethatitdoesNOTcomein
contactwiththepipingandsharpedges.
CAUTION
DoNOTpushorplaceredundantcablelengthintheunit.
NOTICE
More technical specifications of the different connections
areindicatedontheinsideoftheindoorunit.
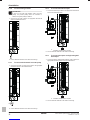
4.5.2 Toconnectthemainpowersupplyofthe
indoorunit
1Connectthemainpowersupply.
IncaseofnormalkWhratepowersupply
X2M
X1M
1
2
3
X5M
1 2 3
1 2 3
a
Legend:seeillustrationbelow.
IncaseofpreferentialkWhratepowersupply
30
31
S1S
X2M
X1M
1
3
4
2
3
X5M
L N
L N
c
1 2 3
1 2 3
ba
aInterconnectioncable(=mainpowersupply)
bNormalkWhratepowersupply
cPreferentialpowersupplycontact
2Fixthecablewithcabletiestothecabletiemountings.
INFORMATION
IfthesystemisconnectedtoapreferentialkWhratepower
supply, a separate normal kWh rate power supply is
required. Change connector X6Y according to the wiring
diagramontheinsideoftheindoorunit.

4Installation
Installationmanual
9
EHYHBH05AAV3+EHYHBH/X08AAV3
DaikinAlthermahybridheatpump–heatpumpmodule
4P3495871C–2013.10
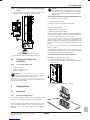
4.5.3 Toconnecttheuserinterface
1Connecttheuserinterfacecabletotheindoorunit.
X2M
X1M
1
2
X5M
2Fixthecablewithcabletiestothecabletiemountings.
4.5.4 Toconnecttheshutoffvalve
1Connectthevalvecontrolcabletotheappropriateterminalsas
shownintheillustrationbelow.
NOTICE
WiringisdifferentforaNC(normalclosed)valveandaNO
(normalopen)valve.
X2M
X1M
7
5
6
X5M
X2M
X1M
X5M
NO NC
M2S M2S
7
6
5
2Fixthecablewithcabletiestothecabletiemountings.
4.5.5 Toconnecttheelectricalmeter
INFORMATION
Incaseofanelectricalmeterwithtransistoroutput,check
the polarity. The positive polarity MUST be connected to
X5M/7;thenegativepolaritytoX5M/8.
1Connecttheelectricalmeterscabletotheappropriateterminals
asshownintheillustrationbelow.
X2M
X1M
7
8
X5M
2Fixthecablewithcabletiestothecabletiemountings.

4Installation
Installationmanual
10
EHYHBH05AAV3+EHYHBH/X08AAV3
DaikinAlthermahybridheatpump–heatpumpmodule
4P3495871C–2013.10
4.5.6 Toconnectthegasmeter
INFORMATION
In case of a gas meter with transistor output, check the
polarity. The positive polarity MUST be connected to
X5M/9;thenegativepolaritytoX5M/10.
1Connect the gas meter cable to the appropriate terminals as
shownintheillustrationbelow.
X2M
X1M
9
10
X5M
2Fixthecablewithcabletiestothecabletiemountings.
4.5.7 Toconnectthedomestichotwaterpump
1Connectthedomestichotwaterpumpcabletotheappropriate
terminalsasshownintheillustrationbelow.
33/35
34
X2M
X1M
X5M
1~
M
M2P
2Fixthecablewithcabletiestothecabletiemountings.
4.5.8 Toconnectthealarmoutput
1Connectthealarmoutputcabletotheappropriateterminalsas
shownintheillustrationbelow.
28
Y1
X2M
X1M
A4P
A8P
X5M
a
aInstallationofEKRP1HBisrequired.
2Fixthecablewithcabletiestothecabletiemountings.
4.5.9 Toconnectthespacecooling/heatingON/
OFFoutput
1Connectthespacecooling/heatingON/OFFoutputcabletothe
appropriateterminalsasshownintheillustrationbelow.
29
Y2
X2M
X1M
A4P
A8P
X5M
a
aInstallationofEKRP1HBisrequired.
2Fixthecablewithcabletiestothecabletiemountings.

5Configuration
Installationmanual
11
EHYHBH05AAV3+EHYHBH/X08AAV3
DaikinAlthermahybridheatpump–heatpumpmodule
4P3495871C–2013.10
4.5.10 Toconnectthepowerconsumptiondigital
inputs
1Connect the power consumption digital inputs cable to the
appropriateterminalsasshownintheillustrationbelow.
X2M
X1M
A4P
A8P
X5M
S6S
S7S
S8S
S9S
a
aInstallationofEKRP1AHTAisrequired.
2Fixthecablewithcabletiestothecabletiemountings.
4.6 Finishingtheindoorunit
installation
4.6.1 Toclosetheindoorunit
1Closetheswitchbox.
2Mountthesideplatetotheunit.
3Mountthetopplate.
NOTICE
When closing the indoor unit cover, make sure that the
tighteningtorquedoesNOTexceed4.1N•m.
Before doing the configuration of the heat pump module, the gas
boilerMUSTbeinstalledcorrectly.
5 Configuration
5.1 Indoorunit
5.1.1 Overview:Configuration
IfyoudoNOTconfigurethesystemcorrectly,itmightNOTworkas
expected.Youcanconfigurethesystemwiththeuserinterface.
WhenyouturnONtheuserinterfaceforthefirsttime(viatheindoor
unit), a quick wizard starts to help you configure the system. If
necessary, you can also make changes to the configuration
afterwards.
NOTICE
The explanation about the configuration in this chapter
gives you ONLY basic explanations. For more detailed
explanation and background information, see the installer
referenceguide.
Theconfigurationinfluencesthefollowing:
▪ Thecalculationsofthesoftware
▪ Whatyoucanseeonanddowiththeuserinterface
Legendforthesettingstables:
▪#:Breadcrumbinthemenustructure
▪Code:Codeintheoverviewsettings
Whentheinstallersettingsare changed, the system will request to
confirm.Whenconfirmationiscomplete,thescreenwill shortlyturn
OFFand"busy"willbedisplayedforseveralseconds.
The most commonly used installation settings are accessible
through the menu structure. Their location is mentioned by the
breadcrumbindication(#).Additionally,allinstallersettingscanalso
be found in "5.1.3 Menu structure: Overview installer settings" on
page17.
For access to the setting codes, see "To access the installer
settings"onpage12.
Notallsettingsareaccessiblethroughthemenustructure.Someare
only accessible through their code. Then in the table explained
below,thebreadcrumbissetasN/A(notapplicable).
ToconnectthePCcabletotheswitchbox
Prerequisite:TheEKPCCAB*kitisrequired.
1ConnectthecablewithUSBconnectiontoyourPC.
2ConnecttheplugofthecabletoX10AonA1Poftheswitchbox
oftheindoorunit.
3Payspecialattentiontothepositionoftheplug!
2
3 4 5
H J S T

5Configuration
Installationmanual
12
EHYHBH05AAV3+EHYHBH/X08AAV3
DaikinAlthermahybridheatpump–heatpumpmodule
4P3495871C–2013.10
Toaccessthemostusedcommands
Toaccesstheinstallersettings
1SettheuserpermissionleveltoInstaller.
2Goto[A]: >Installersettings.
Toaccesstheoverviewsettings
1SettheuserpermissionleveltoInstaller.
2Goto[A.8]: >Installersettings>Overviewsettings.
TosettheuserpermissionleveltoInstaller
1Goto[6.4]: >Information>Userpermissionlevel.
2Press formorethan4seconds.
Result: isdisplayedonthehomepages.
3IfyoudoNOTpressanybuttonformorethan1hourorpress
againformorethan4seconds,theinstallerpermissionlevel
switchesbacktoEnduser.
Toswitchbetweenuserpermissionlevels(Enduserand
Advancedenduser)
1Goto[6]oranyofitssubmenus: >Information.
2Press formorethan4seconds.
Result: The user permission level switches to Adv. end user.
Additionalinformationisdisplayedand"+"isaddedtothemenu
title.
3IfyoudoNOTpressanybuttonformorethan1hourorpress
again for more than 4 seconds, the user permission level
switchesbacktoEnduser.
Tocopythesystemsettingsfromthefirsttothe
seconduserinterface
If a second user interface is connected, the installer must first
proceedbelowinstructionsfortheproperconfigurationofthe2user
interfaces.
Thisprocedure offers you also the possibility to copy the language
setfromoneuserinterfacetotheotherone:e.g.fromEKRUCBL2to
EKRUCBL1.
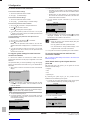
1Whenpoweristurnedonforthefirsttime,bothuserinterfaces
display:
15:10Tue
U5: Auto adress
Push 4 sec. to continue
2Push for4secondsontheuserinterfaceonwhichyouwant
to proceed to the quick wizard. This user interface is now the
mainuserinterface.
INFORMATION
Duringthequickwizard,theseconduserinterfacedisplays
BusyandwillNOTbepossibletooperate.
3Thequickwizardwillguideyou.
4For proper operation of the system, the local data on the two
userinterfacesmustbethesame.IfthisisNOTthecase,both
userinterfaceswilldisplay:
Synchronization
Confirm
Data difference detected.
Please select action:
Adjust
Send data
5Selecttherequiredaction:
▪ Senddata:theuserinterfaceyouareoperatingcontainsthe
correctdataandthedataontheotheruserinterfacewillbe
overwritten.
▪ Receive data: the user interface you are operating does
NOTcontainthecorrectdataandthedataontheotheruser
interfacewillbeusedtooverwrite.
6The user interface requests confirmation if you are sure to
proceed.
Start copy
Confirm
Are you sure you want to
start the copy operation?
Adjust
OK Cancel
7Confirmtheselectiononthescreenbypushing andalldata
(languages, schedules etc.) will be synchronised from the
selectedsourceuserinterfacetotheotherone.
INFORMATION
▪ During the copying, both controllers display Busy and
willNOTallowoperation.
▪ Thecopyoperationcantakeupuntil90minutes.
▪ It is recommended to change installer settings, or the
configurationitself,onthemainuserinterface.
8Yoursystemisnowsettobeoperatedbythe2userinterfaces.
Tocopythelanguagesetfromthefirsttothe
seconduserinterface
See"Tocopy the system settings from the firsttotheseconduser
interface"onpage12.
Quickwizard:Setthesystemlayoutafterfirst
powerON
After first power ON of the system, you are guided on the user
interfacetodoinitialsettings:
▪ language,
▪ date,
▪ time,
▪ systemlayout.
By confirming the system layout, you can proceed with the
installationandcommissioningofthesystem.
1At power ON, the quick wizard starts as long as the system
layoutwasNOTconfirmedyet,bysettingthelanguage.
Language
Confirm
Select the desired language
Adjust
2Setthecurrentdateandtime.
Date
Confirm
What date is it today?
Adjust Scroll
Tue Jan12013

5Configuration
Installationmanual
13
EHYHBH05AAV3+EHYHBH/X08AAV3
DaikinAlthermahybridheatpump–heatpumpmodule
4P3495871C–2013.10
Time
What is the current time?
00 : 00
Confirm Adjust Scroll
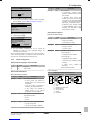
3Set the system layout settings: Standard, Options, Capacities.
Formoredetails,see"5.1.2Basicconfiguration"onpage13.
System layout
Select
Options
Scroll
Capacities
A.2 1
Confirm layout
Standard
4Confirmbypressing .
Confirm layout
Please confirm the system
layout. The system will
OK
restart and will be ready for
Cancel
first startup.
Confirm Adjust
5The user interface reinitialises and you can proceed the
installation by setting the other applicable settings and
commissioningofthesystem.
Whentheinstallersettingsare changed, the system will request to
confirm.Whenconfirmationiscomplete,thescreenwill shortlyturn
OFFand"busy"willbedisplayedforseveralseconds.
5.1.2 Basicconfiguration
Quickwizard:Language/timeanddate
# Code Description
[A.1] N/A Language
[1] N/A Timeanddate
Quickwizard:Standard
Spaceheating/coolingsettings
# Code Description
[A.2.1.7] [C07] Unittemperaturecontrol:
▪ 0 (LWT control): Unit operation is
decided based on the leaving water
temperature.
▪ 1 (Ext RT control): Unit operation is
decidedbytheexternalthermostat.
▪ 2 (RT control): Unit operation is
decided based on the ambient
temperatureoftheuserinterface.
[A.2.1.B] N/A Onlyifthereare2userinterfaces:
Userinterfacelocation:
▪ Atunit
▪ Inroom
[A.2.1.8] [702] Numberofwatertemperaturezones:
▪ 0(1LWTzone):Main
▪ 1(2LWTzones):Main+additional
# Code Description
[A.2.1.9] [F0D] Pumpoperation:
▪ 0 (Continuous): Continuous pump
operation,regardlessofthermoONor
OFFcondition.
▪ 1 (Sample): When thermo OFF
conditionoccurs,thepumprunsevery
5 minutes and the water temperature
ischecked.Ifthewatertemperatureis
belowtarget,unitoperationcanstart.
▪ 2 (Request): Pump operation based
on request. Example: Using a room
thermostat and thermostat creates
thermoON/OFFcondition.
Quickwizard:Options
Domestichotwatersettings
# Code Description
[A.2.2.1] [E05] Domestichotwaterpreparation:
▪ 0(No):NOTpossible
▪ 1(Yes)(default):Possible
[A.2.2.2] [E06] Domestichotwaterproduction:
▪ 0(Type1):byboiler
▪ 1(Type2):bytank
[A.2.2.A] [D02] Domestichotwaterpump:
Incaseof[E06]=0
▪ 0(No)(default):NOTinstalled
Incaseof[E06]=1
▪ 0(No)(default):NOTinstalled
▪ 1(Secondaryrtrn):Installedforinstant
hotwater
▪ 2 (Disinf. shunt): Installed for
disinfection
Seealsoillustrationsbelow.
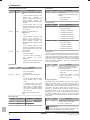
Incaseof[E06]=1
Domestichotwaterpumpinstalledfor…
Instanthotwater Disinfection
c
f
b
a
g
c
b
ad f
e g
aIndoorunit
bTank
cDomestichotwaterpump
dHeaterelement
eNonreturnvalve
fShower
gColdwater

5Configuration
Installationmanual
14
EHYHBH05AAV3+EHYHBH/X08AAV3
DaikinAlthermahybridheatpump–heatpumpmodule
4P3495871C–2013.10
Thermostatsandexternalsensors
# Code Description
[A.2.2.4] [C05] Externalroomthermostatforthemain
zone:
▪ 1 (Thermo ON/OFF): When the used
external room thermostat or
heatpumpconvectorcanonlysenda
thermo ON/OFF condition. No
separationbetweenheatingorcooling
demand.
▪ 2 (H/C request): When the used
external room thermostat can send a
separate heating/cooling thermo ON/
OFFcondition.
[A.2.2.5] [C06] Externalroomthermostatforthe
additionalzone:
▪ 0:N/A
▪ 1 (Thermo ON/OFF): When the used
external room thermostat or
heatpumpconvectorcanonlysenda
thermo ON/OFF condition. No
separationbetweenheatingorcooling
demand.
▪ 2 (H/C request): When the used
external room thermostat can send a
separate heating/cooling thermo ON/
OFFcondition.
[A.2.2.B] [C08] Externalsensor:
▪ 0(No):NOTinstalled.
▪ 1 (Outdoor sensor): Connected to
PCB measuring the outdoor
temperature.
▪ 2 (Room sensor): Connected to PCB
measuringtheindoortemperature.
DigitalI/OPCB
# Code Description
[A.2.2.6.2] [D07] Solarpumpstationkit:
▪ 0(No):NOTinstalled
▪ 1(Yes):Installed
[A.2.2.6.3] [C09] AlarmoutputonoptionalEKRP1HB
PCB:
▪ 0(Normallyopen): The alarm output
will be powered when an alarm
occurs.
▪ 1 (Normally closed): The alarm
outputwillNOTbepoweredwhenan
alarm occurs. This installer setting
allows distinction between detection
ofanalarmanddetectionofapower
failuretotheunit.
Seealsotablebelow(Alarmoutput
logic).
Alarmoutputlogic
[C09] Alarm Noalarm Nopower
supplytounit
0(default) Closedoutput Openoutput Openoutput
1 Openoutput Closedoutput
DemandPCB
# Code Description
[A.2.2.7] [D04] DemandPCB
IndicatesiftheoptionaldemandPCBis
installed.
▪ 0(No):NOTinstalled
▪ 1(Yes):Installed
Energymetering
# Code Description
[A.2.2.8] [D08] OptionalexternalkWhmeter1:
▪ 0(No):NOTinstalled
▪ 1:Installed(0.1pulse/kWh)
▪ 2:Installed(1pulse/kWh)
▪ 3:Installed(10pulse/kWh)
▪ 4:Installed(100pulse/kWh)
▪ 5:Installed(1000pulse/kWh)
[A.2.2.C] [D0A] Optionalgasmeter:
▪ 0(No):NOTinstalled
▪ 1:Installed(1pulse/m³)
▪ 2:Installed(10pulse/m³)
▪ 3:Installed(100pulse/m³)
Savingsmode
Theusercanchoosewhetherswitchingbetweenoperationmodesis
eithereconomicallyorecologicallyoptimised.SettoEconomical,the
systemwillinalloperatingconditionsselecttheenergysource(gas
orelectricity)basedon energyprices, resultinginaminimisationof
energy costs. Set to Ecological, the heat source will be selected
based on ecological parameters, resulting in a minimisation of
primaryenergyconsumption.
# Code Description
[A.6.7] [704] Defineswhetherswitchingbetween
operationmodesiseithereconomically
orecologicallyoptimised.
▪ 0 (Economical)(default): reduction of
energycosts
▪ 1 (Ecological): reduction of primary
energy consumption, but not
necessarilyenergycosts
Primaryenergyfactor
The primary energy factor indicates how many units of primary
energy (natural gas, crude oil, or other fossil fuels, prior to
undergoing any humanmade conversions or transformations) are
neededtoobtain1unitofacertain(secondary)energysource,such
as electricity. The primary energy factor for natural gas is 1.
Assuming an average electricity production efficiency (including
transportation losses) of 40%, the primary energy factor for
electricityequals2.5(=1/0.40).Theprimaryenergyfactorallowsyou
to compare 2 different energy sources. In this case, the primary
energyuseoftheheatpumpiscomparedtothenaturalgasuseof
thegasboiler.
# Code Description
N/A [703] Comparestheprimaryenergyuseofthe
heatpumpwiththatoftheboiler.
0~6,step:0.1(default:2.5)
INFORMATION
The primary energy factor can always be set, but is only
usedincasethesavingsmodeissettoEcological.

5Configuration
Installationmanual
15
EHYHBH05AAV3+EHYHBH/X08AAV3
DaikinAlthermahybridheatpump–heatpumpmodule
4P3495871C–2013.10
Spaceheating/coolingcontrol
Leavingwatertemperature:Mainzone
# Code Description
[A.3.1.1.1] N/A Setpointmode:
▪ 0(Fixed):Absolute
▪ 1 (Weather dep.): Weather
dependent
▪ 2 (Fixed/scheduled): Absolute +
scheduled (only for leaving water
temperaturecontrol)
▪ 3 (WD/scheduled): Weather
dependent + scheduled (only for
leavingwatertemperaturecontrol)
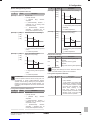
[A.3.1.1.3] [100]
[101]
[102]
[103]
Weatherdependentcurve(heating):
[1-03]
[1-02]
Ta
Tt
[1-00] [1-01]
▪ Tt: Target leaving water temperature
(main)
▪ Ta:Outdoortemperature
[A.3.1.1.4] [106]
[107]
[108]
[109]
OnlyforEHYHBX08.Weather
dependentcurve(cooling):
[1-09]
[1-08]
Ta
Tt
[1-06] [1-07]
▪ Tt: Target leaving water temperature
(main)
▪ Ta:Outdoortemperature
INFORMATION
Inorder tooptimisecomfort aswellas runningcosts, itis
recommended to choose weatherdependent setpoint
operation. Set the settings carefully; they have significant
influence on heat pump as well as boiler operation. Too
highleavingwatertemperaturecanresultinconstantboiler
operation.
Leavingwatertemperature:Additionalzone
# Code Description
[A.3.1.2.1] N/A Setpointmode:
▪ 0(Fixed):Absolute
▪ 1 (Weather dep.): Weather
dependent
▪ 2 (Fixed/scheduled): Absolute +
scheduled (only for leaving water
temperaturecontrol)
▪ 3 (WD/scheduled): Weather
dependent + scheduled (only for
leavingwatertemperaturecontrol)
# Code Description
[A.3.1.2.3] [000]
[001]
[002]
[003]
Weatherdependentcurve(heating):
[0-00]
[0-01]
Ta
Tt
[0-03] [0-02]
▪ Tt: Target leaving water temperature
(additional)
▪ Ta:Outdoortemperature
[A.3.1.2.4] [004]
[005]
[006]
[007]
OnlyforEHYHBX08.Weather
dependentcurve(cooling):
[0-04]
[0-05]
Ta
Tt
[0-07] [0-06]
▪ Tt: Target leaving water temperature
(additional)
▪ Ta:Outdoortemperature
Pumpcontrol:Flowtarget
# Code Description
N/A [80B] Targetflowrateduringheatpump
operation.
N/A [80C] Targetflowrateduringhybrid
operation.
N/A [80D] Targetflowrateduringboileroperation.
INFORMATION
Changingthese settings canresultin discomfort.Referto
theinstallerreferenceguideformoreinformation.
Leavingwatertemperature:Modulation
# Code Description
[A.3.1.1.5] [805] Leavingwatertemperaturemodulation:
▪ 0(No):Disabled
▪ 1 (Yes): Enabled. The leaving water
temperature is calculated according
to the difference between desired
and actual room temperature. This
allows better matching of the
heat pump capacity to actual
required capacity and results in less
start/stop cycles of the heat pump
andmoreeconomicoperation.

5Configuration
Installationmanual
16
EHYHBH05AAV3+EHYHBH/X08AAV3
DaikinAlthermahybridheatpump–heatpumpmodule
4P3495871C–2013.10
Leavingwatertemperature:Emittertype
# Code Description
[A.3.1.1.7] [90B] Reactiontimeofthesystem:
▪ 0: Quick. Example: Small water
volumeandfancoils.
▪ 1: Slow. Example: Large water
volume,floorheatingloops.
Dependingonthesystemwatervolume
andtheheatemitterstype,theheatup
orcooldownofaspacecantake
longer.Thissettingcancompensatefor
asloworaquickheating/cooling
systembyadjustingtheunitcapacity
duringtheheatup/cooldowncycle.
Quickheatupfunction
# Code Description
N/A [C0A] Indoorquickheatupfunction:
▪ 0:OFF.
▪ 1(default):On.
Onlyapplicableincaseofroom
thermostatcontrol.Thefunctionwill
startupthegasboilerwhentheactual
roomtemperatureis3°Clowerthanthe
desiredroomtemperature.Thelarge
boilercapacitycanquicklyboostupthe
roomtemperaturetothedesired
temperature.Thiscanbeusefulafter
longperiodsofabsenceoraftera
breakdownofthesystem.
Domestichotwatercontrol
Only applicable in case an optional domestic hot water tank is
installed.
# Code Description
[A.4.1] [60D] DomestichotwaterType:
▪ 0(Reheatonly):Onlyreheatoperation
isallowed.
▪ 1 (Reheat + sched.): Same as 2, but
betweenthescheduledheatupcycles,
reheatoperationisallowed.
▪ 2 (Scheduled only): The domestic hot
water tank can ONLY be heated
accordingtoaschedule.
[A.4.3.1] N/A Howisthetanktemperaturetobe
displayedontheuserinterface?
▪ Astemperature.
60°C
▪ Asgraphic:Thetemperaturehastobe
displayed as available hot water for
xpersons.Ifyouchoosethis,youalso
have to configure which number
equals which temperature under
[A.4.3.2.1]~[A.4.3.2.6]:
4
[A.4.5] [60E] Themaximumtemperaturethatusers
canselectforthedomestichotwater.
Youcanusethissettingtolimitthe
temperatureatthehotwatertaps.
Contact/helpdesknumber
# Code Description
[6.3.2] N/A Numberthatuserscancallincaseof
problems.

5Configuration
Installationmanual
17
EHYHBH05AAV3+EHYHBH/X08AAV3
DaikinAlthermahybridheatpump–heatpumpmodule
4P3495871C–2013.10
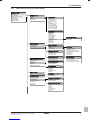
5.1.3 Menustructure:Overviewinstallersettings
Language
Systemlayout
Space operation
Domestic hot water (DHW)
Installer settings[A]
Heat sources
System operation
Commissioning
Overview settings
Standard
Options
Capacities
System layout[A.2]
Unit type
Standard[A.2.1]
DHW operation
DHWtanktype
Contact type main
Contact type add.
Options[A.2.2]
Digital I/O PCB Solarkit
Alarm output
Digital I/O PCB[A.2.2.6]
LWT settings
Roomthermostat
Operation range
Space operation
[A.3]
Main
Additional
LWT settings[A.3.1]
LWT setpoint mode
Temperaturerange
Set weather-dependent heating
Set weather-dependent cooling
Main[A.3.1.1]
Modulated LWT
Shut-off valve
LWT setpoint mode
Temperaturerange
Set weather-dependent heating
Set weather-dependent cooling
Additional[A.3.1.2]
Room temp. range
Roomtemp.offset
Room thermostat[A.3.2]
Space heating OFF temp
SpacecoolingOntemp
[A.3.3]
Type
Domestic hot water (DHW)[A.4]
Setpoint readout type
Conversionpersons
Setpoint readout[A.4.3]
External sensor
Demand PCB
Disinfection
Operationday
Start time
Temperature target
[A.4.4]
Duration
Boiler
Heat sources[A.5]
Auto emergency operation
Equilibriumtemp.
Boiler[A.5.2]
Setpoint readout
Disinfection
Maximum setpoint
Autorestart
Preferential kWh rate
Pwr consumpt. control
System operation[A.6]
Averaging time
Ext amb. sensor offset
Mode
Type
Amp. value
kW value
Pwr consumpt. control[A.6.3]
Amp. limits for DI
kW limits for DI
Forced defrost
Allowed heaters
ForcedpumpOFF
Preferential kWh rate[A.6.2]
Priority
Operation range
Disinfection
Confirm layout Compressortype
Indoor software type
Backup heater steps
BUH type
Preferential kWh rate
Emitter type
Unitcontrolmethod
Number of LWT zones
Pump operation mode
Power saving possible
User interface location
Room temp. step
Delta T emitter
External kWh meter 1
Gas meter
DHW pump
Savings mode
Calorific value
SP mode
Weather-dependent curve
DHW tank

5Configuration
Installationmanual
18
EHYHBH05AAV3+EHYHBH/X08AAV3
DaikinAlthermahybridheatpump–heatpumpmodule
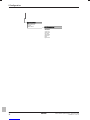
4P3495871C–2013.10
Test run
UFHscreeddryout
Air purge
Actuator test run
Commissioning[A.7]
Pump
Solarpump
Shut-off valve
3-way valve
Actuator test run[A.7.4]
Alarm output
Boiler
H/C signal
Quick heatup
Bypass valve
DHW pump

6Commissioning
Installationmanual
19
EHYHBH05AAV3+EHYHBH/X08AAV3
DaikinAlthermahybridheatpump–heatpumpmodule
4P3495871C–2013.10
6 Commissioning
6.1 Checklistbeforetestrun
DoNOToperatethesystembeforethefollowingchecksareOK:
Theindoorunitisproperlymounted.
Theoutdoorunitisproperlymounted.
Thegasboilerisproperlymounted.
Thefollowingfieldwiringhasbeencarriedoutaccording
tothisdocumentandtheapplicablelegislation:
▪ Betweenthelocalsupplypanelandtheindoorunit
▪ Betweentheindoorunitandthevalves(ifapplicable)
▪ Between the indoor unit and the room thermostat (if
applicable)
▪ Between the indoor unit and the domestic hot water
tank(ifapplicable)
▪ Between the gas boiler and the local supply panel
(onlyapplicableincaseofhybridsystem)
The communication cable between the gas boiler and
theindoorunitisproperlymounted.
The system is properly earthed and the earth terminals
aretightened.
The fuses or locally installed protection devices are
installed according to this document, and have not been
bypassed.
The power supply voltage matches the voltage on the
identificationlabeloftheunit.
Thereare NO loose connections or damaged electrical
componentsintheswitchbox.
There are NO damaged components or squeezed
pipesontheinsideoftheindoorandoutdoorunits.
ThereareNOrefrigerantleaks.
The refrigerant pipes (gas and liquid) are thermally
insulated.
The correct pipe size is installed and the pipes are
properlyinsulated.
ThereisNOwaterleakinsidetheindoorunit.
ThereisNOwaterleakinsidethegasboiler.
There is NO water leak in the connection between the
gasboilerandtheindoorunit.
Theshutoffvalvesareproperlyinstalledandfullyopen
(fieldsupply).
Thestopvalves(gasandliquid)on theoutdoor unitare
fullyopen.
Theairpurgevalveisopen(atleast2turns).
Thepressurereliefvalvepurgeswaterwhenopened.
ThegasboilerisswitchedON.
6.2 Toperformanairpurge
Prerequisite:Makesuretheuserinterfaceshowsthehomescreens
and that the space heating and domestic hot water demands are
turnedoff.
1Go to [A.7.3]: > Installer settings > Commissioning > Air
purge.
2Setthetype,speedandcircuit.
3SelectStartairpurgeandpress .
4SelectOKandpress .
Result: The air purge starts. It stops automatically when done. To
stopitmanually,press ,selectOKandpress .
6.3 Toperformatestrun
Prerequisite:Makesuretheuserinterfaceshowsthehomescreens
and that the space heating and domestic hot water demands are
turnedoff.
1Go to [A.7.1]: > Installer settings > Commissioning > Test
run.
2Selectatestandpress .Example:Heating.
3SelectOKandpress .
Result: The test run starts. It stops automatically when done
(±30min).Tostopitmanually,press ,selectOKandpress .
INFORMATION
If 2 user interfaces are present, you can start a test run
frombothuserinterfaces.
▪ Theuserinterfaceusedtostartthe test run displays a
statusscreen.
▪ Theotheruserinterfacedisplaysa "busy" screen. You
cannotstopthetestrunaslongasthe"busy"screenis
shown.
6.4 Toperformanactuatortestrun
Prerequisite:Makesuretheuserinterfaceshowsthehomescreens
and that the space heating and domestic hot water demands are
turnedoff.
1Make sure the room temperature control, the leaving water
temperature control and the domestic hot water control are
turnedOFFviatheuserinterface.
2Go to [A.7.4]: > Installer settings > Commissioning >
Actuatortestrun.
3Selectanactuatorandpress .Example:Pump.
4SelectOKandpress .
Result: The actuator test run starts. It automatically stops when
finished.Tostopitmanually,press ,selectOKandpress .
6.4.1 Possibleactuatortestruns
▪ Pumptest
INFORMATION
Calibrationoftheproduced heat calculation is included in
thistest.
Makesurethatairispurgedbeforeexecutingthetestrun.
Alsoavoidcausingdisturbancesinthewatercircuitduring
thetestrun.
▪ Solarpumptest
▪ Shutoffvalvetest
▪ 3wayvalvetest
▪ Alarmoutputtest

7Handovertotheuser
Installationmanual
20
EHYHBH05AAV3+EHYHBH/X08AAV3
DaikinAlthermahybridheatpump–heatpumpmodule
4P3495871C–2013.10
▪ Cooling/heatingsignaltest
▪ Quickheatuptest
▪ DHWpumptest
▪ Gasboilertest
▪ Bypassvalvetest
INFORMATION
Thesetpointduringaboilertestrunis40°C.Keepinmind
the5°C overshootthatis possibleduringboiler operation,
especiallyincombinationwithfloorheatingloops.
6.5 Toperformanunderfloorheating
screeddryout
Prerequisite:Makesuretheuserinterfaceshowsthehomescreens
and that the space heating and domestic hot water demands are
turnedoff.
1Go to [A.7.2]: > Installer settings > Commissioning > UFH
screeddryout.
2Setadryoutprogram.
3SelectStartdryoutandpress .
4SelectOKandpress .
Result: The underfloor heating screed dryout starts. It stops
automaticallywhendone. To stop it manually, press ,selectOK
andpress .
7 Handovertotheuser
Oncethetestrunis finishedand theunitoperatesproperly,please
makesurethefollowingisclearfortheuser:
▪ Fillintheinstallersettingtable(intheoperationmanual)withthe
actualsettings.
▪ Make sure that the user has the printed documentation and ask
him/hertokeepitforfuturereference.Informtheuserthathecan
findthecompletedocumentationontheurlasearlierdescribedin
thismanual.
▪ Explaintheuserhowtoproperlyoperatethesystemandwhathe/
shehastodoincaseofproblems.
▪ Showtheuserwhathe/shehastodoinrelationtomaintainingthe
unit.
▪ Explain the user about energy saving tips as described in the
operationmanual.
Pagina se încarcă...
Pagina se încarcă...
Pagina se încarcă...
Pagina se încarcă...
-
 1
1
-
 2
2
-
 3
3
-
 4
4
-
 5
5
-
 6
6
-
 7
7
-
 8
8
-
 9
9
-
 10
10
-
 11
11
-
 12
12
-
 13
13
-
 14
14
-
 15
15
-
 16
16
-
 17
17
-
 18
18
-
 19
19
-
 20
20
-
 21
21
-
 22
22
-
 23
23
-
 24
24


Daikin EHYHBX08AA Ghid de instalare
- Tip
- Ghid de instalare
în alte limbi
- English: Daikin EHYHBX08AA Installation guide
Lucrări înrudite
-
Daikin R32 Split Series Ghid de instalare
-
Daikin R32 Ghid de instalare
-
Daikin EKHWS300D3V3 Ghid de instalare
-
-
-
Daikin FWF04B7TV1B Ghid de instalare
-
-
Daikin Altherma 3 R Manual de utilizare
-
Daikin FTXM71M + RXM71M Manualul proprietarului