Gigabyte G5 GE Intel 12th Gen Laptop Manualul utilizatorului
- Categorie
- Accesorii mixer / robot de bucătărie
- Tip
- Manualul utilizatorului

Quick Start Guide
V1.1
G
5
G
5
G
E
M
E

1
English
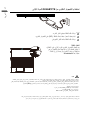
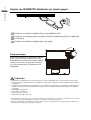
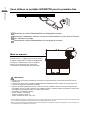
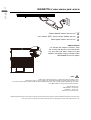
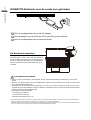
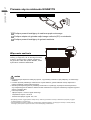
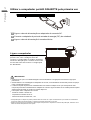
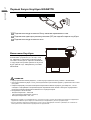
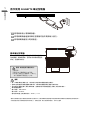
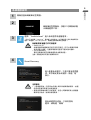
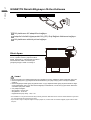
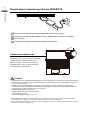
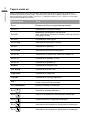
Using GIGABYTE Notebook for the First Time
1Connect the power cord to the AC adapter.
2Connect the adapter to the Power (DC) Input Port on the notebook.
3Connect the power cord to the power outlet.
Switching on the Power
After you turn on the notebook for the very
rst time, do not turn it o until the operating
system has been congured. Please note that
the volume for the audio will not function until
Windows® Setup has completed.
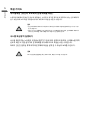
IMPORTANT:
• Ensure that your Notebook PC is connected to a grounded power adapter before turning it on for the first time.
• When using your Notebook PC on power adapter mode, the socket outlet must be near to the unit and easily
accessible.
• Locate the input/output mark on your Notebook PC and ensure that it matches the input/output rating information
on your power adapter. Some Notebook PC models may have multiple rating output currents based on the
available SKU.
• Power adapter information:
- Input voltage: 100-240Vac
- Input frequency: 50-60Hz
- Rating output voltag: 20V , 7.5A
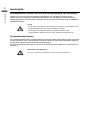
* Product specications and product appearance may dier from country to country. We recommend that you check with your local
dealers for the specications and appearance of the products available in your country.
* Although we endeavor to present the most accurate and comprehensive information at the time of publication, we reserve the right to
make changes without prior notice.
1
2
3

2
English
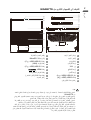
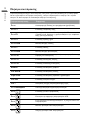
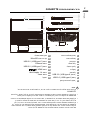
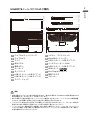
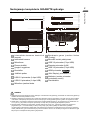
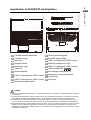
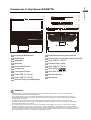
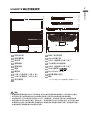
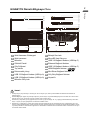
GIGABYTE Notebook Tour
1Webcam Indicator 11 Audio Combo Jack
2Webcam 12 MicroSD Card Reader
3Microphone 13 USB 3.2 Port (USB type-C)
4Display Panel 14 Ethernet Port (LAN)
5Power Button 15 USB 3.2 Port (USB type-C)
6Keyboard 16 HDMI Port
7Touchpad 17 Mini DisplayPort 1.4
8USB 3.2 Port (USB type-A) 18 Power Input (DC)
9USB 2.0 Port (USB type-A) 19 Speakers
10 Microphone-In Jack
IMPORTANT:
● Do not remove the built-in lithium battery. For any service needs, please contact your local GIGABYTE
Authorized Service Center.
● Do not install the Notebook PC on a slant or a place prone to vibrations, or avoid using the Notebook PC in
that location for a long time.This increases the risk that a malfunction or damage to the product will occur.
● Do not store and use Notebook PC in direct sunlight or the location where temperatures exceed 112°F (45°C)
such as inside a vehicle.There is a danger of Lithium-ion battery expansion and aging.
●
Do not use the Notebook PC in a badly ventilated location such as on bedding, on a pillow or cushion, etc,
and do not use it in a location such as room with floor heating as it may cause the computer to overheat.Take
care that the Notebook PC vents (on the side or the bottom) are not blocked especially in these environ-
ments. If the vents are blocked, it may be dangerous and cause the Notebook PC to overheat.

3
English
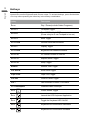
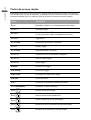
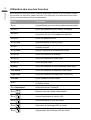
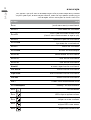
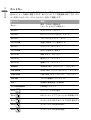
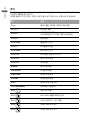
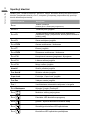
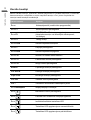
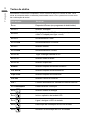
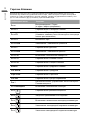
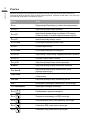
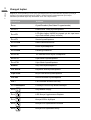
Hotkeys
The computer employs hotkeys or key combinations to access most of the computer’s
controls like screen brightness and volume output. To activate hotkeys, press and hold the
<Fn> key before pressing the other key in the hotkey combination.
Hotkey Description
Fn +~ Play / Pause(in Audio/Video Programs)
Fn + F1 Touchpad Toggle
Fn + F2 Turn LCD Backlight OFF
(Press a key to or use Tochpad to turn on)
Fn + F3 Mute Toggle
Fn + F5/F6 Volume Decrease/Increases
Fn + F7 Display Toggle
Fn + F8/F9 Brightness Decreases/Increases
Fn + F10 PC Camera Power on and o
Fn + F11 Airplane Mode Toggle
Fn + F12 Sleep Toggle
NumLK Number Lock Toggle
Fn+ ScrLK Scroll Lock Toggle
Caps Lock Caps Lock Toggle
Fn+ Esc Control Center Toggle
Fn+ ! Fan Automatic Control / Full Power
Fn + Backspace Disable/Enable Flexikey®
Fn + #
3 Power Modes Toggle
Fn + Launch the LED Keyboard Application
Fn + Toggle the Keyboard LED On/O
Fn + Keyboard LED Illumination Decrease
Fn + Keyboard LED Illumination Increase

4
English
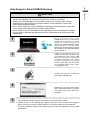
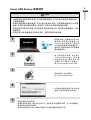
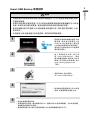
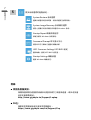
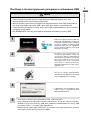
Smart USB Backup Guide
WARNING
yYou can backup original recovery image through this application in case of
losing by device damage.
yYou can backup original recovery image to USB Flash Drive and restore the
system if any storage system replacement with the recovery USB Flash Drive.
yBefore you restore the system through the recovery USB Flash Drive, please
make sure that you have already made the backup of your data.
yPlease DO NOT shut down or un-plug the system when performing backup
through recovery USB Flash Drive.
• Please plug in the USB Flash
Drive which is at least 32GB in
capacity to make the original
image (backup the data in USB
first. All data will be eliminated
during the creation of recovery
USB Flash disk)
• Insert the driver disk to your
optical drive and run the install of
“Smart USB Backup” (for none-
ODD model,please use USB
ODD device or download from
http://www.gigabyte.com
• Run the “Smart USB Backup”
after nishing the install.
• Select your USB Flash disk from
the drop-down list and start to
create the recovery USB disk.
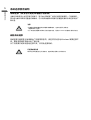
• The window will pop out when the creation of recovery disk is done.
• Please press F12 on starting the system when you need to restore the system.
Select“boot from recovery USB disk” and the system will be restored.
• The time needed for restore will be around 30 mins(time needed may vary by USB
disk model).
1
2
3
4
5

5
English
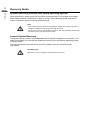
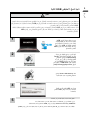
Recovery Guide
System Recovery (Restore your laptop operating system)
When something is going wrong with the laptop operating system, the storage of the laptop
has a hidden partition containing a full back up image of the operating system that can be
used to restore the system to factory default settings.
Note
• If the storage has been switched or the partition deleted, the recovery option will no
longer be available and a recovery service will be needed.
• The recovery function is only available on devices with O/S preinstalled. Devices with
EFI SHELL do not have the recovery function.
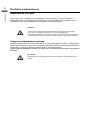
Launch System Recovery
The system recovery feature is preinstalled before the laptop is shipped from the factory. The
option menu allows you to launch the Windows recovery tool to reinstall the operating system
to factory default.
The brief introduction below will show you how to start the recovery tool and restore
your system.
All ready to go
Make sure your PC is plugged in. This will take a few minutes.

6
English
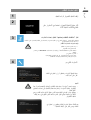
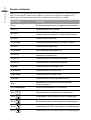
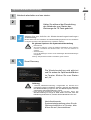
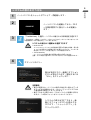
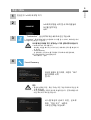
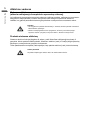
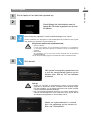
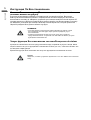
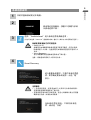
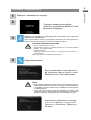
Recovery Guide
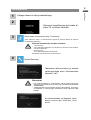
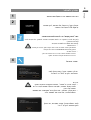
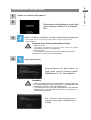
Turn o and restart the laptop.
During the laptop turn on process,press
and hold F9 key to launch the tool.
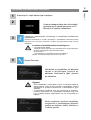
Choose “Troubleshoot” to enter the recovery settings.
(Also you can choose“Continue” to exit recovery system and continue to System
for les or data backup.)
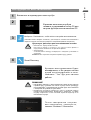
There are two options for system recovery
• Reset this PC
You can choose to keep or remove your files and then
reinstalls Windows without losing your les.
• Smart Recovery
Your PC settings will be restored to factory default settings.
Caution: All personal data and les will be lost.
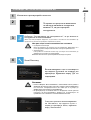
Smart Recovery
The recovery will be activated
and you will see the option buttons
on the window. Click on “Yes” to
start it.
Caution
• Once the “Recovery” is selected, your personal data and
les will be deleted after the laptop starts restoring, and the
operating system will be reset to factory default settings.
• A progress indicator bar will show on the window when the
recovery process is running. Please make sure the AC-
adapter is plugged in and do not turn o the laptop.
After the system recovery is
completed, you will see the
option button on the window,
please click on “Shutdown”.
1
2
3
4

7
English
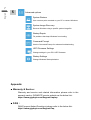
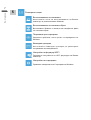
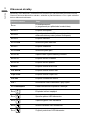
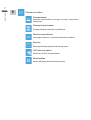
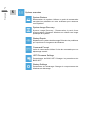
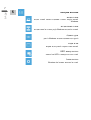
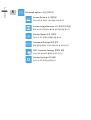
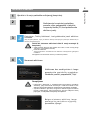
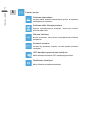
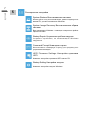
Advanced options
System Restore
Use a restore point recorded on your PC to restore Windows.
System Image Recovery
Recover Windows using a specic system image le.
Startup Repair
Fix problems that keep Windows from loading.
Command Prompt
Use the Command Prompt for advanced trobleshooting.
UEFI Firmware Settings
Change settings in your PC’s UEFI rmware.
Startup Settings
Change Windows Startup behavior.
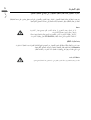
Appendix
■Warranty & Service :
Warranty and service and related information please refer to the
warranty card or GIGABYTE service website as the below link:
https://www.gigabyte.com/Support/Laptop
■FAQ :
FAQ(Frequent Asked Questions) please refer to the below link:
https://www.gigabyte.com/Support/Faq
5

8
English
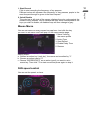
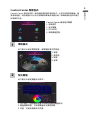
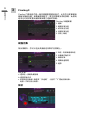
Control Center Application
The Control Center application is a quick computer conguration application,
which allows you to change power mode, set keyboard backlight and assign a
single key to launch multiple key combinations.
Control Center Overview
1. Power Modes
2. LED Keyboard
3. Flexikey
4. FAN speed control
Power Modes
To set dierent power mode.
1. Quiet
2. Performance
3. Enterainment
4. Power Saving
LED Keyboard
To set keyboard backlight.
1. Keyboard Backlit :The buttons surrounding the swatch allow you to
alter the keyboard backlit.
2. Keyboard Sleep timer : enter the value to set backlit sleep timer.
3. Brightness : to set the brightness of keyboard backlight.
1
2

9
English
Flexikey®
The Flexikey® application is a quick hotkey configuration
application. It allows you to assign a single key to launch multiple
key combinations, programs and applications. You also can create
text macros and disable certain keys. The application can also be
used to congure the mouse buttons and create hotkeys for gaming.
Flexikey® Overview
1. Prole
2. Keyboard Macro
3. Statistics
4. Mouse Macro
5. Disable/Enable
Keyboard Macro
You can set macro on every keycap except the black key here.Just
click the key you want to set macro and it will pop out the macro
assign page.
1. Name:naming
the macro prole
2. Action Type
3. Start Record
4. Enable Delay Time
5. Restore
Setting Steps :
a.Choose an action key ”each key”, the name can be edited by "1"
b.Choose an action type by "2"
c.Choose “EXPRESS KEY” as an action type if you want to set a
macro key. Then click "3" to start record and press again to stop it.
Statistics
3

10
English
1. Start Record
Click to start recording the frequency of key presses.
Dierent colors will represent the frequency of key presses, purple is the
most frequent through to green is the less frequent.
2. Quick Disable
The color bar at left side of the screen, displays the color code against the
number of key presses. click to disable the color which corresponds to the
keys you wish to disable, all disabled keys will then change to gray.
Mouse Macro
You can set macro on every mouse key cap here. Just click the key
you want to set macro and it will pop out the macro assign page.
1. Name: naming
the macro prole
2. Action Type
3. Start Record
4. Enable Delay Time
5. Restore
Setting Steps :
a. Choose an action key ”each key”, the name can be edited by "1"
b. Choose an action type by "2"
c. Choose “EXPRESS KEY” as an action type if you want to set a
macro key. Then click "3" to start record and press again to stop it.
FAN speed control
You can set fan speed on here.

1
ةيبرعلا
GIGABYTE
.
1
. 2
.
3
.Windows®
240100
6050
1
2
3
•
•
•
•
-
-
-

2
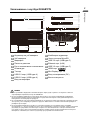
ةيبرعلا
GIGABYTE
11 1
MicroSD ﺔﻗﺎطﺑ ئرﺎﻗ 2
13 3
14 4
15 5
16 6
1.4 17 7
18 8
19 9
10
.
45
112

ةيبرعلا
.
#
3

4
ةيبرعلا
1
2
3
4
5
.
.
.•
.

5
ةيبرعلا
Windows

6
ةيبرعلا
Windows
1
2
3
4

ةيبرعلا
.
.
.
.
5

8
ةيبرعلا
:

1
български
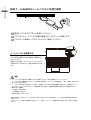
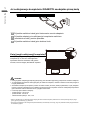
Използване на GIGABYTE Notebook за пръв път
1Свържете захранващия кабел към адаптер за променлив ток.
2Свържете адаптера към входния порт за захранване (DC) на лаптопа.
3Свържете захранващия кабел към електрически контакт.
Включване на захранването
След включване на ноутбука за пръв път,
не го изключвайте докато операционната
система не е конфигурирана. Обърнете
внимание, че силата на звука няма да
функционира докато Windows® Setup
(Настройка на Windows®) не приключи.
ВАЖНО
• Уверете се, че Вашият Notebook PC е свързан към заземен адаптер преди да го включите за пръв път.
• Когато използвате своя Notebook PC в режим на захранващ адаптер, контактът трябва да е близо до
оборудването и да е леснодостъпен.
• Открийте маркировката за вход/изход на Вашия Notebook PC и се уверете, че тя отговаря на номиналните
стойности за входа/изхода на Вашия захранващ адаптер. Някои модели Notebook PC може да имат
няколко стойности за номинален ток въз основа на наличния SKU.
• Информация за токовия адаптер:
- Вход напрежение: 100-240 Vac
- Входна честота: 50-60 Hz
- Номинално изходно напрежение: 20V, 7.5A
* Техническите характеристики на продукта и външният му вид може да се различават за различните държави. Препоръчваме
Ви да проверите при местните търговци какви са техническите характеристики и външният вид на продуктите, налични във
Вашата държава.
* Въпреки че се опитваме да представим най-точната и пълна информация към момента на публикуване, си запазваме правото
да правим промени без предизвестие.
1
2
3
Pagina se încarcă ...
Pagina se încarcă ...
Pagina se încarcă ...
Pagina se încarcă ...
Pagina se încarcă ...
Pagina se încarcă ...
Pagina se încarcă ...
Pagina se încarcă ...
Pagina se încarcă ...
Pagina se încarcă ...
Pagina se încarcă ...
Pagina se încarcă ...
Pagina se încarcă ...
Pagina se încarcă ...
Pagina se încarcă ...
Pagina se încarcă ...
Pagina se încarcă ...
Pagina se încarcă ...
Pagina se încarcă ...
Pagina se încarcă ...
Pagina se încarcă ...
Pagina se încarcă ...
Pagina se încarcă ...
Pagina se încarcă ...
Pagina se încarcă ...
Pagina se încarcă ...
Pagina se încarcă ...
Pagina se încarcă ...
Pagina se încarcă ...
Pagina se încarcă ...
Pagina se încarcă ...
Pagina se încarcă ...
Pagina se încarcă ...
Pagina se încarcă ...
Pagina se încarcă ...
Pagina se încarcă ...
Pagina se încarcă ...
Pagina se încarcă ...
Pagina se încarcă ...
Pagina se încarcă ...
Pagina se încarcă ...
Pagina se încarcă ...
Pagina se încarcă ...
Pagina se încarcă ...
Pagina se încarcă ...
Pagina se încarcă ...
Pagina se încarcă ...
Pagina se încarcă ...
Pagina se încarcă ...
Pagina se încarcă ...
Pagina se încarcă ...
Pagina se încarcă ...
Pagina se încarcă ...
Pagina se încarcă ...
Pagina se încarcă ...
Pagina se încarcă ...
Pagina se încarcă ...
Pagina se încarcă ...
Pagina se încarcă ...
Pagina se încarcă ...
Pagina se încarcă ...
Pagina se încarcă ...
Pagina se încarcă ...
Pagina se încarcă ...
Pagina se încarcă ...
Pagina se încarcă ...
Pagina se încarcă ...
Pagina se încarcă ...
Pagina se încarcă ...
Pagina se încarcă ...
Pagina se încarcă ...
Pagina se încarcă ...
Pagina se încarcă ...
Pagina se încarcă ...
Pagina se încarcă ...
Pagina se încarcă ...
Pagina se încarcă ...
Pagina se încarcă ...
Pagina se încarcă ...
Pagina se încarcă ...
Pagina se încarcă ...
Pagina se încarcă ...
Pagina se încarcă ...
Pagina se încarcă ...
Pagina se încarcă ...
Pagina se încarcă ...
Pagina se încarcă ...
Pagina se încarcă ...
Pagina se încarcă ...
Pagina se încarcă ...
Pagina se încarcă ...
Pagina se încarcă ...
Pagina se încarcă ...
Pagina se încarcă ...
Pagina se încarcă ...
Pagina se încarcă ...
Pagina se încarcă ...
Pagina se încarcă ...
Pagina se încarcă ...
Pagina se încarcă ...
Pagina se încarcă ...
Pagina se încarcă ...
Pagina se încarcă ...
Pagina se încarcă ...
Pagina se încarcă ...
Pagina se încarcă ...
Pagina se încarcă ...
Pagina se încarcă ...
Pagina se încarcă ...
Pagina se încarcă ...
Pagina se încarcă ...
Pagina se încarcă ...
Pagina se încarcă ...
Pagina se încarcă ...
Pagina se încarcă ...
Pagina se încarcă ...
Pagina se încarcă ...
Pagina se încarcă ...
Pagina se încarcă ...
Pagina se încarcă ...
Pagina se încarcă ...
Pagina se încarcă ...
Pagina se încarcă ...
Pagina se încarcă ...
Pagina se încarcă ...
Pagina se încarcă ...
Pagina se încarcă ...
Pagina se încarcă ...
Pagina se încarcă ...
Pagina se încarcă ...
Pagina se încarcă ...
Pagina se încarcă ...
Pagina se încarcă ...
Pagina se încarcă ...
Pagina se încarcă ...
Pagina se încarcă ...
Pagina se încarcă ...
Pagina se încarcă ...
Pagina se încarcă ...
Pagina se încarcă ...
Pagina se încarcă ...
Pagina se încarcă ...
Pagina se încarcă ...
Pagina se încarcă ...
Pagina se încarcă ...
Pagina se încarcă ...
Pagina se încarcă ...
Pagina se încarcă ...
Pagina se încarcă ...
Pagina se încarcă ...
Pagina se încarcă ...
Pagina se încarcă ...
Pagina se încarcă ...
Pagina se încarcă ...
Pagina se încarcă ...
Pagina se încarcă ...
Pagina se încarcă ...
Pagina se încarcă ...
Pagina se încarcă ...
Pagina se încarcă ...
Pagina se încarcă ...
Pagina se încarcă ...
Pagina se încarcă ...
Pagina se încarcă ...
Pagina se încarcă ...
Pagina se încarcă ...
Pagina se încarcă ...
Pagina se încarcă ...
Pagina se încarcă ...
Pagina se încarcă ...
Pagina se încarcă ...
Pagina se încarcă ...
Pagina se încarcă ...
Pagina se încarcă ...
Pagina se încarcă ...
Pagina se încarcă ...
Pagina se încarcă ...
Pagina se încarcă ...
Pagina se încarcă ...
Pagina se încarcă ...
Pagina se încarcă ...
Pagina se încarcă ...
Pagina se încarcă ...
Pagina se încarcă ...
Pagina se încarcă ...
-
 1
1
-
 2
2
-
 3
3
-
 4
4
-
 5
5
-
 6
6
-
 7
7
-
 8
8
-
 9
9
-
 10
10
-
 11
11
-
 12
12
-
 13
13
-
 14
14
-
 15
15
-
 16
16
-
 17
17
-
 18
18
-
 19
19
-
 20
20
-
 21
21
-
 22
22
-
 23
23
-
 24
24
-
 25
25
-
 26
26
-
 27
27
-
 28
28
-
 29
29
-
 30
30
-
 31
31
-
 32
32
-
 33
33
-
 34
34
-
 35
35
-
 36
36
-
 37
37
-
 38
38
-
 39
39
-
 40
40
-
 41
41
-
 42
42
-
 43
43
-
 44
44
-
 45
45
-
 46
46
-
 47
47
-
 48
48
-
 49
49
-
 50
50
-
 51
51
-
 52
52
-
 53
53
-
 54
54
-
 55
55
-
 56
56
-
 57
57
-
 58
58
-
 59
59
-
 60
60
-
 61
61
-
 62
62
-
 63
63
-
 64
64
-
 65
65
-
 66
66
-
 67
67
-
 68
68
-
 69
69
-
 70
70
-
 71
71
-
 72
72
-
 73
73
-
 74
74
-
 75
75
-
 76
76
-
 77
77
-
 78
78
-
 79
79
-
 80
80
-
 81
81
-
 82
82
-
 83
83
-
 84
84
-
 85
85
-
 86
86
-
 87
87
-
 88
88
-
 89
89
-
 90
90
-
 91
91
-
 92
92
-
 93
93
-
 94
94
-
 95
95
-
 96
96
-
 97
97
-
 98
98
-
 99
99
-
 100
100
-
 101
101
-
 102
102
-
 103
103
-
 104
104
-
 105
105
-
 106
106
-
 107
107
-
 108
108
-
 109
109
-
 110
110
-
 111
111
-
 112
112
-
 113
113
-
 114
114
-
 115
115
-
 116
116
-
 117
117
-
 118
118
-
 119
119
-
 120
120
-
 121
121
-
 122
122
-
 123
123
-
 124
124
-
 125
125
-
 126
126
-
 127
127
-
 128
128
-
 129
129
-
 130
130
-
 131
131
-
 132
132
-
 133
133
-
 134
134
-
 135
135
-
 136
136
-
 137
137
-
 138
138
-
 139
139
-
 140
140
-
 141
141
-
 142
142
-
 143
143
-
 144
144
-
 145
145
-
 146
146
-
 147
147
-
 148
148
-
 149
149
-
 150
150
-
 151
151
-
 152
152
-
 153
153
-
 154
154
-
 155
155
-
 156
156
-
 157
157
-
 158
158
-
 159
159
-
 160
160
-
 161
161
-
 162
162
-
 163
163
-
 164
164
-
 165
165
-
 166
166
-
 167
167
-
 168
168
-
 169
169
-
 170
170
-
 171
171
-
 172
172
-
 173
173
-
 174
174
-
 175
175
-
 176
176
-
 177
177
-
 178
178
-
 179
179
-
 180
180
-
 181
181
-
 182
182
-
 183
183
-
 184
184
-
 185
185
-
 186
186
-
 187
187
-
 188
188
-
 189
189
-
 190
190
-
 191
191
-
 192
192
-
 193
193
-
 194
194
-
 195
195
-
 196
196
-
 197
197
-
 198
198
-
 199
199
-
 200
200
-
 201
201
-
 202
202
-
 203
203
-
 204
204
-
 205
205


Gigabyte G5 GE Intel 12th Gen Laptop Manualul utilizatorului
- Categorie
- Accesorii mixer / robot de bucătărie
- Tip
- Manualul utilizatorului