Snapper SXDST82 Manual de utilizare
- Categorie
- Aparate de tuns iarba
- Tip
- Manual de utilizare
Acest manual este potrivit și pentru

82V battery lawn trimmer USER’S MANUAL
آلة تشذيب حشائش بطارية 82 فولت مدختسملا ليلد
Тример за трева с 82 v акумулаторна батерия РЪКОВОДСТВО ЗА УПОТРЕБА
Vyžínač trávníku akumulátorový 82 v NÁVOD K OBSLUZE
82V batteridrevet græstrimmer BRUGERVEJLEDNING
82V akku-rasentrimmer BEDIENUNGSANLEITUNG
Recortadora de césped con batería de 82 v MANUAL DE UTILIZACIÓN
Murutrimmer akuga 82 v KASUTAJAJUHEND
82V akkukäyttöinen ruohotrimmeri KÄYTTÄJÄN KÄSIKIRJA
Débroussailleuse de 82 v av ec batterie MANUEL D’UTILISATION
Trimer za košenje s baterijom od 82v KORISNIÈKI PRIRUÈNIK
82V-os akkumulátoros fűnyíró
Decespugliatore a batteria da 82v
82 V akumuliatorinė žoliapjovė
82 V akumulatora zāles trimmeris
Grasmaaimachine met 82v batterij
Plentrimmer med 82-volts batteri
Podkaszarka do trawy z akumulatorem 82 v
Corta-relva com bateria de 82 v
Maşină de tuns gazonul pe baterie la 82v
Газонный триммер с питанием от батареи 82 в
82 V akumulátorový strihač trávnika
82-Voltni akumulatorski obrezovalnik trave
82V акумулаторски тример за травњаке
82 V batteridriven grästrimmer
82V akülü çim biçme makinesi
Тример для газонів із акумулятором 82В
ESXDST82
1
10
19
29
38
47
57
67
76
85
96
105
115
125
135
144
154
163
174
185
195
206
216
225
236
245
254
AR
BG
CS
DA
DE
ES
ET
FI
FR
HR
HU
IT
LT
LV
NL
NO
PL
PT
RO
RU
SK
SL
SR
SV
TR
UK
EN
HASZNÁLATI ÚTMUTATÓ
MANUALE D’USO
NAUDOJIMO VADOVAS
LIETOTĀJA ROKASGRĀMATA
GEBRUIKERSHANDLEIDING
BRUKSANVISNING
PODRĘCZNIK OBSŻUGI
MANUAL DE UTILIZAÇÃO
MANUAL DE UTILIZARE
РУКОВОДСТВО ПО ЭКСПЛУАТАЦИИ
NÁVOD NA POUŽITIE
UPORABNI KI PRIROČNIK
КОРИСНИЧКИ ПРИРУЧНИК
INSTRUKTIONSBOK
KULLANICI KILAVUZU
ПОСІБНИК КОРИСТУВАЧА
It is essential that you read the instructions in this manual
before operating this machine.
Important!
1696772
Not for Reproduction

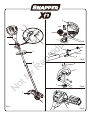
6
5
4
3
2
1
7
8
9
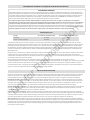
Fig 1.
b
a
c
e
b
a
d
c
a
b
c
a
Fig 2.
Fig 3.
Fig 4.
Fig 5.
Not for Reproduction

Fig 7.
Fig 6.
Fig 8.
Fig 10.
Fig 9.
Fig 11.
Fig 12.
2
9
7
a
b
c
a
b
c
d
a
d
Not for Reproduction

English (original instructions)
EN
AR BG CS DA DE ES ET FI FR HR HU IT LT LV NL NO PL PT RO RU SK SL SR SV TR UK
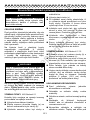
Your trimmer has been engineered and
manufactured to a high standard for
dependability, ease of operation, and operator
safety. When properly cared for, it will give you
years of rugged, trouble-free performance.
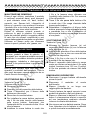
INTENDED USE
This product is only intended for use outdoors.
This product is designed for cutting grass, light
weeds, and other similar vegetation at or about
ground level. The cutting plane should be
approximately parallel to the ground surface.
The product should not be used to cut or trim
hedges, bushes or other vegetation where the
cutting plane is not parallel to the ground surface.
GENERAL SAFETY WARNINGS
WARNING
Read all safety warnings and all
instructions. Failure to follow the warnings
and instructions may result in electric shock,
re and/or serious injury.
Save all warnings and instruction for
future reference.
The term "power tool" in the warnings refers
to your mains-operated (corded) power tool
or battery-operated (cordless) power tool.
TRAINING
Read the instructions carefully. Be familiar
with the controls and the correct use of the
machine.
Never allow children or people unfamiliar
with these instructions to use the machine.
Local regulations can restrict the age of the
operator.
Keep in mind that the operator or user
is responsible for accidents or hazards
occurring to other people or their property.
PREPARATION
Before use, check the battery pack for
signs of damage or aging. If the battery
becomes damaged during use, switch
off the appliance and remove the battery
immediately. Do not use the appliance if
the battery is damaged or worn.
Before use, always visually inspect
the machine for damaged, missing or
misplaced guards or shields.
Never operate the machine while people,
especially children, or pets are nearby.
OPERATION
Keep power cords away from cutting
means.
Wear eye protection and stout shoes at all
times while operating the machine.
Avoid using the machine in bad weather
conditions especially when there is a risk
of lightning.
Use the machine only in daylight or good
artificial light.
Never operate the machine with damaged
guards or shields or without guards or
shields in place.
Switch on the motor only when the hands
and feet are away from the cutting means.
Always disconnect the machine from the
power supply (i.e. remove the plug from
the mains, remove the disabling device or
removable battery)
• whenever the machine is left
unattended;
• before clearing a blockage;
• before checking, cleaning or working on
the machine;
• after striking a foreign object;
• whenever the machine starts vibrating
abnormally.
Take care against injury to feet and hands
from the cutting means.
Always ensure that the ventilation openings
are kept clear of debris.
1
Not for Reproduction

English (original instructions)
EN
AR BG CS DA DE ES ET FI FR HR HU IT LT LV NL NO PL PT RO RU SK SL SR SV TR UK
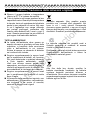
MAINTENANCE AND STORAGE
Disconnect the machine from the power
supply (i.e. remove the plug from the
mains, remove the disabling device or
removable battery) before carrying out
maintenance or cleaning work.
Use only the manufacturer’s recommended
replacement parts and accessories.
Inspect and maintain the machine
regularly. Have the machine repaired only
by an authorized repairer.
When not in use, store the machine out of
the reach of children.
GRASS TRIMMER SAFETY WARNINGS
This appliance can be used by children
aged from 8 years and above and
persons with reduced physical,sensory or
mental capabilities or lack of experience
and knowledge if they have been given
supervision or instruction concerning
use of the appliance in a safe way and
understand the hazards involved.
Children shall not play with the appliance.
Cleaning and user maintenance shall not
be made by children without supervision.
The battery must be removed from the
appliance before it is scrapped;
The appliance must be disconnected
from the supply mains when removing the
battery
The battery is to be disposed of safely.
Do not overreach. Keep proper footing and
balance at all times. This enables better
control of the power tool in unexpected
situations.
Dress properly. Do not wear loose clothing
or jewellery. Keep your hair, clothing and
gloves away from moving parts. Loose
clothes, jewellery or long hair can be
caught in moving parts.
This appliance is not intended for use by
persons (including children) with reduced
understanding, or lack of experience and
knowledge, unless they have been given
supervision or instruction cnocerning use
of the appliance by a person responsible
for their safety.
Children should be supervised to ensure
that they do not play with the appliance.
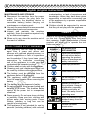
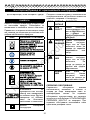
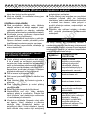
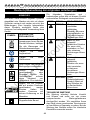
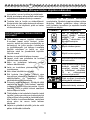
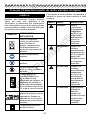
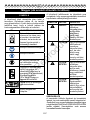
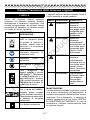
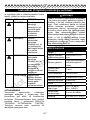
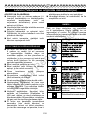
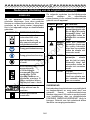
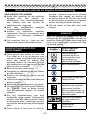
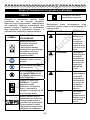
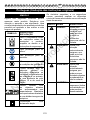
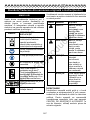
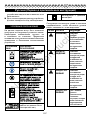
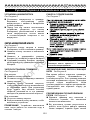
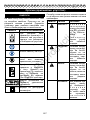
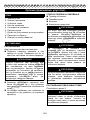
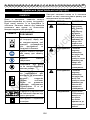
SYMBOLS
Some of the following symbols may be used
on this tool. Please study them and learn
their meaning. Proper interpretation of these
symbols will allow you to operate the tool
better and safer.
SYMBOL
DESIGNATION/
EXPLANATION
Read and understand
all instructions before
operating the product,
follow all warnings and
safety instructions.
Wear eye protection.
Wear ears protection.
Do not expose to rain or in
damp condition.
Beware of thrown or
flying objects. Keep all
bystanders, especially
children and pets, at
least 15m away from the
operating area.
Keep bystanders a safe
distance away from the
machine.
Double-insulated
construction
2
Not for Reproduction

English (original instructions)
EN
AR BG CS DA DE ES ET FI FR HR HU IT LT LV NL NO PL PT RO RU SK SL SR SV TR UK
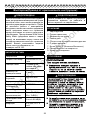
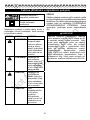
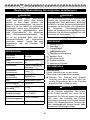
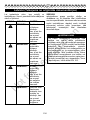
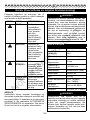
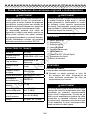
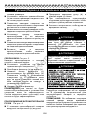
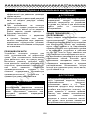
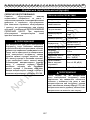
The following signal words and meanings
are intended to explain the levels of risk
associated with this product.
SYMBOL SIGNAL MEANING
DANGER: Indicates an
imminently
hazardous
situation, which, if
not avoided, will
result in death or
serious injury.
WARNING: Indicates a
potentially
hazardous
situation, which, if
not avoided, could
result in death or
serious injury.
CAUTION: Indicates a
potentially
hazardous
situation, which, if
not avoided, may
result in minor or
moderate injury.
NOTICE: (Without Safety
Alert Symbol)
Indicates a situation
that may result in
property damage.
SERVICE
Servicing requires extreme care and
knowledge and should be performed only
by a qualified service technician. For service
we suggest you return the product to your
nearest AUTHORISED SERVICE CENTRE
for repair. When servicing, use only identical
replacement parts.
WARNING
The operation of any power tool can result in
foreign objects being thrown into your eyes,
which can result in severe eye damage.
Before beginning power tool operation,
always wear safety goggles, safety glasses
with side shields, or a full face shield when
needed. We recommend Wide Vision
Safety Mask for use over eyeglasses or
standard safety glasses with side shields.
Always use eye protection which is marked
to comply with EN 166.
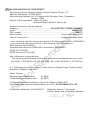
SPECIFICATIONS
Voltage 82 volts
No load speed 5000/5500 ±10% /min
Cutting head Bump Feed
Cutting Line
Diameter
2 mm
Cutting Path
Diameter
356/406 mm
Battery pack EBSB2AH82 (2Ah)
Charger EBSRC82
Weight without
battery pack
5.3 kg
Measuered
sound pressure
level
L
pa= 78 dB(A),
K
pa: 3 dB(A)
Guaranteed
sound power
level
L
wa.d= 96 dB(A)
Vibration 4.3 m/s², k= 1.5 m/s²
3
Not for Reproduction

English (original instructions)
EN
AR BG CS DA DE ES ET FI FR HR HU IT LT LV NL NO PL PT RO RU SK SL SR SV TR UK
WARNING
The vibration emission during actual use of
the power tool can differ from the declared
total value depending on the ways in
which the tool is used; avoid vibration risk
suggestion: Wear glove during operation
limit operating time and shorten trigger time.
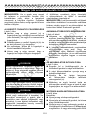
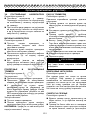
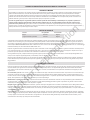
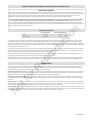
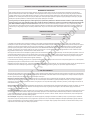
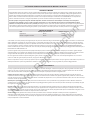
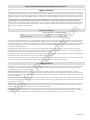
DESCRIPTION
1. Rear handle
2. Switch trigger
3. Grass deector
4. Cut-off blade
5. Shaft coupler
6. Front handle
7. On/off power button
8. Speed switch
9. Lock-out trigger
ASSEMBLY
UNPACKING
This product requires assembly.
Carefully remove the product and any
accessories from the box. Make sure
that all items listed in the packing list are
included.
WARNING
Do not use this product if any parts on the
Packing List are already assembled to
your product when you unpack it. Parts on
this list are not assembled to the product
by the manufacturer and require customer
installation. Use of a product that may have
been improperly assembled could result in
serious personal injury.
Inspect the product carefully to make sure
no breakage or damage occurred during
shipping.
Do not discard the packing material
until you have carefully inspected and
satisfactorily operated the product.
PACKING LIST
String trimmer
Auxiliary handle
Guard
Operator's manual
WARNING
If any parts are damaged or missing do
not operate this product until the parts are
replaced. Use of this product with damaged
or missing parts could result in serious
personal injury.
WARNING
Do not attempt to modify this product or
create accessories not recommended for
use with this product. Any such alteration or
modication is misuse and could result in
a hazardous condition leading to possible
serious personal injury.
WARNING
To prevent accidental starting that could
cause serious personal injury, always
remove the battery pack from the product
when assembling parts.
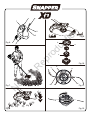
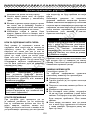
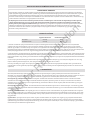
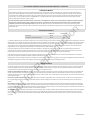
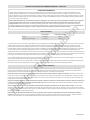
ATTACHING GRASS DEFLECTOR
See Figure 2.
WARNING
The line cut-off blade on the grass deector
is sharp. Avoid contact with the blade.
Failure to avoid contact can result in serious
personal injury.
4
Not for Reproduction

English (original instructions)
EN
AR BG CS DA DE ES ET FI FR HR HU IT LT LV NL NO PL PT RO RU SK SL SR SV TR UK
Invert the string trimmer to access the
trimmer head.
Using a Phillips head screwdriver, remove
the preinstalled screws (a) from the
trimmer head.
Place the guard (b) on to the trimmer
head and slide the guard onto the head by
following the track on the head.
Align the screw holes on the guard with the
screw holes on the trimmer head.
Insert the screws into the trimmer head,
fastening the guard in place.
Place the guard cap (c) on to the guard
and slide the guard cap onto the guard.
Align the screw holes on the guard cap
with the screw holes on the guard.
Insert the screws into the guard, fastening
the the guard cap in place.
SHAFT ASSEMBLY See Figure 3.
The attachment connects to the power head
by means of a coupler device.
Set the unit on a flat, level surface.
Loosen the knob (a) on the coupler (b).
Push in the release button (c) located on
the lower shaft (d). Align the release button
with the positioning hole (e) and slide the two
shafts together. Rotate the lower shaft until
the button locks into the positioning hole.
Tighten the knob securely.
NOTE: If the button does not release
completely in the positioning hole, the shafts
are not locked into place. Slightly rotate from
side to side until the button is locked into
place.
ATTACHING THE FRONT HANDLE
See Figure 4.
Loosen the four screws (a) in the handle
with a philips screwdriver (not included)
and remove the screws from the handle.
Attach the front handle (b) and lower clamp
(c) on the shaft.
Adjust handle up or down, if necessary, to
desired operating position.
Tighten the four screws so that the handle
cannot be rotated on the shaft.
OPERATION
WARNING
Do not allow familiarity with products to
make you careless. Remember that a
careless fraction of a second is sufcient to
inict serious injury.
WARNING
Always wear eye protection. Failure to do
so could result in objects being thrown
into your eyes resulting in possible serious
injury.
WARNING
Never use blades, ailing devices, wire,
or rope on this product. Do not use
any attachments or accessories not
recommended by the manufacturer of
this product. The use of attachments or
accessories not recommended can result in
serious personal injury.
For complete charging instructions, refer to
the Operator’s Manuals for your battery pack
and charger models.
NOTE: To avoid serious personal injury,
always remove the battery pack and keep
hands clear of the lock-out button when
carrying or transporting the tool.
TO INSTALL BATTERY PACK See Figure 5.
Place the battery pack in the trimmer. Align
raised ribs on battery pack with grooves in
the trimmer’s battery port.
Make sure the latch on the back of the
battery pack clicks into place and that
battery pack is fully seated and secure in
the trimmer before beginning operation.
5
Not for Reproduction

English (original instructions)
EN
AR BG CS DA DE ES ET FI FR HR HU IT LT LV NL NO PL PT RO RU SK SL SR SV TR UK
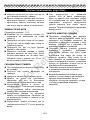
TO REMOVE BATTERY PACK
See Figure 5.
Release the switch trigger and lock-out
trigger to stop the trimmer.
Press the power button to turn off the
trimmer.
Press and hold the battery latch button (a)
on the back of the battery pack.
While holding the battery latch place one
hand the the trimmer handle and remove
battery pack.
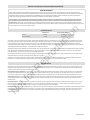
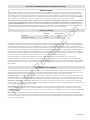
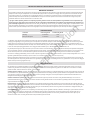
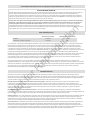
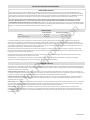
STARTING/STOPPING THE TRIMMER
See Figure 6.
To start:
Press the on/off power button.
Depress the lock-out button and squeeze
the switch trigger.
Press high speed button to increase speed
depending upon grass condition. Two
LED's will illuminate above the high speed
button indicating that the trimmer is in the
high speed setting.
To stop:
Release the switch trigger.
Press the power button again to turn the
unit off.
NOTE: The unit will power itself down after
being idle for 1 minute.
OPERATING THE TRIMMER See Figure 7.
Follow these tips when using the trimmer:
Hold the trimmer with your right hand on
the rear handle and your left hand on the
front handle.
Keep a firm grip with both hands while in
operation.
Trimmer should be held at a comfortable
position with the rear handle about hip
height.
Cut tall grass from the top down. This will
prevent grass from wrapping around the
shaft housing and string head which may
cause damage from overheating.
If grass becomes wrapped around the string
head:
Remove the battery pack from the trimmer.
Remove the grass.
WARNING
Contact with the trimmer cutting head while
operating can result in serious personal
injury.
ADVANCING LINE See Figure 8.
While the string trimmer is operating, the
cutting line gets worn down and becomes
shorter. This trimmer is equipped with bump
feed line advancement, which advances
additional line once the head is bumped on
the ground while rotating. The cutting blade
will cut the line to keep an accurate cutting
swath.
CUTTING TIPS See Figure 9.
Keep the trimmer tilted toward the area
being cut; this is the best cutting area.
The trimmer will cut better when moved
from left to right across the area to be cut;
it is less effective when moved from right
to left.
Use the tip of the cutting line to do the
cutting; do not force cutting head into uncut
grass.
Wire and picket fences cause extra cutting
line wear, even breakage. Stone and brick
walls, curbs, and wood may wear cutting
line rapidly.
Avoid trees and shrubs. Tree bark, wood
moldings, siding, and fence posts can
easily be damaged by the cutting line.
6
Not for Reproduction

English (original instructions)
EN
AR BG CS DA DE ES ET FI FR HR HU IT LT LV NL NO PL PT RO RU SK SL SR SV TR UK
LINE CUT-OFF BLADE
This trimmer is equipped with a line cut-off
blade on the grass deector. For best cutting,
advance line until it is trimmed to length by the
line cut-off blade. Advance line whenever you
hear the engine running faster than normal,
or when trimming efciency diminishes. This
will maintain best performance and keep line
long enough to advance properly.
WARNING
When servicing, use only identical replacement
parts. Use of any other parts may create a
hazard or cause product damage.
WARNING
To avoid serious personal injury, always
remove the battery pack from the tool when
cleaning or performing any maintenance.
GENERAL MAINTENANCE
Before each use, inspect the entire product
for damaged, missing, or loose parts such
as screws, nuts, bolts, caps, etc. Tighten
securely all fasteners and caps and do
not operate this product until all missing or
damaged parts are replaced.
Avoid using solvents when cleaning plastic
parts. Most plastics are susceptible to damage
from various types of commercial solvents
and may be damaged by their use. Use clean
cloths to remove dirt, dust, oil, grease, etc.
WARNING
Do not at any time let brake uids, gasoline,
petroleum-based products, penetrating oils,
etc., come in contact with plastic parts.
Chemicals can damage, weaken or destroy
plastic which may result in serious personal
injury.
Only the parts shown on the parts list are
intended to be repaired or replaced by the
customer. All other parts should be replaced
at an Authorised Service Centre.
SPOOL REPLACEMENT See Figure 10.
Use original manufacturer’s replacement
cutting line for best performance.
Remove the battery pack.
Push in tabs (a) on sides of spool cover
(b).
Pull spool cover up to remove.
Remove the old spool (c).
To install the new spool, make sure the
cutting line is captured in the slot on the
new spool. Make sure the end of the
cutting line is extended approximately
15cm beyond the slot.
Install the new spool so that the cutting
line and slot align with the eyelet in the
cutting head. Thread the cutting line into
the eyelet.
Pull the cutting line extending from the
cutting head so the cutting line releases
from the slot in the spool.
Reinstall the spool cover by depressing
tabs into slots and pushing down until
spool cover clicks into place.
CUTTING LINE REPLACEMENT
See Figures 11-12.
Line up the slots on (a) the spool cap (b)
with the slots on the string head (c).
Insert line through the string head hole (d).
Push line until it exits the opposite string
head hole.
Pull the line through until there is an equal
amount of line on each side.
Turn the spool cap clock-wise to begin
winding the string into the string head.
Leave approximately 5 inches of string
protruding out of each side of the head.
7
Not for Reproduction

English (original instructions)
EN
AR BG CS DA DE ES ET FI FR HR HU IT LT LV NL NO PL PT RO RU SK SL SR SV TR UK
STORING THE TRIMMER
Remove the battery pack from the trimmer
before storing.
Clean all foreign material from the trimmer.
Store it in a place that is inaccessible to
children.
Keep away from corrosive agents such as
garden chemicals and de-icing salts.
Store and charge your batteries in a
cool area. Temperatures above or below
normal room temperature will shorten
battery pack life.
Never store batteries in a discharged
condition. Wait for battery pack to cool and
fully charge immediately.
Store the battery pack where the
temperature is below 27˚C and away from
moisture.
All batteries gradually lose their charge.
The higher the temperature, the quicker
they lose their charge. If you store your unit
for long periods of time without using it,
recharge the batteries every month or two.
This practice will prolong battery pack life.
ENVIRONMENTAL PROTECTION
Environmental protection should be a
priority of considerable importance when
using the machine, for the benefit of both
social coexistence and the environment
in which we live. Try not to cause any
disturbance to the surrounding area.
Carefully comply with local regulations for
the disposal of packaging, deteriorated
parts or any elements with a strong
environmental impact; this waste must not
be disposed of as normal waste, it must
be separated and taken to specified waste
disposal centres where the material will be
recycled.
Carefully comply with local regulations
for the disposal of waste materials after
mowing.
At the time of decommissioning, do not
pollute the environment with the machine,
but hand it over to a disposal centre, in
accordance with the local laws in force.
Separate collection. This product must not
be disposed of with normal household waste.
Should you find one day that your product
needs replacement, or if it isno further use
to you, do not dispose of it with household
waste. Make this product available for
separate collection.
Separate collection of used products and
packaging allows materials to be recycled
and used again.
Re-use of recycled materials helps prevent
environmental pollution and reduces the
demand for raw materials.
Batteries
Li-ion
At the end of their useful life, discard batteries
with due care for our environment. The battery
contains material which is hazardous to you
and the environment. It must be removed
and disposed of separately at a facility that
accepts lithium-ion batteries.
8
Not for Reproduction

English (original instructions)
EN
AR BG CS DA DE ES ET FI FR HR HU IT LT LV NL NO PL PT RO RU SK SL SR SV TR UK
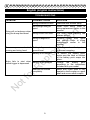
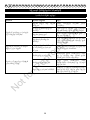
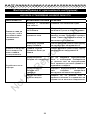
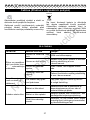
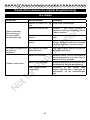
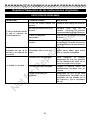
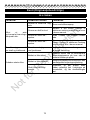
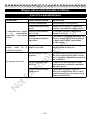
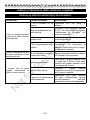
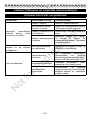
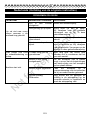
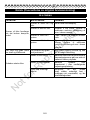
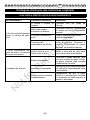
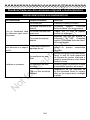
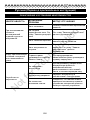
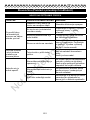
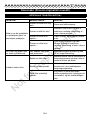
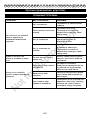
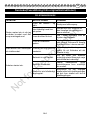
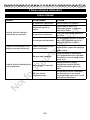
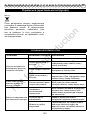
TROUBLESHOOTING
PROBLEM POSSIBLE CAUSE SOLUTION
String will not advance when
using the bump-feed head.
String is welded to itself. Lubricate with silicone spray.
Not enough string on
spool.
Install more string. Refer to
string replacement earlier in this
manual.
String is worn too short. Pull string while pressing line
release button.
String is tangled on
spool.
Remove string from spool
and rewind. Refer to string
replacement earlier in this
manual.
Grass wraps around shaft
housing and string head.
Cutting tall grass at
ground level.
Cut tall grass from the top down
to prevent wrapping.
Motor fails to start when
switch trigger is depressed.
Battery is not secure. To secure the battery pack,
make sure the latch on bottom
of the battery pack snaps into
place.
Battery is not charged. Charge the battery pack
according to the instructions
included with your model.
Shaft not connected
completely.
Make sure lower shaft is fully
seated in shaft coupler on upper
shaft and secure shaft coupler.
9
Not for Reproduction

العربية (التعليمات الأصلية)
AR
EN BG CS DA DE ES ET FI FR HR HU IT LT LV NL NO PL PT RO RU SK SL SR SV TR UK
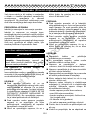
تم تصميم وصناعة آلة تقليم الأعشاب وفقًا
للمعايير الرفيعة للاعتمادية، وسهولة التشغيل،
وسلامة المشغل. عند الاعتناء بها جيدًا سوف تعمل
الآلة لسنوات من الأداء القوي الخالي من المشكلات.
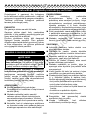
الاستخدام المخصص
هذا المنتج مخصص للاستخدام الخارجي فقط.هذا
المنتج مخصص لقص الحشائش، والأعشاب الضارة
الخفيفة، والنباتات الأخرى المماثلة في مستوى
الأرض أو عنده. ينبغي أن يكون مستوى التقليم
موازي تقريبًا لمستوى سطح الأرض.
لا ينبغي استخدام هذا المنتج لقطع أو تقليم
السياجات العشبية أو الشجيرات أو النباتات
الأخرى التي لا يكون معها مستوى التقليم موازي
تقريبًا لمستوى سطح الأرض.
تحذيرات سلامة عامة
تحذير
يرجى قراءة كافة التحذيرات والتعليمات.
الفشل في إتباع التحذيرات والتعليمات قد
يتسبب في الإصابة بصدمة كهربائية، و/أو
اندلاع حريق، و/أو حدوث إصابة خطيرة.
احتفظ بكافة التحذيرات والتعليمات للرجوع إليها
مستقبلًا.
يشير مصطلح "أداة كهربائية" في التحذيرات
إلى الأداة الكهربائية التي يشغلها مأخذ القوة
الرئيسي (السلكية) أو الأداة الكهربائية التي
تعمل بالكهرباء (اللاسلكية).
التدريب
اقرأ التعليمات بعناية وكن على دراية
بمفاتيح التحكم والاستخدام الصحيح للجهاز.
لا تسمح للأطفال باستخدام هذا الجهاز أو
للأشخاص دون المعرفة بهذه التعليمات
باستخدام الآلة، وقد تفرض اللوائح المحلية
قيود على سن المشغل.
ضع في الاعتبار أن المشغل أو المستخدم مسؤول
عن الحوادث والأخطار التي قد تقع للأشخاص
الآخرين أو لممتلكاتهم.
الإعداد
قبل الاستخدام، افحص علبة البطاريات
للتأكد من عدم وجود علامات تلف أو بلي. في
حالة تضرر البطارية أثناء الاستخدام، يجب
إيقاف تشغيل الجهاز وإخراج البطارية في
الحال. لا تستخدم الجهاز إن كانت البطارية
متضررة أو بالية.
قبل الاستخدام، افحص الآلة بالنظر دائمًا
للتأكد من الحواجز أو التروس المتضررة أو
المفقودة أو في غير موضعها.
لا تشغل الآلة بالقرب من الأشخاص خاصة
الأطفال أو الحيوانات الأليفة.
التشغيل
احتفظ بكافة أسلاك التيار الكهربائي بعيدًا
عن أدوات القطع.
ارتدي نظارات واقية وأحذية سميكة طوال الوقت
أثناء تشغيل الآلة.
تجنب استخدام الآلة في الأحوال الجوية السيئة
خصوصًا في ظل احتمالية حدوث صواعق.
استخدم الآلة في النهار فقط أو في إضاءة
صناعية جيدة.
لا تشغل الآلة في حالة وجود حواجز أو تروس
متضررة أو في حالة عدم وجودها في أماكنها.
قم بتشغيل الموتور عندما تكون الأيدي
والأقدام بعيدة عن أدوات القطع.
افصل الآلة دائمًا عن مصدر الكهرباء (أي
انزع القابس من مقبس الكهرباء، أو انزع أداة
التعطيل، أو البطارية القابلة للإزالة) في
الحالات التالية:
• عند ترك الآلة دون إشراف.
• قبل إزالة انسداد.
• قبل الفحص أو التنظيف أو العمل على
الآلة.
• بعد الاصطدام بشيء غريب.
• عندما تبدأ الآلة في الاهتزاز بشكل غير
طبيعي.
احترس من الإصابة في القدم أو الأيدي بأدوات
القطع.
تأكد دائمًا من خلو فتحات التهوية من المخلفات.
10
Not for Reproduction

العربية (التعليمات الأصلية)
AR
EN BG CS DA DE ES ET FI FR HR HU IT LT LV NL NO PL PT RO RU SK SL SR SV TR UK
الصيانة والحفظ
افصل الآلة عن مصدر الكهرباء (انزع القابس
من مقبس الكهرباء ،أو انزع أداة التعطيل، أو
البطارية القابلة للإزالة) قبل إجراء الصيانة
أو أعمال التنظيف.
لا تستخدم إلا قطع غيار وإكسسوارات أصلية
موصي بها من الشركة المصنعة.
افحص الآلة واحرص على صيانتها بانتظام. قم
بإصلاحها لدى فني إصلاح معتمد.
عند عدم استخدام الآلة، احفظها بعيدًا عن متناول
الأطفال.
تحذيرات السلامة الخاصة بآلة تشذيب
الحشائش
يمكن أن يستخدم هذا الجهاز الأطفال بدءًا من سن 8
سنوات وأكثر، والأشخاص ذوي الفهم المنخفض،
أو انعدام الخبرة والمعرفة عند خضوعها للإشراف
أو التعليمات الخاصة باستخدام هذا الجهاز
بطريقة آمنة وفهم المخاطر التي قد يشكلها.
لا ينبغي أن يعبث الأطفال بهذا الجهاز.
لا ينبغي السماح للأطفال بتنظيف الجهاز أو
صيانته بدون إشراف.
ينبغي نزع البطارية من الجهاز قبل إبطالها.
يجب فصل الجهاز من مصدر الكهرباء عند نزع
البطارية.
ينبغي التخلص من البطارية تخلصًا آمنًا.
لا تتجاوز الآلة وحافظ على موضع القدمين
والاتزان في كافة الأوقات. حيث يتيح ذلك
تحكم أفضل في الأداة الكهربائية في جميع
المواقف غير المتوقعة.
ارتدي ملابس مناسبة، ولا ترتدي ملابس
فضفاضة أو مجوهرات، وأبعد شعرك وملابسك
وقفازاتك بعيدًا عن الأجزاء المتحركة. حيث
قد تعلق الملابس الفضفاضة والمجوهرات أو
الشعر الطويل في الأجزاء المتحركة.
هذا الجهاز غير مخصص للاستخدام من قبل
الأشخاص (بما في ذلك الأطفال) ذوي الفهم
المحدود أو نقص الخبرة والمعرفة ما لم يخضعوا
للإشراف أو التعليمات الخاصة باستخدام هذا
الجهاز من قبل الشخص المسئول عن سلامتهم.
ينبغي الإشراف على الأطفال لضمان عدم
عبثهم بالجهاز.
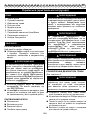
الرموز
سوف تظهر بعض الرموز التالية على هذا الجهاز.
يرجى قراءتها بعناية وفهم معناها. التفسير
الصحيح لهذه الرموز سوف يتيح لك تشغيل الأداة
بشكل أفضل وأكثر أمانًا.
الرمز التسمية/ الشرح
يرجى قراءة كافة التعليمات
وفهمها قبل تشغيل المنتج،
وإتباع كافة التحذيرات
وتعليمات السلامة.
ارتدي واقيات للعين.
ارتدي واقيات للأذن.
لا تعرض الآلة للمطر أو
الأجواء الرطبة.
احترس من الأشياء المقذوفة
أو المتطايرة. وابعد كافة
المارة، وخاصة الأطفال
والحيوانات الأليفة، بمسافة
15 متر على الأقل عن منطقة
التشغيل.
ابعد كافة المارة بمسافة آمنة
عن الآلة.
تصميم بعزل مزدوج.
11
Not for Reproduction

العربية (التعليمات الأصلية)
AR
EN BG CS DA DE ES ET FI FR HR HU IT LT LV NL NO PL PT RO RU SK SL SR SV TR UK
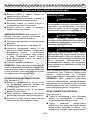
الكلمات التنبيهية والمعاني التالية مخصصة
لشرح مستويات الخطر المرتبطة بهذا المنتج.
الرمز العلامة المعنى
خطر: تشير إلى وضع
بالغ الخطورة من
شأنه أن يتسبب،
في حالة عدم
تجنبه، في خطر
حدوث الموت أو وقوع
إصابة خطيرة.
تحذير: تشير إلى وضع
خطير محتمل قد
يتسبب، في حالة
عدم تجنبه، في
خطر حدوث الموت أو
وقوع إصابة خطيرة.
احترس: تشير إلى وضع
خطير محتمل يمكن
أن يتسبب، في
حالة عدم تجنبه،
في وقوع إصابة
بسيطة أو متوسطة.
احترس: (دون رمز التنبيه
على السلامة) تشير
إلى وضع يمكن أن
يتسبب في إلحاق
ضرر بالممتلكات.
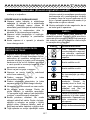
الصيانة والإصلاح
تتطلب الصيانة والإصلاح عناية ومعرفة بالغة
وينبغي أن يتولاها فني صيانة مؤهل فقط.
للصيانة والخدمة نقترح إعادة المنتج إلى أقرب
مركز خدمة معتمد للإصلاح. عند الصيانة والخدمة،
استخدم قطع غيار مماثلة فقط.
تحذير
تشغيل أي أداة كهربائية قد يتسبب في
قذف أشياء غريبة داخل العينين والتي يمكن
أن تتسبب في تضرر بالغ للعين. قبل
تشغيل الأداة الكهربائية، ارتدي دائمًا نظارات
سلامة، أو نظارات سلامة بحواجز جانبية، أو واقي
كامل للوجه عد الحاجة. نوصي باستخدام قناع
السلامة ذو الرؤية الواسعة للاستخدام فوق
النظارات أو نظارات سلامة قياسية ذات حواجز
جانبية. استخدم دائمًا واقي للعين يتطابق مع
المعيار EN166.
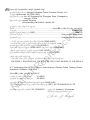
المواصفات
الجهد 82 فولت
سرعة اللاحمل
5000/5500 ± 10%/ دقيقة
رأس التقطيع تغذية بالضخ
قطر خط
التقطيع
2 مم
قطر مسار
التقطيع
356/ 406 مم
علبة البطاريات EBSB2AH82 (2 أمبير)
الشاحن EBSRC82
الوزن بدون علبة
البطاريات
5.3 كجم
مستوى ضغط
الصوت المقاس
L
pa = 78 ديسيبيل (أ)،
ك : 3 ديسيبل (أ)
نومضملا توصلا
ةوق ىوتسم
L
wa.d = 96 ديسيبيل (أ)
مستوى الاهتزاز 4.3 م/ ث², ك= 1.5 م/ث²
12
Not for Reproduction

العربية (التعليمات الأصلية)
AR
EN BG CS DA DE ES ET FI FR HR HU IT LT LV NL NO PL PT RO RU SK SL SR SV TR UK
تحذير
قد يختلف ابتعاث الاهتزاز خلال الاستخدام
الفعلي للأداة الكهربائية عن القيمة الإجمالية
المعلنة اعتمادًا على الطرق التي تُستخدم بها
، ولذا من المقترح تجنب خطر الاهتزازات: وذلك
بارتداء قفاز أثناء التشغيل للحد من وقت
التشغيل وتقصير وقت القدح.
الوصف
1. اليد الخلفية
2. مفتاح تشغيل القدح
3. حارف الحشائش
4. شفرة التقطيع
5. قارن العامود
6. اليد الأمامية
7. زر الطاقة التشغيل / إيقاف والتشغيل
8. مفتاح السرعة
9. مفتاح غلق القدح
التجميع
فض التغليف
هذا المنتج يتطلب التجميع.
أخرج المنتج وأي ملحقات بحرص من الصندوق.
تأكد من أن كافة العناصر المدرجة في قائمة
التعبئة متضمنة.
تحذير
لا تستخدم هذا المنتج إذا كانت أي أجزاء بقائمة
التعبئة مجمعة بالفعل في منتجك عند قيامك
بفكها. الأجزاء الواردة بهذه القائمة غير مجمعة
في المنتج من قبل الشركة المصنعة وتتطلب
التركيب من قبل العميل. قد يؤدي استخدام
المنتج الذي تم تجميعه تجميعًا غير صحيحًا
في حدوث إصابة شخصية خطيرة.
افحص المنتج بعناية للتأكد من أنه لم يحدث
كسر أو تلف أثناء الشحن.
لا تتخلص من مواد التغليف حتى تمام
المعاينة المرضية والتأكد من أن المنتج يعمل
جيدًا.
قائمة التعبئة
آلة تقليم أعشاب جنزيرية
يد مساعدة
حاجز
دليل التشغيل
تحذير
في حالة تضرر أو فقد أي أجزاء لا تشغل
المنتج حتى استبدال هذه الأجزاء. استخدام هذا
المنتج مع وجود أجزاء متضررة أو أجزاء مفقودة
قد يتسبب في حدوث إصابة شخصية خطيرة.
تحذير
لا تحاول إجراء تعديل على هذا المنتج أو صنع
ملحقات غير موصي بها عند استخدام هذا المنتج.
ولذا فإن أي تعديل أو تغيير هو سوء استخدام
وقد يتسبب في وضع خطير يؤدي إلى حدوث
إصابة شخصية خطيرة.
تحذير
لمنع التشغيل غير المقصود الذي قد يؤدي
إلى إصابة شخصية خطيرة، يرجى إزالة علبة
البطاريات دائمًا من المنتج عند تجميع الأجزاء.
تركيب حارف الحشائش
انظر الشكل 2.
تحذير
شفرة حط التقطيع على حارف الحشائش حادة،
ولذا تجنب ملامسة الشفرة. الفشل في تجنب
ملامسة الشفرة يمكن أن يتسبب في حدوث
إصابة شخصية خطيرة.
اقلب خيط التشذيب للوصول إلى رأس آلة
التشذيب.
باستخدام مفك ذو رأس فيليبس، قم بإزالة
المسامير المثبتة مسبقًا (أ) في رأس آلة
التشذيب.
ضع الحاجز (ب) على رأس آلة التشذيب ومرر
الحاجز على الرأس بإتباع المسار على الرأس.
قم بمحازاة ثقوب المسامير على الحاجز مع
ثقوب المسامير على رأس آلة التشذيب.
13
Not for Reproduction

العربية (التعليمات الأصلية)
AR
EN BG CS DA DE ES ET FI FR HR HU IT LT LV NL NO PL PT RO RU SK SL SR SV TR UK
أدخل المسامير في رأس آلة التشذيب وثبت
الحاجز في مكانه.
ضع غطاء الحاجز (ج) على الحاجز ومرر غطاء
الحاجز على الحاجز.
قم بمحازاة ثقوب المسامير بغطاء الحاجز مع
ثقوب المسامير على الحاجز.
أدخل المسامير في الحاجز، ثم ثبت غطاء
الحاجز في مكانه.
تجميع العامود انظر الشكل 3.
يتم توصيل الملحق برأس الكهرباء من خلال أداة
قارنة.
ضع الوحدة على سطح مستوي ومسطح.
قم بإرخاء المقبض (أ) من القارن (ب).
ادفع زر التحرير (ج) الواقع على العامود
السفلي (د). قم بمحاذاة زر التحرير مع فتحة
تحديد الموقع (ه) وتمرير العامودين معًا. ثم لف
العامود السفلي حتى ثبات الزر بإحكام في
فتحة تحديد الموقع.
ثبت المقبض بإحكام.
ملحوظة: في حالة عدم تحرر الزر بالكامل في
فتحة تحديد الموقع، لن يتم إذن تثبيت
العامودين في مكانهما. قم باللف قليلًا من جانب
إلى الجانب الآخر حتى ثبات الزر في موقعه.
إلحاق اليد الأمامية
انظر الشكل 4.
فك البراغي الأربعة (أ) بواسطة مفك فيليبس
(غير متضمن) واخلع البراغي من اليد.
أرفق اليد الأمامية (ب) والكلاب السفلي (ج)
على العامود.
اضبط اليد إلى أعلى أو إلى الأسفل، إن اقتضى
الأمر، حتى الوصول إلى وضع التشغيل
المرغوب.
اربط بإحكام البراغي الأربعة بحيث يصبح لا
يمكن لف اليد على العامود.
التشغيل
تحذير
لا تدع معرفتك بالمنتجات تجعلك مهملًا. تذكر
أن الإهمال لجزء من الثانية يكفي لإحداث إصابة
خطيرة.
تحذير
ارتدي دائمًا واقيات للعين. الفشل في القيام
بذلك قد يتسبب في تطاير أشياء داخل
عينيك مما قد يتسبب في حدوث إصابة محتملة
خطيرة.
تحذير
لا تستخدم أبدًا شفرات، أو أدوات رفرافة،
أو أسلاك، أو حبل مع هذا المنتج. لا تستخدم
ملحقات أو إكسسوارات غير موصي بها من
الشركة المصنعة لهذا المنتج حيث أن استخدامها
قد يتسبب في حدوث إصابة شخصية خطيرة.
للحصول على تعليمات الشحن الكاملة، راجع
دليل المشغل فيما يخص علبةالبطاريات ونماذج
الشاحن.
ملحوظة: لتجنب الإصابة البدنية البالغة،
احرص على إزالة البطارية دائمًا وحافظ على يديك
بعيدًا عن زر القفل عند حمل الأداة أو نقلها.
لتركيب علبة البطاريات انظر الشكل 5.
ضع البطارية في آلة تقليم الأعشاب. قم
بمحاذاة الضلع المرفوع على البطارية مع
التجويف في منفذ بطارية آلة التقليم.
تأكد من أن القفل الموجود على علبة البطارية
مثبت في مكانه وأن علبة البطارية في آلة
تقليم الحشائش مؤمنة قبل بدء التشغيل.
لإزالة علبة البطارية
انظر الشكل 5.
حرر مفتاح تشغيل القدح ومفتاح غلق القدح
لإيقاف آلة التقليم.
اضغط على زر الكهرباء لإيقاف آلة التقليم.
اضغط واستمر في الضغط على زر مزلاج
البطارية (أ) في ظهر علبة البطاريات.
14
Not for Reproduction

العربية (التعليمات الأصلية)
AR
EN BG CS DA DE ES ET FI FR HR HU IT LT LV NL NO PL PT RO RU SK SL SR SV TR UK
أثناء الاستمرار في الضغط على مزلاج
البطارية، أمسك ذراع آلة التقليم بيد، وانزع
علبة البطاريات.
بدء تشغيل / إيقاف تشغيل آلة تقليم الأعشاب
انظر الشكل 6.
لبدء التشغيل:
اضغط على زر التشغيل / إيقاف التشغيل
اضغط على زر الغلق وأطلق مفتاح القدح.
اضغط على زر السرعة العالية لزيادة السرعة
اعتمادًا على حالة الحشائش. سوف تضيء
شاشتي ليد فوق زر السرعة العالية مما يشير
إلى أن ضبط آلة التقليم على إعدادات السرعة
العالية.
لإيقاف التشغيل:
حرر مفتاح القدح.
اضغط على زر الكهرباء مرة أخرى لإيقاف
تشغيل الوحدة.
ملحوظة: سوف يتم إيقاف تشغيل الوحدة ذاتيًا
في حالة تركها دون عمل لمدة 1 دقيقة.
تشغيل آلة التقليم انظر الشكل 7.
اتبع هذه التعليمات عند استخدام آلة التقليم:
احمل آلة التقليم بيدك اليمنى على الذراع
الخلفية ويدك اليسرى على الذراع الأمامية.
أمسك الآلة بإحكام بكلتا يديك أثناء
التشغيل.
ينبغي حمل آلة التقليم في وضع مريح
بحيث تكون اليد الخلفية في مستوى
ارتفاع الأرداف.
قطع الحشائش من أعلى لأسفل. سوف يمنع
ذلك الحشائش من الالتفاف حول مبيت العامود
والرأس الخطي الذي قد يسبب تضرر وإفراط
في السخونة.
في حالة التفاف الحشائش حول الرأس الخطي:
انزع علبة البطاريات من آلة التقليم.
قم بإزالة الحشائش.
تحذير
يمكن أن تتسبب ملامسة رأس تقطيع آلة
التقليم أثناء التشغيل في حدوث إصابة
شخصية خطيرة.
خط التقدم انظر الشكل 8
أثناء تشغيل آلة التقليم الجنزيرية، يصبح
خط التقطيع بمرور الوقت باليًا وأقصر طولًا.
ولذا فإن آلة التقليم مزودة بخاصية خط التغذية
الاصطدامي حيث يتم مد المزيد من الخط بمجرد
صدم الرأس على الأرض أثناء دورانها. وعندها سوف
تقطع شفرة التقطيع الخط للحفاظ على رقعة
تقطيع دقيقة.
نصائح التقطع انظر الشكل 9.
حافظ على ميل آلة التقليم نحو الرقعة المراد
تقطيعها؛ وهي أفضل رقعة للتقطيع.
سوف تقطع آلة التقليم بشكل أفضل عند
نقلها من اليسار إلى اليمين عبر المنطقة
المراد تقطيعها، ولكن تقل فاعليتها عند
الانتقال من اليمين إلى اليسار.
استخدم طرف خط التقطيع لتقطيع
الحشائش، ولا تدفع رأس التقطيع بعنف في
الحشائش غير المقطعة.
الأسوار السلكية والخشبية تسبب مزيد من
الاهتراء لخط التقطيع بل ويمكن أن تتسبب
في انكساره. كما يمكن أن تتسبب الجدران
الحجرية والطوب والحواجز الحجرية والأخشاب
في اهتراء الخط سريعًا.
تجنب الأشجار والشجيرات. حيث يمكن أن
تتسبب لحاء الأشجار، والقوالب الخشبية،
والتحويلات، ودعائم الأسوار في تلف خط
التقطيع بسهولة.
15
Not for Reproduction

العربية (التعليمات الأصلية)
AR
EN BG CS DA DE ES ET FI FR HR HU IT LT LV NL NO PL PT RO RU SK SL SR SV TR UK
شفرة فصل الخط
آلة التقليم مزودة بشفرة فصل الخط على
حارف الحشائش. لتحقيق أفضل تقطيع، مد
الخط حتى يتقلص طوله من خلال شفرة فصل
الخط. قم بمد الخط كلما سمعت المحرك يعمل
بشكل أسرع من المعتاد، أو عندما تتدهور كفاءة
التقليم. وسوف يحافظ ذلك على أفضل أداء
وسوف يحافظ أيضًا على إمكانية مد الخط بما
يكفي بشكل مناسب.
تحذير
عند التشغيل، استخدم قطع الغيار المتطابقة
فقط، وذلك لأن استخدام أي قطع أخرى قد يُحدث خطرًا
أو يسبب تلف المنتج.
تحذير
لتجنب حدوث إصابة جسدية جسيمة، انزع حزمة
البطارية دائمًا من الجهاز عند تنظيفه أو إجراء
أي صيانة.
الصيانة العامة
قبل كل استخدام، افحص المنتج بالكامل بحثًا
عن أجزاء متضررة أو مفقودة أو مفككة مثل
البراغي والصواميل والمسامير والأغطية وما إلى
ذلك، واحرص على ربط كافة المثبتات والأغطية
بإحكام ولا تقم بتشغيل هذا المنتج إلى بعد
استبدال كافة القطع المتضررة أو المفقودة.
تجنب استخدام المذيبات عند تنظيف الأجزاء
البلاستيكية. حيث إن معظم المواد البلاستيكية
عرضة للتضرر من أنواع مختلفة من المذيبات
التجارية ويمكن أن تتلف من جراء استخدامها.
استخدم قطعة قماش نظيفة لإزالة الأتربة،
والأوساخ، والزيوت، والشحم، وما إلى ذلك.
تحذير
لا تترك في أي وقت من الأوقات سوائل الفرامل
أو البنزين أو المنتجات القائمة على النفط
وغيرها تحتك بالأجزاء البلاستيكية. حيث
يمكن أن تتسبب المواد الكيميائية في تلف
أو ضعف أو تدمير البلاستيك مما قد يتسبب
في حدوث إصابة شخصية خطيرة.
يمكن إصلاح أو استبدال الأجزاء المبينة في
قائمة الأجزاء فقط من قبل العميل، أما بالنسبة
لكافة الأجزاء الأخرى فينبغي استبدالها في
مركز خدمة معتمد.
استبدال البكرة انظر الشكل 10.
استخدم خط تقطيع أصلي من الشركة المصنعة من
أجل أفضل أداء.
انزع علبة البطاريات.
ادفع الجنيحين (أ) على جانبي غطاء البكرة
(ب).
اجذب غطاء البكرة لنزعه.
انزع البكرة القديمة (ج).
لتركيب البكرة الجديدة، تأكد من أن خط
التقطيع ملتقط داخل فتحة البكرة الجديدة.
تأكد أيضًا من أن نهاية خط التقطيع يمتد
تقريبًا لمسافة 15 سم خلف الفتحة.
ركب البكرة الجديدة بحيث يكون خط
التقطيع والفتحة محاذيان للفتحة الدائرية
لرأس التقطيع. أدخل خط التقطيع في الفتحة
الدائرية.
اجذب خط التقطيع الممتد من رأس التقطيع
بحيث يتحرر خط التقطيع من الفتحة في
البكرة.
قم بإعادة تركيب غطاء البكرة من خلال الضغط
على الجنيحين إلى الأسفل ودفع غطاء البكرة
إلى الأسفل حتى يثبت في مكانه.
استبدال خط التقطيع
انظر الشكلين 11-12.
قم بمحاذاة الفتحات (أ) على غطاء البكرة (ب)
مع الفتحات على رأس الخيط (ج).
أدخل الخط عبر فتحة رأس الخيط (د). ادفع
الخط حتى يخرج من فتحة رأس الخيط
المقابلة.
اجذب الخط حتى يتساوى طرفيه على كلا
الجانبين.
لف غطاء البكرة في اتجاه عقارب الساعة للبدء
في لف الخيط على رأس الخيط. اترك حوالي
5 بوصات من الخيط متدلية خارج كل جانب من
الرأس.
16
Not for Reproduction

العربية (التعليمات الأصلية)
AR
EN BG CS DA DE ES ET FI FR HR HU IT LT LV NL NO PL PT RO RU SK SL SR SV TR UK
تخزين آلة التقليم
انزع علبة البطاريات من آلة التقليم قبل
التخزين.
نظف آلة التقليم من كافة المواد الغريبة.
خزن آلة التقليم في مكان لا يستطيع الأطفال
الوصول إليه.
احفظ آلة التقليم بعيدًا عن العناصر الآكلة
مثل كيماويات الحدائق وأملاح إذابة الثلج.
خزن بطارياتك واشحنها في مكان بارد. حيث
تؤدي درجات الحرارة الأعلى والأٌقل من درجة حرارة
الغرفة العادية إلى تقصير عمر البطارية.
لا تخزن البطاريات فارغة. انتظر حتى تبرد
علبة البطارية واشحنها بالكامل على الفور.
خزن علبة البطارية في درجة حرارة أقل من 27
درجة مئوية، وبعيدا عن الرطوبة.
تفقد جميع البطاريات شحنها تدريجيًا. كلما
ارتفعت درجة الحرارة فقدت شحنها بسرعة. إذا
قمت بتخزين وحدتك لفترات زمنية طويلة
بدون استخدامها، أعد شحن البطاريات كل شهر
أو شهرين. حيث تعمل الممارسة على إطالة عمر
البطارية.
الحماية البيئية
ينبغي أن تكون الحماية البيئية أولوية ذات
أهمية كبيرة عند استخدام هذه الآلة بما يفيد كل
من التعايش الاجتماعي والبيئة التي نعيش
بها. حاول عدم التسبب في حدوث أي اختلال في
المنطقة المحيطة.
ينبغي الامتثال بدقة إلى اللوائح المحلية
الخاصة بالتخلص من مواد التغليف والأجزاء
التالفة وأي عناصر أخرى لها أثر قوي على
البيئة، ولا يجب التخلص من المخلفات
المذكورة مع المخلفات العادية بل ينبغي
فصلها وإرسالها إلى مراكز التخلص من
المخلفات المخصصة حيث يتم إعادة تدوير هذه
المواد.
يرجى الامتثال بدقة إلى اللوائح المحلية
الخاصة بالتخلص من المواد المتخلفة من جز
الحشائش.
عند التوقف عن استخدام الآلة، لا تقم
بتلويث البيئة بها بل سلمها إلى مركز
للتخلص من المخلفات وفقًا للقوانين
المحلية السارية.
الجمع المنفصل، ينبغي عدم التخلص من هذا
المنتج مع النفايات المنزلية العادية. إذا ما وجدت
في يوم ما أن منتجك بحاجة إلى الاستبدال أو أنك
ستكف عن استخدامه، لا تتخلص منه مع النفايات
المنزلية. بل أجعل هذا المنتج متاحًا للجمع
المنفصل.
يتيح الجمع المنفصل للمنتجات المستخدمة
والتعبئة إعادة تدوير المواد واستخدامها مرة أخرى.
إعادة استخدام المواد المعاد تدويرها يساعد على
منع التلوث البيئي ويقلل من الطلب على المواد
الخام.
Batteries
Li-ion
عند انتهاء عمرها الإنتاجي، تخلص من البطاريات
مع بذل العناية الواجبة لبيئتنا. حيث تحتوي
البطارية على مواد قد تكون ضارة لك وللبيئة.
ولذا ينبغي إزالتها والتخلص منها بشكل
منفصل في المنشآت التي تقبل بطاريات
ليثيوم أيون.
17
Not for Reproduction
Pagina se încarcă...
Pagina se încarcă...
Pagina se încarcă...
Pagina se încarcă...
Pagina se încarcă...
Pagina se încarcă...
Pagina se încarcă...
Pagina se încarcă...
Pagina se încarcă...
Pagina se încarcă...
Pagina se încarcă...
Pagina se încarcă...
Pagina se încarcă...
Pagina se încarcă...
Pagina se încarcă...
Pagina se încarcă...
Pagina se încarcă...
Pagina se încarcă...
Pagina se încarcă...
Pagina se încarcă...
Pagina se încarcă...
Pagina se încarcă...
Pagina se încarcă...
Pagina se încarcă...
Pagina se încarcă...
Pagina se încarcă...
Pagina se încarcă...
Pagina se încarcă...
Pagina se încarcă...
Pagina se încarcă...
Pagina se încarcă...
Pagina se încarcă...
Pagina se încarcă...
Pagina se încarcă...
Pagina se încarcă...
Pagina se încarcă...
Pagina se încarcă...
Pagina se încarcă...
Pagina se încarcă...
Pagina se încarcă...
Pagina se încarcă...
Pagina se încarcă...
Pagina se încarcă...
Pagina se încarcă...
Pagina se încarcă...
Pagina se încarcă...
Pagina se încarcă...
Pagina se încarcă...
Pagina se încarcă...
Pagina se încarcă...
Pagina se încarcă...
Pagina se încarcă...
Pagina se încarcă...
Pagina se încarcă...
Pagina se încarcă...
Pagina se încarcă...
Pagina se încarcă...
Pagina se încarcă...
Pagina se încarcă...
Pagina se încarcă...
Pagina se încarcă...
Pagina se încarcă...
Pagina se încarcă...
Pagina se încarcă...
Pagina se încarcă...
Pagina se încarcă...
Pagina se încarcă...
Pagina se încarcă...
Pagina se încarcă...
Pagina se încarcă...
Pagina se încarcă...
Pagina se încarcă...
Pagina se încarcă...
Pagina se încarcă...
Pagina se încarcă...
Pagina se încarcă...
Pagina se încarcă...
Pagina se încarcă...
Pagina se încarcă...
Pagina se încarcă...
Pagina se încarcă...
Pagina se încarcă...
Pagina se încarcă...
Pagina se încarcă...
Pagina se încarcă...
Pagina se încarcă...
Pagina se încarcă...
Pagina se încarcă...
Pagina se încarcă...
Pagina se încarcă...
Pagina se încarcă...
Pagina se încarcă...
Pagina se încarcă...
Pagina se încarcă...
Pagina se încarcă...
Pagina se încarcă...
Pagina se încarcă...
Pagina se încarcă...
Pagina se încarcă...
Pagina se încarcă...
Pagina se încarcă...
Pagina se încarcă...
Pagina se încarcă...
Pagina se încarcă...
Pagina se încarcă...
Pagina se încarcă...
Pagina se încarcă...
Pagina se încarcă...
Pagina se încarcă...
Pagina se încarcă...
Pagina se încarcă...
Pagina se încarcă...
Pagina se încarcă...
Pagina se încarcă...
Pagina se încarcă...
Pagina se încarcă...
Pagina se încarcă...
Pagina se încarcă...
Pagina se încarcă...
Pagina se încarcă...
Pagina se încarcă...
Pagina se încarcă...
Pagina se încarcă...
Pagina se încarcă...
Pagina se încarcă...
Pagina se încarcă...
Pagina se încarcă...
Pagina se încarcă...
Pagina se încarcă...
Pagina se încarcă...
Pagina se încarcă...
Pagina se încarcă...
Pagina se încarcă...
Pagina se încarcă...
Pagina se încarcă...
Pagina se încarcă...
Pagina se încarcă...
Pagina se încarcă...
Pagina se încarcă...
Pagina se încarcă...
Pagina se încarcă...
Pagina se încarcă...
Pagina se încarcă...
Pagina se încarcă...
Pagina se încarcă...
Pagina se încarcă...
Pagina se încarcă...
Pagina se încarcă...
Pagina se încarcă...
Pagina se încarcă...
Pagina se încarcă...
Pagina se încarcă...
Pagina se încarcă...
Pagina se încarcă...
Pagina se încarcă...
Pagina se încarcă...
Pagina se încarcă...
Pagina se încarcă...
Pagina se încarcă...
Pagina se încarcă...
Pagina se încarcă...
Pagina se încarcă...
Pagina se încarcă...
Pagina se încarcă...
Pagina se încarcă...
Pagina se încarcă...
Pagina se încarcă...
Pagina se încarcă...
Pagina se încarcă...
Pagina se încarcă...
Pagina se încarcă...
Pagina se încarcă...
Pagina se încarcă...
Pagina se încarcă...
Pagina se încarcă...
Pagina se încarcă...
Pagina se încarcă...
Pagina se încarcă...
Pagina se încarcă...
Pagina se încarcă...
Pagina se încarcă...
Pagina se încarcă...
Pagina se încarcă...
Pagina se încarcă...
Pagina se încarcă...
Pagina se încarcă...
Pagina se încarcă...
Pagina se încarcă...
Pagina se încarcă...
Pagina se încarcă...
Pagina se încarcă...
Pagina se încarcă...
Pagina se încarcă...
Pagina se încarcă...
Pagina se încarcă...
Pagina se încarcă...
Pagina se încarcă...
Pagina se încarcă...
Pagina se încarcă...
Pagina se încarcă...
Pagina se încarcă...
Pagina se încarcă...
Pagina se încarcă...
Pagina se încarcă...
Pagina se încarcă...
Pagina se încarcă...
Pagina se încarcă...
Pagina se încarcă...
Pagina se încarcă...
Pagina se încarcă...
Pagina se încarcă...
Pagina se încarcă...
Pagina se încarcă...
Pagina se încarcă...
Pagina se încarcă...
Pagina se încarcă...
Pagina se încarcă...
Pagina se încarcă...
Pagina se încarcă...
Pagina se încarcă...
Pagina se încarcă...
Pagina se încarcă...
Pagina se încarcă...
Pagina se încarcă...
Pagina se încarcă...
Pagina se încarcă...
Pagina se încarcă...
Pagina se încarcă...
Pagina se încarcă...
Pagina se încarcă...
Pagina se încarcă...
Pagina se încarcă...
Pagina se încarcă...
Pagina se încarcă...
Pagina se încarcă...
Pagina se încarcă...
Pagina se încarcă...
Pagina se încarcă...
Pagina se încarcă...
Pagina se încarcă...
Pagina se încarcă...
Pagina se încarcă...
Pagina se încarcă...
Pagina se încarcă...
Pagina se încarcă...
Pagina se încarcă...
Pagina se încarcă...
Pagina se încarcă...
Pagina se încarcă...
Pagina se încarcă...
Pagina se încarcă...
Pagina se încarcă...
Pagina se încarcă...
Pagina se încarcă...
Pagina se încarcă...
Pagina se încarcă...
Pagina se încarcă...
Pagina se încarcă...
Pagina se încarcă...
Pagina se încarcă...
Pagina se încarcă...
Pagina se încarcă...
Pagina se încarcă...
Pagina se încarcă...
Pagina se încarcă...
Pagina se încarcă...
Pagina se încarcă...
Pagina se încarcă...
Pagina se încarcă...
Pagina se încarcă...
Pagina se încarcă...
Pagina se încarcă...
Pagina se încarcă...
Pagina se încarcă...
Pagina se încarcă...
Pagina se încarcă...
Pagina se încarcă...
Pagina se încarcă...
Pagina se încarcă...
Pagina se încarcă...
Pagina se încarcă...
Pagina se încarcă...
Pagina se încarcă...
Pagina se încarcă...
Pagina se încarcă...
Pagina se încarcă...
Pagina se încarcă...
Pagina se încarcă...
Pagina se încarcă...
Pagina se încarcă...
Pagina se încarcă...
Pagina se încarcă...
Pagina se încarcă...
Pagina se încarcă...
Pagina se încarcă...
Pagina se încarcă...
Pagina se încarcă...
Pagina se încarcă...
Pagina se încarcă...
Pagina se încarcă...
Pagina se încarcă...
-
 1
1
-
 2
2
-
 3
3
-
 4
4
-
 5
5
-
 6
6
-
 7
7
-
 8
8
-
 9
9
-
 10
10
-
 11
11
-
 12
12
-
 13
13
-
 14
14
-
 15
15
-
 16
16
-
 17
17
-
 18
18
-
 19
19
-
 20
20
-
 21
21
-
 22
22
-
 23
23
-
 24
24
-
 25
25
-
 26
26
-
 27
27
-
 28
28
-
 29
29
-
 30
30
-
 31
31
-
 32
32
-
 33
33
-
 34
34
-
 35
35
-
 36
36
-
 37
37
-
 38
38
-
 39
39
-
 40
40
-
 41
41
-
 42
42
-
 43
43
-
 44
44
-
 45
45
-
 46
46
-
 47
47
-
 48
48
-
 49
49
-
 50
50
-
 51
51
-
 52
52
-
 53
53
-
 54
54
-
 55
55
-
 56
56
-
 57
57
-
 58
58
-
 59
59
-
 60
60
-
 61
61
-
 62
62
-
 63
63
-
 64
64
-
 65
65
-
 66
66
-
 67
67
-
 68
68
-
 69
69
-
 70
70
-
 71
71
-
 72
72
-
 73
73
-
 74
74
-
 75
75
-
 76
76
-
 77
77
-
 78
78
-
 79
79
-
 80
80
-
 81
81
-
 82
82
-
 83
83
-
 84
84
-
 85
85
-
 86
86
-
 87
87
-
 88
88
-
 89
89
-
 90
90
-
 91
91
-
 92
92
-
 93
93
-
 94
94
-
 95
95
-
 96
96
-
 97
97
-
 98
98
-
 99
99
-
 100
100
-
 101
101
-
 102
102
-
 103
103
-
 104
104
-
 105
105
-
 106
106
-
 107
107
-
 108
108
-
 109
109
-
 110
110
-
 111
111
-
 112
112
-
 113
113
-
 114
114
-
 115
115
-
 116
116
-
 117
117
-
 118
118
-
 119
119
-
 120
120
-
 121
121
-
 122
122
-
 123
123
-
 124
124
-
 125
125
-
 126
126
-
 127
127
-
 128
128
-
 129
129
-
 130
130
-
 131
131
-
 132
132
-
 133
133
-
 134
134
-
 135
135
-
 136
136
-
 137
137
-
 138
138
-
 139
139
-
 140
140
-
 141
141
-
 142
142
-
 143
143
-
 144
144
-
 145
145
-
 146
146
-
 147
147
-
 148
148
-
 149
149
-
 150
150
-
 151
151
-
 152
152
-
 153
153
-
 154
154
-
 155
155
-
 156
156
-
 157
157
-
 158
158
-
 159
159
-
 160
160
-
 161
161
-
 162
162
-
 163
163
-
 164
164
-
 165
165
-
 166
166
-
 167
167
-
 168
168
-
 169
169
-
 170
170
-
 171
171
-
 172
172
-
 173
173
-
 174
174
-
 175
175
-
 176
176
-
 177
177
-
 178
178
-
 179
179
-
 180
180
-
 181
181
-
 182
182
-
 183
183
-
 184
184
-
 185
185
-
 186
186
-
 187
187
-
 188
188
-
 189
189
-
 190
190
-
 191
191
-
 192
192
-
 193
193
-
 194
194
-
 195
195
-
 196
196
-
 197
197
-
 198
198
-
 199
199
-
 200
200
-
 201
201
-
 202
202
-
 203
203
-
 204
204
-
 205
205
-
 206
206
-
 207
207
-
 208
208
-
 209
209
-
 210
210
-
 211
211
-
 212
212
-
 213
213
-
 214
214
-
 215
215
-
 216
216
-
 217
217
-
 218
218
-
 219
219
-
 220
220
-
 221
221
-
 222
222
-
 223
223
-
 224
224
-
 225
225
-
 226
226
-
 227
227
-
 228
228
-
 229
229
-
 230
230
-
 231
231
-
 232
232
-
 233
233
-
 234
234
-
 235
235
-
 236
236
-
 237
237
-
 238
238
-
 239
239
-
 240
240
-
 241
241
-
 242
242
-
 243
243
-
 244
244
-
 245
245
-
 246
246
-
 247
247
-
 248
248
-
 249
249
-
 250
250
-
 251
251
-
 252
252
-
 253
253
-
 254
254
-
 255
255
-
 256
256
-
 257
257
-
 258
258
-
 259
259
-
 260
260
-
 261
261
-
 262
262
-
 263
263
-
 264
264
-
 265
265
-
 266
266
-
 267
267
-
 268
268
-
 269
269
-
 270
270
-
 271
271
-
 272
272
-
 273
273
-
 274
274
-
 275
275
-
 276
276
-
 277
277
-
 278
278
-
 279
279
-
 280
280
-
 281
281
-
 282
282
-
 283
283
-
 284
284
-
 285
285
-
 286
286
-
 287
287
-
 288
288
-
 289
289
-
 290
290
-
 291
291
-
 292
292
-
 293
293
-
 294
294
-
 295
295
-
 296
296
-
 297
297
-
 298
298
-
 299
299
-
 300
300
-
 301
301
-
 302
302
-
 303
303
-
 304
304
-
 305
305
-
 306
306
-
 307
307
-
 308
308
-
 309
309
-
 310
310
-
 311
311
-
 312
312
-
 313
313
-
 314
314
-
 315
315
-
 316
316
-
 317
317
-
 318
318
-
 319
319
-
 320
320
-
 321
321


Snapper SXDST82 Manual de utilizare
- Categorie
- Aparate de tuns iarba
- Tip
- Manual de utilizare
- Acest manual este potrivit și pentru
în alte limbi
- slovenčina: Snapper SXDST82 Používateľská príručka
- eesti: Snapper SXDST82 Kasutusjuhend
Lucrări înrudite
Alte documente
-
Dolmar AT-1827H Original Instructions Manual
-
McCulloch Li 40T Manualul proprietarului
-
Greenworks G24LT Manualul proprietarului
-
Mountfield MT48Li Cordless Grass Trimmer Instrucțiuni de utilizare
-
-
GreenWorks Tools 2103207 Manual de utilizare
-
-
Powerworks PD60LT Manualul proprietarului
-
Makita BBC300L Manual de utilizare
-